Skip to content

Initial setup

After you install Percona Backup for MongoDB on every server with the mongod node that is not an arbiter node, the setup steps are the following:

  1. Configure authentication in MongoDB.

  2. Configure the remote backup storage.

  3. Start pbm-agent process.

The following diagram outlines the installation and setup steps:
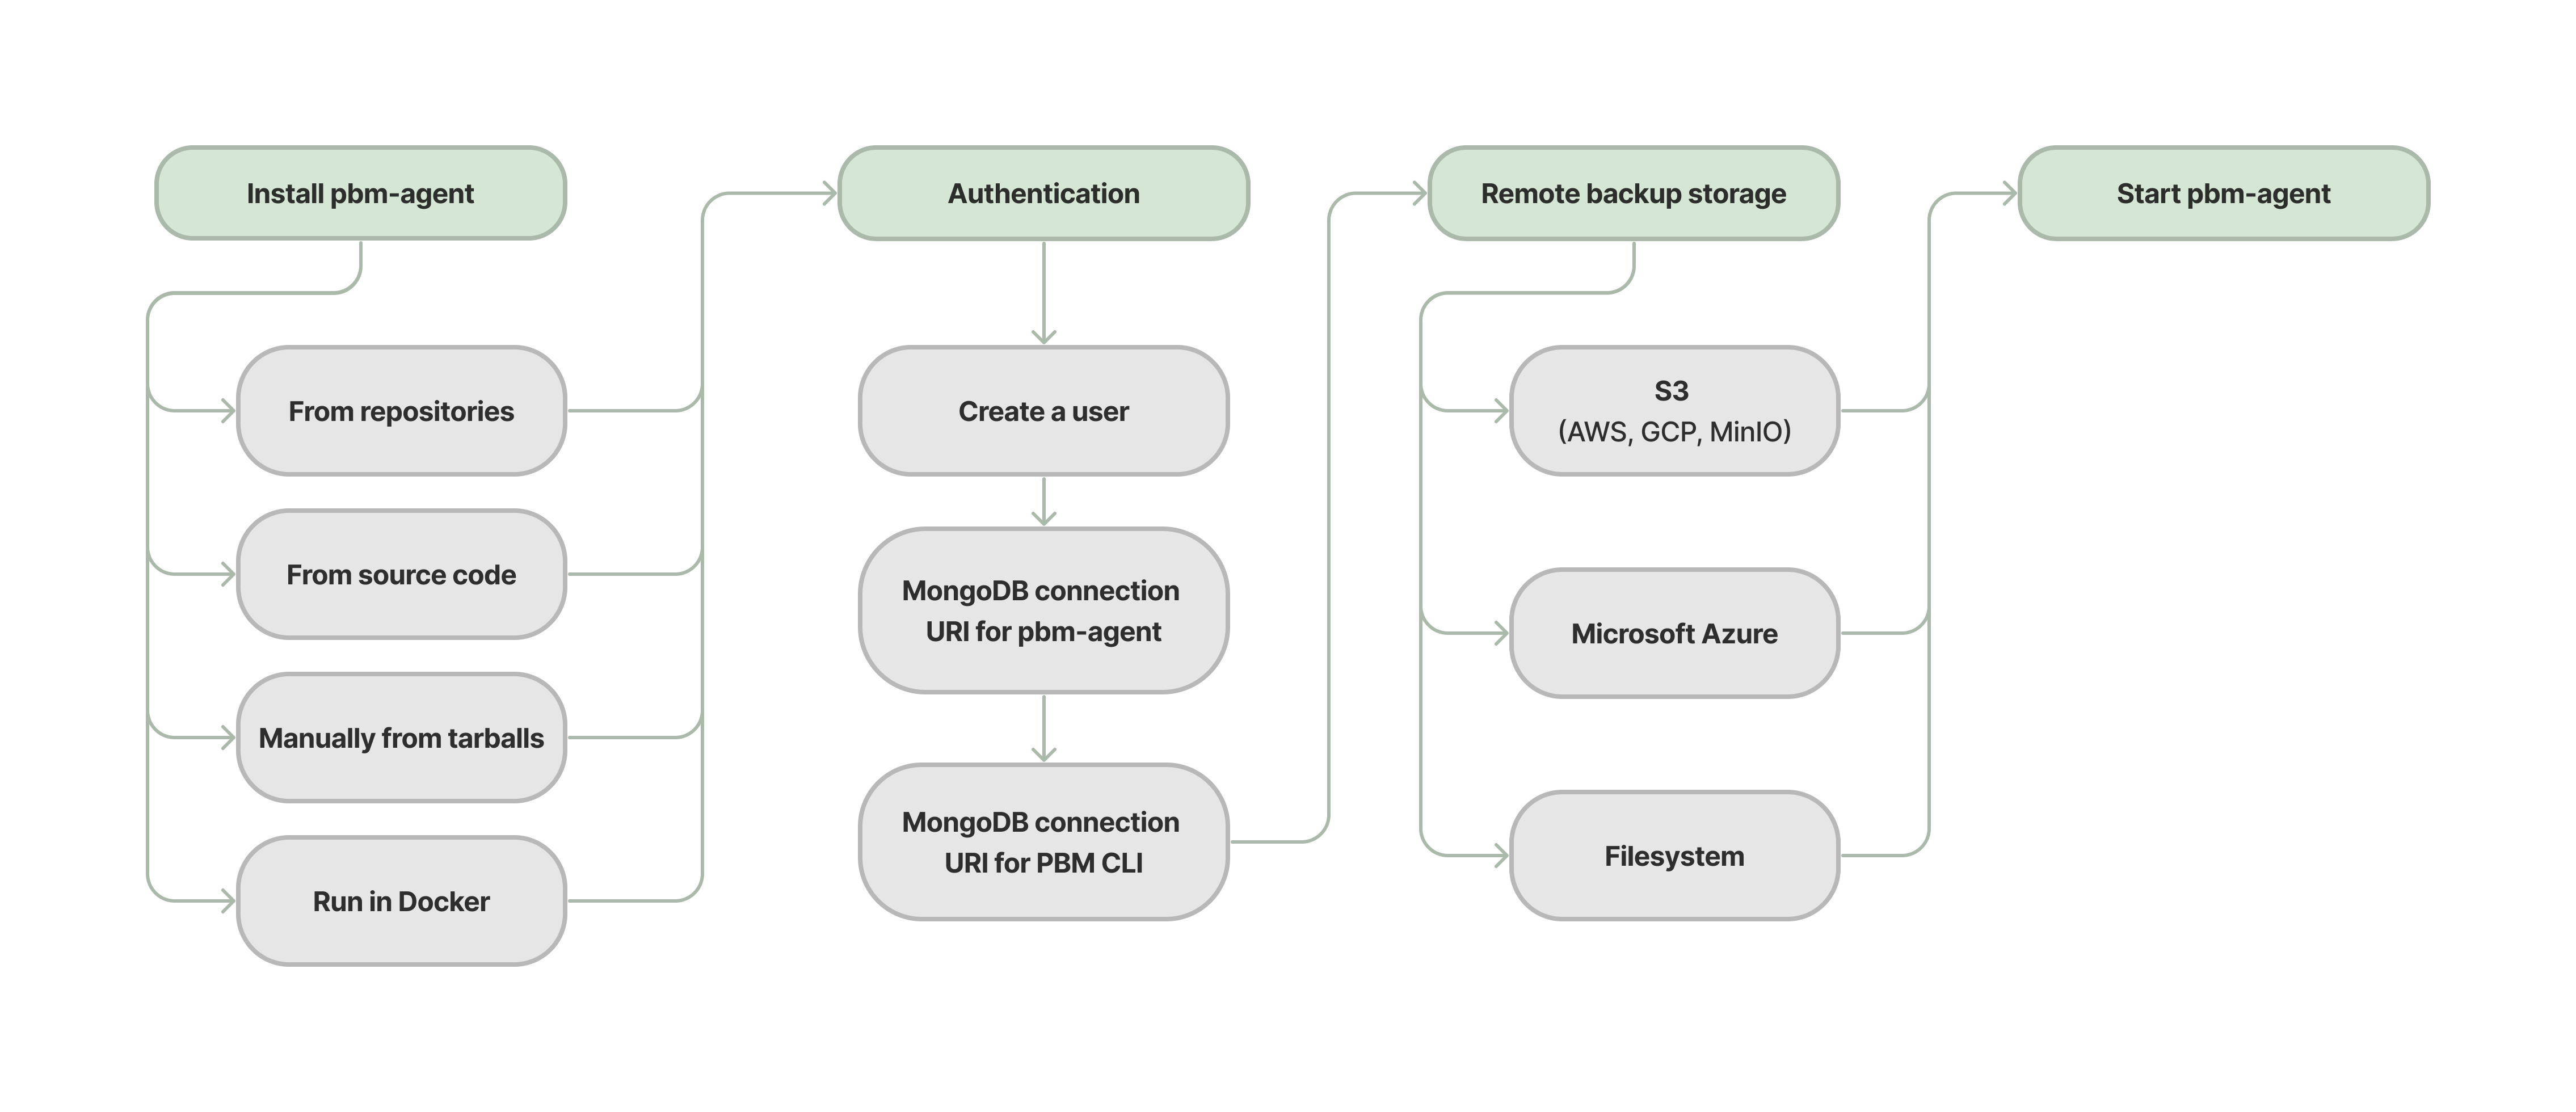
image

Configure authentication in MongoDB

Percona Backup for MongoDB uses the authentication and authorization subsystem of MongoDB. This means that to authenticate Percona Backup for MongoDB, you need to:

Create the pbm user

This step needs to be executed on a primary node of each replica set. In a sharded cluster, this means on every shard replica set and the config server replica set.

  1. Create the role that allows any action on any resource.

    db.getSiblingDB("admin").createRole({ "role": "pbmAnyAction",
          "privileges": [
             { "resource": { "anyResource": true },
               "actions": [ "anyAction" ]
             }
          ],
          "roles": []
       });
    
  2. Create the user and assign the role you created to it.

    db.getSiblingDB("admin").createUser({user: "pbmuser",
           "pwd": "secretpwd",
           "roles" : [
              { "db" : "admin", "role" : "readWrite", "collection": "" },
              { "db" : "admin", "role" : "backup" },
              { "db" : "admin", "role" : "clusterMonitor" },
              { "db" : "admin", "role" : "restore" },
              { "db" : "admin", "role" : "pbmAnyAction" }
           ]
        });
    

You can specify the username and password values and other options of the createUser command as you require so long as the roles shown above are granted.

Tip

To list all the host+port lists for the shard replica sets in a cluster, run the following command:

db.getSiblingDB(config).shards.find({}, {host: true, _id: false}) 

The replica set name at the front of these “host” strings will have to be placed as a “/?replicaSet=xxxx” argument in the parameters part of the connection URI (see below).

Set the MongoDB connection URI for pbm-agent

This step needs to be executed on each node where pbm-agent is installed.

A pbm-agent process connects to its localhost mongod node with a standalone type of connection.

To set the MongoDB URI connection string means to configure a service init script (pbm-agent.service systemd unit file) that runs a pbm-agent.

The pbm-agent.service systemd unit file includes the environment file. You set the MongoDB URI connection string for the PBM_MONGODB_URI variable within the environment file for every pbm-agent.

How to find the environment file

The path to the environment file is specified in the pbm-agent.service systemd unit file.

In Ubuntu and Debian, the pbm-agent.service systemd unit file is at the path /lib/systemd/system/pbm-agent.service.

In Red Hat and CentOS, the path to this file is /usr/lib/systemd/system/pbm-agent.service.

Example of pbm-agent.service systemd unit file

[Unit]
Description=pbm-agent
After=time-sync.target network.target

[Service]
EnvironmentFile=-/etc/default/pbm-agent
Type=simple
User=pbm
Group=pbm
PermissionsStartOnly=true
ExecStart=/usr/bin/pbm-agent

[Install]
WantedBy=multi-user.target

Edit the environment file /etc/default/pbm-agent and specify the MongoDB connection URI string for the pbm user to the local mongod node.

For example, if mongod node listens on port 27017, the MongoDB connection URI string will be the following:

PBM_MONGODB_URI="mongodb://pbmuser:secretpwd@localhost:27017/?authSource=admin"

Edit the environment file /etc/sysconfig/pbm-agent and specify the MongoDB connection URI string for the pbm user to the local mongod node.

For example, if mongod node listens on port 27017, the MongoDB connection URI string will be the following:

PBM_MONGODB_URI="mongodb://pbmuser:secretpwd@localhost:27017/?authSource=admin"

Passwords with special characters

If the password includes special characters like #, @, / and so on, you must convert these characters using the percent-encoding mechanism when passing them to Percona Backup for MongoDB. For example, the password secret#pwd should be passed as follows in PBM_MONGODB_URI:

PBM_MONGODB_URI="mongodb://pbmuser:secret%23pwd@localhost:27017/?authSource=admin"

Set the MongoDB connection URI for pbm CLI

This step needs to be executed only on a host that you will use pbm CLI at.

Set the MongoDB URI connection string for pbm CLI in your shell. This allows you to call pbm commands without the --mongodb-uri flag.

Use the following command:

export PBM_MONGODB_URI="mongodb://pbmuser:secretpwd@localhost:27017/?authSource=admin&replSetName=xxxx"

For more information about what connection string to specify, refer to the pbm connection string section.

External authentication support in Percona Backup for MongoDB

In addition to SCRAM, Percona Backup for MongoDB supports other authentication methods that you use in MongoDB or Percona Server for MongoDB.

For external authentication, you create the pbm user in the format used by the authentication system and set the MongoDB connection URI string to include both the authentication method and authentication source.

For example, for Kerberos authentication, create the pbm user in the $external database in the format <username@KERBEROS_REALM> (e.g. pbm@PERCONATEST.COM).

Specify the following string for MongoDB connection URI:

PBM_MONGODB_URI="mongodb://<username>%40<KERBEROS_REALM>@<hostname>:27018/?authMechanism=GSSAPI&authSource=%24external&replSetName=xxxx"

Note that you must first obtain the ticket for the pbm user with the kinit command before you start the pbm-agent:

$ sudo -u {USER} kinit pbm

Note that the {USER} is the user that you will run the pbm-agent process.

For authentication and authorization via Native LDAP, you only create roles for LDAP groups in MongoDB as the users are stored and managed on the LDAP server. However, you still define the $external database as your authentication source:

PBM_MONGODB_URI="mongodb://<user>:<password>@<hostname>:27017/?authMechanism=PLAIN&authSource=%24external&replSetName=xxxx"

When using AWS IAM authentication, create the pbm user in the $external database with the username that contains the ARN of the IAM user/role.

arn:aws:iam::<ARN>:user/<user_name>
arn:aws:iam::<ARN>:role/<role_name>

The MongoDB connection URI string then looks like the following:

PBM_MONGODB_URI="mongodb://<aws_access_key_id>:<aws_secret_access_key>@<hostname>:27017/?authMechanism=MONGODB-AWS&authSource=%24external&replSetName=xxxx"

Configure remote backup storage

The easiest way to provide remote backup storage configuration is to specify it in a YAML config file and upload this file to Percona Backup for MongoDB using pbm CLI.

The storage configuration itself is out of scope of the present document. We assume that you have configured one of the supported remote backup storages.

  1. Create a config file (e.g. pbm_config.yaml).

  2. Specify the storage information within.

    The following is the sample configuration for Amazon AWS:

    storage:
      type: s3
      s3:
        region: us-west-2
        bucket: pbm-test-bucket
        prefix: data/pbm/backup
        credentials:
          access-key-id: <your-access-key-id-here>
          secret-access-key: <your-secret-key-here>
        serverSideEncryption:
          sseAlgorithm: aws:kms
          kmsKeyID: <your-kms-key-here>
    

    Tip

    If you are using AWS PrivateLink, the s3 endpoint needs to be specified explicitly. You can use the option endpointUrl for this scope, like in the following example:

    ...
    s3:
      region: us-west-2
      bucket: pbm-test-bucket
      prefix: data/pbm/backup
      endpointUrl: https://your-endpoint-url-here
      ...
    

    This is the sample configuration for Microsoft Azure Blob storage:

    storage:
      type: azure
      azure:
        account: <your-account>
        container: <your-container>
        prefix: pbm
        credentials:
          key: <your-access-key>
    

    This is the sample configuration for filesystem storage:

    storage:
      type: filesystem
      filesystem:
        path: /data/local_backups
    

    See more examples in Configuration file examples.

  3. Insert the config file

$ pbm config --file pbm_config.yaml

To learn more about Percona Backup for MongoDB configuration, see Percona Backup for MongoDB configuration in a cluster (or non-sharded replica set).

Start the pbm-agent process

Start pbm-agent on every server with the mongod node installed. It is best to use the packaged service scripts to run pbm-agent.

$ sudo systemctl start pbm-agent
$ sudo systemctl status pbm-agent

For example, imagine that you put configsvr nodes (listen port 27019) collocated on the same servers as the first shard’s mongod nodes (listen port 27018, replica set name sh1rs). In this server there should be two pbm-agent processes, one connected to the shard (e.g. “mongodb://username:password@localhost:27018/”) and one to the configsvr node (e.g. “mongodb://username:password@localhost:27019/”).

For reference, the following is an example of starting pbm-agent manually. The output is redirected to a file and the process is backgrounded.

Important

Start the pbm-agent as the mongod user. The pbm-agent requires write access to the MongoDB data directory to make physical restores.

$ su mongod nohup pbm-agent --mongodb-uri "mongodb://username:password@localhost:27018/" > /data/mdb_node_xyz/pbm-agent.$(hostname -s).27018.log 2>&1 &

Replace username and password with those of your pbm user. /data/mdb_node_xyz/ is the path where pbm-agent log files will be written. Make sure you have created this directory and granted write permissions to it for the mongod user.

Alternatively, you can run pbm-agent on a shell terminal temporarily if you want to observe and/or debug the startup from the log messages.

How to see the pbm-agent log

With the packaged systemd service, the log output to stdout is captured by systemd’s default redirection to systemd-journald. You can view it with the command below. See man journalctl for useful options such as --lines, --follow, etc.

$ journalctl -u pbm-agent.service
-- Logs begin at Tue 2019-10-22 09:31:34 JST. --
Jan 22 15:59:14 : Started pbm-agent.
Jan 22 15:59:14 pbm-agent[3579]: pbm agent is listening for the commands
...
...

If you started pbm-agent manually, see the file you redirected stdout and stderr to.

When a message pbm agent is listening for the commands is printed to the pbm-agent log file, pbm-agent confirms that it has connected to its mongod node successfully.

Get expert help

If you need assistance, visit the community forum for comprehensive and free database knowledge, or contact our Percona Database Experts for professional support and services.


Last update: December 4, 2023
Created: December 4, 2023