Configure PMM Server on AWS
Complete the essential security configuration, user management, and ongoing maintenance for your PMM Server deployment on AWS.
Prerequisites
Before configuring your PMM Server, ensure you have:
- completed planning your PMM Server deployment including instance sizing, storage, and network requirements
- successfully deployed PMM Server from AWS Marketplace
- completed the initial login and changed default credentials
- your PMM Server instance running and accessible via HTTPS
Secure your deployment
Configure SSL/TLS
Replace the self-signed certificate with a proper SSL certificate for production.
If you want to use a free Let’s Encrypt certificate:
- Make sure that the domain name is pointing to your PMM Server’s IP address.
- Install and configure:
# Install certbot
sudo apt update
sudo apt install certbot

# Obtain certificate (replace yourdomain.com)
sudo certbot certonly --standalone -d pmm.yourdomain.com

# Stop PMM temporarily
systemctl --user stop pmm-server

# Configure PMM to use the certificate
sudo cp /etc/letsencrypt/live/pmm.yourdomain.com/fullchain.pem /home/admin/volume/pmm-certs/certificate.crt
sudo cp /etc/letsencrypt/live/pmm.yourdomain.com/privkey.pem /home/admin/volume/pmm-certs/certificate.key
sudo chown pmm:pmm /home/admin/volume/pmm-certs/certificate.*
sudo chmod 600 /home/admin/volume/pmm-certs/certificate.*

# Restart PMM Server
systemctl --user start pmm-server
If you have a commercial SSL certificate:
-
Upload certificate files:
scp -i /path/to/your-key.pem certificate.crt admin@<instance-ip>:/tmp/ scp -i /path/to/your-key.pem private.key admin@<instance-ip>:/tmp/ -
Install certificates:
sudo mv /tmp/certificate.crt /home/admin/volume/pmm-certs/
sudo mv /tmp/private.key /home/admin/volume/pmm-certs/certificate.key
sudo chown pmm:pmm /home/admin/volume/pmm-certs/certificate.*
sudo chmod 600 /home/admin/volume/pmm-certs/certificate.*
systemctl --user restart pmm-server
Harden network access
Configure the operating system-level firewall on your PMM Server instance to further restrict access to required ports. This adds an additional layer of security beyond AWS Security Groups.
# SSH to PMM Server
ssh -i /path/to/your-key.pem admin@<your-instance-ip>

# Configure firewall rules
sudo ufw allow 22/tcp    # SSH access
sudo ufw allow 443/tcp   # HTTPS PMM interface
sudo ufw --force enable
Manage users and access
After the initial setup, create additional user accounts in PMM for your team members. Follow the principle of least privilege when assigning user roles.
- Go to Users and access > Users.
-
Click New user and configure the user with an appropriate role:
- Admin: Full system access
- Editor: Dashboard editing, no system config
- Viewer: Read-only access
-
Limit access based on job responsibilities and use viewer accounts for stakeholders who only need to see metrics.
Configure network and IP
By default, your EC2 instance will have a private IP for internal VPC network access. You can configure your PMM Server to use only a private IP or a static Elastic IP.
During EC2 instance creation:
- In the Network Settings section, uncheck Auto-assign public IP.
- Do not assign an Elastic IP to the instance.
- To access PMM Server using only a private IP, ensure you’re connected to your VPC and use the private IP address for access.
For an existing instance:
- If a public IP is assigned, remove it by disassociating it in the EC2 console.
- If an Elastic IP is assigned, disassociate it from the instance.
- To access PMM Server using only a private IP, ensure you’re connected to your VPC and use the private IP address for access.
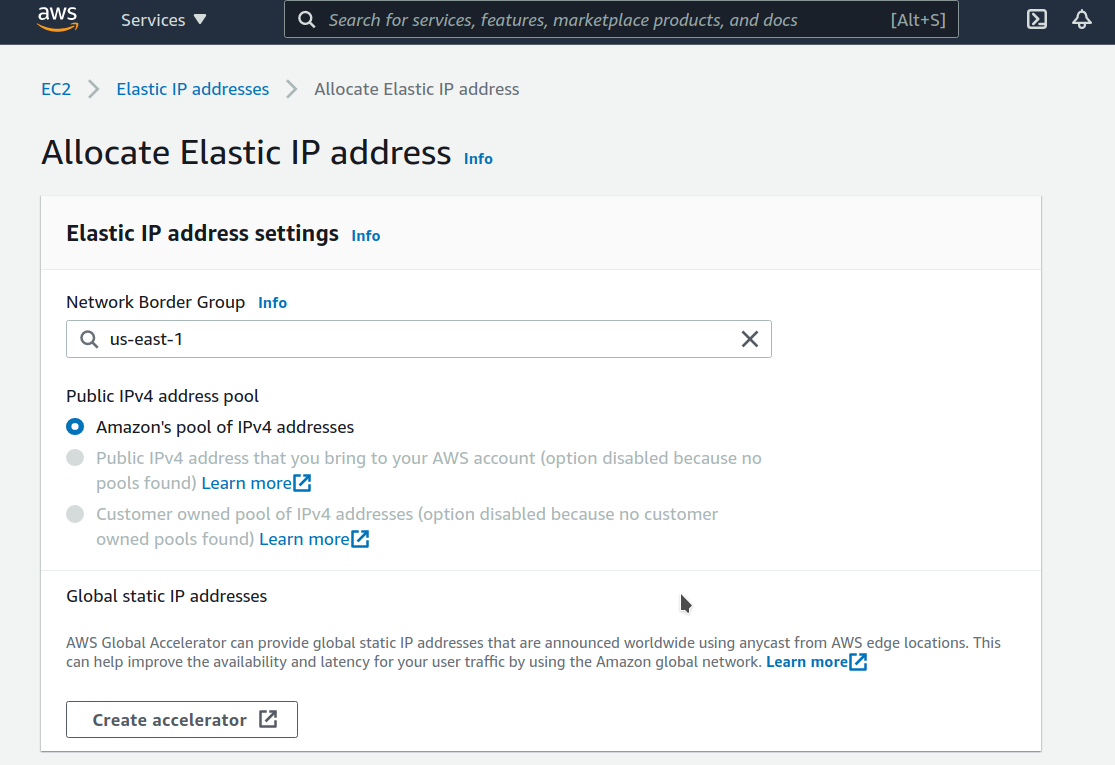
For a static, public-facing IP address:
-
Allocate an Elastic IP address in the EC2 console:
-
Associate the Elastic IP address with your EC2 instance’s network interface ID:
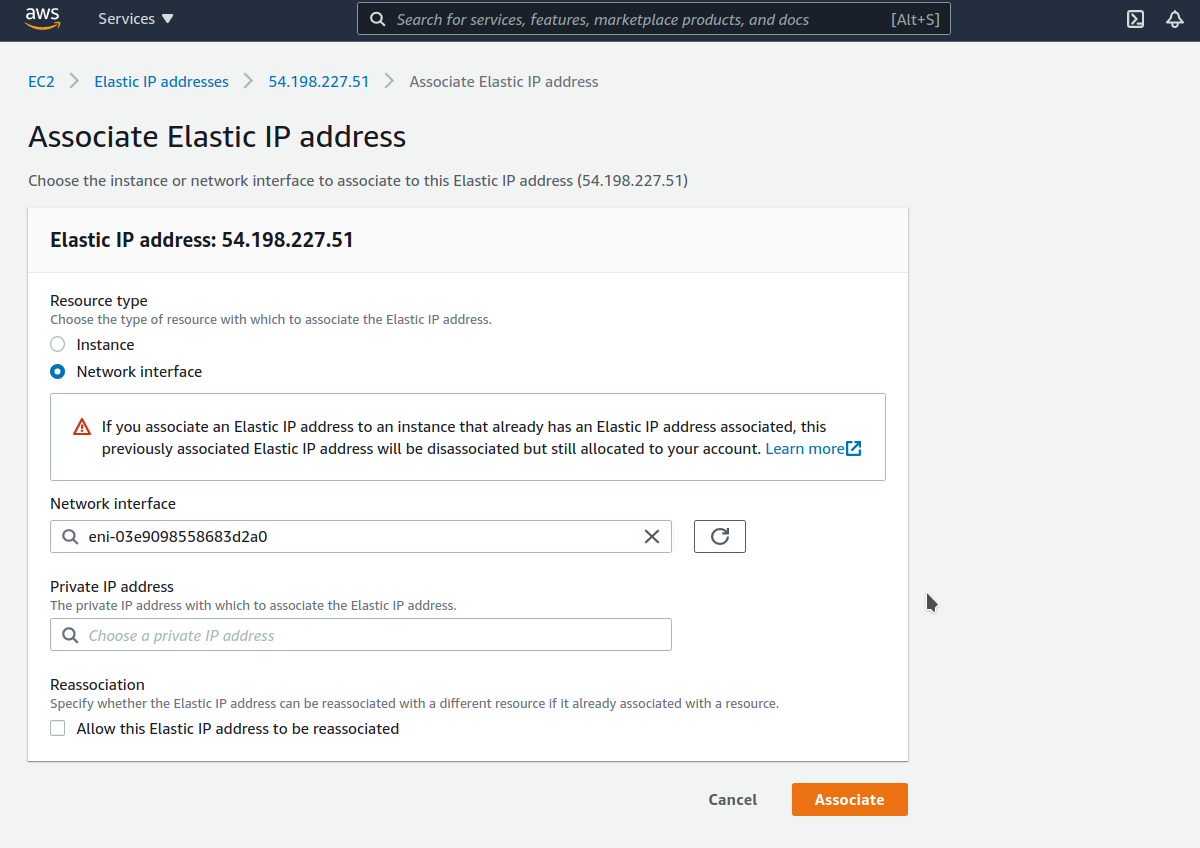
Note
Associating a new Elastic IP to an instance with an existing Elastic IP will disassociate the old one, but it will remain allocated to your account.
For detailed information on EC2 instance IP addressing, see the AWS documentation on using instance addressing.
Expand storage capacity
Resize PMM data volume
When monitoring more hosts or extending data retention, you may need additional storage space:
-
Increase the EBS volume size in the AWS Console following the AWS documentation.
-
Expand the file system to use the additional space:
# SSH to your PMM instance ssh -i /path/to/your-key.pem admin@<pmm-server-ip> # Verify the volume size increase was detected sudo dmesg | grep "capacity change" # Resize the physical volume to use new space sudo pvresize /dev/xvdb # Extend the thin pool to use all available space sudo lvextend /dev/mapper/DataVG-ThinPool -l 100%VG # Extend the data volume to use remaining space sudo lvextend /dev/mapper/DataVG-DataLV -l 100%FREE # Grow the XFS filesystem sudo xfs_growfs /home/admin/volume # Verify the expansion df -h /home/admin/volume -
PMM automatically detects the storage increase within ~5 minutes and adjusts its configuration.
Resize root volume
If the root filesystem runs low on space:
- Increase the root EBS volume in the AWS Console.
-
Expand the disk from AWS Console/CLI to the desired capacity:
-
Log in to the PMM EC2 instance and verify that the disk capacity has increased. For example, if you have expanded disk from 8G to 10G,
dmesg:# dmesg | grep "capacity change" [63175.044762] nvme0n1: detected capacity change from 8589934592 to 10737418240 -
Use the
lsblkcommand to see that our disk size has been identified by the kernel correctly, but LVM2 is not yet aware of the new size:# lsblk NAME MAJ:MIN RM SIZE RO TYPE MOUNTPOINT nvme0n1 259:1 0 10G 0 disk └─nvme0n1p1 259:2 0 8G 0 part / ... -
For volumes that have a partition, such as the root volume shown in the previous step, use the
growpartcommand to extend the partition:# growpart /dev/nvme0n1 1 CHANGED: partition=1 start=2048 old: size=16775168 end=16777216 new: size=20969439 end=20971487 -
Verify that the partition reflects the increased volume size, use the
lsblkcommand again:# lsblk NAME MAJ:MIN RM SIZE RO TYPE MOUNTPOINT nvme0n1 259:1 0 10G 0 disk └─nvme0n1p1 259:2 0 10G 0 part / ... -
Extend the XFS file system on the root volume by
xfs_growfscommand:# xfs_growfs -d / meta-data=/dev/nvme0n1p1 isize=512 agcount=4, agsize=524224 blks = sectsz=512 attr=2, projid32bit=1 = crc=1 finobt=0 spinodes=0 data = bsize=4096 blocks=2096896, imaxpct=25 = sunit=0 swidth=0 blks naming =version 2 bsize=4096 ascii-ci=0 ftype=1 log =internal bsize=4096 blocks=2560, version=2 = sectsz=512 sunit=0 blks, lazy-count=1 realtime =none extsz=4096 blocks=0, rtextents=0 data blocks changed from 2096896 to 2621120 -
Verify that file system reflects the increased volume size:
# df -hT /
Filesystem     Type  Size  Used Avail Use% Mounted on
/dev/nvme0n1p1 xfs    10G  5,6G  4,5G  56% /
-
Upgrade EC2 instance class
Scale your PMM Server by upgrading to a larger instance when CPU or memory usage becomes a bottleneck.
PMM fully supports resizing EC2 instances, as long as you follow the steps outlined in the AWS EC2 resizing guide.
Data safety
PMM uses a separate EBS volume for monitoring data, so changing instance types doesn’t affect your collected metrics or dashboards.
To upgrade the instance type:
-
Open the Amazon EC2 console.
-
In the navigation pane, choose PMM Server Instances.
-
Select the instance and choose Actions > Instance state > Stop instance.
-
In the Change instance type dialog box, select the instance type that you want.

-
Choose Apply to accept the new settings and start the stopped instance.
Configure PMM Clients
Set server URL
Configure the PMM Server URL for client connections:
PMM_SERVER_URL="https://<elastic-ip-or-domain>:443"
PMM_SERVER_URL="https://<private-ip>:443"
Configure authentication
PMM Client authentication uses the same credentials you set for the web interface:
# Example PMM Client configuration command
pmm-admin config --server-insecure-tls --server-url=https://admin:your-password@<pmm-server-ip>:443
Test connection
Test PMM Client connectivity:
# Test PMM Server connectivity
curl -k https://<pmm-server-ip>:443/ping
# Expected response: "OK"

# Test API authentication
curl -k -u admin:your-password https://<pmm-server-ip>:443/v1/readyz
# Expected response: {"status":"ok"}
Back up and restore
To restore PMM Server from a backup:
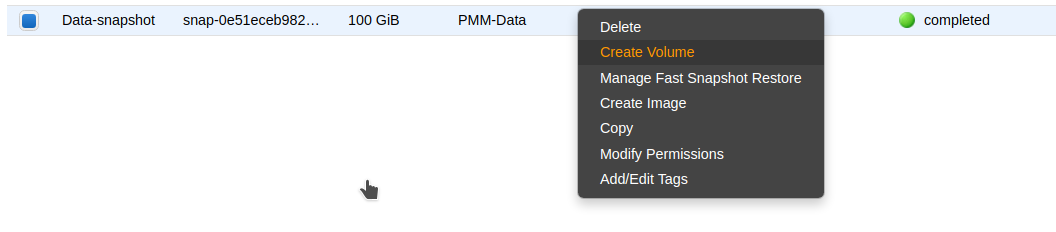
-
Create a new volume using the latest snapshot of the PMM data volume:
-
Stop the PMM Server instance.
-
Detach the current PMM data volume:

-
Attach the new volume:
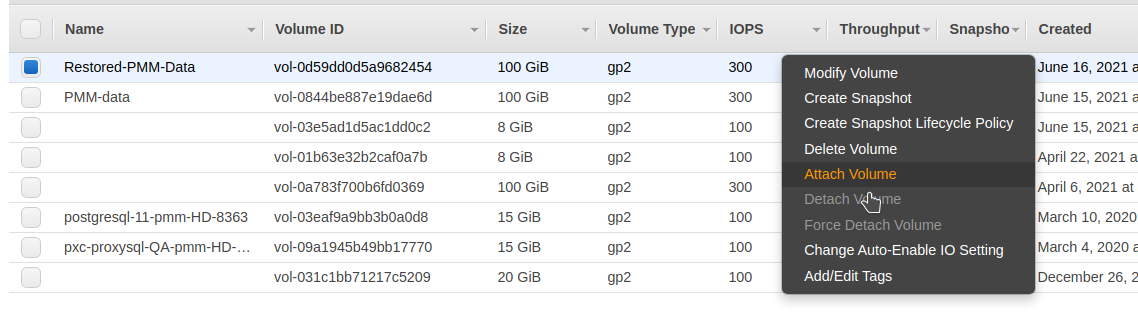
-
Start the PMM Server instance. The restore process typically takes 5-15 minutes depending on volume size and AWS region performance.
Remove PMM Server from AWS
Data loss warning
Instance termination permanently deletes all data. Ensure you have completed all backup procedures before terminating an instance.
To permanently delete your PMM Server instance and clean up resources:
Use the AWS console for a visual, step-by-step termination process:
-
Go to the EC2 Console.
-
Find the instance you want to remove.

-
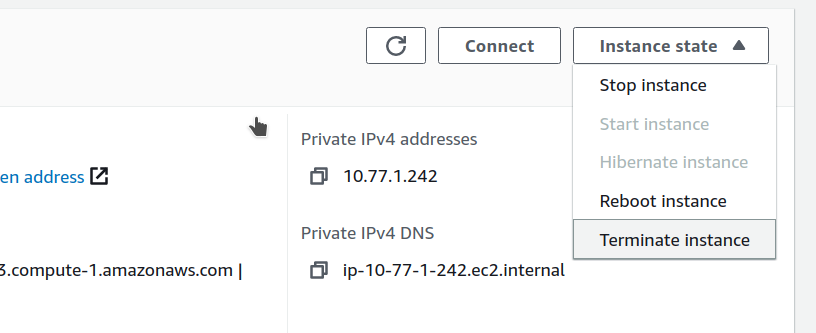
Open the Instance state menu and select Terminate instance.
-
Confirm termination.
Use the AWS CLI when you want to automate termination with cleanup:
-
Create a final backup:
aws ec2 create-snapshot --volume-id $DATA_VOLUME_ID --description "Final backup before termination" -
Disconnect all PMM clients:
# On each monitored server pmm-admin remove --all -
Export configuration:
podman exec pmm-server pmm-admin summary > pmm-final-config.txt -
Stop PMM services:
podman stop pmm-server -
Terminate the instance:
aws ec2 terminate-instances --instance-ids i-1234567890abcdef0 -
Clean up AWS resources (optional):
# Release Elastic IP if allocated
aws ec2 release-address --allocation-id eipalloc-12345678
Next steps
With your PMM Server fully configured and secured:
- Configure PMM clients to start monitoring your infrastructure
- Configure SSL certificates for production use
- Set up monitoring alerts for proactive monitoring