
Percona Server for MySQL
Documentation
8.4.8-8 (March 12, 2026)
Percona Server for MySQL 8.4 - Documentation
This documentation is for the latest release: Percona Server for MySQL 8.4.8-8 (Release Notes).
Percona Server for MySQL is a freely available, fully compatible, enhanced, and open source drop-in replacement for any MySQL database. It provides superior and optimized performance, greater scalability and availability, enhanced backups, and increased visibility and instrumentation.
Thousands of enterprises trust Percona Server for MySQL to provide better performance and concurrency for their most demanding workloads.
New to Percona?
Start here to choose your installation path.
- Are you building a High Availability (HA) Cluster?
- Yes → Use Percona Distribution for MySQL. For a multi-node HA cluster, Percona XtraDB Cluster (PXC) is the clustered database; PDPS includes the server or PXC plus tested versions of HAProxy, ProxySQL, Orchestrator, and XtraBackup.
-
No → Go to step 2.
-
Do you just need a drop-in replacement for MySQL?
-
Yes → Use Percona Server for MySQL. It is lightweight and focuses on the core engine performance.
-
Is your operating system (OS) very new?
-
Check → Verify support on the Percona Software and Platform Lifecycle page.
-
Are you deploying on Kubernetes (a platform for running containerized applications)?
- Yes → Use Percona Operator for MySQL (for Percona Server for MySQL) or Percona Operator for MySQL based on Percona XtraDB Cluster (PXC) (for a clustered, high-availability setup). Operators automate deployment, scaling, backups, and failover on Kubernetes.
- No → Not sure? Learn more about the differences to compare options.
Learn more about the differences →
For Monitoring and Management
Percona Monitoring and Management (PMM) monitors and provides actionable performance data for MySQL variants, including Percona Server for MySQL, Percona XtraDB Cluster, Oracle MySQL Community Edition, Oracle MySQL Enterprise Edition, and MariaDB. PMM captures metrics and data for the InnoDB, XtraDB, and MyRocks storage engines, and has specialized dashboards for specific engine details.
Review Get help from Percona for ways that we can work with you.
Installation guides
Find the best installation solution with our step-by-step installation instructions.
Upgrade instructions
Upgrade your Percona Server for MySQL installation with our comprehensive upgrade guides.
Audit Log Filter plugin
Learn about the Audit Log Filter plugin that allows you to monitor, log, and block a connection or query actively executed on the selected server.
Get help from Percona
Our documentation is packed with information, but it can’t cover everything you need to know about Percona Server for MySQL. It also won’t cover every scenario you might come across. New to Percona? Start with choosing your path. Don’t be afraid to try things out and ask questions when you get stuck.
Percona’s Community Forum
Be a part of a space where you can tap into a wealth of knowledge from other database enthusiasts and experts who work with Percona’s software every day. While our service is entirely free, keep in mind that response times can vary depending on the complexity of the question. You are engaging with people who genuinely love solving database challenges.
We recommend visiting our Community Forum . It’s an excellent place for discussions, technical insights, and support around Percona database software. If you’re new and feeling a bit unsure, our FAQ and Guide for New Users ease you in.
If you have thoughts, feedback, or ideas, the community team would like to hear from you at Any ideas on how to make the forum better? . We’re always excited to connect and improve everyone’s experience.
Percona experts
Percona experts bring years of experience in tackling tough database performance issues and design challenges.
We understand your challenges when managing complex database environments. That’s why we offer various services to help you simplify your operations and achieve your goals.
| Service | Description |
|---|---|
| 24/7 Expert Support | Our dedicated team of database experts is available 24/7 to assist you with any database issues. We provide flexible support plans tailored to your specific needs. |
| Hands-On Database Management | Our managed services team can take over the day-to-day management of your database infrastructure, freeing up your time to focus on other priorities. |
| Expert Consulting | Our experienced consultants provide guidance on database topics like architecture design, migration planning, performance optimization, and security best practices. |
| Comprehensive Training | Our training programs help your team develop skills to manage databases effectively, offering virtual and in-person courses. |
We’re here to help you every step of the way. Whether you need a quick fix or a long-term partnership, we’re ready to provide our expertise and support.
What to do next
- Documentation home — start here or return to the main guide
- Choose your path — Percona Server for MySQL, Percona Distribution for MySQL, or Percona Operators
- Quickstart guide — get up and running quickly
- Install Percona Server for MySQL — step-by-step installation
- Upgrade — upgrade an existing installation
- Troubleshooting overview — diagnose and fix common issues
Choose your path: Percona Server for MySQL, Percona Distribution for MySQL, or Percona Operators
When setting up Percona repositories (online locations where installable software packages are stored), you must choose between two primary paths: Percona Server for MySQL (PS) or Percona Distribution for MySQL (PDPS). Both ship the same Percona Server for MySQL 8.4 database server; PDPS adds a curated set of surrounding components (backup, proxy, orchestration) tested together. They are designed for different operational scopes.
The labels ps-8.4 and pdps-8.4 are repository identifiers (short names for the repository you enable). You use them when enabling the Percona repository—for example, with the percona-release setup tool or in the configuration for your system’s package manager (the tool that installs software: apt on Debian/Ubuntu, yum or dnf on Red Hat–style systems). The number (8.4) matches the MySQL major version.
To read more about Percona Distribution for MySQL, see the Percona Distribution for MySQL 8.4 documentation.
Check Platform Support
Before choosing a repository, verify that your operating system (OS) version is supported for that specific product. Review the Percona Software and Platform Lifecycle page to confirm support for your platform and version. If your OS is not listed (for example, a very new Linux distribution such as a recently released Ubuntu or Debian), use a supported platform or wait until support is added.
Comparison Overview
| Feature | Percona Server for MySQL (ps-8.4) |
Percona Distribution for MySQL (pdps-8.4) |
Percona Operators |
|---|---|---|---|
| Primary Goal | A performance-enhanced, drop-in replacement for MySQL Community Edition. | A curated collection of components tested together as a complete enterprise stack. | Kubernetes-native deployment and lifecycle management for Percona Server for MySQL or Percona XtraDB Cluster (PXC). |
| Included Components | Database server, client, and essential plugins. | Database server, Percona XtraBackup (backup), HAProxy and ProxySQL (traffic and query routing), and Orchestrator (replication management). | Operator plus database pods; backup, proxy, and orchestration vary by Operator (PS or PXC). |
| Release Cycle | Follows the MySQL Community release cadence. | Follows a coordinated release cycle where all bundled components are validated for inter-compatibility. | Follows Operator release cadence; deploys supported PS or PXC versions. |
| Ideal For | Standalone instances or simple primary/replica setups (one server accepts writes; others hold read-only copies). | High Availability (HA) clusters—systems that keep running even if one server or component fails—and mission-critical enterprise environments. | Kubernetes and cloud-native environments; automated failover, scaling, and backups. |
Percona XtraDB Cluster (PXC) is a high-availability clustered database based on MySQL; multiple nodes stay in sync so the cluster keeps running if one node fails. It is a different product from Percona Server for MySQL (which is a single-server database).
Which one should I install?
Need High Availability (HA) or a single supported stack (server, proxy, backup)? Choose Percona Distribution for MySQL (PDPS). Deploying on Kubernetes? See Percona Operators below. Otherwise, choose Percona Server for MySQL (PS).
Percona Server for MySQL (ps-8.4)
Choose this if any of the following conditions apply:
-
Wanting a minimal footprint focused solely on the database engine.
-
Managing your own infrastructure components (backups, proxies, or orchestration) independently.
-
Requiring the latest performance patches and features available in Percona Server but not needing a bundled ecosystem.
Percona Distribution for MySQL (pdps-8.4)
Choose this if any of the following conditions apply:
-
Deploying a High Availability (HA) environment (for example, using Percona XtraDB Cluster).
-
Wanting a curated, version-aligned stack where the server, proxy, and backup tools are validated for compatibility as a single unit.
-
Preferring a single repository entry-point that provides all the tools required for a full production lifecycle (Server + Backups + Management).
If you need only some components (for example, XtraBackup or ProxySQL) with Percona Server for MySQL, you can install those separately; PDPS is for users who want one supported, integrated stack.
Deploying on Kubernetes?
If you run your workloads on Kubernetes (a platform for running containerized applications), use Percona Operators instead of the repository-based installation. Operators automate deployment, scaling, backups, and failover on Kubernetes.
- Percona Operator for MySQL — for Percona Server for MySQL
- Percona Operator for MySQL based on Percona XtraDB Cluster (PXC) — for a clustered, high-availability setup
Next steps
Percona Server for MySQL
Percona Distribution for MySQL
Release notes
Percona Server for MySQL 8.4 release notes index
Percona Server for MySQL 8.4.8-8 (2026-03-12)
Get started with Quickstart Guide for Percona Server for MySQL.
Percona Server for MySQL 8.4.8-8 includes all the features and bug fixes available in the MySQL 8.4.8 Community Edition in addition to enterprise-grade features developed by Percona.
Release highlights
MySQL 8.4.8
Improvements and bug fixes introduced by Oracle for MySQL 8.4.8 and included in Percona Server for MySQL are the following:
-
The warning associated with redo logging being disabled is no longer present, as the underlying condition that triggered the warning has been eliminated. (Bug #37645185)
-
A problem affecting the handling of large insert operations has been corrected, improving stability during bulk data loads. (Bug #38208188)
-
An error that could arise when running certain SQL statements has been resolved. (Bug #38573285)
-
Issues encountered when generating table definitions via
SHOW CREATE TABLEhave been fixed. (Bug #38448700) -
Bug #38298692 was addressed as part of the same fix set as Bug #38448700, resolving related inconsistencies in table metadata handling. (Bug #38298692)
-
Performance regressions affecting queries that rely on regular expression matching have been corrected. (Bug #114056, Bug #36326728)
-
The bundled OpenSSL dependency has been updated, addressing the issue tracked under Bug #38632932. (Bug #38632932)
-
A concurrency flaw in InnoDB that could occur when executing SQL through the
que_eval_sqlinterface has been removed. (Bug #118705, Bug #38310595) -
A timing issue that allowed binary logs to be removed before persisted expiration settings were fully applied has been fixed. (Bug #38554467)
-
A fault affecting clustered environments, where multiple instances could lose connectivity under specific conditions, has been corrected. (Bug #38380392)
-
Several defects that prevented connections from closing properly when using the Thread Pool have been resolved. (Bug #38170188, Bug #36782728, Bug #38549372)
-
An issue that caused gaps in GTID sequences when the
replica_skip_errorsoption was enabled has been fixed. (Bug #28590993)
Find the complete list of bug fixes and changes in the MySQL 8.4.8 release notes .
Bug Fixes
-
PS-9828: The Audit Log Filter could crash when
audit_log_filter.filepointed to a non-existent directory. -
PS-10229: The
audit_log_filter_remove_filterfailed after upgrading from Percona Server for MySQL 8.0 to 8.4.6 due to an index being renamed fromfilter_nametofiltername. The issue resulted in the error:ERROR: Failed to remove filter from users table. -
PS-10232: MySQL 8.0.40 and later could be about 2–3 times slower than 8.0.39 in a particular index scan scenario.
-
PS-10260: Expanded Fast Index Creation could fail with partitioned tables.
-
PS-10287: A table definition mismatch between MyRocks and the data dictionary after a crash could cause a crash or assertion failures.
-
PS-10332: MySQL terminated with signal
SIGABRTwhen an invalid value was specified foraudit-log-filter.compression. -
PS-10345: The Audit Log Filter could crash when the definition passed to
audit_log_filter_set_filter()contained invalid data replacement fields. -
PS-10347: The AuditJsonHandler used by the
audit_log_readUDF could return malformed JSON. -
PS-10383: The MeCab plugin did not enforce phrase adjacency for quoted phrase search in BOOLEAN MODE.
-
PS-10387: The
audit_log_read()function ignoredmax_array_lengthand had pagination issues. -
PS-10446: Back-ported the fix for Bug #118512 (missing semi-join condition causes incorrect result) to 8.4.
-
PS-10447: Back-ported the fix for Bug #119606 (assertion failure in item_func.cc:3937) to 8.4.
-
PS-10545: MySQL Test Run (MTR)
--only-big-testincorrectly skipped tests that included bothbig_test.incandno_valgrind_without_big.inc. -
PS-10591: On systems running OpenSSL 3.4 or later (for example, Debian Trixie and Oracle Linux 10), the use of SHAKE128 and SHAKE256 resulted in an assertion failure. Because SHAKE algorithms are extendable-output functions (XOFs),
EVP_MD_CTX_size()returned0, which triggeredassert(digest_size > 0)infinalize(). The implementation was updated to properly handle XOF algorithms and to useEVP_DigestFinalXOF()instead ofEVP_DigestFinal_ex()for finalizing XOF digests.
Additional resources
-
Install Percona Server for MySQL 8.4
-
Download product binaries, packages, and tarballs at Percona Software Downloads
-
For training , contact Percona Training - Start learning now
Percona Server for MySQL 8.4.7-7 (2025-12-22)
Get started with Quickstart Guide for Percona Server for MySQL.
Percona Server for MySQL 8.4.7-7 includes all the features and bug fixes available in the MySQL 8.4.7 Community Edition in addition to enterprise-grade features developed by Percona.
Release highlights
Percona Server for MySQL 8.4.7-7
- Announcement – Discontinuation of the Percona PRO Program
Percona has consolidated its build offerings. The Pro builds are no longer required. All features from the Percona Server for MySQL 8.0.x Pro build series have been merged into the main open source Community release. FIPS-capable binaries are included in all builds starting with this release. The FIPS mode remains off by default and must be enabled via OS/OpenSSL configuration.
- The audit log plugin has been reintroduced in Percona Server for MySQL 8.4. However, it is already marked as deprecated and is planned for removal in a future release. This deprecation is due to the availability of the audit log filter component, which is the recommended replacement. Users should migrate to this component, which provides equivalent functionality with enhanced flexibility, performance, and filtering capabilities, ensuring continued support for auditing and compliance requirements.
MySQL 8.4.7
Improvements and bug fixes introduced by Oracle for MySQL 8.4.7 and included in Percona Server for MySQL are the following:
-
Fixed an issue where parallel scan thread creation could fail, causing assertion failures when falling back to single-thread mode. (Bug #38325137)
-
Fixed an issue where virtual index rollback could fail on 32-bit builds of MySQL Server under certain circumstances. (Bug #38167527)
-
Fixed an issue where very large buffer pools could require excessive memory chunks per instance, potentially causing allocation failures. The allocation is now validated to ensure proper memory allocation. (Bug #37994397)
-
Fixed an issue where assertion failures could occur due to data size and bounds mismatches during DDL file operations. (Bug #37882398)
-
Fixed an issue related to modifying the internal Full-Text Search (FTS) configuration. (Bug #37792010)
-
Fixed an issue related to virtual indexes. (Bug #37602657)
-
Fixed an issue where confusing warning messages could appear when row sizes exceeded maximum allowed limits with
innodb_strict_mode=OFF, such as during table selection or column dropping operations. Error messages have been improved for clarity. (Bug #37003342, Bug #36768046, Bug #36867372)
Find the complete list of bug fixes and changes in the MySQL 8.4.7 release notes .
Improvements
-
PS-8980: Percona Server for MySQL 8.4.7-7 adds the
performance_schema.account_failed_login_lock_statustable, which lists the user accounts that have been temporarily locked after reaching the limit for failed login attempts. -
PS-9826: Added metrics collection for
component_js_lang. Improved error handling by adding a safety check before accessing the query result vector.
Bug Fixes
-
PS-9220: During slow‑query‑log rotation the server attempts to write to the base file
slow.log(which isn’t created), raises an error -errno 2 – No such file or directory, but the logs are written with numeric suffixes (for example,slow.log.000087) that obey the configured size and file‑count limits. -
PS-9452: When the server uses a thread‑pool (thread_handling = pool‑of‑threads) and the variable
thread_pool_high_prio_modeis set totransactions, every new client connection is placed in the normal‑priority queue. The queue is processed only if there is a free thread in the pool. -
PS-9815: Percona Server using the
component_keyring_vaultcomponent exited when it attempted to load acomponent_keyring_vault.cnffile containing incorrect setting values. -
PS-9834: The Audit Log Filter incorrectly deletes all rotated logs if the
audit_log_filter.max_sizeis set > 2 GiB. -
PS-9837: A server exit occurs on a replica that uses
replica_parallel_workers> 0 andslave_preserve_commit_order=ON when many threads repeatedly delete rows and then insert new rows having the same secondary‑index values, creating duplicate index entries. Changing the workload to a singleUPDATE(instead of a delete‑followed‑by‑insert) prevents the duplicate‑key situation and stops the replica from exiting. -
PS-10113: Percona Server exited when a JavaScript routine attempted to allocate more memory than the internal heap limit allowed.
-
PS-10131: The
audit_log_rotate()could be delayed up to one second becauseFileWriterBuffering::close()waited for a flush‑worker thread that was sleeping inmysql_cond_timedwait. The fix signals the flush‑worker immediately before the wait, ensuring prompt buffer flushing and preventing rotation delays. -
PS-10283: A debug‑assertion failure (
field.field_no < dict_index_get_n_fields(index)) that occurred during recovery of InnoDB tables usingROW_FORMAT=REDUNDANT. The fix added a conditional bypass of the index‑field validation when the server was in recovery mode, and the table was non‑compact (redundant), preventing the assertion from triggering and allowing the server to start and recover normally. -
PS-10324: The audit log filter component was missing required fields for the
table_accessandgeneralevent classes.
MyRocks
-
PS-9680: Calling
ALTER TABLEfrom multiple threads in parallel could trigger the error “Invalid argument: Global seqno is required, but disabled.” -
PS-9838: The server’s estimate for how many rows fit in one index leaf (
guess_rec_per_key()) uses two numbers:used_keyparts(the parts actually stored in the index) anduser_defined_key_parts(the parts the user declared). If these two counts differ, the formula calculates the wrong capacity, leading to inaccurate index‑size estimates. -
PS-9840: An issue during initialization could cause the process to stop midway when encountering a corrupted datadir. Because the system did not mark initialization as complete, the cleanup phase was skipped, leaving internal RocksDB structures unreleased and resulting in an assertion failure. The fix ensures that validation occurs only after initialization is marked as complete, guaranteeing that cleanup always runs and all resources are properly freed.
-
PS-9842: An assertion could occur due to an invalid iterator. After this fix, Rdb_iterator_base is always invalidated when an error occurs.
-
PS-10067: This fix resolves malformed reads and improves the stability of index iteration. The update fixed
Rdb_convert_to_record_key_decoder::skip()so that it now advances both the key‑slice reader and the unpack‑information reader. By consuming the per‑field metadata during iteration withRdb_key_field_iterator::next(), the function correctly handles index fields created viamake_unpack_unknown_varlength(). -
PS-10075: An issue could cause a checksum mismatch when reading records. In some cases, the reader would skip per-field metadata but still attempt to read the checksum, resulting in an invalid position. This fix ensures that the checksum is only verified when the reader is correctly positioned, preventing false checksum errors.
-
PS-10210: Added enforcement for the ranges for the following MyRocks variables:
rocksdb_block_sizenow rejects sizes larger than 4 GiB,rocksdb_keep_log_file_nummust be greater than 0, and the max value ofrocksdb_max_file_opening_threadsis set to 262,144. Additionally, therocksdb_debug_cardinality_multiplierparameter was constrained to valid ranges, eliminating the crashes that occurred when it was set to 0. -
PS-10227: An unexpected server exit occurred when
rocksdb_table_stats_skip_system_cfwas enabled. Previously, enabling this option left the system column‑family pointer null during RocksDB recovery, causing an assertion failure inRdb_cf_manager::get_cf()and abortingmysqldwith signal 6. The fix introduced proper initialization and safety checks for the system column family, allowing the server to start normally while still skipping system‑CF statistics.
Packaging and build notes
-
Percona Server for MySQL 8.4 adds support for Debian 13.
-
Percona Server for MySQL 8.4 has ended support for Ubuntu 20.04.
Known limitation
MySQL Shell is not available as a prebuilt package for Debian 11 (Bullseye) in the Percona APT repository. Recent MySQL Shell releases are built with GNU Compiler Collection (GCC) 11 or later, while Debian 11 ships with GCC 10, making these binaries incompatible.
Additional resources
-
Install Percona Server for MySQL 8.4
-
Download product binaries, packages, and tarballs at Percona Software Downloads
-
For training , contact Percona Training - Start learning now
Percona Server for MySQL 8.4.6-6 (2025-09-08)
Get started with Quickstart Guide for Percona Server for MySQL.
Percona Server for MySQL 8.4.6-6 includes all the features and bug fixes available in the MySQL 8.4.6 Community Edition in addition to enterprise-grade features developed by Percona.
Release highlights
Percona Server for MySQL 8.4.6-6
Implements Link-Time Optimization (LTO) to generate more optimized release binaries, resulting in improved performance for specific workloads.
MySQL 8.4.6
Improvements and bug fixes introduced by Oracle for MySQL 8.4.6 and included in Percona Server for MySQL are the following:
-
Fixed an issue where rebuilding a primary key with duplicate entries could cause the server to stop unexpectedly. (Bug #37822992)
-
Fixed an issue related to dropping columns that were part of an index. (Bug #37726881)
-
Fixed an issue with indexing spatial datatype columns. (Bug #36682518)
-
Fixed an issue where creating a secondary index on a
VARCHARcolumn could exceed configured memory limits, with the amount allocated being directly related to thevalue of innodb_ddl_buffer_size, leading to errors such as ERROR 1136 (21S01): Column count doesn’t match value count at row 1. (Bug #37233273)
Find the complete list of bug fixes and changes in the MySQL 8.4.6 release notes.
Bug Fixes
-
PS-9159: MySQL server exited when running
SELECT GLOBAL_TEMPORARY_TABLESduring an active Data Definition Language (DDL) operation. -
PS-9666: MyRocks exited when inserting into a table with
unique_checks=OFFand Time to Live (TTL) enabled. -
PS-9784: Fix for
gcc-15compilation issues. -
PS-9823: The
mysql_migrate_keyringcomponent didn’t work with Percona Server components. -
PS-9836: Fix for performance regression when using
audit_log_filtervsaudit_logplugins. -
PS-9861: Fixed an issue preventing installation of the
audit_log_filterplugin when thecomponent_keyring_kmipplugin, which integrates with Fortanix Data Security Manager (DSM) via the Key Management Interoperability Protocol (KMIP), was enabled. -
PS-9916: Added logging of an ERROR message when a source server is stopped while waiting for acknowledgments (ACKs).
-
PS-9956: Percona Server exited using Group Replication with the
audit_log_filtercomponent enabled.
Build & packaging notes
-
The official packages were built with the
WITH_LTO=ONflag to enable the Link-Time Optimization (LTO) feature. -
Percona Server for MySQL 8.4.6.6 supports Red Hat Enterprise Linux 10.
Additional resources
-
Install Percona Server for MySQL 8.4
-
Download product binaries, packages, and tarballs at Percona Software Downloads
-
For training, contact Percona Training - Start learning now
Percona Server for MySQL 8.4.5-5 (2025-05-29)
Get started with Quickstart Guide for Percona Server for MySQL.
Percona Server for MySQL 8.4.5-5 includes all the features and bug fixes available in the MySQL 8.4.5 Community Edition in addition to enterprise-grade features developed by Percona.
Release highlights
Percona Server for MySQL 8.4.5-5
-
Updates the C++ level of the KMPI library to enhance error handling capabilities.
-
Improves optimizer behavior by restoring correct handling of const tables in
test_quick_select(). A MySQL Upstream refactor (commit 9a13c1c) removed theQEP_TABdependency, causingget_quick_record_count()to no longer pass const table information. This could lead to suboptimal range scan boundaries. The applied patch resolves the issue by explicitly passingconst_tablestotest_quick_select(), ensuring consistent behavior with the pre-refactor logic.
The latest MyRocks storage engine incorporates code based on RocksDB version 9.3.1. Percona has applied minor modifications to the original RocksDB codebase. Check the list of modifications at https://github.com/percona/rocksdb/.
This release adds the following changes to the list of MyRocks variables.
Adds new MyRocks variables
--rocksdb_bulk_load_compression_parallel_threads--rocksdb_bulk_load_enable_unique_key_check--rocksdb_debug_skip_bloom_filter_check_on_iterator_bounds--rocksdb_enable_udt_in_mem--rocksdb_invalid_create_option_action--rocksdb_io_error_action--rocksdb_table_stats_skip_system_cf--rocksdb_use_io_uring--rocksdb_enable_instant_ddl--rocksdb_enable_instant_ddl_for_append_column--rocksdb_enable_instant_ddl_for_column_default_changes--rocksdb_enable_instant_ddl_for_drop_index_changes--rocksdb_enable_instant_ddl_for_table_comment_changes--rocksdb-bulk-load-compression-parallel-threads--rocksdb-bulk-load-enable-unique-key-check--rocksdb-debug-skip-bloom-filter-check-on-iterator-bounds
Changes default values of MyRocks variables
-
--rocksdb_disable_instant_ddl- the default value is changed fromONtoOFF. -
--rocksdb_file_checksums- the data type is changed fromBooleantoENUM. Also, the default value is changed fromOFFtoCHECKSUMS_OFF. -
--rocksdb_compaction_readahead_size- the default value is changed from0(zero) to2097152.
Deprecates MyRocks variable
--rocksdb_disable_instant_ddl- this variable is being deprecated and is expected to be removed in a future release.
Removes MyRocks variables
--rocksdb-access-hint-on-compaction-start--rocksdb_large_prefix--rocksdb_strict_collation_check--rocksdb_strict_collation_exceptions
MySQL 8.4.5
Improvements and bug fixes introduced by Oracle for MySQL 8.4.5 and included in Percona Server for MySQL are the following:
-
Fixed an issue where
CHECK TABLEsometimes incorrectly reported that spatial indexes were corrupted. (Bug #37286473) -
Fixed an issue in InnoDB redo log recovery to improve data safety after a crash. (Bug #37061960)
-
Fixed an issue where reading
index_idvalues could lead to incorrect behavior with indexes. (Bug #36993445, Bug #37709706) -
Fixed a bug related to the
lower_case_table_namessetting that caused inconsistent behavior with table names on different systems. (Bug #32288105) -
Fixed a bug where
mysqldumpdid not properly escape certain special characters in its output. (Bug #37540722, Bug #37709163) -
The
fprintf_string()function inmysqldumpdid not use the correct quote character for escaping strings. (Bug #37607195)
Find the complete list of bug fixes and changes in the MySQL 8.4.5 release notes.
Improvements
-
PS-9561: Updates the C++ level of the KMPI library to enhance error handling capabilities.
-
PS-9810: Updates the list of MyRocks variables. You can find the list of variables in MyRocks server variables.
Bug Fixes
-
PS-9390: In some cases, using
JSON_TABLEinside anINorEXISTSsubquery caused incorrect results. This happened when the subquery referred to a table from the main query, and a semijoin optimization was applied. Percona merged the fix from MySQL. -
PS-9609: The
audit_log_filterplugin could not be installed when Percona Server was usingcomponent_keyring_kmip. -
PS-9628: The
binlog_encryptiondid not work withcomponent_keyring_kmip. -
PS-9703: In-place
ALTER TABLEoperations that internally rebuilt tables sometimes resulted in lost rows if a concurrent purge happened. -
PS-9719: When
binlog_transaction_dependency_trackingwas changed during a high-load workload, MySQL encountered a segmentation fault. -
PS-9723: MySQL server exited in
xpl::Ssl_context::~Ssl_context()under heavy load ofALTER INSTANCE RELOAD TLSqueries. -
PS-9753: Applied an optimizer patch from Enhanced MySQL to restore correct handling of const tables in
test_quick_select(). -
PS-9764: Added clang-20 to Azure Pipelines and fixed clang-20 compilation issues.
-
PS-9777: The
binlog_utils_udfplugin did not handlebinlog.indexentries the same as the Percona Server code did. -
PS-9780: The maximum size of
audit_log_filterrule was increased from 1024 characters to 16 000 characters. -
PS-9661: The encryption of system tablespaces using
component_keyring_kmipfailed.
Additional resources
-
Install Percona Server for MySQL 8.4
-
Download product binaries, packages, and tarballs at Percona Software Downloads
-
For training, contact Percona Training - Start learning now
Percona Server for MySQL 8.4.4-4 (2025-03-18)
Get started with Quickstart Guide for Percona Server for MySQL.
Percona Server for MySQL 8.4.4-4 includes all the features and bug fixes available in the MySQL 8.4.4 Community Edition in addition to enterprise-grade features developed by Percona.
Release highlights
Percona Server for MySQL 8.4.4-4
-
Improves the Data masking performance by introducing an internal term cache. The new cache speeds up lookups for
gen_blocklist()andgen_dictionary()functions by storing dictionary data in memory. However, if the dictionary table is modified directly (outside of the proper functions), the cache may become out of sync. To fix this, use thenew masking_dictionaries_flush()function.Changes also affect row-based replication: dictionary changes on the source server are replicated, but the term cache on the replica doesn’t update immediately. To address this, a new system variable,
component_masking_functions.dictionaries_flush_interval_seconds, can be set to automatically refresh the cache at specified intervals, helping replicas stay in sync.Find more detailed information in the Data masking overview and in the Data masking component functions.
-
Improves the behavior of
audit_log_filter_set_userto support wildcards in the hostname.
MySQL 8.4.4
Improvements and bug fixes introduced by Oracle for MySQL 8.4.4 and included in Percona Server for MySQL are the following:
-
Fixed an assertion in debug builds where certain IO buffer serializations caused system hangs. (Bug #37139618)
-
Resolved a failure when dropping the primary key and adding a new
AUTO_INCREMENTcolumn as the primary key in descending order using theINPLACEalgorithm resulted in failure. (Bug #36658450) -
Fixed incorrect results, including missing rows, in queries that used a descending primary key with the
index_mergeoptimization. (Bug #106207, Bug #33767814) -
Addressed a replication channel issue where MySQL failed to stop the channel properly when large transactions were being processed, and
STOP REPLICAwas requested. This issue also prevented graceful server shutdown, requiring process termination or system restart. (Bug #115966, Bug #37008345)
Find the complete list of bug fixes and changes in the MySQL 8.4.4 release notes.
Improvements
-
PS-9148: Extends the Data masking with new additions from MySQL 8.3.0 Enterprise Data Masking and De-Identification Component Variables.
-
PS-9024: Improves the behavior of
audit_log_filter_set_userto support wildcards in the hostname.
Bug fixes
-
PS-9391: The replication broke with the error
HA_ERR_KEY_NOT_FOUNDwhen theslave_rows_search_algorithmswere set toINDEX_SCAN,HASH_SCAN. -
PS-9416: The error messages from the Key Management Interoperability Protocol (KMIP) component were not descriptive.
-
PS-9509: Percona Server stopped tracking the
global_connection_memorywhen usingthread_handling='pool-of-threads'. -
PS-9537: When building a new component that used mysql_command_xxx services (such as
mysql_command_factory,mysql_command_query, etc.), it was impossible to reuse the same connection to run multiple queries. This issue was observed withSELECTqueries, but it may also apply toINSERT,UPDATE, andDELETEoperations. -
PS-9542: Added Clang-19 to Azure pipelines, and fixed the clang-19 compilation issues.
-
PS-9551: When building a new component that used mysql_command_xxx services (such as
mysql_command_factory,mysql_command_query, etc.), a server exit was encountered when setting theMYSQL_COMMAND_LOCAL_THD_HANDLEoption. -
PS-9611: An assertion failure occurred during server shutdown:
!is_set() || m_can_overwrite_status. -
PS-9612: Percona Server build failed if more than 128 threads were available. Percona merged the fix from MariaDB.
-
PS-9654: There was an incorrect usage of
setup_component_customized.incin the MySQL Test Runner (MTR) tests. -
PS-9033: The
audit_log_filterplugin did not register remote accesses. -
PS-9464: Some queries that used hash antijoins returned incorrect results when the hash table did not fit in the join buffer and spilled to the disk. (The query triggering the issue specified LEFT JOIN, which was transformed internally from a left outer join to an antijoin.) Percona merged the fix from MySQL (Bug #116334, Bug #37161583).
-
PS-9614: The
Pool-of-Threadstimer thread failed to start ifmysqldwas started with--daemonize. -
PS-9668: The server exited when executing
LOCK TABLES FOR BACKUPafter audit logs were enabled.
Additional resources
-
Install Percona Server for MySQL 8.4
-
Download product binaries, packages, and tarballs at Percona Software Downloads
-
For training, contact Percona Training - Start learning now
Percona Server for MySQL 8.4.3-3 (2024-12-18)
Get started with Quickstart Guide for Percona Server for MySQL.
Percona Server for MySQL 8.4.3-3 includes all the features and bug fixes available in the MySQL 8.4.3 Community Edition in addition to enterprise-grade features developed by Percona.
Release highlights
Improvements and bug fixes introduced by Oracle for MySQL 8.4.3 and included in Percona Server for MySQL are the following:
-
The query
SELECT * FROM sys.innodb_lock_waits;now fetches only two locks per wait, instead of scanning all locks twice, improving performance under heavy load. Additionally, primary keys have been added toDATA_LOCKSandDATA_LOCK_WAITS. (Bug #100537, Bug #31763497) -
Changes in MySQL 8.0.33 caused performance degradation for queries using joins on
InnoDBtables due to refactoring of functions that were previously inline. -
The server crashed when it tried to update columns altered with
NULLas the default value using theINSTANTalgorithm. -
The server could crash during
DELETEorUPDATEoperations if a column was dropped using theINSTANTalgorithm. -
Importing a table created under a different
sql_modesometimes led to schema mismatches, risking data corruption in secondary indexes. The fix now includes integrity checks on the imported tablespace. -
Rebuilding tables with secondary indexes required more file
I/Ooperations compared to MySQL 8.0.26, which slowed down query performance.
Find the complete list of bug fixes and changes in the MySQL 8.4.3 release notes.
Bug fixes
-
PS-9382: After an upgrade, the telemetry daemon ran continuously. The telemetry daemon was manually stopped and the service was disabled. Adding
percona_telemetry_disable=1to the configuration file and restarting MySQL led to the server becoming unresponsive and required a forced termination. -
PS-9453: The
percona_telemetrytool caused a long wait onCOND_thd_listif the root user is absent.
Additional resources
-
Install Percona Server for MySQL 8.4
-
Download product binaries, packages, and tarballs at Percona Software Downloads
-
For training, contact Percona Training - Start learning now
Percona Server for MySQL 8.4.2-2 (2024-11-04)
Get started with Quickstart Guide for Percona Server for MySQL.
Percona Server for MySQL 8.4.2-2 includes all the features and bug fixes available in the MySQL 8.4 Community Edition in addition to enterprise-grade features developed by Percona.
Release highlights
Improvements and bug fixes introduced by Oracle for MySQL 8.4.1 and 8.4.2 and included in Percona Server for MySQL are the following:
-
MySQL stopped unexpectedly during an UPDATE after an ALTER TABLE operation.
-
Shutting down the server after an XA START with an empty XA transaction caused it to stop unexpectedly.
-
Shutting down the replication applier or binlog applier during an empty XA transaction caused the system to stop unexpectedly.
-
The result from a spatial index with a column containing a spatial reference identifier (SRID) was empty. Using FORCE INDEX to scan this index caused an assertion error.
-
In some cases, after creating more than 8000 tables, the server failed to restart.
-
Startup tablespace file scanning performance was improved.
Find the complete list of bug fixes and changes in the MySQL 8.4.1 Release Notes and MySQL 8.4.2 Release Notes.
Bug fixes
-
PS-8057:
slow_query_log_filedoes not match the filename defined in my.cnf. -
PS-9144: Missing rows after running a null
ALTERwithALGORTITHM=INPLACE. -
PS-9214: An
ALTERtable online results in a “duplicate key” error on the primary key (only index). -
PS-9306: The following MySQL versions unexpectedly exit if the database has more than 10K tables:
-
8.0.38
-
8.4.1
-
9.0.0
-
-
PS-9314: Using a JSON_TABLE in Percona Server for MySQL 8.0.36 causes a signal 11 error.
-
PS-9286: The KMIP component left keys in a
pre-activestate. -
PS-9384: A race condition between
dict_stats_threadand the cost model initialization cause sporadic exits in Jenkins on start up.
Additional resources
-
Install Percona Server for MySQL 8.4
-
Download product binaries, packages, and tarballs at Percona Software Downloads
-
For training, contact Percona Training - Start learning now
Percona Server for MySQL 8.4.1
Due to a critical fix, MySQL Community Server 8.4.2 was released shortly (22 days later) after MySQL Community Server 8.4.1. Percona has skipped the release of Percona Server for MySQL 8.4.1. Percona Server for MySQL 8.4.2-2 contains all bug fixes and contents from MySQL Community Server 8.4.1 and MySQL Community Server 8.4.2.
Percona Server for MySQL 8.4.0-1 (2024-08-28)
Get started with Quickstart Guide for Percona Server for MySQL.
Percona Server for MySQL 8.4.0-1 includes all the features and bug fixes available in the MySQL 8.4 Community Edition in addition to enterprise-grade features developed by Percona.
Release highlights
In MySQL 8.0, the release model changed to include new features in patch releases, allowing MySQL to introduce new features more frequently. However, this approach was complex for projects and applications needing only critical patches with minimal changes.
MySQL then moved to a versioning model with two options: Innovation releases and Long-Term Support (LTS) releases. Both types are production-ready.
Innovation releases offer access to the latest features, making them ideal for dynamic environments with strong automated testing and continuous integration.
Changes were made to each Innovation release that are now included in the 8.4 (LTS) release. You should review the Innovation release notes for details.
LTS releases are more suitable for stable, established environments where minimal changes are needed. These releases include only essential fixes, reducing the risk of changes in the database software’s behavior.
This 8.4.0-1 release is the first 8.4 LTS series.
Improvements and bug fixes introduced by Oracle for MySQL 8.4 and included in Percona Server for MySQL are the following:
-
The MySQL native password has been deprecated and is no longer loaded by default. However, it can be loaded if needed.
-
The clone plugin allows cloning between different point releases within the same series. You only must match the major and minor version numbers for cloning.
-
GTIDs (Global Transaction Identifiers) can now handle groups of transactions, which helps speed up processing.
-
mysqldumpcan now create output for older versions of MySQL. -
Automatic updates for histograms. When enabled, the histogram updates automatically whenever
ANALYZE TABLEis run on the table. InnoDB’s automatic recalculation of persistent statistics also updates the histogram when automatic updates are enabled. -
Adds a new privilege called FLUSH_PRIVILEGES. This privilege explicitly allows the use of FLUSH PRIVILEGES statements. Unlike the RELOAD privilege, FLUSH_PRIVILEGES only applies to FLUSH PRIVILEGES statements.
-
The terms “MASTER” and “SLAVE” in replication commands are being replaced with “SOURCE” and “REPLICA”. This change is part of an ongoing effort to use more inclusive language.
-
Removed the the
mysqlpumputility. -
Removed the
mysql_upgradeutility. -
The default values for specific InnoDB server system variables have changed. See What is new in MySQL 8.4 since 8.0 for details.
Find the complete list of bug fixes and changes in the MySQL 8.4 Release Notes.’
New features
- PS-9233: Adds the UUID_VX component which provides a set of functions for generating and working with various versions of the Universally Unique Identifier (UUID).
Improvements
- PS-9302: Changed underlying internal data structure used by the binlog transaction dependency tracking in
WRITESETmode (MySQL 8.4 removed theCOMMIT_ORDERmode). Instead ofstd::map(an RB-tree) we now usestd::unordered_map(a hash) which gives much better performance for lookup operations. This change showed an up to 17% Queries per second (QPS) increase in theoltp_inlist_updateworkload.
Bug fixes
-
PS-9092: There were data inconsistencies during a high rate of page split/merge.
-
PS-9121: MySQL exited when InnoDB failed to update a spatial index.
-
PS-9151: Percona server 8.0 build failed on CentOS 7 with
-DWITH_SSL=openssl11. -
PS-9219: While converting the charset collation in a table, MySQL converted the date and time data types columns in the
.ibdfile. However, thecollation_idin the.ibdfile did not align with that of the data dictionary. -
PS-9155: The server exited during the execution of the complicated query with 9 CTEs.
-
PS-9235: Keyring vault failed to work with
binlog_rotate_encryption_master_key_at_startup.
Deprecation
- PS-8963: The
SEQUENCE_TABLE()function is deprecated and may be removed in a future release. We recommend that you usePERCONA_SEQUENCE_TABLE()instead. To maintain compatibility with existing third-party software,SEQUENCE_TABLEis no longer a reserved term and can be used as a regular identifier. Find more information in PERCONA_SEQUENCE_TABLE(n) function
Packaging notes
Percona Server for MySQL 8.4.0-1 is compatible with Ubuntu 24.04.
Additional resources
-
Install Percona Server for MySQL 8.4
-
Download product binaries, packages, and tarballs at Percona Software Downloads
-
For training, contact Percona Training - Start learning now
Features
Adaptive network buffers
To find the buffer size of the current connection, use the network_buffer_length status variable. Add SHOW GLOBAL to review the cumulative buffer sizes for all connections. This variable can help to estimate the maximum size of the network buffer’s overhead.
Network buffers grow towards the max_allowed_packet size and do not shrink until the connection is terminated. For example, if the connections are selected at random from the pool, an occasional big query eventually increases the buffers of all connections. The combination of max_allowed packet set to a value between 64MB and 128MB and the connection number between 256 and 1024 can create a large memory overhead.
Percona Server for MySQL implemented the net_buffer_shrink_interval variable to solve this issue. The default value is 0 (zero). If you set the value higher than 0, Percona Server records the network buffer’s maximum use size for the number of seconds set by net_buffer_shrink_interval. When the next interval starts, the network buffer is set to the recorded size. This action removes spikes in the buffer size.
You can achieve similar results by disconnecting and reconnecting the TCP connections, but this solution is a heavier process. This process disconnects and reconnects connections with small buffers.
net_buffer_shrink_interval
| Option | Description |
|---|---|
| Command-line: | –net-buffer-shrink-interval=# |
| Scope: | Global |
| Dynamic: | Yes |
| Data type: | integer |
| Default value: | 0 |
The interval is measured in seconds. The default value is 0, which disables the functionality. The minimum value is 0, and the maximum value is 31536000.
Audit Log Filter
Audit Log Filter overview
The Audit Log Filter component allows you to monitor, log, and block a connection or query actively executed on the selected server.
Enabling the component produces a log file that contains a record of server activity. The log file has information on connections and databases accessed by that connection.
Set audit_log_filter.format at startup to choose NEW (default), OLD, or JSON output. For new-style XML, the description in this documentation is aligned to the server from Percona Server for MySQL 8.4.8-8 onward on the 8.4 line (this docs build: 8.4.8-8)—for example audit logging on/off uses Startup / Shutdown, disconnect events use Disconnect, and the NEW formatter does not emit STATUS_CODE or fields such as VERSION, STARTUP_OPTIONS, MYSQL_VERSION, and OS_VERSION on the audit lifecycle records. See Audit Log Filter file format overview and XML (new style).
The component uses the mysql system database to store filter and user account data. Set the audit_log_filter.database variable at server startup to select a different database.
The AUDIT_ADMIN privilege is required to enable users to manage the Audit Log Filter component.
Privileges
Define the privilege at runtime at the startup of the server. The associated Audit Log Filter privilege can be unavailable if the component is not enabled.
AUDIT_ADMIN
This privilege is defined by the server and enables the user to configure the component.
AUDIT_ABORT_EXEMPT
This privilege allows queries from a user account to always be executed. An abort item does not block them. This ability lets the user account regain access to a system if an audit is misconfigured. The query is logged due to the privilege. User accounts with the SYSTEM_USER privilege have the AUDIT_ABORT_EXEMPT privilege.
Audit Log Filter tables
The Audit Log Filter component uses mysql system database tables in the InnoDB storage engine. These tables store user account data and filter data. When you start the server, change the component’s database with the audit_log_filter.database variable.
The audit_log_filter table stores the definitions of the filters and has the following column definitions:
| Column name | Description |
|---|---|
| NAME | Name of the filter |
| FILTER | Definition of the filter linked to the name as a JSON value |
The audit_log_user table stores account data and has the following column definitions:
| Column name | Description |
|---|---|
| USER | The account name of the user |
| HOST | The account name of the host |
| FILTERNAME | The account filter name |
Install the audit log filter
Installation script
The recommended way to install the component is to use the audit_log_filter_linux_install.sql script, located in the share directory, which creates the required tables before installing the component.
Prerequisites
The plugin_dir system variable defines the component library location. If needed, set the plugin_dir variable at server startup.
Database selection
The script determines the target database using the following priority:
-
If the component is already loaded, the script uses the database name from the
audit_log_filter.databasevariable -
If the component is not loaded, but you pass the
-D db_nameoption to the mysql client when running the script, it uses the specifieddb_name -
If the component is not loaded and no
-Doption is provided, you must specify themysqldatabase when running the script
You can also designate a different database with the audit_log_filter.database system variable. The database name cannot be NULL or exceed 64 characters. If the database name is invalid, the audit log filter tables are not found.
Install the component
To install the component using the script, you must specify the mysql database. You can do this in two ways:
-
Option 1: Run the script from the command line with the
-D mysqloption:mysql -u root -p -D mysql < /path/to/mysql/share/audit_log_filter_linux_install.sql -
Option 2: Connect to
mysqldatabase and run the script interactively:use mysql; source /path/to/mysql/share/audit_log_filter_linux_install.sql;Replace
/path/to/mysql/share/with the actual path to your MySQL installation’s share directory.
Verify installation
After running the script, verify that the required tables are created:
show tables in mysql like 'aud%';
Expected output
+------------------------+
| Tables_in_mysql (aud%) |
+------------------------+
| audit_log_filter |
| audit_log_user |
+------------------------+
2 rows in set (0.00 sec)
Alternative: INSTALL COMPONENT method
You can also install the component using the INSTALL COMPONENT command, but this method does not create the required tables and will cause filter operations to fail.
INSTALL COMPONENT 'file://audit_log_filter'
Verify component installation
Check that the component is properly installed:
select * from mysql.component;
Expected output
+--------------+--------------------+------------------------------------+
| component_id | component_group_id | component_urn |
+--------------+--------------------+------------------------------------+
| 1 | 1 | file://component_percona_telemetry |
| 2 | 2 | file://component_audit_log_filter |
+--------------+--------------------+------------------------------------+
2 rows in set (0.00 sec)
Test filter functionality
Test that the audit log filter is working correctly:
SELECT audit_log_filter_set_filter('log_all', '{"filter": {"log": true}}');
Expected output
+---------------------------------------------------------------------+
| audit_log_filter_set_filter('log_all', '{"filter": {"log": true}}') |
+---------------------------------------------------------------------+
| ERROR: Failed to check filtering rule name existence |
+---------------------------------------------------------------------+
1 row in set (0.00 sec)
Note
This error occurs when the component is installed without the required tables. Using the SQL script prevents this issue.
Fix missing tables
If you have already installed the audit log component but are missing the required tables, you can run the audit_log_filter_linux_install.sql script to create the audit tables in the mysql database:
mysql -u root -p -D mysql < /path/to/mysql/share/audit_log_filter_linux_install.sql
Or interactively:
use mysql;
source /path/to/mysql/share/audit_log_filter_linux_install.sql;
This operation creates the missing tables without reinstalling the component.
Additional information
To upgrade from audit_log_filter plugin in Percona Server 8.4 to component_audit_log_filter component in Percona Server 8.4, do the manual upgrade.
Review Get help from Percona for ways that we can work with you.
Formats
Audit Log Filter file format overview
When an auditable event occurs, the component writes a record to the log file.
After the component starts, the first record marks audit logging start. With audit_log_filter.format=NEW, from Percona Server for MySQL 8.4.8-8 onward on the 8.4 line (this docs build: 8.4.8-8), that record’s <NAME> is Startup and the record includes SERVER_ID and COMMAND_CLASS (among the mandatory elements). Later records cover connections, disconnections, SQL statements executed, and so on. Statements within stored procedures or triggers are not logged, only the top-level statements. See XML (new style) for the full field list.
If files are referenced by LOAD_DATA, the contents are not logged.
Set with the audit_log_filter.format system variable at startup. The available format types are the following;
| Format Type | Command | Description |
|---|---|---|
| XML (new style) | audit_log_filter.format=NEW |
The default format |
| XML (old style) | audit_log_filter.format=OLD |
The original version of the XML format |
| JSON | audit_log_filter.format=JSON |
Files written as a JSON array |
By default, the file contents in the new-style XML format are not compressed or encrypted.
Changing the audit_log_filter.format, you should also change
the audit_log_filter.file name. For example, changing the audit_log_filter.format
to JSON, change the audit_log_filter.file to audit.json. If you don’t change
the audit_log_filter.file name, then all audit log filter files have the same
base name and you won’t be able to easily find when the format changed.
Audit Log Filter format - XML (new style)
Starting with Percona Server for MySQL 8.4.8-8 on the 8.4 line, the following describes new-style XML (audit_log_filter.format=NEW) from the Audit Log Filter component: element names, typical fields, and formatter behavior were aligned to the server for that release. This documentation build targets 8.4.8-8 (bump on each publish). If you run an older 8.4 build than 8.4.8-8, verify against your own audit log in case output differs. Implementation reference: components/audit_log_filter/log_record_formatter/new.cc and base.cc.
The Audit Log Filter component can write the audit log file as new-style XML
(audit_log_filter.format=NEW). The file uses UTF-8.
The root element is <AUDIT>. It contains <AUDIT_RECORD> elements. Each
<AUDIT_RECORD> describes one audited event.
For each new file, the component writes the XML declaration and the opening
<AUDIT> tag. When the file is closed, the component writes the closing
</AUDIT> tag. If the file is still open, that closing tag is not present yet.
Element order inside <AUDIT_RECORD> is not guaranteed (the writer may
emit fields in a fixed order in practice, but consumers should not depend on it).
Timestamps use the server local time zone, in YYYY-MM-DDTHH:MM:SS
form. They do not append a UTC suffix to the timestamp string.
NEW XML behavior (from 8.4.8-8, docs 8.4.8-8)
Audit logging on/off is recorded with <NAME> values Startup and
Shutdown. The NEW formatter does not emit STATUS_CODE, and
does not write VERSION, STARTUP_OPTIONS, MYSQL_VERSION, or
OS_VERSION on the startup or shutdown audit record. Disconnect events
use the name Disconnect.
Example (illustrative)
The snippet below shows the shape of several record types. Exact sets of elements depend on the event, filters, and server configuration.
<?xml version="1.0" encoding="utf-8"?>
<AUDIT>
    <AUDIT_RECORD>
        <NAME>Startup</NAME>
        <RECORD_ID>0_2023-03-29T11:11:43</RECORD_ID>
        <TIMESTAMP>2023-03-29T11:11:43</TIMESTAMP>
        <COMMAND_CLASS>Audit</COMMAND_CLASS>
        <SERVER_ID>1</SERVER_ID>
    </AUDIT_RECORD>
    <AUDIT_RECORD>
        <NAME>Connect</NAME>
        <RECORD_ID>1_2023-03-29T11:11:44</RECORD_ID>
        <TIMESTAMP>2023-03-29T11:11:44</TIMESTAMP>
        <COMMAND_CLASS>Connection</COMMAND_CLASS>
        <CONNECTION_ID>11</CONNECTION_ID>
        <HOST>localhost</HOST>
        <IP>127.0.0.1</IP>
        <USER>root</USER>
        <OS_LOGIN></OS_LOGIN>
        <PRIV_USER>root</PRIV_USER>
        <PROXY_USER></PROXY_USER>
        <DB>test</DB>
        <STATUS>0</STATUS>
        <CONNECTION_TYPE>TCP/IP</CONNECTION_TYPE>
    </AUDIT_RECORD>
    <AUDIT_RECORD>
        <NAME>Command Start</NAME>
        <RECORD_ID>2_2023-03-29T11:11:45</RECORD_ID>
        <TIMESTAMP>2023-03-29T11:11:45</TIMESTAMP>
        <STATUS>0</STATUS>
        <CONNECTION_ID>1</CONNECTION_ID>
        <COMMAND_CLASS>query</COMMAND_CLASS>
    </AUDIT_RECORD>
    <AUDIT_RECORD>
        <NAME>Query Start</NAME>
        <RECORD_ID>3_2023-03-29T11:11:45</RECORD_ID>
        <TIMESTAMP>2023-03-29T11:11:45</TIMESTAMP>
        <STATUS>0</STATUS>
        <CONNECTION_ID>11</CONNECTION_ID>
        <COMMAND_CLASS>create_table</COMMAND_CLASS>
        <SQLTEXT>CREATE TABLE t1 (c1 INT)</SQLTEXT>
    </AUDIT_RECORD>
    <AUDIT_RECORD>
        <NAME>Query Status End</NAME>
        <RECORD_ID>4_2023-03-29T11:11:45</RECORD_ID>
        <TIMESTAMP>2023-03-29T11:11:45</TIMESTAMP>
        <STATUS>0</STATUS>
        <CONNECTION_ID>11</CONNECTION_ID>
        <COMMAND_CLASS>create_table</COMMAND_CLASS>
        <SQLTEXT>CREATE TABLE t1 (c1 INT)</SQLTEXT>
    </AUDIT_RECORD>
    <AUDIT_RECORD>
        <NAME>Command End</NAME>
        <RECORD_ID>5_2023-03-29T11:11:45</RECORD_ID>
        <TIMESTAMP>2023-03-29T11:11:45</TIMESTAMP>
        <STATUS>0</STATUS>
        <CONNECTION_ID>1</CONNECTION_ID>
        <COMMAND_CLASS>query</COMMAND_CLASS>
    </AUDIT_RECORD>
    <AUDIT_RECORD>
        <NAME>Disconnect</NAME>
        <RECORD_ID>6_2023-03-29T11:11:50</RECORD_ID>
        <TIMESTAMP>2023-03-29T11:11:50</TIMESTAMP>
        <COMMAND_CLASS>Connection</COMMAND_CLASS>
        <CONNECTION_ID>11</CONNECTION_ID>
        <HOST>localhost</HOST>
        <IP>127.0.0.1</IP>
        <USER>root</USER>
        <OS_LOGIN></OS_LOGIN>
        <PRIV_USER>root</PRIV_USER>
        <PROXY_USER></PROXY_USER>
        <DB>test</DB>
        <STATUS>0</STATUS>
        <CONNECTION_TYPE>TCP/IP</CONNECTION_TYPE>
    </AUDIT_RECORD>
    <AUDIT_RECORD>
        <NAME>Shutdown</NAME>
        <RECORD_ID>7_2023-03-29T11:12:00</RECORD_ID>
        <TIMESTAMP>2023-03-29T11:12:00</TIMESTAMP>
        <COMMAND_CLASS>Audit</COMMAND_CLASS>
        <SERVER_ID>1</SERVER_ID>
    </AUDIT_RECORD>
</AUDIT>
Query-class events (Query Start, Query Status End, nested variants, and
so on) include STATUS, CONNECTION_ID, COMMAND_CLASS (SQL
command name from the event), and often SQLTEXT (or digest text from
extended info). They do not include HOST, IP, USER, or
OS_LOGIN in NEW XML from 8.4.8-8 onward—those appear on connection
records (and on general records, which use subclasses such as Log,
Error, Result, Status, not the string Query).
Connection records use COMMAND_CLASS with the value Connection
(the event class label).
If the client supplies connection attributes and the event carries them,
CONNECTION_ATTRIBUTES holds one ATTRIBUTE per attribute, each with a
NAME and VALUE child element.
Mandatory elements
These appear on every <AUDIT_RECORD> in this format:
| Element | Description |
|---|---|
<NAME> |
Event subclass string (for example Startup, Connect, Query Start, TableRead). |
<RECORD_ID> |
Sequence number and timestamp (see audit_log_filter file handling); format SEQ_TIMESTAMP where the timestamp part matches the formatter’s timestamp string. |
<TIMESTAMP> |
Local date and time for the event. |
Optional elements (by record category)
Many elements appear only for specific event classes. The following table lists elements used by the NEW XML formatter from Percona Server for MySQL 8.4.8-8 onward for at least one event type. It is not a promise that every field appears in every record.
| Element | Description |
|---|---|
<COMMAND_CLASS> |
Meaning depends on the record: connection events use Connection; table-access events use Table Access; command events use the COM_* command text (query, and so on); query events use the SQL command name (for example select, create_table); general events use General. |
<CONNECTION_ID> |
Client connection ID. |
<CONNECTION_ATTRIBUTES> |
Nested ATTRIBUTE elements, each with NAME and VALUE. Omitted if there are no attributes. |
<CONNECTION_TYPE> |
Connection security / transport (for example TCP/IP, SSL, Socket). |
<STATUS> |
Status code for the event (for Query / Command / connection records, 0 success and non-zero for failure where applicable). |
<SQLTEXT> |
Statement or digest text when the event carries SQL text. |
<HOST>, <IP>, <USER> |
Client context on connection and general records (and on authentication records where applicable). Not emitted on Query Start / Query Status End style records in NEW XML. |
<OS_LOGIN> |
External user from authentication (external_user); on connection records from 8.4.8-8 onward (documented behavior). |
<PRIV_USER>, <PROXY_USER>, <DB> |
Included on connection records (including disconnect) from 8.4.8-8 onward (documented behavior). |
<SERVER_ID> |
On Startup, Shutdown, and similar audit records. |
<DB>, <TABLE> |
Database and table name on table-access records (TableRead, TableInsert, …). |
<VARIABLE_NAME>, <VARIABLE_VALUE> |
Global variable audit events. |
<STORED_PROGRAM> |
Stored program events (DB also appears). |
<FLAGS>, <REWRITTEN_QUERY> |
Parse events (SQLTEXT may appear). |
<COMPONENT>, <PRODUCER>, <MESSAGE>, <MESSAGE_ATTRIBUTES> |
Message events (attributes use the same ATTRIBUTE / NAME / VALUE pattern as connection attributes). |
Characters such as <, >, &, and " in element text are XML-escaped by
the component. Very long values may be truncated according to server-side
limits.
Audit Log Filter format - XML (old style)
The old style XML format uses <AUDIT> tag as the root element and adds the </AUDIT> tag when the file closes. Each audited event is contained in an <AUDIT_RECORD> element.
The order of the attributes within an <AUDIT_RECORD> can vary. Certain attributes are in every element. Other attributes are optional and depend on the type of audit record.
<?xml version="1.0" encoding="utf-8"?>
<AUDIT>
  <AUDIT_RECORD
    NAME="Audit"
    RECORD_ID="0_2023-03-29T11:15:52"
    TIMESTAMP="2023-03-29T11:15:52"
    SERVER_ID="1"/>
  <AUDIT_RECORD
    NAME="Command Start"
    RECORD_ID="1_2023-03-29T11:15:53"
    TIMESTAMP="2023-03-29T11:15:53"
    STATUS="0"
    CONNECTION_ID="1"
    COMMAND_CLASS="query"/>
  <AUDIT_RECORD
    NAME="Query"
    RECORD_ID="2_2023-03-29T11:15:53"
    TIMESTAMP="2023-03-29T11:15:53"
    COMMAND_CLASS="create_table"
    CONNECTION_ID="11"
    HOST="localhost"
    IP=""
    USER="root[root] @ localhost []"
    OS_LOGIN=""
    SQLTEXT="CREATE TABLE t1 (c1 INT)"
    STATUS="0"/>
  <AUDIT_RECORD
    NAME="Query Start"
    RECORD_ID="3_2023-03-29T11:15:53"
    TIMESTAMP="2023-03-29T11:15:53"
    STATUS="0"
    CONNECTION_ID="11"
    COMMAND_CLASS="create_table"
    SQLTEXT="CREATE TABLE t1 (c1 INT)"/>
  <AUDIT_RECORD
    NAME="Query Status End"
    RECORD_ID="4_2023-03-29T11:15:53"
    TIMESTAMP="2023-03-29T11:15:53"
    STATUS="0"
    CONNECTION_ID="11"
    COMMAND_CLASS="create_table"
    SQLTEXT="CREATE TABLE t1 (c1 INT)"/>
  <AUDIT_RECORD
    NAME="Query"
    RECORD_ID="5_2023-03-29T11:15:53"
    TIMESTAMP="2023-03-29T11:15:53"
    COMMAND_CLASS="create_table"
    CONNECTION_ID="11"
    HOST="localhost"
    IP=""
    USER="root[root] @ localhost []"
    OS_LOGIN=""
    SQLTEXT="CREATE TABLE t1 (c1 INT)"
    STATUS="0"/>
  <AUDIT_RECORD
    NAME="Command End"
    RECORD_ID="6_2023-03-29T11:15:53"
    TIMESTAMP="2023-03-29T11:15:53"
    STATUS="0"
    CONNECTION_ID="1"
    COMMAND_CLASS="query"/>
</AUDIT>
The required attributes are the following:
Attribute Name |
Description |
|---|---|
| NAME | The action that generated the audit record. |
| RECORD_ID | The RECORD_ID consists of a sequence number and a timestamp value. The sequence number is initialized when the component opens the audit log filter file. |
| TIMESTAMP | Displays the date and time when the audit event happened. |
The optional attributes are the following:
Attribute Name |
Description |
|---|---|
| COMMAND_CLASS |
Type of action performed |
| CONNECTION_ID | Client connection identifier |
| CONNECTION_TYPE | Connection security type |
| DB | Database name |
| HOST | Client's hostname |
| IP | Client's IP address |
| MYSQL_VERSION | Server version |
| OS_LOGIN | The user name used during an external authentication, for example, if the user is authenticated through an LDAP component. If the authentication component does not set a value or the user is authenticated using MySQL authentication, this value is empty. |
| OS_VERSION | Server's operating system |
| PRIV_USER | The user name used by the server when checking privileges. This name may be different than USER. |
| PROXY_USER | The proxy user. If a proxy is not used, the value is empty. |
| SERVER_ID | Server Identifier |
| SQLTEXT | SQL statement text |
| STARTUP_OPTIONS | Server startup options, either command line or config files |
| STATUS | Command's status - a 0 (zero) is a success, a non-zero is an error |
| STATUS_CODE | A 0 (zero) is a success, a non-zero is an error |
| TABLE | Table name |
| USER | Client's user name - this name may be different than PRIV_USER. |
| VERSION | Format of audit log filter |
Audit Log Filter format - JSON
The JSON format has one top-level JSON array, which contain JSON objects with key-value pairs. These objects represent an event in the audit. Some pairs are listed in every audit record. The audit record type determines if other key-value pairs are listed. The order of the pairs within an audit record is not guaranteed. The value description may be truncated.
Certain statistics, such as query time and size, are only available in the JSON format and help detect activity outliers when analyzed.
[
  {
    "timestamp": "2023-03-29 11:17:03",
    "id": 0,
    "class": "audit",
    "server_id": 1
  },
  {
    "timestamp": "2023-03-29 11:17:05",
    "id": 1,
    "class": "command",
    "event": "command_start",
    "connection_id": 1,
    "command_data": {
      "name": "command_start",
      "status": 0,
      "command": "query"}
  },
  {
    "timestamp": "2025-03-29 11:17:05",
    "id": 332,
    "class": "general",
    "event": "log",
    "connection_id": 11,
    "account": { "user": "root[root] @ localhost []", "host": "localhost" },
    "login": { "user": "root[root] @ localhost []", "os": "", "ip": "", "proxy": "" },
    "general_data": { "status": 0 }
  },
  {
    "timestamp": "2023-03-29 11:17:05",
    "id": 3,
    "class": "query",
    "event": "query_start",
    "connection_id": 11,
    "query_data": {
      "query": "CREATE TABLE t1 (c1 INT)",
      "status": 0,
      "sql_command": "create_table"}
  },
  {
    "timestamp": "2023-03-29 11:17:05",
    "id": 4,
    "class": "query",
    "event": "query_status_end",
    "connection_id": 11,
    "query_data": {
      "query": "CREATE TABLE t1 (c1 INT)",
      "status": 0,
      "sql_command": "create_table"}
  },
  {
    "timestamp": "2023-03-29 11:17:05",
    "id": 5,
    "class": "general",
    "event": "status",
    "connection_id": 11,
    "account": { "user": "root[root] @ localhost []", "host": "localhost" },
    "login": { "user": "root[root] @ localhost []", "os": "", "ip": "", "proxy": "" },
    "general_data": {
      "command": "Query",
      "sql_command": "create_table",
      "query": "CREATE TABLE t1 (c1 INT)",
      "status": 0}
  },
  {
    "timestamp": "2023-03-29 11:17:05",
    "id": 6,
    "class": "command",
    "event": "command_end",
    "connection_id": 1,
    "command_data": {
      "name": "command_end",
      "status": 0,
      "command": "query"}
  }
]
The following fields are contained in each object:
timestampidclassevent
The possible attributes in a JSON object are the following:
| Name | Description |
|---|---|
class |
Defines the type of event |
account |
Defines the MySQL account associated with the event. |
connection_data |
Defines the client connection. |
connection_id |
Defines the client connection identifier |
event |
Defines a subclass of the event class |
general_data |
Defines the executed statement or command when the audit record has a class value of general. |
id |
Defines the event ID |
login |
Defines how the client connected to the server |
query_statistics |
Defines optional query statistics and is used for outlier detection |
shutdown_data |
Defines the audit log filter termination |
startup_data |
Defines the initialization of the audit log filter component |
table_access_data |
Defines access to a table |
time |
Defines an integer that represents a UNIX timestamp |
timestamp |
Defines a UTC value in the YYYY-MM_DD hh:mm:ss format |
Write audit_log_filter definitons
When you’re setting up audit log filters in Percona Server for MySQL, you use JSON values to define those filters. At their core, a filter is just a JSON object with a very simple structure.
| Benefit | Description |
|---|---|
| Reduced Log Volume and Storage | By defining specific rules for what events to log (inclusive filters), you significantly reduce the amount of data written to the audit log. This minimizes log file size, reduces storage requirements, and lowers maintenance overhead. |
| Improved Performance | Smaller log files lead to faster log rotations and less disk I/O, which can improve overall server performance. Reducing log volume also decreases the impact of auditing on the database server itself. |
| Enhanced Security Focus | Instead of logging every single event (which can be overwhelming), you can focus on the most critical events. For example, you can prioritize logging events related to: * Sensitive data access: Log queries that access or modify critical tables. * User account activity: Monitor user logins, password changes, and privilege grants. * DML operations: Log INSERT, UPDATE, and DELETE statements on specific tables. * DDL operations: Log schema changes like CREATE TABLE, ALTER TABLE, and DROP TABLE. |
| Simplified Log Analysis | By filtering out irrelevant events, you make it easier to analyze and investigate security incidents or performance issues. You can quickly identify and focus on the most important events in the audit log. |
| Compliance | Many compliance regulations (for example, PCI DSS, HIPAA) require organizations to audit database activity. Well-defined audit log filters help you meet these compliance requirements by ensuring that the necessary events are being logged. |
| Resource Optimization | By minimizing log volume and optimizing the auditing process, you can conserve valuable system resources, such as CPU, memory, and disk space. |
Basic structure
The following is an example of the basic structure of a filter.
{
  "filter": {
    "class": [
      {
        "name": "class_type",
        "option1": ["value1", "value2"],
        "option2": ["value3"]
      }
    ]
  }
}
The filter is the root key in the configuration, which tells the system that you’re setting up a filter for capturing or excluding specific events. Inside the filter, there’s a key called class, which holds an array of different filter definitions. Each object in that array represents a specific rule for filtering events based on certain conditions.
Inside each filter object, you’ll have a few essential parts: The name is where you define the event class you’re targeting, like connection or table_access. This name tells the filter what type of event you want to track. For example, class_type is just a placeholder name for any event class you can filter.
Then, you have option1, which specifies additional filtering criteria. This criteria could be specific users, actions, or other event properties. For example, if you have [“value1”, “value2”] in option1, the filter will include events that match either value1 or value2. The filter also includes option2, which is another set of filtering criteria. It works similarly to option1 but focuses on a different property. So if option2 has [“value3”], it will capture events that match value3.
Practical example
The following code is an example of a filter:
{
  "filter": {
    "class": [
      {
        "name": "connection",
        "user": ["admin", "developer"],
        "host": ["192.168.0.1"]
      }
    ]
  }
}
This filter targets the connection class. It matches connections made by users admin or developer from the host 192.168.0.1. Events meeting these criteria would be logged or processed.
Log all events
You can enable or disable logging for all events in Percona Server for MySQL using an audit log filter definition.
To start, you can explicitly enable or disable logging for all events by adding a log item to your filter like the following example:
{
  "filter": { "log": true }
}
Setting log: true means all events are logged. If you want to turn logging off completely, set the value to false.
You can also leave the log item out, like this example:
{
  "filter": { }
}
This setting works the same as log: true and logs all events by default.
Now, let’s break down how logging behaves depending on whether the log item is included or not:
| Option | Details |
|---|---|
| When you include the log item | The value you set (true or false) determines if events are logged. |
| When you don’t include the log item | If no class or event items are specified, logging is enabled by default. |
However, if you define specific class or event items, they can have their own log settings to control logging for just those events.
Log specific event classes
If you want to log specific types of activities, such as connection-related events, you can define class item in your filter.
For example, to log events in the “connection” class, your filter might look like this example.
{
  "filter": {
    "class": { "name": "connection" }
  }
}
In the example, the outermost element is “filter”, which represents the audit log filter you’re defining. Everything within this key specifies what you want to track in the audit logs.
Inside “filter”, you have a “class” element. This tells the server the general category of events you’re interested in. In this example, “class” is set to { “name”: “connection” }. The “name” key within the “class” specifies the type of events within the connection category that should be logged. By using “connection”, you’re instructing the server to monitor connection-related events, such as when users connect to or disconnect from the database.
This structure makes it easy to focus your logging on specific areas of activity in the server, helping you capture only the data you need without cluttering your logs with unnecessary details.
The following filter definition does the same thing, but explicitly states that no other logging is filtered.
{
  "filter": {
    "log": false,
    "class": {
      "log": true,
      "name": "connection"
    }
  }
}
Log multiple classes or events
To log multiple classes at the same time, you have two options.
Both filters achieve the same goal: they define an audit log filter to log events related to “connection”, “general”, and “table_access”. These examples only differ in how the event classes are listed.
It’s a comprehensive configuration for monitoring activities at the connection level, general server operations, and specific table interactions. This setup is useful for administrators who want broad visibility into user activity and server behavior.
A list
A list is useful when you want to expand the filter later to include more granular settings for each class.
{
  "filter": {
    "class": [
      { "name": "connection" },
      { "name": "general" },
      { "name": "table_access" }
    ]
  }
}
An array
To simplify, when you have multiple items, you can combine their values into a single array:
{
  "filter": {
    "class": [
      { "name": [ "connection", "general", "table_access" ] }
    ]
  }
}
List of event and subclass options
The table shows the available event classes and their subclasses:
| Class name | Event subclass | Details |
|---|---|---|
connection |
connect |
Tracks when a connection is initiated (successful or not) |
connection |
change_user |
Tracks when a user changes during a session |
connection |
disconnect |
Tracks when a connection is terminated |
general |
status |
Tracks the status of general server operations (for example, query success or failure) |
general |
command |
Logs SQL commands issued to the server |
table_access |
read |
Logs read statements, like SELECT or INSERT INTO … SELECT |
table_access |
delete |
Logs delete statements, like DELETE or TRUNCATE TABLE |
table_access |
insert |
Logs insert statements, like INSERT or REPLACE |
table_access |
update |
Logs update statements, like UPDATE |
This setup gives you the flexibility to monitor the exact events that are important to you while controlling logging behavior in a detailed way.
Inclusive filters
Inclusive filters capture specific database events you want to log. They allow you to precisely target and record only the actions you care about.
Basic Structure
An inclusive filter uses a JSON configuration that defines which events to include in your audit logging. The filter specifies:
-
What type of events to capture
-
Which users to track
-
What specific actions to log
Common use cases for inclusive filters include security audits, compliance tracking, performance monitoring, and user behavior analysis.
Event tracking can be more precise, which helps reduce unnecessary log noise. By focusing on the specific events that matter, you can enhance security monitoring and ensure that only the most relevant data is logged. This approach not only improves the clarity of your logs but also helps optimize performance by limiting the number of events being recorded, reducing overhead and making it easier to manage the system.
It’s important to consider the performance impact of logging and how it might affect your server. Before deploying your filters in a production environment, test them thoroughly to ensure everything works as expected.
Inclusive filter example
This filter is useful for monitoring and auditing database changes made by administrative users, particularly to ensure that updates and deletions are tracked.
{
  "filter": {
    "class": [
      {
        "name": "table_access",
        "event": [
          { "name": "update"},
          { "name": "delete"}
        ]
      }
    ]
  }
}
This filter does one thing: log all update and delete operations performed by admin users. The filter uses the following components:
-
“class”: The top-level key specifies that the filter applies to the
table_accessclass. This class monitors events related to database table interactions. -
“name”: “table_access”: This defines the event class you want to track. This class captures interactions with database tables, such as read, insert, update, and delete modifications. Specifies the specific class of events
-
user: [“admin”]: This specifies that the filter applies only to events performed by the admin user and restricts the filter to only log actions executed by this user.
-
event: [“update”, “delete”]: This narrows down the filter to track only specific actions. In this case, the filter captures update and delete modifications. Any SELECT (read) or INSERT modifications on tables will not be logged, as they are excluded by this filter.
Inclusive filters give you granular control over your MySQL audit logging, allowing you to capture exactly the information you need without overwhelming your logging system.
Exclusive filters
Exclusive filters in the audit_log_filter for Percona Server for MySQL let you exclude certain activities from being logged, helping you reduce log size and focus on what matters most. For example, you can filter out routine operations like health checks or background processes to avoid unnecessary clutter in your logs.
This example defines a filter that excludes (negate: true) all table access events (“table_access”) by the user “readonly_user”. Events for other users or other classes of activity are still being logged unless additional filters are defined.
{
  "filter": {
    "class": [
      {
        "name": "table_access",
        "user": ["readonly_user"],
        "negate": true
      }
    ]
  }
}
Exclusive filter example
{
  "filter": {
    "class": [
      {
        "name": "table_access",
        "user": ["admin", "developer"],
        "database": ["financial"],
        "event": [
          {"name":"update"},
          {"name":"delete"}
        ],
        "status": [1]
      },
      {
        "name": "connection",
        "user": ["external_service"],
        "status": [0]
      }
    ]
  }
}
Filter definition
In the filter definitions shown in this example, status values are displayed as integers for readability, but they must be specified as strings in your actual filter definitions (for example, "status": ["0"] or "status": ["1"]). The audit log filter does not filter on integer values, only on string values. This applies to all numeric filter criteria, including connection_id, thread_id, and status. If you use integer values, you will see the error: ERROR: Incorrect rule definition.
This filter captures failed update/delete modifications by admin and developer users in the financial database and successful connections for the external_service user
Best practices
Following a systematic approach helps ensure successful deployment and maintenance when implementing audit log filters. Start by creating broad, inclusive filters that capture a wide range of events, giving you a comprehensive view of your database activity. For example, you might begin by logging all actions from administrative users or all changes on critical databases. As you analyze the captured data, you can refine these filters to focus on specific events, users, or changes that matter most to your organization.
Testing is crucial before deploying filters in production. Set up a non-production environment that mirrors your production setup as closely as possible. This non-production environment allows you to verify that your filters capture the intended events without missing critical information. During testing, pay particular attention to how different filter combinations interact and ensure they don’t create any unexpected gaps in your audit coverage.
Log file management requires careful attention. Audit logs can grow rapidly, especially with detailed filtering configurations. Monitor your log file sizes regularly and implement appropriate rotation policies. Consider storage capacity, retention requirements, and system performance when determining how much detail to include in your logs. It’s often helpful to calculate expected log growth based on your typical database activity and adjust your rotation policies accordingly.
Performance impact is a critical consideration when implementing detailed logging. More granular filters typically require more system resources to process and store the audit data. Monitor your system’s performance metrics while testing different filter configurations. Look for significant changes in query response times, CPU usage, or I/O operations. If you notice performance degradation, consider adjusting your filters to balance capturing necessary audit data and maintaining acceptable system performance. Remember that starting with less detailed logging is often better and gradually increasing it as needed, rather than implementing overly aggressive logging that impacts system performance.
Implement the filter
Here’s how to define and implement an audit log filter in Percona Server for MySQL 8.4.6:
Create a filter
To create an audit log filter, use the audit_log_filter_set_filter() function. This function takes two parameters: the filter name and the filter definition as a JSON string.
SELECT audit_log_filter_set_filter('log_all', '{ "filter": { "log": true } }');
Assign filter to users
To assign a filter to specific users, use the audit_log_filter_set_user() function. This function takes three parameters: username, userhost, and filtername.
SELECT audit_log_filter_set_user('%', 'log_all');
Example: Financial tracking filter
Here’s a complete example of creating and assigning a comprehensive financial tracking filter:
-- Create the filter
SELECT audit_log_filter_set_filter('financial_tracking', '{
  "filter": {
    "class": [
      {
        "name": "table_access",
        "user": ["admin", "finance_team"],
        "database": ["financial_db"],
        "table": ["accounts", "transactions"],
        "event": [
          {"name":"insert"},
          {"name":"update"},
          {"name":"delete"],
        ],
        "status": [0, 1]
      },
      {
        "name": "connection",
        "user": ["admin", "finance_team"],
        "event": [
          {"name":"connect"},
          {"name":"disconnect"}
        ],
        "status": [0, 1]
      }
    ]
  }
}');
Filter definition
In the filter definition shown in this example, status values are displayed as integers ([0, 1]) for readability, but they must be specified as strings in your actual filter definitions (for example, "status": ["0", "1"]). The audit log filter does not filter on integer values, only on string values. This applies to all numeric filter criteria, including connection_id, thread_id, and status. If you use integer values, you will see the error: ERROR: Incorrect rule definition.
-- Assign the filter to all users
SELECT audit_log_filter_set_user('%', '%', 'financial_tracking');
The filter monitors two main types of activities. First, it watches all changes to your accounts and transactions tables. This monitoring means that the filter logs when someone adds new data, changes existing information, or removes records. You get a complete picture of who’s touching your financial data and what they do with it.
The filter tracks both successes and failures. This tracking gives you valuable information about attempted changes that didn’t work out, which is helpful for troubleshooting and security monitoring.
Here’s what gets logged:
-
Every insert, update, and delete action on your financial tables
-
All connection attempts from your admin and finance teams, including when they log in and out
-
Whether each action has succeeded (status 0) or failed (status 1)
The filter focuses only on activity in your financial_db database. This targeted approach makes it easier to find the information you need when you need it.
Tracking all these elements gives you a comprehensive view of who’s accessing your financial data, what changes they’re making, and whether those changes are successful. This ability is beneficial for security monitoring and compliance requirements.
To verify your filter, you can check the audit tables:
-- Check created filters
SELECT * FROM mysql.audit_log_filter;

-- Check user assignments
SELECT * FROM mysql.audit_log_user;
You can examine your audit log file (the default location is the data directory) to check if events are being logged.
Audit Log Filter security
The Audit Log Filter component generates audit log filter files. The directory that contains these files should be accessible only to the following:
-
Users who must be able to view the log
-
Server must be able to write to the directory
The files are not encrypted by default and may contain sensitive information.
The default name for the file in the data directory is audit_filter.log. If needed, use the audit_log_filter.file system variable at server startup to change the location. Due to the log rotation, multiple audit log files may exist.
Audit Log Filter compression and encryption
Compression
You can enable compression for any format by setting the audit_log_filter.compression system variable when the server starts.
The audit_log_filter.compression variable can be either of the following:
- NONE (no compression) - the default value
- GZIP - uses the GNU Zip compression
If compression and encryption are enabled, the component applies compression before encryption. If you must manually recover a file with both settings, first decrypt the file and then uncompress the file.
Encryption
You can encrypt any audit log filter file in any format. The audit log filter component generates the initial password, but you can use user-defined passwords after that. The component stores the passwords in the keyring, so that feature must be enabled.
Set the audit_log_filter.encryption system variable with the server starts. The allowed values are the following:
- NONE - no encryption, the default value
- AES - AES-256-CBC (Cipher Block Chaining) encryption
The AES uses the 256-bit key size.
The following audit log filter functions are used with encryption:
| Function name | Description |
|---|---|
| audit_log_encryption_password_set() | Stores the password in the keyring. If encryption is enabled, the function also rotates the log file by renaming the current log file and creating a log file encrypted with the password. |
| audit_log_encryption_password_get() | Invoking this function without an argument returns the current encryption password. An argument that specifies the keyring ID of an archived password or current password returns that password by ID. |
The audit_log_filter.password_history_keep_days variable is used with encryption. If the variable is not zero (0), invoking audit_log_encryption_password_set() causes the expiration of archived audit log passwords.
When the component starts with encryption enabled, the component checks if the keyring has an audit log filter encryption password. If no password is found, the component generates a random password and stores this password in the keyring. Use audit_log_encryption_password_get() to review this password.
If compression and encryption are enabled, the component applies compression before encryption. If you must manually recover a file with both settings, first decrypt the file and then uncompress the file.
Manually uncompressing and decrypting audit log filter files
To decrypt an encrypted log file, use the openssl command. For example:
openssl enc -d -aes-256-cbc -pass pass:password
    -iter iterations -md sha256
    -in audit.timestamp.log.pwd_id.enc
    -out audit.timestamp.log
To execute that command, you must obtain a password and iterations. To do this, use audit_log_encryption_password_get().
This function gets the encryption password, and the iterations count and returns this data as a JSON-encoded string. For example, if the audit log file name is audit.20190415T151322.log.20190414T223342-2.enc, the password ID is {randomly-generated-alphanumeric-string} and the keyring ID is audit-log-20190414T223342-2.
Get the keyring password:
SELECT audit_log_encryption_password_get('audit-log-20190414T223342-2');
The return value of this function may look like the following:
Expected output
{"password":"{randomly-generated-alphanumeric-string}","iterations":568977}
Reading Audit Log Filter files
The Audit Log Filter functions can provide a SQL interface to read JSON-format audit log files. The functions cannot read log files in other formats. Configuring the component for JSON logging lets the functions use the directory that contains the current audit log filter file and search in that location for readable files. The value of the audit_log_filter.file system variable provides the file location, base name, and the suffix and then searches for names that match the pattern.
If the file is renamed and no longer fits the pattern, the file is ignored.
Functions used for reading the files
The following functions read the files in the JSON-format:
-
audit_log_read- reads audit log filter events -
audit_log_read_bookmark- for the most recently read event, returns a bookmark. This bookmark can be passed toaudit_log_read().
Initialize a read sequence by using a bookmark or an argument that specifies the start position:
SELECT audit_log_read(audit_log_read_bookmark());
The following example continues reading from the current position:
SELECT audit_log_read();
Reading a file is closed when the session ends or calling audit_log_read() with another argument.
Manage the Audit Log Filter files
The Audit Log Filter files have the following potential results:
- Consume a large amount of disk space
- Grow large
You can manage the space by using log file rotation. This operation renames and then rotates the current log file and then uses the original name on a new current log file. You can rotate the file either manually or automatically.
If automatic rotation is enabled, you can prune the log file. This pruning operation can be based on either the log file age or combined log file size.
Manual log rotation
The default setting for audit_log_filter.rotate_on_size is 1GB. If this option is set to 0, the audit log filter component does not do an automatic rotation of the log file. You must do the rotation manually with this setting.
The SELECT audit_log_rotate() command renames the file and creates a new audit log filter file with the original name. You must have the AUDIT_ADMIN privilege.
The files are pruned if either audit_log_filter.max_size or audit_log_filter.prune_seconds have a value greater than 0 (zero) and audit_log_filter.rotate_on_size > 0.
After the files have been renamed, you must manually remove any archived audit log filter files. The renamed audit log filter files can be read by audit_log_read(). The audit_log_read() does not find the logs if the name pattern differs from the current pattern.
Filter the Audit Log Filter logs
The audit filter log filtering is based on rules. The filter rule definition has the ability to include or exclude events based on the following attributes:
- User account
- Audit event class
- Audit event subclass
- Audit event fields (for example,
COMMAND_CLASSorSTATUS)
From Percona Server for MySQL 8.4.8-8: The NEW XML formatter (audit_log_filter.format=NEW) behavior described here—including which <NAME> strings and child elements appear in each <AUDIT_RECORD>—was verified for that release on the 8.4 line. This documentation build is 8.4.8-8. If your server predates 8.4.8-8, or you use a build whose audit code differs, compare against a real log from your server.
When you inspect new-style XML logs for that line of releases, expect values such as Startup, Shutdown, Disconnect, Query Start, Query Status End, and Connection as the COMMAND_CLASS on connect and disconnect. For the full field list per event type, see XML (new style).
You can define multiple filters and assign any filter to multiple accounts. You can also create a default filter for specific user accounts. The filters are defined using function calls. After the filter is defined, the filter is stored in mysql system tables.
Audit Log Filter functions
The Audit Log filter functions require AUDIT_ADMIN or SUPER privilege.
The following functions are used for rule-based filtering:
| Function | Description | Example |
|---|---|---|
| audit_log_filter_flush() | Manually flush the filter tables | SELECT audit_log_filter_flush() |
| audit_log_filter_set_filter() | Defines a filter | SELECT audit_log_filter_set_filter('log_connections','{ "filter":{}}'’) |
| audit_log_filter_remove_filter() | Removes a filter | |
| audit_log_filter_set_user() | Assigns a filter to a specific user account | |
| audit_log_filter_remove_user() | Removes the filters from a specific user account |
Using a SQL interface, you can define, display, or modify audit log filters. The filters are stored in the mysql system database.
The audit_log_session_filter_id() function returns the internal ID of the audit log filter in the current session.
Filter definitions are JSON values.
The function, audit_log_filter_flush(), forces reloading all filters and should only be invoked when modifying the audit tables. This function affects all users. Users in current sessions must either execute change-user or disconnect and reconnect.
Constraints
The component_audit_log_filter component must be enabled and the audit tables must exist to use the audit log filter functions. The user account must have the required privileges.
Using the audit log filter functions
With a new connection, the audit log filter component finds the user account name in the filter assignments. If a filter has been assigned, the component uses that filter. If no filter has been assigned, but there is a default account filter, the component uses that filter. If there is no filter assigned, and there is no default account filter, then the component does not process any event.
The default account is represented by % as the account name.
You can assign filters to a specific user account or disassociate a user account from a filter. To disassociate a user account, either unassign a filter or assign a different filter. If you remove a filter, that filter is unassigned from all users, including current users in current sessions.
set_filter options and available filters
| Filter | Available options |
|---|---|
| class Filter | general: Logs general server events |
connection: Tracks connection-related activities |
|
table_access: Monitors database table interactions |
|
| user Filter | Accepts specific usernames as filter criteria |
| Can include multiple usernames | |
| Supports wildcard matching | |
| database Filter | Filters events by database name |
| Accepts exact database names | |
| Supports wildcard matching for database selection | |
| table Filter | Specifies individual table names |
| Allows filtering for specific tables within databases | |
| Supports wildcard matching | |
| operation Filter | read: SELECT statements |
write: INSERT, UPDATE, DELETE statements |
|
ddl: Data Definition Language operations |
|
dcl: Data Control Language operations |
|
| event Filter | status: Tracks query execution status |
query: Captures query details |
|
connection: Monitors connection events |
|
| status Filter | 0: Successful operations |
1: Failed operations |
Filter definition
Status values must be specified as strings (for example, "0", "1"). The audit log filter does not filter on integer values, only on string values. If you use integer values, you will see the error: ERROR: Incorrect rule definition.
Examples
Create simple filters
SELECT audit_log_filter_set_filter('log_general', '{
  "filter": {
    "class": {
      "name": "general"
    }
  }
}');

SELECT audit_log_filter_set_filter('log_connection', '{
  "filter": {
    "class": {
      "name": "connection"
    }
  }
}');

SELECT audit_log_filter_set_filter('log_table_access', '{
  "filter": {
    "class": {
      "name": "table_access"
    }
  }
}');

SELECT audit_log_filter_set_filter('log_global_variable', '{
  "filter": {
    "class": {
      "name": "global_variable"
    }
  }
}');

SELECT audit_log_filter_set_filter('log_command', '{
  "filter": {
    "class": {
      "name": "command"
    }
  }
}');

SELECT audit_log_filter_set_filter('log_query', '{
  "filter": {
    "class": {
      "name": "query"
    }
  }
}');

SELECT audit_log_filter_set_filter('log_stored_program', '{
  "filter": {
    "class": {
      "name": "stored_program"
    }
  }
}');

SELECT audit_log_filter_set_filter('log_authentication', '{
  "filter": {
    "class": {
      "name": "authentication"
    }
  }
}');

SELECT audit_log_filter_set_filter('log_message', '{
  "filter": {
    "class": {
      "name": "message"
    }
  }
}');
Add filter_update_on_user_change.
SELECT audit_log_filter_set_filter('log_connect', '{
  "filter": {
    "class": { "name": "connection" },
    "event": { "name": "connect" }
  }
}');

SELECT audit_log_filter_set_filter('log_disconnect', '{
  "filter": {
    "class": { "name": "connection" },
    "event": { "name": "disconnect" }
  }
}');
| Option | Filters | Example | Event |
|---|---|---|---|
| class | general, connection, table_access | N/A | General: Server-wide events, query processing connection: Login, logout, connection attempts table_access: Database and table-level interactions |
| user | Filters by MySQL user accounts | [“admin”, “readonly_user”] | All actions performed by specified users |
| database | Filters by database name | [“sales”, “inventory”] | Operations within specified databases |
| table | Filters by table name | [“customers”, “orders”] | Interactions with specific tables |
| operation | For table_access: read, insert, update, delete For connection: connect, disconnect |
N/A | Specific types of database operations |
| status | 0: Successful queries 1: Failed queries |
N/A | Query execution result filtering |
| thread_id | Filters by specific MySQL thread identifiers | [“12345”, “67890”] | Actions within a particular database thread |
| query_time | Filters based on query execution duration | N/A | Long-running or quick queries |
Filter definition
Status, thread ID, and connection ID values must be specified as strings (for example, "0", "1", "12345"). The audit log filter does not filter on integer values, only on string values. If you use integer values, you will see the error: ERROR: Incorrect rule definition.
Audit Log Filter restrictions
General restrictions
The Audit Log Filter has the following general restrictions:
-
Log only SQL statements. Statements made by NoSQL APIs, such as the Memcached API, are not logged.
-
Log only the top-level statement. Statements within a stored procedure or a trigger are not logged. Do not log the file contents for statements like
LOAD_DATA. -
Require the component to be installed on each server used to execute SQL on the cluster if used with a cluster.
-
Hold the application or user responsible for aggregating all the data from each server used in the cluster if used with a cluster.
-
Each server must have its own audit log filter rules. If you do not set up the rules on the replica server, that server does not record the corresponding entries in the audit log. This design requires that the audit log configuration be performed separately for each server.
As by default the content of the mysql.audit_log_filter and mysql.audit_log_user tables may be replicated from source to replica and may affect audit log rules created on the replica, it is recommended to configure replication in such a way that the changes in these tables are simply ignored.
Please notice that just changing the content of these tables (via replication channel) is not enough to automatically make changes to in-memory data structures in the audit_log_filter component that store information about active audit log filtering rules. However, this may happen after component reloading / server restart or manually calling audit_log_filter_flush().
- Filter only on string values. The audit log filter does not filter on integer values. All filter criteria must be specified as strings, even when the underlying value is numeric. For example,
connection_idvalues must be specified as strings (for example,"123"rather than123), and status values must be specified as"0"or"1"rather than0or1. If you use integer values in your filter definition, you will see the error:ERROR: Incorrect rule definition.
Synchronizing audit log filters between source and replica
You can keep audit log filter definitions in sync between a source and a replica by replicating the filter tables and periodically calling audit_log_filter_flush() on the replica. That reloads the filter tables and makes the replicated changes effective on the replica.
Procedure: MySQL event to flush filters on the replica
-
Install MySQL on the source with the audit log filter component.
-
Create a replica from a source backup.
-
Create a MySQL event on the replica that runs every minute:
USE mysql;
CREATE EVENT auditflush
    ON SCHEDULE EVERY 1 MINUTE
    COMMENT 'Flush audit log filters every minute'
    DO
      SELECT audit_log_filter_flush();
This event runs
audit_log_filter_flush()every minute on the replica, so replicated changes to the filter tables become effective shortly after they are applied. -
Create a filter on the source and assign the filter to a user using the usual filter functions or by modifying the filter tables and calling
audit_log_filter_flush()on the source. -
After a minute, check that the filter is available on the replica. Run some queries on the replica as that user and confirm that the expected messages appear in the audit log file.
If the filter is not yet visible or the audit log does not show the expected entries, wait for the next event run (within a minute) or run SELECT audit_log_filter_flush(); on the replica to refresh the filter tables immediately; also confirm that replication has applied the changes to the filter tables and that the event is enabled. If the filter or expected log entries still do not appear, the cause may be a problem in replication between source and replica; troubleshooting replication may help.
Another possible scenario is that the source and replica are set up and replication is working, but the audit log component is not installed on either the source or the replica. In that case, install the audit log component on both the source and the replica separately.
Limitation
If a user modifies the filter tables directly on the source (for example, with INSERT, UPDATE, or DELETE) but does not run audit_log_filter_flush() on the source, the table changes will be replicated to the replica and the event will run audit_log_filter_flush() there, so the filters become effective on the replica. The filters will then work correctly on the replica but will not be effective on the source until audit_log_filter_flush() is run on the source.
Audit Log Filter file naming conventions
Name qualities
The audit log filter file name has the following qualities:
- Optional directory name
- Base name
- Optional suffix
Using either compression or encryption adds the following suffixes:
- Compression adds the
.gzsuffix - Encryption adds the
pwd_id.encsuffix
The pwd_id represents the password used for encrypting the log files. The audit log filter component stores passwords in the keyring.
You can combine compression and encryption, which adds both suffixes to the audit_filter.log name.
The following table displays the possible ways a file can be named:
| Default name | Enabled feature |
|---|---|
| audit.log | No compression or encryption |
| audit.log.gz | Compression |
| audit.log.pwd_id.enc | Encryption |
| audit.log.gz.pwd_id.enc | Compression, encryption |
Encryption ID format
The format for pwd_id is the following:
- A UTC value in
YYYYMMDDThhmmssformat that represents when the password was created - A sequence number that starts at
1and increases if passwords have the same timestamp value
The following are examples of pwd_id values:
20230417T082215-1
20230301T061400-1
20230301T061400-2
The following example is a list of the audit log filter files with the pwd_id:
audit_filter.log.20230417T082215-1.enc
audit_filter.log.20230301T061400-1.enc
audit_filter.log.20230301T061400-2.enc
The current password has the largest sequence number.
Renaming operations
During initialization, the component checks if a file with that name exists. If it does, the component renames the file. The component writes to an empty file.
During termination, the component renames the file.
Disable Audit Log Filter logging
The audit_log_filter.disable system variable lets you disable or enable logging for all connections based on the value:
| Value | Actions |
|---|---|
audit_log_filter.disable = true |
Disables logging. |
audit_log_filter.disable = false |
Enables logging. |
You can set the variable in the following ways:
-
Specify in the option file.
-
Include in the command-line startup string.
-
Use a SET statement during runtime.
SET GLOBAL audit_log_filter.disable = true;
Privileges required
Setting the value of audit_log_filter.disable at runtime requires the following:
AUDIT_ADMINprivilegeSYSTEM_VARIABLES_ADMINprivilege
Audit log filter functions, options, and variables
The following sections describe the functions, options, and variables available in the audit log filter component.
Audit log filter functions
The following audit log filter functions are available.
audit_log_encryption_password_get(keyring_id)
This function returns the encryption password. Any keyring component or keyring component can be used, but the component or component must be enabled. If the component or component is not enabled, an error occurs.
Parameters
keyring_id - If the function does not contain a keyring_id, the function returns the current encryption password. You can also request a specific encryption password with the keyring ID of either the current password or an archived password.
Returns
This function returns a JSON object containing the password, iterations count used by the password.
Example
SELECT audit_log_encryption_password_get();
Expected output
+---------------------------------------------+
| audit_log_encryption_password_get()         |
+---------------------------------------------+
| {"password":"passw0rd","iterations":5689}   |
+---------------------------------------------+
audit_log_encryption_password_set(new_password)
This function sets the encryption password and stores the new password in the keyring.
Parameters
password - the password as a string. The maximum length is 766 bytes.
Returns
This function returns a string. An OK indicates a success. ERROR indicates a failure.
Example
SELECT audit_log_encryption_password_set(passw0rd);
Expected output
+-----------------------------------------------------+
| audit_log_encryption_password_set(passw0rd)         |
+-----------------------------------------------------+
| OK                                                  |
+-----------------------------------------------------+
audit_log_filter_flush()
This function updates the audit log filter tables and makes any changes operational.
Modifying the audit log filter tables directly with INSERT, UPDATE, or DELETE does not implement the modifications immediately. The tables must be flushed to have those changes take effect.
This function forces reloading all filters and should only be used if someone has modified the tables directly.
Parameters
None.
Returns
This function returns either an OK for success or an error message for failure.
Example
SELECT audit_log_filter_flush();
Expected output
+--------------------------+
| audit_log_filter_flush() |
+--------------------------+
| OK                       |
+--------------------------+
audit_log_read()
If the audit log filter format is JSON, this function reads the audit log and returns an array of the audit events as a JSON string. Generates an error if the format is not JSON.
Parameters
None. If the start position is not provided, the read continues from the current position.
Optional: You can specify a starting position for the read with start or a timestamp and an id, both items are considered a bookmark and can be used to identify an event. You must include both (timestamp and id) or an error is generated. If the timestamp does not include a time section, the function assumes the time is 00:00.
You can also provide a max_array_length to limit the number of log events.
Callaudit_log_read_bookmark() to return the most recently written event.
Returns
This function returns a string of a JSON array of the audit events or a JSON NULL value. Returns NULL and generates an error if the call fails.
Example
SELECT audit_log_read(audit_log_read_bookmark());
Expected output
+------------------------------------------------------------------------------+
| audit_log_read(audit_log_read_bookmark())                                   |
+------------------------------------------------------------------------------+
| [{"timestamp" : "2023-06-02 09:43:25", "id": 10,"class":"connection",]       |
+------------------------------------------------------------------------------+
audit_log_read_bookmark()
This function provides a bookmark for the most recently written audit log event as a JSON string. Generates an error if the format is not JSON.
When this function is used with audit_log_read(), the read starts reading at the specified position.
SELECT audit_log_read(audit_log_read_bookmark());
Parameters
None.
Returns
This function returns a JSON string containing a bookmark for success or NULL and an error for failure.
Example
SELECT audit_log_read_bookmark();
Expected output
+----------------------------------------------------+
| audit_log_read_bookmark()                          |
+----------------------------------------------------+
| {"timestamp" : "2023-06-02 09:43:25", "id": 10 }   |
+----------------------------------------------------+
audit_log_session_filter_id()
This function returns the internal ID of the audit log filter in the current session.
Returns 0 (zero) if the session has no assigned filter.
audit_log_filter_remove_filter(filter_name)
This function removes the selected filter from the current set of filters.
If user accounts are assigned the selected filter, the user accounts are no longer filtered. The user accounts are removed from audit_log_user. If the user accounts are in a current session, they are detached from the selected filter and no longer logged.
Parameters
filter_name - a selected filter name as a string.
Returns
This function returns either an OK for success or an error message for failure.
If the filter name does not exist, no error is generated.
Example
SELECT audit_log_filter_remove_filter('filter-name');
Expected output
+------------------------------------------------+
| audit_log_filter_remove_filter('filter-name')  |
+------------------------------------------------+
| OK                                             |
+------------------------------------------------+
audit_log_filter_remove_user(user_name)
This function removes the assignment of a filter from the selected user account.
If the user account is in a current session, they are not affected. New sessions for this user account use the default account filter or are not logged.
If the user name is %, the default account filter is removed.
Parameters
user_name - a selected user name in either the user_name@host_name format or %.
Returns
This function returns either an OK for success or an error message for failure.
If the user_name has no filter assigned, no error is generated.
Example
SELECT audit_log_filter_remove_user('user-name@localhost');
Expected output
+------------------------------------------------------+
| audit_log_filter_remove_user('user-name@localhost')  |
+------------------------------------------------------+
| OK                                                   |
+------------------------------------------------------+
audit_log_rotate()
Parameters
None.
Returns
This function returns the renamed file name.
Example
SELECT audit_log_rotate();
audit_log_filter_set_filter(filter_name, definition)
This function, when provided with a filter name and definition, adds the filter.
The new filter has a different filter ID. Generates an error if the filter name exists.
Parameters
-
filter_name- a selected filter name as a string. -
definition- Defines the definition as a JSON value.
Returns
This function returns either an OK for success or an error message for failure.
Example
SET @filter = '{ "filter_name": { "log": true }}'
SELECT audit_log_filter_set_filter('filter-name', @filter);
Expected output
+-------------------------------------------------------------+
| audit_log_filter_set_filter('filter-name', @filter)  |
+-------------------------------------------------------------+
| OK                                                          |
+-------------------------------------------------------------+
audit_log_filter_set_user(user_name, filter_name)
This function assigns the filter to the selected user account.
Starting from Percona Server for MySQL 8.4.4, the audit_log_filter_set_user() UDF accepts account names with wildcard characters ('%' and '_') in the host part. For example, you can use ‘usr1@%', ‘usr2%192.168.0.%’, or 'usr3@%.mycorp.com'.
A user account can only have one filter. If the user account already has a filter, this function replaces the current filter. If the user account is in a current session, nothing happens. When the user account connects again the new filter is used.
The user name, %, is the default account. The filter assigned to % is used by any user account without a defined filter.
Parameters
-
user_name- a selected user name in either theuser_name@host_nameformat or%. -
filter_name- a selected filter name as a string.
Returns
This function returns either an OK for success or an error message for failure.
Example
SELECT audit_log_filter_set_user('user-name@localhost', 'filter-name');
Expected output
+-------------------------------------------------------------------+
| audit_log_filter_set_user('user-name@localhost', 'filter-name')  |
+-------------------------------------------------------------------+
| OK                                                                |
+-------------------------------------------------------------------+
Audit log filter options and variables
audit_log_filter.buffer_size
| Option name | Description |
|---|---|
| Command-line | –audit-log-filter.buffer-size |
| Dynamic | No |
| Scope | Global |
| Data type | Integer |
| Default | 1048576 |
| Minimum value | 4096 |
| Maximum value | 18446744073709547520 |
| Units | byes |
| Block size | 4096 |
This read-only variable defines the buffer size in multiples of 4096 when logging is asynchronous. Events are temporarily stored in this buffer before being written to the log file. This variable requires a server restart to change.
The component initializes a single buffer and removes the buffer when the component terminates.
audit_log_filter.compression
| Option name | Description |
|---|---|
| Command-line | –audit-log-filter.compression |
| Dynamic | No |
| Scope | Global |
| Data type | Enumeration |
| Default | NONE |
| Valid values | NONE or GZIP |
This read-only variable defines the compression type for the audit log filter file. This variable requires a server restart to change. The values can be either NONE, the default value and file has no compression, or GZIP.
audit_log_filter.database
| Option name | Description |
|---|---|
| Command-line | –audit-log-filter.database |
| Dynamic | No |
| Scope | Global |
| Data type | String |
| Default | mysql |
This read-only variable defines the audit_log_filter database, which stores the necessary tables.
The database name cannot exceed 64 characters or be NULL. An invalid database name prevents the use of the audit log filter component.
This variable requires a server restart to change.
audit_log_filter.disable
| Option name | Description |
|---|---|
| Command-line | –audit-log-filter.disable |
| Dynamic | Yes |
| Scope | Global |
| Data type | Boolean |
| Default | OFF |
This variable disables the component logging for all connections and any sessions.
This variable requires the user account to have SYSTEM_VARIABLES_ADMIN and AUDIT_ADMIN privileges.
audit_log_filter.encryption
| Option name | Description |
|---|---|
| Command-line | –audit-log-filter.encryption |
| Dynamic | No |
| Scope | Global |
| Data type | Enumeration |
| Default | NONE |
| Valid values | NONE or AES |
This read-only variable defines the encryption type for the audit log filter file. This variable requires a server restart to change. The values can be either of the following:
-
NONE- the default value, no encryption -
AES
audit_log_filter.file
| Option name | Description |
|---|---|
| Command-line | –audit-log-filter.file |
| Dynamic | No |
| Scope | Global |
| Data type | String |
| Default | audit_filter.log |
This read-only variable defines the filename of the audit log filter file. The component writes events to this file. This variable requires a server restart to change.
The filename can be either of the following:
-
a relative path name - the component looks for this file in the data directory
-
a full path name - the component uses the given value
If you use a full path name, ensure the directory is accessible only to users who need to view the log and the server.
For more information, see Naming conventions
audit_log_filter.format
| Option name | Description |
|---|---|
| Command-line | –audit-log-filter.format |
| Dynamic | No |
| Scope | Global |
| Data type | Enumeration |
| Default | NEW |
| Available values | OLD, NEW, JSON |
This read-only variable defines the audit log filter file format. This variable requires a server restart to change.
The available values are the following:
audit_log_filter.format_unix_timestamp
| Option name | Description |
|---|---|
| Command-line | –audit-log-filter.format-unix-timestamp |
| Dynamic | Yes |
| Scope | Global |
| Data type | Boolean |
| Default | OFF |
This option is only supported for JSON-format files.
Enabling this option adds a time field to JSON-format files. The integer represents the UNIX timestamp value and indicates the date and time when the audit event was generated. Changing the value causes a file rotation because all records must either have or do not have the time field. This option requires the AUDIT_ADMIN and SYSTEM_VARIABLES_ADMIN privileges.
This option does nothing when used with other format types.
audit_log_filter.handler
| Option name | Description |
|---|---|
| Command-line | –audit-log-filter.handler |
| Dynamic | No |
| Scope | Global |
| Data type | String |
| Default | FILE |
This read-only variable defines where the component writes the audit log filter file. This variable requires a server restart to change. The following values are available:
-
FILE- component writes the log to a location specified inaudit_log_filter.file -
SYSLOG- component writes to the syslog
audit_log_filter.key_derivation_iterations_count_mean
| Option name | Description |
|---|---|
| Command-line | –audit-log-filter.key-derivation-iterations-count-mean |
| Dynamic | Yes |
| Scope | Global |
| Data type | Integer |
| Default | 60000 |
| Minimum value | 1000 |
| Maximum value | 1000000 |
Defines the mean value of iterations used by the password-based derivation routine while calculating the encryption key and iv values. A random number represents the actual iteration count and deviates no more than 10% from this value.
audit_log_filter.max_size
| Option name | Description |
|---|---|
| Command-line | –audit-log-filter.max-size |
| Dynamic | Yes |
| Scope | Global |
| Data type | Integer |
| Default | 1GB |
| Minimum value | 0 |
| Maximum value | 18446744073709551615 |
| Unit | bytes |
| Block size | 4096 |
This variable defines the maximum combined size of all audit log files before pruning occurs.
Default value: 1GB
Behavior: * A value of 0 (zero) disables size-based pruning * A value greater than 0 enables pruning when the combined size of all audit log files exceeds this limit * Values are rounded down to the nearest multiple of 4096 bytes (block size) * Values less than 4096 are treated as 0 (disabled)
Recommendation: When both audit_log_filter.rotate_on_size and audit_log_filter.max_size are greater than 0, set audit_log_filter.max_size to at least seven times the audit_log_filter.rotate_on_size value.
Pruning requirements: To enable pruning, you must configure at least one of the following:
* audit_log_filter.rotate_on_size - enables rotation
* audit_log_filter.max_size - enables size-based pruning
* audit_log_filter.prune_seconds - enables time-based pruning
audit_log_filter.password_history_keep_days
| Option name | Description |
|---|---|
| Command-line | –audit-log-filter.password-history-keep-days |
| Dynamic | Yes |
| Scope | Global |
| Data type | Integer |
| Default | 0 |
Defines when passwords may be removed and measured in days.
Encrypted log files have passwords stored in the keyring. The component also stores a password history. A password does not expire, despite being past the value, in case the password is used for rotated audit logs. The operation of creating a password also archives the previous password.
The default value is 0 (zero). This value disables the expiration of passwords. Passwords are retained forever.
If the component starts and encryption is enabled, the component checks for an audit log filter encryption password. If a password is not found, the component generates a random password.
Call audit_log_encryption_password_set(new_password) to set a specific password.
audit_log_filter.prune_seconds
| Option name | Description |
|---|---|
| Command-line | –audit-log-filter.prune-seconds |
| Dynamic | Yes |
| Scope | Global |
| Data type | Integer |
| Default | 0 |
| Minimum value | 0 |
| Maximum value | 1844674073709551615 |
| Unit | seconds |
Defines when the audit log filter file is pruned. This pruning is based on the age of the file. The value is measured in seconds.
A value of 0 (zero) is the default and disables pruning. The maximum value is 18446744073709551615.
A value greater than 0 enables pruning. An audit log filter file can be pruned after this value.
To enable log pruning, you must set one of the following:
- Enable log rotation by setting
audit_log_filter.rotate_on_size - Add a value greater than 0 (zero) for either
audit_log_filter.max_sizeoraudit_log_filter.prune_seconds
audit_log_filter.read_buffer_size
| Option name | Description |
|---|---|
| Command-line | –audit-log-filter.read-buffer-size |
| Dynamic | Yes |
| Scope | Global |
| Data type | Integer |
| Unit | Bytes |
| Default | 32768 |
This option is only supported for JSON-format files.
The size of the buffer for reading from the audit log filter file. The audit_log_filter_read() reads only from this buffer size.
audit_log_filter.rotate_on_size
| Option name | Description |
|---|---|
| Command-line | –audit-log-filter.rotate-on-size |
| Dynamic | Yes |
| Scope | Global |
| Data type | Integer |
| Default | 1073741824 |
Performs an automatic log file rotation based on the size. The default value is 1073741824. If the value is greater than 0, when the log file size exceeds the value, the component renames the current file and opens a new log file using the original name.
If you set the value to less than 4096, the component does not automatically rotate the log files. You can rotate the log files manually using audit_log_rotate(). If the value is not a multiple of 4096, the component truncates the value to the nearest multiple.
audit_log_filter.strategy
| Option name | Description |
|---|---|
| Command-line | –audit-log-filter.strategy |
| Dynamic | No |
| Scope | Global |
| Data type | Enumeration |
| Default | ASYNCHRONOUS |
This read-only variable defines the Audit Log filter component’s logging method. This variable requires a server restart to change. The valid values are the following:
| Values | Description |
|---|---|
| ASYNCHRONOUS | Waits until there is outer buffer space |
| PERFORMANCE | If the outer buffer does not have enough space, drops requests |
| SEMISYNCHRONOUS | Operating system permits caching |
| SYNCHRONOUS | Each request calls sync() |
audit_log_filter.syslog_tag
| Option | Description |
|---|---|
| Command-line | –audit-log-filter.syslog-tag= |
| Dynamic | No |
| Scope | Global |
| Data type | String |
| Default | audit-filter |
This read-only variable specifies the syslog tag value. This variable requires a server restart to change.
audit_log_filter.syslog_facility
| Option name | Description |
|---|---|
| Command-line | –audit-log-filter.syslog-facility |
| Dynamic | No |
| Scope | Global |
| Data type | String |
| Default | LOG_USER |
This read-only variable specifies the syslog facility value. This variable requires a server restart to change. The option has the same meaning as the appropriate parameter described in the syslog(3) manual .
audit_log_filter.syslog_priority
| Option name | Description |
|---|---|
| Command-line | –audit-log-filter.syslog-priority |
| Dynamic | No |
| Scope | Global |
| Data type | String |
| Default | LOG_INFO |
This read-only variable defines the priority value for the syslog. This variable requires a server restart to change. The option has the same meaning as the appropriate parameter described in the syslog(3) manual .
Audit log filter status variables
The audit log filter component exposes status variables. These variables provide information on the operations.
| Name | Description |
|---|---|
audit_log_filter_current_size |
The current size of the audit log filter file. If the log is rotated, the size is reset to 0. |
audit_log_filter_direct_writes |
Identifies when the log_strategy_type = ASYNCHRONOUS and messages bypass the write buffer and are written directly to the log file. |
audit_log_filter_max_drop_size |
In the performance logging mode, the size of the largest dropped event. |
audit_log_filter_events |
The number of audit log filter events. |
audit_log_filter_events_filtered |
The number of filtered audit log filter component events. |
audit_log_filter_events_lost |
If the event is larger than the available audit log filter buffer space, the event is lost. |
audit_log_filter_events_written |
The number of audit log filter events written. |
audit_log_filter_total_size |
The total size of the events written to all audit log filter files. The number increases even when a log is rotated. |
audit_log_filter_write_waits |
In the asynchronous logging mode, the number of times an event waited for space in the audit log filter buffer. |
Uninstall Audit Log Filter
If you no longer need the audit log filter functionality, you can remove the component from server using the following command:
UNINSTALL COMPONENT 'file://component_audit_log_filter';
This command does the following:
-
UNINSTALL COMPONENT: This tells the server to remove a plugin or feature that was previously installed. -
file://component_audit_log_filter: This is the identifier for the Audit Log Filter Component, which is responsible for applying rules to decide which audit log events are recorded.
Managing binary log disk space
Controlling binary log disk usage can be difficult because binary log sizes vary. The database writes each transaction in full to a single binary log file and cannot split a write across multiple files. This requirement can lead to large log files, especially when transactions are large.
binlog_space_limit
| Attribute | Description |
|---|---|
| Uses the command line | Yes |
| Uses the configuration file | Yes |
| Scope | Global |
| Dynamic | No |
| Variable type | ULONG_MAX |
| Default value | 0 (unlimited) |
| Maximum value - 64-bit platform | 18446744073709547520 |
This variable sets an upper limit on the total size of all binary logs in bytes. When the combined size exceeds this limit, the server automatically purges the oldest binary logs until the total size falls below the limit or only the active log remains.
A default value of 0 disables this feature. In this case, the server does not enforce a size limit and continues to write binary logs until the binary logs exhaust the available disk space.
Example
Set the binlog_space_limit to 50 GB in the my.cnf file:
[mysqld]
...
binlog_space_limit = 50G
...
Extended SELECT INTO OUTFILE/DUMPFILE
Percona Server for MySQL extends the SELECT INTO ... OUTFILE and SELECT INTO
DUMPFILE commands to add support for UNIX sockets and named pipes. Before this was implemented
the database would return an error for such files.
This feature allows using LOAD DATA LOCAL INFILE in combination with
SELECT INTO OUTFILE to quickly load multiple partitions across the network
or in other setups, without having to use an intermediate file that wastes
space and I/O.
Expanded fast index creation
Percona has implemented several changes related to MySQL’s fast index creation feature. Fast index creation was implemented in MySQL as a way to speed up the process of adding or dropping indexes on tables with many rows.
This feature implements a session variable that enables extended fast index creation. Besides optimizing DDL directly, expand_fast_index_creation may also optimize index access for subsequent DML statements because using it results in much less fragmented indexes.
The mysqldump command
A new option, --innodb-optimize-keys, was implemented in mysqldump. It
changes the way InnoDB tables are dumped, so that secondary and foreign keys
are created after loading the data, thus taking advantage of fast index
creation. More specifically:
-
KEY,UNIQUE KEY, andCONSTRAINTclauses are omitted fromCREATE TABLEstatements corresponding to InnoDB tables. -
An additional
ALTER TABLEis issued after dumping the data, in order to create the previously omitted keys.
ALTER TABLE
When ALTER TABLE requires a table copy, secondary keys are now dropped and
recreated later, after copying the data. The following restrictions apply:
-
Only non-unique keys can be involved in this optimization.
-
If the table contains foreign keys, or a foreign key is being added as a part of the current
ALTER TABLEstatement, the optimization is disabled for all keys. -
If the table is partitioned, the optimization is disabled for all keys.
OPTIMIZE TABLE
Internally, OPTIMIZE TABLE is mapped to ALTER TABLE ... ENGINE=innodb
for InnoDB tables. As a consequence, it now also benefits from fast index
creation, with the same restrictions as for ALTER TABLE.
Caveats
InnoDB fast index creation uses temporary files in tmpdir for all indexes being created. So make sure you have enough tmpdir space when using expand_fast_index_creation. It is a session variable, so you can temporarily switch it off if you are short on tmpdir space and/or don’t want this optimization to be used for a specific table.
There’s also a number of cases when this optimization is not applicable:
-
UNIQUEindexes inALTER TABLEare ignored to enforce uniqueness where necessary when copying the data to a temporary table; -
ALTER TABLEandOPTIMIZE TABLEalways process tables containing foreign keys as if expand_fast_index_creation is OFF to avoid dropping keys that are part of a FOREIGN KEY constraint; -
ALTER TABLEandOPTIMIZE TABLEalways process partitioned tables as if expand_fast_index_creation is OFF; -
mysqldump –innodb-optimize-keys ignores foreign keys because InnoDB requires a full table rebuild on foreign key changes. So adding them back with a separate
ALTER TABLEafter restoring the data from a dump would actually make the restore slower; -
mysqldump –innodb-optimize-keys ignores indexes on
AUTO_INCREMENTcolumns, because they must be indexed, so it is impossible to temporarily drop the corresponding index; -
mysqldump –innodb-optimize-keys ignores the first UNIQUE index on non-nullable columns when the table has no
PRIMARY KEYdefined, because in this case InnoDB picks such an index as the clustered one.
System variables
expand_fast_index_creation
| Option | Description |
|---|---|
| Command Line: | Yes |
| Config file | No |
| Scope: | Local/Global |
| Dynamic: | Yes |
| Data type | Boolean |
| Default value | ON/OFF |
FIPS compliance
The Federal Information Processing Standards (FIPS) are a set of regulations mandated by the United States government that ensure the security of computer systems for non-military government agencies and their contractors. These standards specify how to perform cryptographic operations, such as encryption, hashing, and digital signatures. FIPS mode is a mode of operation that enforces these standards and rejects any non-compliant algorithms or parameters.
Percona Server for MySQL can run in FIPS mode if a FIPS-enabled OpenSSL library and FIPS Object Module are available at runtime or if compiled using a FIPS-validated version of OpenSSL. FIPS mode remains off by default and must be enabled via OS/OpenSSL configuration.
Version changes
Introduced in Percona Server for MySQL Pro build for 8.4.0-1. You can also receive this functionality by building Percona Server for MySQL from source code.
Percona Server for MySQL 8.4.0-5 includes the FIPS-capable binaries in all builds. No Pro build is required for FIPS compatibility.
Prerequisites
To prepare Percona Server for MySQL for FIPS certification, do the following:
-
Check that your operating system includes FIPS pre-approved OpenSSL library in version 3.0.x or higher. The following distributions includes FIPS pre-approved OpenSSL library in version 3.0.x or higher:
-
RedHat Enterprise Linux 9 and derivatives
-
Oracle Linux 9
The following distributions also includes OpenSSL library in version 3.0.x but do not have FIPS-approved crypto provider installed by default (you can build the crypto provider from the source for testing):
-
Debian 12
-
Ubuntu 22.04 Pro (the OpenSSL FIPS 140-3 certification is under implementation)
Note
If you enable FIPS on Ubuntu Pro with
$ sudo pro enable fips-updatesand then disable FIPS with$ sudo pro disable fips-updates, Percona Server for MySQL may stop operating properly. For example, if you disable FIPS on Ubuntu Pro with$ sudo pro disable fips-updatesand enable the FIPS mode on Percona Server withssl-fips-mode=ON, Percona Server may not load the SSL certificate.
-
The FIPS mode variables
Percona Server for MySQL uses the same variables and values as MySQL. Percona Server for MySQL enables control of FIPS mode on the server side and the client side:
-
The
ssl_fips_modesystem variable shows whether the server operates in FIPS mode. This variable is disabled by default.The
ssl_fips_modesystem variable has these values:0- disables FIPS mode1- enables FIPS mode. The exact behavior of the enabled FIPS mode depends on the OpenSSL version. The server only specifies the FIPS value to OpenSSL.2- enablesstrictFIPS mode. This value provides more restrictions than the1value. The exact behavior of thestrictFIPS mode depends on the OpenSSL version. The server only specifies the FIPS value to OpenSSL.
-
The
--ssl-fips-modeclient/server option controls whether a given client operates in FIPS mode. This setting does not change the server setting. This option is disabled by default.The
--ssl-fips-modeclient/server option has these values:OFF- disables FIPS modeON- enables FIPS mode. The exact behavior of the enabled FIPS mode depends on the OpenSSL version. The server only specifies the FIPS value to OpenSSL.STRICT- enablesstrictFIPS mode. This value provides more restrictions than theONvalue. The exact behavior of thestrictFIPS mode depends on the OpenSSL version. The server only specifies the FIPS value to OpenSSL.
The server operation in FIPS mode does not depend on which crypto module (regular or FIPS-approved) is set as the default in the OpenSSL configuration file. The server always respects the value of
--ssl-fips-modeserver command line option (OFF,ON, orSTRICT). Thessl_fips_modeglobal system variable is read-only and cannot be changed at runtime.
Enable the FIPS mode
To enable the FIPS mode, pass --ssl-fips-mode=ON or --ssl-fips-mode=STRICT to mysqld as a command line argument or add ssl-fips-mode=ON or --ssl-fips-mode=STRICT to the configuration file. Ignore the warning that the --ssl-fips-mode client/server option is deprecated.
Check that FIPS mode is enabled
To ensure that the FIPS mode is enabled, do the following:
-
Pass
--log-error-verbosity=3to mysqld as a command line argument or addlog-error-verbosity=3to the configuration file. -
Check that the error log contains the following message:
A FIPS-approved version of the OpenSSL cryptographic library has been detected in the operating system with a properly configured FIPS module available for loading. Percona Server for MySQL will load this module and run in FIPS mode.
JS language support
js_lang stored procedure and function overview
This feature is a tech preview. Before using this feature in production, we recommend that you test restoring production from physical backups in your environment, and also use the alternative backup method for redundancy.
You can use stored procedures and functions written in JS with a MySQL-compatible database. This feature helps you manage complex data processing tasks. This method improves performance. This method lets developers run complex operations faster. If you know JS, you can use your existing skills. Using stored procedures and functions reduces the work done by client applications. Using stored procedures and functions also improves overall system performance. Using stored procedures and functions helps developers process data faster. Using stored procedures and functions also makes maintenance and scaling easier. This approach is a good solution for developers who know JS.
| Benefit | Description |
|---|---|
| Familiarity | Developers who already know JS can use their existing skills. |
| Efficiency | JS can run complex data processing tasks more efficiently. |
| Performance | Stored procedures and functions in JS improve database performance. They reduce the work done by client applications. |
| Reusability | You can write code once in stored procedures and functions. Then you can use that code in multiple applications. |
| Scalability | Using stored procedures and functions makes database operations easier to maintain and scale. |
| Simplified Development Process | This feature makes development easier for developers who know JS. |
| Integration with Client Applications | Stored procedures and functions work well with client applications. You need less additional processing. |
| Optimization | This feature improves overall system performance through efficient data processing. |
Limitations
The JS procedure parameters cannot be JS reserved words and must be legal JS identifiers .
Our implementation offers the same level of JS support as the V8 engine inside the context of a database engine. You can check out the details at v8.dev/docs and tc39.es/ecma262 . Developers have access to standard operators, data types, objects (such as Math), and functions defined in the ECMAScript standard. However, objects and modules specific to Node.NS or DOM, which are only available in browsers, are not accessible.
In a typical database environment, direct access to external files (like reading or writing files on the server’s file system) is restricted. Our implementation adheres to a trusted external routine language policy, ensuring routines cannot perform operations beyond what is normally possible for database users. Consequently, file or network I/O operations are not supported within our routines.
Our system supports asynchronous JS code, but it does not work well for database routines. Since everything runs on the same thread and there is nothing to wait for asynchronously, using asynchronous code is unnecessary and not recommended.
We always run JS code in strict mode, and developers cannot disable or change this setting.
Type conversions
SQL and JS use different data types, so the js_lang component converts values when passing SQL parameters to JS and back. SQL NULL values are converted to JS null values, and JS null and undefined values are always mapped to SQL NULL. When converting to JS strings, data is automatically converted from the SQL parameter’s character set to utf8mb4.
For detailed information about type conversions, including complete conversion tables and rules, see js_lang type conversions.
System variables
The js_lang component provides the following system variables for configuring JS routine execution:
| Variable name | Description | Default |
|---|---|---|
js_lang.max_mem_size |
Maximum memory size (soft limit) for JS routines | 8 MB |
js_lang.max_mem_size_hard_limit_factor |
Hard limit factor for memory allocation | 0 (disabled) |
The js_lang.max_mem_size variable sets a soft limit on memory usage per JS environment. The js_lang.max_mem_size_hard_limit_factor variable (settable only at start-up) allows you to override V8’s internal hard memory limit, though this is not recommended for most users.
These variables help prevent runaway scripts from consuming excessive memory or CPU time. For detailed information about each variable, including configuration options, examples, and memory limit behavior, see js_lang component system variables.
Status variables
The js_lang component provides global status variables for monitoring JS routine execution:
- Memory usage:
js_lang_total_heap_size,js_lang_peak_total_heap_size,js_lang_used_heap_size,js_lang_peak_used_heap_size,js_lang_external_memory_size,js_lang_peak_external_memory_size - Contexts:
js_lang_contexts,js_lang_peak_contexts - Call count:
js_lang_stored_program_call_count
Note
Status variable values are approximate as they are refreshed at Isolate creation/destruction and GC time, not on each operation.
User-defined functions
The js_lang component includes a set of User-Defined Functions (UDFs) that retrieve and clear information about the last JS error that occurred in the current connection for the current user. This information updates each time a JS error occurs for the current connection and user. Successful execution of JS code does not change this state.
The following UDFs are helpful for debugging JS code:
-
JS_GET_LAST_ERROR(): Returns the error message for the last JS error that occurred in the current connection for the current user. -
JS_GET_LAST_ERROR_INFO(): Returns extended information about the last JS error that occurred in the current connection for the current user. In addition to the error message, it tries to provide the exact line and column where the problem occurred, as well as the stack trace if available. -
JS_CLEAR_LAST_ERROR(): Resets the information about the last JS error for the current connection and user, as if no error had occurred. -
JS_GET_MEMORY_USAGE_JSON(): Returns information about memory usage by the JS environment (isolate) for the current user and connection pair, as well as total memory usage by all JS environments in the server, in the form of a JSON object. The returned object includeslocal(per-environment) andglobal(aggregated) memory statistics with heap sizes, external memory, and context counts. If there is no JS environment for the current user-connection pair, thelocalmember isnull.
For more information about using these functions for troubleshooting, see Troubleshoot js_lang procedures and functions.
Console API
The js_lang component provides support for the JS Console API as described at console.spec.whatwg.org . The Console API provides debugging support including logging, timers, and counters. Users can use methods of the JS console object to write messages to the console log, and then inspect this log using UDFs.
Our implementation supports logging calls (assert(), clear(), debug(), error(), info(), log(), warn()), counting (count(), countReset()), grouping (group(), groupCollapsed(), groupEnd()), and timing (time(), timeLog(), timeEnd()). Each user-connection pair has its own separate console log instance, with size limits controlled by the js_lang.max_console_log_size variable.
For detailed information about the Console API, including supported calls, format specifiers, log severity levels, and UDFs for accessing console logs, see js_lang Console API.
Further reading
Install js_lang component
This feature is a tech preview. Before using this feature in production, we recommend that you test restoring production from physical backups in your environment, and also use the alternative backup method for redundancy.
The plugin_dir system variable specifies where the component library is located. If you need to, you should set the plugin_dir variable when you start the server.
To install the js_lang component, you need to run the following command:
INSTALL COMPONENT 'file://component_js_lang';
If you decide to uninstall the component, you may have to restart the server before you can reinstall it.
When you install the component_js_lang, it gives you a new global privilege called CREATE_JS_ROUTINE. This privilege allows you to create JS routines within the database.
For more details, check out INSTALL COMPONENT.
Further reading
js_lang component system variables
This feature is a tech preview. Before using this feature in production, we recommend that you test restoring production from physical backups in your environment, and also use the alternative backup method for redundancy.
The following sections describe the system variables available in the js_lang component.
js_lang system variables
The following js_lang system variables are available:
| Variable name | Description |
|---|---|
| js_lang.max_mem_size | Maximum memory size for JS routines |
| js_lang.max_mem_size_hard_limit_factor | Maximum memory size hard limit factor |
The following variables are described in detail:
js_lang.max_mem_size
| Options | Description |
|---|---|
| Command-line | –js-lang.max-mem-size=value |
| Dynamic | Yes |
| Scope | Global |
| Data type | Numeric |
| Default | 8388608 (8 MB) |
| Minimum value | 3145728 (3 MB) |
| Maximum value | 1073741824 (1 GB) |
| Block size | 1024 bytes |
This variable sets the soft memory allocation limit for JS routines. The component configures V8 with this limit. Since every JS execution (or session, depending on the isolation mode) creates a V8 environment, this limit prevents a single poorly written script or a loop from consuming all the server’s physical memory.
Values are rounded down to the nearest multiple of 1024 bytes (block size). V8 requires a minimum heap size to start, which is typically around 10 MB.
V8 behavior with the soft limit:
The soft limit is a threshold that triggers V8’s garbage collection (GC) process. When memory usage approaches the soft limit configured by this variable, V8 starts incremental marking in the background to identify objects that can be freed. This background GC runs without pausing JS execution. If the soft limit is reached or exceeded and GC cannot free enough memory, V8 Isolate Termination is triggered, stopping JS execution and returning a “Memory limit exceeded” error to the MySQL client.
Relationship to hard limit:
The hard limit is calculated as js_lang.max_mem_size * js_lang.max_mem_size_hard_limit_factor and is configured separately using the js_lang.max_mem_size_hard_limit_factor variable. When the hard limit is reached, V8 performs a “last resort” garbage collection, stopping all execution to attempt to free every possible byte of memory. If this final GC cannot free enough memory, V8 triggers out-of-memory (OOM) handling, which terminates the mysqld process and causes a server exit. The hard limit is disabled by default (factor = 0) because it causes a server exit.
This variable is dynamic and can be changed at runtime using the SET statement. The updated value is applied to new V8 isolate contexts created after the change. Sessions that are already running may not be affected until the next time a context is initialized.
An example of setting the variable:
SET GLOBAL js_lang.max_mem_size = 16777216;
This sets the limit to 16 MB. To make the change persistent across server restarts, add this setting to your configuration file:
[mysqld]
js_lang.max_mem_size = 16777216
js_lang.max_mem_size_hard_limit_factor
| Options | Description |
|---|---|
| Command-line | –js-lang.max-mem-size-hard-limit-factor=value |
| Dynamic | No |
| Scope | Global |
| Data type | Numeric |
| Default | 0 |
| Minimum value | 0 |
| Maximum value | 1024 |
This variable controls the hard limit for JS routine memory allocation. When set to a non-zero value, the component calculates the hard limit as js_lang.max_mem_size * js_lang.max_mem_size_hard_limit_factor in bytes.
When a JS session’s memory usage reaches the hard limit threshold, V8 performs a “last resort” garbage collection, stopping all execution to attempt to free every possible byte of memory. If this final GC cannot free enough memory, V8 triggers out-of-memory (OOM) handling, which terminates the mysqld process and causes a server exit. This is different from the soft limit behavior, where V8 Isolate Termination stops only the JS execution and returns an error to the client.
When set to 0 (the default), the component does not set an explicit V8 memory limit. Instead, V8 uses the default limit, which is typically greater than 1 GB). The default V8 limt avoids a server exit from an abrupt out-of-memory (OOM) scenario.
Warning
Allocating more than 1 GB of memory is not safe, as this allocation can exceed V8’s default hard limit and cause the server to exit.
A non-zero value enforces the V8 hard limit. This setting ensures that the hard memory limit will never be exceeded, at the price of process abort. Note that large single allocations that exceed this limit will cause server exit.
You should be aware that:
-
V8 may abort the process if a single allocation attempt exceeds the limit and garbage collection cannot free enough memory.
-
Changing this variable requires a server restart
In earlier versions, the component set the V8 memory limit to js_lang.max_mem_size * 4 bytes by default. This setting worked well for detecting memory limit violations with small allocations, but failed when a single huge allocation exceeded the limit. Attempting to allocate more than js_lang.max_mem_size * 4 bytes in one operation could cause the server to crash because V8 aborts the process when an allocation exceeds its memory limit and garbage collection cannot help.
Note
This variable relates to the internal heap limit for JS routines and works in conjunction with js_lang.max_mem_size. For more information about memory limits and troubleshooting, see Troubleshoot js_lang procedures and functions.
Further reading
js_lang privileges
This feature is a tech preview. Before using this feature in production, we recommend that you test restoring production from physical backups in your environment, and also use the alternative backup method for redundancy.
Privileges control what users can do. You use them to give specific permissions to different users. This ability helps you keep your data secure by only allowing authorized users to access and change information in the database.
Privileges
To create routines within a database, you must be granted the CREATE_JS_ROUTINE privilege and the standard CREATE ROUTINE privilege.
GRANT CREATE_JS_ROUTINE ON *.* TO user1@localhost;
If a user is granted the ability to create routines and holds the CREATE_JS_ROUTINE privilege, they are capable of creating stored functions and procedures using JS.
However, it is important to note that at this time, the creation of JS triggers or events is not supported.
Further reading
js_lang stored function or procedure
This feature is a tech preview. Before using this feature in production, we recommend that you test restoring production from physical backups in your environment, and also use the alternative backup method for redundancy.
Once the component’s installed, you can write stored functions and procedures in JavaScript. The syntax looks like this:
CREATE
[DEFINER = user]
FUNCTION [IF NOT EXISTS] sp_name ([func_parameter[,...]])
RETURNS type
LANGUAGE JS [other-func-characteristic ...] AS js_routine_body
CREATE
[DEFINER = user]
PROCEDURE [IF NOT EXISTS] sp_name ([proc_parameter[,...]])
LANGUAGE JS [other-proc-characteristic ...] AS js_routine_body
routine_body:
text_string_literal | dollar_quoted_string
Use the LANGUAGE JS clause when creating a routine.
CREATE FUNCTION f1(n INT) RETURNS INT LANGUAGE JS AS $$
return n*42;
$$
CREATE PROCEDURE p1(a INT, b INT, OUT r INT) LANGUAGE JS AS $$
r = a * b;
$$
You can modify or delete stored programs in JS by using the standard ALTER PROCEDURE/FUNCTION and DROP PROCEDURE/FUNCTION statements. These statements do not require the CREATE_JS_ROUTINE privilege.
Further reading
js_lang type conversions
This feature is a tech preview. Before using this feature in production, we recommend that you test restoring production from physical backups in your environment, and also use the alternative backup method for redundancy.
SQL and JS use different data types, so the js_lang component converts values when passing SQL parameters to JS and back. This document describes how these conversions work.
Convert SQL data types to JS
SQL NULL values are converted to JS null values.
| SQL type | JS return type | Notes |
|---|---|---|
| BOOLEAN, TINYINT, SHORTINT, MEDIUMINT, INT | Number | |
| BIGINT | Number or BigInt | Number for values [-2^53-1, 2^53-1], BigInt otherwise |
| DECIMAL | String | |
| FLOAT, DOUBLE | Number | |
| BIT(k) | Number or BigInt | Number for k ≤ 53, BigInt for k > 53 |
| TIME, DATE, TIMESTAMP, DATETIME | String | |
| YEAR | Number | |
| CHAR, VARCHAR, TINYTEXT, TEXT, MEDIUMTEXT, LONGTEXT | String | Fails if length exceeds 2^29 - 24 |
| BINARY, VARBINARY, TINYBLOB, BLOB, MEDIUMBLOB, LONGBLOB | DataView | |
| ENUM, SET | String | |
| GEOMETRY and spatial types | DataView | |
| JSON | Object |
When the data converts to a JS string, it automatically changes from the SQL parameter’s character set to utf8mb4, which JS uses.
Convert JS data types to SQL
The system uses the target SQL data type to determine how to convert each value. It typically converts a JS value into a basic type—such as a string, integer, or double—based on the specified SQL type. Once converted, the system stores the result in the corresponding SQL parameter or return value.
If a value exceeds allowed limits or uses an unsupported format, the conversion fails and triggers an error. During this process, the system automatically converts JS strings from the utf8mb4 encoding to the character set defined by the SQL parameter.
The system always maps JS null and undefined values to SQL NULL, regardless of the target SQL type.
JS to SQL type conversion rules
| Target SQL Data Type | Conversion Rules | Explanation | Example |
|---|---|---|---|
BOOLEAN, TINYINT, SHORTINT, MEDIUMINT, INT, BIGINT |
(Version 8.4.5) - Numbers: stored as integers - Booleans: true → 1, false → 0- BigInts: stored as integers when possible - Other types: converted to strings first (Version 8.4.4) - JS Integers/Numbers: integers stored as-is, BigInts attempted as integers, others as strings.) |
Preserves native numeric forms where possible; other values default to string representation | 42 → 423.14 → "3.14"true → "1" |
DECIMAL |
- All values converted to strings - Booleans: converted to 0/1, then stored as doubles |
Supports precision formatting; special handling ensures Booleans fit numeric context | 123.45 → "123.45"true → 1.0 |
FLOAT, DOUBLE |
- Numbers: stored as doubles - (Version 8.4.5) - Booleans: converted to 0/1, then stored as doubles- Others: converted to strings |
Treats numeric and Boolean inputs consistently using floating-point representation | 3.14 → 3.14true → 1.0"3.14" → "3.14" |
BIT |
Converted to SQL BIT type | Only binary-compatible values allowed | 1 → BIT(1) |
TIME, DATE, TIMESTAMP, DATETIME |
All values converted to strings | Usually expects ISO date formats or equivalents | Date() → "2024-01-30" |
CHAR, VARCHAR, TEXT, etc. |
All values converted to strings Charset conversion from utf8mb4 if needed |
Supports text types with encoding fallback | "hello" → "hello" |
BINARY, VARBINARY, BLOB, etc. |
- ArrayBuffer/View: stored directly- Others: converted to strings |
Binary data must be explicitly wrapped; others fallback to string | buffer → binary |
SET |
- Numbers: stored as integers/doubles - BigInts: stored as integers - Others: converted to strings with charset conversion if needed |
Tries native storage before falling back to strings | 1 → 1"value" → "value" |
GEOMETRY |
- Valid ArrayBuffer/View: stored as binary- Others: cause an error |
Enforces format rules to maintain spatial integrity | valid buffer → GEOMETRY |
JSON |
Converted using JSON.stringify() |
Converts objects or arrays to serialized strings | {key: "value"} → "{"key":"value"}" |
Further reading
js_lang Console API
This feature is a tech preview. Before using this feature in production, we recommend that you test restoring production from physical backups in your environment, and also use the alternative backup method for redundancy.
The js_lang component provides support for the JS Console API as described at console.spec.whatwg.org . The Console API provides rudimentary support for debugging including logging, timers, and counters. Users can use methods of the JS console object to write messages to the console log, and then later inspect this log using UDFs.
Note
This document does not go into details describing the behavior of each console call. Refer to the Console API specification for detailed information. You can also use developer.mozilla.org/en-US/docs/Web/API/console as a more convenient reference.
Supported logging calls
Our implementation supports the following logging calls described in the Console API specification:
assert()clear()debug()error()info()log()warn()
Supported counting, grouping, and timing calls
We also support calls implementing functionality for:
- Counting:
count(),countReset() - Grouping:
group(),groupCollapsed(),groupEnd() - Timing:
time(),timeLog(),timeEnd()
Unsupported calls
We do not support trace(), table(), dir(), and dirxml() calls from the specification. They can be called but do nothing.
Log severity levels
Our implementation supports Error, Warning, Info, and Debug log severity levels. The console.log() and console.timeLog() calls use Info log severity.
Substitution and format specifiers
For those logging calls which support substitution/format specifiers per specification, we support the following substitution/format specifiers: %s, %i, %d, %f, %o, %O, %c, %%.
String conversion
Unless the specification says otherwise (for example, when substitution/format specifiers are used), when we convert a JS value to a string in order to add it to a console log message, we try to use a representation that is useful for debugging purposes. However, for Object values, the current result of such conversion is rather brief and far from optimal (see Node.js or browsers for example).
Console log instances
Each user in each connection gets access to its own separate instance of the console log.
Console log size limits
The number of console log messages that are kept for each user-connection pair is limited by the global dynamic js_lang.max_console_log_size variable. Once the console instance for the pair reaches this limit, we start to discard the oldest messages from the console log when new messages are added.
Accessing console logs
The following UDFs are available for accessing and managing console logs:
-
JS_GET_CONSOLE_LOG(): Returns a simple and plain representation of the console log for the current user and connection pair. We only show the text of the log messages in this representation (for example, no timestamps or level of log messages is shown). Each log message gets its own line and is indented according to its grouping. -
JS_GET_CONSOLE_LOG_JSON(): Returns a JSON representation of the console log for the current user and connection pair. Each log entry is represented by an object in a JSON array returned. This object contains all the available information about the log entry, such as the log entry timestamp, its log level, whether it belongs to a group (in which case we provide the hierarchy of the groups it belongs to in the form of an array), and whether it is a group header. This representation can be used for advanced processing of console log output such as filtering by severity or providing an interactive version of the log output. -
JS_CLEAR_CONSOLE_LOG(): Empties the console log for the current user and connection pair. It also returns the number of log entries it has removed. Note that unlike the similarconsole.clear()call, this UDF does not reset the current group stack for the console instance.
Further reading
Troubleshoot js_lang procedures and functions
This feature is a tech preview. Before using this feature in production, we recommend that you test restoring production from physical backups in your environment, and also use the alternative backup method for redundancy.
The component includes a set of User-Defined Functions (UDFs) that retrieve and clear information about the last JS error that occurred in the current connection for the current user. This information updates each time a JS error occurs for the current connection and user. Successful execution of JS code does not change this state.
The following UDFs are helpful for debugging JS code.
-
JS_GET_LAST_ERROR(): Returns the error message for the last JS error that occurred in the current connection for the current user. -
JS_GET_LAST_ERROR_INFO(): Returns extended information about the last JS error that occurred in the current connection for the current user. In addition to the error message, it tries to provide the exact line and column where the problem occurred, as well as the stack trace if available. -
JS_CLEAR_LAST_ERROR(): Resets the information about the last JS error for the current connection and user, as if no error had occurred.
Terminating JS routine execution
You can terminate the execution of a JS routine in the following ways:
-
You can kill a connection or statement that executes a JS routine using
KILLorKILL QUERY, and the execution is aborted without much delay. For example, you can useKILL QUERYto abort a JS routine executing a long or infinite loop. -
Exceeding the
MAX_EXECUTION_TIMEtimeout (if present) for a statement that executes a JS routine aborts execution without much delay. For example, this option can be used to limit the execution time of a JS routine performing a long computation.
Further reading
Uninstall the js_lang component
This feature is a tech preview. Before using this feature in production, we recommend that you test restoring production from physical backups in your environment, and also use the alternative backup method for redundancy.
The uninstall works only when no connections are using JavaScript stored programs. If there are connections, the procedure fails with an error.
To remove the component, run the following:
UNINSTALL COMPONENT 'file://component_js_lang';
Further reading
Kill idle transaction
Database servers face a constant challenge: managing resources efficiently while maintaining system stability. The kill idle transactions timeout option is a strategic tool to address this challenge. The server automatically stops any transaction that remains inactive for longer than this limit. This action prevents forgotten or stuck transactions from slowing down your database by blocking critical cleanup processes.
The option has the following benefits:
-
Automatically terminates long-running, inactive database connections
-
Prevents resource hogging by abandoned or forgotten transactions
-
Frees up database connection pools
-
Reduces unnecessary memory consumption
-
Protects against potential connection leaks
-
Prevents unnecessary server load from dormant sessions
You must also consider the following:
-
May interrupt legitimate long-running queries
-
Requires careful configuration to avoid disrupting critical processes
-
Can cause unexpected application behavior if timeout is too aggressive
-
Might create additional overhead in monitoring and logging
-
Requires precise tuning for different application requirements
We recommend that starting with a conservative timeout setting and reviewing the logs frequently to track terminated transactions.
This feature works with all types of database storage that support transactions.
Best practices
Consider these recommended practices when configuring the idle transaction timeout:
-
Starting with a higher timeout value: Begin by setting the
kill_idle_transactionto a larger value, such as 600 seconds (10 minutes). This initial higher value provides a buffer and reduces the risk of prematurely terminating legitimate, long-running transactions while you observe your application’s behavior under normal load. -
Monitoring logs for premature terminations: After implementing the idle transaction timeout, actively monitor the MySQL error logs for messages indicating that transactions are being killed. If you observe “Killed idle transaction” messages frequently for transactions that should still be active, it suggests that your timeout value is too aggressive and needs adjustment.
-
Testing in a staging environment: Before applying any changes to the
kill_idle_transactionsetting in your production environment, thoroughly test the configuration in a staging or development environment that closely mirrors your production setup. This testing allows you to identify and resolve any unintended consequences, such as premature transaction terminations, without impacting your live application and data.
Determine the idle transaction threshold
When setting up a database, you must decide how long to let inactive transactions sit before ending them. This decision affects the database’s performance.
| Items to consider | Description |
|---|---|
| How your database is used | Look at how long transactions usually take and how often they happen. If most transactions finish quickly, you should end idle ones sooner. |
| How many things happen at once | Count how many transactions your system handles simultaneously. You may need to end idle transactions faster to free up space for new ones. |
| How it affects speed | Monitor how idle transactions change your database’s speed. If they noticeably slow down the database, ending these transaction can help keep everything running smoothly. |
| What your business needs | What’s important for your work. Some transactions may need more time. |
InnoDB purge
The InnoDB purge process removes outdated row versions (undo logs) from the system. When a transaction modifies data, InnoDB keeps old row versions for rollback and to support transactions running with multi-version concurrency control (MVCC). Once these versions are no longer needed, the purge process deletes them to free up space and improve performance.
Blocking the InnoDB purge can lead to increased disk space usage and potential performance degradation. This feature helps prevent issues such as:
| Benefit | Description |
|---|---|
| Limiting idle transactions | Kills any idle transaction after a specified threshold, ensuring transactions don’t remain idle for too long. |
| Preventing mistakes | Users can’t accidentally block the InnoDB purge by leaving transactions idle. |
| Improving performance | Keeping the purge process running smoothly helps maintain optimal database performance. |
System variables
kill_idle_transaction
| Option | Description |
|---|---|
| Config file | Yes |
| Scope: | Global |
| Dynamic: | Yes |
| Data type | Integer |
| Default value | 0 (disabled) |
| Unit | Seconds |
If set to a non-zero value, the server kills any idle transaction after it stays idle for this number of seconds.
Examples
The SET GLOBAL kill_idle_transaction = 300; command configures the server to automatically end any idle transaction that has lasted for 300 seconds (5 minutes). This command immediately takes effect for the current and new server sessions. An idle transaction holds resources, potentially preventing other operations from proceeding. This setting helps to release these resources if a transaction is unintentionally left open.
SET GLOBAL kill_idle_transaction = 300;
The [mysqld] section in the my.cnf configuration file allows you to set server-wide options that persist across server restarts. Adding the line kill_idle_transaction = 300 under [mysqld] makes the idle transaction timeout of 300 seconds the default setting for the server. This setting ensures that the server automatically terminates idle transactions after 5 minutes every time it starts.
You must restart the server for changes in the my.cnf file to take effect. This configuration prevents long-held idle transactions from consuming resources over extended periods.
[mysqld]
kill_idle_transaction = 300
Monitor terminated transactions
If the kill_idle_transaction setting is active and idle transactions have been terminated, this command will output any lines from the error log that contain the “Killed idle transaction” message. Each matching line typically includes a timestamp and details about the terminated transaction, such as its ID and the duration it was idle.
If the kill_idle_transaction setting is active and idle transactions have been terminated, this command will output any lines from the error log that contain the “Killed idle transaction” message. Each matching line typically includes a timestamp and details about the terminated transaction, such as its ID and the duration it was idle.
The command produces no output if the server has not terminated any idle transactions since the last log rotation or server start. Regularly checking this log helps you verify that the idle transaction option is working as expected and provides insights into transaction management within your server.
$ grep "Killed idle transaction" /var/log/mysql/error.log
PERCONA_SEQUENCE_TABLE(n) function
Using the PERCONA_SEQUENCE_TABLE() function provides the following:
| Benefit | Description |
|---|---|
| Generates Sequences | Acts as an inline table-valued function that generates a sequence of numbers. |
| Table-Valued Function | Unlike traditional scalar functions, PERCONA_SEQUENCE_TABLE() returns a virtual table with a single column named value containing the generated sequence. |
| Simpler Syntax | Simplifies queries that need to generate predictable sequences of numbers. |
| Flexibility | Allows dynamic definition of sequences within queries, offering more control compared to pre-defined tables for sequences. |
| Predefined Sequence | Does not manage sequences like Oracle or PostgreSQL; instead, it allows definition and generation of sequences within a SELECT statement. |
| Customization | Enables customization of starting value, increment/decrement amount, and number of values to generate. |
Version update
Percona Server for MySQL 8.4 deprecated SEQUENCE_TABLE(), and Percona may remove this function in a future release. We recommend that you use PERCONA_SEQUENCE_TABLE() instead.
To maintain compatibility with existing third-party software, SEQUENCE_TABLE is no longer a reserved term and can be used as a regular identifier.
Table functions
The function is an inline table-valued function. This function creates a temporary table with multiple rows. You can use this function within a single SELECT statement. Oracle MySQL Server only has the JSON_TABLE table function. The Percona Server for MySQL has the JSON_TABLE and PERCONA_SEQUENCE_TABLE() table functions. A single SELECT statement generates a multi-row result set. In contrast, a scalar function (like EXP(x) or LOWER(str) always returns a single value of a specific data type.
Syntax
As with any derived tables , a table function requires an alias in the SELECT statement.
The result set is a single column with the predefined column name value of type BIGINT UNSIGNED. You can reference the value column in SELECT statements. The following statements are valid. Using n as the number of generated values, the following is the basic syntax:
PERCONA_SEQUENCE_TABLE(n) [AS] alias
SELECT … FROM PERCONA_SEQUENCE_TABLE(n) [AS] alias
PERCONA_SEQUENCE_TABLE(n) [AS] alias
SELECT * FROM PERCONA_SEQUENCE_TABLE(n) AS tt;
SELECT <expr(value)> FROM PERCONA_SEQUENCE_TABLE(n) AS tt;
The first number in the series, the initial term, is defined as 0, and the series ends with a value less than n.
Basic sequence generation
In this example, the following statement generates a sequence:
SELECT * FROM PERCONA_SEQUENCE_TABLE(3) AS tt;
Expected output
+-------+
| value |
+-------+
| 0 |
| 1 |
| 2 |
+-------+
Start with a specific value
You can define the initial value using the WHERE clause. The following example starts the sequence with 4.
SELECT value AS result \
FROM \
(SELECT seq AS value
FROM PERCONA_SEQUENCE_TABLE(8)) AS tt \
WHERE value >= 4;
Expected output
+--------+
| result |
+--------+
| 4 |
| 5 |
| 6 |
| 7 |
+--------+
Filter even numbers
Consecutive terms increase or decrease by a common difference. The default common difference value is 1. However, it is possible to filter the results using the WHERE clause to simulate common differences greater than 1.
The following example prints only even numbers from the 0..7 range:
SELECT value AS result \
FROM PERCONA_SEQUENCE_TABLE(8) AS tt \
WHERE value % 2 = 0;
Expected output
+--------+
| result |
+--------+
| 0 |
| 2 |
| 4 |
| 6 |
+--------+
Generate random numbers
The following is an example of using the function to populate a table with a set of random numbers:
SELECT FLOOR(RAND() * 100) AS result \
FROM PERCONA_SEQUENCE_TABLE(4) AS tt;
The output could be the following:
Expected output
+--------+
| result |
+--------+
| 24 |
| 56 |
| 70 |
| 25 |
+--------+
Generate random strings
You can populate a table with a set of pseudo-random strings with the following statement:
SELECT MD5(value) AS result \
FROM PERCONA_SEQUENCE_TABLE(4) AS tt;
Expected output
+----------------------------------+
| result |
+----------------------------------+
| f17d9c990f40f8ac215f2ecdfd7d0451 |
| 2e5751b7cfd7f053cd29e946fb2649a4 |
| b026324c6904b2a9cb4b88d6d61c81d1 |
| 26ab0db90d72e28ad0ba1e22ee510510 |
+----------------------------------+
Add a sequence to a table
You can add the sequence as a column to a new table or an existing table, as shown in this example:
CREATE TABLE t1 AS SELECT * FROM PERCONA_SEQUENCE_TABLE(4) AS tt;
SELECT * FROM t1;
Expected output
+-------+
| value |
+-------+
| 0 |
| 1 |
| 2 |
| 3 |
+-------+
Sequences are helpful for various purposes, such as populating tables and generating test data.
The ProcFS plugin
The ProcFS plugin provides access to the Linux performance counters by running SQL queries against a Percona Server for MySQL 8.4.
You may be unable to capture operating system metrics in certain environments, such as Cloud installations or MySQL-as-a-Service installations. These metrics are essential for complete system performance monitoring.
The plugin does the following:
-
Reads selected files from the
/procfile system and the/sysfile system. -
Populates the file names and their content as rows in the INFORMATION_SCHEMA.PROCFS view.
The system variable procfs_files_spec provides access to the /proc and the /sys files and directories. This variable cannot be changed at run time, preventing a compromised account from giving itself greater access to those file systems.
Install the PLUGIN manually
We recommend installing the plugin as part of the package. If needed, you can install this plugin manually. Copy the procfs.so file to the mysql plugin installation directory and execute the following command:
INSTALL PLUGIN procfs SONAME 'procfs.so';
Access privileges required
Only users with the ACCESS_PROCFS dynamic privilege can access the INFORMATION_SCHEMA.PROCFS view. During the plugin startup, this dynamic privilege is registered with the server.
After the plugin installation, grant a user access to the INFORMATION_SCHEMA.PROCFS view by executing the following command:
GRANT ACCESS_PROCFS ON *.* TO 'user'@'host';
Important
An SELinux policy or an AppArmor profile may prevent access to file locations needed by the ProcFS plugin, such as the ‘/proc/sys/fs/file-nr’ directory or any sub-directories or files under ‘/proc/irq/’. Either edit the policy or profile to ensure that the plugin has the necessary access. If the policy and profile do not allow access, the plugin may may have unexpected behavior.
For more information, see Working with SELinux and Working with AppArmor.
Using the ProcFS plugin
Authorized users can obtain information from individual files by specifying the exact file name within a WHERE clause. Files that are not included are ignored and considered not to exist.
All files that match the procfs_files_spec are opened, read, stored in memory, and, finally, returned to the client. It is critical to add a WHERE clause to return only specific files to limit the impact of the plugin on the server’s performance. A failure to use a WHERE clause can lead to lengthy query response times, high load, and high memory usage on the server. The WHERE clause can contain either an equality operator, the LIKE operator, or the IN operator. The LIKE operator limits file globbing. You can write file access patterns in the glob(7) style , such as /sys/block/sd[a-z]/stat;/proc/version\*
The following example returns the proc/version:
SELECT * FROM INFORMATION_SCHEMA.PROCFS WHERE FILE = '/proc/version';
Tables
PROCFS
The schema definition of the INFORMATION_SCHEMA.PROCFS view is:
CREATE TEMPORARY TABLE `PROCFS` (
`FILE` varchar(1024) NOT NULL DEFAULT '',
`CONTENTS` longtext NOT NULL
) ENGINE=InnoDB DEFAULT CHARSET=utf8;
Status variables provide the basic metrics:
| Name | Description |
|---|---|
| procfs_access_violations | The number of attempted queries by users without the ACCESS_PROCFS privilege. |
| procfs_queries | The number of queries made against the procfs view. |
| procfs_files_read | The number of files read to provide content |
| procfs_bytes_read | The number of bytes read to provide content |
Variable
procfs_files_spec
| Option | Description |
|---|---|
| Scope: | Global |
| Dynamic: | Yes |
| Read, Write, or Read-Only: | Read-Only |
The default value for procfs_files_spec is: /proc/cpuinfo;/proc/irq//;/proc/loadavg/proc/net/dev;/proc/net/sockstat;/proc/net/sockstat_rhe4;/proc/net/tcpstat;/proc/self/net/netstat;/proc/self/stat;/proc/self/io;/proc/self/numa_maps/proc/softirqs;/proc/spl/kstat/zfs/arcstats;/proc/stat;/proc/sys/fs/file-nr;/proc/version;/proc/vmstat
Enables access to the /proc and /sys directories and files. This variable is global, read only, and is set by using either the mysqld command line or by editing my.cnf.
Limitations
The following limitations are:
-
Only first 60k of /proc/ /sys/ files are returned
-
The file name size is limited to 1k
-
The plugin cannot read files if path does not start from /proc or /sys
-
Complex WHERE conditions may force the plugin to read all configured files.
Uninstall plugin
The following statement removes the procfs plugin.
UNINSTALL PLUGIN procfs;
Support for PROXY protocol
The proxy protocol allows an intermediate proxying server speaking proxy protocol (ie. HAProxy) between the server and the ultimate client (i.e. mysql client etc) to provide the source client address to the server, which normally would only see the proxying server address instead.
As the proxy protocol amounts to spoofing the client address, it is disabled by default, and can be enabled on per-host or per-network basis for the trusted source addresses where trusted proxy servers are known to run. Unproxied connections are not allowed from these source addresses.
Note
Ensure that proper firewall access control lists (ACL) are in place when this feature is enabled.
Proxying is supported only for TCP over IPv4 and IPv6 connections. The UNIX socket connections can not be proxied and do not fall under the effect of using the asterisk symbol (*).
You cannot have a proxied IP address that is 127.0.0.1 or ::1, even if the IP address is in the proxy_protocol_networks.
System variables
proxy_protocol_networks
| Option | Description |
|---|---|
| Command-line | Yes |
| Config file | Yes |
| Scope | Global |
| Dynamic | No |
| Default | (empty string) |
This variable is a global-only, read-only variable, which is either an asterisk symbol(*), or a list of comma-separated IPv4 and IPv6 network and host addresses. For security reasons we do not recommend using an asterisk symbol for the IP address. This symbol causes the server to accept the proxy protocol from any host. Network addresses are specified in CIDR notation, i.e. 192.168.0.0/24. To prevent source host spoofing, the setting of this variable must be as restrictive as possible to include only trusted proxy hosts.
Related reading
SEQUENCE_TABLE(n) function
Using SEQUENCE_TABLE() function provides the following:
| Benefit | Description |
|---|---|
| Generates Sequences | Acts as an inline table-valued function that generates a sequence of numbers. |
| Table-Valued Function | Unlike traditional scalar functions, SEQUENCE_TABLE() returns a virtual table with a single column named value containing the generated sequence. |
| Simpler Syntax | Simplifies queries that need to generate predictable sequences of numbers. |
| Flexibility | Allows dynamic definition of sequences within queries, offering more control compared to pre-defined tables for sequences. |
| Predefined Sequence | Does not manage sequences like Oracle or PostgreSQL; instead, it allows definition and generation of sequences within a SELECT statement. |
| Customization | Enables customization of starting value, increment/decrement amount, and number of values to generate. |
Version update
Percona Server for MySQL 8.4 deprecated SEQUENCE_TABLE(), and this function can be removed in a future release. We recommend that you use PERCONA_SEQUENCE_TABLE() instead.
To maintain compatibility with existing third-party software, SEQUENCE_TABLE is no longer a reserved term and can be used as a regular identifier.
Table functions
The function is an inline table-valued function. This function creates a temporary table with multiple rows. You can use this function within a single SELECT statement. Oracle MySQL Server only has the JSON_TABLE table function. The Percona Server for MySQL has the JSON_TABLE and SEQUENCE_TABLE() table functions. A single SELECT statement generates a multi-row result set. In contrast, a scalar function (like EXP(x) or LOWER(str) always returns a single value of a specific data type.
Syntax
As with any derived tables , a table function requires an alias in the SELECT statement.
The result set is a single column with the predefined column name value of type BIGINT UNSIGNED. You can reference the value column in SELECT statements. The following statements are valid. Using n as the number of generated values, the following is the basic syntax:
- SEQUENCE_TABLE(n) [AS] alias
SELECT … FROM SEQUENCE_TABLE(n) [AS] alias
SEQUENCE_TABLE(n) [AS] alias
SELECT * FROM SEQUENCE_TABLE(n) AS tt;
SELECT <expr(value)> FROM SEQUENCE_TABLE(n) AS tt;
The first number in the series, the initial term, is defined as 0, and the series ends with a value less than n.
Example usage
Using SEQUENCE_TABLE():
SELECT * FROM SEQUENCE_TABLE(5)) AS sequence_data;
Using PERCONA_SEQUENCE_TABLE():
SELECT * FROM PERCONA_SEQUENCE_TABLE(5)) AS sequence_data;
Basic sequence generation
In this example, the following statement generates a sequence:
SELECT * FROM SEQUENCE_TABLE(3) AS tt;
Expected output
+-------+
| value |
+-------+
|     0 |
|     1 |
|     2 |
+-------+
Start with a specific value
You can define the initial value using the WHERE clause. The following example starts the sequence with 4.
SELECT value AS result FROM SEQUENCE_TABLE(8) AS tt WHERE value >= 4;
Expected output
+--------+
| result |
+--------+
|      4 |
|      5 |
|      6 |
|      7 |
+--------+
Filter even numbers
Consecutive terms increase or decrease by a common difference. The default common difference value is 1. However, it is possible to filter the results using the WHERE clause to simulate common differences greater than 1.
The following example prints only even numbers from the 0..7 range:
SELECT value AS result FROM SEQUENCE_TABLE(8) AS tt WHERE value % 2 = 0;
Expected output
+--------+
| result |
+--------+
|      0 |
|      2 |
|      4 |
|      6 |
+--------+
Generate random numbers
The following is an example of using the function to populate a table with a set of random numbers:
SELECT FLOOR(RAND() * 100) AS result FROM SEQUENCE_TABLE(4) AS tt;
The output could be the following:
Expected output
+--------+
| result |
+--------+
|     24 |
|     56 |
|     70 |
|     25 |
+--------+
Generate random strings
You can populate a table with a set of pseudo-random strings with the following statement:
SELECT MD5(value) AS result FROM SEQUENCE_TABLE(4) AS tt;
Expected output
+----------------------------------+
| result                           |
+----------------------------------+
| f17d9c990f40f8ac215f2ecdfd7d0451 |
| 2e5751b7cfd7f053cd29e946fb2649a4 |
| b026324c6904b2a9cb4b88d6d61c81d1 |
| 26ab0db90d72e28ad0ba1e22ee510510 |
+----------------------------------+
Add a sequence to a table
You can add the sequence as a column to a new table or an existing table, as shown in this example:
CREATE TABLE t1 AS SELECT * FROM SEQUENCE_TABLE(4) AS tt;
SELECT * FROM t1;
Expected output
+-------+
| value |
+-------+
|     0 |
|     1 |
|     2 |
|     3 |
+-------+
Sequences are helpful for various purposes, such as populating tables and generating test data.
Slow query log rotation and expiration
Percona has implemented two new variables, max_slowlog_size and max_slowlog_files to provide users with ability to control the slow query log disk usage. These variables have the same behavior as the max_binlog_size variable and the max_binlog_files variable used for controlling the binary log.
max_slowlog_size
| Option | Description |
|---|---|
| Command-line | Yes |
| Config file | Yes |
| Scope | Global |
| Dynamic | Yes |
| Data type | numeric |
| Default | 0 (unlimited) |
| Range | 0 - 1073741824 |
The max_slowlog_size variable controls when the server rotates the slow query log file based on size.
By default, the value is set to 0, which means the server does not automatically rotate the slow query log file.
The block size is 4096 bytes. If you set a value that is not a multiple of 4096, the server rounds it down to the nearest multiple of 4096. For example, setting max_slowlog_size to any value less than 4096 will effectively set the value to 0.
If you set a limit for this size and enable this feature, the server will rename the slow query log file to slow_query_log_file.000001 once it reaches the specified size.
max_slowlog_files
| Option | Description |
|---|---|
| Command-line | Yes |
| Config file | Yes |
| Scope | Global |
| Dynamic | Yes |
| Data type | numeric |
| Default | 0 (unlimited) |
| Range | 0 - 102400 |
This variable limits the total amount of slow query log files and is used with max_slowlog_size.
The server creates and adds slow query logs until reaching the range’s upper value. When the upper value is reached, the server creates a new slow query log file with a higher sequence number and deletes the log file with the lowest sequence number maintaining the total amount defined in the range.
Thread pool
Thread pooling can improve performance and scalability for MySQL databases. This technique reuses a fixed number of threads to handle multiple client connections and execute statements. It reduces the overhead of creating and destroying threads and avoids the contention and context switching that can occur when there are too many threads.
If you have fewer than 20,000 connections, using the thread pool does not provide significant benefits. It’s better to keep thread pooling disabled and use the default method.
The default method, called one-thread-per-connection, creates a new thread for each client that connects to the MySQL server. This thread manages all queries and responses for that connection until it’s closed. This approach works well for a moderate number of connections, but it can become inefficient as the number of connections increases.
MySQL supports thread pooling through the thread pool plugin, which replaces the default one-thread-per-connection model. When a statement arrives, the thread group either begins executing it immediately or queues it for later execution in a round-robin fashion. The high-priority queue consists of several thread groups, each managing client connections. Each thread group has a listener thread that listens for incoming statements from the connections assigned to the group. The thread pool exposes several system variables that can be used to configure its operation, such as thread_pool_size, thread_pool_algorithm, thread_pool_stall_limit, and others.
The thread pool plugin consists of several thread groups, each of which manages a set of client connections. As connections are established, the thread pool assigns them to thread groups using the round-robin method. This method assigns threads fairly and efficiently. Here’s how it works:
-
The thread pool starts with a set number of thread groups.
-
When a new task arrives, the pool needs to assign it to a group.
-
It does this by going through the groups in order, one by one.
-
Let’s say you have four thread groups. The assignment would work like this:
- Task 1 goes to Group 1
- Task 2 goes to Group 2
- Task 3 goes to Group 3
- Task 4 goes to Group 4
-
Task 5 goes back to Group 1
-
This pattern continues, always moving to the next group and starting over when it reaches the end.
-
Each group handles its assigned tasks using its available threads.
This round-robin approach spreads work evenly across all groups. It prevents any single group from getting overloaded while others sit idle. This method helps maintain balanced performance across the system.
MySQL executes statements using one thread per client connection. When the number of connections increases past a specific point, performance degrades.
This feature introduces a dynamic thread pool, which enables the server to maintain top performance even with a large number of client connections. The server decreases the number of threads using the thread pool and reduces the context switching and hot lock contentions. The thread pool is most effective with OLTP workloads (relatively short CPU-bound queries).
Set the thread pool variable thread_handling to pool-of-threads by adding the following line to my.cnf:
thread_handling=pool-of-threads
Although the default values for the thread pool should provide good performance, additional tuning should be performed with the dynamic system variables. The goal is to minimize the number of open transactions on the server. Short-running transactions commit faster and deallocate server resources and locks.
Due to the following differences, this implementation is not compatible with upstream:
-
Built into the server, upstream implements the thread pool as a plugin
-
Does not minimize the number of concurrent transactions
Priority Queue:
A queue that assigns a priority to each data element and processes them according to their priority. The data element with the highest priority is served first, regardless of its order in the queue. A priority queue can be implemented using an array, a linked list, a heap, or a binary search tree. It can also be ascending or descending, meaning that the highest priority is either the smallest or the largest value.
Priority connection scheduling
The thread pool limits the number of concurrently running queries. The number of open transactions may remain high. Connections with already-started transactions are added to the end of the queue. A high number of open transactions has implications for the currently running queries. The thread_pool_high_prio_tickets variable controls the high-priority queue policy and assigns tickets to each new connection.
The thread pool adds the connection to the high-priority queue and decrements the ticket if the connection has the following attributes:
-
Has an open transaction
-
Has a non-zero number of high-priority tickets
Otherwise, the variable adds the connection to the low-priority queue with the initial value.
Each time, the thread pool checks the high-priority queue for the next connection. When the high-priority queue is empty, the thread pool picks connections from the low-priority queue. The default behavior is to put events from already started transactions into the high-priority queue.
If the value equals 0, all connections are put into the low-priority queue. If the value exceeds zero, each connection could be put into a high-priority queue.
The thread_pool_high_prio_mode variable prioritizes all statements for a connection or assigns connections to the low-priority queue. To implement this new thread_pool_high_prio_mode variable
Low-priority queue throttling
One case that can limit thread pool performance and even lead to deadlocks under high concurrency is when thread groups are oversubscribed due to active threads reaching the oversubscribe limit. Still, all/most worker threads are waiting on locks currently held by a transaction from another connection that is not currently in the thread pool.
In this case, the oversubscribe limit does not account for those threads in the pool that marked themselves inactive. As a result, the number of threads (both active and waiting) in the pool grows until it hits the thread_pool_max_threads value. If the connection executing the transaction holding the lock has managed to enter the thread pool by then, we get a large (depending on the thread_pool_max_threads value) number of concurrently running threads and, thus, suboptimal performance. Otherwise, we get a deadlock as no more threads can be created to process those transaction(s) and release the lock(s).
Such situations are prevented by throttling the low-priority queue when the total number of worker threads (both active and waiting ones) reaches the oversubscribe limit. If there are too many worker threads, do not start new transactions; create new threads until queued events from the already-started transactions are processed.
Handling long network waits
Specific workloads (large result sets, BLOBs, slow clients) can wait longer on network I/O (socket reads and writes). Whenever the server waits, this should be communicated to the thread pool so it can start a new query by either waking a waiting thread or sometimes creating a new one.
System variables
thread_handling
| Option | Description |
|---|---|
| Command-line | Yes |
| Config file | Yes |
| Scope | Global |
| Dynamic | No |
| Data type | String |
| Default | one-thread-per-connection |
This variable defines how the server handles threads for connections from the client.
| Values | Description |
|---|---|
| one-thread-per-connection | One thread handles all requests for a connection |
| pool-of-threads | A thread pool handles requests for all connections |
| no-threads | A single thread for all connections for debugging mode |
thread_pool_idle_timeout
| Option | Description |
|---|---|
| Command-line: | Yes |
| Config file: | Yes |
| Scope: | Global |
| Dynamic: | Yes |
| Data type: | Numeric |
| Default value: | 60 (seconds) |
This variable can limit the time an idle thread should wait before exiting.
thread_pool_high_prio_mode
This variable provides more fine-grained control over high-priority scheduling globally or per connection.
The following values are allowed:
-
transactions(the default). In this mode, only statements from already started transactions may go into the high-priority queue depending on the number of high-priority tickets currently available in a connection (see thread_pool_high_prio_tickets). -
statements. In this mode, all individual statements go into the high-priority queue, regardless of the transactional state and the number of available high-priority tickets. Use this value to prioritizeAUTOCOMMITtransactions or other statements, such as administrative ones. Setting this value globally essentially disables high-priority scheduling. All connections use the high-priority queue. -
none. This mode disables the priority queue for a connection. Certain types of connections, such as monitoring, are insensitive to execution latency and do not allocate the server resources that would impact the performance of other connections. These types of connections do not require high-priority scheduling. Setting this value globally essentially disables high-priority scheduling. All connections use the low-priority queue.
thread_pool_high_prio_tickets
| Option | Description |
|---|---|
| Command-line: | Yes |
| Config file: | Yes |
| Scope: | Global, Session |
| Dynamic: | Yes |
| Data type: | Numeric |
| Default value: | 4294967295 |
This variable controls the high-priority queue policy. Assigns the selected number of tickets to each new connection to enter the high-priority queue. Setting this variable to 0 disables the high-priority queue.
thread_pool_max_threads
| Option | Description |
|---|---|
| Command-line: | Yes |
| Config file: | Yes |
| Scope: | Global |
| Dynamic: | Yes |
| Data type: | Numeric |
| Default value: | 100000 |
This variable can limit the maximum number of threads in the pool. When the limit is reached, the server does not create new threads.
thread_pool_oversubscribe
| Option | Description |
|---|---|
| Command-line: | Yes |
| Config file: | Yes |
| Scope: | Global |
| Dynamic: | Yes |
| Data type: | Numeric |
| Default value: | 3 |
Determines the number of threads run simultaneously. A value lower than 3 could cause sleep and wake-up actions.
thread_pool_size
| Option | Description |
|---|---|
| Command-line: | Yes |
| Config file: | Yes |
| Scope: | Global |
| Dynamic: | Yes |
| Data type: | Numeric |
| Default value: | Number of processors |
Defines the number of threads that can use the CPU simultaneously.
thread_pool_stall_limit
| Option | Description |
|---|---|
| Command-line: | Yes |
| Config file: | Yes |
| Scope: | Global |
| Dynamic: | No |
| Data type: | Numeric |
| Default value: | 500 (ms) |
Defines the number of milliseconds before a running thread is considered stalled. When this limit is reached, the thread pool will wake up or create another thread. This variable prevents a long-running query from monopolizing the pool.
Status variables
Threadpool_idle_threads
| Option | Description |
|---|---|
| Scope: | Global |
| Data type: | Numeric |
This status variable shows the number of idle threads in the pool.
Threadpool_threads
| Option | Description |
|---|---|
| Scope: | Global |
| Data type: | Numeric |
This status variable shows the number of threads in the pool.
Trigger updates
In MySQL, the system efficiently handles multiple client queries to the same table by opening separate table instances for each query. This prevents delays and conflicts. The use of a “Table Cache” speeds up access by reducing the need to repeatedly open and close tables, improving overall performance.
The table_open_cache system variable controls the number of tables MySQL can keep open simultaneously across all threads. By increasing this setting, MySQL can handle more open files, although this requires more file descriptors. Despite a soft limit, MySQL can temporarily exceed it if queries demand more open tables. Upon query completion, MySQL automatically manages the cache by closing the least recently used tables.
The table_open_cache_instances system variable controls the number of open table cache instances in MySQL. By splitting the open tables cache into smaller segments (table_open_cache divided by table_open_cache_instances), sessions can access only one instance at a time for DML operations, reducing contention and improving performance when many sessions are running. For systems with 16 or more CPU cores, a value of 8 or 16 is recommended. However, if many large triggers are causing high memory usage, setting this variable to 1 can help limit memory consumption.
When a table with triggers is opened in the Table Cache, it also reads the trigger definitions and links the open table instance to its specific trigger instances. When a connection executes a Data Manipulation Language (DML) statement that activates a trigger, that connection uses its own instance of the trigger body for that particular table instance. This method of caching both the open table instances and their associated trigger bodies can unexpectedly use a significant amount of memory.
Percona Server for MySQL has the following abilities:
-
Avoid using table instances with fully-loaded and parsed triggers by read-only queries
-
Show trigger CREATE statements even if the statement is unparseable
The additional system variable reduces the Table Cache memory consumption on the server when tables that contain trigger definitions also are part of a significant read-only workload.
System variables
table_open_cache_triggers
| Option | Description |
|---|---|
| Command-line | --table-open-cache-triggers |
| Dynamic | Yes |
| Scope | Global |
| Data type | Integer |
| Default | 524288 |
| Minimum value | 1 |
| Maximum value | 524288 |
This variable sets a soft limit on the maximum number of open tables in the Table Cache, which holds fully loaded triggers. By default, this value is set to the maximum to prevent any changes in behavior for existing users. If the number of open table instances with fully loaded triggers exceeds this limit, the system removes the least recently used unused table instances. You can set this value as a start-up option or change it dynamically while the system runs.
Status variables
The following status variables are available:
| Variable name | Description |
|---|---|
table_open_cache_triggers_hits |
A hit means the statement required an open table instance with fully-loaded triggers and was able to get one from the table_open_cache. |
table_open_cache_triggers_misses |
A miss means the statement requiring an open table instance with fully-loaded triggers was not found one in the table_open_cache. The statement may find a table instance without fully-loaded triggers and finalized their loading for it. |
table_open_cache_triggers_overflows |
An overflow indicates the number of unused table instances with triggers that were expelled from the table_open_cache due to the table_open_cache_triggers soft limit. This variable may demonstrate that the table_open_cache_triggers value should be increased. |
SHOW CREATE TRIGGER statment changes
The SHOW CREATE TRIGGER statement displays the SQL command that created a trigger, including definitions that may no longer be understandable. For example, if a trigger was created before a server upgrade that changed the trigger syntax, this statement will still show its definition.
Additional resources
For more information, see How MySQL opens and closes tables .
Percona Toolkit UDFs
The Percona Toolkit component adds user-defined functions (UDFs) that provide fast 64-bit hashing. These UDFs are primarily about speed and data integrity. They are implemented in C++ to perform the hashing operations much faster than standard SQL or stored procedures. With datasets often in the multi-terabyte range, they address several critical scenarios.
Prerequisites
Before using these functions, add the Percona Repository and install the component.
Why use these functions
| Use case | Context | Benefit |
|---|---|---|
| High-speed data checksums (pt-table-checksum) | pt-table-checksum must hash every row to verify replicas. MySQL’s built-in MD5() or SHA1() is CPU-intensive and slow for billions of rows. |
When you install fnv_64 or murmur_hash, the checksum process becomes significantly faster; pt-table-checksum can finish in hours instead of days. |
| Efficient data sharding and partitioning | When you shard data across multiple servers, you need a consistent way to map a key (for example, a user ID) to a specific shard. A common pattern is murmur_hash(user_id) % 10 to distribute data across 10 shards. |
MurmurHash has a low collision rate and uniform distribution, so shards stay balanced and one server does not become a hotspot. |
| Change Data Capture (CDC) and auditing | When you sync data to an external warehouse (for example, Snowflake or BigQuery) without a full binary log parser, you can store a hash of each row in a row_hash column and recompute on the next sync to detect changed rows. |
fnv_64 is very lightweight, so you can run this in an INSERT or UPDATE trigger with negligible impact on transaction latency. |
| Fast lookups for large string columns | For tables with very long strings (for example, URLs or JSON) that you need to index or check for uniqueness, indexing the full string is inefficient. | Index fnv_64(string) instead; you get a 64-bit integer index that is smaller, uses the buffer pool efficiently, and supports fast equality lookups. |
Functions provided
The component registers these functions (one load registers all of them):
| Function | Description |
|---|---|
fnv_64() |
64-bit FNV hash. Simple, fast. |
fnv1a_64() |
64-bit FNV-1a variant. Often better distribution than FNV on sequential input. |
murmur_hash() |
64-bit MurmurHash. Strong avalanche; good for fewer collisions on diverse data. |
Each function takes a string or numeric value and returns an unsigned 64-bit integer.
Technical comparison: FNV vs Murmur
| Aspect | fnv_64 / fnv1a_64 |
murmur_hash() |
|---|---|---|
| Speed | Very fast; minimal operations per byte. | Very fast; often comparable or slightly better on long strings. |
| Collision behavior | Good for general use. FNV can cluster more on sequential or similar inputs; FNV-1a usually improves that. | Better distribution and avalanche (small input change → large output change). Prefer for large datasets or when collision rate matters. |
| When to use | General-purpose hashing, simple checksums, shard keys when collision risk is low. | Distributed systems, large tables, or when you need the lowest practical collision rate. |
Benchmark with your own data and workload when you choose; performance depends on key length, data patterns, and hardware.
Installation
The UDFs are shipped as a MySQL component (not as separate plugin files). After you install the Percona Server package, load the component. Full repository and package steps are in Install Percona Toolkit UDFs (Optional). Then run:
INSTALL COMPONENT 'file://component_percona_udf';
Expected output
Query OK, 0 rows affected (0.01 sec)
Examples
Hash a single value (for example, for a lookup key or checksum):
SELECT fnv_64('test_string');
SELECT murmur_hash(12345);
Expected output
+----------------------+
| fnv_64('test_string') |
+----------------------+
|   13528473474361592478 |
+----------------------+

+-------------------+
| murmur_hash(12345) |
+-------------------+
|  12345678901234567 |
+-------------------+
Use in queries—for example, to derive a shard or partition key from user_id:
SELECT user_id, murmur_hash(user_id) AS shard_key FROM users;
Expected output
+---------+-------------------+
| user_id | shard_key         |
+---------+-------------------+
|       1 | 12345678901234567 |
|       2 | 98765432109876543 |
|       3 | 55555555555555555 |
+---------+-------------------+
Checksum a column to compare two tables (same expression on both sides gives the same result when data matches):
SELECT SUM(murmur_hash(col1)) AS checksum FROM replica_db.my_table;
-- Compare with the same expression on the source table.
Expected output
+---------------------+
| checksum            |
+---------------------+
| 1234567890123456789 |
+---------------------+
Use in WHERE or joins when you need a stable numeric fingerprint:
SELECT * FROM events WHERE murmur_hash(device_id) MOD 10 = 0;
Expected output
+----+-----------+---------------------+
| id | device_id | created_at          |
+----+-----------+---------------------+
|  2 | dev_abc   | 2024-01-15 10:30:00 |
|  5 | dev_xyz   | 2024-01-15 11:00:00 |
+----+-----------+---------------------+
Maintenance
Verify the component is loaded
Check that the component is registered:
SELECT * FROM mysql.component WHERE component_urn = 'file://component_percona_udf';
Expected output
+----------------+------------------------------------------+
| component_id   | component_urn                            |
+----------------+------------------------------------------+
|              1 | file://component_percona_udf             |
+----------------+------------------------------------------+
A single row means the component is installed and will load on restart. You can also confirm the functions exist by invoking one:
SELECT fnv_64('check');
Expected output
+----------------+
| fnv_64('check') |
+----------------+
| 123456789012345 |
+----------------+
If the component is not loaded, you get an error such as “Unknown function ‘fnv_64’”.
Uninstall the component
To remove the UDFs, uninstall the component. Any views, stored procedures, or triggers that call these functions will become invalid after uninstall.
UNINSTALL COMPONENT 'file://component_percona_udf';
Expected output
Query OK, 0 rows affected (0.00 sec)
You need the DELETE privilege on the mysql.component system table. See UNINSTALL COMPONENT for details.
Troubleshooting
If INSTALL COMPONENT fails:
- Check the error message for details.
- Verify the component path
'file://component_percona_udf'is correct and that the component library exists in the directory given bySELECT @@plugin_dir;. - Ensure you have the required privileges (for example,
INSERTonmysql.componentfor install,DELETEfor uninstall).
For further help, see Percona Support .
Next steps
-
Post-installation — If you installed the server or the UDF component from a package, configure and secure the server next.
-
Percona Toolkit updates for 8.4 — If you use other Percona Toolkit tools (for example,
pt-replica-find), see version-specific updates and terminology changes. -
Upgrade from plugins to components — If you are migrating from the old UDF plugin to the component, see the upgrade path.
Other reading
- Percona Toolkit documentation
Utility user
Percona Server for MySQL has implemented ability to have a MySQL user who has system access to do administrative tasks but limited access to user schema. This feature is especially useful to those operating MySQL As A Service.
This user has a mixed and special scope of abilities and protection:
-
Utility user does not appear in the mysql.user table and can not be modified by any other user, including root.
-
Utility user does not appear in INFORMATION_SCHEMA.USER_STATISTICS, INFORMATION_SCHEMA.CLIENT_STATISTICS or THREAD_STATISTICS tables or in any performance_schema tables .
-
Utility user’s queries may appear in the general and slow logs.
-
Utility user does not have the ability create, modify, delete or see any schemas or data not specified, except for information_schema.
-
Utility user may modify all visible, non-read-only system variables (see expanded_option_modifiers functionality).
-
Utility user may see, create, modify and delete other system users only if given access to the mysql schema.
-
Regular users may be granted proxy rights to the utility user but attempts to impersonate the utility user fail. The utility user may not be granted proxy rights on any regular user.
For example, GRANT PROXY ON utility_user TO regular_user; does not fail, but any actual attempt to impersonate as the utility user fails.
GRANT PROXY ON regular_user TO utility_user; fails when utility_user is an exact match or is more specific than than the utility user specified.
At server start, the server notes in the log output that the utility user exists and the schemas that the utility user can access.
System variables
In order to have the ability for a special type of MySQL user, which will have a very limited and special amount of control over the system and can not be see or modified by any other user including the root user, three new options have been added.
utility_user
| Option | Description |
|---|---|
| Command Line: | Yes |
| Config file | utility_user=<user@host> |
| Scope: | Global |
| Dynamic: | No |
| Data type | String |
| Default | NULL |
Specifies a MySQL user that will be added to the internal list of users and recognized as the utility user.
Option utility_user specifies the user which the system creates and recognizes as the utility user. The host in the utility user specification follows conventions described in the MySQL manual . For example, the conventions allow wildcards and IP masks. Anonymous user names are not permitted to be used for the utility user name.
This user must not be an exact match to any other user that exists in the mysql.user table. If the server detects that the user specified with this option exactly matches any user within the mysql.user table on start up, the server reports an error and exits gracefully.
If host name wildcards are used and a more specific user specification is identified on start up, the server reports a warning and continues.
Error message
utility_user=frank@% and [frank@localhost](mailto:frank@localhost) exists within the mysql.user table.
If a client attempts to create a MySQL user that matches this user specification exactly or if host name wildcards are used for the utility user and the user being created has the same name and a more specific host, the creation attempt fails with an error.
Error message
utility_user=frank@% and CREATE USER [‘frank@localhost](mailto:'frank@localhost)’;
As a result of these requirements, it is strongly recommended that a very unique user name and reasonably specific host be used.
Verify the script or tools test they are running within the correct user by executing SELECT CURRENT_USER() and comparing the result against the known utility user.
utility_user_password
| Option | Description |
|---|---|
| Command Line: | Yes |
| Config file | utility_user_password=password |
| Scope: | Global |
| Dynamic: | No |
| Data type | String |
| Default | NULL |
Specifies the password required for the utility user.
Option utility_user_password specifies the password for the utility user and must be specified or the server exits with an error.
Utility user password
utility_user_password=Passw0rD
utility_user_schema_access
| Option | Description |
|---|---|
| Command Line: | Yes |
| Config file | utility_user_schema_access=schema,schema,schema |
| Scope: | Global |
| Dynamic: | No |
| Data type | String |
| Default | NULL |
Specifies the schemas that the utility user has access to in a comma delimited list.
Option utility_user_schema_access specifies the name(s) of the schema(s) that the utility user will have access to read write and modify. If a particular schema named here does not exist on start up it will be ignored. If a schema by the name of any of those listed in this option is created after the server is started, the utility user will have full access to it.
Utility user schema access
utility_user_schema_access=schema1,schema2,schema3
utility_user_privileges
| Option | Description |
|---|---|
| Command Line: | Yes |
| Config file | utility_user_privileges=privilege1,privilege2,privilege3 |
| Scope: | Global |
| Dynamic: | No |
| Data type | String |
| Default | NULL |
This variable can be used to specify a comma-separated list of extra access privileges to grant to the utility user. Supported values for the privileges list are: SELECT, INSERT, UPDATE, DELETE, CREATE, DROP, RELOAD, SHUTDOWN, PROCESS, FILE, GRANT, REFERENCES, INDEX, ALTER, SHOW DATABASES, SUPER, CREATE TEMPORARY TABLES, LOCK TABLES, EXECUTE, REPLICATION SLAVE, REPLICATION CLIENT, CREATE VIEW, SHOW VIEW, CREATE ROUTINE, ALTER ROUTINE, CREATE USER, EVENT, TRIGGER, CREATE TABLESPACE
Option utility-user-privileges allows a comma-separated list of extra access privileges to grant to the utility user.
Utility user privileges
utility-user-privileges =”CREATE,DROP,LOCK TABLES”;
utility_user_dynamic_privileges
| Option | Description |
|---|---|
| Command Line: | Yes |
| Config file | utility_user_dynamic_privileges=privilege1,privilege2,privilege3 |
| Scope: | Global |
| Dynamic: | No |
| Data type | String |
| Default | NULL |
This variable allows a comma-separated list of extra access dynamic privileges to grant to the utility user. The supported values for the dynamic privileges are:
-
APPLICATION_PASSWORD_ADMIN
-
AUDIT_ADMIN
-
BACKUP_ADMIN
-
BINLOG_ADMIN
-
BINLOG_ENCRYPTION_ADMIN
-
CLONE_ADMIN
-
CONNECTION_ADMIN
-
ENCRYPTION_KEY_ADMIN
-
FIREWALL_ADMIN
-
FIREWALL_USER
-
GROUP_REPLICATION_ADMIN
-
INNODB_REDO_LOG_ARCHIVE
-
NDB_STORED_USER
-
PERSIST_RO_VARIABLES_ADMIN
-
REPLICATION_APPLIER
-
REPLICATION_SLAVE_ADMIN
-
RESOURCE_GROUP_ADMIN
-
RESOURCE_GROUP_USER
-
ROLE_ADMIN
-
SESSION_VARIABLES_ADMIN
-
SET_USER_ID
-
SHOW_ROUTINE
-
SYSTEM_USER
-
SYSTEM_VARIABLES_ADMIN
-
TABLE_ENCRYPTION_ADMIN
-
VERSION_TOKEN_ADMIN
-
XA_RECOVER_ADMIN
Other dynamic privileges may be defined by plugins.
Option utility_user_dynamic_privileges allows a comma-separated list of extra-access dynamic privileges to grant to the utility user.
Utility user dynamic privileges
utility_user_dynamic_privileges =”SYSTEM_USER,AUDIT_ADMIN”;
Quickstart
Overview
Percona Server for MySQL is a freely available, fully compatible, enhanced, and open source drop-in replacement for any MySQL database and provides enterprise-grade features in security, availability, data management, visibility, instrumentation, and performance.
Review Get help from Percona for ways that we can work with you.
Quickstart path
Follow this path to install Percona Server for MySQL, work with a database, and learn next steps:
-
Choose an installation method
-
Work with a database — create a database and run queries
-
Clean up your installation (optional) — when you are finished
-
Next steps — ideas for further learning
Install method
Run Percona Server for MySQL with Docker
Install Percona Server for MySQL on Ubuntu
Install Percona Server for MySQL on Oracle Linux
Additional resources
Quickstart - Run Percona Server for MySQL container images with Docker
Quickstart path: Step 1 — Install. Next: Work with a database (step 2).
Prerequisites
-
Docker Engine and Docker Compose installed and running
-
Stable internet connection
-
Basic understanding of the command-line interface (CLI)
Always adapt the commands and configurations to your specific environment and security requirements.
Start a Docker container
Choose one of the following methods:
-
Create a directory and add a
docker-compose.ymlfile:services: mysql: image: percona/percona-server:8.4.8 container_name: psmysql ports: - "3306:3306" environment: MYSQL_ROOT_PASSWORD: secret volumes: - myvol:/var/lib/mysql restart: unless-stopped volumes: myvol:To run the Docker ARM64 version of Percona Server for MySQL, use the
8.4.8-aarch64tag instead of8.4.8in theimageline. If needed, you can replace thesecretpassword with a stronger password. -
Start the container:
docker compose up -dExpected output
[+] Running 2/2
 ✔ Network quickstart_default  Created
 ✔ Container psmysql           Started
If you prefer to run the container manually, use the following. The command has the following options:
| Option | Description |
|---|---|
-d |
Runs the container in detached mode. |
-p 3306:3306 |
Maps the container’s MySQL port (3306) to the same port on your host. |
--name psmysql |
Container name (required for the connect step below). |
-e MYSQL_ROOT_PASSWORD=secret |
Sets the root password. |
-v myvol:/var/lib/mysql |
Named volume for persistent storage. |
percona/percona-server:8.4.8 |
Image and tag for the release. |
You must set at least one environment variable (for example MYSQL_ROOT_PASSWORD) or the instance refuses to initialize. For more on tags and images, see percona/percona-server on the Docker Hub . For ARM64, use the 8.4.8-aarch64 tag instead of 8.4.8.
docker run -d -p 3306:3306 --name psmysql \
--platform linux/amd64 \
-e MYSQL_ROOT_PASSWORD=secret \
-v myvol:/var/lib/mysql \
percona/percona-server:8.4.8
Expected output
Unable to find image 'percona/percona-server:8.4.8' locally
Pulling from percona/percona-server
b902d6b6048a: Pull complete
...
708ba1f9874cbc09441d18b1ca5d9c0a6f045b27e54aafe15fdd78eda8ef3ecf
Connect to the database instance
To connect to a MySQL database on a container, use the Docker exec command with the database instance connect command. You must know the name or ID of the container that runs the database server and the database credentials.
The Docker exec command runs a specified command in a running container. The database instance connect command connects to a MySQL server with the user name and password.
For this example, we have the following options:
| Option | Description |
|---|---|
it |
Interact with the container and be a pseudo-terminal |
psmysql |
Running container name |
mysql |
Connects to a database instance |
-u |
Specifies the user account used to connect |
-p |
Use this password when connecting |
You must enter the password when the server prompts you.
Run the following to connect:
docker exec -it psmysql mysql -uroot -p
You are prompted to enter the password, which is secret. If you have changed the password, use your password. You will not see any characters as you type.
Enter password:
You should see the following result.
Expected output
Welcome to the MySQL monitor.  Commands end with ; or \g.
Your MySQL connection id is 10
Server version: 8.4.8 Percona Server (GPL), Release 1, Revision 238b3c02

Copyright (c) 2009-2026 Percona LLC and/or its affiliates
Copyright (c) 2000, 2026, Oracle and/or its affiliates.

Oracle is a registered trademark of Oracle Corporation and/or its
affiliates. Other names may be trademarks of their respective
owners.

Type 'help;' or '\h' for help. Type '\c' to clear the current input statement.
Troubleshooting
-
Connection Refusal: Ensure Docker is running and the container is active. Verify port 3306 is accessible on the container’s IP address.
-
Incorrect Credentials: Double-check the root password you set during container launch.
-
Data Loss: Always back up your data regularly outside the container volume.
Security best practices
-
Strong Passwords: Utilize complex, unique passwords for the root user and any additional accounts created within the container. The alphanumeric password should contain at least 12 characters. The password should include uppercase and lowercase letters, numbers, and symbols.
-
Network Restrictions: Limit network access to the container by restricting firewall rules to only authorized IP addresses.
-
Periodic Updates: Regularly update the Percona Server image and Docker Engine to mitigate known vulnerabilities.
-
Data Encryption: Consider encrypting the data directory within the container volume for an additional layer of security.
-
Monitor Logs: Actively monitor container logs for suspicious activity or errors.
Remember, responsible container management and robust security practices are crucial for safeguarding your MySQL deployment. By following these guidelines, you can leverage the benefits of Docker and Percona Server while prioritizing the integrity and security of your data.
Work with a database
Additional resources
Install Percona Server for MySQL and create a database on Ubuntu
Use the Percona repositories to install using APT.
Quickstart path: Step 1 — Install. Next: Work with a database (step 2).
The percona-release tool is a command-line utility that simplifies the management and installation of Percona software packages, providing access to the latest versions and ensuring consistency across environments. For more information, refer to the Percona Software Repositories Documentation.
Prerequisites
-
Either use
sudoor run as root -
Stable Internet access
Installation steps
Do the following steps to install the server:
-
Update the package index:
sudo apt update -
Install curl:
sudo apt install -y curl -
Download and install the
percona-releaserepository package:curl -O https://repo.percona.com/apt/percona-release_latest.generic_all.deb sudo apt install -y gnupg2 lsb-release ./percona-release_latest.generic_all.deb -
Set up the Percona Server for MySQL 8.4 repository:
sudo percona-release setup ps-84-lts --scheme https -
Enable the Percona Server for MySQL release repository:
sudo percona-release enable ps-84-lts release --scheme https sudo apt update -
Install Percona Server for MySQL:
sudo apt install -y percona-server-serverDuring installation, you may be prompted to:
-
Enter a root password (use
secretfor these examples, or choose your own) -
Confirm the password
-
Choose an authentication method, if the installer asks (Strong password encryption recommended)
-
-
[Optional] Secure the installation:
Run the
mysql_secure_installationscript to improve security. The script helps you:-
Set a password for the root user
-
Select a password validation policy level
-
Remove anonymous users
-
Disable root login remotely
-
Remove the test database
-
Reload the privilege table
sudo mysql_secure_installation -
-
Check the service status and restart if needed:
sudo systemctl status mysql sudo systemctl restart mysql -
Log in to the server using the password you set during installation:
mysql -uroot -p Enter password:
Work with a database
The steps below walk you through creating a database and running basic queries. You can also open the Work with a database script in its own page.
Troubleshooting
-
Connection issues
-
Check that the MySQL service is running:
sudo systemctl status mysql -
If the service is not active, start it:
sudo systemctl start mysql -
Try connecting with the password you set during installation:
mysql -uroot -p Enter password:
-
-
Permission errors
If MySQL reports that a user lacks permission to perform an action, grant the needed privilege. For example, to allow a user to create databases from the MySQL shell:
GRANT CREATE ON *.* TO 'username'@'localhost'; FLUSH PRIVILEGES;Replace
usernamewith your MySQL user name. -
Package installation issues
Check the system log for errors during installation:
sudo journalctl -u mysql -n 50For specific error messages, see the Percona Server for MySQL documentation or the Percona community forum.
Security best practices
-
Strong Passwords: Utilize complex and unique passwords for all users, especially the root account.
-
Minimize Permissions: Grant users only the privileges necessary for their tasks.
-
Disable Unnecessary Accounts: Remove test accounts and unused accounts.
-
Regular Backups: Implement consistent backup routines to safeguard your data.
-
Keep Software Updated: Maintain Percona Server and related packages updated with security patches.
-
Monitor Server Activity: Employ tools, like Percona Monitoring and Management , and logs to monitor server activity for suspicious behavior.
Additional resources
Install Percona Server for MySQL and create a database on Oracle Linux
Use the Percona repositories to install using YUM.
Quickstart path: Step 1 — Install. Next: Work with a database (step 2).
The percona-release tool is a command-line utility that simplifies the management and installation of Percona software packages, providing access to the latest versions and ensuring consistency across environments. For more information, refer to the Percona Software Repositories Documentation.
Prerequisites
-
Either use
sudoor run as root -
Stable Internet access
Installation steps
{.power-number}
-
Install
percona-release:sudo yum install -y https://repo.percona.com/yum/percona-release-latest.noarch.rpm -
Set up the repository for Percona Server for MySQL 8.4:
[Optional] On Red Hat 8 systems (including Rocky Linux and AlmaLinux), disable the distribution’s MySQL module first:
sudo dnf module disable mysql -yThen run:
sudo percona-release setup ps-84-lts -
Enable the release repository:
sudo percona-release enable ps-84-lts release -
Install Percona Server for MySQL:
sudo yum install -y percona-server-server -
Start the MySQL service:
sudo systemctl restart mysql -
Retrieve the temporary password:
sudo grep 'temporary password' /var/log/mysqld.log -
Log in to the server using the temporary password:
mysql -uroot -p Enter password: -
Change the temporary password:
ALTER USER 'root'@'localhost' IDENTIFIED BY '[your password]'; exit -
Log in again with the new password to verify:
mysql -uroot -p Enter password:
Secure the installation
[Optional] Run the mysql_secure_installation script to improve security. The script helps you:
-
Set a password for the root user
-
Select a password validation policy level
-
Remove anonymous users
-
Disable root login remotely
-
Remove the test database
-
Reload the privilege table
sudo mysql_secure_installation
Troubleshooting
-
Connection issues
-
Check that the MySQL service is running:
sudo systemctl status mysql -
If the service is not active, start it:
sudo systemctl start mysql -
Try connecting with the password you set during installation:
mysql -uroot -p Enter password:
-
-
Permission errors
If MySQL reports that a user lacks permission to perform an action, grant the needed privilege. For example, to allow a user to create databases from the MySQL shell:
GRANT CREATE ON *.* TO 'username'@'localhost'; FLUSH PRIVILEGES;Replace
usernamewith your MySQL user name. -
Package installation issues
Check the system log for errors during installation:
sudo journalctl -u mysqld -n 50For specific error messages, see the Percona Server for MySQL documentation or the Percona community forum.
Security best practices
-
Keep software updated:
sudo yum updateregularly. -
Strong root password: Set a complex, unique password using
mysql_secure_installation. -
Disable unused accounts and databases: Remove unnecessary elements.
-
Monitor Server Activity: Employ tools, like Percona Monitoring and Management , and logs to monitor server activity for suspicious behavior.
-
Backup data regularly: Ensure robust backups for disaster recovery.
Work with a database
Additional resources
First five minutes after installation
This guide walks you through the most important security and stability steps to take right after installing Percona Server for MySQL. Completing these steps helps protect your server and makes troubleshooting easier.
Quickstart path: After Install (Ubuntu), Install (Oracle Linux), or Docker. Next: Work with a database.
| Step | What you do |
|---|---|
| Secure the installation | Run post-installation security steps so the server is not left in a default, weak state. |
| Create a least-privilege admin user | Use a dedicated admin account with only the privileges (permissions) that account needs instead of root. |
| Configure an OOM-killer guardrail | Reduce the chance the Linux OOM killer will abruptly terminate the MySQL process. |
| Enable diagnostic logging | Turn on error and slow-query logging so you can diagnose issues later. |
| Verify the backup path | Ensure the directory where backups will go exists and is writable. |
When you are done, use Sanity check: First five minutes to verify that these steps were applied correctly.
Secure the installation
Before doing anything else, complete the standard post-installation security steps. These ensure the server is not left with default passwords, anonymous users (accounts with no username that can connect without proper credentials), or remote root login.
-
Set or update the
rootpassword
The root account is the default MySQL administrative user. If you did not set its password during install (for example, on some RPM-based systems), set one now. See Post-installation — Update the root password. -
Run
mysql_secure_installationto:- Change the root password (if needed)
- Disallow remote login for root
- Remove anonymous users
- Remove the test database
- Reload privilege tables
-
Optional: populate time zone tables
If you installed from source or generic binaries, populate the time zone tables (the system data that makes time zone–aware date and time functions work correctly).
For more information, see Post-installation — Secure the server.
Create a least-privilege admin user
Use a dedicated admin account for day-to-day administration instead of root. Give that account only the privileges the account needs (least privilege: the practice of granting only the minimum permissions necessary). Reserve root for emergencies and avoid using root for routine tasks.
-
Connect as
root(or another user that can create users and grant privileges):mysql -u root -p -
Create an admin user. Use a strong password and a specific host (the machine or network location the user can connect from; for example,
localhostmeans the same machine only) instead of%(which means any host):CREATE USER 'admin'@'localhost' IDENTIFIED BY 'YourStrongPassword_12'; -
Grant only the privileges the admin needs. Grant means to assign a permission to a user. The following is a common set for an admin who manages users, replication, and backups but does not need full
SUPER(a powerful built-in privilege) or global privileges on all databases (*.*):GRANT CREATE USER, RELOAD, PROCESS, REPLICATION CLIENT, REPLICATION SLAVE, BACKUP_ADMIN, SHOW DATABASES, SELECT ON *.* TO 'admin'@'localhost'; FLUSH PRIVILEGES;FLUSH PRIVILEGEStells the server to reload the privilege tables so the new grants take effect immediately. -
Test the new user:
mysql -u admin -p -e "SHOW DATABASES;" -
Use
adminfor daily tasks and keeprootfor rare, high-privilege operations.
Adjust privileges to your needs
Add or remove privileges based on what this admin will do. For example, add SHOW VIEW, CREATE ROUTINE, or EVENT if they manage views (saved queries presented as virtual tables), routines (stored procedures and functions), or scheduled events. Avoid granting SUPER, ALL, or *.* unless necessary. You can review effective privileges with SHOW EFFECTIVE GRANTS.
Configure an OOM-killer guardrail
On Linux, when the system runs low on memory, the kernel OOM killer (out-of-memory killer: a kernel process that terminates other processes to free memory) may terminate processes. MySQL can be one of them, which leads to abrupt shutdowns. You can make the MySQL service less likely to be chosen by adjusting its OOM score.
Using systemd (the Linux system and service manager that starts and manages the MySQL service), set OOMScoreAdjust so that the kernel prefers to kill other processes before MySQL. A typical value is -500 (range is -1000 to 1000; lower means less likely to be killed).
- Create or edit an override file for the MySQL service. On Red Hat–based systems the service is often
mysqld; on Debian/Ubuntu the service may be namedmysql. Adjust the service name if needed:
sudo systemctl edit mysqld
If your service is named mysql:
sudo systemctl edit mysql
- Add the following (use
mysqldormysqlto match your service name):
[Service]
OOMScoreAdjust=-500
- Save and close the editor. Reload systemd and restart the MySQL service:
sudo systemctl daemon-reload
sudo systemctl restart mysqld
- Confirm the setting:
systemctl show mysqld -p OOMScoreAdjust
You should see OOMScoreAdjust=-500 (or the value you set).
Not a memory limit
The OOM score adjustment only influences which process the OOM killer chooses. It does not set a memory limit for MySQL. For strict limits, use cgroups or MySQL/InnoDB memory settings.
Enable diagnostic logging
Enabling the error log (a file where the server records errors, warnings, and startup messages) and the slow query log (a file that records SQL statements that run longer than a threshold you set) gives you the information you need to diagnose problems and tune performance.
-
Locate your configuration file
The configuration file (oftenmy.cnformysqld.cnf) controls server options. Common paths:/etc/my.cnf,/etc/mysql/my.cnf, or/etc/mysql/mysql.conf.d/mysqld.cnf. Edit the file under the[mysqld]section (the section that applies to the MySQL server process). -
Ensure the error log is set
The server usually writes an error log by default. Confirm or set an explicit path so you know where to look:
[mysqld]
log_error=/var/log/mysql/error.log
On some systems the directory is /var/lib/mysql (the default data directory, where the server stores database files) or similar. Create the log directory if needed and set ownership to the MySQL system user (the operating-system user that runs the MySQL process; often named mysql):
sudo mkdir -p /var/log/mysql
sudo chown mysql:mysql /var/log/mysql
- Enable the slow query log
The slow query log helps you find queries that need optimization:
slow_query_log = 1
long_query_time = 2
slow_query_log_file = /var/log/mysql/slow.log
Adjust long_query_time (the time in seconds above which a query is considered “slow” and written to the log) to what you consider slow. Restart the server after changing the config.
- Optional: restrict log locations
For tighter control over where logs are written, see Restrict dynamic log file locations.
Verify the backup path
Your backup strategy (for example, Percona XtraBackup for full physical backups, or mysqldump for logical backups that produce SQL) will write to a directory. Verify that path before you run a backup.
-
Choose a backup directory
For example,/var/backups/mysqlor a dedicated volume. Do not use the data directory (where the server stores live database files) for backup output. -
Create the directory and set permissions
The MySQL process (or the operating-system user that runs the backup tool) must be able to write there:
sudo mkdir -p /var/backups/mysql
sudo chown mysql:mysql /var/backups/mysql
sudo chmod 750 /var/backups/mysql
- Check that the backup directory is writable
As the MySQL user (or the backup user), test write access:
sudo -u mysql touch /var/backups/mysql/.write_test && sudo -u mysql rm /var/backups/mysql/.write_test && echo "OK: backup path is writable"
- Document the path
Use this path in your backup scripts, cron jobs, or documentation so that restores use the same location.
For backup strategy and tools, see Backup and restore overview. For Percona XtraBackup , see the Quickstart for 8.4 .
Next steps
- Quickstart — Work with a database — Create tables and run queries (next step in the Quickstart path).
- Run Sanity check: First five minutes to confirm all steps were applied correctly.
- Use your new admin user for daily work and keep
rootfor emergencies. - Plan and test backups to the verified backup path.
- Quickstart — Overview — See the full Quickstart path.
Work with a database
Benefits and what to watch out for when creating databases and tables
Creating a database and table provides the following benefits:
-
Store and organize your data in a structured and consistent way.
-
Query and manipulate your data using SQL statements like SELECT, INSERT, UPDATE, and DELETE.
-
Use primary keys to uniquely identify records.
This quickstart demonstrates basic database operations. As you advance, you can add constraints, triggers, views, indexes, and other features to enforce data integrity, improve security, and optimize performance.
When you create a table, design your database schema carefully, as changing the schema later may be difficult and costly. You should also backup and restore your data regularly, as data loss or corruption may occur due to hardware failures, human errors, or malicious attacks.
You are welcome to name any items to match your organization’s standards or use your table structure and data. If you do, the results are different from the expected results.
To create a database, use the CREATE DATABASE statement. After the database is created, select the database using the USE statement.
CREATE DATABASE mydb;
Expected output
Query OK, 1 row affected (0.01 sec)
USE mydb;
Expected output
Database changed
Create tables
Create tables using the CREATE TABLE statement. You can specify data types, constraints, indexes, and other options for each column.
First, create the departments table:
CREATE TABLE `departments` (
`id` INT AUTO_INCREMENT,
`name` VARCHAR(100),
PRIMARY KEY (`id`)
);
Expected output
Query OK, 0 rows affected (0.01 sec)
Next, create the employees table with a foreign key to the departments table:
CREATE TABLE `employees` (
`id` INT AUTO_INCREMENT,
`name` VARCHAR(255),
`department_id` INT,
`country` VARCHAR(100),
PRIMARY KEY (`id`),
FOREIGN KEY (`department_id`) REFERENCES `departments`(`id`)
);
Expected output
Query OK, 0 rows affected, 1 warning (0.03 sec)
Insert data into the tables
Insert data into the departments table first:
INSERT INTO `departments` (`name`)
VALUES
("Engineering"),
("Sales"),
("Marketing");
Expected output
Query OK, 3 rows affected (0.01 sec)
Records: 3 Duplicates: 0 Warnings: 0
Insert data into the employees table using the INSERT INTO SQL statement. This statement adds multiple records into a table in one statement.
Insert data into the table using the INSERT INTO SQL statement. This statement adds multiple records into a table in one statement.
INSERT INTO `employees` (`name`,`department_id`,`country`)
VALUES
("Erasmus Richardson",1,"England"),
("Jenna French",2,"Canada"),
("Alfred Dejesus",1,"Austria"),
("Hamilton Puckett",3,"Canada"),
("Michal Brzezinski",1,"Poland"),
("Zofia Lis",2,"Poland"),
("Aisha Yakubu",3,"Nigeria"),
("Miguel Cardenas",1,"Peru"),
("Luke Jansen",2,"Netherlands"),
("Roger Pettersen",1,"Norway");
Expected output
Query OK, 10 rows affected (0.02 sec)
Records: 10 Duplicates: 0 Warnings: 0
View all data
To view all records in a table, use SELECT * to retrieve all columns:
SELECT * FROM employees;
Expected output
+----+---------------------+--------------+------------+
| id | name | department_id| country |
+----+---------------------+--------------+------------+
| 1 | Erasmus Richardson | 1 | England |
| 2 | Jenna French | 2 | Canada |
| 3 | Alfred Dejesus | 1 | Austria |
| 4 | Hamilton Puckett | 3 | Canada |
| 5 | Michal Brzezinski | 1 | Poland |
| 6 | Zofia Lis | 2 | Poland |
| 7 | Aisha Yakubu | 3 | Nigeria |
| 8 | Miguel Cardenas | 1 | Peru |
| 9 | Luke Jansen | 2 | Netherlands|
| 10 | Roger Pettersen | 1 | Norway |
+----+---------------------+--------------+------------+
10 rows in set (0.00 sec)
Join tables
JOIN queries combine data from multiple tables based on a related column. Use JOINs to retrieve data from related tables in a single query.
Join the employees and departments tables to display employee names with their department names:
SELECT e.id, e.name, d.name AS department, e.country
FROM employees e
JOIN departments d ON e.department_id = d.id;
Expected output
+----+---------------------+------------+------------+
| id | name | department | country |
+----+---------------------+------------+------------+
| 1 | Erasmus Richardson | Engineering| England |
| 2 | Jenna French | Sales | Canada |
| 3 | Alfred Dejesus | Engineering| Austria |
| 4 | Hamilton Puckett | Marketing | Canada |
| 5 | Michal Brzezinski | Engineering| Poland |
| 6 | Zofia Lis | Sales | Poland |
| 7 | Aisha Yakubu | Marketing | Nigeria |
| 8 | Miguel Cardenas | Engineering| Peru |
| 9 | Luke Jansen | Sales | Netherlands|
| 10 | Roger Pettersen | Engineering| Norway |
+----+---------------------+------------+------------+
10 rows in set (0.00 sec)
Run a SELECT query
SELECT queries retrieve data from one or more tables based on specified criteria. They are the most common type of query and can be used for various purposes, such as displaying, filtering, sorting, aggregating, or joining data. SELECT queries do not modify the data in the database but can affect the performance if the query involves large or complex datasets.
SELECT e.id, e.name, d.name AS department, e.country
FROM employees e
JOIN departments d ON e.department_id = d.id
WHERE e.country = 'Poland';
Expected output
+----+-------------------+------------+---------+
| id | name | department | country |
+----+-------------------+------------+---------+
| 5 | Michal Brzezinski | Engineering| Poland |
| 6 | Zofia Lis | Sales | Poland |
+----+-------------------+------------+---------+
2 rows in set (0.00 sec)
Run an Update query
UPDATE queries modify existing data in a table. They are used to change or correct the information stored in the database. UPDATE queries can update one or more columns and rows simultaneously, depending on the specified conditions. They may also fail if they violate any constraints or rules defined on the table.
Run an UPDATE query to change a record, and then run a SELECT with a WHERE clause to verify the update.
UPDATE employees SET name = 'Zofia Niemec' WHERE id = 6;
Expected output
Query OK, 1 row affected (0.01 sec)
Rows matched: 1 Changed: 1 Warnings: 0
SELECT name FROM employees WHERE id = 6;
Expected output
+--------------+
| name |
+--------------+
| Zofia Niemec |
+--------------+
1 row in set (0.00 sec)
Run an INSERT query
INSERT queries add new data to a table. They are used to populate the database with new information. INSERT queries can insert one or more rows at a time, depending on the syntax. INSERT queries may fail if they violate any constraints or rules defined on the table, such as primary keys, foreign keys, unique indexes, or triggers.
Insert a row into a table and then run a SELECT with a WHERE clause to verify the record was inserted.
INSERT INTO `employees` (`name`,`department_id`,`country`)
VALUES
("Kenzo Sasaki",1,"Japan");
Expected output
Query OK, 1 row affected (0.01 sec)
SELECT e.id, e.name, d.name AS department, e.country
FROM employees e
JOIN departments d ON e.department_id = d.id
WHERE e.id = 11;
Expected output
+----+--------------+------------+---------+
| id | name | department | country |
+----+--------------+------------+---------+
| 11 | Kenzo Sasaki | Engineering| Japan |
+----+--------------+------------+---------+
1 row in set (0.00 sec)
Run a Delete query
DELETE queries remove existing data from a table. They are used to clean up the information no longer needed or relevant in the database. The DELETE queries can delete one or more rows at a time, depending on the specified conditions. They may also trigger cascading deletes on related tables if foreign key constraints are enforced.
Delete a row in the table and run a SELECT with a WHERE clause to verify the deletion.
DELETE FROM employees WHERE id >= 11;
Expected output
Query OK, 1 row affected (0.01 sec)
SELECT e.id, e.name, d.name AS department, e.country
FROM employees e
JOIN departments d ON e.department_id = d.id
WHERE e.id > 10;
Expected output
Empty set (0.00 sec)
Count records
Use the COUNT() function to count the number of records that match a condition:
SELECT COUNT(*) FROM employees;
Expected output
+----------+
| COUNT(*) |
+----------+
| 10 |
+----------+
1 row in set (0.00 sec)
SELECT d.name AS department, COUNT(*) AS employee_count
FROM employees e
JOIN departments d ON e.department_id = d.id
GROUP BY d.name;
Expected output
+------------+---------------+
| department | employee_count|
+------------+---------------+
| Engineering| 5 |
| Sales | 3 |
| Marketing | 2 |
+------------+---------------+
3 rows in set (0.00 sec)
Next step
-
Clean up your installation (optional)
Additional resources
Clean up your installation
Clean up is optional. If you want to remove Percona Server for MySQL and clean up your system, follow the steps below for your installation method.
Warning
These steps will remove Percona Server for MySQL and may delete all data files (databases, tables, logs, etc.). Take a backup before proceeding if you need to preserve any data.
If you installed Percona Server for MySQL using Docker, follow these steps:
-
Exit the MySQL command client shell if you’re still connected:
exitYou can also use
\qorquitcommands. The execution of the statement also closes the connection. -
Stop and remove the Docker container:
docker container rm psmysql -fExpected output
psmysql -
Remove the Docker image:
docker image rmi percona/percona-server:8.4.8If you are running the ARM64 version of Percona Server, use:
docker image rmi percona/percona-server:8.4.8-aarch64Expected output
Untagged: percona/percona-server:8.4.8 Untagged: percona/percona-server@sha256:4944f9b365e0dc88f41b3b704ff2a02d1459fd07763d7d1a444b263db8498e1f Deleted: sha256:b2588da614b1f382468fc9f44600863e324067a9cae57c204a30a2105d61d9d9 ... -
Remove the Docker volume (if you created one):
docker volume rm myvolExpected output
myvol
If you installed Percona Server for MySQL using APT on Ubuntu or Debian, follow these steps:
-
Stop the Percona Server for MySQL service:
sudo systemctl stop mysql -
Choose one of the following options:
Option A: Remove packages but keep data files
This command removes the packages but leaves data files (databases, tables, logs, configuration, etc.) behind:
sudo apt remove percona-server*Option B: Remove packages and delete all data files
Warning
This command removes all packages and permanently deletes all data files (databases, tables, logs, etc.). Ensure you have a backup if you need this data.
sudo apt purge percona-server* -
[Optional] If you used Option A and want to remove data files manually:
Warning
This step permanently deletes all data files. Ensure you have a backup if you need this data.
sudo rm -rf /var/lib/mysql sudo rm -f /etc/mysql/my.cnf
If you installed Percona Server for MySQL using YUM or DNF on Oracle Linux or RHEL, follow these steps:
-
Stop the Percona Server for MySQL service:
sudo systemctl stop mysql -
Remove the packages:
sudo yum remove percona-server*Or if you’re using DNF:
sudo dnf remove percona-server*These commands remove the packages but leave data files behind. If you want to remove data files as well, continue to step 3.
-
[Optional] Remove data and configuration files:
Warning
This step permanently deletes all data files (databases, tables, logs, etc.). Ensure you have a backup if you need this data.
sudo rm -rf /var/lib/mysql sudo rm -f /etc/my.cnf
Next steps
Additional resources
Next steps
You have the basics. To go further with Percona Server for MySQL, consider:
-
Data types — Choose the right types (integers, strings, dates, booleans) for your data.
-
Indexes — Create and use indexes to improve query performance.
-
Joins and subqueries — Combine data from multiple tables.
-
Functions, procedures, triggers, views — Encapsulate logic and automate tasks.
-
Transactions and isolation levels — Ensure data integrity with concurrent operations.
-
Backup and restore — Protect your data from loss or corruption.
-
Security — Use users, roles, privileges, and encryption.
-
Debugging and testing — Use logs, error messages, and assertions to find and fix issues.
For full details, see the Percona Server for MySQL documentation.
Other database servers you might try
Percona offers quickstart guides for MongoDB and PostgreSQL if you want to try another database server.
Related Percona products
For backups and restores
Percona XtraBackup performs online, non-blocking full backups for Percona Server for MySQL and MySQL®.
Percona XtraBackup Quickstart overview
For monitoring and management
Percona Monitoring and Management (PMM) monitors MySQL variants and provides metrics, dashboards, and actionable performance data.
Install PMM and connect your MySQL instances to it .
For high availability
Percona XtraDB Cluster (PXC) is an open source, highly available clustering solution for MySQL based on Galera.
Percona XtraDB Cluster Quickstart overview
Advanced command-line tools
Percona Toolkit is a collection of command-line tools for MySQL and MongoDB tasks that are complex or tedious to do manually.
Operators
Percona Operator for MySQL and Percona Operator for MySQL based on Percona XtraDB Cluster simplify deploying and managing MySQL and PXC in Kubernetes, with automated failover, self-healing, and scaling.
Percona Operator for MySQL Documentation
Percona Operator for MySQL - Quickstart overview
Percona Operator for MySQL based on Percona XtraDB Cluster - Quickstart overview
Additional resources
Install
Install Percona Server for MySQL
Before installing, read the Percona Server for MySQL 8.4 Release notes.
We gather Telemetry data in the Percona packages and Docker images.
Install Percona Server for MySQL from repositories
Percona provides repositories for yum (RPM packages for Red Hat) and apt (.deb packages for Ubuntu and Debian) for software such as Percona Server for MySQL, Percona XtraBackup, and Percona Toolkit. This makes it easy to install and update your software and its dependencies through your operating system’s package manager. This is the recommended way of installing where possible.
The following guides describe the installation process for using the official Percona repositories for the .deb and .rpm packages.
Install Percona Server for MySQL on Debian and Ubuntu Install Percona Server for MySQL on Red Hat Enterprise Linux
Other installation methods
Install Percona Server for MySQL from Binaries
Compile Percona Server for MySQL from Source
Run Percona Server for MySQL in a Docker container
Before you start
Percona Software Download instructions
Select the software
Do the following steps to select the software:
- Open Percona Software Downloads
- Locate the Percona Software, for example, Percona Server for MySQL
- In
Select Product, select the which product, for example, Percona Server 8.4 - In
Select Product Version, select the version, for example, PERCONA-SERVER-8.4.8-8 - In
Select Platform, select the operating system, for example, DEBIAN GNU/LINUX 12.0 (“BOOKWORM”).
The easiest method is to download all packages.
The Package Download Options may mix amd64 and arm64 packages. Select the correct CPU architecture for your system.
Download to a local computer
In Package Download Options, select a specific package or select the DOWNLOAD ALL PACKAGES button.
The selected packages are downloaded to the local computer.
Download to another computer
In Package Download Options, select a specific package or select the DOWNLOAD ALL PACKAGES button, and hover your cursor over the DOWNLOAD arrow. Right-click and in the drop-down menu, select Copy Link.
Paste the link in your terminal to download the selected package.
Use APT
Use an APT repository to install Percona Server for MySQL 8.4
Ready-to-use packages are available from the Percona Server for MySQL software repositories and the Percona downloads page.
Specific information on the supported platforms, products, and versions—including which Debian and Ubuntu releases and CPU architectures (DEB packages include arm64, among others)—is described in Percona Software and Platform Lifecycle .
The percona-release tool is a command-line utility that simplifies the management and installation of Percona software packages, providing access to the latest versions and ensuring consistency across environments. For more information, refer to the Percona Software Repositories Documentation.
We gather Telemetry data in the Percona packages and Docker images.
Review Get help from Percona for ways that we can work with you.
Install Percona Server for MySQL using APT
If you are new to installing Percona Server on Debian or Ubuntu, copy the first command block below and run the commands in order. Use Configure authentication when the installer asks about the default authentication plugin. After the server packages are installed, open Next Steps for securing and configuring the instance. Expand the step-by-step section when you want an explanation of each command; use Non-interactive installs and debconf and Unattended installations only for scripted automation.
Run the following commands as a root user or with sudo:
sudo apt update
sudo apt install -y curl
curl -O https://repo.percona.com/apt/percona-release_latest.generic_all.deb
sudo apt install -y gnupg2 lsb-release ./percona-release_latest.generic_all.deb
sudo percona-release setup ps-84-lts --scheme https
sudo percona-release enable ps-84-lts release --scheme https
sudo apt update
sudo apt install -y percona-server-server
The command sequence matches Install Percona Server for MySQL and create a database on Ubuntu (installation steps 1–6 there).
percona-release flag: --scheme
The command examples on the page pass --scheme https so repository URLs in APT source lists use HTTPS. The Percona Software Repositories — percona-release documentation describes the Flags section: the available flag is --scheme, with supported values HTTP and HTTPS; without the flag, the tool defaults to HTTP.
You can add --scheme https to subcommands such as setup, enable, enable-only, or disable following the same pattern as the examples. See the linked documentation for the full command reference.
Starting in 8.4, the mysql_native_password plugin is no longer loaded by default. When the package manager may prompt you during installation (depending on the package and distribution), follow the choices and steps in Configure authentication. If you choose legacy authentication but do not enable the plugin in configuration, clients may be unable to connect or the Percona Server service may fail to start.
Step-by-step: what each command does
The following sections provide detailed explanations for each step:
-
The
apt updatecommand shown below updates the package lists for upgrades and new package installations.sudoruns the command with superuser privileges;apt updateresynchronizes the package index files from the sources configured in/etc/apt/sources.listand/etc/apt/sources.list.d/.sudo apt update -
The
sudo apt install -y curlcommand installs thecurlpackage.curlis a command-line tool used to transfer data over networks and is required to download the Percona repository package.sudo apt install -y curl -
The
curl -Ocommand shown below downloads thepercona-release_latest.generic_all.debfile from the Percona APT repository. The-Ooption saves the file with the same name as in the URL.curl -O https://repo.percona.com/apt/percona-release_latest.generic_all.deb -
The
sudo apt install -y gnupg2 lsb-release ./percona-release_latest.generic_all.debcommand installsgnupg2(for package signature verification),lsb-release(for distribution information), and the downloaded Percona release package. Together,gnupg2,lsb-release, and the Percona release.debconfigure the Percona APT repository on your system.sudo apt install -y gnupg2 lsb-release ./percona-release_latest.generic_all.deb -
The
percona-release setup ps-84-lts --scheme httpscommand disables all current Percona repository locations on the system, then enables the release repositories that match Percona Server for MySQL 8.4 for your distribution over HTTPS (see the Percona Software Repositories documentation). Omit--scheme httpsonly if you intentionally want HTTP repository URLs (the tool default).sudo percona-release setup ps-84-lts --scheme https -
The
percona-release enable ps-84-lts release --scheme httpscommand turns on the Percona Server for MySQL release repository location with HTTPS URLs. Runapt updateafterward so APT loads package indexes for that repository (includingpercona-server-serverand related packages).sudo percona-release enable ps-84-lts release --scheme https sudo apt update -
You can verify the repository setup by inspecting the
.listfiles under/etc/apt/sources.list.d/(for examplepercona-original-release.list, depending on yourpercona-releaseversion). -
The
sudo apt install -y percona-server-servercommand installs thepercona-server-serverpackage. During installation, the package manager may prompt you to select the default authentication plugin (some builds use only debconf or post-install configuration); follow the Configure authentication section when a prompt or post-install step applies.sudo apt install -y percona-server-server
Configure authentication
During the installation process, the package manager may prompt you to select the default authentication plugin, or you may need to adjust authentication only after install—see your installer output and Non-interactive installs and debconf when automating.
Important change in 8.4
Percona Server for MySQL 8.4 inherits the upstream change where the mysql_native_password plugin is disabled by default.
Select Option 1 if you are setting up a new server or using modern application drivers.
The recommended option uses the caching_sha2_password plugin, providing superior security and performance. No further configuration is required.
Select Option 2 only if you must support legacy applications that cannot be updated.
If you choose Option 2, you must manually enable the plugin after installation, or the server will fail to authenticate users who rely on native-password authentication.
-
Open your configuration file (for example,
/etc/mysql/mysql.conf.d/mysqld.cnf). -
Add the following to the
[mysqld]section:[mysqld] mysql_native_password=ON -
Restart the service:
sudo systemctl restart mysql
See Configuring Percona repositories with percona-release for more information.
Percona Server for MySQL 8.4.x comes with the MyRocks storage engine. This storage engine is installed as a plugin. For information on installing and configuring MyRocks, refer to the Percona MyRocks Installation Guide.
Next Steps
After successful installation:
-
Post-installation — Configure and secure your Percona Server for MySQL installation.
-
First five minutes after installation — Security and stability steps to take right after install (secure the server, create an admin user, enable logging, verify backup path).
-
Next steps — Ideas for what to do next (backup, monitoring, data types, and related Percona products).
Non-interactive installs and debconf
Adding -y to apt install only skips APT confirmation prompts. The percona-server-server packages still run maintainer scripts that may ask debconf questions (for example the MySQL root password, whether to reuse an existing data directory, or lowercase table names, depending on your version and what is already on the disk).
To automate those prompts:
-
Discover the questions your package version uses. On a lab host, install once interactively or inspect templates, then run:
sudo debconf-show percona-server-serverTemplate definitions are also shipped with the package (paths such as
/var/lib/dpkg/info/percona-server-server.templates).Verify for each target: preseed names and choices can differ by distribution, point release, and
percona-server-serverpackage version. Re-rundebconf-showafter upgrades or when you change base image. For production automation, keep a short checklist (distro + package version → saveddebconf-showoutput) so scripts stay aligned with what the package actually asks. -
Preseed answers with
debconf-set-selectionsbeforeapt install. For the templates shipped with many Percona Server for MySQL 8.4 packages, password prompts use thepercona-server-server/root-passandpercona-server-server/re-root-passnames—for example:echo "percona-server-server percona-server-server/root-pass password choose-a-strong-secret" | sudo debconf-set-selections echo "percona-server-server percona-server-server/re-root-pass password choose-a-strong-secret" | sudo debconf-set-selectionsOther prompts (for example
percona-server-server/lowercase-table-namesorpercona-server-server/remove-data-dir) appear only in some upgrade or edge-case paths—usedebconf-showoutput to add matching lines. Do not commit real passwords to version control or broad shell history. -
Optional: set
DEBIAN_FRONTEND=noninteractivefor the install so debconf does not try to open a UI. Noninteractive installs are usually combined with preseeding; without defaults for required questions, the configure step can still fail or leave the server in an unexpected state.sudo DEBIAN_FRONTEND=noninteractive apt install -y percona-server-server
Default authentication plugin: if your distribution or package adds a debconf choice for the authentication plugin, that question shows up under debconf-show for percona-server-server. If the distribution or package does not add such a question, unattended installs still follow the same rules as an interactive install: use Configure authentication after the package is installed (for example mysql_native_password=ON in my.cnf when you need legacy auth).
See also
- Telemetry — disable collection for package installs with
PERCONA_TELEMETRY_DISABLE=1on the sameaptcommand line. - Authentication methods — options for
mysql_native_password,caching_sha2_password, and related settings. - Post-installation — secure and configure the server after packages are installed.
- Debian Wiki — debconf — how debconf and preseeding work on Debian-derived systems.
Unattended installations
For the same apt / percona-release sequence as in Install Percona Server for MySQL using APT, add -y to each sudo apt install line where you need non-interactive APT confirmations, and use non-interactive options for percona-release as in the following snippet.
The -y flag (on apt and apt-get, --assumeyes on dnf) tells the package manager to assume affirmative answers so installs do not block on prompts. That suits scripts and unattended installs, but you do not get a last chance to review dependency changes—use it only when you accept that tradeoff.
percona-release — The setup command documents -y for non-interactive repository configuration, for example:
sudo percona-release setup -y {{pkg}} --scheme https
If you use enable or enable-only instead, see sudo percona-release --help and the Percona Software Repositories documentation for flags your version supports.
Debian and Ubuntu (apt) — Add -y to each sudo apt install (or sudo apt-get install) you run, for example sudo apt install -y curl and sudo apt install -y percona-server-server.
To disable telemetry during an unattended server install, set PERCONA_TELEMETRY_DISABLE=1 on the same line (see Telemetry for details):
sudo PERCONA_TELEMETRY_DISABLE=1 apt install -y percona-server-server
RPM-based systems (dnf / yum) — Add -y (or yes) to install commands as supported by your tool. Example with telemetry disabled:
sudo PERCONA_TELEMETRY_DISABLE=1 dnf install -y percona-server-server
Use yum instead of dnf where that is the supported tool on your OS.
Install Percona Toolkit UDFs (Optional)
Percona Server for MySQL includes user-defined functions (UDFs) from Percona Toolkit .
These UDFs provide faster checksum calculations. Install the component if you use tools that need the component (for example, pt-table-checksum) or need fast fingerprinting to compare tables or distribute rows across servers.
Use these functions for high-speed checksumming and sharding. Learn more about UDF Use Cases →
-
fnv_64: Fast hash function -
fnv1a_64: Alternative fast hash function -
murmur_hash: High-performance hash function
User-Defined Functions (UDFs) are custom functions you can add to MySQL to extend MySQL capabilities. The Percona Toolkit UDFs are useful for data integrity checks and performance monitoring.
To install the Percona Toolkit UDFs after installation:
INSTALL COMPONENT 'file://component_percona_udf';
Expected output
Query OK, 0 rows affected (0.01 sec)
You can now use the UDFs in your SQL queries. For example: SELECT fnv_64('test_string');
For detailed information about the UDFs, see Percona Toolkit UDF functions.
Install the Percona testing repository using APT
Percona offers pre-release builds from the testing repository. As a superuser, run percona-release with the testing argument to enable the testing repository:
sudo percona-release enable ps-84-lts testing --scheme https
Do not run testing repository builds in production. The build may not contain all the features available in the final release and may change without notice.
DEB repository package list - Percona Server for MySQL 8.4
| Package Name | Description |
|---|---|
| libperconaserverclient22 | The shared client library used by Percona Server and MySQL client programs. Applications that connect to MySQL servers dynamically link to this library. |
| libperconaserverclient22-dev | Development headers and static libraries for building software that links against libperconaserverclient22. Needed when compiling client applications using the MySQL C API. |
| percona-mysql-router | A lightweight middleware that routes connections between applications and backend MySQL or Percona Server instances. Used in high availability and cluster setups. |
| percona-server-client | The command-line client utilities, including mysql, mysqldump, and related tools for interacting with a Percona Server instance. |
| percona-server-common | Common configuration files, character sets, and data shared among multiple Percona Server packages. Installed automatically as a dependency. |
| percona-server-dbg | Debug symbols for the Percona Server binaries. Useful for developers or support teams when diagnosing crashes or profiling performance. |
| percona-server-rocksdb | The RocksDB storage engine plugin for Percona Server, providing high-performance key-value storage optimized for fast writes. |
| percona-server-server | The main Percona Server daemon (mysqld) and supporting files. This is the actual database server that runs and manages data. |
| percona-server-source | The source code package for Percona Server, often used for auditing, compliance, or custom builds. |
| percona-server-test | A suite of functional and regression tests used to verify server correctness and compatibility. Useful for QA or CI environments. |
| percona-telemetry-agent | A lightweight agent that collects anonymous usage and performance data to help Percona improve the product. Optional; can be disabled if desired. |
Build APT packages
If you wish to build your own Debian/Ubuntu (dpkg) packages of Percona Server for MySQL, you first need to start with a source tarball, either from the Percona website or by generating your own by following the instructions above (Installing Percona Server for MySQL from the Git Source Tree).
Extract the source tarball:
tar xfz Percona-Server-8.4.8-8-Linux.x86_64.ssl102.tar.gz
cd Percona-Server-8.4.8-8
Copy the Debian packaging in the directory that Debian expects it to be in:
cp -ap build-ps/debian debian
Update the changelog for your distribution (here we update for the unstable distribution - sid), setting the version number appropriately. The trailing one in the version number is the revision of the Debian packaging.
dch -D unstable --force-distribution -v "8.0.13-3-1" "Update to 8.0.13-3"
Build the Debian source package:
dpkg-buildpackage -S
Use sbuild to build the binary package in a chroot:
sbuild -d sid percona-server-8.4_8.4.8-8.dsc
You can give different distribution options to dch and sbuild to build binary
packages for all Debian and Ubuntu releases.
Note
PAM Authentication Plugin is not built with the server by default. In order to build the Percona Server for MySQL with PAM plugin, an additional option -DWITH_PAM=ON should be used.
Install Percona Server for MySQL 8.4 using downloaded DEB packages
Download the packages from Percona Product Downloads . If needed, Instructions for the Percona Product Download are available.
The following example downloads Percona Server for MySQL 8.4.8-8 release packages for Ubuntu 22.04:
wget https://downloads.percona.com/downloads/Percona-Server-8.4/Percona-Server-8.4.0-1/binary/debian/jammy/x86_64/Percona-Server-8.4.0-1-r238b3c02-jammy-x86_64-bundle.tar
Unpack the download to get the packages:
tar xvf Percona-Server-8.4.0-1-r71449379-buster-x86_64-bundle.tar
Expected output
libperconaserverclient21_8.4.8-8-1.buster_amd64.deb
libperconaserverclient21-dev_8.4.8-8-1.buster_amd64.deb
percona-mysql-router_8.4.8-8-1.buster_amd64.deb
percona-server-client_8.4.8-8-1.buster_amd64.deb
percona-server-common_8.4.8-8-1.buster_amd64.deb
percona-server-dbg_8.4.8-8-1.buster_amd64.deb
percona-server-rocksdb_8.4.8-8-1.buster_amd64.deb
percona-server-server_8.4.8-8-1.buster_amd64.deb
percona-server-source_8.4.8-8-1.buster_amd64.deb
percona-server-test_8.4.8-8-1.buster_amd64.deb
Install Percona Server for MySQL using dpkg. Run this command as root or use the sudo command:
sudo dpkg -i *.deb
Warning
When installing packages manually like this, you’ll need to resolve all the dependencies and install missing packages yourself. The following packages will need to be installed before you can manually install Percona Server: mysql-common, libjemalloc1, libaio1, and libmecab2.
Apt pinning the Percona Server for MySQL 8.4 packages
Pinning allows you to stay on a release and get packages from a different version. In some cases, you can pin selected packages and avoid accidentally upgrading all the packages.
The pinning takes place in the preference file. To pin a package, set the Pin-Priority to higher numbers.
Make a new file /etc/apt/preferences.d/00percona.pref. For example, add the following to the preference file:
Package:
Pin: release o=Percona Development Team
Pin-Priority: 1001
For more information about the pinning, you can check the official debian wiki .
Run Percona Server for MySQL 8.4 after APT repository installation
Percona Server for MySQL stores the data files in /var/lib/mysql/ by
default. You can find the configuration file that is used to manage Percona Server for MySQL in /etc/mysql/my.cnf.
Note
Debian and Ubuntu installation doesn’t automatically create a special debian-sys-maint user which can be used by the control scripts to control the Percona Server for MySQL mysqld and mysqld_safe services which was the case with previous Percona Server for MySQL versions. If you still require this user you’ll need to create it manually.
Run the following commands as root or by using the sudo command
-
Starting the service
Percona Server for MySQL is started automatically after it gets installed unless it encounters errors during the installation process. You can also manually start it by running:
service mysql start -
Confirming that service is running. You can check the service status by running:
service mysql status -
Stopping the service
You can stop the service by running:
service mysql stop -
Restarting the service.
service mysql restart
Note
Debian 9.0 (stretch) and Ubuntu 18.04 LTS (bionic) come with systemd as the default system and service manager. You can invoke all the above commands with systemctl instead of service. Currently, both are supported.
Working with AppArmor
For information on AppArmor, see Working with AppArmor.
Uninstall Percona Server for MySQL 8.4 using the APT package manager
To uninstall Percona Server for MySQL you’ll need to remove all the installed packages. Removing packages with apt remove does not remove the configuration and data files. Removing the packages with apt purge does remove the packages with configuration files and data files (all the databases). Depending on your needs you can choose which command better suits you.
-
Stop the Percona Server for MySQL service:
service mysql stop -
Remove the packages
-
Remove the packages. This will leave the data files (databases, tables, logs, configuration, etc.) behind. In case you don’t need them you’ll need to remove them manually:
apt remove percona-server\ -
Purge the packages. This command removes all the packages and deletes all the data files (databases, tables, logs, and so on.):
apt purge percona-server\
-
Use DNF
Install using DNF
Installation Method
This guide describes standard OS installation on RPM-based operating systems (RHEL, CentOS, Rocky Linux, etc.) using DNF. Ready-to-use packages are available from the Percona Server for MySQL software repositories and the [Percona downloads] page. On RHEL 8+ systems, DNF has superseded YUM, but yum commands continue to work as they are aliased to dnf.
For containerized deployments:
-
For Docker containers, see Running Percona Server for MySQL in a Docker Container.
-
For Kubernetes deployments, refer to the documentation for Percona Operator based on Percona Server for MySQL or Percona Operator based on Percona XtraDB Cluster.
The percona-release tool is a command-line utility that simplifies the management and installation of Percona software packages, providing access to the latest versions and ensuring consistency across environments. For more information, refer to the Percona Software Repositories Documentation.
We gather Telemetry data in the Percona packages and Docker images.
Review Get help from Percona for ways that we can work with you.
Prerequisites
Required permissions
You need either sudo access or root access to install packages and configure system services. The installation commands in this guide use sudo, but you can run them as the root user if you prefer.
Package verification
The packages are signed with GPG keys for security. The installation process automatically installs the Percona GPG key and handles key verification, but you can manually verify packages if needed.
Security Note
Always download packages from official Percona repositories to ensure authenticity and security.
Limitations
RHEL 8+ and other EL8+ systems enable the MySQL module by default. This module hides the Percona-provided packages and the module must be disabled to make these packages visible.
Checking the MySQL Module
RHEL 8+ systems enable the MySQL module by default, which can hide or conflict with Percona’s packages. The first installation step below shows you how to check if the module is enabled. If you see an [e] marker, you must disable the module before proceeding. If you only see [d] (default), you can proceed.
Install using DNF (RHEL 8+)
Standard OS Installation
The following steps install Percona Server for MySQL directly on the host operating system using DNF. These instructions are for standard OS installations, not for Kubernetes pods or containerized environments.
All commands in this guide use sudo for privilege elevation. Follow these steps:
-
Verify that the MySQL module is currently enabled on your system:
sudo dnf module list mysqlExpected output
Rocky Linux 9 - BaseOS 2.2 MB/s | 2.6 MB 00:01 Rocky Linux 9 - AppStream 3.7 MB/s | 8.2 MB 00:02 Rocky Linux 9 - Extras 35 kB/s | 18 kB 00:00 Rocky Linux 9 - AppStream Name Stream Profiles Summary mysql 8.4 api, client, filter, server [d] MySQL Module Hint: [d]efault, [e]nabled, [x]disabled, [i]nstalledThe [d] next to the server profile indicates that this is the default stream. A module is only considered enabled if an [e] is present. If you see [e], it means the module is active.
-
[Optional] If the module is listed as [e]nabled, it can cause conflicts with Percona’s packages. You must disable the module before proceeding.
sudo dnf module disable mysqlExpected output
Last metadata expiration check: 0:33:11 ago on Fri Aug 29 14:37:35 2025. Dependencies resolved. Nothing to do. Complete!The
dnf module disablecommand disables the MySQL module. If the module was not enabled to begin with (as shown in the dnf module list output without [e]), this command will display “Nothing to do,” which is the expected result. You can then proceed with your installation. -
Install the Percona repository package:
sudo yum install https://repo.percona.com/yum/percona-release-latest.noarch.rpmExpected output
Last metadata expiration check: 1:04:21 ago on Fri Aug 29 14:37:35 2025. percona-release-latest.noarch.rpm 69 kB/s | 28 kB 00:00 Dependencies resolved. =========================================================================== Package Architecture Version Repository Size =========================================================================== Installing: percona-release noarch 1.0-32 @commandline 28 k Transaction Summary =========================================================================== Install 1 Package ... Installed: percona-release-1.0-32.noarch Complete!If this step fails:
-
Check your internet connection.
-
Verify the URL is accessible:
curl -I https://repo.percona.com/yum/percona-release-latest.noarch.rpm -
Ensure you have sufficient disk space:
df -h
-
-
Enable the Percona Server for MySQL repository:
sudo percona-release enable-only ps-84-lts releaseExpected output
* Disabling all Percona Repositories * Enabling the Percona Server for MySQL - PS 8.4- repository <*> All done!If this step fails:
-
Check if percona-release is properly installed:
which percona-release -
Verify the package name is correct for your version.
-
Check for any error messages in the output.
-
-
Install the server package:
sudo yum install percona-server-serverExpected output
Percona Release release/noarch YUM reposit 6.0 kB/s | 2.5 kB 00:00 Percona Server for MySQL - PS 8.4- release 1.5 MB/s | 2.4 MB 00:01 Percona Telemetry release/aarch64 YUM repo 6.8 kB/s | 2.7 kB 00:00 Dependencies resolved. =========================================================================== Package Arch Version Repository Size =========================================================================== Installing: percona-server-server aarch64 8.4.5-5.1.el9 ps-84-lts-release-aarch64 ... systemd-252-51.el9_6.1.aarch64 systemd-pam-252-51.el9_6.1.aarch64 systemd-rpm-macros-252-51.el9_6.1.noarch Complete!If this step fails:
-
Check available packages:
yum search percona-server. -
Ensure the repository is properly configured.
-
Check for package conflicts with existing MySQL installations.
-
Review error messages for specific issues.
-
See Configuring Percona repositories with percona-release for more information.
Post-installation configuration
Percona Server for MySQL 8.4.x comes with the MyRocks storage engine. This storage engine is installed as a plugin. For information on installing and configuring MyRocks, refer to the Percona MyRocks Installation Guide.
Unattended installations
The -y flag (on apt and apt-get, --assumeyes on dnf) tells the package manager to assume affirmative answers so installs do not block on prompts. That suits scripts and unattended installs, but you do not get a last chance to review dependency changes—use it only when you accept that tradeoff.
percona-release — The setup command documents -y for non-interactive repository configuration, for example:
sudo percona-release setup -y {{pkg}} --scheme https
If you use enable or enable-only instead, see sudo percona-release --help and the Percona Software Repositories documentation for flags your version supports.
Debian and Ubuntu (apt) — Add -y to each sudo apt install (or sudo apt-get install) you run, for example sudo apt install -y curl and sudo apt install -y percona-server-server.
To disable telemetry during an unattended server install, set PERCONA_TELEMETRY_DISABLE=1 on the same line (see Telemetry for details):
sudo PERCONA_TELEMETRY_DISABLE=1 apt install -y percona-server-server
RPM-based systems (dnf / yum) — Add -y (or yes) to install commands as supported by your tool. Example with telemetry disabled:
sudo PERCONA_TELEMETRY_DISABLE=1 dnf install -y percona-server-server
Use yum instead of dnf where that is the supported tool on your OS.
Next steps
After a successful installation, refer to the Post-installation documentation for detailed steps to configure and secure your Percona Server for MySQL installation.
Additional information
Red Hat certified
Percona Server for MySQL is certified for Red Hat Enterprise Linux 8. This certification is based on common and secure best practices, as well as successful interoperability with the operating system. Percona Server is listed in the Red Hat Ecosystem Catalog.
ARM support
The RPM builds contain ARM packages with the aarch64.rpm extension.
Supported platforms
Specific information on the supported platforms, products, and versions ican be found in the Percona Software and Platform Lifecycle document.
Install Percona Toolkit UDFs (optional)
Percona Server for MySQL includes user-defined functions (UDFs) from Percona Toolkit . These UDFs provide faster checksum calculations:
-
fnv_64: Fast hash function -
fnv1a_64: Alternative fast hash function -
murmur_hash: High-performance hash function
User-defined functions (UDFs) are custom functions you can add to MySQL to extend its capabilities. These particular UDFs are useful for data integrity checks and performance monitoring.
To install these functions after installation:
INSTALL COMPONENT 'file://component_percona_udf';
Expected output
Query OK, 0 rows affected (0.01 sec)
UDFs installed
You can now use these functions in your SQL queries. For example: SELECT fnv_64('test_string');
For detailed information about these functions, see Percona Toolkit UDF functions.
Install the Percona testing repository (advanced users only)
Do not use testing repositories in production environments. Testing builds are pre-release versions that may contain bugs or incomplete features.
Percona offers pre-release builds from the testing repository for advanced users who want to:
-
Test new features before official release.
-
Evaluate upcoming improvements.
-
Provide feedback on development versions.
To enable the testing repository:
sudo percona-release enable ps-84-lts testing
Expected output
* Enabling Percona Server for MySQL 8.4 LTS testing repository
* Running yum update...
Last metadata expiration check: 0:01:23 ago on Mon Jan 15 10:30:00 2024.
All packages are up to date.
Please be aware of the following limitations when using the testing repository:
-
Features may change without notice.
-
Not all features from the final release may be included.
-
May contain experimental or incomplete functionality
-
No production support for testing builds
To disable the testing repository and return to stable releases:
sudo percona-release disable testing
sudo yum update
Expected output
* Disabling Percona testing repository
* Running yum update...
Last metadata expiration check: 0:01:23 ago on Mon Jan 15 10:30:00 2024.
All packages are up to date.
Yum repository package list - Percona Server for MySQL 8.4
| Package Name | Description |
|---|---|
| percona-icu-data-files | Provides ICU (International Components for Unicode) data files required by Percona Server for locale, collation, and Unicode character set support. |
| percona-mysql-router | A lightweight routing middleware that directs client connections to backend MySQL or Percona Server instances, often used in high availability setups. |
| percona-mysql-router-debuginfo | Debug symbols for percona-mysql-router, used for troubleshooting or analyzing router crashes and performance issues. |
| percona-server-client | Command-line client utilities for connecting to and managing MySQL/Percona Server instances, including tools like mysql and mysqldump. |
| percona-server-client-debuginfo | Debug symbols for the client utilities, useful for diagnosing crashes or debugging client-related issues. |
| percona-server-debuginfo | Debug symbols for the main Percona Server binaries, required when debugging or profiling the server process. |
| percona-server-debugsource | Source code corresponding to the debug build of Percona Server, used for in-depth debugging and code-level analysis. |
| percona-server-devel | Development files and headers for building applications that link against Percona Server client libraries. |
| percona-server-rocksdb | The RocksDB storage engine plugin, providing high-performance key-value storage optimized for write-heavy workloads. |
| percona-server-rocksdb-debuginfo | Debug symbols for the RocksDB plugin, useful for diagnosing issues or profiling RocksDB engine performance. |
| percona-server-server | The main Percona Server daemon (mysqld) and associated server-side components for database management and operations. |
| percona-server-server-debuginfo | Debug symbols for the Percona Server daemon, enabling developers to trace or debug server-level issues. |
| percona-server-shared | Shared libraries used by both the Percona Server and client utilities, providing common functionality and APIs. |
| percona-server-shared-debuginfo | Debug symbols for the shared libraries, useful for debugging applications that depend on these libraries. |
| percona-server-test | A collection of tests used to verify the correctness and stability of Percona Server, typically used in QA or CI environments. |
| percona-server-test-debuginfo | Debug symbols for the test suite, aiding developers in diagnosing issues encountered during test runs. |
| percona-telemetry-agent | A lightweight agent that collects anonymous usage and performance data to help Percona improve its products. Optional and can be disabled. |
Install Percona Server for MySQL using downloaded RPM packages
Download the packages from Percona Product Downloads . If needed, Instructions for the Percona Product Download are available.
The RPM builds for RHEL 8 and RHEL 9 contain ARM packages with the aarch64.rpm extension. This means that Percona Server for MySQL is available for users on ARM-based systems.
The following example downloads Percona Server for MySQL 8.4.8-8 release x86_64 packages for RHEL 8.
-
Use
wgetto download the tar file.The download filename includes a
<revision-identifier>value. This value is build-specific and must be obtained from the Percona Product Downloads page for the exact release you are installing. Select the product, version, and operating system, and find the link with the required<revision identifier>under the Download all packages button. For more details, see the Instructions for Percona Product Downloads.wget https://downloads.percona.com/downloads/Percona-Server-8.4/Percona-Server-8.4.8-8/binary/redhat/8/x86_64/Percona-Server-8.4.8-8-<revision identifier>-el8-x86_64-bundle.tar -
Unpack the bundle to get the packages:
tar xvf Percona-Server-8.4.8-8-<revision identifier>-el8-x86_64-bundle.tar -
To view a list of packages, run the following command:
The output should look like the following:ls *.rpmExpected output
percona-icu-data-files-8.4.8-8.1.el8.x86_64.rpm percona-mysql-router-8.4.8-8.1.el8.x86_64.rpm percona-mysql-router-debuginfo-8.4.8-8.1.el8.x86_64.rpm percona-server-client-8.4.8-8.1.el8.x86_64.rpm percona-server-client-debuginfo-8.4.8-8.1.el8.x86_64.rpm percona-server-debuginfo-8.4.8-8.1.el8.x86_64.rpm percona-server-debugsource-8.4.8-8.1.el8.x86_64.rpm percona-server-devel-8.4.8-8.1.el8.x86_64.rpm percona-server-rocksdb-8.4.8-8.1.el8.x86_64.rpm percona-server-rocksdb-debuginfo-8.4.8-8.1.el8.x86_64.rpm percona-server-server-8.4.8-8.1.el8.x86_64.rpm percona-server-server-debuginfo-8.4.8-8.1.el8.x86_64.rpm percona-server-shared-8.4.8-8.1.el8.x86_64.rpm percona-server-shared-compat-8.4.8-8.1.el8.x86_64.rpm percona-server-shared-debuginfo-8.4.8-8.1.el8.x86_64.rpm percona-server-test-8.4.8-8.1.el8.x86_64.rpm percona-server-test-debuginfo-8.4.8-8.1.el8.x86_64.rpm -
Install
jemallocwith the following command, if needed. See When to install jemalloc for guidance:wget https://repo.percona.com/yum/release/8/RPMS/x86_64/jemalloc-3.6.0-1.el8.x86_64.rpm -
An EL8-based RHEL distribution or derivatives package installation requires the mysql module to be disabled before installing the packages:
sudo yum module disable mysql -
Install all the packages (for debugging, testing, etc.) with the following command:
sudo rpm -ivh *.rpmNote
When installing packages manually, you must make sure to resolve all dependencies and install any missing packages yourself.
When to install jemalloc
jemalloc is an alternative memory allocator that can improve performance and reduce memory fragmentation in certain scenarios. Consider the following when deciding whether to install jemalloc:
Install jemalloc when:
-
You have high-concurrency workloads with many threads
-
You experience memory fragmentation issues that impact performance
-
You run multi-threaded applications that perform frequent memory allocation and deallocation
-
You want to use memory profiling features to investigate memory-related issues.
-
You observe performance degradation related to memory allocation in your current setup
Do not install jemalloc when:
-
Your current memory allocator (typically glibc malloc) performs adequately for your workload
-
You have single-threaded or low-concurrency workloads where jemalloc’s benefits are minimal
-
You encounter compatibility issues with jemalloc in your environment
-
You need to debug memory issues that may be complicated by using an alternative allocator
-
Your system is already optimized and stable with the default memory allocator
Run Percona Server for MySQL
Percona Server for MySQL stores the data files in /var/lib/mysql/ by
default. The configuration file used to manage Percona Server for MySQL is the /etc/my.cnf.
The following commands start, provide the server status, stop the server, and restart the server.
Note
The RHEL distributions and derivatives come with systemd as the default system and service manager so you can invoke all of the commands with sytemctl instead of service. Currently, both options are supported.
-
Percona Server for MySQL is not started automatically on the RHEL distributions and derivatives after installation. Start the server with the following command:
sudo service mysql start -
Review the service status with the following command:
sudo service mysql status -
Stop the service with the following command:
sudo service mysql stop -
Restart the service with the following command:
sudo service mysql restart
SELinux and security considerations
For information on working with SELinux, see Working with SELinux.
The RHEL 8 distributions and derivatives have added system-wide cryptographic policies component. This component allows the configuration of cryptographic subsystems.
Uninstall Percona Server for MySQL
To completely uninstall Percona Server for MySQL, remove all the installed packages and data files.
-
Stop the Percona Server for MySQL service:
sudo service mysql stop -
Remove the packages:
sudo yum remove percona-server* -
Remove the data and configuration files:
Warning
This step removes all the packages and deletes all the data files (databases, tables, logs, etc.). Take a backup before this operation in case you need the data.
rm -rf /var/lib/mysql rm -f /etc/my.cnf
Use binary tarballs
Install Percona Server for MySQL 8.4 from a binary tarball
A binary tarball contains a group of files, including the server binaries and support files, bundled together into one file using the tar command and compressed using gzip.
See the list of binary tarballs available based on the Percona Server for MySQL version to select the right tarball for your environment.
You can download the binary tarballs from the Linux - Generic section on the download page.
Fetch and extract the correct binary tarball. For example, for Ubuntu 22.04:
Download the tarball:
wget https://downloads.percona.com/downloads/Percona-Server-innovative-release/Percona-Server-8.4.8-8/binary/tarball/Percona-Server-8.4.8-8-Linux.x86_64.glibc2.35.tar.gz
Expected output
--2024-01-15 10:00:00-- https://downloads.percona.com/...
Saving to: 'Percona-Server-8.4.8-8-Linux.x86_64.glibc2.35.tar.gz'
Percona-Server-8.4.8-8-Linux.x86_64.glibc2.35.tar.gz 100%[=================>] xxx MB xx.x MB/s in xx s
2024-01-15 10:00:xx (xx.x MB/s) - 'Percona-Server-8.4.8-8-Linux.x86_64.glibc2.35.tar.gz' saved [xxxxxx/xxxxxx]
Extract the tarball:
tar -xzf Percona-Server-8.4.8-8-Linux.x86_64.glibc2.35.tar.gz
Expected output
(No output on success.)
Change into the extracted directory:
cd Percona-Server-8.4.8-8-Linux.x86_64.glibc2.35
Expected output
(No output on success.)
After extraction
The tarball does not start the server for you. To run Percona Server you must:
-
Initialize the data directory (once) using the server executable
bin/mysqldwith--initializeor--initialize-insecure. -
Start the server (for example with
bin/mysqld_safeor by configuring a systemd service).
The server executable is bin/mysqld inside the extracted directory. Do not run it for normal operation until the data directory has been initialized.
For step-by-step instructions (including creating a data directory, initializing it, starting the server, and optional boot-time setup), see Post-installation. If you did not install under /usr/local/mysql, use your extraction directory instead (for example, cd /path/to/Percona-Server-8.4.8-8-Linux.x86_64.glibc2.35 then bin/mysqld --initialize).
Binary tarball file names available based on the Percona Server for MySQL version
For later of Percona Server for MySQL, the tar files are organized by the glibc2 version. You can find this version on your operating system with the following command:
ldd --version
Expected output
ldd (Ubuntu GLIBC 2.35-0ubuntu3.1) 2.35
Copyright (C) 2022 Free Software Foundation, Inc.
This is free software; see the source for copying conditions. There is NO
warranty; not even for MERCHANTABILITY or FITNESS FOR A PARTICULAR PURPOSE.
Written by Roland McGrath and Ulrich Drepper.
If the glibc2 version from your operating system is not listed, then this Percona Server for MySQL version does not support that operating system.
Binary tarball file name organization
The following lists the platform and the associated full binary file name used by Percona Server for MySQL tar files 8.4.8-8.
| Platform | Percona Server for MySQL tarball name | glibc2 version |
|---|---|---|
| Ubuntu 22.04 | Percona-Server-8.4.8-8-Linux.x86_64.glibc2.35.tar.gz | glibc2.35 |
| Ubuntu 20.04 | Percona-Server-8.4.8-8-Linux.x86_64.glibc2.31.tar.gz | glibc2.31 |
| Red Hat Enterprise 9 | Percona-Server-8.4.8-8-Linux.x86_64.glibc2.34.tar.gz | glibc2.34 |
| Red Hat Enterprise 8 | Percona-Server-8.4.8-8-Linux.x86_64.glibc2.28.tar.gz | glibc2.28 |
| Red Hat Enterprise 7 | Percona-Server-8.4.8-8-Linux.x86_64.glibc2.17.tar.gz | glibc2.17 |
The types of files are as follows:
| Type | Name | Description |
|---|---|---|
| Full | Percona-Server-<version-number>-Linux.x86_64.<glibc2-version>.tar.gz | Contains all files available |
| Minimal | Percona-Server-<version-number>-Linux.x86_64.<glibc2-version>.minimal.tar.gz | Contains binaries and libraries |
| Debug | Percona-Server-<version-number>-Linux.x86_64.<glibc2-version>.debug.tar.gz | Contains the minimal build files and test files, and debug symbols |
Compile from source
Install Percona Server for MySQL from a source tarball
Fetch and extract the source tarball. For example:
wget https://downloads.percona.com/downloads/Percona-Server-innovative-release/Percona-Server-8.4.8-8/binary/tarball/Percona-Server-8.4.8-8-Linux.x86_64.glibc2.35.tar.gz
Unpack the download to get the packages:
tar xfz Percona-Server-8.4.8-8-Linux.x86_64.glibc2.35.tar.gz
To complete the installation, follow the instructions in Compile Percona Server for MySQL from Source.
Compile Percona Server for MySQL from source
The following instructions install Percona Server for MySQL 8.4.
Install Percona Server for MySQL from the Git Source Tree
Percona uses the Github revision
control system for development. To build the latest Percona Server for MySQL
from the source tree, you will need git installed on your system.
You can now fetch the latest Percona Server for MySQL 8.4 sources.
git clone https://github.com/percona/percona-server.git
cd percona-server
git checkout 8.4
git submodule init
git submodule update
If you are going to be making changes to Percona Server for MySQL 8.4 and wanting to distribute the resulting work, you can generate a new source tarball (exactly the same way as we do for release):
cmake .
make dist
After either fetching the source repository or extracting a source tarball (from Percona or one you generated yourself), you will now need to configure and build Percona Server for MySQL.
First, run CMake to configure the build. Here you can specify all the normal build options as you do for a normal MySQL build. Depending on what options you wish to compile Percona Server for MySQL with, you may need other libraries installed on your system. Here is an example using a configure line similar to the options that Percona uses to produce binaries:
cmake . -DCMAKE_BUILD_TYPE=RelWithDebInfo -DBUILD_CONFIG=mysql_release -DFEATURE_SET=community
Compile from source
Now, compile using make:
make
Install:
make install
Percona Server for MySQL 8.4 is installed on your system.
Docker
Running Percona Server for MySQL in a Docker Container
Percona Server for MySQL has an official Docker image hosted on Docker Hub . Download a specific version by adding the Docker tag filter for the 8.4 versions .
We gather Telemetry data in the Percona packages and Docker images.
Make sure that you are using the latest version of Docker. The APT version or the YUM version may be outdated and cause errors.
Review Get help from Percona for ways that we can work with you.
Starting a detached container
Start a container with the --detached or -d option, which runs the container in the background. In detached mode, when the root process used to run the container exits, the container exits.
The following example starts a container named ps with the latest version of
Percona Server for MySQL 8.4. This action also creates the root user and uses root as the password. Please note that root is not a secure password.
docker run -d \
--name ps \
-e MYSQL_ROOT_PASSWORD=root \
percona/percona-server:8.4
Expected output
Unable to find image 'percona/percona-server:8.4' locally
8.4: Pulling from percona/percona-server
By default, Docker pulls the image from Docker Hub if it is not available locally.
To view the container’s logs, use the following command:
docker logs ps --follow
Expected output
Initializing database
2022-09-07T15:20:03.158128Z 0 [System] [MY-013169] [Server] /usr/sbin/mysqld (mysqld 8.4.8-8) initializing of server in progress as process 15
2022-09-07T15:20:03.167764Z 1 [System] [MY-013576] [InnoDB] InnoDB initialization has started.
2022-09-07T15:20:03.530600Z 1 [System] [MY-013577] [InnoDB] InnoDB initialization has ended.
2022-09-07T15:20:04.367600Z 0 [Warning] [MY-013829] [Server] Missing data directory for ICU regular expressions: /usr/lib64/mysql/private/.
...
2022-09-07T15:20:13.706090Z 0 [System] [MY-011323] [Server] X Plugin ready for connections. Bind-address: '::' port: 33060, socket: /var/lib/mysql/mysqlx.sock
2022-09-07T15:20:13.706136Z 0 [System] [MY-010931] [Server] /usr/sbin/mysqld: ready for connections. Version: '8.4.8-8' socket: '/var/lib/mysql/mysql.sock' port: 3306 Percona Server (GPL), Release 21, Revision c59f87d2854.
You can access the server when you see the ready for connections information in the log.
Passing Options
You can pass options with the docker run command. For example, the following command uses UTF-8 as the default setting for character set and collation for all databases:
docker run -d \
--name ps \
-e MYSQL_ROOT_PASSWORD=root \
percona/percona-server:8.4 \
--character-set-server=utf8 \
--collation-server=utf8_general_ci
Accessing the Percona Server Container
The docker exec command lets you have a shell inside the container. This command uses it which forwards your input stream as an interactive TTY.
An example of accessing the detached container:
docker exec -it ps /bin/bash
If you need to troubleshoot, the error log is found in /var/log/ or /var/log/mysql/. The file name may be error.log or mysqld.log.
Troubleshooting
You can view the error log with the following command:
[mysql@ps] more /var/log/mysql/error.log
Expected output
...
2017-08-29T04:20:22.190474Z 0 [Warning] 'NO_ZERO_DATE', 'NO_ZERO_IN_DATE' and 'ERROR_FOR_DIVISION_BY_ZERO' sql modes should be used with strict mode. They will be merged with strict mode in a future release.
2017-08-29T04:20:22.190520Z 0 [Warning] 'NO_AUTO_CREATE_USER' sql mode was not set.
...
Accessing the database
You can access the database either with Docker exec or using the mysql command in the container’s shell.
An example of using Docker exec to access the database:
docker exec -ti ps mysql -uroot -proot
Expected output
mysql: [Warning] Using a password on the command line interface can be insecure.
Welcome to the MySQL monitor. Commands end with ; or \g.
Your MySQL connection id is 9
...
Exiting Percona Server also exits the container.
You can also run the MySQL command-line client within the container’s shell to access the database:
[mysql@ps] mysql -uroot -proot
Expected output
mysql: [Warning] Using a password on the command line interface can be insecure.
Welcome to the MySQL monitor. Commands end with ; or \g.
Your MySQL connection id is 8
Server version: 8.4.8-8 Percona Server (GPL), Release 21, Revision c59f87d2854
Copyright (c) 2009-2022 Percona LLC and/or its affiliates
Copyright (c) 2000, 2022, Oracle and/or its affiliates.
Oracle is a registered trademark of Oracle Corporation and/or its
affiliates. Other names may be trademarks of their respective
owners.
Type 'help;' or '\h' for help. Type '\c' to clear the current input statement.
Accessing the server from an application in another container
The image exposes the standard MySQL port 3306,
so container linking makes the Percona Server instance available
from other containers.
To link a container running your application
(in this case, from an image named app/image)
with the Percona Server container,
run it with the following command:
docker run -d \
--name app \
--link ps \
app/image:latest
This application container will be able to access the Percona Server container via port 3306.
Storing data
There are two ways to store data used by applications that run in Docker containers:
-
Let Docker manage the storage of your data by writing the database files to disk on the host system using its internal volume management.
-
Create a data directory on the host system on high-performance storage and mount it to a directory visible from the container. This method places the database files in a known location on the host system, and makes it easy for tools and applications on the host system to access the files. The user should ensure that the directory exists, that the user accounts have required permissions, and that any other security mechanisms on the host system are set up correctly.
For example, if you create a data directory on a suitable volume
on your host system named /local/datadir,
you run the container with the following command:
docker run -d \
--name ps \
-e MYSQL_ROOT_PASSWORD=root \
-v /local/datadir:/var/lib/mysql \
percona/percona-server:8.4
The -v /local/datadir:/var/lib/mysql option
mounts the /local/datadir directory on the host
to /var/lib/mysql in the container,
which is the default data directory used by Percona Server for MySQL.
Do not add MYSQL_ROOT_PASSWORD to the docker run command if the data directory contains subdirectories, files, or data.
Note
If you have SELinux enabled, assign the relevant policy type to the new data directory so that the container will be allowed to access it:
chcon -Rt svirt_sandbox_file_t /local/datadir
Port forwarding
Docker allows mapping ports on the container to ports on the host system
using the -p option.
If you run the container with this option,
you can connect to the database by connecting your client
to a port on the host machine.
This ability simplifies consolidating instances to a single host.
To map the standard MySQL port 3306 to port 6603 on the host:
docker run -d \
--name ps \
-e MYSQL_ROOT_PASSWORD=root \
-p 6603:3306 \
percona/percona-server:8.4
Exiting the container
If you are in the interactive shell, use CTRL-D or exit to exit the session.
If you have a non-shell process running, interrupt the process with CTRL-C before using either CTRL-D or exit.
Stopping the container
The docker stop container command sends a TERM signal, then waits 10 seconds and sends a KILL signal. The following example stops the ps container:
docker stop ps
The default length of time before stopping a container is 10 seconds. A very large instance cannot dump the data from memory to disk within that time. With this type of instance, add the --time or the -t option to docker stop:
docker stop ps -t 600
Removing the container
To remove a stopped container, use the docker rm command.
docker rm ps
For more information
Review the Docker Docs
Docker environment variables
When running a Docker container with Percona Server,
you can adjust the configuration of the instance
Add one or more environment variables to the docker run command.
These variables will not affect you if you start the container with a data directory that already contains a database. Any pre-existing database remains untouched on the container startup.
The variables are optional, but you must specify at least one of the following:
-
MYSQL_DATABASE- the database schema name that is created when the container starts -
MYSQL_USER- create a user account when the container starts -
MYSQL_PASSWORD- used withMYSQL_USERto create a password for that user account. -
MYSQL_ALLOW_EMPTY_PASSWORD- creates a root user with an empty password. This option is insecure and only should be used for testing or proof of concept when the database can be removed afterward. Anyone can connect asroot. -
MYSQL_ROOT_PASSWORD- this password is used for therootuser account. This option is not recommended for production. -
MYSQL_RANDOM_ROOT_PASSWORD- set this variable instead ofMYSQL_ROOT_PASSWORDwhen you want Percona Server to generate a password for you. The generated password is available in the container’s logs only during the first start of the container. Usedocker logs. You cannot retrieve the password after the first start.
To further secure your instance, use the MYSQL_ONETIME_PASSWORD variable.
These variables are visible to anyone able to run Docker inspect.
docker inspect ps
Expected output
...
"Env": [
"MYSQL_ROOT_PASSWORD=root",
"PATH=/usr/local/sbin:/usr/local/bin:/usr/sbin:/usr/bin:/sbin:/bin",
"PS_VERSION=8.4.8-8",
"OS_VER=el8",
"FULL_PERCONA_VERSION=8.4.8-8.el8"
]
...
You should use Docker secrets or volumes instead.
Percona Server for MySQL also allows adding the _FILE suffix to a variable name. This suffix lets you add the value in a path so that the value cannot be inspected from outside the container.
Use Docker Compose and named volumes
Docker Compose simplifies managing containerized services. This guide shows how to run Percona Server for MySQL 8.4 with persistent storage for data, logs, and backups using named Docker volumes.
Benefits
Creating a docker-compose.yml file offers numerous advantages for managing containerized applications effectively:
| Benefit | Description |
|---|---|
| Simplifies multi-container management | Define and manage multiple services (containers) in a single configuration file, making it easy to run, stop, and scale your application. |
| Automates dependency handling | Specify dependencies between services, ensuring containers start in the correct order, such as databases starting before application servers. |
| Enhances portability | Share the docker-compose.yml file across environments (development, staging, production) to ensure consistent behavior regardless of system setup. |
| Supports scalability | Easily scale services using the docker-compose up –scale command, allowing you to run multiple instances of specific containers. |
| Improves readability | Centralizes configuration in a human-readable YAML format, making it easier to understand and modify compared to command-line options. |
| Enables reproducibility | Store application settings and container configurations in version control to ensure consistent deployments. |
| Allows persistent data | Define volumes directly in the file to persist data for services, ensuring storage remains intact even when containers are stopped. |
| Facilitates networking | Automatically sets up networks for containers to communicate with each other without requiring manual configuration. |
| Simplifies environment variables management | Integrate .env files to externalize sensitive information like database passwords and access tokens. |
| Reduces errors | Avoid repetitive CLI commands by storing configurations in the file, reducing the chance of mistakes during deployment. |
Directory structure
Docker automatically manages volumes, so you don’t create folders manually.
percona-compose/
├── .env
└── docker-compose.yml
Create .env
Using an .env file for MySQL Docker containers has several advantages:
| Benefit | Description |
|---|---|
| Keeps sensitive data secure | Stores environment variables (e.g., passwords) in an .env file, keeping them out of docker-compose.yml to avoid exposure. |
| Simplifies configuration | Centralizes environment variables, making it easier to manage and update configurations in one place. |
| Improves portability | Enables reuse of variables across different environments (development, staging, production) without changes to configuration files. |
| Enhances readability | Keeps docker-compose.yml or Dockerfiles cleaner by externalizing environment variables. |
| Facilitates collaboration | Allows the use of shared templates (e.g., .env.example) for required variables, while hiding actual secrets. |
| Supports dynamic updates | Makes it easy to update environment variables without modifying Docker configurations or scripts. |
By leveraging an .env file, you streamline both security and ease of use for MySQL container deployments. This approach ensures better organization and adaptability for various environments.
MYSQL_ROOT_PASSWORD=supersecurepassword
MYSQL_DATABASE=mydb
MYSQL_USER=myuser
MYSQL_PASSWORD=myuserpassword
Create docker-compose.yml
By using a docker-compose.yml file, you streamline container orchestration, ensure consistency, and simplify collaboration across teams.
services:
mysql:
image: percona/percona-server:8.4
container_name: percona-server
ports:
- "3306:3306"
environment:
MYSQL_ROOT_PASSWORD: ${MYSQL_ROOT_PASSWORD}
MYSQL_DATABASE: ${MYSQL_DATABASE}
MYSQL_USER: ${MYSQL_USER}
MYSQL_PASSWORD: ${MYSQL_PASSWORD}
volumes:
- percona-data:/var/lib/mysql # Database data
- percona-logs:/var/log/mysql # MySQL logs
- percona-backups:/backups # XtraBackup output (optional, for future use)
restart: unless-stopped
volumes:
percona-data:
percona-logs:
percona-backups:
Start the Container
The command has the following options:
-
up: Starts the containers specified in the docker-compose.yml file. -
-d: Runs the containers in detached mode, meaning they operate in the background.
docker-compose up -d
Expected output
{.text .no-copy}
[+] Running 11/11
✔ mysql Pulled 34.1s
✔ 56631da24b0d Pull complete 28.9s
✔ 5aee836c3728 Pull complete 28.9s
✔ a5fd539367b0 Pull complete 28.9s
✔ fc4a4cc146b3 Pull complete 28.9s
✔ 7a3939b8d92c Pull complete 32.1s
✔ 6fdbd2a9e883 Pull complete 32.1s
✔ 70ac4d191dd1 Pull complete 32.1s
✔ 5872370b843d Pull complete 32.1s
✔ 8310fa1d2765 Pull complete 32.1s
✔ 4437564bc659 Pull complete 32.2s
[+] Running 5/5
✔ Network percona-compose_default Created 0.0s
✔ Volume "percona-compose_percona-data" Created 0.0s
✔ Volume "percona-compose_percona-logs" Created 0.0s
✔ Volume "percona-compose_percona-backups" Created 0.0s
✔ Container percona-server Star... 0.3s
Docker automatically creates the volumes:
• percona-data: stores MySQL tables
• percona-logs: stores logs generated by the database
• percona-backups: a mount point you can use for Percona XtraBackup
Connect to the server and run a simple query
After the container is up, you can connect to the running server instance using the mysql client included in the container.
Run the following command to open a MySQL shell in the container:
docker exec -it percona-server mysql -u root -p
You must enter the root password.
Expected output
Enter password:
Welcome to the MySQL monitor. Commands end with ; or \g.
Your MySQL connection id is 9
Server version: 8.4.4-4 Percona Server (GPL), Release 32, Revision b8e378ec
Copyright (c) 2009-2025 Percona LLC and/or its affiliates
Copyright (c) 2000, 2025, Oracle and/or its affiliates.
Oracle is a registered trademark of Oracle Corporation and/or its
affiliates. Other names may be trademarks of their respective
owners.
Type 'help;' or '\h' for help. Type '\c' to clear the current input statement.
Run a simple query:
SHOW DATABASES;
Expected output
+--------------------+
| Database |
+--------------------+
| information_schema |
| mydb |
| mysql |
| performance_schema |
| sys |
+--------------------+
5 rows in set (0.02 sec)
Create a test database and table
The following query creates a test_db database and test_table:
CREATE DATABASE test_db;
USE test_db;
CREATE TABLE test_table (id INT AUTO_INCREMENT PRIMARY KEY, name VARCHAR(100));
INSERT INTO test_table (name) VALUES ('Sample Data');
SELECT * FROM test_table;
Expected output
Query OK, 1 row affected (0.02 sec)
Database changed
Query OK, 0 rows affected (0.01 sec)
Query OK, 1 row affected (0.01 sec)
+----+-------------+
| id | name |
+----+-------------+
| 1 | Sample Data |
+----+-------------+
1 row in set (0.00 sec)
Remember to exit when you are finished working with the server.
Use the backup volume with XtraBackup
When you run XtraBackup inside a container, either in the same network or another container, you can target /backups to store backup files.
An example of using Docker to backup the server:
docker run --rm \
--volumes-from percona-server \
-v percona_backups:/backup \
percona/percona-xtrabackup:8.0 \
xtrabackup --backup \
--target-dir=/backup \
--host=percona-server \
--user=myuser \
--password=mypassword
Best practices
-
Use named volumes to simplify backup and migration.
-
Mount logs separately for easier troubleshooting and rotation.
-
Use docker volume inspect to view volume metadata and mount points.
Shut down and clean up
You can stop the stack but retain volumes:
docker-compose down
You can also remove all resources, including volumes:
docker-compose down -v
Upgrade
Upgrade from 8.0 to 8.4 overview
Review Get help from Percona for ways that we can work with you.
Need expert guidance for your upgrade? Percona Support is ready to assist you every step of the way .
Why upgrade to Percona Server for MySQL 8.4 LTS
Long‑Term Support (LTS) releases focus on stability, predictable security patches, and a clearly defined maintenance horizon—essential qualities for production databases. Moving from 8.0 to 8.4 isn’t just a simple version bump: new defaults, deprecated options, and behavior changes can affect performance and break existing scripts. Treat the upgrade as a small project: plan the steps, pick the method that matches your downtime window, and verify the result.
Benefits of upgrading to Percona Server for MySQL 8.4
| Benefit | What it means for you |
|---|---|
| Security fixes | Patches close known vulnerabilities, keeping your data safe from attacks. |
| New or enhanced features | Access to functionality that improves performance, reliability, and overall capability. |
| Less manual effort | Automation tools let you handle routine tasks without hands-on intervention. |
| Stay relevant | The latest version helps you meet evolving customer expectations and deliver solutions more quickly. |
| Lower operational cost | Improved efficiency, and scalability translate into cheaper day-to-day operations. |
Risks of staying on an older version
| Risk | Potential impact |
|---|---|
| Security exposure | Without the latest patches, attackers can breach, corrupt, or destroy data, harming reputation and causing financial loss. |
| Feature stagnation | Missing new capabilities can lead to slower performance, lower productivity, and more frequent outages. |
| Reduced support | Older versions receive less vendor assistance, resulting in longer troubleshooting times and higher support expenses. |
| Compatibility problems | New hardware, operating system releases, or third-party applications may not work with an outdated Percona Server version, eventually leaving the server unsupported. |
| Unplanned upgrade pressure | Unexpected hardware or OS failures can force a rushed upgrade, increasing the chance of errors. |
Concerned about these risks? Percona Support can help assess and mitigate them .
Upgrade workflow
Follow this step-by-step workflow to plan and execute your upgrade from 8.0 to 8.4:
Step 1: Understand what’s changing
Review these documents to understand breaking changes, removed features, and compatibility issues:
-
Breaking and incompatible changes in 8.4 - Review behavioral changes, removed features, and removed variables that may affect your applications
-
Compatibility and removed items in 8.4 - Verify third-party tool compatibility
-
Defaults and tuning guidance for 8.4 - Understand configuration changes that may impact performance
-
Percona Toolkit updates for 8.4 - Review toolkit changes if you use Percona Toolkit
Step 2: Complete pre-upgrade preparation
Work through the pre-upgrade checks in the upgrade checklist. This includes:
-
Verifying authentication methods and client compatibility
-
Updating replication scripts (MASTER/SLAVE → SOURCE/REPLICA syntax)
-
Identifying and addressing removed features or variables
-
Reviewing configuration defaults
-
Testing backups and restore procedures
-
Planning plugin-to-component transitions (if applicable)
Step 3: Choose your upgrade strategy
Select the upgrade method that best fits your environment:
-
Upgrade strategies - Overview of in-place, logical dump/restore, and side-by-side methods
-
MySQL upgrade paths and supported methods - Verify your upgrade path is supported
Step 4: Execute the upgrade
Follow the step-by-step procedures for your chosen method:
- Upgrade procedures for 8.4 - Detailed procedures for repository-based or standalone package upgrades
Step 5: Validate the upgrade
After completing the upgrade, complete the post-upgrade validation steps in the upgrade checklist. These steps include:
-
Verifying connectivity and authentication
-
Checking replication health (if applicable)
-
Re-creating spatial indexes
-
Validating performance baselines
-
Reviewing logs and metrics
-
Testing backup and recovery
Additional reference materials
-
Upgrade from plugins to components - Guide for migrating from plugins to components
-
Downgrade options - Information about downgrading if needed
Tooling to de-risk your upgrade
-
pt-upgrade– compares query plans and execution behavior between Percona Server 8.0 and 8.4 -
Percona XtraBackup – creates hot backups and lets you test restores without downtime.
-
A full dry-run workflow - backup → restore on 8.4 → run smoke/load tests → validate → practice rollback.
These purpose‑built tools let you spot regressions early and ensure a reliable fallback plan.
Test environment is mandatory
Set up a sandbox and run the upgrade there first. This isolated environment is essential for a successful migration. If you ever need to revert to the previous version, note that there is no fully supported in-place downgrade procedure from Percona Server for MySQL 8.4 to an earlier major version. The most reliable rollback method is to restore a backup taken before the upgrade, or to use a logical dump/load or replication into the older version. Because binary compatibility may not be preserved when new features or data-format changes have been applied, the safest approach is to provision a fresh instance of the older version and reload your data, rather than expecting a simple “undo” of the upgrade.
We strongly advise upgrading to the latest LTS release (Percona Server for MySQL 8.4) to stay secure, performant, and fully supported.
Need personalized support during your upgrade? Contact Percona Support for a detailed migration plan .
Further reading
Review these upgrade-related documents:
Additional MySQL documentation
The following list summarizes a number of the changes in the 8.0 series and has useful guides that can help you perform a smooth upgrade. We strongly recommend reading this information:
Review other Percona blogs that contain upgrade information.
Understand what's changing
Breaking and incompatible changes in 8.4
Review these items before upgrading from 8.0 to 8.4. This document covers the most significant breaking behavioral changes, removed features, and removed variables that may affect your upgrade. Each entry includes the impact, replacement (if available), and recommended action.
Review the MySQL 8.4 Reference manual for more information.
Authentication and user management
Impact:
-
mysql_native_passwordis disabled by default in 8.4; new users default tocaching_sha2_password. -
The
mysql_native_passwordplugin can still be loaded using--mysql-native-password=ONif needed for backward compatibility. -
In the 9.x series,
mysql_native_passwordwill be completely removed. -
default_authentication_pluginvariable is removed.
Replacement:
- New users default to
caching_sha2_password; configure authentication via supported mechanisms without this variable.
Action:
- Identify accounts and applications using
mysql_native_passwordand plan migration tocaching_sha2_password. - If necessary for temporary compatibility, you can enable
mysql_native_passwordwith--mysql-native-password=ON, but plan to migrate accounts as this plugin will be removed in future versions. - Validate that drivers and clients support
caching_sha2_passwordand TLS.
Replication terminology and commands
Impact:
-
Many of the MASTER/SLAVE terms and statements are removed in 8.4 and will cause syntax errors if used.
-
Statements such as
CHANGE MASTER TO,START SLAVE,STOP SLAVE, andSHOW SLAVE STATUSare no longer supported. -
Related status variables and counters (for example,
Com_show_slave_status) are also removed.
Replacement:
- Use SOURCE/REPLICA equivalents:
START REPLICA,SHOW REPLICA STATUS,CHANGE REPLICATION SOURCE TOand updated status fields.
Action:
-
Update operational scripts, automation, and runbooks to new commands before upgrading.
-
You should replace only the replication‑related statements (for example,
CHANGE MASTER TO,START SLAVE,SHOW SLAVE STATUS) with theirSOURCE/REPLICAequivalents, while leaving identifiers, theREPLICATION SLAVEprivilege, and theslave_*system tables untouched. A scoped, manual review of each occurrence prevents breaking non‑replication code. -
Update scripts, automation, and monitoring that reference removed statements or counters.
-
Re-test replication lifecycle: provisioning, change-source, failover.
Spatial indexes
Impact:
- A known issue can corrupt a spatial index (R-Tree index) in MySQL 8.4.0 through 8.4.3. The corruption is triggered when an
UPDATEthat slightly changes a geometry’s MBR (Minimum Bounding Rectangle) is immediately followed by aDELETEof the same row. The R-Tree index can retain a dangling leaf, leading to “Incorrect key file” errors.
Action:
-
Upgrade to 8.4.4 or later, which fixes this issue.
-
If you must remain on 8.4.0-8.4.3, apply one of these workarounds:
- Serialize UPDATE and DELETE statements (ensure they don’t execute in immediate succession)
- Rebuild the spatial index after operations that might trigger the bug
-
Set
innodb_rtree_index_update_interval=0to disable deferred updates -
If you’re planning an upgrade from 8.0 or an earlier 8.4 point release, schedule a pre-upgrade test that exercises an update-then-delete pattern on a table with a spatial index. Verify the index remains healthy with
CHECK TABLE ... EXTENDED. This will surface the bug before you move production data. -
As a precautionary measure, you can drop spatial indexes before upgrade and re-create them after upgrade, then verify integrity.
New reserved keywords
Impact:
- New reserved words (for example,
MANUAL,PARALLEL,QUALIFY,TABLESAMPLE) may conflict with unquoted identifiers and break queries.
Action:
-
Scan schemas and queries for unquoted usage; quote or rename objects.
-
See: Keywords and Reserved Words in MySQL 8.4 for the complete list of reserved keywords.
Data type restrictions
Impact:
AUTO_INCREMENTis not permitted onFLOATorDOUBLE.
Action:
- Evaluate each case for the best solution.
Removed SQL function
Impact:
WAIT_UNTIL_SQL_THREAD_AFTER_GTIDS()function is removed (deprecated in 8.0).
Replacement:
WAIT_FOR_EXECUTED_GTID_SET().
Action:
- Replace function usage in procedures, scripts, and runbooks.
Binary log retention variable
Impact:
expire_logs_daysvariable is removed.
Replacement:
binlog_expire_logs_seconds.
Action:
- Adjust configuration and automation to use seconds-based retention.
Memcached-related variables and APIs
Impact:
- Built-in memcached integration variables (for example,
daemon_memcached,innodb_api, and related settings) are removed.
Replacement:
- Externalize caching at the application tier or separate cache services.
Action:
- Remove dependencies on the built-in memcached functionality.
Further reading
Compatibility and removed items in 8.4
A successful migration requires identifying and addressing all removed parameters, variables, and functions. Using removed items in configuration files or application code will cause errors and prevent the server from starting or applications from running.
Removed server and replication system variables
| Variable Name | Description | Replacement |
|---|---|---|
avoid_temporal_upgrade |
Whether ALTER TABLE should upgrade pre-5.6.4 temporal columns | No replacement |
binlog_transaction_dependency_tracking |
Source of dependency information for multithreaded applier | Functionality is now internal; WRITESET is the default and the only available mode |
character-set-client-handshake |
Do not ignore client-side character set value sent during handshake | No replacement |
default_authentication_plugin |
Default authentication plugin | authentication_policy |
expire_logs_days |
Purge binary logs after a number of days | binlog_expire_logs_seconds |
group_replication_ip_whitelist |
List of hosts permitted to connect to the group | No replacement |
group_replication_primary_member |
Primary member UUID when in single-primary mode | No replacement |
group_replication_recovery_complete_at |
Recovery policies when handling cached transactions | No replacement |
have_openssl |
Whether the server supports SSL connections | No replacement |
have_ssl |
Whether the server supports SSL connections | No replacement |
innodb_api_... variables |
All innodb_api variables related to built-in memcached functionality | No replacement |
Removed server options, SQL statements, and status variables
| Item Name | Type | Replacement |
|---|---|---|
admin-ssl |
Server Option | --tls-version and --admin-tls-version |
authentication_fido_rp_id |
Server Option | No replacement |
--language |
Server Option | No replacement |
--old and --new |
Server Option | No replacement |
Com_change_master |
Status Variable | Com_change_replication_source |
Com_show_master_status |
Status Variable | Com_show_binary_log_status |
Com_show_slave_status |
Status Variable | Com_show_replica_status |
Com_slave_start |
Status Variable | Com_replica_start |
Com_slave_stop |
Status Variable | Com_replica_stop |
CHANGE MASTER TO |
SQL Statement | CHANGE REPLICATION SOURCE TO |
SHOW SLAVE STATUS |
SQL Statement | SHOW REPLICA STATUS |
START SLAVE |
SQL Statement | START REPLICA |
STOP SLAVE |
SQL Statement | STOP REPLICA |
SHOW MASTER STATUS |
SQL Statement | SHOW BINARY LOG STATUS |
RESET MASTER |
SQL Statement | RESET BINARY LOGS AND GTIDS |
WAIT_UNTIL_SQL_THREAD_AFTER_GTIDS() |
SQL Function | WAIT_FOR_EXECUTED_GTID_SET() |
Third-party tool compatibility
Percona XtraBackup (PXB)
- Version-specific backups: Percona XtraBackup 8.4 creates backups of MySQL 8.4, Percona Server for MySQL 8.4, and Percona XtraDB Cluster 8.4 only.
- Compatibility: Percona XtraBackup 8.4 does not support backing up databases from MySQL 8.0 or 9.x servers.
- Action: Upgrade Percona XtraBackup to version 8.4 before or during the database upgrade.
Percona Operator for MySQL
- Upgrade method: Create a new PXC 8.4 installation using the Percona Operator for PXC 8.4.
- Data migration: Recover data from an 8.0 backup, then establish asynchronous replication between clusters.
- In-place upgrade: Not recommended; in-place upgrades may work but are not guaranteed.
ProxySQL
- MySQL 8.4 support: Recent versions support MySQL 8.4 and include Group Replication support for 8.4 and 9.x.
- Authentication: ProxySQL 2.6+ supports
caching_sha2_password(default in 8.4). - Replication terminology: Compatible with SOURCE/REPLICA syntax; can monitor replica lag and manage traffic accordingly.
Pre-upgrade validation
Use these methods to identify compatibility issues:
- mysqlsh upgrade checker: Identifies many removed parameters and compatibility issues.
- Manual review: Cross-reference your configuration files and application code against the removed items tables above.
- Third-party tooling: Verify versions of backup utilities, proxies, and monitoring solutions are compatible with 8.4.
Further reading
Defaults and tuning guidance for 8.4
MySQL 8.4 updates several server defaults to align with modern CPUs, memory sizes, and SSD/NVMe storage. An in-place upgrade that blindly reuses an 8.0-era my.cnf may miss out on these improvements or cause unexpected performance behaviors. Review and re-evaluate your configuration on 8.4, or generate a new config, rather than carrying old settings forward.
Notable InnoDB default changes
| InnoDB System Variable Name | New Default (8.4) | Previous Default (8.0) |
|---|---|---|
innodb_adaptive_hash_index |
OFF | ON |
innodb_change_buffering |
none | all |
innodb_doublewrite_files |
2 | innodb_buffer_pool_instances * 2 |
innodb_doublewrite_pages |
128 | 4 |
innodb_flush_method on Linux |
O_DIRECT if supported, otherwise fsync | fsync |
innodb_io_capacity |
10000 | 200 |
innodb_log_buffer_size |
67108864 (64 MiB) | 16777216 (16 MiB) |
innodb_numa_interleave |
ON | OFF |
temptable_max_ram |
3% of total memory (1–4 GiB range) | 1073741824 (1 GiB) |
innodb_parallel_read_threads |
available logical processors / 8 (min 4) | 4 |
Why these changes matter:
- Higher
innodb_io_capacityleverages SSD/NVMe for IO-bound workloads; legacy spinning disks may need a lower value. - Larger
innodb_log_buffer_sizereduces redo flush frequency—helpful for write-heavy workloads. innodb_adaptive_hash_indexdefault OFF favors predictability; the adaptive hash index can become a contention source under concurrency.innodb_numa_interleavedefaults ON to reduce memory imbalance on multi-socket systems.innodb_change_bufferingset tononereduces overhead for modern storage that handles random writes efficiently.innodb_doublewrite_pagesincreased to 128 improves doublewrite performance on fast storage.
Configuration review checklist
Use this to adapt an 8.0 configuration to 8.4:
- Remove overrides that merely reassert old 8.0 defaults unless they are proven necessary.
- Re-evaluate IO settings (
innodb_io_capacity, flush method) based on storage type and observed latency. - Confirm redo/undo settings and log buffer meet current write patterns.
- Validate parallel read threads relative to CPU topology and workload.
- Generate a fresh config for 8.4 when possible; only reapply carefully justified overrides.
Practical evaluation steps
- Benchmark with your workload: establish a baseline on 8.0, then restore to 8.4 and run the same tests.
- Compare Performance Schema metrics and wait events for regressions or new hotspots.
- Adjust a single variable at a time; document changes and their impacts.
Further reading
Percona Toolkit updates for 8.4
Percona Toolkit has been updated to support MySQL 8.4, addressing terminology, deprecations, and authentication improvements. If your automation or runbooks use these tools, plan updates alongside the database upgrade.
Terminology alignment
- Toolkit commands and output now use SOURCE/REPLICA terminology consistent with MySQL 8.4.
Renamed tools
pt-slave-find→pt-replica-findpt-slave-restart→pt-replica-restart
Aliases with the old names remain for a transition period; update scripts and runbooks to the new names.
Deprecated tool
pt-slave-delayis deprecated and does not support MySQL 8.4. Use built-in delayed replication features instead.
Authentication and SSL
- Enhanced SSL/TLS handling and improved support for
caching_sha2_passwordandsha256_passwordauthentication plugins.
What to change in your environment
- Update automation and scripts: replace
pt-slave-findwithpt-replica-find, andpt-slave-restartwithpt-replica-restart. - Remove dependencies on
pt-slave-delay; use native delayed replication features instead. - Validate Toolkit connectivity using your TLS settings and modern authentication plugins.
Further reading
- Upgrade overview
- Upgrade checklist for 8.4
- Upgrade procedures for 8.4
- Upgrade strategies
- MySQL upgrade paths and supported methods
- Upgrade from plugins to components
- Downgrade options
- Breaking and incompatible changes in 8.4
- Compatibility and removed items in 8.4
- Defaults and tuning guidance for 8.4
Upgrade checklist for 8.4
Thorough preparation and validation reduce risk more than any cutover tactic. Use this checklist to guide your upgrade from 8.0 to 8.4, validating each item in staging before upgrading production.
Pre-upgrade checks
Complete these checks before starting the upgrade process.
Authentication and connectivity
Impact: mysql_native_password is disabled by default in 8.4; default_authentication_plugin is removed. New accounts default to caching_sha2_password. The mysql_native_password plugin can still be loaded using --mysql-native-password=ON if needed, but it will be completely removed in the MySQL 9.x series.
Action:
- Inventory accounts and applications that still use
mysql_native_password. - Verify drivers/clients support
caching_sha2_passwordand TLS as configured. - Plan account migration to
caching_sha2_password. If temporary compatibility is needed,--mysql-native-password=ONcan be used, but plan migration as this plugin will be removed in future versions. - See: authentication methods
Replication and operational scripts
Impact: MASTER/SLAVE syntax is removed and will cause syntax errors if used; use SOURCE/REPLICA commands.
Action:
- Search and update scripts:
START REPLICA,SHOW REPLICA STATUS,CHANGE REPLICATION SOURCE TO. - Validate Orchestrator/HA tooling versions for 8.4 syntax.
- Update Percona Toolkit calls: replace
pt-slave-findwithpt-replica-find, andpt-slave-restartwithpt-replica-restart; removept-slave-delayusage. - See: Percona Toolkit updates for 8.4
Removed features and variables
Impact: Several legacy statements, status counters, variables, and functions are removed in 8.4.
Action:
- Replace MASTER/SLAVE statements and counters with SOURCE/REPLICA equivalents.
- Migrate from
expire_logs_daystobinlog_expire_logs_seconds. - Replace
WAIT_UNTIL_SQL_THREAD_AFTER_GTIDS()withWAIT_FOR_EXECUTED_GTID_SET(). - Remove dependencies on built-in memcached variables/APIs.
- See: Breaking and incompatible changes in 8.4
Reserved keywords in identifiers
Impact: New reserved words (for example, MANUAL, PARALLEL, QUALIFY, TABLESAMPLE) can break schemas and queries.
Action:
- Scan object names and queries for unquoted usage; quote or rename as needed.
- See: Keywords and Reserved Words in MySQL 8.4 for the complete list of reserved keywords.
Schema constraints
Impact: AUTO_INCREMENT is not allowed on FLOAT/DOUBLE.
Action:
- Identify and convert any
FLOAT/DOUBLEAUTO_INCREMENTcolumns to integer types prior to upgrade.
Configuration defaults review
Impact: 8.4 changes several InnoDB defaults for modern hardware; old 8.0 configs may not be optimal and can cause behavior changes.
Action:
- Compare your overrides to 8.4 defaults; remove obsolete settings and re-evaluate IO/log parameters.
- See: Defaults and tuning guidance for 8.4
Spatial indexes
Impact: A known issue can corrupt a spatial index (R-Tree index) in MySQL 8.4.0 through 8.4.3. The corruption is triggered when an UPDATE that slightly changes a geometry’s MBR (Minimum Bounding Rectangle) is immediately followed by a DELETE of the same row. This issue is fixed in 8.4.4 and later.
Action:
- If upgrading to 8.4.0-8.4.3, drop spatial indexes before upgrade (document which ones for post-upgrade re-creation) as a precautionary measure.
- If upgrading to 8.4.4 or later, this issue is fixed; spatial indexes can remain in place.
- Plan to re-create any spatial indexes dropped pre-upgrade after upgrade completion.
- See: Breaking and incompatible changes in 8.4 for detailed information and workarounds.
Backup and recovery rehearsal
Action:
- Take a hot backup with Percona XtraBackup; document restore steps and timings.
- Restore into a clean 8.4 environment; validate startup and metadata upgrade.
- See: Backup and restore overview
Behavior comparison and testing
Action:
- Use
pt-upgradeto compare query plans/behavior between 8.0 and 8.4. - Run application smoke and load tests against a restored 8.4 copy.
Plugins to components transitions
Impact: Some 8.0 plugins are removed or replaced by components in 8.4.
Action:
- If a component exists in 8.0 (for example, data masking), transition in 8.0 before upgrading.
- Plan configuration changes from plugin variables/
--early-plugin-loadto component manifests/config files. - See: Upgrade from plugins to components
Rollback feasibility
Action:
- Define a rollback path (for example, keep 8.0 environment on standby or validate point-in-time recovery to 8.0-compatible readers if applicable).
- Confirm cutover/rollback runbooks with approvers.
Post-upgrade validation
Run these checks immediately after upgrading from 8.0 to 8.4 and before widening traffic.
Connectivity and authentication
- Verify application logins for every service account.
- Confirm new account creations default to
caching_sha2_passwordas expected.
Replication health (if applicable)
- Confirm
SHOW REPLICA STATUSreports healthy IO/SQL threads. - Exercise planned failover and change-source procedures.
Spatial indexes
- Re-create any spatial indexes dropped pre-upgrade.
- Run integrity checks (for example,
CHECK TABLE ... EXTENDED) and representative spatial queries to verify index health.
Workload and performance baselines
- Re-run baseline queries and workload tests; compare latency and throughput.
- Review changes in 8.4 defaults that can affect performance (optimizer/costing, redo/undo, IO settings) and tune as needed.
- See: Defaults and tuning guidance for 8.4
Logs and observability
- Review error logs and warnings post-startup and during smoke tests.
- Inspect Performance Schema metrics and application SLOs for regressions.
Backup and recovery
- Take a fresh full backup with Percona XtraBackup.
- Optionally perform a spot restore test to validate recovery on 8.4.
Further reading
- Upgrade overview
- Upgrade procedures for 8.4
- Upgrade strategies
- MySQL upgrade paths and supported methods
- Upgrade from plugins to components
- Downgrade options
- Breaking and incompatible changes in 8.4
- Compatibility and removed items in 8.4
- Defaults and tuning guidance for 8.4
- Percona Toolkit updates for 8.4
Upgrade strategies
For critical production systems, consider engaging Percona Support to assist with your upgrade process. Our experts can help ensure a smooth transition and minimize potential risks during this sensitive operation.
Downgrade options
Review the Downgrade options to ensure that your downgrade path is supported.
In-place upgrade
Use the in-place upgrade strategy only as a last resort. This approach involves shutting down the server and replacing the server binaries or packages with new ones. The new server version then starts using the existing data directory. Configure the server to perform a slow shutdown by setting innodb_fast_shutdown=0 before shutting down.
The benefits are:
-
Lower infrastructure costs compared to creating a new environment, though nodes require testing.
-
Ability to complete an upgrade over weeks with cool-down periods between reader node upgrades.
-
Requires a failover of production traffic, and achieving minimal downtime demands robust high-availability tools.
If you use XA transactions with InnoDB, running XA RECOVER before upgrading checks for uncommitted XA transactions. If results are returned, either commit or rollback the XA transactions by issuing an XA COMMIT or XA ROLLBACK statement.
New environment with cut over
Upgrading with a new environment involves provisioning a duplicate environment with the same number of servers with the same hardware specs and same operating system as the current production nodes.
On the newly provided hardware, the target MySQL version will be installed. The new environment will be set up, and the production data will be recovered. Remember that you can use pt-config-diff to verify MySQL configurations.
Replication from the current source to the newly built environment will be established. At cutover time, all writes on the current source will be halted, and the application traffic will need to be redirected to the new source. The cutover can be done using a Virtual IP address or manually redirecting the application itself. Once writes are being received on the new environment, you are in a fail forward situation, and the old environment can be torn down.
The new environment strategy has the following pros and cons:
-
Additional infrastructure cost since a new environment must be built.
-
Ability to upgrade both the OS and the DBMS at the same time.
-
Allows upgrade of hardware easily.
-
Requires only a single cutover window.
8.0 → 8.4 migration methods
Choose the approach that matches your downtime budget, risk tolerance, and rollback needs. Always rehearse in a non-production environment first.
Note: For a complete overview of supported upgrade paths and methods, see MySQL upgrade paths and supported methods.
In-place upgrade (stop/replace/start)
Downtime: short to moderate
Risk: higher (shared data directory; fewer rollback options)
Use when: the environment is simple, downtime is acceptable, and you have strong backups and validation.
Prerequisites:
- Complete Upgrade checklist pre-upgrade checks
- Set
innodb_fast_shutdown=0for a clean shutdown - Verified backup and restore
Rollback: restore backup and revert binaries.
Logical dump and restore (clean rebuild)
Downtime: moderate to high (data size dependent)
Risk: moderate (clean metadata; slower for large datasets)
Use when: you want a pristine 8.4 instance and can accept longer downtime.
Prerequisites:
- Sufficient capacity for parallel dump/restore
- Application maintenance window sized to data volume
Rollback: keep 8.0 online until validation completes; redirect traffic back if needed.
Side-by-side with replication and controlled cutover
Downtime: minimal (cutover only)
Risk: lower (new environment; defined fallback until fail-forward)
Use when: you need the smallest outage and can provision a parallel environment.
Prerequisites:
- Build a new 8.4 environment; establish replication from 8.0
- Validate workload on the replica(s) and rehearse failover
Cutover: stop writes on 8.0, allow replica to catch up, redirect traffic (VIP/DNS), then promote 8.4.
Rollback: if issues arise before fail-forward, redirect traffic back to 8.0 and resume writes.
Further reading
- Upgrade overview
- Upgrade checklist for 8.4
- Upgrade procedures for 8.4
- MySQL upgrade paths and supported methods
- Upgrade from plugins to components
- Downgrade options
- Breaking and incompatible changes in 8.4
- Compatibility and removed items in 8.4
- Defaults and tuning guidance for 8.4
- Percona Toolkit updates for 8.4
MySQL upgrade paths and supported methods
MySQL supports different upgrade paths depending on the source and target versions. Choose the appropriate method based on your current version and target.
Upgrade path matrix
| Upgrade Path | Path Examples | Supported Upgrade Methods |
|---|---|---|
| Within an LTS or Bugfix series | 8.0.37 to 8.0.41 or 8.4.0 to 8.4.4 | In-place upgrade, logical dump and load, replication, and MySQL Clone |
| From an LTS or Bugfix series to the next LTS series | 8.0.37 to 8.4.x LTS | In-place upgrade, logical dump and load, and replication |
| From an LTS or Bugfix release to an Innovation release before the next LTS series | 8.0.34 to 8.3.0 or 8.4.0 to 9.0.0 | In-place upgrade, logical dump and load, and replication |
| From the Innovation series to the next LTS series | 8.3.0 to 8.4 LTS | In-place upgrade, logical dump and load, and replication |
| From an Innovation series to an Innovation release after the next LTS series | Not allowed, two steps are required: 8.3.0 to 8.4 LTS, and 8.4 LTS to 9.x Innovation | In-place upgrade, logical dump and load, and replication |
Key considerations
- LTS to LTS: Direct upgrade from 8.0 LTS to 8.4 LTS is supported with multiple methods.
- Innovation to Innovation: Cannot skip LTS releases; must upgrade through the LTS series first.
- MySQL Clone: Only available for upgrades within the same major version series.
- Replication: Available for most upgrade paths but requires careful planning for cross-version replication.
Choosing your upgrade method
- In-place upgrade: Fastest but highest risk; requires downtime.
- Logical dump and load: Cleanest but slowest for large datasets; requires downtime.
- Replication: Minimal downtime but requires additional infrastructure; good for high-availability setups.
- MySQL Clone: Fastest for same-series upgrades; requires compatible versions.
Further reading
Upgrade procedures for 8.4
Need expert guidance for your Percona Server upgrade? Percona Support is here to help .
This document provides step-by-step procedures for upgrading Percona Server for MySQL using either Percona repositories (recommended) or standalone packages.
Before beginning the upgrade process:
- Complete the upgrade checklist pre-upgrade checks.
- Create a full backup (or dump if possible) of your database.
- Back up your database configuration file (
my.cnf) to a safe location, then modify it as needed (for example, remove deprecated variables, update settings for 8.4) before stopping the server. -
Stop the server using the appropriate command for your system:
sudo systemctl stop mysql
Critical
Always test the upgrade process in a non-production environment first. For detailed upgrade procedures or if you encounter any issues during this process, our Percona Support team is available to assist you.
Using Percona repositories (recommended)
We recommend using the Percona repositories to upgrade your server. This method automatically handles dependencies and simplifies the upgrade process.
Find the instructions on how to enable the repositories in the following documents:
Run the following commands as root or use the sudo command.
-
Make a full backup (or dump if possible) of your database. Copy the database configuration file,
my.cnf, to another directory as a backup. If the configuration file is not backed up, it may be overwritten during the upgrade. -
Stop the server with the appropriate command for your system:
sudo systemctl stop mysql -
Modify the database configuration file,
my.cnf, as needed (for example, remove deprecated variables, update settings for 8.4). -
Install Percona Server for MySQL:
sudo apt update sudo apt install curl curl -O https://repo.percona.com/apt/percona-release_latest.generic_all.deb sudo apt install gnupg2 lsb-release ./percona-release_latest.generic_all.deb sudo apt update sudo percona-release setup ps-84-lts sudo apt install percona-server-server -
Install the storage engine packages.
If you used the MyRocks storage engine in Percona Server for MySQL 8.4, install the
percona-server-rocksdbpackage:sudo apt install percona-server-rocksdb -
The mysqld binary automatically runs the upgrade process if needed. To find more information, see MySQL Upgrade Process .
-
Restart the service:
sudo systemctl restart mysql
After the service has been successfully restarted, you can use the new Percona Server for MySQL 8.4.
Run the following commands as root or use the sudo command.
-
Make a full backup (or dump if possible) of your database. Copy the database configuration file, for example,
my.cnf, to another directory to save it. -
Stop the server with the appropriate command for your system:
sudo systemctl stop mysql -
Check your installed packages:
rpm -qa | grep Percona-Server -
Remove only the packages without dependencies and leave dependent packages. The command does not prompt for confirmation:
rpm -qa | grep Percona-Server | xargs rpm -e --nodeps -
Remove the mysql-related packages:
rpm -qa | grep '^mysql-' | xargs rpm -e --nodeps -
Install the
percona-server-serverpackage:sudo yum install https://repo.percona.com/yum/percona-release-latest.noarch.rpm sudo percona-release setup ps-84-lts sudo yum install percona-server-server -
Install the storage engine packages.
If you used the MyRocks storage engine in the previous version, install the
percona-server-rocksdbpackage:sudo yum install percona-server-rocksdb -
Modify your configuration file,
my.cnf, as needed (for example, remove deprecated variables, update settings for 8.4). If you were using plugins that have been replaced by components in 8.4, plan the transition to components. See Upgrade from plugins to components for details. -
The mysqld binary automatically runs the upgrade process if needed. To find more information, see MySQL Upgrade Process .
-
Restart the server:
sudo systemctl restart mysql
After the service has been successfully restarted, you can use the Percona Server for MySQL 8.4.
Using standalone packages
Use this method when you cannot use repositories or need to install from manually downloaded packages. This method requires you to manually resolve dependencies.
-
Remove the installed packages with their dependencies:
sudo apt autoremove percona-server percona-client -
Do the required modifications in the database configuration file
my.cnf. -
Download the following packages for your architecture:
percona-server-serverpercona-server-clientpercona-server-commonlibperconaserverclient21
The following example downloads Percona Server for MySQL 8.4.8-8 packages for Debian 11.0:
wget https://downloads.percona.com/downloads/Percona-Server-innovative-release/Percona-Server-8.4.8-8/binary/debian/bullseye/x86_64/Percona-Server-8.4.8-8-r582ebeef-bullseye-x86_64-bundle.tar -
Unpack the bundle to get the packages:
tar xvf Percona-Server-8.4.8-8-r582ebeef-bullseye-x86_64-bundle.tarAfter you unpack the bundle, you should see the following packages:
ls *.debExpected output
libperconaserverclient21-dev_8.4.8-8.bullseye_amd64.deb percona-server-dbg_8.4.8-8.bullseye_amd64.deb libperconaserverclient21_8.4.8-8.bullseye_amd64.deb percona-server-rocksdb_8.4.8-8.bullseye_amd64.deb percona-mysql-router_8.4.8-8.bullseye_amd64.deb percona-server-server_8.4.8-8.bullseye_amd64.deb percona-server-client_8.4.8-8.bullseye_amd64.deb percona-server-source_8.4.8-8.bullseye_amd64.deb percona-server-common_8.4.8-8.bullseye_amd64.deb percona-server-test_8.4.8-8.bullseye_amd64.deb -
Install Percona Server for MySQL:
sudo dpkg -i *.debThis command installs the packages from the bundle. Another option is to download or specify only the packages you need for running Percona Server for MySQL installation (
libperconaserverclient21_8.4.8-8.bullseye_amd64.deb,percona-server-client_8.4.8-8.bullseye_amd64.deb,percona-server-common_8.4.8-8.bullseye_amd64.deb, andpercona-server-server_8.4.8-8.bullseye_amd64.deb).Warning
When installing packages manually, you must resolve all the dependencies and install missing packages yourself. At least the following packages should be installed before installing Percona Server for MySQL 8.4.8-8: *
libmecab2*libjemalloc1*zlib1g-dev*libaio1 -
The mysqld binary automatically runs the upgrade process if needed. To find more information, see MySQL Upgrade Process .
-
Restart the service:
sudo service mysql restart
After the service has been successfully restarted, use the new Percona Server for MySQL 8.4.8-8.
-
Check the installed packages:
rpm -qa | grep percona-serverExpected output
percona-server-shared-8.4.8-8.el9.x86_64 percona-server-shared-compat-8.4.8-8.el9.x86_64 percona-server-client-8.4.8-8.el9.x86_64 percona-server-server-8.4.8-8.el9.x86_64You may have the
shared-compatpackage, which is required for compatibility. -
Remove the packages without dependencies:
rpm -qa | grep percona-server | xargs rpm -e --nodepsIt is important that you remove the packages without dependencies as many packages may depend on these (as they replace
mysql) and will be removed if omitted.To remove the listed packages, run:
rpm -qa | grep '^mysql-' | xargs rpm -e --nodeps -
Download the packages of the desired series for your architecture from the download page . The easiest way is to download the bundle which contains all the packages. The following example downloads Percona Server for MySQL 8.4.8-8 packages for RHEL 9:
wget https://downloads.percona.com/downloads/Percona-Server-8.4/Percona-Server-8.4.8-8/binary/redhat/9/x86_64/Percona-Server-8.4.8-8-r9927a2fb-el9-x86_64-bundle.tar -
Unpack the bundle to get the packages:
tar xvf Percona-Server-8.4.8-8-r9927a2fb-el9-x86_64-bundle.tarAfter you unpack the bundle, you should see the following packages:
ls *.rpm -
Install Percona Server for MySQL:
sudo rpm -ivh percona-server-server-8.4.8-8.el9.x86_64.rpm \ percona-server-client-8.4.8-8.el9.x86_64.rpm \ percona-server-shared-8.4.8-8.el9.x86_64.rpm \ percona-server-shared-compat-8.4.8-8.el9.x86_64.rpmThis command installs only packages required to run the Percona Server for MySQL 8.4.8-8.
You can install all the packages (for debugging, testing, etc.) with:
sudo rpm -ivh *.rpmNote
When manually installing packages, you must resolve all the dependencies and install missing ones.
-
Modify your configuration file,
my.cnf, as needed (for example, remove deprecated variables, update settings for 8.4). If you were using plugins that have been replaced by components in 8.4, plan the transition to components. See Upgrade from plugins to components for details.RHEL or derivatives automatically backs up the previous configuration file to
/etc/my.cnf.rpmsaveand installs the defaultmy.cnf. After the upgrade/install process completes, you can restore your configuration from the backup (after removing all unsupported system variables). -
The mysqld binary automatically runs the upgrade process if needed. To find more information, see MySQL Upgrade Process .
-
Restart the server:
sudo service mysql restart
After the service has been successfully restarted, you can use the new Percona Server for MySQL 8.4.8-8.
Post-upgrade validation
After completing the upgrade, follow the post-upgrade validation steps in the upgrade checklist.
Further reading
- Upgrade overview
- Upgrade checklist for 8.4
- Upgrade strategies
- MySQL upgrade paths and supported methods
- Upgrade from plugins to components
- Downgrade options
- Breaking and incompatible changes in 8.4
- Compatibility and removed items in 8.4
- Defaults and tuning guidance for 8.4
- Percona Toolkit updates for 8.4
Upgrade from plugins to components
Need help navigating plugin to component transitions? Percona Support can assist .
Percona Server for MySQL 8.4 introduces a shift from plugins to components for several key features, a change that requires a manual transition during the upgrade process. It is generally recommended to transition to the component version of a feature in the 8.0 series before performing the upgrade to 8.4 if both a plugin and a component are available for that feature.
The following plugins have changed:
| Plugin | 8.0 information | 8.4 changes | Notes |
|---|---|---|---|
keyring_vault |
Only available as a plugin | component_keyring_vault |
This plugin has been replaced by the component_keyring_vault component. The upgrade requires a manual conversion of the plugin’s configuration file from the keyring_vault_config system variable format to a JSON format. |
audit_log |
Only available as a plugin | a deprecated plugin added in 8.4.7-7 | The recommended replacement is component_audit_log_filter. |
audit_log_filter |
Only available as a plugin | component_audit_log_filter |
This plugin has a corresponding component. The transition to the component should be performed after the upgrade to 8.4. |
data_masking |
Available as a plugin and component | component_masking_functions |
For this feature, it is specifically advised to transition to the component_masking_functions in the 8.0 series before upgrading to 8.4. |
binlog_utils_udf and percona-udf user defined functions |
Previously installed via a plugin. Users must install the plugin and then run CREATE FUNCTION ... SONAME ... for each function. |
component_binlog_utils_udf and component_percona_udf |
These user-defined functions, previously installed via plugins, are now available as components. After running INSTALL COMPONENT, all functions are automatically registered, which simplifies the process. |
Transition a plugin to a component
The operation to transition from a plugin to a component can be complicated. Always test the migration in a staging environment before applying the changes to the production servers. To ensure there is minimal interruption, the key preparation steps are the following:
-
Plan for downtime
-
Create a comprehensive testing strategy
-
Verify that the existing functionality transfers correctly
Before you start, review the differences between the plugin and the component. The configuration of these features changes: plugins use system variables and the --early-plugin-load option, while components rely on a separate configuration file and are loaded using a manifest.
General procedure
The general procedure for transitioning from a plugin to a component involves:
-
Setup the component’s configuration file.
-
Load the component using the manifest (
INSTALL COMPONENTor manifest file, as applicable). -
Confirm that the component works. Thoroughly test the component’s functionality in your staging environment. Run queries or other operations to verify all existing functionality is correctly transferred.
-
After confirmation, remove the original plugin.
This process should be carefully planned to minimize downtime and ensure that all existing functionality is correctly transferred.
Transition timing
The timing of the transition depends on the specific plugin:
-
Transition before upgrade: For plugins that have both plugin and component versions available in 8.0 (for example,
data_masking), transition to the component in 8.0 before upgrading to 8.4. -
Transition after upgrade: For plugins that only exist as plugins in 8.0 but have component equivalents in 8.4 (for example,
audit_log_filter,keyring_vault), you must upgrade to 8.4 first, then transition to the component. The general procedure for these cases is: -
Test the plugin functionality in 8.0 to establish a baseline.
-
Stop the service and upgrade to 8.4.
-
Review and adjust configurations as needed (for example, convert
keyring_vault_configsystem variable to JSON format for the component). -
Start the new 8.4 server.
-
Transition to the component following the general procedure above.
-
Verify the component works correctly in 8.4.
Further reading
- Upgrade overview
- Upgrade checklist for 8.4
- Upgrade procedures for 8.4
- Upgrade strategies
- MySQL upgrade paths and supported methods
- Downgrade options
- Breaking and incompatible changes in 8.4
- Compatibility and removed items in 8.4
- Defaults and tuning guidance for 8.4
- Percona Toolkit updates for 8.4
Component-specific documentation
Downgrade Percona Server for MySQL
Review Get help from Percona for ways that we can work with you.
Downgrading to a 5.7 or earlier series is not supported.
Between versions within the same Long-Term Support (LTS) series, you can downgrade from 8.4.y LTS to 8.4.x LTS using the following methods:
-
Performing an in-place upgrade
-
Creating a logical dump and loading it
-
Use MySQL Clone functionality
-
Set up replication between the versions
Between one LTS or Bugfix series to the previous LTS or Bugfix series, such as moving from 8.4.x LTS to 8.0.y, you have two primary options:
-
Create a logical dump of your data and load it into the older version
-
Set up replication between the versions.
Important
This downgrade path is only supported when no new server functionality has been applied to your data.
Between an LTS or Bugfix series to an earlier Innovation series (after the previous LTS release), such as from 8.4.x LTS to 8.3.0 Innovation, you have the following options:
-
Create a logical dump of your data and load it into the older version
-
Set up replication between the versions.
Important
This downgrade path is only supported when no new server functionality has been applied to your data.
We don’t support downgrades with any 8.0.x release below 8.0.34. Releases in the range above 8.0.34 can be downgraded to any release within that range, including 8.0.34.
Downgrading risks
Downgrading has the following risks:
| Risk | Description |
|---|---|
| Data loss | If the downgrade process has issues, you may lose your data. It is crucial that you back up your data before attempting to downgrade. |
| Incompatibility | If you use any feature or improvement in the latest version, downgrading could result in incompatibility issues. |
| Performance | Downgrading may result in a loss of performance |
| Security | Newer versions have security updates that are not available in the older versions, which could lead to exposure. |
Further reading
- Upgrade overview
- Upgrade checklist for 8.4
- Upgrade procedures for 8.4
- Upgrade strategies
- MySQL upgrade paths and supported methods
- Upgrade from plugins to components
- Breaking and incompatible changes in 8.4
- Compatibility and removed items in 8.4
- Defaults and tuning guidance for 8.4
- Percona Toolkit updates for 8.4
Downgrade from Percona Server for MySQL Pro
If you want to downgrade from Percona Server for MySQL Pro to the same version of Percona Server for MySQL, do the following:
-
Set up the Percona Server for MySQL 8.4 repository
sudo percona-release setup ps84 -
Stop the
mysqlserver.sudo systemctl stop mysql -
Install the server package
sudo apt install percona-server-serverInstall other required packages. Check files in the DEB package built for Percona Server for MySQL 8.4.
-
Start the
mysqlserversudo systemctl start mysql
Note
On Debian 12, if you want to remove the Percona Server for MySQL after the downgrade, you must stop the server manually. This behavior will be fixed in future releases.
sudo systemctl stop mysql
-
Set up the Percona Server for MySQL 8.4 repository
sudo percona-release setup ps84 -
Stop the
mysqlserver.sudo systemctl stop mysql -
Install the server package
sudo yum --allowerasing install percona-server-serverInstall other required packages. Check files in the RPM package built for Percona Server for MySQL 8.4.
-
Start the
mysqlserversudo systemctl start mysql
Post-Installation
First five minutes after installation
This guide walks you through the most important security and stability steps to take right after installing Percona Server for MySQL. Completing these steps helps protect your server and makes troubleshooting easier.
Quickstart path: After Install (Ubuntu), Install (Oracle Linux), or Docker. Next: Work with a database.
| Step | What you do |
|---|---|
| Secure the installation | Run post-installation security steps so the server is not left in a default, weak state. |
| Create a least-privilege admin user | Use a dedicated admin account with only the privileges (permissions) that account needs instead of root. |
| Configure an OOM-killer guardrail | Reduce the chance the Linux OOM killer will abruptly terminate the MySQL process. |
| Enable diagnostic logging | Turn on error and slow-query logging so you can diagnose issues later. |
| Verify the backup path | Ensure the directory where backups will go exists and is writable. |
When you are done, use Sanity check: First five minutes to verify that these steps were applied correctly.
Secure the installation
Before doing anything else, complete the standard post-installation security steps. These ensure the server is not left with default passwords, anonymous users (accounts with no username that can connect without proper credentials), or remote root login.
-
Set or update the
rootpassword
The root account is the default MySQL administrative user. If you did not set its password during install (for example, on some RPM-based systems), set one now. See Post-installation — Update the root password. -
Run
mysql_secure_installationto:- Change the root password (if needed)
- Disallow remote login for root
- Remove anonymous users
- Remove the test database
- Reload privilege tables
-
Optional: populate time zone tables
If you installed from source or generic binaries, populate the time zone tables (the system data that makes time zone–aware date and time functions work correctly).
For more information, see Post-installation — Secure the server.
Create a least-privilege admin user
Use a dedicated admin account for day-to-day administration instead of root. Give that account only the privileges the account needs (least privilege: the practice of granting only the minimum permissions necessary). Reserve root for emergencies and avoid using root for routine tasks.
-
Connect as
root(or another user that can create users and grant privileges):mysql -u root -p -
Create an admin user. Use a strong password and a specific host (the machine or network location the user can connect from; for example,
localhostmeans the same machine only) instead of%(which means any host):CREATE USER 'admin'@'localhost' IDENTIFIED BY 'YourStrongPassword_12'; -
Grant only the privileges the admin needs. Grant means to assign a permission to a user. The following is a common set for an admin who manages users, replication, and backups but does not need full
SUPER(a powerful built-in privilege) or global privileges on all databases (*.*):GRANT CREATE USER, RELOAD, PROCESS, REPLICATION CLIENT, REPLICATION SLAVE, BACKUP_ADMIN, SHOW DATABASES, SELECT ON *.* TO 'admin'@'localhost'; FLUSH PRIVILEGES;FLUSH PRIVILEGEStells the server to reload the privilege tables so the new grants take effect immediately. -
Test the new user:
mysql -u admin -p -e "SHOW DATABASES;" -
Use
adminfor daily tasks and keeprootfor rare, high-privilege operations.
Adjust privileges to your needs
Add or remove privileges based on what this admin will do. For example, add SHOW VIEW, CREATE ROUTINE, or EVENT if they manage views (saved queries presented as virtual tables), routines (stored procedures and functions), or scheduled events. Avoid granting SUPER, ALL, or *.* unless necessary. You can review effective privileges with SHOW EFFECTIVE GRANTS.
Configure an OOM-killer guardrail
On Linux, when the system runs low on memory, the kernel OOM killer (out-of-memory killer: a kernel process that terminates other processes to free memory) may terminate processes. MySQL can be one of them, which leads to abrupt shutdowns. You can make the MySQL service less likely to be chosen by adjusting its OOM score.
Using systemd (the Linux system and service manager that starts and manages the MySQL service), set OOMScoreAdjust so that the kernel prefers to kill other processes before MySQL. A typical value is -500 (range is -1000 to 1000; lower means less likely to be killed).
- Create or edit an override file for the MySQL service. On Red Hat–based systems the service is often
mysqld; on Debian/Ubuntu the service may be namedmysql. Adjust the service name if needed:
sudo systemctl edit mysqld
If your service is named mysql:
sudo systemctl edit mysql
- Add the following (use
mysqldormysqlto match your service name):
[Service]
OOMScoreAdjust=-500
- Save and close the editor. Reload systemd and restart the MySQL service:
sudo systemctl daemon-reload
sudo systemctl restart mysqld
- Confirm the setting:
systemctl show mysqld -p OOMScoreAdjust
You should see OOMScoreAdjust=-500 (or the value you set).
Not a memory limit
The OOM score adjustment only influences which process the OOM killer chooses. It does not set a memory limit for MySQL. For strict limits, use cgroups or MySQL/InnoDB memory settings.
Enable diagnostic logging
Enabling the error log (a file where the server records errors, warnings, and startup messages) and the slow query log (a file that records SQL statements that run longer than a threshold you set) gives you the information you need to diagnose problems and tune performance.
-
Locate your configuration file
The configuration file (oftenmy.cnformysqld.cnf) controls server options. Common paths:/etc/my.cnf,/etc/mysql/my.cnf, or/etc/mysql/mysql.conf.d/mysqld.cnf. Edit the file under the[mysqld]section (the section that applies to the MySQL server process). -
Ensure the error log is set
The server usually writes an error log by default. Confirm or set an explicit path so you know where to look:
[mysqld]
log_error=/var/log/mysql/error.log
On some systems the directory is /var/lib/mysql (the default data directory, where the server stores database files) or similar. Create the log directory if needed and set ownership to the MySQL system user (the operating-system user that runs the MySQL process; often named mysql):
sudo mkdir -p /var/log/mysql
sudo chown mysql:mysql /var/log/mysql
- Enable the slow query log
The slow query log helps you find queries that need optimization:
slow_query_log = 1
long_query_time = 2
slow_query_log_file = /var/log/mysql/slow.log
Adjust long_query_time (the time in seconds above which a query is considered “slow” and written to the log) to what you consider slow. Restart the server after changing the config.
- Optional: restrict log locations
For tighter control over where logs are written, see Restrict dynamic log file locations.
Verify the backup path
Your backup strategy (for example, Percona XtraBackup for full physical backups, or mysqldump for logical backups that produce SQL) will write to a directory. Verify that path before you run a backup.
-
Choose a backup directory
For example,/var/backups/mysqlor a dedicated volume. Do not use the data directory (where the server stores live database files) for backup output. -
Create the directory and set permissions
The MySQL process (or the operating-system user that runs the backup tool) must be able to write there:
sudo mkdir -p /var/backups/mysql
sudo chown mysql:mysql /var/backups/mysql
sudo chmod 750 /var/backups/mysql
- Check that the backup directory is writable
As the MySQL user (or the backup user), test write access:
sudo -u mysql touch /var/backups/mysql/.write_test && sudo -u mysql rm /var/backups/mysql/.write_test && echo "OK: backup path is writable"
- Document the path
Use this path in your backup scripts, cron jobs, or documentation so that restores use the same location.
For backup strategy and tools, see Backup and restore overview. For Percona XtraBackup , see the Quickstart for 8.4 .
Next steps
- Quickstart — Work with a database — Create tables and run queries (next step in the Quickstart path).
- Run Sanity check: First five minutes to confirm all steps were applied correctly.
- Use your new admin user for daily work and keep
rootfor emergencies. - Plan and test backups to the verified backup path.
- Quickstart — Overview — See the full Quickstart path.
Sanity check: First five minutes
This guide helps you verify that the First five minutes security and stability steps have been applied correctly. Run these checks after completing the First five minutes, or on an existing server to see if those steps are in place.
You need:
- Access to the MySQL server as a user with enough privileges (permissions to run statements and see system data) to run the SQL checks—for example,
root(the default MySQL administrative user) or the admin user you created. - Ability to run shell commands (and
systemctl, the systemd command to inspect and manage services) on the host (the machine where MySQL runs).
Summary: what we check
| Check | Purpose |
|---|---|
| 1. Root and security script | Root has a password and basic hardening (no anonymous user, no test DB, root not remote) is done. |
| 2. Least-privilege admin user | A dedicated admin user exists and does not have full SUPER/ALL. |
| 3. OOM-killer guardrail | systemd OOM score is set so MySQL is less likely to be killed by the kernel when the system is low on memory. |
| 4. Diagnostic logging | Error log and slow query log are enabled and paths are set. |
| 5. Backup path | Backup directory exists and is writable by the MySQL (or backup) user. |
1. Root and security script
Goal: Confirm the MySQL root account is not empty and that mysql_secure_installation–style hardening is in place.
1.1 Root has a password
Try connecting without a password; the connection should fail:
mysql -u root -h localhost 2>&1 | head -1
You want to see an access denied or password-related error, not a successful connection.
1.2 No anonymous user
Anonymous users (accounts with an empty username that can connect without proper credentials) should not exist:
mysql -u root -p -e "SELECT user, host FROM mysql.user WHERE user = '';"
Expected: empty result set (no rows returned by the query).
1.3 No remote root
The root user should not be allowed to connect from remote hosts—only from the same machine (root@localhost or similar):
mysql -u root -p -e "SELECT user, host FROM mysql.user WHERE user = 'root' AND host != 'localhost';"
Expected: empty result set. If you use a specific hostname for root (e.g. [email protected]), that is fine; the important thing is no root@'%' (which would allow root from any host).
1.4 Test database removed
The default test database (a sample database that is often removed for security) should not exist:
mysql -u root -p -e "SHOW DATABASES LIKE 'test';"
Expected: empty result set.
2. Least-privilege admin user
Goal: Confirm you have a dedicated admin user and that the account does not have full SUPER (a powerful built-in privilege) or global privileges on all databases (*.*) unless you intentionally grant them.
2.1 List admin-like users
Adjust the user name if you used something other than admin:
mysql -u root -p -e "SELECT user, host FROM mysql.user WHERE user IN ('admin','dba','mysqladmin') OR user NOT IN ('root','mysql.session','mysql.sys','mysql.infoschema');"
Use this to identify the account you use for day-to-day admin.
2.2 Check that admin does not have SUPER
Replace 'admin'@'localhost' with your admin user and host (the connection source; localhost means the same machine):
mysql -u root -p -e "SHOW GRANTS FOR 'admin'@'localhost';"
Expected: no line containing SUPER or ALL PRIVILEGES ON *.* unless you deliberately grant them. A limited set of grants (assigned privileges) such as CREATE USER, RELOAD, PROCESS, REPLICATION CLIENT, BACKUP_ADMIN, etc., is what we expect from the First five minutes.
2.3 (Optional) Effective privileges
To see the full effective privilege set (the combined permissions a user actually has, including from roles), use SHOW EFFECTIVE GRANTS if your server supports that statement:
mysql -u root -p -e "SHOW EFFECTIVE GRANTS FOR 'admin'@'localhost';"
3. OOM-killer guardrail
Goal: Confirm that the MySQL systemd service has a lower OOM score (a value the kernel uses when choosing which process to terminate when the system is out of memory; lower means less likely to be killed) so the kernel is less likely to kill MySQL.
3.1 Service name
On Red Hat–based systems the service is often mysqld; on Debian/Ubuntu the service may be named mysql. Check which is in use:
systemctl status mysqld 2>/dev/null || systemctl status mysql 2>/dev/null
3.2 OOMScoreAdjust
Use the same service name as above:
systemctl show mysqld -p OOMScoreAdjust
# or
systemctl show mysql -p OOMScoreAdjust
Expected: OOMScoreAdjust=-500 (or another negative value). If you see an empty value or OOMScoreAdjust=0, the First five minutes OOM guardrail is not applied.
4. Diagnostic logging
Goal: Confirm the error log and slow query log are enabled and that paths are set so you can find them.
4.1 Error log
Check that the error log (the file where the server records errors, warnings, and startup messages) is set and that the server is writing to that file:
mysql -u root -p -e "SELECT @@log_error;"
Expected: a non-empty path (e.g. /var/log/mysql/error.log or a path under the datadir—the directory where the server stores database files). Then check that the file exists and is recent:
ls -la $(mysql -u root -p -N -e "SELECT @@log_error;" 2>/dev/null)
4.2 Slow query log
Check that the slow query log (the file that records SQL statements that run longer than the long_query_time threshold) is on and where that log is written:
mysql -u root -p -e "SELECT @@slow_query_log, @@slow_query_log_file, @@long_query_time;"
Expected: slow_query_log = 1, and slow_query_log_file set to a path you can monitor. Optionally confirm the file exists and is writable after the server has been running with slow log enabled.
5. Backup path
Goal: Confirm the directory you use for backups exists and is writable by the MySQL system user (the operating-system user that runs the MySQL process or backup tool; often named mysql).
5.1 Choose your backup path
Use the same path you configured in First five minutes — Verify the backup path (e.g. /var/backups/mysql). Set that path in a variable for the next commands:
BACKUP_DIR=/var/backups/mysql
5.2 Directory exists
test -d "$BACKUP_DIR" && echo "OK: backup directory exists" || echo "FAIL: backup directory missing"
5.3 Writable by MySQL user
Replace mysql with the user that runs your backup tool if different:
sudo -u mysql touch "$BACKUP_DIR/.write_test" 2>/dev/null && sudo -u mysql rm -f "$BACKUP_DIR/.write_test" && echo "OK: backup path is writable" || echo "FAIL: backup path not writable by mysql"
Optional: run checks in one go
You can run a subset of these checks from the shell in one pass. The following assumes:
- Service name is
mysqld(change tomysqlif needed). - Admin user is
'admin'@'localhost'(change SQL if needed). - Backup path is
/var/backups/mysql(change if needed). - You will enter the root password when prompted.
echo "=== 1. No anonymous user ==="
mysql -u root -p -e "SELECT user, host FROM mysql.user WHERE user = '';"

echo "=== 2. No remote root ==="
mysql -u root -p -e "SELECT user, host FROM mysql.user WHERE user = 'root' AND host != 'localhost';"

echo "=== 3. No test database ==="
mysql -u root -p -e "SHOW DATABASES LIKE 'test';"

echo "=== 4. Admin grants (no SUPER/ALL on *.*) ==="
mysql -u root -p -e "SHOW GRANTS FOR 'admin'@'localhost';"

echo "=== 5. OOMScoreAdjust ==="
systemctl show mysqld -p OOMScoreAdjust

echo "=== 6. Error log and slow query log ==="
mysql -u root -p -e "SELECT @@log_error, @@slow_query_log, @@slow_query_log_file;"

echo "=== 7. Backup path writable ==="
BACKUP_DIR=/var/backups/mysql
test -d "$BACKUP_DIR" && sudo -u mysql touch "$BACKUP_DIR/.write_test" 2>/dev/null && sudo -u mysql rm -f "$BACKUP_DIR/.write_test" && echo "OK: writable" || echo "FAIL or missing"
Interpret the output using the expected results described in each section above.
Next steps
- If any check fails, re-read the corresponding section in First five minutes and apply or fix the step.
- Re-run this sanity check after changes to confirm everything passes.
- For backup strategy and restore testing, see Backup and restore overview.
Post-installation
Depending on the type of installation, you may need to do the following tasks:
Installed using binary files or compiling from source
| Task |
|---|
| Initialize the data dictionary |
| Test the server |
| Set service to start at boot time |
Initialize the data directory
If you install the server using either the source distribution or generic binary distribution files, the data directory is not initialized, and you must run the initialization process after installation.
Run mysqld with the –initialize option or the initialize- option.
Executing mysqld with either option does the following:
-
Verifies the existence of the data directory
-
Initializes the system tablespace and related structures
-
Creates system tables including grant tables, time zone tables, and server-side help tables
-
Creates
root@localhost
You should run the following steps with the mysql login.
-
Navigate to the MySQL directory. The example uses the default location.
cd /usr/local/mysql -
Create a directory for the MySQL files. The secure_file_priv uses the directory path as a value.
mkdir mydataThe
mysqluser account should have thedrwxr-x---permissions. Four sections define the permissions; file or directory, User, Group, and Others.The first character designates if the permissions are for a file or directory. The first character is
dfor a directory.The rest of the sections are specified in three-character sets.
Permission User Group Other Read Yes Yes No Write Yes No No Execute Yes Yes No -
Run the command to initialize the data directory.
bin/mysqld --initialize
Test the server
After you have initialized the data directory, and the server is started, you can run tests on the server.
This section assumes you have used the default installation settings. If you have modified the installation, navigate to the installation location. You can also add the location by Setting the Environment Variables .
You can use the mysqladmin client to access the server.
If you have issues connecting to the server, use the root user and the root account password.
sudo mysqladmin -u root -p version
Expected output
Enter password:
mysql Ver 8.4.8-8 for debian-linux-gnu on x86_64 (Percona Server (GPL), Release '10', Revision 'f446c04')
...
Server version      8.4.8-8
Protocol version    10
Connection          Localhost via UNIX socket
UNIX socket         /var/run/mysqld/mysqld.sock
Uptime:             4 hours 58 min 10 section

Threads:    2 Questions:    16 Slow queries: 0 Opens: 139 Flush tables: 3
Open tables: 59  Queries per second avg: 0.0000
Use mysqlshow to display database and table information.
sudo mysqlshow -u root -p
Expected output
Enter password:

+---------------------+
|      Databases      |
+=====================+
| information_schema  |
+---------------------+
| mysql               |
+---------------------+
| performance_schema  |
+---------------------+
| sys                 |
+---------------------+
Set service to run at boot time
After a generic binary installation, manually configure systemd support.
The following commands start, check the status, and stop the server:
sudo systemctl start mysqld
sudo systemctl status mysqld
sudo systemctl stop mysqld
Run the following command to start the service at boot time:
sudo systemctl enable mysqld
sudo systemctl disable mysqld
All installations
| Task |
|---|
| Update the root password |
| Secure the server |
| Populate the time zone tables |
Update the root password
During an installation on Debian/Ubuntu, you are prompted to enter a root password. On Red Hat Enterprise Linux and derivatives, you update the root password after installation.
Restart the server with the --skip-grant-tables option to allow access without a password. This option is insecure. This option also disables remote connections.
sudo systemctl stop mysqld
sudo systemctl set-environment MYSQLD_OPTS="--skip-grant-tables"
sudo systemctl start mysqld
mysql
Reload the grant tables to be able to run the ALTER USER statement. Enter a password that satisfies the current policy.
FLUSH PRIVILEGES;
ALTER USER 'root'@'localhost' IDENTIFIED BY 'rootPassword_12';
exit
If the command fails, with ERROR 1524 (HY000): Plugin [plugin name] is not loaded., then check if the plugin is available.
SELECT PLUGIN_NAME, PLUGIN_STATUS
       FROM INFORMATION_SCHEMA.PLUGINS
       WHERE PLUGIN_NAME LIKE 'validate%';
If the result is empty or shows DISABLED, the plugin is not available. Switch the MySQL user to use the default authentication plugin, caching_sha2_password or mysql_native_password for your installation.
ALTER USER 'root'@'localhost' IDENTIFIED WITH caching_sha2_password BY 'rootPassword_12';
If, when adding the password, MySQL returns ERROR 1819 (HY000) Your password does not satisfy the current policy, run the following command to see policy requirement.
SHOW VARIABLES LIKE 'validate_password%';
Stop the server, remove the --skip-grant-tables option, start the server, and log into the server with the updated password.
sudo systemctl stop mysqld
sudo systemctl unset-environment MYSQLD_OPTS
sudo systemctl start mysqld
mysql -u root -p
Secure the server
The mysql_secure_installation script improves the security of the instance.
The script does the following:
-
Changes the
rootpassword -
Disallows remote login for
rootaccounts -
Removes anonymous users
-
Removes the
testdatabase -
Reloads the privilege tables
The following statement runs the script:
mysql_secure_installation
Populate the time zone tables
The time zone system tables are the following:
-
time_zone -
time_zone_leap_second -
time_zone_name -
time_zone_transition -
time_zone_transition_type
If you install the server using either the source distribution or the generic binary distribution files, the installation creates the time zone tables, but the tables are not populated.
The mysql_tzinfo_to_sql program
populates the tables from the zoneinfo directory data available in Linux.
A common method to populate the tables is to add the zoneinfo directory path
to mysql_tzinfo_to_sql and then send the output into
the mysql system schema .
The example assumes you are running the command with the root account.
The account must have the privileges for modifying the mysql
system schema.
mysql_tzinfo_to_sql /usr/share/zoneinfo | mysql -u root -p -D mysql
Binary logs and replication improvements
Due to continuous development, Percona Server for MySQL has incorporated a number of improvements related to replication and binary log handling. These improvements result in replication-specific behaviors that distinguish Percona Server for MySQL from standard MySQL.
Statements with a LIMIT clause
In MySQL 8.4, any UPDATE/DELETE/INSERT … SELECT statements that include a LIMIT clause are indeed considered unsafe for statement-based replication. These statements will cause MySQL to automatically switch from statement-based logging to row-based logging if binlog_format is set to MIXED.
Here’s why:
-
The LIMIT clause without an ORDER BY makes the result set non-deterministic
-
The same statement might affect different rows on the primary and replicas
Run these example statements in the MySQL client:
UPDATE table1 LIMIT 10 SET col1 = 'value';
DELETE FROM table1 LIMIT 5;
INSERT INTO table2 SELECT * FROM table1 LIMIT 3;
To make these statements safe for statement-based replication, you should do one of the following:
-
Remove the LIMIT clause
-
Add an ORDER BY clause to make the result set deterministic
Run these example statements in the MySQL client:
UPDATE table1 SET col1 = 'value' ORDER BY id LIMIT 10;
DELETE FROM table1 ORDER BY id LIMIT 5;
INSERT INTO table2 SELECT * FROM table1 ORDER BY id LIMIT 3;
The exception is when the LIMIT is used with an ORDER BY clause that uses a unique key - in this case, the statement becomes deterministic and safe for statement-based replication.
Percona Server for MySQL acknowledges statements as safe when they include either an ORDER BY PK or WHERE
condition.
Relay log position fix
MySQL always updated relay log position in multi-source replications setups regardless of whether the committed transaction has already been executed or not. Percona Server omits relay log position updates for the already logged GTIDs.
Source and connection status update fix
Replica nodes configured to update source status and connection information only on log file rotation did not experience the expected reduction in load. MySQL was additionally updating this information in case of multi-source replication when replica had to skip the already executed GTID event.
Write FLUSH commands to the binary log
FLUSH commands, such as FLUSH SLOW LOGS, are not written to the
binary log if the system variable binlog_skip_flush_commands is set
to ON.
In the context of MySQL, the read_only and super_read_only system variables control the ability to modify data in the database. The following changes were implemented in the behavior of read_only and super_read_only modes:
-
When
read_onlyis set toON, anyFLUSH ...command executed by a normal user (without theSUPERprivilege) are not written to the binary log regardless of the value of the binlog_skip_flush_command variable. -
When
super_read_onlyis set toON, anyFLUSH ...command executed by any user (even by those with theSUPERprivilege) are not written to the binary log regardless of the value of the binlog_skip_flush_commands variable.
An attempt to run a FLUSH command without either SUPER or RELOAD
privileges results in the ER_SPECIFIC_ACCESS_DENIED_ERROR exception
regardless of the value of the binlog_skip_flush_commands variable.
binlog_skip_flush_commands
| Option | Description |
|---|---|
| Command-line | Yes |
| Config file | Yes |
| Scope | Global |
| Dynamic | Yes |
| Default | OFF |
When binlog_skip_flush_commands is set to ON, FLUSH ... commands are not written to the binary
log.
The binlog_skip_flush_commands setting does not impact the following commands because they are never recorded in the binary log:
-
FLUSH LOGS -
FLUSH BINARY LOGS -
FLUSH TABLES WITH READ LOCK -
FLUSH TABLES ... FOR EXPORT
The FLUSH command is not recorded in the binary log and ignores the binlog_skip_flush_commands setting when executed with the NO_WRITE_TO_BINLOG keyword (or its alias LOCAL).
Keep comments with DDL commands
When you run a DDL command, such as DROP TABLE, the server does the following in the binary log.
| Actions | Description |
|---|---|
| Removes Comments | The server deletes any comments in the original command. For example, if you use DROP TABLE my_table /* This is a comment */;, the binary log does not save the comment. |
| Adds Quotation Marks | The server puts quotation marks around the table name. So, if you run DROP TABLE my_table;, it logs it as DROP TABLE "my_table";. |
These actions simplify the logging format, but sometimes, you want the original format.
binlog_ddl_skip_rewrite
| Option | Description |
|---|---|
| Command-line | Yes |
| Config file | Yes |
| Scope | Global |
| Dynamic | Yes |
| Default | OFF |
When disabled (default setting), the server removes comments and adds quotation marks to DDL statements.
When enabled, all single-table DROP TABLE DDL statements are logged in the binary log with the following characteristics:
-
Comments are preserved, allowing any notes added to the command to remain in the binary log.
-
Quotation marks are not added.
Enable binlog_ddl_skip_rewrite
You can enable binlog_ddl_skip_rewrite at runtime:
-- Check current setting
SHOW VARIABLES LIKE 'binlog_ddl_skip_rewrite';

-- Enable feature
SET GLOBAL binlog_ddl_skip_rewrite = ON;

-- Disable feature
SET GLOBAL binlog_ddl_skip_rewrite = OFF;
to enable the variable permanently, add the following line to the my.cnf configuration file:
[mysqld]
binlog_ddl_skip_rewrite = ON
After making this change, restart the MySQL service for it to take effect.
Note
Multi-table DROP TABLE DDL statements are not supported and return an error.
Example usage
The following code demonstrates how to enable binlog_ddl_skip_rewrite and shows the feature’s effect on a DROP TABLE statement. Run these commands in the MySQL client:
SET binlog_ddl_skip_rewrite = ON;
/*comment at start*/DROP TABLE t /*comment at end*/;
Point-in-Time Recovery with binlog_utils_udf
Point-in-Time Recovery (PiTR) allows you to restore a database to any specific moment in time using binary logs. The binlog_utils_udf component provides user-defined functions (UDFs) that simplify PiTR operations by helping you:
- Map Global Transaction Identifiers (GTIDs) to specific binary log files
- Inspect binary log contents and timestamps
- Locate the exact binary log files needed for recovery operations
These functions are particularly useful when you need to determine which binary log files contain specific transactions or events during recovery planning.
Prerequisites
Before using the binlog_utils_udf component, ensure the following requirements are met:
-
Percona Server for MySQL: The component is only available in Percona Server for MySQL, not in standard MySQL
-
Binary logging enabled: The server must have binary logging enabled (
log_binsystem variable set toON) -
GTID enabled: For GTID-related functions, GTID must be enabled (
gtid_modeset toON) -
MySQL privileges: You need
SYSTEM_VARIABLES_ADMINprivilege to install components. For binary log operations,BINLOG_ADMINprivilege may also be required. TheSUPERprivilege is deprecated in MySQL 8.0+ and should be replaced with specific dynamic privileges
Install the component
Install the component on each server where you plan to use these functions:
INSTALL COMPONENT 'file://component_binlog_utils_udf';
Verify installation
Run this command in the MySQL client:
SELECT * FROM mysql.component WHERE component_urn = 'file://component_binlog_utils_udf';
Alternatively, run this command to view all installed components:
SELECT * FROM mysql.component;
Available functions
The binlog_utils_udf component provides six functions for binary log analysis and GTID mapping:
| Function | Returns | Description | Use Case |
|---|---|---|---|
get_binlog_by_gtid(gtid) |
STRING (binlog name) | Returns the binary log file that contains the specified GTID. | Find which binary log contains a specific transaction |
get_last_gtid_from_binlog(binlog) |
STRING (GTID) | Returns the last GTID found in the specified binary log. | Identify the final transaction in a binary log file |
get_gtid_set_by_binlog(binlog) |
STRING (GTID set) | Returns all GTIDs found in the specified binary log. | Get complete list of transactions in a binary log |
get_binlog_by_gtid_set(gtid_set) |
STRING (binlog name) | Returns the first binary log file that contains at least one GTID from the specified set. | Find binary log containing any transaction from a GTID set |
get_first_record_timestamp_by_binlog(binlog) |
INTEGER (timestamp) | Returns the timestamp of the first event in the specified binary log. | Determine when a binary log file started |
get_last_record_timestamp_by_binlog(binlog) |
INTEGER (timestamp) | Returns the timestamp of the last event in the specified binary log. | Determine when a binary log file ended |
Important notes
-
CAST requirement: When using these user-defined functions, you must use CAST to return a result. String functions require
CAST(...AS CHAR)and timestamp functions requireCAST(...AS UNSIGNED). -
Timestamp precision: Timestamp-returning functions provide values with microsecond precision in UNIX time format. Each value represents the number of microseconds since 1970-01-01 00:00:00 UTC.
-
Binary log file names: Functions that accept a binary log name require only the short file name (for example,
binlog.000001). Do not include the full path. If the input contains a path separator (/), the server returns an error. -
Binary log directory: The server reads binary logs from the directory defined by the
@@log_bin_basenamesystem variable. -
Return values: Functions that return binary log file names return only the short name without the path.
-
Performance considerations: These functions read binary log files directly from disk. For large binary log files, the functions may take several seconds to complete.
Simplifying UDF usage without CAST()
While CAST() is required for proper function execution, you can configure your MySQL client to handle data type conversions automatically, reducing the need to use CAST() explicitly in your queries.
Configure the MySQL client
You can set the appropriate client character set and collation to simplify UDF usage:
-- Set client character set
SET character_set_client = 'utf8mb4';

-- Set client collation
SET collation_connection = 'utf8mb4_general_ci';
Alternatively, you can configure these settings in your MySQL client configuration file (e.g., ~/.my.cnf or /etc/mysql/my.cnf):
[client]
default-character-set=utf8mb4
default-collation=utf8mb4_general_ci
By configuring these settings, the MySQL client can handle data type conversions more effectively, allowing you to use the UDF functions without explicit CAST() statements in many cases.
Note
While client configuration can simplify usage, CAST() will still work and may be necessary in some scenarios. The choice between using CAST() explicitly or relying on client configuration depends on your specific use case and preferences.
Usage examples
The following examples demonstrate how to use each function. Replace the sample arguments with values from your environment. All examples include CAST statements for proper function execution, though these may be optional if you’ve configured your MySQL client as described in the Simplifying UDF usage without CAST() section.
Find binary log by GTID
Use get_binlog_by_gtid() to locate which binary log file contains a specific transaction:
SELECT CAST(get_binlog_by_gtid('550e8400-e29b-41d4-a716-446655440000:123') AS CHAR) AS binlog;
Use case: When you know a specific GTID and need to find which binary log file contains that transaction for recovery purposes.
Get last GTID from binary log
Use get_last_gtid_from_binlog() to find the final transaction in a specific binary log file:
SELECT CAST(get_last_gtid_from_binlog('binlog.000001') AS CHAR) AS last_gtid;
Use case: Determine the last transaction processed in a binary log file before rotating to the next file.
Get all GTIDs from binary log
Use get_gtid_set_by_binlog() to retrieve all GTIDs contained in a specific binary log file:
SELECT CAST(get_gtid_set_by_binlog('binlog.000001') AS CHAR) AS gtid_set;
Use case: Get a complete list of all transactions in a binary log file for analysis or replication setup.
Find binary log by GTID set
Use get_binlog_by_gtid_set() to find the first binary log file that contains any GTID from a specified set:
SELECT CAST(get_binlog_by_gtid_set('550e8400-e29b-41d4-a716-446655440000:7,550e8400-e29b-41d4-a716-446655440000:8') AS CHAR) AS binlog;
Use case: When you have a set of GTIDs and need to find which binary log file contains at least one of those transactions.
Get binary log timestamps
Use timestamp functions to determine when events occurred in binary log files. These functions return microsecond-precision timestamps in UNIX time format.
Get first event timestamp
Find when the first event was written to a binary log file:
SELECT CAST(get_first_record_timestamp_by_binlog('binlog.000001') AS UNSIGNED) AS raw_ts;
SELECT FROM_UNIXTIME(
    CAST(get_first_record_timestamp_by_binlog('binlog.000001') AS UNSIGNED) DIV 1000000
) AS first_event_ts;
Use case: Determine when a binary log file started receiving events, useful for recovery planning.
Get last event timestamp
Find when the last event was written to a binary log file:
SELECT CAST(get_last_record_timestamp_by_binlog('binlog.000001') AS UNSIGNED) AS raw_ts;
SELECT FROM_UNIXTIME(
    CAST(get_last_record_timestamp_by_binlog('binlog.000001') AS UNSIGNED) DIV 1000000
) AS last_event_ts;
Use case: Determine when a binary log file stopped receiving events, useful for understanding binary log rotation timing.
Troubleshooting
Common issues
Function returns NULL: This usually indicates that the specified GTID or binary log file does not exist. Verify that:
-
The GTID format is correct (UUID:transaction_id)
-
The binary log file exists in the binary log directory
-
GTID is enabled on the server
Error: “Unknown function”: The component is not installed. Install the component using the INSTALL COMPONENT command.
Error: “Access denied”: You need SYSTEM_VARIABLES_ADMIN privilege to install the component and BINLOG_ADMIN privilege for binary log operations. The SUPER privilege is deprecated in MySQL 8.0+.
Performance issues: These functions read binary log files directly from disk. For large binary log files, expect execution times of several seconds.
Verify binary log files
Check which binary log files are available:
SHOW BINARY LOGS;
Check GTID status
Verify GTID is enabled:
SHOW VARIABLES LIKE 'gtid_mode';
Uninstall the component
Remove the component and all associated functions:
UNINSTALL COMPONENT 'file://component_binlog_utils_udf';
Verify removal. Run this command in the MySQL client:
SELECT * FROM mysql.component WHERE component_urn = 'file://component_binlog_utils_udf';
The query should return no rows if the component is successfully uninstalled.
Limitations
For the following variables, do not define values with one or more dot (.) characters:
A value defined with the dot (.) character is handled differently in MySQL and Percona XtraBackup and can cause unpredictable behavior.
AppArmor
Secure Percona Server for MySQL with AppArmor
The operating system has a Discretionary Access Controls (DAC) system. AppArmor supplements the DAC with a Mandatory Access Control (MAC) system. AppArmor is the default security module for Ubuntu or Debian systems and uses profiles to define how programs access resources.
AppArmor is path-based and restricts processes by using profiles. Each profile contains a set of policy rules. Some applications may install their profile along with the application. If an installation does not also install a profile, that application is not part of the AppArmor subsystem. You can also create profiles since they are simple text files stored in the /etc/apparmor.d directory.
AppArmor enhances system security by enforcing strict access controls and protecting against unauthorized access and potential threats. It achieves this by defining profiles that specify how programs interact with system resources. These profiles act as a set of rules dictating a program’s actions and the resources it can access. By confining each program to its designated profile, AppArmor limits the damage in case of a compromise and prevents unauthorized escalation of privileges. Additionally, AppArmor provides fine-grained control over program behavior, allowing administrators to tailor security policies to specific application requirements and minimize the attack surface. Overall, AppArmor is crucial in bolstering system security for MySQL developers, maintaining system integrity, and mitigating the risks associated with security breaches.
AppArmor links:
AppArmor Profiles
Manage AppArmor Profiles
Disable AppArmor
Configure AppArmor
Troubleshoot AppArmor
AppArmor profile modes
AppArmor profile modes determine how applications interact with system resources. You can mix enforce mode profiles and complain mode profiles in your server.
| Mode | Description |
|---|---|
| Enforce | Restricts MySQL processes according to the rules defined in the profile. Any action violating these rules is denied. |
| Complain | Allows MySQL processes to take restricted actions, but logs these actions for review. |
| Disabled | Turns off profile restrictions entirely, allowing MySQL processes to take any action without logging. |
Understanding these modes helps MySQL developers ensure that their applications can access necessary resources while maintaining system security.
Benefits
| Benefit | Description |
|---|---|
| Enhanced Security | AppArmor profile modes, such as Enforce and Complain, help enforce security policies to prevent unauthorized access. |
| Easy Troubleshooting | Profile modes provide flexibility in troubleshooting access issues by allowing developers to switch between modes. |
Disadvantages
| Disadvantage | Description |
|---|---|
| Limited Flexibility | Profile modes may restrict certain actions or access, potentially limiting the functionality of MySQL applications. |
| Complexity | Understanding and managing different profile modes can be complex for beginner developers, leading to errors. |
| Debugging Challenges | Troubleshooting issues related to profile modes, such as DENIED entries in logs, may require additional expertise. |
AppArmor links:
AppArmor
Manage AppArmor Profiles
Disable AppArmor
Configure AppArmor
Troubleshoot AppArmor
Managing AppArmor profiles
Understanding AppArmor Risks in MySQL Development
While AppArmor profiles help secure your MySQL server, misconfiguring them can lead to unexpected behavior and potential security vulnerabilities. Here’s why careful review and testing are crucial when making changes:
Potential risks of misconfigured AppArmor profiles
| Misconfiguration | Description |
|---|---|
| Overly restrictive profiles | These profiles might prevent MySQL from accessing necessary files or resources, hindering its functionality and causing errors. Imagine a profile accidentally blocking MySQL from writing to its log files, rendering them useless for troubleshooting. |
| Underly permissive profiles | Profiles with insufficient restrictions could allow unauthorized access to MySQL’s files or functionalities. This creates a security risk, as an attacker exploiting a vulnerability might leverage a permissive profile to gain more control over the server. |
| Incorrect profile assignment | Assigning the wrong profile to a process can lead to either of the issues mentioned above. For instance, accidentally assigning a profile meant for a different service to MySQL could have unintended consequences. |
Importance of careful review and testing
By carefully reviewing and testing your AppArmor profile changes, you can minimize the risks associated with misconfigurations and ensure a secure and functional MySQL environment.
-
Review your changes thoroughly: Double-check your AppArmor profile modifications to ensure they grant MySQL the necessary permissions while maintaining security.
-
Test your changes in a safe environment: Before deploying changes to a production server, test them in a staging environment that mimics your production setup. This test allows you to identify and fix any issues caused by the AppArmor profile adjustments without impacting your live MySQL instance.
Install the utilities used to control AppArmor
Install the apparmor-utils package to work with profiles. Use these utilities to create, update, enforce, switch to complain mode, and disable profiles, as needed:
$ sudo apt install apparmor-utils
Expected output
Reading package lists... Done
Building dependency tree
...
The following additional packages will be installed:
    python3-apparmor python3-libapparmor
...
Add the mysqld profile
Add the mysqld profile with the following procedure:
-
Download the current version of the AppArmor:
$ wget https://raw.githubusercontent.com/percona/percona-server/release-8.4.8-8/build-ps/debian/percona-server-server.installExpected output
... Saving to 'apparamor-profile` ... -
Move the file to /etc/apparmor.d/usr.sbin.mysqld
$ sudo mv apparmor-profile /etc/apparmor.d/usr.sbin.mysqld -
Create an empty file for editing:
$ sudo touch /etc/apparmor.d/local/usr.sbin.mysqld -
Load the profile:
$ sudo apparmor_parser -r -T -W /etc/apparmor.d/usr.sbin.mysqld -
Restart Percona Server for MySQL:
$ sudo systemctl restart mysql -
Verify the profile status:
$ sudo aa-statusExpected output
...
processes are in enforce mode
...
/usr/sbin/mysqld (100840)
...
Check the current status
As root or using sudo, you can check the AppArmor status:
$ sudo aa-status
Expected output
apparmor module is loaded.
34 profiles are loaded.
32 profiles in enforce mode.
...
    /usr/sbin/mysqld
...
2 profiles in complain mode.
...
3 profiles have profiles defined.
...
0 processes are in complain mode.
0 processes are unconfined but have a profile defined.
Switch a profile to complain mode
Switch a profile to complain mode when the program is in your path with this command:
$ sudo aa-complain <program>
If needed, specify the program’s path in the command:
$ sudo aa-complain /sbin/<program>
If the profile is not stored in /etc/apparmor.d/, use the following command:
$ sudo aa-complain /path/to/profiles/<program>
Switch a profile to enforce mode
Switch a profile to the enforce mode when the program is in your path with this command:
$ sudo aa-enforce <program>
If needed, specify the program’s path in the command:
$ sudo aa-enforce /sbin/<program>
If the profile is not stored in /etc/apparmor.d/, use the following command:
$ sudo aa-enforce /path/to/profile
Disable one profile
You can disable a profile but it is recommended to Switch a Profile to Complain mode.
Use either of the following methods to disable a profile:
$ sudo ln -s /etc/apparmor.d/usr.sbin.mysqld /etc/apparmor.d/disable/
$ sudo apparmor_parser -R /etc/apparmor.d/usr.sbin.mysqld
or
$ aa-disable /etc/apparmor.d/usr.sbin.mysqld
Reload all profiles
Run either of the following commands to reload all profiles:
$ sudo service apparmor reload
or
$ sudo systemctl reload apparmor.service
Reload one profile
To reload one profile, run the following: You may need to restart the program for some changes to take effect.
Useful links:
AppArmor
AppArmor Profiles
Disable AppArmor
Configure AppArmor
Troubleshoot AppArmor
Disable AppArmor
Disable AppArmor Risks
Using AppArmor might seem like an extra step, but if you disable it, your server could face security risks.
Do not disable AppArmor in production environments. This action can have the following risks:
| Risk | Description |
|---|---|
| Increased Attack Surface | Disabling AppArmor removes security restrictions, potentially allowing unauthorized access to Percona Server for MySQL’s files and functionalities. This creates an attractive target for attackers seeking to exploit vulnerabilities or gain control of your database. |
| Unforeseen Security Holes | AppArmor can help mitigate even unknown vulnerabilities by restricting unexpected behaviors. Disabling it leaves your system more susceptible to these hidden security holes. |
| Accidental Misconfigurations | Even with good intentions, manual configuration of access controls can be error-prone. AppArmor provides a pre-defined security layer, reducing the risk of human error in managing permissions. |
Instead, use AppArmor’s security features and configure it to fit your needs.
Disable procedure
If AppArmor must be disabled, run the following commands:
-
Check the status.
sudo apparmor_status -
Stop and disable AppArmor.
sudo systemctl stop apparmor
sudo systemctl disable apparmor
AppArmor links
AppArmor
AppArmor Profiles
Manage AppArmor Profiles
Configure AppArmor
Troubleshoot AppArmor
Configure AppArmor
Edit profile
Only edit /etc/apparmor.d/local/usr.sbin.mysql.
You should [switch the profile] to Complain mode before editing the file. Edit the file in any text editor. When finished, reload the profile and switch it to Enforce mode.
Configure data directory location
You can change the data directory to a non-default location, like /var/lib/mysqlcustom. You should enable audit mode to capture all actions and edit the profile to allow access to the custom location.
cat /etc/mysql/mysql.conf.d/mysqld.cnf
Expected output
The Percona Server 8.4 configuration file.

For explanations see
https://dev.mysql.com/doc/mysql/en/server-system-variables.html

[mysqld]
pid-file    = /var/run/mysqld/mysqld.pid
socket        = /var/run/mysqld/mysqld.sock
*datadir    = /var/lib/mysqlcustom*
log-error    = /var/log/mysql/error.log
Enable audit mode for mysqld. In this mode, the security policy is enforced and all access is logged.
aa-audit mysqld
Restart Percona Server for MySQL.
sudo systemctl mysql restart
The restart fails because AppArmor has blocked access to the custom data directory location. To diagnose the issue, check the logs for the following:
-
ALLOWED - A log event when the profile is in complain mode and the action violates a policy.
-
DENIED - A log event when the profile is in enforce mode and the action is blocked.
For example, the following log entries show DENIED:
Expected output
...
Dec 07 12:17:08 ubuntu-s-4vcpu-8gb-nyc1-01-aa-ps audit[16013]: AVC apparmor="DENIED" operation="mknod" profile="/usr/sbin/mysqld" name="/var/lib/mysqlcustom/binlog.index" pid=16013 comm="mysqld" requested_mask="c" denied_mask="c" fsuid=111 ouid=111
Dec 07 12:17:08 ubuntu-s-4vcpu-8gb-nyc1-01-aa-ps kernel: audit: type=1400 audit(1607343428.022:36): apparmor="DENIED" operation="mknod" profile="/usr/sbin/mysqld" name="/var/lib/mysqlcustom/mysqld_tmp_file_case_insensitive_test.lower-test" pid=16013 comm="mysqld" requested_mask="c" denied_mask="c" fsuid=111 ouid=111
...
Open /etc/apparmor.d/local/usr.sbin.mysqld in a text editor and edit the following entries in the Allow data dir access section.
Allow data dir access
/var/lib/mysqlcustom/ r,
/var/lib/mysqlcustom/** rwk,
In etc/apparmor.d/local/usr.sbin.mysqld, comment out, using the # symbol, the current entries in the Allow data dir access section. This step is optional. If you skip this step, mysqld continues to access the default data directory location.
Note
Edit the local version of the file instead of the main profile. Separating the changes makes maintenance easier.
Reload the profile:
apparmor_parser -r -T /etc/apparmor.d/usr.sbin.mysqld
Restart mysql:
systemctl restart mysqld
Set up a custom log location
To move your logs to a custom location, you must edit the my.cnf configuration file and then edit the local profile to allow access:
cat /etc/mysql/mysql.conf.d/mysqld.cnf
Expected output
The Percona Server 8.4 configuration file.
For explanations see
https://dev.mysql.com/doc/mysql/en/server-system-variables.html
[mysqld]
pid-file = /var/run/mysqld/mysqld.pid
socket = /var/run/mysqld/mysqld.sock
datadir = /var/lib/mysql
log-error = /*custom-log-dir*/mysql/error.log
Verify the custom directory exists.
ls -la /custom-log-dir/
Expected output
total 12
drwxrwxrwx 3 root root 4096 Dec 7 13:09 .
drwxr-xr-x 24 root root 4096 Dec 7 13:07 ..
drwxrwxrwx 2 root root 4096 Dec 7 13:09 mysql
Restart Percona Server.
service mysql start
Expected output
Job for mysql.service failed because the control process exited with error code.
See "systemctl status mysql.service" and "journalctl -xe" for details.
journalctl -xe
Expected output
...
AVC apparmor="DENIED" operation="mknod" profile="/usr/sbin/mysqld" name="/custom-log-dir/mysql/error.log"
...
The access has been denied by AppArmor. Edit the local profile in the Allow log file access section to allow access to the custom log location.
cat /etc/apparmor.d/local/usr.sbin.mysqld
Expected output
Site-specific additions and overrides for usr.sbin.mysqld..
For more details, please see /etc/apparmor.d/local/README.
Allow log file access
/custom-log-dir/mysql/ r,
/custom-log-dir/mysql/** rw,
Reload the profile:
apparmor_parser -r -T /etc/apparmor.d/usr.sbin.mysqld
Restart Percona Server:
systemctl restart mysqld
Set secure_file_priv directory location
By default, secure_file_priv points to the following location:
mysqlshow variables like 'secure_file_priv';
Expected output
+------------------+-----------------------+
| Variable_name | Value |
+------------------+-----------------------+
| secure_file_priv | /var/lib/mysql-files/ |
+------------------+-----------------------+
To allow access to another location, in a text editor, open the local profile. Review the settings in the Allow data dir access section:
Allow data dir access
/var/lib/mysql/ r,
/var/lib/mysql/** rwk,
Edit the local profile in a text editor to allow access to the custom location.
cat /etc/apparmor.d/local/usr.sbin.mysqld
Expected output
Site-specific additions and overrides for usr.sbin.mysqld..
For more details, please see /etc/apparmor.d/local/README.
Allow data dir access
/var/lib/mysqlcustom/ r,
/var/lib/mysqlcustom/** rwk,
Reload the profile:
apparmor_parser -r -T /etc/apparmor.d/usr.sbin.mysqld
Restart Percona Server for MySQL:
systemctl restart mysqld
AppArmor links:
AppArmor
AppArmor Profiles
Manage AppArmor Profiles
Disable AppArmor
Troubleshoot AppArmor
Troubleshoot AppArmor profiles
Troubleshooting AppArmor profiles ensure that applications can access necessary resources without compromising system security.
Review Get help from Percona for ways that we can work with you.
Profile Modes
AppArmor profiles operate in different modes:
| Mode | Description |
|---|---|
| Enforce | Applications are restricted by profile rules, and any violation results in denial of access. |
| Complain | Applications are allowed to take restricted actions, but these actions are logged. |
| Disabled | Profile restrictions are turned off, allowing applications to take any action without logging. |
Check status
Use commands like aa-status to check the current status of AppArmor profiles. This check helps identify if profiles are enforcing or complaining about actions.
Switch modes
You may need to switch profiles between enforce and complain modes when troubleshooting. Use aa-enforce to switch to enforce mode and aa-complain to switch to complain mode.
Disable profiles
If necessary, profiles can be temporarily disabled. However, this is not recommended for security reasons. Use commands like ln -s or aa-disable to disable profiles.
Reload profiles
After making changes to profiles or switching modes, reloading profiles for changes to take effect is essential. Use commands like service apparmor reload or apparmor_parser -r to reload profiles.
Check Log Entries
Monitor log entries for DENIED or ALLOWED actions. DENIED entries indicate that a profile is blocking an action, while ALLOWED entries suggest that an action is permitted.
Edit Profiles
You may need to edit AppArmor profiles to troubleshoot access issues and allow specific actions. Edit the profile files in the /etc/apparmor.d/ directory to adjust access permissions.
AppArmor links
AppArmor
AppArmor Profiles
Manage AppArmor Profiles
Disable AppArmor
Configure AppArmor
SELinux
Secure Percona Server for MySQL with SELinux
Understanding SELinux labels and their components (user, role, type, sensitivity level) Importance of SELinux context for administrators and users
MySQL SELinux Policy Explanation of SELinux policy for MySQL Compatibility of Percona Server for MySQL with CentOS 7 and CentOS 8 SELinux policies
SELinux is a mandatory access control system implemented in the Linux kernel. It’s designed to enhance system security by enforcing strict rules on how processes interact with files, directories, and other system resources. Unlike discretionary access control (DAC), where users have some control over permissions, SELinux imposes policies that must be followed regardless of user settings.
In SELinux, access policies are defined based on the context of processes and files. Each process and file is assigned a security context, which includes information about its identity and permissions. These contexts determine a process’s actions on a file or resource.
For processes, SELinux defines policies based on their security context, such as their domain and role. These policies specify which operations a process can perform and what resources it can access. For example, a web server process may be allowed to read web content files but not modify system configuration files. Similarly, files and directories are assigned security contexts that dictate how processes can access them. SELinux policies define rules governing interactions between processes and files based on their contexts. For instance, a database file may only be accessible for reading and writing by the database server process, while other processes are restricted from accessing it.
Overall, SELinux acts as a guardrail for system resources, ensuring that only authorized processes can access sensitive files and directories, thereby bolstering system security. Understanding SELinux and its access policies is crucial for maintaining a secure and robust MySQL environment.
Understanding SELinux labels and their components
| Component | Description |
|---|---|
| User | Represents the identity of the user or process attempting an action. It helps SELinux determine which user is initiating the action. |
| Role | Defines the role or function of a process within the system. It assists SELinux in determining the purpose or responsibility of the process. |
| Type | Represents the type or category of an object such as files, directories, or processes. It aids SELinux in identifying the nature of the resource being accessed. |
| Sensitivity Level | Indicates the sensitivity level or security classification of an object. It assists SELinux in enforcing security policies based on the object’s sensitivity. |
Importance of SELinux context for administrators and users
Understanding SELinux context is crucial for administrators and users because it determines how processes interact with system resources. By assigning specific labels to users, roles, types, and sensitivity levels, SELinux ensures that only authorized actions are permitted. This granular control enhances system security by restricting unauthorized access and preventing malicious activities. Administrators rely on SELinux context to configure policies that align with organizational security requirements, while users benefit from a secure environment where their actions are safeguarded against potential threats. Overall, SELinux context plays a pivotal role in maintaining the integrity and confidentiality of system operations.
Explanation of SELinux Policy for MySQL
SELinux is a security feature in Linux that controls access to various resources such as files, directories, and network ports based on defined policies. For MySQL, SELinux has a specific policy that governs how the MySQL server process interacts with the system and other resources.
This policy defines rules for MySQL’s behavior, including which files it can access, which network ports it can use, and what actions it can perform. These rules help enforce security by restricting MySQL’s actions to only those that are necessary for its operation, preventing unauthorized access and potential security breaches.
The SELinux policy for MySQL ensures that the MySQL server process operates within predefined boundaries, limiting its capabilities to minimize the risk of exploitation or unauthorized access to sensitive data.
Compatibility of Percona Server for MySQL with SELinux Policies
Percona Server for MySQL is a drop-in replacement for MySQL that offers enhanced performance, scalability, and other features. When running Percona Server for MySQL on Red Hat Enterprise Linux (RHEL) 8, RHEL 9, or their derivatives, compatibility with SELinux policies is essential for ensuring secure and reliable operation.
Percona Server for MySQL is designed to be compatible with SELinux policies on these Linux distributions. This means that Percona Server for MySQL can seamlessly integrate with SELinux, allowing administrators to enforce security policies and restrictions without sacrificing the functionality or performance of the database server.
By adhering to SELinux policies, Percona Server for MySQL ensures that it operates within the confines defined by SELinux, preventing any unauthorized or potentially malicious actions that could compromise the system’s security. This compatibility with SELinux policies enhances the overall security posture of Percona Server for MySQL deployments on RHEL and its derivatives, providing peace of mind to administrators and users alike.
SELinux context example
To view the SELinux context, add the -Z switch to many of the utilities. Here is an example of the context for mysqld:
ps -eZ | grep mysqld_t
Expected output
system_u:system_r:mysqld_t:s0 3356 ? 00:00:01 mysqld
The context has the following properties:
-
User - system_u
-
Role - system_r
-
Type or domain - mysqld_t
-
Sensitivity level - s0 3356
Most SELinux policy rules are based on the type or domain.
List SELinux types or domains associated with files
The security property that SELinux relies on is the Type security property. The type name often end with a _t. A group of objects with the same type security value belongs to the same domain.
To view the mysqldb_t types associated with the MySQL directories and files, run the following command:
ls -laZ /var/lib/ | grep mysql
Expected output
drwxr-x--x. mysql mysql system_u:object_r:mysqld_db_t:s0 mysql
drwxr-x---. mysql mysql system_u:object_r:mysqld_db_t:s0 mysql-files
drwxr-x---. mysql mysql system_u:object_r:mysqld_db_t:s0 mysql-keyring
Note
If a policy type does not define the type property for an object, the default value is unconfined_t.
SELinux modes
SELinux has the following modes:
-
Disabled - No SELinux policy modules loaded, which disables policies. Nothing is reported.
-
Permissive - SELinux is active, but policy modules are not enforced. A policy violation is reported but does not stop the action.
-
Enforcing - SELinux is active, and violations are reported and denied. If there is no rule to allow access to a confined resource, SELinux denies the access.
Policy types
SELinux has several policy types:
-
Targeted - Most processes operate without restriction. Specific services are contained in security domains and defined by policies.
-
Strict - All processes are contained in security domains and defined by policies.
SELinux has confined processes that run in a domain and restricts everything unless explicitly allowed. An unconfined process in an unconfined domain is allowed almost all access.
MySQL is a confined process, and the policy module defines which files are read, which ports are opened, and so on. SELinux assumes the Percona Server for MySQL installation uses the default file locations and default ports.
If you change the default, you must also edit the policy. If you do not update the policy, SELinux, in enforcing mode, denies access to all non-default resources.
Check the SELinux mode
To check the current SELinux mode, use either of the following commands:
sestatus
Expected output
SELinux status: enabled
SELinuxfs mount: /sys/fs/selinux
SELinux root directory: /etc/selinux
Loaded policy name: targeted
Current mode: enforcing
Mode from config file: enforcing
Policy MLS status: enabled
Policy deny_unknown status: allowed
Memory protection checking: actual (secure)
Max kernel policy version: 31
or
grep ^SELINUX= /etc/selinux/config
Expected output
SELINUX=enforcing
Note
Add the -b parameter to sestatus to display the Policy booleans. The boolean values for each parameter is shown. An example of using the b parameter is the following:
sestatus -b | grep mysql
Expected output
mysql_connect_any off
selinuxuser_mysql_connect_enabled
The /etc/selinux/config file controls if SELinux is disabled or enabled, and if enabled, whether SELinux operates in enforcing mode or permissive mode.
Disable SELinux
If you plan to use the enforcing mode at another time, use the permissive mode instead of disabling SELinux. During the time that SELinux is disabled, the system may contain mislabeled objects or objects with no label. If you re-enable SELinux and plan to set SELinux to enforcing, you must follow the steps to Relabel the entire file system.
On boot, to disable SELinux, set the selinux=0 kernel option. The kernel does not load the SELinux infrastructure. This option has the same effect as changing the SELINUX=disabled instruction in the configuration file and then rebooting the system.
Additional SELinux tools
Install the SELinux management tools, such as semanage or sesearch, if needed.
On RHEL 8 or compatible operating systems, use the following command as root:
yum -y install policycoreutils-python-utils
Note
You may need root privileges to run SELinux management commands.
Switch the mode in the configuration file
Switching between modes may help when troubleshooting or when modifying rules.
To permanently change the mode, edit the /etc/selinux/config file and change the SELINUX= value. You should also verify the change.
cat /etc/selinux/config | grep SELINUX= | grep -v ^#
Expected output
SELINUX=enforcing
SELINUX=enforcing
sudo sed -i 's/^SELINUX=.*/SELINUX=permissive/g' /etc/selinux/config
cat /etc/selinux/config | grep SELINUX= | grep -v ^#
Expected output
SELINUX=permissive
SELINUX=permissive
Reboot your system after the change.
If switching from either disabled mode or permissive mode to enforcing, see Relabel the entire file system.
Switch the mode until the next reboot
To change the mode until the next reboot, use either of the following commands as root:
setenforce Enforcing
or
setenforce 1
The following setenforce parameters are available:
| setenforce parameters | Also Permitted |
|---|---|
| 0 | Permissive |
| 1 | Enforcing |
You can view the current mode by running either of the following commands:
getenforce
Expected output
Enforcing
or
sestatus | grep -i mode
Expected output
Current mode: permissive
Mode from config file: enforcing
Switch the mode for a service
You can move one or more services into a permissive domain. The other services remain in enforcing mode.
To add a service to the permissive domain, run the following as root:
sudo semanage permissive -a mysqld_t
To list the current permissive domains, run the following command:
sudo semanage permissive -l
Expected output
...
Customized Permissive Types
mysqld_t
Builtin Permissive Types
...
To delete a service from the permissive domain, run the following:
sudo semanage permissive -d mysqld_t
The service returns to the system’s SELinux mode. Be sure to follow the steps to Relabel the entire file system.
Relabel the entire file system
Switching from disabled or permissive to enforcing requires additional steps. The enforcing mode requires the correct contexts, or labels, to function. The permissive mode allows users and processes to label files and system objects incorrectly. The disabled mode does not load the SELinux infrastructure and does not label resources or processes.
RHEL and compatible systems, use the fixfiles application for relabeling. You can relabel the entire file system or the file contexts of an application.
For one application, run the following command:
fixfiles -R mysqld restore
To relabel the file system without rebooting the system, use the following command:
fixfiles -f -F relabel
Another option relabels the file system during a reboot. You can either add a touch file, read during the reboot operation, or configure a kernel boot parameter. The completion of the relabeling operation automatically removes the touch file.
Add the touch file as root:
touch /.autorelabel
To configure the kernel, add the autorelabel=1 kernel parameter to the boot parameter list. The parameter forces a system relabel. Reboot in permissive mode to allow the process to complete before changing to enforcing.
Note
Relabeling an entire filesystem takes time. When the relabeling is complete, the system reboots again.
Set a custom data directory
If you do not use the default settings, SELinux, in enforcing mode, prevents access to the system.
For example, during installation, you have used the following configuration:
datadir=/var/lib/mysqlcustom
socket=/var/lib/mysqlcustom/mysql.sock
Restart the service.
service mysqld restart
Expected output
Redirecting to /bin/systemctl restart mysqld.service
Job for mysqld.service failed because the control process exited with error code.
See "systemctl status mysqld.service" and "journalctl -xe" for details.
Check the journal log to see the error code.
journalctl -xe
Expected output
...
SELinux is preventing mysqld from getattr access to the file /var/lib/mysqlcustom/ibdata1.
...
Check the SELinux types in /var/lib/mysqlcustom.
ls -1aZ /var/lib/mysqlcustom
Expected output
total 164288
drwxr-x--x. 6 mysql mysql system_u:object_r:var_lib_t:s0 4096 Dec 2 07:58 .
drwxr-xr-x. 38 root root system_u:object_r:var_lib_t:s0 4096 Dec 1 14:29 ..
...
-rw-r-----. 1 mysql mysql system_u:object_r:var_lib_t:s0 12582912 Dec 1 14:29 ibdata1
...
To solve the issue, use the following methods:
-
Set the proper labels for
mysqlcustomfiles -
Change the mysqld SELinux policy to allow mysqld access to
var_lib_tfiles.
The recommended solution is to set the proper labels. The following procedure assumes you have already created and set ownership to the custom data directory location:
-
To change the SELinux context, use
semanage fcontext. In this step, you define how SELinux deals with the custom paths:semanage fcontext -a -e /var/lib/mysql /var/lib/mysqlcustomSELinux applies the same labeling schema, defined in the mysqld policy, for the
/var/lib/mysqldirectory to the custom directory. Files created within the custom directory are labeled as if they were in/var/lib/mysql. -
To
restoreconcommand applies the change.restorecon -R -v /var/lib/mysqlcustom -
Restart the mysqld service:
service mysqld start
Set a custom log location
If you do not use the default settings, SELinux, in enforcing mode, prevents access to the location. Change the log location to a custom location in my.cnf:
log-error=/logs/mysqld.log
Verify the log location with the following command:
ls -laZ /
Expected output
...
drwxrwxrwx. 2 root root unconfined_u:object_r:default_t:s0 6 Dec 2 09:16 logs
...
Starting MySQL returns the following message:
service mysql start
Expected output
Redirecting to /bin/systemctl start mysql.service
Job for mysqld.service failed because the control process exited with error code.
See "systemctl status mysqld.service" and "journalctl -xe" for details.
To view the error details, run:
journalctl -xe
The output may include a line such as:
```{.text .no-copy}
SELinux is preventing mysqld from write access to the directory logs.
```
The default SELinux policy allows mysqld to write logs into a location tagged with var_log_t, which is the /var/log location. You can solve the issue with either of the following methods:
-
Tag the
/logslocation properly -
Edit the SELinux policy to allow mysqld access to all directories.
To tag the custom /logs location is the recommended method since it locks down access. Run the following commands to tag the custom location:
semanage fcontext -a -t var_log_t /logs
restorecon -v /logs
You may not be able to change the /logs directory label. For example, other applications, with their own rules, use the same directory.
To adjust the SELinux policy when a directory is shared, follow these steps:
-
Create a local policy:
ausearch -c 'mysqld' --raw | audit2allow -M my-mysqld -
This command generates the my-mysqld.te and the my-mysqld.pp files. The mysqld.te is the type enforcement policy file. The my-mysqld.pp is the policy module loaded as a binary file into the SELinux subsystem.
An example of the my-myslqd.te file:
module my-mysqld 1.0; require { *type mysqld_t*; type var_lib_t; *type default_t*; class file getattr; *class dir write*; } ============= mysqld_t ============== *allow mysqld_t default_t:dir write*; allow mysqld_t var_lib_t:file getattr;The policy contains rules for the custom data directory and the custom logs directory. We have set the proper labels for the data directory location, and applying this auto-generated policy would loosen our hardening by allowing mysqld to access
var_lib_ttags. -
SELinux-generated events are converted to rules. A generated policy may contain rules for recent violations and include unrelated rules. Unrelated rules are generated from actions, such as changing the data directory location, that are not related to the logs directory. Add the
--startparameter to use log events after a specific time to filter out the unwanted events. This parameter captures events when the time stamp is equal to the specified time or later. SELinux generates a policy for the current actions.ausearch --start 10:00:00 -c 'mysqld' --raw | audit2allow -M my-mysqld -
This policy allows mysqld writing into the tagged directories. Open the my_mysqld file:
module my-mysqld 1.0; require { type mysqld_t; type default_t; class dir write; } ============= mysqld_t ============== allow mysqld_t default_t:dir write; -
Install the SELinux policy module:
semodule -i my-mysqld.pp
Restart the service. If you have a failure, check the journal log and follow the same procedure.
If SELinux prevents mysql from creating a log file inside the directory. You can view all the violations by changing the SELinux mode to permissive and then running mysqld. All violations are logged in the journal log. After this run, you can generate a local policy module, install it, and switch SELinux back to enforcing mode.
Follow this procedure:
-
Unload the current local my-mysqld policy module:
semodule -r my-mysqld -
You can put a single domain into permissive mode. Other domains on the system to remain in enforcing mode. Use
semanage permissivewith the-aparameter to change mysqld_t to permissive mode:semanage permissive -a mysqld_t -
Verify the mode change:
semdule -l | grep permissiveExpected output
... permissive_mysqld_t ... -
To make searching the log easier, return the time:
date -
Start the service.
service mysqld start -
MySQL starts, and SELinux logs the violations in the journal log. Check the journal log:
journalctl -xe -
Stop the service:
service mysqld stop -
Generate a local mysqld policy, using the time returned from step 4:
ausearch --start <date-c 'mysqld' --raw | audit2allow -M my-mysqld -
Review the policy (the policy you generate may be different):
cat my-mysqld.teExpected output
module my-mysqld 1.0; require { type default_t; type mysqld_t; class dir { add_name write }; class file { append create open }; } ============= mysqld_t ============== allow mysqld_t default_t:dir { add_name write }; allow mysqld_t default_t:file { append create open }; -
Install the policy:
semodule -i my-mysqld.pp -
Use
semanage permissivewith the-dparameter, which deletes the permissive domain for the service:semanage permissive -d mysqld_t -
Restart the service:
service mysqld start
Note
Use this procedure to adjust the local mysqld policy module. You should review the changes which are generated to ensure the rules are not too tolerant.
Set secure_file_priv directory
Update the SELinux tags for the /var/lib/mysql-files/ directory, used for SELECT ... INTO OUTFILE or similar operations, if required. The server needs only read/write access to the destination directory.
To set secure_file_priv to use this directory, run the following commands to set the context:
semanage fcontext -a -t mysqld_db_t "/var/lib/mysql-files/(/.*)?"
restorecon -Rv /var/lib/mysql-files
Edit the path for a different location, if needed.
SELinux contexts and labels
Viewing SELinux Contexts Example of viewing SELinux context for a process using ps command Listing SELinux Types or Domains Explanation of SELinux type security property Example of listing SELinux types associated with MySQL directories and files
SELinux context is like a label that tells the system how to handle files, processes, and other resources. For example, it determines which processes can access certain files and what actions they can perform on them. Understanding SELinux context helps you know how your applications interact with the system and ensures that they have the necessary permissions to function correctly. It’s like giving each item on your computer a tag that says what it is and what it’s allowed to do. So when your application tries to access a file, SELinux checks its context to see if it’s allowed. If the context matches what’s expected, the action is allowed; if not, it’s denied. So knowing the SELinux context is essential for managing security and troubleshooting issues on your system.
Viewing SELinux context for a process using ps command
To view the SELinux context for a process using the ps command, you can add the -Z option to display the context information. Here’s how you can do it:
ps -eZ | grep <process_name>
Replace <process_name> with the process name you want to check. For example, if you want to see the SELinux context for the MySQL process, you would use:
ps -eZ | grep mysqld
The output displays the SELinux context for the specified process and typically consists of four parts: user, role, type (or domain), and sensitivity level.
Expected output
system_u:system_r:mysqld_t:s0 3356 ? 00:00:01 mysqld
system_urepresents the user context.system_rrepresents the role context.mysqld_trepresents the type (or domain) context.s0represents the sensitivity level.
This information helps you understand how SELinux enforces security policies for the specified process.
List SELinux Types or Domains
SELinux types or domains categorize different resources on the system, such as files, directories, and processes. Each type or domain has specific permissions and restrictions associated with it, determining how resources interact with each other. To list SELinux types or domains associated with files, you can use the ls command with the -Z option. For example:
ls -laZ /var/lib/mysql
Expected output
drwxr-x--x. mysql mysql system_u:object_r:mysqld_db_t:s0 mysql
drwxr-x---. mysql mysql system_u:object_r:mysqld_db_t:s0 mysql-files
drwxr-x---. mysql mysql system_u:object_r:mysqld_db_t:s0 mysql-keyring
This command lists the files and directories under /var/lib/mysql along with their SELinux context, which includes the type or domain associated with each resource. Understanding these types or domains helps manage SELinux policies and ensure proper access control for MySQL-related resources.
Manage SELinux modes
SELinux, or Security-Enhanced Linux, is a security module that provides access control policies. It enhances the system’s security by allowing administrators to define rules restricting how applications and users can access resources. SELinux operates in three different modes: Disabled, Permissive, and Enforcing.
Disabled Mode
In Disabled mode, SELinux is completely turned off. The system does not enforce any SELinux policies, and there is no SELinux security checking. Applications and processes run without any restrictions imposed by SELinux. This mode is typically used for troubleshooting or when SELinux is not needed.
To set SELinux to Disabled mode, you need to edit the SELinux configuration file. Open the file /etc/selinux/config with a text editor and set the SELINUX parameter to disabled:
$ SELINUX=disabled
Save the file and reboot the system for the change to take effect.
Permissive Mode
In Permissive mode, SELinux policies are not enforced, but violations are logged. This mode is useful for troubleshooting and for understanding what SELinux would block without actually blocking anything. Applications and processes run as if SELinux is not enforcing policies, but administrators can see which actions would have been denied if SELinux were enforcing.
To set SELinux to Permissive mode, you can edit the SELinux configuration file /etc/selinux/config and set the SELINUX parameter to permissive:
$ SELINUX=permissive
Save the file and reboot the system. Alternatively, you can change to Permissive mode temporarily without rebooting by running the following command as root:
$ setenforce 0
Enforcing Mode
In Enforcing mode, SELinux enforces all policies and denies access based on the rules defined in the policy. This mode is the default and most secure mode. SELinux actively restricts actions of applications and processes based on the policies in place. Any violation of the rules results in access being denied and logged.
To set SELinux to Enforcing mode, edit the SELinux configuration file /etc/selinux/config and set the SELINUX parameter to enforcing:
$ SELINUX=enforcing
Save the file and reboot the system. To change to Enforcing mode temporarily without rebooting, you can use the following command as root:
$ setenforce 1
How to check the SELinux mode
You can check which mode SELinux is currently running in by using a few terminal commands.
Use the sestatus command
To check the current SELinux mode, you can use the sestatus command. This command shows the status of SELinux, including the mode it is operating in. Type the following command and press Enter:
$ sestatus
Expected output
SELinux status: enabled
SELinuxfs mount: /sys/fs/selinux
SELinux root directory: /etc/selinux
Loaded policy name: targeted
Current mode: enforcing
Mode from config file: enforcing
Policy MLS status: enabled
Policy deny_unknown status: allowed
Max kernel policy version: 31
| Result | Description |
|---|---|
| Current mode | This line shows the mode SELinux is currently operating in. It can be “enforcing”, “permissive”, or “disabled”. |
| Enforcing | SELinux is actively enforcing its policies and blocking any actions that are not allowed. |
| Permissive | SELinux is not blocking actions, but it logs any actions that would be blocked in enforcing mode. |
| Disabled | SELinux is completely turned off, and no policies are enforced or logged. |
| Mode from config file | This line shows the mode that SELinux is configured to use at boot time, which might be different from the current mode if changes were made without rebooting. |
Use the getenforce command
Another command to check the current SELinux mode is getenforce. Type the following command and press Enter:
$ getenforce
Expected output
Enforcing
Check the configuration file
You can also check the SELinux configuration file to see what mode SELinux is set to use when the system boots. Open the configuration file located at /etc/selinux/config using a text editor. For example, you can use cat to view the file contents:
$ cat /etc/selinux/config
Expected output
SELINUX=enforcing
How to switch the SELinux mode
Switching the SELinux mode changes how the Security-Enhanced Linux (SELinux) system controls access and enforces policies on your system.
Switch SELinux mode temporarily
To switch SELinux mode temporarily, use the setenforce command. This change will last until the system is rebooted.
$ sudo setenforce 1
To check if the mode has changed, run sestatus.
Switch SELinux Mode permanently
To make the change permanent, you need to edit the SELinux configuration file. This file is usually located at /etc/selinux/config.
-
Open the configuration file with a text editor. For example, using
nano:$ sudo nano /etc/selinux/config -
Look for the line that starts with
SELINUX=. It will be followed by the current mode:enforcing,permissive, ordisabled. -
Change the value to the desired mode.
-
Save the file and exit the text editor.
To apply the permanent change, reboot the system. After the system restarts, check the SELinux mode with sestatus to ensure the change took effect.
Changing SELinux mode for a service
SELinux (Security-Enhanced Linux) controls access and permissions for processes and users on a Linux system. SELinux has different modes: Enforcing, Permissive, and Disabled. When you change the SELinux mode for a specific service, you can control how strictly SELinux policies apply to that service. This can be useful when you need to test or troubleshoot services without disabling SELinux entirely.
Step 1: Identify the Service
First, identify the service for which you want to change the SELinux mode. For example, let’s say you want to change the SELinux mode for the Apache web server (httpd).
Step 2: Check current SELinux context
Check the current SELinux context of the service to understand its current mode and permissions. You can use the ps command with -Z option to view the SELinux context of a running process.
$ ps -eZ | grep httpd
This command displays the SELinux context for all httpd processes.
Step 3: Create a Custom SELinux Policy Module
To change the SELinux mode for a specific service, you create a custom SELinux policy module. This module will move the service to a permissive domain while keeping the rest of the system in enforcing mode.
Create a policy file, for example, httpd_permissive.te:
$ nano httpd_permissive.te
Add the following content to the file:
policy_module(httpd_permissive, 1.0)
gen_permissive(httpd_t)
This policy module tells SELinux to make the httpd_t domain permissive.
Step 4: Compile and Install the Policy Module
Compile the policy module using the checkmodule and semodule_package commands:
$ checkmodule -M -m -o httpd_permissive.mod httpd_permissive.te
$ semodule_package -o httpd_permissive.pp -m httpd_permissive.mod
Install the compiled policy module using the semodule command:
$ semodule -i httpd_permissive.pp
This installs the custom SELinux policy module, making the httpd service run in permissive mode.
Step 5: Verify the Changes
Restart the service to apply the changes:
$ systemctl restart httpd
Check the SELinux context again to ensure the httpd service is running in the permissive domain:
$ ps -eZ | grep httpd
You should see the httpd processes with a permissive context.
Step 6: Monitor Logs and Adjust Policies
While the service is in a permissive domain, SELinux logs any policy violations without enforcing them. Monitor the logs to identify and resolve issues. Use audit2allow to generate new policies if needed:
$ ausearch -m avc -c httpd | audit2allow -M httpd_custom
$ semodule -i httpd_custom.pp
This command sequence helps you create and install new SELinux policies based on logged violations, refining your SELinux configuration.
Additional SELinux tools and management
Installing SELinux management tools
To install SELinux management tools on Red Hat Enterprise Linux 8 or later, run the following command as root:
yum -y install policycoreutils-python-utils
Ensure you have root privileges to execute these commands.
Switching SELinux mode
SELinux can operate in three modes: Disabled, Permissive, and Enforcing.
To switch SELinux mode until the next reboot, use either of the following commands as root:
setenforce Enforcing
setenforce 1
To view the current SELinux mode, use either of the following commands:
getenforce
sestatus | grep -i mode
Managing SELinux policies
Using the semanage command
To add a service to the permissive domain, execute the following as root:
semanage permissive -a <service_name>
To delete a service from the permissive domain, run:
semanage permissive -d <service_name>
List the current Permissive domains
To list the current permissive domains, use the following command:
semanage permissive -l
Troubleshoot SELinux issues
Review Get help from Percona for ways that we can work with you.
Relabel the Entire File System
Relabeling the entire file system is updating SELinux contexts for all files and directories. This operation ensures that SELinux can enforce its policies correctly.
When relabeling the entire file system for SELinux, you should use fixfiles when you want to initiate the relabeling process manually. This command is useful when you need to perform the relabeling operation immediately or if you want to specify additional options, such as forcing the operation with the -f flag.
On the other hand, .autorelabel is used when you want the relabeling process to occur automatically during system boot. This method is convenient when scheduling the relabeling task without manual intervention. The .autorelabel in the root directory triggers the relabeling process during the boot sequence, ensuring that all files and directories are relabeled according to the SELinux policy.
Manually relabeling
This command relabels the entire file system without requiring a system reboot.
fixfiles -f relabel
fixfiles -f relabel is a directive used within the context of SELinux, a security feature in Linux systems. This specific command instructs the system to forcefully reapply SELinux labels, also known as contexts, to files and directories.
Here’s a breakdown of what each part of the command does:
| Option | Description |
|---|---|
| fixfiles | This is the name of the command being executed. It’s a tool provided by SELinux specifically designed to fix file contexts. |
| -f | This is an option passed to the fixfiles command. In this context, the -f option stands for “force”. It tells the fixfiles command to perform the relabeling operation forcefully, regardless of the current state or any potential errors. |
| relabel | This is an argument passed to the fixfiles command. It specifies the action that fixfiles should take: relabel the files and directories on the system. |
When you run fixfiles -f relabel, SELinux goes through all files and directories on the system and applies the appropriate SELinux labels to each one. These labels are crucial for SELinux to enforce its security policies effectively. They determine how processes and users can interact with the files and directories, ensuring that only authorized actions are allowed.
This command is typically used in scenarios where there may have been changes to the file system that require SELinux labels to be updated. For example, if files or directories have been moved or copied from one location to another or if SELinux policies have been modified, running fixfiles -f relabel ensures that the SELinux labels remain consistent with the system’s current configuration.
It’s important to note that running fixfiles -f relabel can be a resource-intensive operation and may take some time to complete, especially on systems with many files and directories. Additionally, since it forcefully relabels all files and directories, use it cautiously and preferably during maintenance windows to minimize potential disruptions to system operations.
Automatic relabeling
Creating the .autorelabel file initiates a relabeling process that often requires a reboot to apply the changes effectively. During this reboot, SELinux relabels all files based on their defined policies.
touch /.autorelabel
This command creates a file named .autorelabel in the root directory of the Linux filesystem. The “touch” command creates a new file.
The purpose of the .autorelabel file is to trigger an automatic relabeling of the entire filesystem when the system boots up. Relabeling involves assigning security labels to files and directories based on SELinux policies. This process ensures that all files and directories have the correct security context, which is essential for SELinux to enforce its security policies effectively.
Creating this file tells the system to perform a relabeling operation during the next boot. This operation can be useful in situations where SELinux policies or file contexts have been modified, and we want to ensure that all files are correctly labeled according to the updated policies.
It’s important to note that the .autorelabel file contains no data or configuration. The file acts as a trigger for the relabeling process. Once the relabeling is complete, the system automatically removes the .autorelabel file.
Set Custom Data Directory
Setting a custom data directory for the server involves configuring SELinux contexts to allow the server to access the new directory properly.
It would be best to use semanage when you defining or modifying SELinux policy rules related to a custom data directory. This command allows you to manage SELinux policy modules, including adding, deleting, and modifying SELinux policy rules for specific file contexts or directories.
It would be best to use restorecon when you restore the default SELinux context for files and directories, including those in a custom data directory. restorecon resets the SELinux context of specified files or directories to match the default context defined in the SELinux policy. It’s typically used after file or directory modifications to ensure they have the correct SELinux context.
Use semanage
The following command configures the SELinux context for a custom data directory in the server.
semanage fcontext -a -t mysqld_db_t "/path/to/custom/data(/.*)?"
Each part of the command is as follows:
| Option | Description |
|---|---|
semanage |
Command-line tool used to manage SELinux policy settings. |
fcontext |
Sub-command of semanage specifically used to manage file contexts, which define how SELinux labels files and directories. |
-a |
Stands for “add” and indicates the intention to add a new file context configuration. |
-t mysqld_db_t |
Specifies the type of context to assign to the specified path. In this case, mysqld_db_t is the SELinux type context for The server database files. |
"/path/to/custom/data(/.*)?" |
Path to the custom data directory in the Server setup. The (/.*)? part is a regular expression pattern matching any files or subdirectories within the specified directory. |
This command tells SELinux to label all files and subdirectories within the /path/to/custom/data directory with the SELinux type context mysqld_db_t. This operation ensures that SELinux treats these files and directories as part of the server’s database, allowing the server to access them according to its SELinux policy.
Use restorecon
restorecon -Rv /path/to/custom/data
The restorecon -Rv /path/to/custom/data command restores the SELinux context for a specific directory and subdirectory. Here’s what each part of the command does:
restorecon: This is the main command used to restore the SELinux context of files and directories.-R: This option stands for “recursive” and indicates that the command should operate recursively on all files and subdirectories within the specified directory.-v: This option stands for “verbose” and instructs the command to display detailed information about the actions it performs, providing feedback on which files and directories had their SELinux context restored.
The /path/to/custom/data part of the command should be replaced with the actual path to the directory for which you want to restore the SELinux context.
Typically, restorecon does not require a system reboot. It simply restores the SELinux context for the specified directory and its contents. However, if you’re experiencing issues with SELinux after running the command, a system reboot may be necessary to ensure all changes take effect.
Setting Custom Log Location
When setting a custom log location for the server, SELinux permissions may need adjustment to allow the server to write to the new directory.
This command associates the var_log_t type with the custom log directory and contents.
semanage fcontext -a -t var_log_t "/path/to/custom/logs(/.*)?"
This command restores SELinux contexts recursively for the custom log directory, ensuring proper permissions for the server to write logs.
restorecon -Rv /path/to/custom/logs
Setting secure_file_priv Directory
When configuring the server’s secure_file_priv directory, you must update the SELinux tags to allow the server to access this directory.
This command associates the mysqld_db_t type with the secure_file_priv directory and its contents.
semanage fcontext -a -t mysqld_db_t "/path/to/secure_file_priv(/.*)?"
This command restores SELinux contexts recursively for the secure_file_priv directory, ensuring proper permissions for the server file operations.
restorecon -Rv /path/to/secure_file_priv
Develop
Fundamental SQL operations
SQL basics
SQL stands for Structured Query Language. It’s a powerful tool used to communicate with databases. Think of a database as a digital filing cabinet where you store and organize information. SQL is like the language you use to talk to that filing cabinet and ask questions or tell it what you want to do with the data inside.
With SQL, you can do a variety of tasks:
-
Retrieve Data: You can ask the database to give you specific information, like all the names of customers who bought a certain product.
-
Insert Data: You can add new information into the database, such as adding a new customer’s details.
-
Update Data: If information changes, like a customer’s address, you can update it in the database.
-
Delete Data: If information is no longer needed, you can remove it from the database.
SQL provides a standardized way to interact with a database. It uses simple commands and statements to perform these tasks, making it easy to learn and use for managing data effectively.
Fundamental SQL links:
Common SQL commands
SQL commands used by MySQL can be categorized into different types based on their purposes: Data Definition Language (DDL), Data Manipulation Language (DML), Data Control Language (DCL), and Transaction Control Language (TCL).
Data Manipulation Language (DML)
DML commands manage data within database tables.
Common DML commands include:
- [SELECT]: This command retrieves data from a table or from several tables when you use a join. In this example, it selects all columns with a wildcard (
*) from thecustomerstable.
Be careful when using wildcards. They return every column, which can slow down queries, use more memory and network resources, and put extra load on both the server and the client.
```sql
SELECT * FROM customers;
```
-
[INSERT]: This command adds new records to a table.
INSERT INTO customers (name, city) VALUES ('John Doe', 'Berlin'); -
[UPDATE]: This command modifies existing records in a table.
UPDATE customers SET city = 'Madrid' WHERE id = 1; -
[DELETE]: This command removes records from a table.
DELETE FROM customers WHERE id = 1;
Data Definition Language (DDL)
DDL commands define, modify, and remove database objects such as tables, indexes, and views.
Common DDL commands include:
-
CREATE: This command creates new database objects like tables, indexes, and views.
CREATE TABLE employees (id INT, name VARCHAR(50)); -
ALTER: This command modifies the structure of existing database objects.
ALTER TABLE employees ADD COLUMN city VARCHAR(50); -
DROP: This command removes database objects from the database.
DROP TABLE employees;
Data Control Language (DCL)
DCL commands control access to database objects and define privileges.
Common DCL commands include:
-
GRANT: This command grants specific privileges to database users.
GRANT SELECT, INSERT ON employees TO 'user1'@'localhost'; -
REVOKE: This command revokes privileges from database users.
REVOKE INSERT ON employees FROM 'user2'@'localhost';
Transaction Control Language (TCL)
TCL commands manage transactions within a database.
Common TCL commands include:
-
COMMIT: This command saves changes made during the current transaction to the database.
COMMIT; -
ROLLBACK: This command undoes changes made during the current transaction and restores the database to its previous state.
ROLLBACK;
Fundamental SQL links:
SELECT statement
The syntax of a SELECT statement in MySQL is straightforward. You start with the keyword SELECT, followed by the columns from which you want to retrieve data. You can specify the table from which to retrieve data using the FROM keyword. Optionally, you can include conditions to filter the results using the WHERE clause.
The following table is a breakdown of the syntax:
| Syntax | Description |
|---|---|
| SELECT | This keyword indicates that you want to retrieve data from the database. |
| Columns | Specify the columns you want to retrieve data from. You can use the asterisk (*) to select all columns or specify individual column names separated by commas. |
| FROM | Use the FROM keyword to specify the table from which you want to retrieve data. |
| WHERE (optional) | If you want to filter the results based on specific conditions, you can use the WHERE clause. This clause allows you to specify conditions using comparison operators like =, >, <, etc., and logical operators like AND, OR, NOT. |
SELECT column1, column2
FROM table_name
WHERE condition;
SELECT column1, column2specifies that you want to retrieve data from column1 and column2.FROM table_namespecifies the table from which you want to retrieve data.WHERE conditionis an optional clause that filters the results based on the specified condition.
Fundamental SQL links:
INSERT statement
In MySQL, the INSERT statement adds new rows of data to a table. It follows a simple syntax pattern that beginners can easily understand.
| Trade-Offs | Description |
|---|---|
| Advantages | - Allows for efficient addition of new data into the database. |
| - Provides flexibility to insert data into specific columns or all columns of a table. | |
| - Supports inserting multiple rows with a single INSERT statement. | |
| - Can be used in conjunction with SELECT statements to insert data from one table into another. | |
| Disadvantages | - May result in performance overhead, especially when inserting large volumes of data or when indexes need to be updated. |
| - Requires proper error handling to deal with constraints, such as primary key or unique constraints, to prevent duplicate entries. | |
| - Limited functionality for bulk inserts compared to specialized tools or techniques like bulk loading utilities. |
Syntax of the INSERT Statement:
| Option | Description |
|---|---|
| INSERT INTO | This keyword indicates that you are performing an insertion operation into a table. |
| table_name | This is the name of the table where you want to insert the data. |
| column1, column2, … | These are optional and specify the columns into which you want to insert data. If omitted, values must be provided for all columns in the table, in the same order as they are defined in the table. |
| VALUES | This keyword introduces the list of values to be inserted into the specified columns. Alternatively, you can use the SELECT statement to retrieve data from another table and insert it into the specified columns. |
| value1, value2, … | These are the values to be inserted into the corresponding columns. The number and order of values must match the number and order of columns specified in the INSERT INTO clause. |
The number of values in the VALUES clause must always match the number of columns specified or the total number of columns in the table.
To insert data into a table, you use the INSERT INTO statement followed by the table name and a list of column names (if specified) or the VALUES keyword, followed by the values you want to insert into the table.
INSERT INTO table_name (column1, column2, ...)
VALUES (value1, value2, ...);
In this example, we are doing the following:
-
Inserting a new row into the “employees” table.
-
The values 1, ‘John Doe’, and 50000 are being inserted into the “id”, “name”, and “salary” columns, respectively.
INSERT INTO employees (id, name, salary)
VALUES (1, 'John Doe', 50000);
Fundamental SQL links:
UPDATE statement
Purpose of the UPDATE Statement
The UPDATE statement modifies existing records in a table. It allows developers to change the values of one or more columns in a specific row or set of rows based on certain conditions.
Advantages and Disadvantages of Using the UPDATE Statement:
| Trade-offs | Description |
|---|---|
| Advantages | - Allows for updating existing data without the need to delete and re-insert records. |
| - Provides flexibility in modifying specific columns or rows based on specified conditions. | |
| - Can be used in conjunction with WHERE clause to update only selected rows, reducing unnecessary updates and improving performance. | |
| - Supports bulk updates, allowing multiple rows to be modified in a single statement. | |
| Disadvantages | - Incorrectly formulated UPDATE statements can lead to unintended data changes or data loss. |
| - Lack of proper WHERE clause can result in updating all rows in a table, potentially causing data corruption or performance issues. | |
| - May cause locking and contention issues in high-concurrency environments, impacting the performance of other queries accessing the same table. |
Syntax of an UPDATE Statement:
| Option | Description |
|---|---|
UPDATE table_name |
This clause specifies the name of the table you want to modify. |
SET column_name1 = value1, column_name2 = value2, ... |
This clause defines which columns you want to update and their corresponding new values. You can update multiple columns by separating them with commas. |
WHERE condition (optional) |
This clause specifies a condition that filters which rows in the table will be affected by the update. If omitted, all rows in the table will be updated. |
UPDATE table_name
SET column1 = value1, column2 = value2, ...
[WHERE condition];
In this example, the statement does the following:
-
Modifies the
salarycolumn for employees in the ‘Sales’ department. -
Increases the salary of each employee by 10% (
salary * 1.1).
UPDATE employees
SET salary = salary * 1.1
WHERE department = 'Sales';
Fundamental SQL links:
DELETE statement
The DELETE statement removes one or more rows from a table based on specified conditions. It allows developers to selectively delete data from a table, providing a way to manage and maintain the database by removing unnecessary or outdated records.
Advantages and Disadvantages of Using DELETE Statement
| Trade-offs | Description |
|---|---|
| Advantages | Allows selective removal of specific rows from a table, helping to maintain data integrity and manage database resources efficiently. |
| Can be combined with WHERE clause to delete rows that meet certain conditions, providing flexibility in data manipulation. | |
| Provides a straightforward way to remove unwanted data without affecting the structure of the table or other related tables. | |
| Disadvantages | Deleting large amounts of data can impact performance and may require careful consideration to avoid unintended consequences. |
| Deletes are permanent and irreversible, so it’s crucial to double-check conditions and backup data before executing DELETE queries. |
Syntax of DELETE Statement
The statement has the following options:
| Option | Description |
|---|---|
DELETE FROM table_name |
This clause specifies the table from which you want to delete rows. |
WHERE condition (Optional) |
This clause filters the rows to be deleted based on a specific condition. If omitted, all rows in the table will be deleted. |
The syntax of the DELETE statement is as follows:
DELETE FROM table_name
[WHERE condition];
Example of DELETE Statement
This example deletes all rows from the orders table where the order_date is before January 1, 2023.
DELETE FROM orders
WHERE order_date < '2023-01-01';
Fundamental SQL links:
SQL operators
Purpose of SQL Operators
SQL operators are symbols or keywords used to perform operations on data in SQL queries. They allow developers to manipulate and compare data, perform calculations, and filter results based on specified conditions.
Advantages and Disadvantages of Using SQL Operators:
| Trade-Offs | Description |
|---|---|
| Advantages | - Enables developers to perform various operations on data, such as arithmetic calculations, comparisons, logical operations, and string concatenation. |
| - Provides flexibility in crafting complex queries to extract, transform, and manipulate data according to specific requirements. | |
| - Enhances query efficiency by allowing filtering and sorting of data directly within SQL queries, reducing the need for post-processing in application code. | |
| Disadvantages | - May introduce complexity to queries, especially when multiple operators are combined or when dealing with complex logical conditions. |
| - Requires careful consideration of operator precedence and evaluation order to ensure the desired results are obtained. | |
| - Can sometimes result in less readable or maintainable queries, particularly for developers unfamiliar with the SQL syntax or operators being used. |
Syntax of Using SQL Operators:
| Option | Description |
|---|---|
| Arithmetic | Arithmetic operators such as +, -, *, /, and % are used to perform mathematical calculations on numeric data. |
| Comparison | Comparison operators like =, <>, <, >, <=, and >= are used to compare values and determine their relationship. |
| Logical | Logical operators such as AND, OR, and NOT are used to perform logical operations on boolean values or expressions. |
| Concatenation | The CONCAT() function or || operator is used to concatenate strings together. |
| Bitwise | Bitwise operators like &, |, ^, ~, <<, and >> are used to perform bitwise operations on binary data. |
| Assignment | The = and := operators are used to assign values to variables or columns. |
| In | The IN operator is used to check whether a value matches any value in a list or subquery. |
| Like | The LIKE operator is used to compare a value to a pattern using wildcard characters % and _. |
Example of Using SQL Operators:
- Arithmetic Operator Example:
SELECT 10 * 5; -- Multiplication
- Comparison Operator Example:
SELECT * FROM products WHERE price > 100; -- Select products with price greater than 100
- Logical Operator Example:
SELECT * FROM customers WHERE age >= 18 AND age <= 30; -- Select customers aged between 18 and 30
- Concatenation Operator Example:
SELECT CONCAT(first_name, ' ', last_name) AS full_name FROM employees; -- Concatenate first name and last name
- Bitwise Operator Example:
SELECT id, name FROM permissions WHERE permission_flags & 4 = 4; -- Select permissions with specific flag
- Assignment Operator Example:
SET @total_sales := 500; -- Assigning a value to a variable
- In Operator Example:
SELECT * FROM products WHERE category_id IN (1, 2, 3); -- Select products in specified categories
- Like Operator Example:
SELECT * FROM customers WHERE city LIKE 'Ber%'; -- Select customers in cities starting with Ber
These examples illustrate how SQL operators are used in Percona Server for MySQL queries to perform various data operations.
Fundamental SQL links:
Advanced SQL features
Common data types
Choosing the correct data type for each column ensures data accuracy, efficiency, and reliability within the database. The following describes the purpose of a data type in Percona Server for MySQL:
-
Purpose:
-
Data types define the kind of data that can be stored in a column of a table.
-
They enforce constraints on the values that can be inserted into the column, ensuring data integrity.
-
Data types determine how the data is stored in memory and on disk, optimizing storage space and performance.
-
They provide a way to specify the format and range of acceptable values for numeric, string, date, and other types of data.
-
Data types facilitate efficient sorting, indexing, and searching of data within the database.
-
Importance:
-
Choosing the appropriate data type for each column is crucial for efficient database design and performance.
-
Data types help prevent data corruption and inconsistency by enforcing strict rules for data storage and manipulation.
-
They enable database administrators and developers to define the structure of the database accurately and ensure compatibility with application requirements.
-
Understanding data types allows for effective data modeling and schema design, leading to well-organized and scalable databases.
The following is a description of common data types:
Integer Types
Integers are whole numbers without any fractional part. Percona Server for MySQL offers different sizes of integer types to accommodate various ranges of values.
| Data Type name | Description |
|---|---|
TINYINT |
A very small integer that can hold values from -128 to 127 (signed) or 0 to 255 (unsigned). |
SMALLINT |
A small integer that can hold values from -32768 to 32767 (signed) or 0 to 65535 (unsigned). |
MEDIUMINT |
A medium-sized integer that can hold values from -8388608 to 8388607 (signed) or 0 to 16777215 (unsigned). |
INT or INTEGER |
A standard-sized integer that can hold values from -2147483648 to 2147483647 (signed) or 0 to 4294967295 (unsigned). |
BIGINT |
A large integer that can hold values from -9223372036854775808 to 9223372036854775807 (signed) or 0 to 18446744073709551615 (unsigned). |
Floating-Point Types
Floating-point types are used to represent numbers with a fractional part.
| Data Type name | Description |
|---|---|
FLOAT |
A single-precision floating-point number that can hold up to 7 decimal digits of precision. |
DOUBLE or REAL |
A double-precision floating-point number that can hold up to 15 decimal digits of precision. |
Fixed-Point Types
Fixed-point types are used to represent exact numeric values.
DECIMALorNUMERIC: A fixed-point number with user-defined precision and scale.
String Types
String types are used to store text data.
| Data Type name | Description |
|---|---|
CHAR |
A fixed-length string that can hold up to 255 characters. |
VARCHAR |
A variable-length string that can hold up to 65535 characters. |
TEXT |
A string with a maximum length of 65535 characters. |
BLOB |
A binary large object that can hold up to 65535 bytes. |
Date and Time Types
Date and time types are used to store date and time information.
| Data Type name | Description |
|---|---|
DATE |
A date value in the format YYYY-MM-DD. |
TIME |
A time value in the format HH:MM:SS. |
DATETIME |
A combination of date and time values in the format YYYY-MM-DD HH:MM:SS. |
TIMESTAMP |
A timestamp value representing the number of seconds since the Unix epoch (January 1, 1970). |
Advanced SQL features
Functions
A function in MySQL is a reusable block of code that performs a specific task and returns a value. It allows users to encapsulate logic, modularize code, and perform complex calculations or data manipulations.
Advantages of Using Functions:
| Benefits | Description |
|---|---|
| Reusability | Functions can be reused multiple times in different parts of a SQL statement or query, reducing code duplication and promoting code modularity and maintainability. |
| Encapsulation | Functions encapsulate logic and calculations, making it easier to understand and manage complex operations within the database. |
| Performance | Functions can improve query performance by reducing the amount of data transferred between the database server and the client application. |
| Customization | Functions allow users to create custom data transformations and calculations tailored to specific business requirements, enhancing the flexibility of the database. |
Disadvantages of Using Functions:
| Disadvantages | Description |
|---|---|
| Performance | Functions may introduce performance overhead, particularly if they involve complex computations or require access to large datasets. |
| Maintenance | Functions require maintenance to keep them synchronized with changes to the underlying data model or business logic. Changes may impact the behavior of dependent queries. |
| Portability | Functions written in MySQL may not be compatible with other database systems, limiting the portability of applications and databases. |
| Security | Improperly designed or implemented functions may pose security risks, such as SQL injection vulnerabilities or unauthorized access to sensitive data. |
Create function
CREATE FUNCTION calculate_discount (total_amount DECIMAL(10, 2)) RETURNS DECIMAL(10, 2)
-> BEGIN
-> DECLARE discount DECIMAL(10, 2);
-> IF total_amount > 100 THEN
-> SET discount = total_amount * 0.1;
-> ELSE
-> SET discount = 0;
-> END IF;
-> RETURN discount;
-> END;
Call function
SELECT calculate_discount(120);
Drop function
DROP FUNCTION IF EXISTS calculate_discount;
Advanced SQL features
SQL conventions
Sure, here’s a description of common SQL style conventions with examples using common MySQL commands:
Naming Conventions
Naming conventions refer to the rules and guidelines for naming database objects such as tables, columns, indexes, and stored procedures.
- Use descriptive names: Choose names that clearly describe the purpose or content of the database object.
CREATE TABLE users (
user_id INT AUTO_INCREMENT PRIMARY KEY,
username VARCHAR(50),
email VARCHAR(100)
);
- Avoid abbreviations: Prefer full and meaningful words over abbreviations to enhance readability and understanding.
ALTER TABLE customers
ADD COLUMN date_of_birth DATE;
Indentation and Formatting
Indentation and formatting conventions improve the readability and maintainability of SQL code.
- Indent SQL statements: Indent SQL statements consistently to show the logical structure of queries and commands.
SELECT
user_id,
username,
email
FROM
users
WHERE
user_id = 1;
- Use consistent casing: Use consistent casing for keywords, identifiers, and SQL functions to improve code consistency.
SELECT
first_name,
last_name,
CONCAT_WS(' ', first_name, last_name) AS full_name
FROM
customers;
Comments
Comments are annotations added to SQL code to explain its purpose, logic, or any other relevant information.
- Document intent: Use comments to document the intent or purpose of SQL statements and code blocks.
-- Retrieve all active users
SELECT * FROM users WHERE status = 'active';
- Avoid redundant comments: Avoid adding comments that merely repeat the code without adding meaningful information.
-- This query retrieves all users
SELECT * FROM users;
These SQL style conventions help maintain consistency, readability, and clarity in SQL code, making it easier to understand, debug, and maintain.
Advanced SQL features
Common SQL errors
Error handling in SQL commands involves managing and responding to errors that may occur during database operations. It ensures that the database remains consistent and provides feedback to users when errors occur.
SELECT statement
When executing a SELECT statement, errors may occur due to invalid syntax, missing tables, or insufficient permissions.
SELECT * FROM non_existent_table;
ERROR 1146 (42S02): Table 'database_name.non_existent_table' doesn't exist
INSERT Statement
Errors can occur during INSERT operations if data violates constraints or exceeds column limits.
INSERT INTO table_name (id, name) VALUES (1, 'John');
ERROR 1136 (21S01): Column count doesn't match value count at row 1
UPDATE Statement
UPDATE statements may encounter errors when attempting to modify non-existent rows or violating constraints.
UPDATE table_name SET non_existent_column = 'value';
ERROR 1054 (42S22): Unknown column 'non_existent_column' in 'field list'
DELETE Statement
Errors in DELETE statements can occur if the WHERE clause condition is invalid or violates constraints.
DELETE FROM table_name WHERE id = 'non_numeric_value';
ERROR 1054 (42S22): Unknown column 'non_numeric_value' in 'where clause'
DDL Statements (CREATE, ALTER, DROP)
DDL statements may fail due to syntax errors, existing object conflicts, or insufficient privileges.
CREATE TABLE existing_table (id INT PRIMARY KEY);
ERROR 1050 (42S01): Table 'existing_table' already exists
Advanced SQL features
SQL syntax
SQL (Structured Query Language) is a standardized language used to communicate with databases. Percona Server for MySQL follows SQL syntax, which consists of commands and statements for performing various operations on databases and their objects.
The SQL syntax includes commands for data manipulation (e.g., SELECT, INSERT, UPDATE, DELETE), data definition (e.g., CREATE, ALTER, DROP), data control (e.g., GRANT, REVOKE), and transaction control (e.g., COMMIT, ROLLBACK).
| Syntax type | Description |
|---|---|
| Data Manipulation | MySQL supports powerful data manipulation features, allowing you to retrieve, insert, update, and delete data |
| Data Definition | With MySQL, you can define the structure of your database objects such as tables, indexes, views, and stored procedures |
| Data Control | MySQL provides commands for controlling access to database objects and defining user privileges |
| Transaction Management | MySQL supports transactions, which allow you to group multiple SQL statements into a single unit of work |
| Stored Procedures | MySQL allows you to define stored procedures and functions using SQL syntax |
| Triggers | MySQL supports triggers, which are special types of stored procedures that automatically execute in response to specific events |
| Indexes | MySQL provides features for optimizing query performance, including the ability to create indexes on columns |
| Views | MySQL allows you to create views, which are virtual tables generated from SQL queries |
| Data Types | MySQL supports a wide range of data types for storing different types of data |
These features make MySQL a powerful and versatile database management system, capable of handling a wide range of database tasks efficiently and effectively using SQL syntax.
While MySQL SQL syntax may deviate from the standard SQL syntax in some aspects, it generally aims to be compatible with standard SQL to ensure interoperability with other database systems and tools. However, developers should be aware of these differences and consult the MySQL documentation for guidance when writing SQL queries and statements.
MySQL SQL syntax largely adheres to the standard SQL syntax, but there are some differences and extensions that set it apart:
| Syntax | Description |
|---|---|
| Data Types | MySQL supports additional data types beyond the standard SQL specification, such as ENUM, SET, and BOOLEAN. These data types provide additional flexibility but may not be compatible with other database systems. |
| String Quoting | MySQL allows both single quotes (') and double quotes (") for string literals, while standard SQL typically only uses single quotes. Additionally, MySQL supports backticks (`) for quoting identifiers, which is not standard SQL syntax. |
| Case Sensitivity | By default, MySQL treats table and column names as case-insensitive, while standard SQL treats them as case-sensitive. However, this behavior can be changed by adjusting the server configuration. |
| LIMIT Clause | MySQL uses the LIMIT clause to restrict the number of rows returned by a query, while standard SQL uses the FETCH FIRST or OFFSET clauses for similar functionality. |
| AUTO_INCREMENT | MySQL uses the AUTO_INCREMENT attribute to automatically generate unique values for a column, while standard SQL uses IDENTITY or sequences for this purpose. |
| SQL Functions | MySQL provides additional built-in functions and extensions beyond the standard SQL functions. For example, MySQL has functions like GROUP_CONCAT() and IFNULL(), which may not be available in other database systems. |
| Storage Engines | MySQL supports multiple storage engines, each with its own set of features and capabilities. This option allows users to choose the most suitable storage engine for their specific requirements, but it introduces differences in behavior and syntax. |
Advanced SQL features
Stored Procedures
A stored procedure is a set of pre-defined SQL statements stored in the database and executed as a single unit. It allows users to execute complex operations without rewriting the same code multiple times.
| Benefit | Description |
|---|---|
| Code Reusability | Stored procedures can be reused multiple times in different parts of an application, reducing code duplication. |
| Improved Performance | By executing multiple SQL statements in a single call, stored procedures can reduce network traffic and improve performance. |
| Enhanced Security | Users can execute stored procedures without needing direct access to underlying tables, improving security and data integrity. |
| Centralized Logic | Business logic is encapsulated within stored procedures, making it easier to manage and maintain. |
| Disadvantage | Description |
|---|---|
| Difficulty in Debugging | Stored procedures can be challenging to debug, as they are executed on the database server rather than within the application code. |
| Vendor Lock-in | Stored procedures are specific to a particular database system, making it difficult to migrate to another database platform. |
| Limited Portability | Stored procedures written in one database system may not be compatible with other systems, limiting portability and interoperability. |
Stored Procedure examples
Create a Stored Procedure
DELIMITER //
CREATE PROCEDURE GetCustomerDetails (IN customerId INT)
BEGIN
SELECT * FROM customers WHERE id = customerId;
END //
DELIMITER ;
Call a Stored Procedure
CALL GetCustomerDetails(123);
Modify a Stored Procedure
DELIMITER //
ALTER PROCEDURE GetCustomerDetails (IN customerId INT)
BEGIN
SELECT name, city FROM customers WHERE id = customerId;
END //
DELIMITER ;
Drop a Stored Procedure
DROP PROCEDURE IF EXISTS GetCustomerDetails;
Advanced SQL features
Error handling in stored procedures
Error handling in stored procedures allows developers to gracefully handle exceptions and errors that may occur during the execution of the procedure. It enables better control over error messages and the ability to perform custom actions in response to errors.
Advantages of Using Error Handling:
| Benefits | Description |
|---|---|
| Graceful | Error handling provides a way to handle exceptions gracefully, preventing unexpected termination of the procedure and providing users with meaningful error messages. |
| Customized | Developers can customize error handling to perform specific actions based on the type of error encountered, such as logging errors, rolling back transactions, or retrying operations. |
| Control | Error handling gives developers greater control over error propagation and recovery, allowing them to handle errors at different levels of granularity and complexity. |
| Robustness | By implementing error handling, developers can make stored procedures more robust and resilient to unexpected conditions, enhancing the overall stability and reliability of the system. |
Disadvantages of Using Error Handling:
| Disadvantages | Description |
|---|---|
| Complexity | Error handling can introduce additional complexity to stored procedures, making them harder to understand, debug, and maintain, especially when dealing with nested error handling. |
| Overhead | Implementing error handling may add overhead in terms of code complexity and execution time, particularly for procedures with extensive error-checking logic or frequent error conditions. |
| Performance | Error handling may impact performance, especially in scenarios where error-checking logic needs to be executed repeatedly or in tight loops, leading to increased CPU and resource utilization. |
| Dependency | Error handling can create dependencies between stored procedures and error-handling routines, making it challenging to modify or refactor procedures without affecting error handling. |
To add error handling to a stored procedure, developers can use constructs like DECLARE, SIGNAL, RESIGNAL, and HANDLER to declare variables, raise errors, and handle exceptions. Here’s an example of error handling in a stored procedure:
DELIMITER //
CREATE PROCEDURE my_procedure()
BEGIN
DECLARE exit handler for sqlexception
BEGIN
-- Handle SQL exceptions
ROLLBACK;
SELECT 'An error occurred: ' || SQLSTATE();
END;
-- Procedure logic here
END //
DELIMITER ;
In this example, the DECLARE statement declares an exit handler for SQL exceptions. Inside the handler block, the procedure rolls back any changes made and returns a custom error message with the SQL state.
CALL my_procedure();
This command executes the stored procedure and triggers the error handling logic if an exception occurs during execution.
Advanced SQL features
Variables in stored procedures, functions, and triggers
To add a variable in MySQL, you use the DECLARE keyword within the context of a stored program, such as a stored procedure, function, or trigger. The DECLARE keyword is used to define a new variable along with its data type and optionally, its initial value.
| Value | Description |
|---|---|
| variable_name | This is the name of the variable you want to declare. Variable names must follow the rules for identifiers in MySQL. |
| data_type | This specifies the data type of the variable, such as INT, VARCHAR, DECIMAL, DATE, etc. |
| default_value | This is an optional parameter that specifies the default value for the variable. If not provided, the variable will be initialized to NULL by default. |
DECLARE variable_name data_type [DEFAULT default_value];
-
When you declare a variable using the
DECLAREkeyword, you are essentially telling MySQL to reserve space in memory to store a value of the specified data type. -
Variables in MySQL are scoped to the block in which they are declared. This means they can only be used within the block of code (for example, stored procedure, function) in which they are declared.
-
Variables can be used to store and manipulate values within the context of the stored program. They are commonly used for temporary storage of intermediate results, loop counters, or parameters passed to the program.
DECLARE total_sales DECIMAL(10, 2) DEFAULT 0.0;
This statement has the following settings:
| Description | Value |
|---|---|
total_sales is the name of the variable. |
total_sales |
DECIMAL(10, 2) specifies that total_sales will hold decimal numbers with a precision of 10 digits and a scale of 2 decimal places. |
DECIMAL(10, 2) |
DEFAULT 0.0 sets the initial value of total_sales to 0.0. If not provided, the default value would be NULL. |
DEFAULT 0.0 |
Advanced SQL features
Triggers
Using triggers
A trigger is a database object that automatically performs a specified action in response to certain events on a table or view. It allows users to enforce business rules, maintain data integrity, and automate tasks within the database.
Advantages of Using Triggers
| Benefits | Description |
|---|---|
| Data Integrity | Triggers can enforce data integrity constraints by automatically validating or modifying data before it is inserted, updated, or deleted in a table. |
| Audit Trails | Triggers can be used to create audit trails by recording changes made to the database, including who made the changes and when they occurred. |
| Simplified | Triggers simplify application logic by moving complex business rules and validation checks into the database, reducing the amount of code needed in the application layer. |
| Automated | Triggers automate repetitive tasks, such as updating denormalized data or sending notifications, by executing predefined actions in response to specified events. |
Disadvantages of Using Triggers
| Disadvantages | Description |
|---|---|
| Complexity | Triggers can add complexity to the database schema and make it harder to understand and maintain, especially when dealing with multiple triggers and complex logic. |
| Performance | Triggers may impact database performance, particularly if they involve complex operations or are triggered frequently, leading to increased overhead and slower response times. |
| Debugging | Triggers can be difficult to debug and troubleshoot, as they are executed automatically in response to events and may not provide detailed error messages or logging information. |
| Dependency | Triggers create dependencies between database objects, making it challenging to modify or refactor the database schema without considering the impact on existing triggers. |
Create a before_insert trigger
CREATE TRIGGER before_insert_customer
BEFORE INSERT ON customers
FOR EACH ROW
BEGIN
SET NEW.created_at = NOW();
END;
Create an after_update trigger
CREATE TRIGGER after_update_inventory
AFTER UPDATE ON inventory
FOR EACH ROW
BEGIN
INSERT INTO inventory_changes (product_id, old_quantity, new_quantity, change_date)
VALUES (OLD.product_id, OLD.quantity, NEW.quantity, NOW());
END;
Drop a before_insert trigger
DROP TRIGGER IF EXISTS before_insert_customer;
Drop an after_update trigger
DROP TRIGGER IF EXISTS after_update_inventory;
Advanced SQL features
Troubleshoot SQL code
Review Get help from Percona for ways that we can work with you.
Troubleshooting SQL Code
To troubleshoot SQL code, follow these steps:
| Action | Description |
|---|---|
| Review Error Messages | Carefully read any error messages returned by the MySQL server. They often provide valuable clues about what went wrong. |
| Check Syntax | Verify that the SQL syntax is correct. A single typo or missing keyword can cause errors. |
| Verify Table and Column Names | Ensure that table and column names are spelled correctly and match the actual names in the database. |
| Test in Isolation | Test each part of the SQL statement separately to identify which part is causing the issue. |
| Use Logging Tools | Enable query logging or use debugging tools to track the execution of SQL queries and identify any issues. |
| Review Documentation | Consult the MySQL documentation to understand the correct usage of SQL statements and functions. |
| Seek Help | Don’t hesitate to ask for help from more experienced developers or consult online forums and communities for assistance. |
Troubleshooting SQL Code example:
Suppose you have the following SQL query that is not returning the expected results:
SELECT * FORM users WHERE age = 30;
After reviewing the error message returned by MySQL, you notice a typo in the query. The keyword “FORM” should be “FROM”. After correcting the typo, the query becomes:
SELECT * FROM users WHERE age = 30;
Now, the query should execute successfully and return the desired results.
Advanced SQL features
JSON
JSON in Percona Server for MySQL
JSON stands for JavaScript Object Notation. It is a lightweight data-interchange format that is easy for humans to read and write. It is also easy for machines to parse and generate. Percona Server for MySQL supports JSON data type, allowing you to store JSON documents in your database.
The JSON data type in Percona Server for MySQL is a handy way to store and work with flexible, semi-structured data right in your database. Think of it as a way to save JSON objects directly into your tables, so you don’t have to convert them into a rigid format.
When you use the JSON data type, the database stores your data in a special binary format that’s optimized for speed and space which is faster and more efficient than just saving JSON as plain text.
The JSON data type is great when your data doesn’t fit into a fixed structure or if it’s likely to change over time. The following are examples of when you would use the JSON data type:
-
Storing user preferences or settings.
-
Capturing logs or other dynamic data.
-
Handling complex objects without adding a ton of columns to your table.
JSON has the following features:
| Feature | Details |
|---|---|
| Validation Built-In | Percona Server checks your JSON data when you insert or update it to make sure it’s valid. If something’s wrong, you’ll know right away. |
| Powerful Querying | You can dig into specific parts of your JSON data using built-in functions like the following: - JSON_EXTRACT() to pull out specific keys or values. - JSON_CONTAINS() to check if a key or value exists. - JSON_SET() to update parts of your JSON object without replacing the whole thing. |
| Indexing for Speed | If you often query a particular key inside your JSON, you can create a generated column based on that key and index it, making queries much faster. |
Use JSON in your database
The following is an example using JSON in your database.
CREATE TABLE user_data (
id INT PRIMARY KEY AUTO_INCREMENT,
name VARCHAR(50),
settings JSON
);
INSERT INTO user_data (name, settings)
VALUES ('John', '{"theme": "dark", "notifications": {"push": true, "sms": false}}');
SELECT JSON_EXTRACT(settings, '$.theme') AS theme
FROM user_data
WHERE name = 'John';
-
The settings column stores JSON data.
-
You can use
JSON_EXTRACT()to get the value of a specific key, like theme.
JSON in Percona Server for MySQL gives you have the flexibility of NoSQL with the reliability and querying power of a relational database.
Create a table with JSON Data Type
Create a table that includes a column with the JSON data type.
CREATE TABLE users (
id INT AUTO_INCREMENT PRIMARY KEY,
name VARCHAR(255) NOT NULL,
info JSON
);
The columns are the following:
-
idis an auto-incremented primary key. -
nameis a column for storing the user’s name. -
infois a column for storing JSON data.
Insert JSON Data
Insert the JSON data into the table using the INSERT statement. The name column stores the user’s name. The info column stores JSON data using the JSON_OBJECT function. This function creates a JSON object with key-value pairs.
INSERT INTO users (name, info) VALUES (
'John Doe',
JSON_OBJECT('age', 30, 'city', 'Berlin', 'phone', '+44 20 7946 0958')
);
Query JSON Data
You can query JSON data using the SELECT statement. The name column retrieves the user’s name. The info->>'$.age' expression retrieves the value of the age key from the JSON object stored in the info column.
SELECT name, info->>'$.age' AS age FROM users;
Update JSON Data
You can update JSON data using the UPDATE statement. The JSON_SET function updates the value of the age key in the JSON object stored in the info column. The WHERE clause specifies that only the row with the name ‘John Doe’ should be updated.
UPDATE users
SET info = JSON_SET(info, '$.age', 31)
WHERE name = 'John Doe';
Delete JSON Data
You can delete JSON data using the DELETE statement. This statement removes rows from the users table where the city key in the JSON object stored in the info column has the value ‘New York’.
DELETE FROM users WHERE info->>'$.city' = 'Berlin';
Add New Key-Value Pairs to JSON Data
You can add new key-value pairs to existing JSON data using the JSON_SET function. The JSON_SET function adds a new key phone with the value ‘+44 20 7946 0958’ to the JSON object stored in the info column.
UPDATE users
SET info = JSON_SET(info, '$.phone', '+44 20 7946 0958')
WHERE name = 'John Doe';
Remove Key-Value Pairs from JSON Data
You can remove key-value pairs from existing JSON data using the JSON_REMOVE function. This function removes the phone key from the JSON object stored in the info column.
UPDATE users
SET info = JSON_REMOVE(info, '$.phone')
WHERE name = 'John Doe';
Use JSON Functions
Percona Server for MySQL provides several functions to work with JSON data.
JSON_EXTRACT
You can extract data from a JSON document using the JSON_EXTRACT function. This function extracts the value of the city key from the JSON object stored in the info column.
SELECT JSON_EXTRACT(info, '$.city') AS city FROM users WHERE name = 'John Doe';
JSON_ARRAY
You can create a JSON array using the JSON_ARRAY function. This function creates a JSON array with the values ‘apple’, ‘banana’, and ‘cherry’.
INSERT INTO users (name, info) VALUES (
'Jane Smith',
JSON_ARRAY('apple', 'banana', 'cherry')
);
JSON_CONTAINS
You can check if a JSON document contains a specific value using the JSON_CONTAINS function. This function checks if the info column contains the value ‘New York’ for the city key.
SELECT name FROM users WHERE JSON_CONTAINS(info, '"New York"', '$.city');
Manage
Database management
Introduction to Databases and SQL
Introduction to databases
A database in the server is a structured collection of data. It helps store, organize, and manage various types of information like customer details, product inventories, financial records, and more. Using a database allows you to store data in an organized manner, making it easy to retrieve, update, and manipulate as needed.
Advantages
Using a database in servers has several benefits. The table below lists these advantages:
| Advantages | Description |
|---|---|
| Efficient Storage | Databases store data in an organized way, making it easy to manage large volumes of information. |
| Quick Retrieval | You can quickly find and retrieve specific data using SQL queries. |
| Data Integrity | Databases ensure data accuracy and consistency through constraints and relationships. |
| Scalability | Databases can handle growing amounts of data and users efficiently. |
| Security | Databases provide robust security features to protect sensitive data. |
Disadvantages
While databases offer many advantages, there are also some drawbacks to consider. The table below outlines these disadvantages:
| Disadvantages | Description |
|---|---|
| Complex Setup | Setting up and configuring a database can be complex and time-consuming. |
| Maintenance | Databases require regular maintenance and updates to function optimally. |
| Resource Intensive | Databases can consume significant server resources, impacting performance. |
| Backup and Recovery | Proper backup and recovery processes are necessary to prevent data loss. |
| Cost | Licensing and operational costs for databases can be high, especially for large-scale deployments. |
Permissions required
To create a database on a server, a user must have the CREATE privilege. This privilege allows the user to create new databases and tables within those databases.
Using SQL Commands with a database
Create a database
You use the CREATE DATABASE command to create a new database in the server. This command tells the server to create a new database with the specified name. For example, to create a database named my_database, you execute the following command:
CREATE DATABASE my_database;
This command creates a new, empty database called my_database. You can then start adding tables and data to this database.
Select a database
After creating a database, you need to select it to start working with it. Use the USE command to specify which database you want to use for your SQL statements. For example, to select the my_database database, you execute the following command:
USE my_database;
This command tells the server to use my_database for all subsequent SQL commands. Now, any SQL operations you perform will apply to my_database.
Database management
Introduction to database tables
A database table is a collection of data organized into rows and columns. Each table consists of records (rows) and fields (columns). Tables help organize and manage data efficiently.
Advantages
| Advantages | Description |
|---|---|
| Organized Data | Tables allow you to organize data into rows and columns, making it easy to understand and manage. |
| Efficient Queries | You can use SQL queries to quickly search, filter, and retrieve data from tables. |
| Data Integrity | Tables support constraints like primary keys and foreign keys, ensuring data integrity and consistency. |
| Scalability | You can add or modify tables as your data grows, making it easy to scale your database. |
| Relational Management | Tables allow you to create relationships between different sets of data, making it easier to manage complex datasets. |
Disadvantages
| Disadvantages | Description |
|---|---|
| Complexity | Designing and maintaining tables, especially with relationships, can become complex and time-consuming. |
| Performance Issues | Large tables with many rows can lead to performance issues, requiring optimization and indexing. |
| Storage Overhead | Tables with many columns or large data types can consume significant storage space. |
| Maintenance | Regular maintenance tasks, such as backups and indexing, are necessary to ensure optimal performance and data integrity. |
| Learning Curve | Beginners may find it challenging to learn SQL and understand how to design and manage tables effectively. |
Permissions required
To create a table in a database, you need appropriate permissions granted to your database user account. These permissions are typically managed by the database administrator (DBA) or system administrator. Database permissions control what actions a user can perform on a database. In the context of creating a table, the user needs specific permissions related to database management.
| Permission | Description |
|---|---|
| CREATE TABLE | The most fundamental permission required to create a table is the CREATE TABLE permission. This permission allows the user to create new tables within the database. |
| CREATE | In addition to CREATE TABLE, the user might also need the more general CREATE permission. This permission grants the ability to create other database objects besides tables, such as indexes, views, or stored procedures. |
| ALTER | Depending on the database configuration, the user might also need the ALTER permission. This permission allows the user to modify the structure of existing tables, such as adding or removing columns. |
Create a table
To create a table, use the CREATE TABLE command. Follow it with the table name and define the columns and their data types. For example, to create a table named customers with columns for id, name, and city, use this command:
CREATE TABLE customers (
id INT AUTO_INCREMENT PRIMARY KEY,
name VARCHAR(100),
city VARCHAR(100)
);
Database management
Create a table
Creating a table is essential to organizing and storing your data effectively when working with a database. Here’s a step-by-step guide on how to create a table in such a database:
Permissions Required
To create a table in a database, you need appropriate permissions. Typically, you’ll need the CREATE TABLE privilege, which allows you to create new tables within a database. This privilege is usually granted to database users by database administrators or through predefined user roles. If you do not have the necessary permissions, you’ll need to contact your database administrator to grant them.
Define the table structure
Now, define the structure of your table by specifying its columns along with their data types and any additional properties. Each column represents a different attribute of your data.
Here’s the syntax for creating a table:
CREATE TABLE table_name (
column1_name data_type constraints,
column2_name data_type constraints,
...
);
Replace table_name with the desired name for your table. For each column, provide a name, data type, and constraints such as NOT NULL, PRIMARY KEY, AUTO_INCREMENT.
Create the table
Execute the CREATE TABLE command to create the table in the database. For example, to create a table named employees with columns for id, name, and salary, you would run the following SQL command:
CREATE TABLE employees (
id INT PRIMARY KEY AUTO_INCREMENT,
name VARCHAR(50) NOT NULL,
salary DECIMAL(10, 2)
);
This command creates a table named employees with three columns: id, name, and salary. The id column is an integer type and serves as the primary key with auto-increment functionality. The name column is a variable-length string, and the salary column is a decimal number with a precision of 10 digits and a scale of 2.
Verify Table Creation
After executing the CREATE TABLE command, verify that the table has been successfully created. You can use various SQL commands such as SHOW TABLES or DESCRIBE table_name to check the existence and structure of the newly created table.
SHOW TABLES;
DESCRIBE employees;
Database management
Modify a table
The ALTER TABLE command acts like a toolkit that allows you to change the structure of existing tables. You can add new sections (columns), remove old ones, or change how information is stored (data types). This command helps you adapt your database to new needs or improve efficiency.
Things to Watch Out For
-
Data loss: Be careful when modifying tables! Deleting a section (column) or changing its format might erase existing data in that section.
-
Slowdowns: Altering large tables or making complex changes can slow down the database, especially during busy times. It might take longer for things to work while the changes are applied.
-
Locks: MySQL might temporarily lock the tables you’re working on when making changes. This operation means other users can’t access or modify that data until the changes are complete, which can cause delays for others.
Modify table example
After a table has been created, you may need to modify its structure or properties. Percona Server for MySQL provides the ALTER TABLE command for making such modifications. You can add, modify, or drop columns, change data types, add constraints, and more using this command.
The following is an example using an ALTER TABLE command:
ALTER TABLE users
ADD COLUMN age INT,
MODIFY COLUMN city VARCHAR(100),
DROP COLUMN username;
Database management
Isolation levels
In databases, isolation levels define how transactions interact with each other and the data they access. They determine the level of concurrency and consistency in a multi-user database environment.
In MySQL, there are four isolation levels available, each offering different trade-offs between concurrency and consistency:
Each isolation level offers a different balance between concurrency and consistency, and the choice depends on the application’s specific requirements. By selecting the appropriate isolation level, developers can ensure their MySQL database applications’ desired data integrity and performance level.
Read Uncommitted
In the Read Uncommitted isolation level, transactions can read data that has been modified by other transactions but not yet committed. This level allows for the highest concurrency but can lead to dirty reads.
SET TRANSACTION ISOLATION LEVEL READ UNCOMMITTED;
-- Perform a SELECT query to read uncommitted data
SELECT * FROM table_name;
Read Committed
In Read Committed isolation level, transactions can only read data that has been committed by other transactions. This level prevents dirty reads but allows for non-repeatable reads and phantom reads.
SET TRANSACTION ISOLATION LEVEL READ COMMITTED;
-- Perform a SELECT query to read committed data
SELECT * FROM table_name;
Repeatable Read
In Repeatable Read isolation level, transactions can only read data that has been committed by other transactions at the start of the transaction. This level prevents dirty reads and non-repeatable reads but allows for phantom reads.
SET TRANSACTION ISOLATION LEVEL REPEATABLE READ;
-- Perform a SELECT query to read data consistently within the transaction
SELECT * FROM table_name;
Serializable
In Serializable isolation level, transactions are executed serially, preventing any concurrent access to the data. This level provides the highest level of isolation but can lead to reduced concurrency and potential deadlock situations.
SET TRANSACTION ISOLATION LEVEL SERIALIZABLE;
-- Perform a SELECT query within a serializable transaction
SELECT * FROM table_name;
These examples demonstrate how to set and use different isolation levels in SQL transactions, each providing consistency and concurrency control.
Database management
Transaction management
A database transaction is a unit of work performed within a database management system (DBMS) that must be executed atomically and consistently. A transaction represents a series of operations (such as queries, inserts, updates, or deletes) that are treated as a single, indivisible unit. Transactions ensure data integrity by guaranteeing that all of the transaction’s operations are completed successfully and permanently saved to the database (committed) or none of them are applied (rolled back).
Percona Server for MySQL provides features for managing transactions to ensure the consistency and reliability of data.Transactions in Percona Server for MySQL are typically managed using the following commands and techniques:
-
START TRANSACTION: This command begins a new transaction. Once started, all subsequent SQL statements will be part of the transaction until it is either committed or rolled back.
-
COMMIT: The COMMIT command is used to save the changes made during the transaction to the database permanently. Once committed, the changes become visible to other transactions.
-
ROLLBACK: The ROLLBACK command is used to undo the changes made during the transaction and restore the database to its state before the transaction begins. It cancels any modifications made within the transaction.
-
SAVEPOINT: SAVEPOINTs are markers within a transaction that allow you to set points to which you can later roll back. They provide a way to partially undo changes within a transaction without rolling back the entire transaction.
Transactions in Percona Server for MySQL are ACID-compliant, meaning they adhere to the principles of Atomicity, Consistency, Isolation, and Durability:
| Type | Description |
|---|---|
| Atomicity | Transactions are atomic, meaning that all the operations within a transaction are treated as a single unit of work. Either all operations are completed successfully, or none of them are applied. |
| Consistency | Transactions ensure that the database remains in a consistent state before and after the transaction. Constraints, triggers, and other rules are enforced to maintain data integrity. |
| Isolation | Transactions are isolated from each other, meaning that the changes made within one transaction are not visible to other transactions until the transaction is committed. |
| Durability | Once a transaction is committed, the changes made to the database are permanent and cannot be lost, even in the event of system failure. |
Percona Server for MySQL supports different transaction isolation levels, such as READ UNCOMMITTED, READ COMMITTED, REPEATABLE READ, and SERIALIZABLE, which control how transactions interact with each other and with the data in the database.
Database management
Views
A view is a virtual table generated from a SQL query. It allows users to simplify complex queries, hide sensitive data, and provide a customized view of the database without altering the underlying schema.
Advantages of Using Views
| Benefits | Description |
|---|---|
| Simplification | Views simplify complex queries by encapsulating them into a single, reusable object. They provide a convenient way to abstract and hide the complexity of underlying tables. |
| Security | Views can enhance security by restricting access to sensitive data. Users can be granted access to views containing only the necessary columns, without direct access to the tables. |
| Customization | Views enable users to create customized perspectives of the data, presenting only the relevant information needed for specific tasks or reports. |
| Performance | Views can improve query performance by pre-computing and caching results, reducing the need to repeatedly execute complex queries. |
Disadvantages of Using Views
| Disadvantages | Description |
|---|---|
| Complexity | Views can introduce complexity to the database schema and query execution plan, making it harder to optimize and troubleshoot performance issues. |
| Overhead | Views may incur overhead in terms of storage and processing resources, particularly for materialized views or views involving joins and aggregation functions. |
| Maintenance | Views require maintenance to keep them synchronized with the underlying tables. Changes to the base tables may impact the results returned by the view. |
| Limited Use | Views have limitations in terms of updateability and support for certain SQL operations, such as ordering or grouping by columns not present in the underlying tables. |
Create view
CREATE VIEW customer_orders AS
SELECT customers.name, orders.order_id, orders.total_amount
FROM customers
JOIN orders ON customers.customer_id = orders.customer_id;
CREATE VIEW recent_orders AS
SELECT *
FROM orders
WHERE order_date >= CURDATE() - INTERVAL 30 DAY;
Drop view
DROP VIEW IF EXISTS customer_orders;
DROP VIEW IF EXISTS recent_orders;
Database management
Authentication methods
An authentication method is a way to verify the identity of a user trying to access the database. It defines how the server checks if the credentials provided are correct and whether the user can connect.
Version changes
MySQL 8.4 disables the deprecated mysql_native_password authentication plugin by default.
To use this plugin, you must explicitly enable it. You can do this in two ways:
-
Add the new
--mysql-native-password=ONoption when starting the MySQL server. -
Edit your MySQL configuration file. In the
[mysqld]section, add the linemysql_native_password=ON.
Either of these ways let you continue using the authentication method if needed, but we encourage the adoption of more secure authentication methods.
Common Authentication Methods
| Method | Description |
|---|---|
| Caching SHA-2 Pluggable Authentication | Uses SHA-256 for password hashing. MySQL hashes the user’s password and compares it to the stored hash. It caches authentication data for better performance. Suitable for modern setups with strong security and performance. However, it may not work with older MySQL clients. |
| MySQL Native Authentication | An older method that uses SHA-1 for password hashing. It offers wide compatibility, making it useful for legacy systems or applications that don’t support newer methods. However, it has reduced security and is best avoided unless necessary for compatibility. |
| PAM Pluggable Authentication | Integrates MySQL with Linux’s Pluggable Authentication Modules (PAM). MySQL relies on the operating system for authentication, allowing for various authentication mechanisms. Useful in environments needing centralized authentication management, but setup can be complex. |
| LDAP Authentication | MySQL connects to an LDAP server to authenticate users. Ideal for managing large, distributed systems, enabling centralized user management, and integrating with existing directory services. The main drawback is the added complexity of maintaining an LDAP server. |
| Kerberos Authentication | Uses the Kerberos protocol for authentication. Provides strong security and single sign-on across multiple services. Common in enterprise environments but requires a complex Kerberos infrastructure. |
| FIDO Pluggable Authentication | Supports FIDO (Fast IDentity Online) authentication devices. Used in high-security environments for robust two-factor authentication. Requires special hardware like security keys and may face user resistance. |
| Auth Socket Authentication | Uses the operating system’s socket-based authentication, matching the connecting user with the system user that owns the MySQL process. Ideal for local administrative access but limited to local machine use and not suitable for remote or multi-user environments. |
Review effective privileges with SHOW EFFECTIVE GRANTS
In MySQL, SHOW GRANTS has the following limitations:
-
Shows only explicitly granted privileges
-
Does not show inherited anonymous user privileges
-
Does not show privileges inherited through roles unless the USING clause is specified
Other privileges might be available to the account but are not displayed. For example:
-- Create named and anonymous users
CREATE USER 'user1'@'localhost';
CREATE USER ''@'localhost';
-- Grant privilege to anonymous user
GRANT SELECT ON db.* TO ''@'localhost';
-- Check user1's grants
SHOW GRANTS FOR 'user1'@'localhost';
Expected output
GRANT USAGE ON *.* TO 'user1'@'localhost'
Even though ‘user1’@’localhost’ can use SELECT on db.*, this privilege does not appear in SHOW GRANTS.
Percona Server for MySQL’s SHOW EFFECTIVE GRANTS command provides a comprehensive view of a user’s permissions. It reveals not only the privileges directly granted to the user but also those inherited from other accounts, such as anonymous users or roles. This includes system-level, database-level, and table-level privileges, giving you a complete picture of the user’s access rights within the database.
The benefits are:
-
Shows complete privilege picture
-
Helps identify privilege sources
-
Simplifies security audits
-
Makes troubleshooting easier
-
Reveals inherited privileges
Example
If we create the following users:
CREATE USER grantee@localhost IDENTIFIED BY 'grantee1';
Expected output
Query OK, 0 rows affected (0.50 sec)
CREATE USER grantee IDENTIFIED BY 'grantee2';
Expected output
Query OK, 0 rows affected (0.09 sec)
CREATE DATABASE db2;
Expected output
Query OK, 1 row affected (0.20 sec)
GRANT ALL PRIVILEGES ON db2.* TO grantee WITH GRANT OPTION;
Expected output
Query OK, 0 rows affected (0.12 sec)
SHOW EFFECTIVE GRANTSoutput before the change:
SHOW EFFECTIVE GRANTS;
Expected output
+----------------------------------------------------------------------------------------------------------------+
| Grants for grantee@localhost |
+----------------------------------------------------------------------------------------------------------------+
| GRANT USAGE ON *.* TO 'grantee'@'localhost' IDENTIFIED BY PASSWORD '*9823FF338D44DAF02422CF24DD1F879FB4F6B232' |
+----------------------------------------------------------------------------------------------------------------+
1 row in set (0.04 sec)
Although the grant for the db2 database isn’t shown, grantee user has enough privileges to create the table in that database:
user@trusty:~mysql -ugrantee -pgrantee1 -h localhost
CREATE TABLE db2.t1(a int);
Expected output
Query OK, 0 rows affected (1.21 sec)
- The output of
SHOW EFFECTIVE GRANTSafter the change shows all the privileges for thegranteeuser:
SHOW EFFECTIVE GRANTS;
Expected output
+-------------------------------------------------------------------+
| Grants for grantee@localhost |
+-------------------------------------------------------------------+
| GRANT USAGE ON *.* TO 'grantee'@'localhost' IDENTIFIED BY PASSWORD|
| '*9823FF338D44DAF02422CF24DD1F879FB4F6B232' |
| GRANT ALL PRIVILEGES ON `db2`.* TO 'grantee'@'%' WITH GRANT OPTION|
+-------------------------------------------------------------------+
2 rows in set (0.00 sec)
Restrict dynamic log file locations
The secure_log_path system variable plays a crucial role in enhancing the security and organization of log files within a MySQL database environment by restricting where dynamic log files can be stored.
In a MySQL environment, restricting dynamic log locations offers several benefits:
| Benefit | Details |
|---|---|
| Enhanced security | It prevents unauthorized modification of log files, protecting sensitive information and audit trails. |
| Improved compliance | It helps meet regulatory requirements for data security and auditability. |
| Simplified administration | It centralizes log files, making them easier to manage and monitor. |
| Increased reliability | It reduces the risk of accidental log file deletion or corruption. |
The disadvantages could be:
-
Reduced flexibility: Cannot change the log file locations easily
-
Increased complexity: Adds an extra layer of configuration and management
-
Performance impact: Writing to log files on slower storage media may increase overhead and potentially affect the overall performance of the MySQL server.
The benefits of restricting dynamic log locations in MySQL outweigh the disadvantages, especially in security-conscious environments.
secure_log_path
| Variable Name | Description |
|---|---|
| Command-line | –secure-log-path |
| Dynamic | No |
| Scope | Global |
| Data type | String |
| Default | empty string |
The secure_log_path variable controls where specific log files are stored. This variable expects a directory name as a string value. By default, the value is an empty string, allowing older applications to continue functioning without requiring a secure log path.
This variable affects the following options:
| Option | Description |
|---|---|
slow_query_log=ON |
Enables the storage of the slow query log file. |
slow_query_log_file |
Sets the name and location of the slow query log file. |
general_log=ON |
Enables the storage of the general log file. |
general_log_file |
Sets the name and location of the general log file. |
buffered_error_log_filename |
Sets the name and location of the buffered error log file. |
buffered-error-log-size |
Specifies the size of the buffer for error logging in bytes. |
The secure_log_path variable is read-only and must be set up in a configuration file or the command line.
| Value | Description |
|---|---|
| Empty string | The variable only adds a warning to the error log and does nothing. The log files are located in the default directory, /var/lib/mysql. |
| Directory name | If the value contains a directory name, then the slow query log and the general log must be located in that directory. An attempt to move either of these files outside of the specified directory results in an error. |
By establishing a controlled logging environment through the secure_log_path variable, MySQL administrators can significantly enhance both the security and manageability of their logs, reducing risks associated with unauthorized access and data integrity.
The example of the secure_log_path variable usage
Run the following commands as root:
-
Create the direcory to store the log files.
mkdir /var/lib/mysqld-logs -
Enable the following options and set them up with the created directory in /etc/my.cnf configuration file.
[mysqld] secure_log_path=/var/lib/mysqld-logs general-log=ON general-log-file=/var/lib/mysqld-logs/general_log slow-query-log=ON slow-query-log-file=/var/lib/mysqld-logs/slow_log buffered-error-log-size=1000 buffered-error-log-filename=/var/lib/mysqld-logs/buffered_log -
Change the owner and group of the
/var/lib/mysqld-logsdirectory and all its subdirectories and files tomysql.chown -R mysql:mysql /var/lib/mysqld-logs -
Restart the MySQL server.
systemctl restart mysql -
Check that the slow query log and the general log are enabled for the MySQL server.
mysql -e "select @@slow_query_log, @@general_log, @@secure_log_path"Expected output
+------------------+---------------+-----------------------+ | @@slow_query_log | @@general_log | @@secure_log_path | +------------------+---------------+-----------------------+ | 1 | 1 | /var/lib/mysqld-logs/ | +------------------+---------------+-----------------------+ -
Check that the slow query log and the general log are stored in the
/var/lib/mysqld-logsdirectory. As root (or a user with read access to the directory), run:cd /var/lib/mysqld-logs/ ls -lrthExpected output
-rw-r-----. 1 mysql mysqld-logs 240 Aug 18 11:56 localhost-slow.log -rw-r-----. 1 mysql mysqld-logs 565 Aug 18 11:56 localhost.log
MySQL Clone plugin
The MySQL Clone plugin lets you clone data from either a local server or from a remote server. The plugin creates a physical snapshot of the data stored in InnoDB, which includes schemas, tables, tablespaces, and data dictionary metadata. The cloned data is a functional data directory and can be used for provisioning a server .
The following table lists the cloning operation types:
| Cloning operation type | Description |
|---|---|
| Local | Clones the data from the server where the operation is initiated to either a directory on the same server or a server node. |
| Remote | Clones the data from the donor to the joiner over the network. |
When replicating a large number of transactions, the Clone plugin may be a more efficient solution.
Install the Clone plugin
The Clone plugin must be installed on both the donor and the joiner servers at either server startup or at runtime. To install the plugin at runtime, run the following command:
INSTALL PLUGIN clone SONAME 'mysql_clone.so';
Review the INFORMATION_SCHEMA.PLUGINS table or run the SHOW PLUGINS command to verify the installation. The following is an example of querying the PLUGINS table.
SELECT PLUGIN_NAME, PLUGIN_STATUS FROM INFORMATION_SCHEMA.PLUGINS WHERE PLUGIN_NAME='clone';
The result lists the Clone plugin and the status.
Clone data
The SQL statement used to clone data depends on if the operation is local or remote. The following code is an example of cloning data from a remote server:
CLONE INSTANCE FROM `root@remote.server:13336` IDENTIFIED BY `user`;
Replace the user name, host name, and port number with the settings from the donor server.
Limitations
The MySQL 8.4 clone plugin enforces several functional and scope limitations that define which instances administrators clone and which data or metadata a clone operation includes.
Version and instance limits
-
The clone plugin only supports cloning within the same MySQL server series, so administrators clone between patch releases such as 8.4.1 and 8.4.13, but not between different major series such as 8.0 and 8.4.
-
Each clone operation targets only one MySQL instance, and a single operation never clones multiple instances at once.
Network and protocol restrictions
-
The clone plugin uses the classic MySQL protocol, so the X Protocol port defined by
mysqlx_portdoes not serve as the donor port in remote cloning operations withCLONE INSTANCE. -
The donor MySQL server instance does not accept clone connections that pass through MySQL Router, so administrators connect directly to the donor.
Configuration and logs excluded
-
The clone plugin preserves the configuration of the recipient server instance, so a clone operation does not copy the donor server configuration or persisted system variable settings.
-
The plugin does not copy binary logs, so the recipient does not receive the donor’s binary log files as part of the clone .
Storage engine behavior
-
The clone plugin copies only data stored in the InnoDB storage engine and excludes data that other storage engines store.
-
The plugin creates
MyISAMandCSVtables on the recipient as empty tables, even when those tables reside in special schemas such as thesysschema .
Local cloning and tablespaces
- During local cloning, the clone plugin does not support general tablespaces that use an absolute path, because cloning those tablespaces would create a conflicting file that uses the same absolute path on the destination host.
Manage components
INSTALL COMPONENT
The INSTALL COMPONENT does the following:
- Installs the component
- Activates the component
If an error, such as a misspelled component name, occurs, the statement fails and nothing happens.
You can install multiple components at the same time.
Example
The following is an example of the INSTALL COMPONENT statement.
INSTALL COMPONENT 'file://componentA';
UNINSTALL COMPONENT
The UNINSTALL COMPONENT does the following:
- Deactivates the component
- Uninstalls the component
If the statement does not undo any persisted variables.
If an error, such as a misspelled component name, occurs, the statement fails and nothing happens.
You can uninstall multiple components at the same time.
Required privilege
The statement requires the DELETE privilege for the mysql.component system table. Executing the statement removes the registration row from this table.
Example
The following is an example of the UNINSTALL COMPONENT statement.
mysql > UNINSTALL COMPONENT 'file://componentA' ;
Find more information in the UNINSTALL COMPONENT document.
Back up and restore
Backup and restore overview
Backups are data snapshots that are taken at a specific time and are stored in a common location in a common format. A backup is only useful for a defined time.
The following scenarios require a backup to recover:
| Reason | Description |
|---|---|
| Hardware or host failure | Issues with disks, such as stalls or broken disks. With cloud services, the instance can be unaccessible or broken. |
| Corrupted data | This issue can be caused by power outages, the database failed to write correctly and close the file. |
| User mistake | Deleting data or an update overwriting good data with bad data |
| Natural disaster or data center failure | Power outage, flooding, or internet issues |
| Compliance | Required to comply with regulations and standards |
Strategies
Define a backup and restore strategy for each of your databases. The strategies should have the following practices:
| Practice | Description |
|---|---|
| Retention | How long should you keep the backups. This decision should be based on the organization’s data governance policies and the expense of storing the backups. The schedule for backups should match the retention schedule. |
| Document | Document the strategy and any related policies. The documents should include information about the process and any tools used during backup or restore. |
| Encrypt | Encrypt the backup and secure the storage locations |
| Test | Test the backups on a timely basis. |
The backup strategy defines type and the backup frequency, the hardware required, how the backups are verified, and storing the backups, which also includes the backup security. The strategy uses the following metrics:
| Metric | Description |
|---|---|
| Recovery Time Objective (RTO) | How long can the system be down? |
| Recovery Point Objective (RPO) | How much data can the organization lose? |
The restore strategy defines which user account has the restore responsibility and how and frequency of testing the restore process.
These strategies require planning, implementation, and rigorous testing. You must test your restore process with each type of backup used to validate the backup and measure the recovery time. Automate this testing as much as possible. You should also document the process. In case of disaster, you can follow the procedures in the document without wasting time.
If you are using replication, consider using a dedicated replica for backups because the operation can cause a high CPU load.
Physical backup or logical backup
A backup can be either a physical backup or a logical backup.
Physical backups
A physical backup copies the files needed to store and recover the database. They can be data files, configuration files, logs, and other types of files. The physical database can be stored in the cloud, in offline storage, on disc, or tape.
Percona XtraBackup takes a physical backup. You can also use RDS/LVM Snapshots or the MySQL Enterprise Backup.
If the server is stopped or down, you can copy the datadir with the cp command or the rsync command.
Logical backups
A logical backup contains the structural details. This type of backup contains tables, views, procedures, and functions.
Tools like mysqldump ,
mydumper
mysqlpump , and
mysql shell take a logical backup.
Comparison
| Comparison | Physical backup | Logical backup |
|---|---|---|
| Content | The physical database files | The tables, users, procedures, and functions |
| Restore speed | Restore can be quick | Restore can be slower and does not include file information. |
| Storage | Can take more space | Based on what is selected, the backup can be smaller |
Backup locks
Percona Server for MySQL offers the LOCK TABLES FOR BACKUP statement as a
lightweight alternative to FLUSH TABLES WITH READ LOCK for both physical and
logical backups.
FLUSH TABLES WITH READ LOCK
The FLUSH TABLES WITH READ LOCK statement performs two main actions:
-
Flushes any changes to the tables currently in memory but have not yet been written to disk. This operation ensures that the data on the disk is up-to-date with the most recent changes.
-
Acquires a read lock on all tables. This means that other sessions can continue to read from the tables but cannot execute any write operations (like INSERT, UPDATE, or DELETE) until the lock is released. This action is beneficial when creating a consistent data snapshot for backup purposes.
Please note that FLUSH TABLES WITH READ LOCK applies to all databases unless you specify tables individually. Also, this statement causes an implicit commit.
The following command connects to the server and executes the FLUSH TABLES WITH READ LOCK statement. After running this command, no write operations can be performed until the lock is released.
mysql --user="user" --password="password" --host="host" --execute="FLUSH TABLES WITH READ LOCK"
LOCK TABLES FOR BACKUP
LOCK TABLES FOR BACKUP uses a new MDL lock type to block updates to
non-transactional tables and DDL statements for all tables. If there is an
active LOCK TABLES FOR BACKUP lock then all DDL statements and all updates
to MyISAM, CSV, MEMORY, ARCHIVE, and MyRocks tables will be blocked
in the Waiting for backup lock status, visible in PERFORMANCE_SCHEMA or
PROCESSLIST.
LOCK TABLES FOR BACKUP does not affect SELECT queries for all mentioned
storage engines. Against InnoDB, MyRocks, Blackhole and Federated tables,
the LOCK TABLES FOR BACKUP does not apply to the INSERT, REPLACE,
UPDATE, DELETE statements: Blackhole tables have no relevance
to backups and Federated tables are ignored by both logical and physical backup
tools.
Unlike FLUSH TABLES WITH READ LOCK, LOCK TABLES FOR BACKUP does not
flush tables, i.e. storage engines are not forced to close tables, and tables are
not expelled from the table cache. As a result, LOCK TABLES FOR BACKUP only
waits for conflicting statements to complete (i.e. DDL and updates to
non-transactional tables). It never waits for SELECTs, or UPDATEs to InnoDB or
MyRocks tables to complete, for example.
If an “unsafe” statement is executed in the same connection that is holding a
LOCK TABLES FOR BACKUP lock, the statement fails with the following error:
Expected output
ERROR 1880 (HY000): Can't execute the query because you have a conflicting backup lock
UNLOCK TABLES releases the lock acquired by LOCK TABLES FOR BACKUP.
The intended use case for Percona XtraBackup is:
LOCK TABLES FOR BACKUP
... copy .frm, MyISAM, CSV, etc. ...
UNLOCK TABLES
... get binlog coordinates ...
... wait for redo log copying to finish ...
Privileges
The LOCK TABLES FOR BACKUP requires the BACKUP_ADMIN
privilege.
Interaction with other global locks
The LOCK TABLES FOR BACKUP has no effect if the current connection already
owns a FLUSH TABLES WITH READ LOCK lock, as that lock is more restrictive. If FLUSH TABLES WITH READ LOCK is executed in a connection that has
acquired LOCK TABLES FOR BACKUP, FLUSH TABLES WITH READ LOCK fails with
an error.
If the server is operating in the read-only mode (for example, read_only set
to 1), statements that are unsafe for backups will be either blocked or fail
with an error, depending on whether they are executed in the same connection
that owns a LOCK TABLES FOR BACKUP lock or other connections.
MyISAM index and data buffering
MyISAM key buffering is normally write-through, i.e. by the time each update to a MyISAM table is completed, all index updates are written to disk. The only exception is the delayed key writing feature which is disabled by default.
When the global system variable delay_key_write is set to ALL,
key buffers for all MyISAM tables are not flushed between updates, so a
physical backup of those tables may result in broken MyISAM indexes. To
prevent this, LOCK TABLES FOR BACKUP will fail with an error if
delay_key_write is set to ALL. An attempt to set delay_key_write to ALL when there’s an active backup lock will also fail with an error.
Another option to involve delayed key writing is to create MyISAM tables with
the DELAY_KEY_WRITE option and set the delay_key_write variable to
ON (which is the default). In this case, LOCK TABLES FOR BACKUP will not
be able to prevent stale index files from appearing in the backup. Users are
encouraged to set delay_key_writes to OFF in the configuration
file, my.cnf, or repair MyISAM indexes after restoring from a physical
backup created with backup locks.
MyISAM may also cache data for bulk inserts, e.g. when executing multi-row
INSERTs or LOAD DATA statements. Those caches, however, are flushed between
statements, so do not affect physical backups as long as all statements
updating MyISAM tables are blocked.
The mysqldump Command
The mysqldump tool has also been extended with a new option,
lock-for-backup (disabled by default). When used together with the
--single-transaction option, the option makes mysqldump issue a
LOCK TABLES FOR BACKUP before starting the dump operation to prevent unsafe
statements that would normally result in an inconsistent backup.
When used without the --single-transaction option,
lock-for-backup is automatically converted to lock-all-tables.
The option lock-for-backup is mutually exclusive with lock-all-tables, i.e. specifying both on the command line will lead to an error.
If the backup locks feature is not supported by the target server, but
lock-for-backup is specified on the command line, mysqldump aborts with an error.
System Variables
have_backup_locks
| Option | Description |
|---|---|
| Command Line: | Yes |
| Config file | No |
| Scope: | Global |
| Dynamic: | No |
| Data type | Boolean |
| Default value | YES |
This is a server variable implemented to help other utilities decide what
locking strategy can be implemented for a server. When available, the backup
locks feature is supported by the server and the variable value is always
YES.
Status variables
Com_lock_tables_for_backup
| Option | Description |
|---|---|
| Scope: | Global/Session |
| Data type | Numeric |
This status variable indicates the number of times the corresponding statements have been executed.
Client command line parameter
lock-for-backup
| Option | Description |
|---|---|
| Command Line: | Yes |
| Scope: | Global |
| Dynamic: | No |
| Data type | String |
| Default value | Off |
When used together with the –-single-transaction option, the option
makes mysqldump issue LOCK TABLES FOR BACKUP before starting the dump
operation to prevent unsafe statements that would normally result in an
inconsistent backup.
Extended mysqldump
Backup locks support
When used together with the –single-transaction option, the
lock-for-backup option makes mysqldump issue LOCK
TABLES FOR BACKUP before starting the dump operation to prevent
unsafe statements that would normally result in an inconsistent
backup.
More information can be found in Backup Locks.
Compressed columns support
mysqldump supports the Compressed columns with dictionaries feature.
More information can be found in Compressed columns with dictionaries.
Taking backup by descending primary key order
–order-by-primary-desc tells mysqldump to take the backup by
descending primary key order (PRIMARY KEY DESC) which can be useful if
the storage engine is using the reverse order column for a primary key.
RocksDB support
mysqldump detects when MyRocks is installed and available.
If there is a session variable named
rocksdb_skip_fill_cache, mysqldump sets the variable to 1.
mysqldump automatically enables rocksdb_bulk_load if the the target server supports the variable.
Start transaction with consistent snapshot
Percona Server for MySQL has ported MariaDB enhancement for START TRANSACTION WITH CONSISTENT SNAPSHOTS feature to the group commit implementation. This enhancement makes binary log positions consistent with InnoDB transaction snapshots.
This feature obtains logical backups with correct positions without running a FLUSH TABLES WITH READ LOCK. Binary log position can be obtained by two newly implemented status variables: Binlog_snapshot_file and Binlog_snapshot_position. After starting a transaction using the START TRANSACTION WITH CONSISTENT SNAPSHOT, these two variables provide you with the binlog position that corresponds to the state of the database when the consistent snapshot is created and ignores which other transactions have been committed since the snapshot was created.
Snapshot cloning
The Percona Server for MySQL implementation extends the START TRANSACTION WITH CONSISTENT SNAPSHOT syntax with the optional FROM SESSION clause:
START TRANSACTION WITH CONSISTENT SNAPSHOT FROM SESSION <session_id>;
When specified, all participating storage engines and binary log instead of creating a new snapshot of data (or binary log coordinates), create a copy of the snapshot which has been created by an active transaction in the specified session. session_id is the session identifier reported in the Id column of SHOW PROCESSLIST.
Currently snapshot cloning is only supported by XtraDB and the binary log. As with the regular START TRANSACTION WITH CONSISTENT SNAPSHOT, snapshot clones can only be created with the REPEATABLE READ isolation level.
For XtraDB, a transaction with a cloned snapshot will only see data visible or changed by the donor transaction. That is, the cloned transaction will see no changes committed by transactions that started after the donor transaction, not even changes made by itself. Note that in case of chained cloning the donor transaction is the first one in the chain. For example, if transaction A is cloned into transaction B, which is in turn cloned into transaction C, the latter will have read view from transaction A (i.e., the donor transaction). Therefore, it will see changes made by transaction A, but not by transaction B.
mysqldump
mysqldump has been updated to use new status variables automatically when they are supported by the server and both –single-transaction and –source-data are specified on the command line. Along with the mysqldump improvements introduced in Backup Locks there is now a way to generate mysqldump backups that are guaranteed to be consistent without using FLUSH TABLES WITH READ LOCK even if --source-data is requested.
System variables
have_snapshot_cloning
| Option | Description |
|---|---|
| Command Line: | Yes |
| Config file | No |
| Scope: | Global |
| Dynamic: | No |
| Data type | Boolean |
This server variable is implemented to help other utilities detect if the server supports the FROM SESSION extension. When available, the snapshot cloning feature and the syntax extension to START TRANSACTION WITH CONSISTENT SNAPSHOT are supported by the server, and the variable value is always YES.
Status variables
Binlog_snapshot_file
| Option | Description |
|---|---|
| Scope: | Global |
| Data type | String |
Binlog_snapshot_position
| Option | Description |
|---|---|
| Scope: | Global |
| Data type | Numeric |
These status variables are only available when the binary log is enabled globally.
Secure
LDAP features
Using LDAP authentication plugins
LDAP (Lightweight Directory Access Protocol) provides an alternative method to access existing directory servers, which maintain information about individuals, groups, and organizations.
Percona Server for MySQL supports the simple LDAP authentication. The Percona simple LDAP authentication plugin is a free and Open Source implementation of the MySQL Enterprise Simple LDAP authentication plugin. Percona Server for MySQL also supports an SASL-based LDAP authentication plugin. This plugin only supports the SCRAM-SHA-1 SASL mechanism.
Plugin names and file names
The following tables show the plugin names and the file name for simple LDAP authentication and SASL-based LDAP authentication.
| Plugin or file | Plugin name or file name |
|---|---|
| Server-side plugin | authentication_ldap_simple |
| client-side plugin | mysql_clear_password |
| library file | authentication_ldap_simple.so |
| Plugin or file | Plugin name or file name |
|---|---|
| Server-side plugin | authentication_ldap_sasl |
| client-side plugin | authentication_ldap_sasl_client |
| library files | authentication_ldap_sasl.so authentication_ldap_sasl_client.so |
How does the authentication work
The server-side LDAP plugins work only with the specific client-side plugin:
-
The
authentication_ldap_simpleplugin, on the server, performs the simple LDAP authentication. The client, usingmysql_clear_password, connects to the server. The client plugin sends the password to the server as cleartext. For this method, use a secure connection between the client and server. -
The
authentication_ldap_saslplugin, on the server, performs the SASL-based LDAP authentication. The client must use theauthentication_ldap_sasl_clientplugin. The method does not send the password to the server in cleartext. The server-side and client-side plugins use Simple Authentication and Security Layer (SASL) to send secure messages within the LDAP protocol.
For either method, the database server rejects the connection if the client user name and the host name do not match a server account.
If a database server LDAP authentication is successful, the LDAP server searches for an entry. The LDAP server matches the user and authenticates using the LDAP password. If the database server account names the LDAP user distinguished name (DN), added by the IDENTIFIED WITH <plugin-name> BY '<auth-string>' clause, the LDAP server uses that value and the LDAP password provided by the client. This method fails if the DN and password have incorrect values
If the LDAP server finds multiple matches or no match, authentication fails.
If the password is correct, and the LDAP server finds a match, then LDAP authentication succeeds. The LDAP server returns the LDAP entry and the authentication plugin determines the authenticated user’s name based on the entry. If the LDAP entry has no group attribute, the plugin returns the client user name as the authenticated name. If the LDAP entry has a group attribute, the plugin returns the group value as the authenticated name.
The database server compares the client user name to the authenticated user name. If these names are the same, the database server uses the client user name to check for privileges. If the name differs, then the database server looks for an account that matches the authenticated name.
Prerequisites for authentication
The LDAP authentication plugins required the following:
-
An available LDAP server
-
The LDAP server must contain the LDAP user accounts to be authenticated
-
The OpenLDAP client library must be available on the same system as the plugin
The SASL-based LDAP authentication additionally requires the following:
-
Configure the LDAP server to communicate with a SASL server
-
Available SASL client library on the same system as the client plugin.
-
Services are configured to use the supported SCRAM-SHA-1 SASL mechanism
Install the plugins
You can use either of the following methods to install the plugins.
Load the plugins at server start
Use either of the following methods to load the plugin at server start.
Add the following statements to your my.cnf file to load simple LDAP authentication:
[mysqld]
plugin-load-add=authentication_ldap_simple.so
authentication_ldap_simple_server_host=127.0.0.1
authentication_ldap_simple_bind_base_dn='dc=percona, dc=com'
Restart the server for the changes to take effect.
Add the following statements to your my.cnf file to load the SASL-based LDAP authentication:
[mysqld]
plugin-load-add=authentication_ldap_sasl.so
authentication_ldap_sasl_server_host=127.0.0.1
authentication_ldap_sasl_bind_base_dn='dc=percona, dc=com'
Load the plugins at runtime
Install the plugin with the following statements.
INSTALL PLUGIN authentication_ldap_simple SONAME 'authentication_ldap_simple.so';
To set and persist values at runtime, use the following statements:
SET PERSIST authentication_ldap_simple_server_host='127.0.0.1';
SET PERSIST authentication_ldap_simple_bind_base_dn='dc=percona, dc=com';
INSTALL PLUGIN authentication_ldap_sasl SONAME 'authentication_ldap_sasl.so';
To set and persist values at runtime, use the following statements:
SET PERSIST authentication_ldap_sasl_server_host='127.0.0.1';
SET PERSIST authentication_ldap_sasl_bind_base_dn='dc=percona, dc=com';
Create a user using simple LDAP authentication
There are several methods to add or modify a user.
In the CREATE USER statement or the ALTER USER statement, for simple LDAP authentication, you can specify the authentication_ldap_simple plugin in the IDENTIFIED WITH clause:
CREATE USER ... IDENTIFIED WITH authentication_ldap_simple;
Using the IDENTIFIED WITH clause, the database server assigns the specified plugin.
If you provide the optional authentication string clause, ‘cn,ou,dc,dc’ in the example, the string is stored along with the password.
CREATE USER ... IDENTIFIED WITH authentication_ldap_simple BY 'cn=[user name],ou=[organization unit],dc=[domain component],dc=com'
Unless the authentication_ldap_simple_group_role_mapping variable is used, creating a user with an authentication string does not use the following system variables:
Creating the user with IDENTIFIED BY authentication_ldap_simple uses the variables.
Creating the user with the authentication_ldap_simple_group_role_mapping variable also adds the authentication_ldap_simple_bind_root_dn and authentication_ldap_simple_bind_root_pwd variables.
Create a user using SASL-based LDAP authentication
There are several methods to add or modify a user.
For SASL-based LDAP authentication, in the CREATE USER statement or the ALTER USER statement, you can specify the authentication_ldap_sasl plugin:
CREATE USER ... IDENTIFIED WITH authentication_ldap_sasl;
If you provide the optional authentication string clause, ‘cn,ou,dc,dc’ in the example, the string is stored along with the password.
CREATE USER ... IDENTIFIED WITH authentication_ldap_sasl BY 'cn=[user name],ou=[organization unit],dc=[domain component],dc=com'
Unless the authentication_ldap_sasl_group_role_mapping variable is used, creating a user with an authentication string does not use the following system variables:
Creating the user with IDENTIFIED BY authentication_ldap_sasl uses the variables.
Creating the user with the authentication_ldap_sasl_group_role_mapping variable also adds theauthentication_ldap_sasl_bind_root_dn and authentication_ldap_sasl_bind_root_pwd variables.
Examples
The following sections are examples of using simple LDAP authentication and SASL-based LDAP authentication.
For the purposes of this example, we use the following LDAP user:
uid=ldapuser,ou=testusers,dc=percona,dc=com
The following example configures an LDAP user and connects to the database server.
Create a database server account for ldapuser with the following statement:
CREATE USER 'ldapuser'@'localhost' IDENTIFIED WITH authentication_ldap_simple BY 'uid=ldapuser,ou=testusers,dc=percona,dc=com';
The authentication string does not include the LDAP password. This password must be provided by the client user when they connect.
mysql --user=ldapuser --password --enable-cleartext-plugin
The user enters the ldapuser password. The client sends the password as cleartext, which is necessary when using a server-side LDAP library without SASL. The following actions may minimize the risk:
- Require that the database server clients explicitly enable the
mysql_clear_passwordplugin with--enable-cleartext-plugin. - Require that the database server clients connect to the database server using an encrypted connection
The following example configures an LDAP user and connect to the database server.
Create a database server account for ldapuser with the following statement:
CREATE USER 'ldapuser'@'localhost' IDENTIFIED WITH authentication_ldap_sasl AS 'uid=ldapuser,ou=testusers,dc=percona,dc=com';
The authentication string does not include the LDAP password. This password must be provided by the client user when they connect.
Clients connect ot the database server by providing the database server user name and LDAP password:
mysql --user=ldapuser --password
The authentication is similar to the authentication method used by simple LDAP authentication, except that the client and the database server SASL LDAP plugins use SASL messages. These messages are secure within the LDAP protocol.
Uninstall the plugins
If you installed either plugin at server startup, remove those options from the my.cnf file, remove any startup options that set LDAP system variables, and restart the server.
If you installed the plugins at runtime, run the following statements:
UNINSTALL PLUGIN authentication_ldap_simple;
If you used SET_PERSIST, use RESET PERSIST to remove the settings.
If you installed the plugins at runtime, run the following statements:
UNINSTALL PLUGIN authentication_ldap_sasl;
If you used SET_PERSIST, use RESET PERSIST to remove the settings.
LDAP authentication plugin system variables
Authentication system variables
The installation adds the following variables:
| Variable name | Description |
|---|---|
| authentication_ldap_sasl_bind_base_dn | Base distinguished name |
| authentication_ldap_sasl_bind_root_dn | Root distinguished name |
| authentication_ldap_sasl_bind_root_dn_pwd | Password for the root distinguished name |
| authentication_ldap_sasl_ca_path | Absolute path of the certificate authority |
| authentication_ldap_sasl_fallback_server_host | If the primary server is unavailable, the authentication plugin attempts to connect to the fallback server |
| authentication_ldap_sasl_fallback_server_port | The port number for the fallback server |
| authentication_ldap_sasl_group_role_mapping | A list of LDAP group names - MySQL role pairs |
| authentication_ldap_sasl_group_search_attr | Name of the attribute that specifies the group names in the LDAP directory entries |
| authentication_ldap_sasl_group_search_filter | Custom group search filter |
| authentication_ldap_sasl_init_pool_size | Initial size of the connection pool to the LDAP server |
| authentication_ldap_sasl_log_status | logging level |
| authentication_ldap_sasl_max_pool_size | Maximum size of the pool of connections to the LDAP server |
| authentication_ldap_sasl_server_host | LDAP server host |
| authentication_ldap_sasl_server_port | LDAP server TCP/IP port number |
| authentication_ldap_sasl_ssl | If plugin connections to the LDAP server use the SSL protocol (ldaps://) |
| authentication_ldap_sasl_tls | If plugin connections to the LDAP server are secured with STARTTLS (ldap://) |
| authentication_ldap_sasl_user_search_attr | Name of the attribute that specifies user names in the LDAP directory entries |
| authentication_ldap_simple_bind_base_dn | Base distinguished name |
| authentication_ldap_simple_bind_root_dn | Root distinguished name |
| authentication_ldap_simple_bind_root_dn_pwd | Password for the root distinguished name |
| authentication_ldap_simple_ca_path | Absolute path of the certificate authority |
| authentication_ldap_simple_fallback_server_host | If the primary server is unavailable, the authentication plugin attempts to connect to the fallback server |
| authentication_ldap_simple_fallback_server_port | The port number for the fallback server |
| authentication_ldap_simple_group_role_mapping | A list of LDAP group names - MySQL role pairs |
| authentication_ldap_simple_group_search_attr | Name of the attribute that specifies the group names in the LDAP directory entries |
| authentication_ldap_simple_group_search_filter | Custom group search filter |
| authentication_ldap_simple_init_pool_size | Initial size of the connection pool to the LDAP server |
| authentication_ldap_simple_log_status | logging level |
| authentication_ldap_simple_max_pool_size | Maximum size of the pool of connections to the LDAP server |
| authentication_ldap_simple_server_host | LDAP server host |
| authentication_ldap_simple_server_port | LDAP server TCP/IP port number |
| authentication_ldap_simple_ssl | If plugin connections to the LDAP server use the SSL protocol (ldaps://) |
| authentication_ldap_simple_tls | If plugin connections to the LDAP server are secured with STARTTLS (ldap://) |
| authentication_ldap_simple_user_search_attr | Name of the attribute that specifies user names in the LDAP directory entries |
The following variables are described in detail:
authentication_ldap_sasl_bind_base_dn
| Option | Description |
|---|---|
| Command-line | –authentication-ldap-sasl-bind-base-dn=value |
| Scope | Global |
| Dynamic | Yes |
| Data type | String |
| Default | NULL |
The base distinguished name (DN) for SASL-based LDAP authentication. You can limit the search scope by using the variable as the base of the search.
authentication_ldap_sasl_bind_root_dn
| Option | Description |
|---|---|
| Command-line | –authentication-ldap-sasl-bind-root-dn=value |
| Scope | Global |
| Dynamic | Yes |
| Data type | String |
| Default | NULL |
The root distiguished name (DN) used to authenticate SASL-based LDAP. When performing a search, this variable is used with
authentication_ldap_sasl_bind_root_pwd as the authenticating credentials to the LDAP server.
authentication_ldap_sasl_bind_root_pwd
| Option | Description |
|---|---|
| Command-line | –authentication-ldap-sasl-bind-root-pwd=value |
| Scope | Global |
| Dynamic | Yes |
| Data type | String |
| Default | NULL |
The root password used to authenticate against SASL-based LDAP server. This variable is used with
authentication_ldap_sasl_bind_root_dn.
authentication_ldap_sasl_ca_path
| Option | Description |
|---|---|
| Command-line | –authentication-ldap-sasl-ca_path=value |
| Scope | Global |
| Dynamic | Yes |
| Data type | String |
| Default | NULL |
The certificate authority’s absolute path used to verify the LDAP certificate.
authentication_ldap_sasl_fallback_server_host
| Option | Description |
|---|---|
| Command-line | –authentication-ldap-sasl-fallback-server-host |
| Scope | Global |
| Dynamic | Yes |
| Type | Sting |
| Default | NULL |
Use with authentication_ldap_sasl_fallback_server_port.
If the primary server is unavailable, the authentication plugin attempts to connect to the fallback server and authenticate using that server.
authentication_ldap_sasl_fallback_server_port
| Option | Description |
|---|---|
| Command-line | –authentication-ldap-sasl-fallback-server-port |
| Scope | Global |
| Dynamic | Yes |
| Type | Integer |
| Default | NULL |
Use with authentication_ldap_sasl_fallback_server_host.
If the primary server is unavailable, the authentication plugin attempts to connect to the fallback server and authenticate using that server.
If the fallback server host has a value, and the fallback port is 0, users can specify multiple fallback servers.
Use this format to specify multiple fallback servers: authentication_ldap_sasl_fallback_server_host="ldap(s)://host:port,ldap(s)://host2:port2, for example.
authentication_ldap_sasl_group_role_mapping
| Option | Description |
|---|---|
| Command-line | –authentication-ldap-sasl-group-role-mapping=value |
| Scope | Global |
| Dynamic | Yes |
| Data type | String |
| Default | Null |
When an LDAP user logs in, the server checks if the LDAP user is a member of the specified group. If the user is, then the server automatically grants the database server roles to the user.
The variable has this format: <ldap_group>=<mysql_role>,<ldap_group2>=<mysql_role2>,.
authentication_ldap_sasl_group_search_attr
| Option | Description |
|---|---|
| Command-line | –authentication-ldap-sasl-group-search-attr=value |
| Scope | Global |
| Dynamic | Yes |
| Data type | String |
| Default | cn |
The attribute name that specifies group names in the LDAP directory entries for SASL-based LDAP authentication.
authentication_ldap_sasl_group_search_filter
| Option | Description |
|---|---|
| Command-line | –authentication-ldap-sasl-group-search-filter=value |
| Scope | Global |
| Dynamic | Yes |
| Data type | String |
| Default | (|(&(objectClass=posixGroup)(memberUid=%s))(&(objectClass=group)(member=%s))) |
The custom group search filter for SASL-based LDAP authentication.
authentication_ldap_sasl_init_pool_size
| Option | Description |
|---|---|
| Command-line | –authentication-ldap-sasl-init-pool-size=value |
| Scope | Global |
| Dynamic | Yes |
| Data type | Integer |
| Default | 10 |
| Minimum value | 0 |
| Maximum value | 32767 |
| Unit | connections |
The initial size of the connection pool to the LDAP server for SASL-based LDAP authentication.
authentication_ldap_sasl_log_status
| Option | Description |
|---|---|
| Command-line | –authentication-ldap-sasl-log-status=value |
| Scope | Global |
| Dynamic | Yes |
| Data type | Integer |
| Default | 1 |
| Minimum value | 1 |
| Maximum value | 6 |
The logging level for messages written to the error log for SASL-based LDAP authentication.
authentication_ldap_sasl_max_pool_size
| Option | Description |
|---|---|
| Command-line | –authentication-ldap-sasl-max-pool-size=value |
| Scope | Global |
| Dynamic | Yes |
| Data type | Integer |
| Default | 1000 |
| Minimum value | 0 |
| Maximum value | 32767 |
| Unit | connections |
The maximum connection pool size to the LDAP server in SASL-based LDAP authentication. The variable is used with authentication_ldap_sasl_init_pool_size.
authentication_ldap_sasl_server_host
| Option | Description |
|---|---|
| Command-line | –authentication-ldap-sasl-server-host=value |
| Scope | Global |
| Dynamic | Yes |
| Data type | String |
| Default | NULL |
The LDAP server host used for SASL-based LDAP authentication. The LDAP server host can be an IP address or a host name.
authentication_ldap_sasl_server_port
| Option | Description |
|---|---|
| Command-line | –authentication-ldap-sasl-server-port=value |
| Scope | Global |
| Dynamic | Yes |
| Data type | Integer |
| Default | 389 |
| Minimum value | 1 |
| Maximum value | 32376 |
The LDAP server TCP/IP port number used for SASL-based LDAP authentication.
authentication_ldap_sasl_ssl
| Option | Description |
|---|---|
| Command-line | –authentication-ldap-sasl-ssl=value |
| Scope | Global |
| Dynamic | Yes |
| Data type | Boolean |
| Default | OFF |
If this variable is enabled, the plugin connects to the server with SSL.
authentication_ldap_sasl_tls
| Option | Description |
|---|---|
| Command-line | –authentication-ldap-sasl-tls=value |
| Scope | Global |
| Dynamic | Yes |
| Data type | Boolean |
| Default | OFF |
If this variable is enabled, the plugin connects to the server with TLS.
authentication_ldap_sasl_user_search_attr
| Option | Description |
|---|---|
| Command-line | –authentication-ldap-sasl-user-search-attr=value |
| Scope | Global |
| Dynamic | Yes |
| Data type | String |
| Default | uid |
The attribute name that specifies the user names in LDAP directory entries in SASL-based LDAP authentication.
authentication_ldap_simple_bind_base_dn
| Option | Description |
|---|---|
| Command-line | –authentication-ldap-simple-bind-base-dn=value |
| Scope | Global |
| Dynamic | Yes |
| Data type | String |
| Default | NULL |
The base distinguished name (DN) for simple LDAP authentication. You can limit the search scope by using the variable as the base of the search.
authentication_ldap_simple_bind_root_dn
| Option | Description |
|---|---|
| Command-line | –authentication-ldap-simple-bind-root-dn=value |
| Scope | Global |
| Dynamic | Yes |
| Data type | String |
| Default | NULL |
The root distinguished name (DN) used to authenticate simple LDAP. When performing a search, this variable is used with
authentication_ldap_simple_bind_root_pwd as the authenticating credentials to the LDAP server.
authentication_ldap_simple_bind_root_pwd
| Option | Description |
|---|---|
| Command-line | –authentication-ldap-simple-bind-root-pwd=value |
| Scope | Global |
| Dynamic | Yes |
| Data type | String |
| Default | NULL |
The root password used to authenticate against simple LDAP server. This variable is used with
authentication_ldap_simple_bind_root_dn.
authentication_ldap_simple_ca_path
| Option | Description |
|---|---|
| Command-line | –authentication-ldap-simple-ca_path=value |
| Scope | Global |
| Dynamic | Yes |
| Data type | String |
| Default | NULL |
The certificate authority’s absolute path used to verify the LDAP certificate.
authentication_ldap_simple_fallback_server_host
| Option | Description |
|---|---|
| Command-line | –authentication-ldap-simple-fallback-server-host |
| Scope | Global |
| Dynamic | Yes |
| Type | Sting |
| Default | NULL |
Use with authentication_ldap_simple_fallback_server_port.
If the primary server is unavailable, the authentication plugin attempts to connect to the fallback server and authenticate using that server.
authentication_ldap_simple_fallback_server_port
| Option | Description |
|---|---|
| Command-line | –authentication-ldap-simple-fallback-server-port |
| Scope | Global |
| Dynamic | Yes |
| Type | Integer |
| Default | NULL |
Use with authentication_ldap_simple_fallback_server_host.
If the primary server is unavailable, the authentication plugin attempts to connect to the fallback server and authenticate using that server.
If the fallback server host has a value, and the fallback port is 0, users can specify multiple fallback servers.
Use this format to specify multiple fallback servers: authentication_ldap_simple_fallback_server_host="ldap(s)://host:port,ldap(s)://host2:port2, for example.
authentication_ldap_simple_group_role_mapping
| Option | Description |
|---|---|
| Command-line | –authentication-ldap-simple-group-role-mapping=value |
| Scope | Global |
| Dynamic | Yes |
| Data type | String |
| Default | Null |
When an LDAP user logs in, the server checks if the LDAP user is a member of the specified group. If the user is, then the server automatically grants the database server roles to the user.
The variable has this format: <ldap_group>=<mysql_role>,<ldap_group2>=<mysql_role2>,.
authentication_ldap_simple_group_search_attr
| Option | Description |
|---|---|
| Command-line | –authentication-ldap-simple-group-search-attr=value |
| Scope | Global |
| Dynamic | Yes |
| Data type | String |
| Default | cn |
The attribute name that specifies group names in the LDAP directory entries for simple LDAP authentication.
authentication_ldap_simple_group_search_filter
| Option | Description |
|---|---|
| Command-line | –authentication-ldap-simple-group-search-filter=value |
| Scope | Global |
| Dynamic | Yes |
| Data type | String |
| Default | (|(&(objectClass=posixGroup)(memberUid=%s))(&(objectClass=group)(member=%s))) |
The custom group search filter for simple LDAP authentication.
authentication_ldap_simple_init_pool_size
| Option | Description |
|---|---|
| Command-line | –authentication-ldap-simple-init-pool-size=value |
| Scope | Global |
| Dynamic | Yes |
| Data type | Integer |
| Default | 10 |
| Minimum value | 0 |
| Maximum value | 32767 |
| Unit | connections |
The initial size of the connection pool to the LDAP server for simple LDAP authentication.
authentication_ldap_simple_log_status
| Option | Description |
|---|---|
| Command-line | –authentication-ldap-simple-log-status=value |
| Scope | Global |
| Dynamic | Yes |
| Data type | Integer |
| Default | 1 |
| Minimum value | 1 |
| Maximum value | 6 |
The logging level for messages written to the error log for simple LDAP authentication.
authentication_ldap_simple_max_pool_size
| Option | Description |
|---|---|
| Command-line | –authentication-ldap-simple-max-pool-size=value |
| Scope | Global |
| Dynamic | Yes |
| Data type | Integer |
| Default | 1000 |
| Minimum value | 0 |
| Maximum value | 32767 |
| Unit | connections |
The maximum connection pool size to the LDAP server in simple LDAP authentication. The variable is used with authentication_ldap_simple_init_pool_size.
authentication_ldap_simple_server_host
| Option | Description |
|---|---|
| Command-line | –authentication-ldap-simple-server-host=value |
| Scope | Global |
| Dynamic | Yes |
| Data type | String |
| Default | NULL |
The LDAP server host used for simple LDAP authentication. The LDAP server host can be an IP address or a host name.
authentication_ldap_simple_server_port
| Option | Description |
|---|---|
| Command-line | –authentication-ldap-simple-server-port=value |
| Scope | Global |
| Dynamic | Yes |
| Data type | Integer |
| Default | 389 |
| Minimum value | 1 |
| Maximum value | 32376 |
The LDAP server TCP/IP port number used for simple LDAP authentication.
authentication_ldap_simple_ssl
| Option | Description |
|---|---|
| Command-line | –authentication-ldap-simple-ssl=value |
| Scope | Global |
| Dynamic | Yes |
| Data type | Boolean |
| Default | OFF |
If this variable is enabled, the plugin connects to the server with SSL.
authentication_ldap_simple_tls
| Option | Description |
|---|---|
| Command-line | –authentication-ldap-simple-tls=value |
| Scope | Global |
| Dynamic | Yes |
| Data type | Boolean |
| Default | OFF |
If this variable is enabled, the plugin connects to the server with TLS.
authentication_ldap_simple_user_search_attr
| Option | Description |
|---|---|
| Command-line | –authentication-ldap-simple-user-search-attr=value |
| Scope | Global |
| Dynamic | Yes |
| Data type | String |
| Default | uid |
The attribute name that specifies the user names in LDAP directory entries in simple LDAP authentication.
Data masking
Data masking overview
Data masking protects sensitive information by changing or replacing values so that readers see altered data instead of the originals. Use masking when you need to present, demonstrate, or test software without revealing real data. Masking keeps a similar data format, which reduces the risk of recovering originals.
Masking is a data transformation, not a substitute for access control. It works alongside MySQL privileges (RBAC—role-based access control). RBAC is MySQL’s privilege system: it determines which users and roles can read, write, or administer tables. Users who have permission to read the table see the unmasked result; the component does not by itself restrict access or prevent privilege escalation. You still need to grant only the minimum required privileges so that only authorized users can access the data at all. For small value domains (for example, gender or state codes), inference or frequency analysis may still reveal or narrow down originals. Treat masking as one layer of protection, not a guarantee of irreversibility.
Typical use cases:
| Use case | Description |
|---|---|
| Development and testing | Supply non-production environments with masked copies of sensitive fields (for example, payment card numbers, Social Security numbers, addresses) so applications can be validated without exposing real data. |
| Compliance (GDPR, HIPAA, CCPA, and similar) | Anonymize or pseudonymize personal data so that analysis and reporting can use the data while meeting regulatory requirements for protection of personal information. |
| Sharing data with third parties | Provide vendors or partners with datasets where sensitive columns are masked so that accurate personal details are not exposed. |
| Customer service and training | Give support or training staff access to data that looks realistic but does not contain real customer identifiers or PII. |
| Analysis and reporting on masked data | Run queries and reports on privacy-safe data. Generated values do not guarantee the same statistical distribution as originals; use for privacy-safe environments or design generation to preserve distributions where needed. |
Use masking as part of a broader data-protection and access-control strategy, not as the only safeguard.
The component offers two kinds of functions: those that mask existing values (for example, replace digits with a character) and those that generate replacement values (for example, random SSNs or emails). See Data masking component functions for the full catalog and to find a function by task.
Next steps: Install the data masking component, then follow the Data masking quickstart to create a test database and try masking. The quickstart covers required privileges and working examples.
Version updates
Percona Server for MySQL 8.4.4-4 adds an internal term cache that speeds up dictionary lookups. The cache affects gen_blocklist() and gen_dictionary(). Lookups are faster than querying the dictionary table each time, especially when processing many rows.
Memory use grows with the size of your dictionaries. For very large dictionaries, consider server memory and monitor resource use.
Cache and table can get out of sync if you change the dictionary table directly instead of using the management functions. Use the management functions to add or remove terms:
If the cache and table do get out of sync, call masking_dictionaries_flush() to resync them. The function returns 1 when successful.
Replication: Dictionary changes on the source are written to the binary log and applied to the replica’s table, but the replica’s term cache does not update immediately. During that lag, queries on the replica can see stale or inconsistent dictionary data. In sensitive or high-traffic setups, unmasked or incorrectly masked data may be visible until the cache is refreshed.
To reduce that risk, set the component_masking_functions.dictionaries_flush_interval_seconds variable to a positive value (for example, 60). A background process then refreshes the cache at that interval so replicas stay in sync. The default is 0 (no automatic refresh).
Limitations and security considerations
This component is a data-presentation tool, not a data-redaction tool. The component changes how data is shown in query results; the component does not redact stored data or enforce a full secure data lifecycle.
Referential integrity: The component does not enforce consistency across tables. The same logical identifier (for example, a customer ID) can be masked to different values in different tables. If you need consistent masked identities for joins or testing, use deterministic masking so the same input always maps to the same output (for example, gen_blocklist() with the same dictionaries, or a single mapping in application logic).
Access control: Masking in a SELECT only protects that query. Users with SELECT on the base table can bypass masking by querying the table directly. Restrict access to views or stored procedures that apply the masking functions.
Views are not a complete boundary. Users with SHOW CREATE VIEW can see underlying table and column names; users with FILE or other privileges may read data outside the SQL layer. Secure the rest of the stack separately. Do not grant UPDATE or INSERT to users who should only see masked data; writing masked values back into the database corrupts real data. Treat masking as read-only presentation and control write access separately.
Partial masking: Functions that leave part of a value visible (for example, last four digits) can allow re-identification when combined with other data. Consider k-anonymity and your threat model.
Logs (slow query log, general query log, binary logs) may record query text or parameters. Restrict log access or redact as required. The component transforms values at query time; stored data is not altered. Behavior for empty strings or malformed identifiers is not fully specified; poor data quality can undermine masking.
Granting privileges to mysql.session on the dictionary table has security implications; the documentation does not prove the absence of privilege escalation. Regional functions (for example, mask_canada_sin, mask_uk_nin, mask_iban) are not documented as compliant with current regulatory or format requirements in those jurisdictions; verify for your use case.
Masking is applied per query, so the same column can appear differently in different contexts. Use views or standardized patterns for a consistent policy. For very large dictionaries, performance and memory use depend on size and workload; see the function list for cache behavior and operational notes.
Additional resources
- Install the data masking component
- Uninstall the data masking component
- Data masking component functions
- Data masking quickstart — test database and examples
Install the data masking component
Prerequisites
- Percona Server for MySQL with the data masking component available for your version.
- The
component_masking_functionslibrary must be present in the server plugin directory. Theplugin_dirsystem variable defines that directory; the server resolvesfile://component_masking_functionsinINSTALL COMPONENTrelative toplugin_dir. To verify the library is available, check that the file exists in the directory reported by:If the library is missing,SHOW VARIABLES LIKE 'plugin_dir';INSTALL COMPONENTfails at load time; check the server error log and your installation package or deployment to ensure the component library is installed in the plugin directory.
The component has the following parts:
- A system table,
mysql.masking_dictionaries, used to store terms and dictionaries (you must create this table; see below). - The loadable component
component_masking_functions, which provides the masking functions.
The MASKING_DICTIONARIES_ADMIN privilege is required for dictionary management functions; the privilege is registered when the component is loaded.
Install the component
Follow the steps in order. The table must exist and match the required schema before you run INSTALL COMPONENT; the component does not create the table. If the table is missing or the schema is wrong (for example, a typo in column names or types), the component can load in a broken state or fail.
-
Create the
masking_dictionariestable in themysqlschema.Ensure the statement completes and is committed before you run step 2. The schema below is required; do not alter column names or types unless a future Percona Server release documents a different schema. You are responsible for creating and maintaining this table; if the component’s expected schema changes in an upgrade, release or upgrade documentation will describe any required
ALTER TABLEor migration that you must apply.CREATE TABLE IF NOT EXISTS mysql.masking_dictionaries( Dictionary VARCHAR(256) NOT NULL, Term VARCHAR(256) NOT NULL, UNIQUE INDEX dictionary_term_idx (Dictionary, Term) ) ENGINE = InnoDB DEFAULT CHARSET=utf8mb4; -
Install the component and loadable functions.
INSTALL COMPONENT 'file://component_masking_functions';If the command fails, check the server error log and confirm the library is present in
plugin_dir(see Prerequisites). The component is registered inmysql.componentand is loaded again on server restart. On replicas or in high-availability setups, the instance may be inread_onlyorsuper_read_onlymode; component loading in those states follows server behavior. If the component does not load on a replica (for example, because the library is missing or configuration differs), masking is not available on that instance until the cause is resolved.On Percona Server for MySQL 8.4.4-1 and later, dictionary-based functions (
gen_dictionary,gen_blocklist) use the built-inmysql.sessionuser for internal queries. Grantmysql.sessionthe required privileges on themasking_dictionariestable as described in Permissions in the data masking function list. Granting these privileges allows the server to read and modify the dictionary table for masking; the table may contain lookup data. Rely on your normal access controls and hardening for themysqlschema and dictionary contents. -
Grant
MASKING_DICTIONARIES_ADMINto users who will manage dictionaries.The privilege is registered when the component loads. Run this step only after
INSTALL COMPONENThas succeeded. IfGRANTfails with an unknown-privilege or similar error, the component may not be loaded or your Percona Server version may not support this privilege; verify the component is loaded (for example, checkmysql.component) and consult the documentation for your version.The following functions require
MASKING_DICTIONARIES_ADMIN:masking_dictionary_term_addmasking_dictionary_term_removemasking_dictionary_remove
GRANT MASKING_DICTIONARIES_ADMIN ON *.* TO <user>;
Useful links
Uninstall the data masking component
Data masking component functions
Data masking quickstart — create a test database and try masking functions.
Get started with Data Masking
This quickstart gets the data masking component installed and lets you try the component with a test database. You need access to a Percona Server for MySQL 8.4 server. Follow the steps to install, set permissions, create sample data, and run masking examples. For production use and limitations, see the Data masking overview.
Prerequisites
- Percona Server for MySQL (latest recommended).
- The
component_masking_functionslibrary in the server plugin directory. RunSHOW VARIABLES LIKE 'plugin_dir';and confirm the library exists in that directory. If the library is missing, see Install the data masking component.
Install the component and set permissions
Do these once, in order. Full details: Install the data masking component.
-
Create the dictionary table (required before step 2):
CREATE TABLE IF NOT EXISTS mysql.masking_dictionaries( Dictionary VARCHAR(256) NOT NULL, Term VARCHAR(256) NOT NULL, UNIQUE INDEX dictionary_term_idx (Dictionary, Term) ) ENGINE = InnoDB DEFAULT CHARSET=utf8mb4;Expected output
Query OK, 0 rows affected (0.01 sec) -
Install the component:
INSTALL COMPONENT 'file://component_masking_functions';Expected output
Query OK, 0 rows affected (0.00 sec) -
Grant
mysql.sessionaccess to the dictionary table (required forgen_dictionaryandgen_blockliston 8.4.4-1 and later):GRANT SELECT, INSERT, UPDATE, DELETE ON mysql.masking_dictionaries TO 'mysql.session'@'localhost';Expected output
Query OK, 0 rows affected (0.00 sec) -
Grant dictionary management to your user (required for the dictionary-based masking section below; skip if you will not try that section). Replace
<user>and<host>with the MySQL user you connect as (for example,rootandlocalhost):GRANT MASKING_DICTIONARIES_ADMIN ON *.* TO '<user>'@'<host>';Expected output
Query OK, 0 rows affected (0.00 sec)No
FLUSH PRIVILEGESis needed; the grant takes effect immediately. If the privilege does not appear, reconnect to the server.
Create the test database and tables
Run the following script to create the database and both tables with sample rows. The script drops the database if the database already exists so you can run the script again without creating duplicate rows. The column types and values are chosen so you can try masking functions in the next sections.
DROP DATABASE IF EXISTS masking_demo;
CREATE DATABASE masking_demo;
USE masking_demo;
CREATE TABLE contacts (
id INT AUTO_INCREMENT PRIMARY KEY,
name VARCHAR(100),
ssn VARCHAR(11),
card_no VARCHAR(19),
email VARCHAR(255),
phone VARCHAR(20),
notes VARCHAR(255)
) ENGINE=InnoDB DEFAULT CHARSET=utf8mb4;
INSERT INTO contacts (name, ssn, card_no, email, phone, notes)
VALUES
('Priya Sharma', '123-45-6789', '4111111111111111', '[email protected]', '1-555-010-1234', 'VIP'),
('Yuki Tanaka', '987-65-4321', '5500000000000004', '[email protected]', '1-555-010-5678', 'Newsletter'),
('Fatima Hassan', '111-22-3333', '340000000000009', '[email protected]', '1-555-010-9012', NULL);
CREATE TABLE contacts_intl (
id INT AUTO_INCREMENT PRIMARY KEY,
name VARCHAR(100),
country VARCHAR(50),
canada_sin VARCHAR(11),
uk_nin VARCHAR(20),
iban VARCHAR(40)
) ENGINE=InnoDB DEFAULT CHARSET=utf8mb4;
INSERT INTO contacts_intl (name, country, canada_sin, uk_nin, iban)
VALUES
('Jean Lefebvre', 'Canada', '506-948-819', NULL, NULL),
('Siobhan O''Brien', 'UK', NULL, 'CT264683D', NULL),
('Hans Mueller', 'Germany', NULL, NULL, 'DE27 1002 02003 77495 4156');
Expected output
Query OK, 0 rows affected (0.00 sec)
Query OK, 1 row affected (0.00 sec)
Database changed
Query OK, 0 rows affected (0.01 sec)
Query OK, 3 rows affected (0.00 sec)
Query OK, 0 rows affected (0.00 sec)
Query OK, 3 rows affected (0.00 sec)
View raw data
SELECT id, name, ssn, card_no, email, phone FROM contacts;
Expected output
+----+--------------+-------------+------------------+-------------------------+----------------+
| id | name | ssn | card_no | email | phone |
+----+--------------+-------------+------------------+-------------------------+----------------+
| 1 | Priya Sharma | 123-45-6789 | 4111111111111111 | [email protected]| 1-555-010-1234 |
| 2 | Yuki Tanaka | 987-65-4321 | 5500000000000004 | [email protected] | 1-555-010-5678 |
| 3 | Fatima Hassan| 111-22-3333 | 340000000000009 | [email protected]| 1-555-010-9012 |
+----+--------------+-------------+------------------+-------------------------+----------------+
3 rows in set (0.00 sec)
Mask sensitive columns in queries
The examples below use masking functions in SELECT; the table data is unchanged. Expected outputs in this guide are illustrative; results from random or dictionary-based functions vary on each run and may not match the examples. To enforce masking for other users, use a view (see Expose masked data via a view) and restrict access to the base table. For limitations and security, see the Data masking overview.
Payment card and SSN
mask_pan leaves the last four digits visible; mask_ssn does the same for SSN.
SELECT
name,
mask_pan(card_no) AS card_masked,
mask_ssn(ssn) AS ssn_masked
FROM contacts;
Expected output
+--------------+------------------+-------------+
| name | card_masked | ssn_masked |
+--------------+------------------+-------------+
| Priya Sharma | XXXXXXXXXXXX1111 | ***-**-6789 |
| Yuki Tanaka | XXXXXXXXXXXX0004 | ***-**-4321 |
| Fatima Hassan| XXXXXXXXXX0009 | ***-**-3333 |
+--------------+------------------+-------------+
3 rows in set (0.00 sec)
Inner and outer parts of a string
mask_inner keeps the first and last character(s); mask_outer masks the left and right ends. The third and fourth arguments are the number of characters to keep unmasked on the left and right.
SELECT
name,
mask_inner(name, 1, 1) AS name_inner_masked,
mask_outer(phone, 2, 4) AS phone_outer_masked
FROM contacts;
Expected output
+--------------+------------------+------------------+
| name | name_inner_masked| phone_outer_masked|
+--------------+------------------+------------------+
| Priya Sharma | PXXXXXXXXXXa | XX5-010-1234 |
| Yuki Tanaka | YXXXXXXXXa | XX5-010-5678 |
| Fatima Hassan| FXXXXXXXXXXn | XX5-010-9012 |
+--------------+------------------+------------------+
3 rows in set (0.00 sec)
Generated values (for testing)
gen_rnd_email() and gen_rnd_ssn() return new values each time. They are useful for generating test data, not for masking existing values in place.
SELECT
id,
gen_rnd_email(5, 8, 'test.example') AS generated_email,
gen_rnd_ssn() AS generated_ssn
FROM contacts;
Expected output
+----+---------------------------+-------------+
| id | generated_email | generated_ssn|
+----+---------------------------+-------------+
| 1 | [email protected]| 912-34-5678 |
| 2 | [email protected]| 987-65-4321 |
| 3 | [email protected]| 923-45-6789 |
+----+---------------------------+-------------+
3 rows in set (0.00 sec)
Output will vary on each run and may not match the expected results above. For constraints and caveats, see Data masking component functions and variables.
International data masking functions
The component includes functions for region-specific identifiers: Canadian Social Insurance Number (SIN) (mask_canada_sin), United Kingdom National Insurance Number (NIN) (mask_uk_nin), and International Bank Account Number (IBAN) (mask_iban). The script above already created the contacts_intl table. View the raw data, then apply the region-specific masking functions:
SELECT name, country, canada_sin, uk_nin, iban FROM contacts_intl;
Expected output
+----------------+---------+-------------+----------------+------------------------------+
| name | country | canada_sin | uk_nin | iban |
+----------------+---------+-------------+----------------+------------------------------+
| Jean Lefebvre | Canada | 506-948-819 | NULL | NULL |
| Siobhan O'Brien| UK | NULL | CT264683D | NULL |
| Hans Mueller | Germany | NULL | NULL | DE27 1002 02003 77495 4156 |
+----------------+---------+-------------+----------------+------------------------------+
3 rows in set (0.00 sec)
SELECT
name,
country,
mask_canada_sin(canada_sin) AS canada_sin_masked,
mask_uk_nin(uk_nin) AS uk_nin_masked,
mask_iban(iban) AS iban_masked
FROM contacts_intl;
Expected output
+----------------+---------+------------------+---------------+----------------------------+
| name | country | canada_sin_masked| uk_nin_masked | iban_masked |
+----------------+---------+------------------+---------------+----------------------------+
| Jean Lefebvre | Canada | XXX-XXX-XXX | NULL | NULL |
| Siobhan O'Brien| UK | NULL | CT******* | NULL |
| Hans Mueller | Germany | NULL | NULL | DE** **** **** **** **** |
+----------------+---------+------------------+---------------+----------------------------+
3 rows in set (0.00 sec)
Each function returns NULL when the input is NULL. For more options (for example, custom mask characters) and the corresponding generators (gen_rnd_canada_sin, gen_rnd_uk_nin, gen_rnd_iban), see Data masking component functions and variables.
Expose masked data via a view
To ensure that only masked data is visible, define a view that applies the masking functions and grant SELECT on the view (not on the base table) to users who should see masked data. Example:
DROP VIEW IF EXISTS contacts_masked;
CREATE VIEW contacts_masked AS
SELECT
id,
name,
mask_pan(card_no) AS card_no,
mask_ssn(ssn) AS ssn,
mask_outer(email, 2, 4) AS email,
mask_outer(phone, 2, 4) AS phone,
notes
FROM contacts;
SELECT id, name, card_no, ssn, email, phone FROM contacts_masked;
Expected output
Query OK, 0 rows affected (0.00 sec)
Query OK, 0 rows affected (0.00 sec)
+----+--------------+------------------+-------------+--------------------------+------------------+
| id | name | card_no | ssn | email | phone |
+----+--------------+------------------+-------------+--------------------------+------------------+
| 1 | Priya Sharma | XXXXXXXXXXXX1111 | ***-**-6789 | XXriya.sharma@exampXXXX | XX5-010-1234 |
| 2 | Yuki Tanaka | XXXXXXXXXXXX0004 | ***-**-4321 | XXuki.tanaka@exampXXXX | XX5-010-5678 |
| 3 | Fatima Hassan| XXXXXXXXXX0009 | ***-**-3333 | XXtima.hassan@examXXXX | XX5-010-9012 |
+----+--------------+------------------+-------------+--------------------------+------------------+
3 rows in set (0.00 sec)
The view uses mask_outer(..., 2, 4) for email and phone. Grant SELECT on the view (not the base table) to users who should see masked data only. For access control and limitations, see the Data masking overview.
Optional: dictionary-based masking
Functions such as gen_dictionary and gen_blocklist use the mysql.masking_dictionaries table.
You need the step 4 grant (MASKING_DICTIONARIES_ADMIN) and, on 8.4.4-1 and later, the step 3 grant to mysql.session described in the install guide.
Add a small dictionary with masking_dictionary_term_add, then try gen_dictionary.
The role column is chosen at random from the dictionary; your output will vary and may not match the expected results.
SELECT masking_dictionary_term_add('roles', 'Engineer');
SELECT masking_dictionary_term_add('roles', 'Analyst');
SELECT masking_dictionary_term_add('roles', 'Manager');
SELECT id, name, gen_dictionary('roles') AS role FROM contacts;
Expected output (role column varies; your output may not match)
+-----------------------------------------------+
| masking_dictionary_term_add('roles', 'Engineer')|
+-----------------------------------------------+
| 1 |
+-----------------------------------------------+
1 row in set (0.00 sec)
+----------------------------------------------+
| masking_dictionary_term_add('roles', 'Analyst')|
+----------------------------------------------+
| 1 |
+----------------------------------------------+
1 row in set (0.00 sec)
+----------------------------------------------+
| masking_dictionary_term_add('roles', 'Manager') |
+----------------------------------------------+
| 1 |
+----------------------------------------------+
1 row in set (0.00 sec)
+----+---------------+----------+
| id | name | role |
+----+---------------+----------+
| 1 | Priya Sharma | Manager |
| 2 | Yuki Tanaka | Engineer |
| 3 | Fatima Hassan | Manager |
+----+--------------+----------+
3 rows in set (0.00 sec)
To remove the dictionary when finished: SELECT masking_dictionary_remove('roles'); (masking_dictionary_remove). For large dictionaries or production use, see the Data masking overview and function list.
Clean up (optional)
To remove the test database and all objects in the database (tables, the contacts_masked view, and data):
DROP DATABASE IF EXISTS masking_demo;
Expected output
Query OK, 0 rows affected (0.01 sec)
Additional resources
Data masking component functions and variables
The feature is in tech preview. This page is a catalog of individual functions and variables. For the security model, use cases, and when to apply masking (including limitations and failure modes), see Data masking overview and the Limitations and security considerations section. Performance characteristics (latency, complexity, scalability) are not documented; for large result sets or SLA-critical workloads, benchmark and evaluate per-row overhead. The component does not provide a function to test whether a value is already masked; auditing that masking has been applied to required rows must be done by application logic, known patterns, or other tooling.
To find a function by what the function does, use the “Find by task” table or the full list below. Each function name links to that function’s definition later on this page.
Find by task
| If you want to… | Function(s) |
|---|---|
| Mask or generate a payment card number (PAN) | mask_pan, mask_pan_relaxed, gen_rnd_pan |
| Mask or generate a US Social Security number (SSN) | mask_ssn, gen_rnd_ssn |
| Mask or generate a Canadian SIN | mask_canada_sin, gen_rnd_canada_sin |
| Mask or generate a UK National Insurance number | mask_uk_nin, gen_rnd_uk_nin |
| Mask or generate an IBAN | mask_iban, gen_rnd_iban |
| Mask or generate a UUID | mask_uuid, gen_rnd_uuid |
| Generate a random email or US phone number | gen_rnd_email, gen_rnd_us_phone |
| Mask the middle or the ends of any string | mask_inner, mask_outer |
| Replace a value with a random term from a dictionary | gen_dictionary, gen_blocklist |
| Generate a number in a range | gen_range |
| Manage dictionaries (add/remove terms, flush cache) | masking_dictionary_term_add, masking_dictionary_term_remove, masking_dictionary_remove, masking_dictionaries_flush |
Full list (by name)
| Name | Details |
|---|---|
gen_blocklist(str, from_dictionary_name, to_dictionary_name) |
If the input is in the source dictionary, returns a random term from the target dictionary; otherwise returns the input |
gen_dictionary(dictionary_name) |
Returns a random term from a dictionary |
gen_range(lower, upper) |
Returns a number from a range |
gen_rnd_canada_sin() |
Generates a Canadian Social Insurance number |
gen_rnd_email([name_size, surname_size, domain]) |
Generates a random string in name.surname@domain format |
gen_rnd_iban([country, size]) |
Generates an International Bank Account number |
gen_rnd_pan() |
Generates a Primary account number for a payment card |
gen_rnd_ssn() |
Generates a US Social Security number |
gen_rnd_uk_nin() |
Generates a United Kingdom National Insurance number |
gen_rnd_us_phone() |
Generates a US phone number |
gen_rnd_uuid() |
Generates a Universally Unique Identifier |
mask_canada_sin(str [,mask_char]) |
Masks the Canadian Social Insurance number |
mask_iban(str [,mask_char]) |
Masks the International Bank Account number |
mask_inner(str, margin1, margin2 [,mask_char]) |
Masks the inner part of a string |
mask_outer(str, margin1, margin2 [,mask_char]) |
Masks the outer part of the string |
mask_pan(str [,mask_char]) |
Masks the Primary Account number for a payment card |
mask_pan_relaxed(str [,mask_char]) |
Partially masks the Primary Account number for a payment card |
mask_ssn(str [,mask_char]) |
Masks the US Social Security number |
mask_uk_nin(str [,mask_char]) |
Masks the United Kingdom National Insurance number |
mask_uuid(str [,mask_char]) |
Masks the Universally Unique Identifier |
masking_dictionaries_flush() |
Resyncs the internal dictionary term cache |
masking_dictionary_remove(dictionary_name) |
Removes the dictionary |
masking_dictionary_term_add(dictionary_name, term_name) |
Adds a term to the masking dictionary |
masking_dictionary_term_remove(dictionary_name, term_name) |
Removes a term from the masking dictionary |
Permissions
In Percona Server for MySQL 8.4.4-1, dictionary-related functions no longer run internal queries as the root user without a password. Following MySQL best practices, many admins disable the root user, which previously caused these functions to stop working. The server now uses the built-in mysql.session user to execute dictionary queries.
However, for dictionary operations to work, you need to grant the mysql.session user SELECT, INSERT, UPDATE, and DELETE privileges on the masking_dictionaries table. Granting UPDATE and DELETE allows the server to modify or remove dictionary data. Compromise of the server or abuse of that user could allow dictionary tampering or deletion, causing dictionary-based functions to fail or return unexpected values; protect the server and the mysql schema accordingly.
GRANT SELECT, INSERT, UPDATE, DELETE ON mysql.masking_dictionaries TO 'mysql.session'@'localhost';
If you change the value of the masking_functions.masking_database system variable to something other than mysql, make sure to update the GRANT query to match the new value.
GRANT SELECT, INSERT, UPDATE, DELETE ON <masking_functions.masking_database>.masking_dictionaries TO 'mysql.session'@'localhost';
Limitations and operational notes
-
Character set and collation: Several functions accept a
mask_charthat can be in a different character set than the input string. When the character sets differ, the server must transcode the mask character; in some collations or storage contexts this can produce illegal byte sequences or errors. Prefer using amask_charin the same character set as the input (or the target column) to avoid corruption or storage failures. -
Schema and format: Masking functions return strings (for example, containing
Xor*). If the target column or application enforces strict validation (numeric-only, regex, fixed width, or checksums such as Luhn for payment cards), the masked value may cause INSERT or UPDATE failures or break application logic. The component does not guarantee format-preserving or type-preserving output; choose mask character and usage so that results remain valid for the target schema and application. -
Randomness: Functions that return “random” values (for example,
gen_dictionary,gen_blocklist,gen_rnd_*) do not document that the randomness is cryptographically secure or unpredictable. The selection or generation logic is not necessarily resistant to prediction; do not rely on that logic to resist inference attacks (for example, an attacker with partial data might infer mappings). -
Collision and uniqueness: The
gen_rnd_*functions do not document entropy source or collision probability. At scale (for example, millions of rows), duplicate generated values are possible and can violate unique constraints or make the dataset unsuitable for integration testing. Evaluate uniqueness requirements before relying on these generators for large datasets. -
Default mask character: The default masking character (for example,
Xor*) may not suit all use cases. For fixed-width fields, padding, or systems that expect specific formats or checksums (for example, Luhn for payment cards), the default can break validation. Choose mask character and format to match the target schema and application requirements. -
Performance at scale: Applying masking functions to very large result sets (for example, tens or hundreds of millions of rows) can add significant CPU and memory cost. No performance guarantees or benchmarks are documented. Test and monitor when using these functions in heavy reporting or large SELECTs to avoid resource exhaustion or denial-of-service risk.
-
Aggregation and inference: Row-level masking affects how values are displayed in results; such masking does not necessarily protect against inference via aggregates. Depending on implementation,
SUM(),AVG(), or other aggregates may be computed over unmasked data in the execution engine. Do not assume that masking in the result set prevents leakage through aggregate queries; consider differential privacy or aggregate-level protection if that is a threat. -
Boundary behavior: For
mask_outer, when the sum ofmargin1andmargin2is greater than or equal to the string length, the entire string is replaced with the mask character (the whole string is masked). Formask_inner, when that sum is greater than or equal to the string length, no masking occurs (the string is returned unchanged). -
Validation: The component does not provide a function to check whether a value is already masked. To audit that required rows or columns have been masked, use application logic, schema conventions, or external tooling.
gen_blocklist(str, from_dictionary_name, to_dictionary_name)
If str is present in the dictionary named from_dictionary_name, returns a randomly selected term from the dictionary named to_dictionary_name. Otherwise returns str unchanged. The selection is not documented as cryptographically secure; do not rely on the selection to resist prediction or inference (see Limitations and operational notes).
Version update
Percona Server for MySQL 8.4.4-4 introduces an internal term cache. The server now uses in-memory data structures for lookups instead of querying the <masking_functions.masking_database>.masking_dictionaries table every time. This improvement boosts performance, especially when handling multiple rows.
Parameters
| Parameter | Optional | Description | Type |
|---|---|---|---|
str |
No | The input value to look up and optionally replace | String |
from_dictionary_name |
No | The dictionary in which str must be found for replacement to occur |
String |
to_dictionary_name |
No | The dictionary from which a replacement term is chosen at random | String |
Returns
If str is in from_dictionary_name, a randomly selected term from to_dictionary_name. If str is not in from_dictionary_name or either dictionary is missing, str unchanged. If to_dictionary_name does not exist, NULL. Returns NULL if str is NULL. The character set of the returned string is the same as str.
Example
SELECT gen_blocklist('apple', 'fruit', 'nut');
Expected output
+-----------------------------------------+
| gen_blocklist('apple', 'fruit', 'nut') |
+-----------------------------------------+
| walnut |
+-----------------------------------------+
gen_dictionary(dictionary_name)
Returns a term from a dictionary selected at random. The selection is not documented as cryptographically secure; do not rely on the selection to resist prediction or inference (see Limitations and operational notes).
Version update
Percona Server for MySQL 8.4.4-4 introduces an internal term cache. The server now uses in-memory data structures for lookups instead of querying the <masking_functions.masking_database>.masking_dictionaries table every time. This improvement boosts performance, especially when handling multiple rows.
Parameters
| Parameter | Optional | Description | Type |
|---|---|---|---|
dictionary_name |
No | Select the random term from this dictionary | String |
Returns
A random term from the dictionary listed in dictionary_name in the utf8mb4 character set. Returns NULL if the dictionary_name does not exist.
Example
SELECT gen_dictionary('trees');
Expected output
+--------------------------------------------------+
| gen_dictionary('trees') |
+--------------------------------------------------+
| Norway spruce |
+--------------------------------------------------+
gen_range(lower, upper)
Returns a number from a defined range.
Parameters
| Parameter | Optional | Description | Type |
|---|---|---|---|
lower |
No | The lower boundary of the range | Integer |
upper |
No | The upper boundary of the range | Integer |
The upper parameter value must be an integer either greater than or equal to the lower parameter value.
Returns
An integer, selected at random, from an inclusive range defined by the lower parameter value and the upper parameter value, or NULL if the upper boundary is less than the lower boundary.
Example
SELECT gen_range(10, 100);
Expected output
+--------------------------------------+
| gen_range(10,100) |
+--------------------------------------+
| 56 |
+--------------------------------------+
gen_rnd_canada_sin()
Generates a Canada Social Insurance Number (SIN).
Important
Only use this function for testing because the result could be a legitimate SIN. Use mask_canada_sin to disguise the result if you must publish the result.
Parameters
None.
Returns
Returns a Canada SIN formatted in three groups of three digits (for example, 123-456-789) in the utf8mb4 character set. To ensure the number is consistent, the number is verified with the Luhn algorithm .
Example
SELECT gen_rnd_canada_sin();
Expected output
+-------------------------+
| gen_rnd_canada_sin() |
+-------------------------+
| 506-948-819 |
+-------------------------+
gen_rnd_email([name_size, surname_size, domain])
Generates a random string in the name.surname@domain format.
Parameters
| Parameter | Optional | Description | Type |
|---|---|---|---|
name_size |
Yes | Specifies the number of characters in the name part. The default number is five. The minimum number is one. The maximum number is 1024. | Integer |
surname_size |
Yes | Specifies the number of characters in the surname part. The default number is seven. The minimum number is one. The maximum number is 1024. | Integer |
domain |
Yes | Specifies the domain name used. The default value is example.com. |
String |
Returns
A generated string in the same character set as domain. If the domain value is not specified, then the string is in the utf8mb4 character set. The name and surname are random lower-case letters (a - z). For columns with a unique constraint, duplicates are possible at scale; see Collision and uniqueness in Limitations and operational notes.
Example
SELECT gen_rnd_email(name_size=4, surname_size=5, domain='example.test');
Expected output
+----------------------------------------+
| gen_rnd_email(4, 5, 'example.test') |
+----------------------------------------+
| [email protected] |
+----------------------------------------+
gen_rnd_iban([country, size])
Generates an International Bank Account Number (IBAN).
Important
Generating an IBAN with a valid country code should only be used for testing. The function does not check if the generated value is a legitimate bank account. If you must publish the result, consider using mask_iban to disguise the result. The function does not perform a checksum on the bank account number.
Parameters
| Parameter | Optional | Description | Type |
|---|---|---|---|
country |
Yes | A two-character country code | String |
size |
Yes | Number of characters | Integer |
If the country is not specified, the default value is ZZ. The value must be two upper-case characters (A-Z) or an error is returned.
The default value for size is 16. The minimum value is 15. The maximum value is 34.
Returns
The function returns a string that is the length of the size value. The string consists of country (two characters) followed by the (size - 2) random digits.
The character set is the same as the country parameter or if that parameter is not specified, the character set is utf8mb4.
Example
SELECT gen_rnd_iban();
Expected output
+-------------------+
| gen_rnd_iban() |
+-------------------+
|ZZ78959120078536 |
+-------------------+
gen_rnd_pan()
Generates a Primary Account Number (PAN) for a payment card that passes basic checksum validation.
The generated PAN can be one of the following:
-
American Express
-
Visa
-
Mastercard
-
Discover
Important
Generating the PAN should only be used for testing. The function does not check if the generated value is a legitimate primary account number. If you must publish the result, consider using mask_pan or mask_pan_relaxed() to disguise the result.
Parameters
None
Returns
A random PAN string in utf8mb4 character set.
Example
SELECT gen_rnd_pan();
Expected output
+-------------------+
| gen_rnd_pan() |
+-------------------+
| 1234567898765432 |
+-------------------+
gen_rnd_ssn()
Generates a United States Social Security Account Number (SSN).
Parameters
None
Returns
An SSN string in nine-digit format “AAA-GG-SSSS” in the utf8mb4 character set. The number has three parts, the first three digits are the area number, the group number, and the serial number. The generated SSN uses ‘900’ or greater numbers for the area number. These numbers are not legitimate because they are outside the approved range.
Example
SELECT gen_rnd_ssn();
Expected output
+----------------+
| gen_rnd_ssn() |
+----------------+
| 970-03-0370 |
+----------------+
gen_rnd_uk_nin()
Generates a United Kingdom National Insurance Number (NIN).
Important
This function should only be used for testing. The function does not check if the generated value is a legitimate United Kingdom National Insurance number. If you must publish the result, consider masking the result with mask_uk_nin.
Parameters
None.
Returns
A NIN string in the utf8mb4 character set. The string is nine (9) characters in length, always starts with ‘AA’ and ends with ‘C’.
Example
SELECT gen_rnd_uk_nin();
Expected output
+----------------------+
| gen_rnd_uk_nin() |
+----------------------+
| AA123456C |
+----------------------+
gen_rnd_us_phone()
Generates a United States phone number with the 555 area code. The ‘555’ area code represents fictional numbers.
Parameters
None
Returns
Returns a United States phone number in the utf8mb4 character set.
Example
SELECT gen_rnd_us_phone();
Expected output
+--------------------+
| gen_rnd_us_phone() |
+--------------------+
| 1-555-249-2029 |
+--------------------+
gen_rnd_uuid()
Generates a version 4 Universally Unique Identifier (UUID).
Parameters
None.
Returns
Returns a UUID as a string in the utf8mb4 character set.
Example
SELECT gen_rnd_uuid();
Expected output
+------------------------------------+
| gen_rnd_uuid() |
+------------------------------------+
|9a3b642c-06c6-11ee-be56-0242ac120002|
+------------------------------------+
mask_canada_sin(str [,mask_char])
Masks a Canada Social Insurance Number (SIN).
Parameters
| Parameter | Optional | Description | Type |
|---|---|---|---|
str |
No | The string to be masked | String |
mask_char |
Yes | The masking character | String |
The str accepts an alphanumeric string.
If you do not specify a mask_char, the default character is X. The mask_char value can be a multibyte character in any character set and may not be the same character set as str. See Limitations and operational notes for character set and collation caveats when mask_char differs from the input.
Returns
A string with the selected characters masked by a specified mask_char or the default value for that parameter. The function supports multibyte characters in any character set. The character set of the return value is the same as str.
An error is reported if str length is an incorrect length.
Returns a NULL if you invoke this function with NULL as the primary argument.
Example
SELECT mask_canada_sin('555-555-555');
Expected output
+--------------------------------+
| mask_canada_sin('555-555-555') |
+--------------------------------+
| XXX-XXX-XXX |
+--------------------------------+
mask_iban(str [,mask_char])
Masks an International Bank Account Number (IBAN).
Parameters
| Parameter | Optional | Description | Type |
|---|---|---|---|
str |
No | The string to be masked | String |
mask_char |
Yes | Character used for masking | String |
The str accepts either of the following:
-
No separator symbol
-
Groups of four characters. These groups can be separated by a space or any separator character.
The default value for mask_char is *. The value can be a multibyte character in any character set and may not be the same character set as str. See Limitations and operational notes for character set and collation caveats when mask_char differs from the input.
Returns
Returns the masked string. The character set of the result is the same as the character set of str.
An error is reported if the str length is incorrect.
Returns NULL if you invoke this function with NULL as the primary argument.
Example
SELECT mask_iban('DE27 1002 02003 77495 4156');
Expected output
+---------------------------------------------+
| mask_iban('DE27 1002 02003 77495 4156') |
+---------------------------------------------+
| DE** **** **** **** **** |
+---------------------------------------------+
mask_inner(str, margin1, margin2 [,mask_char])
Returns the string where a selected inner portion is masked with a substitute character.
Parameters
| Parameter | Optional | Description | Type |
|---|---|---|---|
str |
No | The string to be masked | String |
margin1 |
No | The number of characters on the left end of the string to remain unmasked | Integer |
margin2 |
No | The number of characters on the right end of the string to remain unmasked | Integer |
mask_char |
Yes | The masking character | String |
The margin1 value cannot be a negative number. A value of 0 (zero) masks all characters.
The margin2 value cannot be a negative number. A value of 0 (zero) masks all characters.
If the sum of margin1 and margin2 is greater than or equal to the string length, no masking occurs. See Limitations and operational notes for character set and collation caveats when mask_char differs from the input.
If the mask_char is not specified, the default is ‘X’. The mask_char value can be a multibyte character in any character set and may not be the same character set as str.
Returns
A string with the selected characters masked by a specified mask_char or that parameter’s default value in the character set of str.
Returns NULL if you invoke this function with NULL as the primary argument.
Example
SELECT mask_inner('123456789', 1, 2);
Expected output
+-----------------------------------+
| mask_inner('123456789', 1, 2) |
+-----------------------------------+
| 1XXXXXX89 |
+-----------------------------------+
mask_outer(str, margin1, margin2 [,mask_char])
Returns the string where a selected outer portion is masked with a substitute character.
Parameters
| Parameter | Optional | Description | Type |
|---|---|---|---|
str |
No | The string to be masked | String |
margin1 |
No | On the left end of the string, mask this designated number of characters | Integer |
margin2 |
No | On the right end of the string, mask this designated number of characters | Integer |
mask_char |
Yes | The masking character | String |
The margin1 cannot be a negative number. A value of 0 (zero) does not mask any characters.
The margin2 cannot be a negative number. A value of 0 (zero) does not mask any characters.
If the sum of margin1 and margin2 is greater than or equal to the string length, the entire string is replaced with the mask character (the whole string is masked). See Limitations and operational notes for character set and collation caveats when mask_char differs from the input.
If the mask_char is not specified, the default is ‘X’. The mask_char value can be a multibyte character in any character set and may not be the same character set as str.
Returns
A string with the selected characters masked by a specified mask_char or that parameter’s default value in the same character set as str.
Returns NULL if you invoke this function with NULL as the primary argument.
Example
SELECT mask_outer('123456789', 2, 2);
Expected output
+------------------------------------+
| mask_outer('123456789', 2, 2) |
+------------------------------------+
| XX34567XX |
+------------------------------------+
mask_pan(str [,mask_char])
Returns a masked payment card Primary Account Number (PAN). The mask replaces the PAN number with the specified character except for the last four digits.
Parameters
| Parameter | Optional | Description | Type |
|---|---|---|---|
str |
No | The string to be masked | String |
mask_char |
Yes | The masking character | String |
The str contains a minimum of 14 or a maximum of 19 alphanumeric characters.
If the mask_char is not specified, the default value is ‘X’. The mask_char value can be a multibyte character in any character set and may not be the same character set as str. See Limitations and operational notes for character set and collation caveats when mask_char differs from the input. For numeric-only columns or systems that validate Luhn checksums, the default character may be invalid; see Schema and format and Default mask character in that section.
Returns
A string with the selected characters masked by a specified mask_char or that parameter’s default value. The character set of the result is the same character set as str.
An error occurs if the str parameter is not the correct length.
Returns NULL if you invoke this function with NULL as the primary argument.
Example
SELECT mask_pan (gen_rnd_pan());
Expected output
+------------------------------------+
| mask_pan(gen_rnd_pan()) |
+------------------------------------+
| XXXXXXXXXXX2345 |
+------------------------------------+
mask_pan_relaxed(str [,mask_char])
Returns a masked payment card Primary Account Number (PAN). Leaves the first six and last four digits unmasked; the rest is masked by the specified character or X.
Parameters
| Parameter | Optional | Description | Type |
|---|---|---|---|
str |
No | The string to be masked | String |
mask_char |
Yes | The specified character for masking | String |
The str must contain a minimum of 14 or a maximum of 19 alphanumeric characters.
If the mask_char is not specified, the default value is ‘X’.
Returns
A string with the first six and last four digits unmasked and the rest masked by a specified mask_char or that parameter’s default value (X). The character set of the result is the same character set as str.
The mask_char value can be a multibyte character in any character set and may not be the same character set as str. See Limitations and operational notes for character set and collation caveats when mask_char differs from the input.
Reports an error if the str parameter is not the correct length.
Returns NULL if you invoke this function with NULL as the primary argument.
Example
SELECT mask_pan_relaxed(gen_rnd_pan());
Expected output
+------------------------------------------+
| mask_pan_relaxed(gen_rnd_pan()) |
+------------------------------------------+
| 520754XXXXXX4848 |
+------------------------------------------+
mask_ssn(str [,mask_char])
Returns a masked United States Social Security Number(SSN). The mask replaces the SSN number with the specified character except for the last four digits.
Parameters
| Parameter | Optional | Description | Type |
|---|---|---|---|
str |
No | The string to be masked | String |
mask_char |
Yes | The masking character | String |
The str accepts either of the following:
- Nine integers, no separator symbol
- Nine integers in the
AAA-GG-SSSSpattern. The-(dash symbol) is the separator character.
If the mask_char is not specified, the default value is *. The mask_char value can be a multibyte character in any character set and may not be the same character set as str. See Limitations and operational notes for character set and collation caveats when mask_char differs from the input.
Returns
A string with the selected characters masked by a specified mask_char or that parameter’s default value in the same character set as str.
Reports an error if the value of the str is an incorrect length.
Returns a NULL value if you invoke this function with NULL as the primary argument.
Example
SELECT mask_ssn('555-55-5555', 'X');
Expected output
+-----------------------------+
| mask_ssn('555-55-5555','X') |
+-----------------------------+
| XXX-XX-5555 |
+-----------------------------+
mask_uk_nin(str [,mask_char])
Returns a masked United Kingdom National Insurance Number (NIN). The mask replaces the NIN with the specified character except for the first two characters.
Parameters
| Parameter | Optional | Description | Type |
|---|---|---|---|
str |
No | The string to be masked | String |
mask_char |
Yes | The masking character | String |
The str accepts an alpha-numeric string and does not check format and the str can use any separator character.
If the mask_char is not specified, the default value is *. The mask_char value can be a multibyte character in any character set and may not be the same character set as str. See Limitations and operational notes for character set and collation caveats when mask_char differs from the input.
Returns
Returns a string with the selected characters masked by a specified mask_char or that parameter’s default value in the same character set as str.
An error occurs if the str parameter is not the correct length.
Returns a NULL value if you invoke this function with NULL as the primary argument.
Example
SELECT mask_uk_nin ('CT 26 46 83 D');
Expected output
+------------------------------------+
| mask_uk_nin('CT 26 46 83 D') |
+------------------------------------+
| CT ** ** ** * |
+------------------------------------+
mask_uuid(str [,mask_char])
Masks a Universally Unique Identifier (UUID).
Parameters
| Parameter | Optional | Description | Type |
|---|---|---|---|
str |
No | The string to be masked | String |
mask_char |
Yes | The masking character | String |
The str format is ********-****-****-****-************.
If the mask_char is not specified, the default value is ‘*’. The mask_char value can be a multibyte character in any character set and may not be the same character set as str. See Limitations and operational notes for character set and collation caveats when mask_char differs from the input.
Returns
A string with the characters masked by a specified mask_char or that parameter’s default value in the same character set as str.
An error occurs if the length of str is incorrect.
Returns NULL if you invoke this function with NULL as the primary argument.
Example
SELECT mask_uuid('9a3b642c-06c6-11ee-be56-0242ac120002');
Expected output
+-------------------------------------------------------+
| mask_uuid('9a3b642c-06c6-11ee-be56-0242ac120002') |
+-------------------------------------------------------+
|********-****-****-****-************ |
+-------------------------------------------------------+
masking_dictionaries_flush()
Resyncs the internal dictionary term cache.
Parameters
None
Returns
Returns an integer value of 1 (one) when successful.
Example
SELECT masking_dictionaries_flush();
Expected output
+------------------------------+
| masking_dictionaries_flush() |
+------------------------------+
| 1 |
+------------------------------+
masking_dictionary_remove(dictionary_name)
Removes all of the terms and then removes the dictionary.
Requires the MASKING_DICTIONARIES_ADMIN privilege.
Parameters
| Parameter | Optional | Description | Type |
|---|---|---|---|
dictionary_name |
No | The dictionary to be removed | String |
Returns
Returns an integer value of 1 (one) if the operation is successful. Returns the integer value of 0 (zero) for a failure.
Example
SELECT masking_dictionary_remove('trees');
Expected output
+------------------------------------------+
| masking_dictionary_remove('trees') |
+------------------------------------------+
| 1 |
+------------------------------------------+
masking_dictionary_term_add(dictionary_name, term_name)
Adds a term to the dictionary and requires the MASKING_DICTIONARIES_ADMIN privilege.
Parameters
| Parameter | Optional | Description | Type |
|---|---|---|---|
dictionary_name |
No | The dictionary where the term is added | String |
term_name |
No | The term added to the selected dictionary | String |
Returns
Returns an integer value of 1 (one) if the operation is successful. Returns an integer value of 0 (zero) for a failure. If the dictionary_name does not exist, the operation creates the dictionary.
The operation uses INSERT IGNORE and can have the following outcomes:
-
The
term_nameis truncated if theterm_namelength is greater than maximum length of theTermfield in themysql.masking_dictionariestable. -
The character of the
dictionary_nameis not supported by theDictionaryfield inmysql.masking_dictionariestable, the character is implicitly converted to ‘?’. -
If the character of the
term_nameis not supported by theTermfield in themysql.masking_dictionariestable, the character is implicitly converted to ‘?’.
The following command returns the table information:
DESCRIBE mysql.masking_dictionaries;
The result returns the table structure.
Expected output
+------------+--------------+------+-----+---------+-------+
| Field | Type | Null | Key | Default | Extra |
+------------+--------------+------+-----+---------+-------+
| Dictionary | varchar(256) | NO | PRI | NULL | |
| Term | varchar(256) | NO | PRI | NULL | |
+------------+--------------+------+-----+---------+-------+
2 rows in set (0.02 sec)
Modify the table with an ALTER TABLE statement, if needed.
Example
SELECT masking_dictionary_term_add('trees','pine');
Expected output
+-----------------------------------------------+
| masking_dictionary_term_add('trees', 'pine') |
+-----------------------------------------------+
| 1 |
+-----------------------------------------------+
masking_dictionary_term_remove(dictionary_name, term_name)
Removes the selected term from the dictionary.
Requires the MASKING_DICTIONARIES_ADMIN privilege.
Parameters
| Parameter | Optional | Description | Type |
|---|---|---|---|
dictionary_name |
No | The dictionary that contains the term_name |
String |
term_name |
No | The term to be removed | String |
Returns
Returns an integer value of 1 (one) if the operation is successful. Returns the integer value of 0 (zero) for a failure.
Returns NULL if the operation fails. An operation can fail if the following occurs:
- The
term_nameis not available in the dictionary specified bydictionary_name - The
dictionary_namecould not be found
Example
SELECT masking_dictionary_term_remove('trees','pine');
Expected output
+-------------------------------------------------------+
| masking_dictionary_term_remove('trees', 'pine') |
+-------------------------------------------------------+
| 1 |
+-------------------------------------------------------+
System variables
| Name | Details |
|---|---|
dictionaries_flush_interval_seconds (integer, unsigned) |
The number of seconds between updates to the internal dictionary cache to match changes in the dictionaries table. |
masking_database(string) |
Set a different database name to use for the dictionaries table. |
dictionaries_flush_interval_seconds(integer, unsigned)
| Option | Description |
|---|---|
| command-line | Yes |
| scope | Global |
| data type | unsigned integer |
| default | 0 |
Variable name: component_masking_functions.dictionaries_flush_interval_seconds. You can set the variable at runtime (for example, with SET GLOBAL) or on the command line.
Percona Server for MySQL 8.4.4-4 adds this variable. The number of seconds between synchronizations of the dictionaries table and the internal dictionary cache. The default value is 0 seconds (disabled). The minimum value is 1 second. The maximum value is 31,536,000 seconds (1 year).
Replication: On replicas that use row-based replication, the dictionary term cache is not updated immediately when dictionary changes are applied from the binary log. Set this variable to a positive value (for example, 60) so that a background process periodically refreshes the cache and keeps replicas in sync with the source.
masking_database(string)
| Option | Description |
|---|---|
| Scope: | Global |
| Read, Write, or Read-Only: | Read-Only |
| Data type | String |
| Default value | “mysql” |
Specify the name of the database that holds the masking_dictionaries table. By default, the setting uses the mysql database.
Uninstall the data masking component
Uninstalling removes the masking functions and (if you choose) the dictionary table. The steps below prioritize a clean removal. Before you run them, address dependencies, privileges, and the risk of exposing previously masked data.
Before you uninstall
-
Views, stored procedures, and triggers: Any view, routine, or trigger that calls masking functions (for example, in a
SELECTor default expression) depends on the component. AfterUNINSTALL COMPONENT, those objects become invalid. Queries that use them can fail with an error such as a missing function or component. Before uninstalling, identify and either drop or replace those objects, or ensure no application uses them. If you leave them in place and uninstall, applications that query the view may fail or, if they fall back to base tables, may see unmasked data. Plan to replace masking-based views with restricted views, dummy tables, or access denial so that uninstallation does not inadvertently expose raw data. -
Privileges: The install procedure grants
MASKING_DICTIONARIES_ADMINto users and may grant privileges tomysql.sessiononmysql.masking_dictionaries. Uninstalling does not revoke these. For a clean state, revoke them before or after uninstall. To revoke frommysql.session, the table must still exist, so do that before dropping the table. Example (adjust for your database if you changedmasking_database):
REVOKE MASKING_DICTIONARIES_ADMIN ON *.* FROM <user>;
REVOKE SELECT, INSERT, UPDATE, DELETE ON mysql.masking_dictionaries FROM 'mysql.session'@'localhost';
-
System variables: If you set masking-related variables (for example,
component_masking_functions.dictionaries_flush_interval_secondsor the database used for the dictionaries table), remove or reset them in your configuration (for example,my.cnfor the command line). After the component is uninstalled, references to component variables in the config can produce “unknown variable” warnings or errors on server restart and can confuse configuration management tools. -
In-flight use: Ensure no views, routines, or applications are actively using masking functions when you uninstall. Uninstalling while queries or background processes depend on the component can cause those operations to fail.
Uninstall steps
The following steps uninstall the component; the second step optionally drops the masking_dictionaries table.
-
Uninstall the component and loadable functions.
UNINSTALL COMPONENT 'file://component_masking_functions';After this step, any view, stored procedure, or trigger that references masking functions is invalid and will cause errors when used.
-
Optionally drop the
masking_dictionariestable.Dropping this table permanently removes all dictionary data and cannot be undone. Skip this step if you plan to reinstall or upgrade and want to keep the table and data. If you might need the dictionary data later, back up the table or export the data before dropping.
DROP TABLE mysql.masking_dictionaries;If you granted privileges to
mysql.sessionon this table and did not revoke them in “Before you uninstall,” the grant entries may remain in the system until you revoke them; revoking requires the table to exist, so revoke before dropping the table if you want a full cleanup.
Useful links
PAM authentication plugin
Percona PAM Authentication Plugin is a free and Open Source implementation of the MySQL’s authentication plugin. This plugin acts as a mediator between the MySQL server, the MySQL client, and the PAM stack. The server plugin requests authentication from the PAM stack, forwards any requests and messages from the PAM stack over the wire to the client (in cleartext) and reads back any replies for the PAM stack.
PAM plugin uses dialog as its client side plugin. Dialog plugin can be loaded to any client application that uses libperconaserverclient/libmysqlclient library.
Here are some of the benefits that Percona dialog plugin offers over the default one:
-
It correctly recognizes whether PAM wants input to be echoed or not, while the default one always echoes the input on the user’s console.
-
It can use the password which is passed to MySQL client via “-p” parameter.
-
Dialog client installation bug has been fixed.
Percona offers two versions of this plugin:
-
Full PAM plugin called auth_pam. This plugin uses dialog.so. It fully supports the PAM protocol with arbitrary communication between client and server.
-
Oracle-compatible PAM called auth_pam_compat. This plugin uses mysql_clear_password which is a part of Oracle MySQL client. It also has some limitations, such as, it supports only one password input. You must use
-poption in order to pass the password to auth_pam_compat.
These two versions of plugins are physically different. To choose which one you want used, you must use IDENTIFIED WITH ‘auth_pam’ for auth_pam, and IDENTIFIED WITH ‘auth_pam_compat’ for auth_pam_compat.
Version specific information
A plugin may not be supported in later releases of MySQL or Percona Server for MySQL since version changes may introduce incompatible changes.
Installation
This plugin requires manual installation because it isn’t installed by default.
INSTALL PLUGIN auth_pam SONAME 'auth_pam.so';
After the plugin has been installed it should be present in the plugins list. To check if the plugin has been correctly installed and active
SHOW PLUGINS;
Expected output
...
| auth_pam | ACTIVE | AUTHENTICATION | auth_pam.so | GPL |
Configuration
In order to use the plugin, authentication method should be configured. Simple setup can be to use the standard UNIX authentication method (pam_unix).
Note
To use pam_unix, mysql will need to be added to the shadow group in order to have enough privileges to read the /etc/shadow.
A sample /etc/pam.d/mysqld file:
auth required pam_unix.so
account required pam_unix.so
For added information in the system log, you can expand it to be:
auth required pam_warn.so
auth required pam_unix.so audit
account required pam_unix.so audit
Creating a user
After the PAM plugin has been configured, users can be created with the PAM plugin as authentication method
CREATE USER 'newuser'@'localhost' IDENTIFIED WITH auth_pam;
This will create a user newuser that can connect from localhost who will be authenticated using the PAM plugin. If the pam_unix method is being used user will need to exist on the system.
Supplementary groups support
Percona Server for MySQL has implemented PAM plugin support for supplementary groups. Supplementary or secondary groups are extra groups a specific user is member of. For example user joe might be a member of groups: joe (his primary group) and secondary groups developers and dba. A complete list of groups and users belonging to them can be checked with cat /etc/group command.
This feature enables using secondary groups in the mapping part of the authentication string, like “mysql, developers=joe, dba=mark”. Previously only primary groups could have been specified there. If user is a member of both developers and dba, PAM plugin will map it to the joe because developers matches first.
Known issues
Default mysql stack size is not enough to handle pam_encryptfs module. The workaround is to increase the MySQL stack size by setting the thread-stack variable to at least 512KB or by increasing the old value by 256KB.
PAM authentication can fail with mysqld: pam_unix(mysqld:account): Fork failed: Cannot allocate memory error in the /var/log/secure even when there is enough memory available. Current workaround is to set vm.overcommit_memory to 1:
echo 1 /proc/sys/vm/overcommit_memory
and by adding the vm.overcommit_memory = 1 to /etc/sysctl.conf to make the change permanent after reboot. Authentication of internal (i.e. non PAM) accounts continues to work fine when mysqld reaches this memory utilization level. NOTE: Setting the vm.overcommit_memory to 1 will cause kernel to perform no memory overcommit handling which could increase the potential for memory overload and invoking of OOM killer.
SSL improvements
Percona Server for MySQL passes Elliptic Curve Cryptography (ECC) ciphers to OpenSSL by default.
Note
Although documented as supported, elliptic-curve crypto-based ciphers do not work with MySQL.
FIDO authentication plugin
Percona Server for MySQL supports the Fast Identify Online (FIDO) authentication method that uses a plugin. The FIDO authentication provides a set of standards that reduces the reliance on passwords.
The server-side fido authentication plugin enables authentication using external devices. If this plugin is the only authentication plugin used by the account, this plugin allows authentication without a password. Multi-factor authentication can use non-FIDO MySQL authentication methods, the FIDO authentication method, or a combination of both.
All distributions include the client-side authentication_fido_client plugin. This plugin allows clients to connect to accounts that use authentication_fido and authenticate on a server that has that plugin loaded.
Plugin and library file names
The plugin and library file names are listed in the following table.
| Plugin or file name | Plugin or library file name |
|---|---|
| Server-side plugin | authentication_fido |
| Client-side plugin | authentication_fido_client |
| Library file | authentication_fido.so |
Install the FIDO authentication plugin
The library file must be stored in the directory named by the plugin_dir variable.
At server startup, use the --plugin_load_add option with the library name. The option must be added each time the server starts.
[mysqld]
...
plugin-load-add=authentication_fido.so
...
INSTALL PLUGIN authentication_fido SONAME `authentication_fido.so`;
Verify installation
Use the SHOW PLUGINS statement or query the INFORMATION_SCHEMA.PLUGINS table to verify that the plugin was loaded successfully and is active.
Check the server error log if the plugin is not loaded.
FIDO authentication strategies
FIDO can be used with non-FIDO authentication. FIDO can be used to create 1FA accounts that do not require passwords.
Use FIDO authentication with non-FIDO authentication
A FIDO device is associated with the account using FIDO authentication. The FIDO device must be registered before the account can be used in a one-time process. This device must be available and the user must perform whatever FIDO device action required, such as adding a thumbprint, or the registration fails.
The registration can only be performed by the user named by the account. An error occurs if a user attempts the registration for another user.
The device registration can be performed on the mysql client or MySQL Shell. Use the --fido-register-factor option with the factor or factors for the device. For example, if you are using FIDO as a second authentication method, which is a common practice, the statement is --fido-register-factor=2.
Any authentication factors that proceed the FIDO registration must succeed before the registration continues.
The server checks the user account information to determine if the FIDO device requires registration. If the device must be registered, the server switches the client session to sandbox mode. The registration must be completed before any other activity. In this mode, only ALTER USER statements are permitted. If the session is started with --fido-register-factor, the client generates the statements required to register. After the registration is complete, the session is switched out of sandbox mode and the client can proceed as normal.
After the device is registered, the server updates the mysql.user system table for that account with the device registration status and stores the public key and credential ID.
The user must use the same FIDO device during registration and authentication. If the device is reset or the user attempts to use a different device, the authentication fails. To use a different device, the registered device must be unregistered and you must complete the registration process again.
Use FIDO authentication as the only method
If FIDO is used as the only method of authentication, the method does not use a password. The authentication uses a method such as a biometric scan or a security key.
The user creates an account with the PASSWORDLESS_USER_ADMIN privilege and the CREATE USER privilege.
The first element of the authentication_policy value must be an asterisk(*). Do not start with the plugin name. Configuring the authentication policy value has more information.
You must include the INITIAL AUTHENTICATION IDENTIFIED BY clause in the CREATE USER statement. The server does accept the statement without the clause but the account is unusable because the user cannot connect to the server to register the device.
The CREATE USER syntax is the following:
CREATE USER <username>@<hostname> IDENTIFIED WITH authentication_fido INITIAL AUTHENTICATION IDENTIFIED BY '<password>';
During registration, the user must authenticate with the password. After the device is registered, the server deletes the password and modifies the account to make FIDO the only authentication method.
Unregister a FIDO device
If the FIDO device is replaced or lost, the following actions occur:
| Action required | Who can perform the action |
|---|---|
| Unregister the previous device | The account owner or any user with the CREATE USER privilege can unregister the device |
| Register the new device | The user planning to use the device must register the new device |
Unregister a device with the following statement:
ALTER USER `username`@`hostname` {2|3} FACTOR UNREGISTER;
Encryption functions
Percona Server for MySQL adds encryption functions and variables to manage the encryption range. The functions may take an algorithm argument. Encryption converts plaintext into ciphertext using a key and an encryption algorithm.
You can also use the user-defined functions with the PEM format keys generated externally by the OpenSSL utility.
A digest uses plaintext and generates a hash value. This hash value can verify if the plaintext is unmodified. You can also sign or verify on digests to ensure that the original plaintext was not modified. You cannot decrypt the original text from the hash value.
When choosing key lengths, consider the following:
-
Encryption strength increases with the key size and, also, the key generation time.
-
If performance is important and the functions are frequently used, use symmetric encryption. Symmetric encryption functions are faster than asymmetric encryption functions. Moreover, asymmetric encryption has restrictions on the maximum length of a message being encrypted. For example, for RSA the algorithm maximum message size is the key length in bytes (key length in bits / 8) minus 11.
Version updates
Percona Server for MySQL 8.4.4 adds the following:
-
Support for
pkcs1,oaep, ornopadding for RSA encrypt and decrypt operationspkcs1padding explanationRSAES-PKCS1-v1_5RSA encryption padding scheme prevents patterns that attackers could exploit by including a random sequence of bytes, which ensures that the ciphertext is different no matter how many times it is encrypted.oaeppadding explanation
TheRSAES-OAEP-Optimal Asymmetric Encryption PaddingRSA encryption padding scheme adds a randomized mask generation function. This function makes it more difficult for attackers to exploit the encryption algorithm’s weaknesses or recover the original message.
Usingnopadding explanationnopadding means the plaintext message is encrypted without adding an extra layer before performing the RSA encryption operation. -
Support for
pkcs1orpkcs1_psspadding for RSA sign and verify operations
Thepkcs1padding explanationRSASSA-PKCS1-v1_5is a deterministic RSA signature padding scheme that hashes a message, pads the hash with a specific structure, and encrypts it with the signer’s private key for signature generation.
Thepkcs1_psspadding explanationRSASSA-PSS- `Probabilistic Signature Scheme’ is an RSA signature padding scheme used to add randomness to a message before signing it with a private key. This randomness helps to increase the security of the signature and makes it more resistant to various attacks. -
encryption_udf.legacy_padddingsystem variable -
Character set awareness
Charset Awareness
All component_encryption_udf functions now handle character sets intelligently:
• Algorithms, digest names, padding schemes, keys, and parameters in PEM format: Automatically converted to the ASCII charset at the MySQL level before passing to the functions.
• Messages, data blocks, and signatures used for digest calculation, encryption, decryption, signing, or verification: Automatically converted to the binary charset at the MySQL level before passing to the functions.
• Function return values in PEM format: Assigned the ASCII charset.
• Function return values for operations like digest calculation, encryption, decryption, and signing: Assigned the binary charset.
Use user-defined functions
You can also use the user-defined functions with the PEM format keys generated externally by the OpenSSL utility.
A digest uses plaintext and generates a hash value. This hash value can verify if the plaintext is unmodified. You can also sign or verify on digests to ensure that the original plaintext was not modified. You cannot decrypt the original text from the hash value.
When choosing key lengths, consider the following:
-
Encryption strength increases with the key size and generation time.
-
If performance is essential and the functions are frequently used, use symmetric encryption. Symmetric encryption functions are faster than asymmetric encryption functions. Moreover, asymmetric encryption restricts the maximum length of a message being encrypted. For example, the algorithm’s maximum message size for RSA is the key length in bytes (key length in bits / 8) minus 11.
Install component_encryption_udf
Use the Install Component Statement to add the component_encryption_udf component. The functions and variables are available. The user-defined functions and the Encryption threshold variables are auto-registered. There is no requirement to invoke CREATE FUNCTION ... SONAME ....
The INSERT privilege on the mysql.component system table is required to run the INSTALL COMPONENT statement. The operation adds a row to this table to register the component.
The following is an example of the installation command:
INSTALL COMPONENT 'file://component_encryption_udf';
Note
When you build Percona Server for MySQL from source code, the Encryption UDF component is included by default. To exclude it, use the -DWITH_ENCRYPTION_UDF=OFF option with cmake.
Functions
The following table and sections describe the functions. For examples, see function examples.
The following table describes the encryption threshold variables which can be used to set the maximum value for a key length based on the type of encryption used.
| Variable Name |
|---|
| encryption_udf.dh_bits_threshold |
| encryption_udf.dsa_bits_threshold |
| encryption_udf.legacy_padding |
| encryption_udf.rsa_bits_threshold |
User-defined functions described
asymmetric_decrypt(algorithm, crypt_str, key_str)
Decrypts an encrypted string using the algorithm and a key string.
Returns
A plaintext as a string.
Parameters
The following are the function’s parameters:
-
algorithm - the encryption algorithm supports RSA in decrypting the string.
-
crypt_str- an encrypted string produced by certain encryption functions like AES_ENCRYPT(). This string is typically stored as a binary or blog data type. -
key_str - a string in the PEM format. The key string must have the following attributes:
-
Valid
-
Public or private key string corresponding with the private or public key string used with the
asymmetric_encryptfunction. -
padding - An optional parameter introduced in Percona Server for MySQL 8.4.4. It is used with the RSA algorithm and supports RSA encryption padding schemes like pkcs1, or oaep. If you skip this parameter, the system determines its value based on the
encryption_udf.legacy_paddingvariable.
asymmetric_derive(pub_key_str, priv_key_str)
Derives a symmetric key using a public key generated on one side and a private key generated on another.
asymmetric_derive output
A key as a binary string.
asymmetric_derive parameters
The pub_key_str must be a public key in the PEM format and generated using the Diffie-Hellman (DH) algorithm.
The priv_key_str must be a private key in the PEM format and generated using the Diffie-Hellman (DH) algorithm.
asymmetric_encrypt(algorithm, str, key_str)
Encrypts a string using the algorithm and a key string.
asymmetric_encrypt output
A ciphertext as a binary string.
asymmetric_encrypt parameters
The parameters are the following:
-
algorithm - the encryption algorithm supports RSA to encrypt the string.
-
str - measured in bytes. The length of the string must not be greater than the key_str modulus length in bytes - 11 (additional bytes used for PKCS1 padding)
-
key_str - a key (either private or public) in the PEM format
-
padding - An optional parameter introduced in Percona Server for MySQL 8.4.4. It is used with the RSA algorithm and supports RSA encryption padding schemes like pkcs1, or oaep. If you skip this parameter, the system determines its value based on the
encryption_udf.legacy_paddingvariable.
asymmetric_sign(algorithm, digest_str, priv_key_str, digest_type)
Signs a digest string using a private key string.
asymmetric_sign output
A signature is a binary string.
asymmetric_sign parameters
The parameters are the following:
-
algorithm - the encryption algorithm supports either RSA or DSA in encrypting the string.
-
digest_str - the digest binary string that is signed. Invoking create_digest generates the digest.
-
priv_key_str - the private key used to sign the digest string. The key must be in the PEM format.
-
digest_type - the OpenSSL version installed on your system determines the available hash functions. The following table lists these functions:
OpenSSL 1.0.2 OpenSSL 1.1.0 OpenSSL 1.1.1 OpenSSL 3.0.x md5 md5 md5 md5 sha1 sha1 sha1 sha1 sha224 sha224 sha224 sha224 sha384 sha384 sha384 sha384 sha512 sha512 sha512 sha512 md4 md4 md4 md4 sha md5-sha1 md5-sha1 md5-sha1 ripemd160 ripemd160 ripemd160 sha512-224 whirlpool whirlpool sha512-224 sha512-256 blake2b512 sha512-256 sha3-224 blake2s256 whirlpool sha3-256 sm3 sha3-384 blake2b512 sha3-512 blake2s256 sha3-224 sha3-384 sha3-512 shake128 shake256 -
padding - An optional parameter introduced in Percona Server for MySQL 8.4.4. It is used with the RSA algorithm and supports RSA signature padding schemes like
pkcs1, orpkcs1_pss. If you skip this parameter, the system determines its value based on theencryption_udf.legacy_paddingvariable.
asymmetric_verify(algorithm, digest_str, sig_str, pub_key_str, digest_type)
Verifies whether the signature string matches the digest string.
asymmetric_verify output
A 1 (success) or a 0 (failure).
asymmetric_verify parameters
The parameters are the following:
-
algorithm - supports either ‘RSA’ or ‘DSA’.
-
digest_str - invoking create_digest generates this digest binary string.
-
sig_str - the signature binary string. Invoking asymmetric_sign generates this string.
-
pub_key_str - the signer’s public key string. This string must correspond to the private key passed to asymmetric_sign to generate the signature string. The string must be in the PEM format.
-
digest_type - the supported values are listed in the digest type table of create_digest
-
padding - An optional parameter introduced in Percona Server for MySQL 8.4.4. It is used with the RSA algorithm and supports RSA signature padding schemes like
pkcs1, orpkcs1_pss. If you skip this parameter, the system determines its value based on theencryption_udf.legacy_paddingvariable.
create_asymmetric_priv_key(algorithm,(key_len | dh_parameters))
Generates a private key using the given algorithm and key length for RSA or DSA
or Diffie-Hellman parameters for DH. For RSA or DSA, if needed, execute KILL
[QUERY|CONNECTION] <id> to terminate a long-lasting key generation. The
DH key generation from existing parameters is a quick operation. Therefore, it
does not make sense to terminate that operation with KILL.
create_asymmetric_priv_key output
The key as a string in the PEM format.
create_asymmetric_priv_key parameters
The parameters are the following:
-
algorithm - the supported values are ‘RSA’, ‘DSA’, or ‘DH’.
-
key_len - the supported key length values are the following:
-
RSA - the minimum length is 1,024. The maximum length is 16,384.
-
DSA - the minimum length is 1,024. The maximum length is 9,984.
Note
The key length limits are defined by OpenSSL. To change the maximum key length, use either encryption_udf.rsa_bits_threshold or encryption_udf.dsa_bits_threshold.
-
-
dh_parameters - Diffie-Hellman (DH) parameters. Invoking create_dh_parameter creates the DH parameters.
create_asymmetric_pub_key(algorithm, priv_key_str)
Derives a public key from the given private key using the given algorithm.
create_asymmetric_pub_key output
The key as a string in the PEM format.
create_asymmetric_pub_key parameters
The parameters are the following:
-
algorithm - the supported values are ‘RSA’, ‘DSA’, or ‘DH’.
-
priv_key_str - must be a valid key string in the PEM format.
create_dh_parameters(key_len)
Creates parameters for generating a Diffie-Hellman (DH) private/public key pair.
If needed, execute KILL [QUERY|CONNECTION] <id> to terminate the generation of long-lasting parameters.
Generating the DH parameters can take more time than generating the RSA keys or
the DSA keys.
OpenSSL defines the parameter length limits. To change the maximum parameter length, use encryption_udf.dh_bits_threshold.
create_dh_parameters output
A string in the PEM format and can be passed to create_asymmetric_priv_key.
create_dh_parameters parameters
The parameters are the following:
- key_len - the range for the key length is from 1024 to 10,000. The default value is 10,000.
create_digest(digest_type, str)
Creates a digest from the given string using the given digest type. The digest string can be used with asymmetric_sign() and asymmetric_verify().
create_digest output
The digest of the given string as a binary string
create_digest parameters
The parameters are the following:
-
digest_type - the OpenSSL version installed on your system determines the available hash functions. The following table lists these functions:
OpenSSL 1.0.2 OpenSSL 1.1.0 OpenSSL 1.1.1 OpenSSL 3.0.x md5 md5 md5 md5 sha1 sha1 sha1 sha1 sha224 sha224 sha224 sha224 sha384 sha384 sha384 sha384 sha512 sha512 sha512 sha512 md4 md4 md4 md4 sha md5-sha1 md5-sha1 md5-sha1 ripemd160 ripemd160 ripemd160 sha512-224 whirlpool whirlpool sha512-224 sha512-256 blake2b512 sha512-256 sha3-224 blake2s256 whirlpool sha3-256 sm3 sha3-384 blake2b512 sha3-512 blake2s256 sm3 sha3-224 blake2b512 sha3-384 blake2s256 sha3-512 blake2b512 shake128 blake2s256 shake256 -
str - String used to generate the digest string.
Encryption threshold variables
The maximum key length limits are defined by OpenSSL. Server administrators can limit the maximum key length using the encryption threshold variables.
The variables are automatically registered when component_encryption_udf is installed.
| Variable Name |
|---|
| encryption_udf.dh_bits_threshold |
encryption_udf.dh_bits_threshold
The variable sets the maximum limit for the create_dh_parameters() user-defined function and takes precedence over the OpenSSL maximum length value.
| Option | Description |
|---|---|
| command-line | Yes |
| scope | Global |
| data type | unsigned integer |
| default | 10000 |
The range for this variable is from 1024 to 10,000. The default value is 10,000.
encryption_udf.dsa_bits_threshold
The variable sets the threshold limits for create_asymmetric_priv_key() user-defined function when the function is invoked with the DSA parameter and takes precedence over the OpenSSL maximum length value.
| Option | Description |
|---|---|
| command-line | Yes |
| scope | Global |
| data type | unsigned integer |
| default | 9984 |
The range for this variable is from 1,024 to 9,984. The default value is 9,984.
encryption_udf.legacy_padding
The variable enables or disables the legacy padding scheme for certain encryption operations.
| Option | Description |
|---|---|
| command-line | Yes |
| scope | Global |
| data type | Boolean |
| default | OFF |
This system variable is a BOOLEAN type and set to OFF by default.
This variable controls how the functions asymmetric_encrypt(), asymmetric_decrypt(), asymmetric_sign(), and asymmetric_verify() behave when you don’t explicitly set the padding parameter.
-
When encryption_udf.legacy_padding is OFF:
-
asymmetric_encrypt() and asymmetric_decrypt() use OAEP encryption padding.
-
asymmetric_sign() and asymmetric_verify() use PKCS1_PSS signature padding.
-
When encryption_udf.legacy_padding is ON:
-
asymmetric_encrypt() and asymmetric_decrypt() use PKCS1 encryption padding.
-
asymmetric_sign() and asymmetric_verify() use PKCS1 signature padding.
The asymmetric_encrypt() and asymmetric_decrypt() functions, when the encryption is RSA, can accept an optional parameter, padding. You can set this parameter to no, pkcs1, or oaep. If you don’t specify this parameter, it defaults based on the encryption_udf.legacy_padding value.
The padding schemes have the following limitations:
| Padding Scheme | Details |
|---|---|
oaep |
The message you encrypt can be as long as your RSA key size in bytes - 42 bytes. |
no |
The message length must exactly match your RSA key size in bytes. For example, if your key is 1024 bits (128 bytes), the message must also be 128 bytes. If it doesn’t match, it will cause an error. |
pkcs1 |
Your message can be equal to or smaller than the RSA key size - 11 bytes. For instance, with a 1024-bit RSA key, your message can’t be longer than 117 bytes. |
Similarly, asymmetric_sign() and asymmetric_verify() also have an optional padding parameter, either pkcs1 or pkcs1_pss. If not explicitly set, it follows the default based on encryption_udf.legacy_padding. You can only use the padding parameter with RSA algorithms.
Additional resources
For more information, read Digital Signatures: Another layer of Data Protection in Percona Server for MySQL
encryption_udf.rsa_bits_threshold
The variable sets the threshold limits for the create_asymmetric_priv_key user-defined function when the function is invoked with the RSA parameter and takes precedence over the OpenSSL maximum length value.
| Option | Description |
|---|---|
| command-line | Yes |
| scope | Global |
| data type | unsigned integer |
| default | 16384 |
The range for this variable is from 1,024 to 16,384. The default value is 16,384.
Examples
Code examples for the following operations:
-
Set the threshold variables
-
Create a private key
-
Create a public key
-
Encrypt data
-
Decrypt data
-- Set Global variable
SET GLOBAL encryption_udf.dh_bits_threshold = 4096;
-- Set Global variable
SET GLOBAL encryption_udf.rsa_bits_threshold = 4096;
-- Create private key
SET @private_key = create_asymmetric_priv_key('RSA', 3072);
-- Create public key
SET @public_key = create_asymmetric_pub_key('RSA', @private_key);
-- Encrypt data using the private key (you can also use the public key)
SET @ciphertext = asymmetric_encrypt('RSA', 'This text is secret', @private_key);
-- Decrypt data using the public key (you can also use the private key)
-- The decrypted value @plaintext should be identical to the original 'This text is secret'
SET @plaintext = asymmetric_decrypt('RSA', @ciphertext, @public_key);
Code examples for the following operations:
-
Generate a digest string
-
Generate a digest signature
-
Verify the signature against the digest
-- Generate a digest string
SET @digest = create_digest('SHA256', 'This is the text for digest');
-- Generate a digest signature
SET @signature = asymmetric_sign('RSA', @digest, @private_key, 'SHA256');
-- Verify the signature against the digest
-- The @verify_signature must be equal to 1
SET @verify_signature = asymmetric_verify('RSA', @digest, @signature, @public_key, 'SHA256');
Code examples for the following operations:
-
Generate a DH parameter
-
Generates two DH key pairs
-
Generate a symmetric key using the public_1 and the private_2
-
Generate a symmetric key using the public_2 and the private_1
-- Generate a DH parameter
SET @dh_parameter = create_dh_parameters(3072);
-- Generate DH key pairs
SET @private_1 = create_asymmetric_priv_key('DH', @dh_parameter);
SET @public_1 = create_asymmetric_pub_key('DH', @private_1);
SET @private_2 = create_asymmetric_priv_key('DH', @dh_parameter);
SET @public_2 = create_asymmetric_pub_key('DH', @private_2);
-- Generate a symmetric key using the public_1 and private_2
-- The @symmetric_1 must be identical to @symmetric_2
SET symmetric_1 = asymmetric_derive(@public_1, @private_2);
-- Generate a symmetric key using the public_2 and private_1
-- The @symmetric_2 must be identical to @symmetric_1
SET symmetric_2 = asymmetric_derive(@public_2, @private_1);
Code examples for the following operations:
-
Create a private key using a
SETstatement -
Create a private key using a
SELECTstatement -
Create a private key using an
INSERTstatement
SET @private_key1 = create_asymmetric_priv_key('RSA', 3072);
SELECT create_asymmetric_priv_key('RSA', 3072) INTO @private_key2;
INSERT INTO key_table VALUES(create_asymmetric_priv_key('RSA', 3072));
Uninstall component_encryption_udf
You can deactivate and uninstall the component using the Uninstall Component statement.
UNINSTALL COMPONENT 'file://component_encryption_udf';
UUID_VX component
UUID_VX component
A Universally Unique Identifier (UUID) is a 128-bit number used to identify information uniquely in computer systems. It is often represented as a 32-character hexadecimal string divided into five groups separated by hyphens.
| Benefit | Description |
|---|---|
| Global Uniqueness | UUIDs ensure that each identifier is unique across different databases and systems without needing a central authority to manage the IDs. This prevents ID conflicts when merging data from multiple sources. |
| Decentralized Generation | Since UUIDs can be generated independently by different systems, there is no need for coordination. This is particularly useful in distributed environments where systems might not have constant communication with each other. |
| Scalability | UUIDs support scalability in distributed databases. New records can be added without worrying about generating duplicate IDs, even when data is inserted concurrently across multiple nodes. |
| Improved Data Merging | When data from various sources is combined, UUIDs prevent conflicts, making the merging process simpler and more reliable. |
| Security | UUIDs, especially those generated randomly (like UUIDv4), are hard to predict, adding a layer of security when used as identifiers. |
The following table describes the UUID versions:
| UUID Version | Description |
|---|---|
| Version 1 (Time-based) | - Generated using the current time and a node identifier (usually the MAC address). - Ensures uniqueness over time and across nodes. |
| Version 2 (DCE Security) | - Similar to version 1 but includes additional information such as POSIX UID/GID. - Often used in environments requiring enhanced security. |
| Version 3 (Name-based, MD5 hash) | - Generated from a namespace identifier and a name (string). - Uses the MD5 hashing algorithm to ensure the UUID is derived from the namespace and name. |
| Version 4 (Random) | - Generated using random numbers. - Offers high uniqueness and is easy to generate without requiring specific inputs. |
| Version 5 (Name-based, SHA-1 hash) | - Similar to version 3 but uses the SHA-1 hashing algorithm. - Provides a stronger hash function than MD5. |
| Version 6 (Time-ordered) | - A reordered version of UUIDv1 for better indexing and storage efficiency. - Combines timestamp and random or unique data. |
| Version 7 (Unix Epoch Time) | - Combines a high-precision timestamp with random data. - Provides unique, time-ordered UUIDs that are ideal for database indexing. |
| Version 8 (Custom) | - Reserved for user-defined purposes and experimental uses. - Allows custom formats and structures according to specific requirements. |
UUID version 4 (UUIDv4) generates a unique identifier using random numbers. This randomness ensures a high level of uniqueness without needing a central authority to manage IDs. However, using UUIDv4 as a primary key in a distributed database is not recommended. The random nature of UUIDv4 leads to several issues:
| Issue | Description |
|---|---|
| Inefficient Indexing | UUIDv4 does not follow any order, causing inefficient indexing. Databases struggle to keep records organized, leading to slower query performance. |
| Fragmentation | The random distribution of UUIDv4 can cause data fragmentation, making database storage less efficient. |
| Storage Space | UUIDs are larger (128 bits) than traditional integer keys, consuming more storage space and memory. |
For better performance and efficiency in a distributed database, consider using UUIDv7, which incorporates timestamps for some order levels.
UUID version 7 (UUIDv7) creates time-ordered identifiers by encoding a Unix timestamp with millisecond precision in the first 48 bits. It uses 6 bits to specify the UUID version and variant, while the remaining 74 bits are random. This time-ordering results in nearly sequential values, which helps improve index performance and locality in distributed systems.
Install the UUID_VX component
INSTALL COMPONENT 'file://component_uuid_vx_udf';
Expected output
Query OK, 0 rows affected (0.03 sec)
Character sets available
The following character sets are used in the component:
| Character set | Description |
|---|---|
| ascii | Used everywhere UUID strings are returned by functions or accepted as function arguments. |
| utf8mb4 | Used for string arguments in hash-based UUID generators, like UUID_V3() and UUID_V5() functions. |
| binary | Used for arguments in the BIN_TO_UUID_VX() function and for results from the UUID_VX_TO_BIN() function. |
Functions available in UUID_VX
The following functions are compatible with all UUID versions:
| Function name | Argument | Description |
|---|---|---|
BIN_TO_UUID_VX() |
One string argument that must be a hexadecimal of exactly 32 characters (16 bytes) | The function returns a UUID with binary data from the argument. It returns an error for all other inputs. |
IS_MAX_UUID_VX() |
One string argument that represents a UUID in standard or hexadecimal form. | The function returns true if the argument is a valid UUID and is a MAX UUID. It returns false for all other inputs. If the argument is NULL, it returns NULL. If the argument cannot be parsed as a UUID, the function throws an error. |
IS_NIL_UUID_VX() |
One string argument representing a UUID in standard or hexadecimal form. | The function returns true if the string is a NIL UUID. If the argument is NULL, it returns NULL. If the argument is not a valid UUID, it throws an error. |
IS_UUID_VX() |
One string argument that represents a UUID in either standard or hexadecimal form. | The function returns true if the argument is a valid UUID. If the argument is NULL, it returns NULL. For any other input, it returns false. |
MAX_UUID_VX() |
No argument | This function generates a MAX UUID, which has all 128 bits set to one (FFFFFFFF-FFFF-FFFF-FFFF-FFFFFFFFFFFF). This function result is the opposite of the NIL UUID. |
NIL_UUID_VX() |
No argument. | This function generates a NIL UUID, which has all 128 bits set to zero (00000000-0000-0000-0000-000000000000). |
UUID_VX_TO_BIN() |
One string argument, formatted as a UUID or in hexadecimal form | The function converts the string arugment to its binary representation. |
UUID_VX_VARIANT() |
One string argument that represents a UUID in either standard or hexadecimal format. | The function returns the UUID version (1-8) or an error if the argument is not a valid UUID or returns NULL if the input is NULL. |
UUID_VX_VERSION() |
One string representing a UUID in standard or hexadecimal form. | The function returns version of UUID(1-8). The function throws an error if the argument is not a valid UUID in formatted or hexadecimal form or returns a NULL if the argument is NULL. If the argument is a valid UUID string but has an unknown value (outside of the 1-8 range) the function returns -1. |
Examples of functions for all UUID versions
SELECT is_uuid_vx('01900bf6-0eb0-715a-80f4-636367e07777');
Expected output
+----------------------------------------------------+
| is_uuid_vx('01900bf6-0eb0-715a-80f4-636367e07777') |
+----------------------------------------------------+
| 1 |
+----------------------------------------------------+
SELECT uuid_vx_version('01900bf6-0eb0-715a-80f4-636367e07777');
Expected output
+---------------------------------------------------------+
| uuid_vx_version('01900bf6-0eb0-715a-80f4-636367e07777') |
+---------------------------------------------------------+
| 7 |
+---------------------------------------------------------+
SELECT uuid_vx_variant('01900bf6-0eb0-715a-80f4-636367e07777');
Expected output
+---------------------------------------------------------+
| uuid_vx_variant('01900bf6-0eb0-715a-80f4-636367e07777') |
+---------------------------------------------------------+
| 1 |
+---------------------------------------------------------+
UUID generator functions
The following functions generate specific UUID versions:
| UUID Version | Arguement | Description |
|---|---|---|
UUID_V1() |
No argument | Generates a version 1 UUID based on a timestamp. If possible, use UUID_V7() instead. |
UUID_V3() |
One or two arguments: the first argument is a string that is hashed with MD5 and used in the UUID; the second argument is optional and specifies a namespace (integer values: DNS: 0, URL: 1, OID: 2, X.500: 3; default is 1 or URL). | Generates a version 3 UUID based on a name. Note: MD5 is outdated and not secure. Use with caution and avoid exposing sensitive data. |
UUID_V4() |
No argument | The function generates a version 4 UUID using random numbers and is similar to the built-in UUID() function. |
UUID_V5() |
One or two arguments: the first argument is a string that is hashed with SHA1 and used in the UUID; the second argument is optional and specifies a namespace (integer values: DNS: 0, URL: 1, OID: 2, X.500: 3; default is 1 or URL). | Generates a version 5 UUID based on a name. Note: SHA1 is better than MD5 but still not secure. Use with caution and avoid exposing sensitive data. |
UUID_V6() |
No argument | Generates a version 6 UUID based on a timestamp. If possible, use UUID_V7() instead. |
UUID_V7() |
Can have either no argument or a one integer argument: the argument is the number of milliseconds to adjust the timestamp forward or backward (negative values). | Generates a version 7 UUID based on a timestamp. If there is no argument, no timestamp shift occurs. Timestamp shift can hide the actual creation time of the record. |
The UUID_v3() function and UUID_v5() function do not validate the string argument, such as whether the URL is formatted correctly or the DNS name is correct. These functions generate a string hash and then add that hash to a UUID with the defined namespace. The user specifies the string.
UUID generator examples
UUID version 1:
SELECT uuid_v1();
Expected output
+--------------------------------------+
| uuid_v1() |
+--------------------------------------+
| 14c22f93-2962-11ef-9078-c3abf1c446bb |
+--------------------------------------+
UUID version 3 takes one argument and uses the default UUID namespace as “URL”.
SELECT uuid_v3('http://example.com');
Expected output
+--------------------------------------+
| uuid_v3('http://example.com') |
+--------------------------------------+
| d632b50c-7913-3137-ae9a-2d93f56e70d5 |
+--------------------------------------+
UUID version 3 takes one argument and the explicit UUID namespace is “URL”.
SELECT uuid_v3('http://example.com', 1);
Expected output
+--------------------------------------+
| uuid_v3('http://example.com') |
+--------------------------------------+
| d632b50c-7913-3137-ae9a-2d93f56e70d5 |
+--------------------------------------+
UUID version 3 takes one argument, with the explicit UUID namespace set to “DNS”.
SELECT uuid_v3('example.com',0);
Expected output
+--------------------------------------+
| uuid_v3('example.com',0) |
+--------------------------------------+
| 9073926b-929f-31c2-abc9-fad77ae3e8eb |
+--------------------------------------+
UUID version 4:
SELECT uuid_v4();
Expected output
+--------------------------------------+
| uuid_v4() |
+--------------------------------------+
| a408e4ad-9b98-4edb-a105-40f22648a928 |
+--------------------------------------+
UUID version 5:
SELECT uuid_v5("http://example.com");
Expected output
+--------------------------------------+
| uuid_v5("http://example.com") |
+--------------------------------------+
| 8c9ddcb0-8084-5a7f-a988-1095ab18b5df |
+--------------------------------------+
UUID version 6:
SELECT uuid_v6();
Expected output
+--------------------------------------+
| uuid_v6() |
+--------------------------------------+
| 1ef29686-2168-64a7-b9a2-adb13f80f118 |
+--------------------------------------+
UUID version 7 generation:
SELECT uuid_v7();
Expected output
+--------------------------------------+
| uuid_v7() |
+--------------------------------------+
| 019010f6-0426-70f0-80b0-b63decd3d7d1 |
+--------------------------------------+
1 row in set (0.00 sec)
UUID version 7 with timestamp offset in 84000 seconds in the future
SELECT uuid_v7(84000000);
Expected output
+--------------------------------------+
| uuid_v7(84000000) |
+--------------------------------------+
| 019015f8-c7c4-70b4-8043-fe241c2be36c |
+--------------------------------------+
Time-based functions
The following functions are used only with time-based UUIDs, specifically versions 1, 6, and 7.
| Function name | Argument | Description |
|---|---|---|
| UUID_VX_TO_TIMESTAMP() | One string argument | Returns a timestamp string like “2024-05-29 18:04:14.201”. If the argument is not parsable as UUID v.1,6,7, the function throws an error. The function always uses UTC time, regardless of system settings or time zone settings in MySQL. |
| UUID_VX_TO_TIMESTAMP_TZ() | One string argument | Returns a timestamp string with the time zone like “Wed May 29 18:05:07 2024 GMT”. If the argument is not parsable as UUID v.1,6,7, the function throws an error. The function always uses UTC time (GMT time zone), regardless of system settings or time zone settings in MySQL. |
| UUID_VX_TO_UNIXTIME() | One string argument | Returns a number of milliseconds since the Epoch. If the argument is not parsable as UUID v.1,6,7, the function throws an error. |
Timestamp-based function examples
SELECT uuid_vx_to_timestamp('01900bf6-0eb0-715a-80f4-636367e07777');
Expected output
+--------------------------------------------------------------+
| uuid_vx_to_timestamp('01900bf6-0eb0-715a-80f4-636367e07777') |
+--------------------------------------------------------------+
| 2024-06-12 10:19:53.392 |
+--------------------------------------------------------------+
1 row in set (0.00 sec)
SELECT uuid_vx_to_timestamp_tz('01900bf6-0eb0-715a-80f4-636367e07777');
Expected output
+-----------------------------------------------------------------+
| uuid_vx_to_timestamp_tz('01900bf6-0eb0-715a-80f4-636367e07777') |
+-----------------------------------------------------------------+
| Wed Jun 12 10:19:53 2024 GMT |
+-----------------------------------------------------------------+
SELECT uuid_vx_to_unixtime('01900bf6-0eb0-715a-80f4-636367e07777');
Expected output
+-------------------------------------------------------------+
| uuid_vx_to_unixtime('01900bf6-0eb0-715a-80f4-636367e07777') |
+-------------------------------------------------------------+
| 1718187593392 |
+-------------------------------------------------------------+
Uninstall the UUID_VX component
UNINSTALL COMPONENT 'file://component_uuid_vx_udf';
Expected output
Query OK, 0 rows affected (0.03 sec)
Data-at-rest-encryption
Data at Rest Encryption
Data security is a concern for institutions and organizations. Transparent
Data Encryption (TDE) or Data at Rest Encryption encrypts
data files. Data at rest is any data that is not accessed or changed frequently, stored on different
types of storage devices. Encryption ensures that if an unauthorized user
accesses the data files from the file system, the user cannot read the contents.
If the user uses master key encryption, the MySQL keyring plugin stores the InnoDB master key, used for the master key encryption implemented by MySQL. The master key is also used to encrypt redo logs, and undo logs, along with the tablespaces.
The InnoDB tablespace encryption has the following components:
-
The database instance has a master key for tablespaces and a master key for binary log encryption.
-
Each tablespace has a tablespace key. The key is used to encrypt the Tablespace data pages. Encrypted tablespace keys are written on the tablespace header. In the master key implementation, the tablespace key cannot be changed unless you rebuild the table.
Two separate keys allow the master key to be rotated in a minimal operation. When the master key is rotated, each tablespace key is decrypted and re-encrypted with the new master key. The key rotation only reads and writes to the first page of each tablespace file (.ibd).
An InnoDB tablespace file is comprised of multiple logical and physical pages. Page 0 is the tablespace header page and keeps the metadata for the tablespace. The encryption information is stored on page 0 and the tablespace key is encrypted.
An encrypted page is decrypted at the I/O layer, added to the buffer pool, and used to access the data. A buffer pool page is not encrypted. The page is encrypted by the I/O layer before the page is flushed to disk.
Review Get help from Percona for ways that we can work with you.
Percona XtraBackup support
Percona XtraBackup version 8.4 supports the backup of encrypted general tablespaces.
Percona XtraBackup only supports features that are Generally Available (GA) in Percona Server for MySQL. Due to time constraints, a GA feature may be supported in a later Percona XtraBackup release. Review the Percona XtraBackup release notes for more information.
Keyring components
Keyring components overview
Percona Server supports a keyring that enables internal server components to store sensitive information securely for later retrieval.
Warning
Enable only one keyring component at a time for each server instance. Enabling multiple keyring components is not supported and may result in data loss.
Percona Server supports the following keyring components:
Get Started with component keyring
Use the keyring file component
Use the keyring vault component
Get Started with component keyring
Enable the component keyring (component_keyring_file) in Percona Server 8.4 for encryption at rest. In MySQL 8.4, the supported path is the component keyring, not legacy keyring plugins.
Important
Enable only one keyring at a time. Do not use legacy keyring plugins (such as keyring_file or keyring_vault) together with the component keyring.
If you are upgrading from 8.0 or another release and already have data encrypted with a legacy keyring plugin, do not enable the component keyring without a migration plan. Data encrypted with the old plugin will not be readable by the new component; existing encrypted tables can become unreadable.
See Upgrade components and your upgrade documentation before switching. For migrating keys from a legacy keyring to the component keyring, check MySQL and Percona documentation for your version (for example, the mysql_migrate_keyring utility where applicable).
This guide is based on Configuring the Component Keyring in Percona Server and PXC 8.4 (Percona Community).
Scope: This quickstart assumes a typical package install and standard paths. Minimal images, custom builds, tarball installs, or locked-down environments may need different paths and steps. Confirm your binary location, plugin directory, and manifest path before following the steps below.
Prerequisites
- Percona Server for MySQL 8.4 installed
sudoor root access to the server filesystem (to create the keyring directory, manifest, and component config)- Service name may be
mysqlormysqlddepending on your system - For the encryption examples (tables, system tablespace, redo/undo), the MySQL user you connect as must have the required privileges (for example,
CREATE TABLESPACEfor system tablespace). OS-level sudo does not grant MySQL privileges.
This guide assumes you have OS-level access to install and configure the keyring. In managed or hosted environments where you have only SQL privileges and no filesystem access, your provider must configure the keyring or offer an alternative. This quickstart does not cover managed or hosted environments with only SQL access.
Step 1: Register the component (manifest)
The manifest file (mysqld.my) tells MySQL which component to load. The component’s own configuration file (Step 3) configures how it behaves: where to store keys and whether the keyring is read-only.
MySQL loads components from a JSON manifest. A single typo, trailing comma, or missing quote can prevent the server from starting.
Before restarting, you can validate JSON syntax locally with jq . /usr/sbin/mysqld.my (if jq is installed). When the JSON is valid, jq . prints the file contents back; invalid JSON produces an error.
Note: jq only checks syntax. It does not verify that the component library exists in the plugin directory or that the server will load it. A successful jq run does not guarantee the server will start with the keyring. Do not paste configuration that contains paths or other sensitive details into third-party websites.
-
Confirm where your server expects the manifest. The server reads the manifest from a location tied to the
mysqldbinary (often the same directory as the binary). Check the path of the running binary (for example, inspect your systemd unit file or runreadlink -f /proc/$(pgrep -f mysqld)/exeon Linux).If you installed from a tarball or a non-standard repo, the path may not be
/usr/sbin. Create the manifest in the location you confirmed. If the manifest is in the wrong place, the server ignores it and starts without the keyring; encryption (for example,CREATE TABLE ... ENCRYPTION='Y') will then fail with no clear error.A common path is
/usr/sbin/mysqld.my. Custom builds or container images may use/usr/bin,/usr/local/sbin, or another directory. Some packages or security modules (for example, AppArmor or SELinux) may block writing under/usr/sbin. Create the manifest file at the path you confirmed:sudo vi /usr/sbin/mysqld.my -
Add the following JSON (check spelling and quotes):
{ "components": "file://component_keyring_file" } -
Set ownership and permissions:
sudo chown root:root /usr/sbin/mysqld.my sudo chmod 644 /usr/sbin/mysqld.my
Step 2: Create the keyring directory
The keyring directory holds encryption keys. Restrict access.
sudo mkdir -p /var/lib/mysql-keyring
sudo chown mysql:mysql /var/lib/mysql-keyring
sudo chmod 750 /var/lib/mysql-keyring
Rule of thumb: mysql owns the directory; only MySQL (and root for administration) should access it.
If you use a custom Linux user, a Docker volume, or a non-standard install, ensure the keyring directory is owned by the user that runs MySQL and that the MySQL process has read access to the manifest and component config files. “Permission denied” on startup usually means ownership or permissions on the manifest and component config paths.
In hardened environments (for example, security-hardened AMIs), extended attributes (ACLs) or immutable flags (for example, chattr +i) may also block access. If chmod/chown succeed but MySQL still cannot access the file or directory, check with getfacl or lsattr and adjust or remove restrictions as your security policy allows.
In orchestrated or container environments (for example, Kubernetes, OpenShift), file ownership and permissions are often managed by the platform (for example, Security Context Constraints or admission controllers). Manual chown/chmod may fail or be overwritten when the pod restarts. Check your platform documentation for how to set permissions or run as the correct user.
Back up the keyring file: data recovery depends on it
Do not delete the keyring file (for example, /var/lib/mysql-keyring/component_keyring_file) to “clean up” or for any other reason. If that file is lost or deleted, all data encrypted with it is unrecoverable. There is no way to decrypt tablespaces, redo logs, or undo logs without the keyring.
Life cycle: Back up the keyring file and its directory as part of your normal backup strategy. Include the keyring in your restore procedures so that after a restore you can start MySQL with the same keys and access your encrypted data. If you move or clone the server, copy the keyring file to the new location before starting the server.
Step 3: Configure the keyring component
Verify the component library exists before pointing the manifest at it. In a MySQL session (if the server is already running), run SELECT @@plugin_dir;. Then list that directory and confirm the component_keyring_file library (or the file name your distribution uses) is present. On Linux you can run ls -la "$(mysql -N -e 'SELECT @@plugin_dir;')" and look for a file related to component_keyring_file.
Minimal or slim container images may omit the library. Install the package that provides the keyring component or use a full image.
Create the component configuration file in the MySQL plugin directory. Use the path returned by @@plugin_dir (typical paths: /usr/lib64/mysql/plugin on RHEL-style, /usr/lib/mysql/plugin on Debian/Ubuntu).
-
Go to the plugin directory (use the path from
@@plugin_diror adjust for your distribution):cd /usr/lib64/mysql/plugin -
Create the config file:
sudo vi component_keyring_file.cnf -
Add (adjust
pathif you used a different keyring directory):{ "path": "/var/lib/mysql-keyring/component_keyring_file", "read_only": false }Use
"read_only": trueif you want to prevent runtime changes to the keyring. You can validate the component config file withjq . component_keyring_file.cnfbefore restarting. -
Set ownership and permissions:
sudo chown root:root component_keyring_file.cnf sudo chmod 640 component_keyring_file.cnf
Step 4: Restart MySQL
Loading the component from the manifest requires a server restart. On a typical system:
sudo systemctl restart mysql
Or sudo systemctl restart mysqld, depending on your system.
In orchestrated or managed environments (for example, Kubernetes or some cloud DB services), restart may be controlled by a scheduler or not allowed mid-workflow. Plan the keyring setup during a maintenance window or coordinate with your provider. There is no supported way to load the keyring component at runtime without a restart when using the file-based manifest.
If the server does not start, check the error log. To see where it is written, run SELECT @@log_error; in a previous MySQL session, or look in common locations such as /var/log/mysql/error.log or the server datadir. JSON syntax errors in the manifest or component config (trailing commas, missing quotes, wrong brackets) are reported there. Fix the JSON and restart again.
Step 5: Verify the keyring is loaded
In a MySQL session:
SELECT * FROM performance_schema.keyring_component_status;
You should see component_keyring_file with Component_status = Active and the correct Data_file path.
Example:
+---------------------+-----------------------------------------------+
| STATUS_KEY | STATUS_VALUE |
+---------------------+-----------------------------------------------+
| Component_name | component_keyring_file |
| Component_status | Active |
| Data_file | /var/lib/mysql-keyring/component_keyring_file |
| Read_only | No |
+---------------------+-----------------------------------------------+
Seeing “Active” here means only that the keyring component is loaded and ready. Your data is not encrypted until you enable encryption for tables, tablespaces, or logs in the next section.
Treat Step 5 as “keyring ready”. Actual protection comes from applying encryption in the Data at rest encryption section below.
Data at rest encryption
With the keyring loaded, the server can encrypt data on disk (transparent data encryption, or TDE). Keys are stored in the keyring; you enable encryption per tablespace or for redo/undo logs.
Performance: Enabling system-wide encryption (redo logs, undo logs, and the system tablespace) consumes extra CPU cycles and I/O. Encryption has a measurable cost: throughput can drop and latency can increase. The impact depends on workload. Consider enabling encryption where it matters for compliance or risk, and measure performance under your load before and after.
Tables and schemas
Create a new table with encryption:
CREATE TABLE myapp.sensitive_data (
id INT PRIMARY KEY,
payload VARCHAR(255)
) ENCRYPTION='Y';
Encrypt an existing table:
ALTER TABLE myapp.existing_table ENCRYPTION='Y';
Set default encryption for a schema so new tables are encrypted by default:
ALTER SCHEMA myapp DEFAULT ENCRYPTION='Y';
System tablespace
Encrypt the system tablespace (data dictionary, mysql system tablespace):
ALTER TABLESPACE mysql ENCRYPTION='Y';
Requires the CREATE TABLESPACE privilege on the MySQL user you use (having OS sudo does not grant MySQL privileges).
Encrypting the system tablespace can be a long-running, high-I/O operation. On a large instance it may take minutes or hours and can increase load or cause blocking. Do not assume it is safe to run on a heavily loaded production system without a maintenance window. Plan for a maintenance window and expect significant I/O. See Encrypt system tablespace.
Redo and undo logs
Enable encryption for redo and undo log files so recovery and rollback data are encrypted on disk.
All SET GLOBAL settings are temporary and are lost at restart. For redo/undo log encryption, use the config file as the primary method. Do not enable it only with SET GLOBAL or your protection will vanish after the next reboot (for example, after a kernel update or crash).
Add these options to your MySQL config file (for example, my.cnf) so they persist:
innodb_redo_log_encrypt = ON
innodb_undo_log_encrypt = ON
Restart the server (or add the options and plan a restart). If these settings are only set with SET GLOBAL and not in the config file, the server will stop encrypting new redo/undo pages after a restart with no clear indication.
New log pages are encrypted when written; existing pages are unchanged until they are rewritten. See Log encryption.
Verify encryption
The following checks report metadata and schema settings only. They do not prove that data on disk is actually encrypted or that the keyring has served a key for that tablespace.
InnoDB encrypts data when the option is set. These queries only confirm that the option is set (the “label”), not that the “lock” is engaged on disk.
Tables: List tables that have the encryption option set. Such tables show ENCRYPTION="Y" in CREATE_OPTIONS:
SELECT TABLE_SCHEMA, TABLE_NAME, CREATE_OPTIONS
FROM INFORMATION_SCHEMA.TABLES
WHERE CREATE_OPTIONS LIKE '%ENCRYPTION%';
Tablespaces: Check whether a tablespace has the encryption flag set in INNODB_TABLESPACES. Bit 13 (value 8192) is set when the tablespace is marked encrypted:
SELECT name, (flag & 8192) != 0 AS encrypted
FROM INFORMATION_SCHEMA.INNODB_TABLESPACES;
Schemas: List schemas that have default encryption (new tables in schemas with default encryption are encrypted by default):
SELECT SCHEMA_NAME, DEFAULT_ENCRYPTION
FROM INFORMATION_SCHEMA.SCHEMATA
WHERE DEFAULT_ENCRYPTION = 'YES';
Redo and undo logs: Confirm whether redo and undo log encryption is enabled:
SHOW GLOBAL VARIABLES LIKE 'innodb_redo_log_encrypt';
SHOW GLOBAL VARIABLES LIKE 'innodb_undo_log_encrypt';
For more (binary logs, doublewrite, temporary files, and INNODB_TABLESPACES_ENCRYPTION), see Verify encryption.
Clean up
If you ran the examples above and want to return the instance to its previous state, run the following. Skip any step that does not apply (for example, if you did not create myapp or encrypt the system tablespace).
Disable redo and undo log encryption. If you added them to my.cnf, remove or comment out those lines and restart; otherwise they will turn back on at next restart.
To turn off only for the current run:
SET GLOBAL innodb_redo_log_encrypt = OFF;
SET GLOBAL innodb_undo_log_encrypt = OFF;
Revert system tablespace encryption (only if you ran ALTER TABLESPACE mysql ENCRYPTION='Y'):
ALTER TABLESPACE mysql ENCRYPTION='N';
Remove the example schema default and tables. If you created the myapp schema or the example tables used in this guide:
ALTER SCHEMA myapp DEFAULT ENCRYPTION='N';
DROP TABLE IF EXISTS myapp.sensitive_data;
If you encrypted a different existing table, revert it with ALTER TABLE schema_name.table_name ENCRYPTION='N';.
The keyring remains loaded and the keyring files on disk are unchanged. To remove the keyring entirely, delete the component from mysqld.my, remove or rename component_keyring_file.cnf, and restart MySQL.
Next steps
- Use data at rest encryption (for example, encrypt tablespaces, redo/undo logs) with the keyring in place.
- Verify encryption for your tablespaces and logs.
- For Percona XtraDB Cluster (PXC): keyring file is not replicated; copy the keyring file from the bootstrap node to other nodes before starting them. See the Percona Community blog for PXC-specific steps and the 8.4.4/8.4.5 plugin-path workaround.
Operational notes
- Treat the keyring file as a secret: restrict access and include it in your secure backup strategy.
- Back up the keyring file and its directory. If the keyring is lost or damaged (for example, after a migration or permission change), you cannot decrypt data that was encrypted with the keyring. Recovery is not possible. Duplicate or back up the keyring before major changes to the server or filesystem.
- If the keyring is lost and you have encrypted data, recovery is not possible.
- To change the master key (for example, for rotation or compliance), use
ALTER INSTANCE ROTATE INNODB MASTER KEY; see Rotate the master encryption key. Do not delete or replace the keyring file manually to “reset” or rotate. You will lose access to all data encrypted with it. - For MySQL 8.4 and later, components are the supported keyring model; avoid mixing with legacy keyring plugins.
Use the keyring file component
The keyring_file component is part of the component-based MySQL infrastructure which extends the server capabilities.
Important
Percona Server for MySQL 8.4 does not support the keyring_file plugin.
See the MySQL documentation on the component installation and on the keyring_file component usage for more information.
The component must be installed with a manifest. A keyring component is not loaded with the --early-plugin-load option on the server. The server uses a manifest and the component consults its configuration file during initialization. You should only load a keyring component with a manifest file. Do not use the INSTALL_COMPONENT statement, which loads the keyring components too late in the startup sequence of the server. For example, InnoDB requires the component, but because the components are registered in the mysql.component table, this table is loaded after InnoDB initialization.
You should create a global manifest file named mysqld.my in the installation directory and, optionally, create a local manifest file, also named mysqld.my in a data directory.
To install a keyring component, do the following:
-
Write a manifest in a valid JSON format
-
Write a configuration file
A manifest file indicates which component to load. If the manifest file does not exist, the server does not load the component associated with that file. During startup, the server reads the global manifest file from the installation directory. The global manifest file can contain the required information or point to a local manifest file located in the data directory. If you have multiple server instances that use different keyring components use a local manifest file in each data directory to load the correct keyring component for that instance.
Warning
Enable only one keyring plugin or one keyring component at a time for each server instance. Enabling multiple keyring plugins or keyring components or mixing keyring plugins or keyring components is not supported and may result in data loss.
An example of a manifest and a configuration file is the following:
An example of ./bin/mysqld.my:
{
"components": "file://component_keyring_file"
}
An example of /lib/plugin/component_keyring_file.cnf:
{
"path": "/var/lib/mysql-keyring/keyring_file", "read_only": false
}
Use the keyring vault component
The keyring_vault component extends the server capabilities and provides an interface for the database with a HashiCorp Vault server to store key and secure encryption keys.
The component must be installed with a manifest. A keyring component is not loaded with the --early-plugin-load option on the server. The server uses a manifest and the component consults its configuration file during initialization. You should only load a keyring component with a manifest file. Do not use the INSTALL_COMPONENT statement, which loads the keyring components too late in the startup sequence of the server. For example, InnoDB requires the component, but because the components are registered in the mysql.component table, this table is loaded after InnoDB initialization.
You should create a global manifest file named mysqld.my in the installation directory and, optionally, create a local manifest file, also named mysqld.my in a data directory.
To install a keyring component, do the following:
-
Write a manifest in a valid JSON format
-
Write a configuration file
A manifest file indicates which component to load. If the manifest file does not exist, the server does not load the component associated with that file. During startup, the server reads the global manifest file from the installation directory. The global manifest file can contain the required information or point to a local manifest file located in the data directory. If you have multiple server instances that use different keyring components use a local manifest file in each data directory to load the correct keyring component for that instance.
Warning
Enable only one keyring plugin or one keyring component at a time for each server instance. Enabling multiple keyring plugins or keyring components or mixing keyring plugins or keyring components is not supported and may result in data loss.
The following example is a global manifest file that does not use local manifests:
{
"read_local_manifest": false,
"components": "file://component_keyring_vault"
}
The following is an example of a global manifest file that points to a local manifest file:
{
"read_local_manifest": true
}
The following is an example of a local manifest file:
{
"components": "file://component_keyring_vault"
}
The configuration settings are either in a global configuration file or a local configuration file.
The component communicates with the Hashicorp Vault server . Prepare the certificate and key files for a secure HTTPS connection to the server. You must have an organizational Certificate Authority (CA), a private vault key, and certificate for the Hashicorp Vault server instance.
You can use OpenSSL to generate these files or use existing files. The key files contain sensitive information. Store these key files and the password used to create each key in a secure location.
You can use the Hashicorp Vault to build your own CA , if needed, and then create a Hashicorp Vault server certificate.
The component_keyring_vault.cnf file contains the following information:
-
read_local_config [optional]- this option can be used only in the global configuration file. This option indicates whether the component should read configuration information from the local configuration file. The allowed values aretrueorfalse. If you do not use this option, the component uses only the global configuration file.If you use the
read_local_configoption in the global configuration file along with other items, the component checks theread_local_configitem value first:false- the component processes other items in the global configuration file and ignores the local configuration file.true- the component ignores other items in the global configuration file and attempts to read the local configuration file. -
timeout- the duration in seconds for the Vault server connection timeout. The default value is 15. The allowed range is from 0 to 86400. The timeout can be also disabled to wait an infinite amount of time by setting this variable to 0. -
vault_url- the Vault server address. -
secret_mount_point- the mount point name where the keyring_vault stores the keys. -
token- a token generated by the Vault server. -
secret_mount_point_version [optional]- theKV Secrets Engine version (kv or kv-v2)used. The allowed values areAUTO,1, and2. The default value isAUTO. -
vault_ca [optional]- if the machine does not trust the Vault’s CA certificate, this variable points to the CA certificate used to sign the Vault’s certificates.
Example of a configuration file in JSON format
{
"timeout": 15,
"vault_url": "https://vault.public.com:8202",
"secret_mount_point": "secret",
"secret_mount_point_version": "AUTO",
"token": "{randomly-generated-alphanumeric-string}",
"vault_ca": "/data/keyring_vault_confs/vault_ca.crt"
}
Warning
Each secret_mount_point must be used by only one server. The behavior is unpredictable if multiple servers use the same secret_mount_point.
The first time a key is fetched from a keyring, the keyring_vault communicates with the Vault server to retrieve the key type and data.
secret_mount_point_version information
The secret_mount_point_version can be either a 1, 2, AUTO, or the secret_mount_point_version parameter is not listed in the configuration file.
| Value | Description |
|---|---|
| 1 | Works with KV Secrets Engine - Version 1 (kv). When forming key operation URLs, the secret_mount_point is always used without any transformations. For example, to return a key named skey, the URL is |
| 2 | Works with KV Secrets Engine - Version 2 (kv) The initialization logic splits the secret_mount_point parameter into two parts:
mount_point_path and the directory_path are needed to form key access URLs: |
| AUTO | An autodetection mechanism probes and determines if the secrets engine version is kv or kv-v2 and based on the outcome will either use the secret_mount_point as is, or split the secret_mount_point into two parts. |
| Not listed | If the secret_mount_point_version is not listed in the configuration file, the behavior is the same as AUTO. |
If you set the secret_mount_point_version to 2 but the path pointed by secret_mount_point is based on KV Secrets Engine - Version 1 (kv), an error is reported, and the component fails to initialize.
If you set the secret_mount_point_version to 1 but the path pointed by secret_mount_point is based on KV Secrets Engine - Version 2 (kv-v2), the component initialization succeeds but any MySQL keyring-related operations fail.
Upgrade from Vault Secrets Engine Version 1 to Version 2
You can upgrade from the Vault Secrets Engine Version 1 to Version 2.
Use either of the following methods:
-
Set the
secret_mount_point_versiontoAUTOor the variable is not set in thekeyring_vaultcomponent configuration files in all Percona Servers. TheAUTOvalue ensures the autodetection mechanism is invoked during the component initialization. -
Set the
secret_mount_point_versionto2to ensure that components do not initialize unless thekvtokv-v2upgrade completes.
Note
The keyring_vault component that works with kv-v2 secret engines does not use the built-in key versioning capabilities. The keyring key versions are encoded into key names.
See also
Hashicorp Documentation: Installing Vault
[Hashicorp Documentation: Production Hardening ](https://learn.hashicorp.com/vault/operations/production-hardening
)
Use the Key Management Interoperability Protocol (KMIP)
Percona Server for MySQL supports the OASIS Key Management Interoperability Protocol (KMIP) . This implementation was tested with: - PyKMIP server - HashiCorp Vault Enterprise KMIP Secrets Engine - Thales CipherTrust Manager - Fortanix Data Security Manager
KMIP enables communication between key management systems and the database server. The protocol can do the following:
-
Streamline encryption key management
-
Eliminate redundant key management processes
Component installation
The component must be installed with a manifest. A keyring component is not loaded with the --early-plugin-load option on the server. The server uses a manifest and the component consults its configuration file during initialization. You should only load a keyring component with a manifest file. Do not use the INSTALL_COMPONENT statement, which loads the keyring components too late in the startup sequence of the server. For example, InnoDB requires the component, but because the components are registered in the mysql.component table, this table is loaded after InnoDB initialization.
You should create a global manifest file named mysqld.my in the installation directory and, optionally, create a local manifest file, also named mysqld.my in a data directory.
To install a keyring component, do the following:
-
Write a manifest in a valid JSON format
-
Write a configuration file
A manifest file indicates which component to load. If the manifest file does not exist, the server does not load the component associated with that file. During startup, the server reads the global manifest file from the installation directory. The global manifest file can contain the required information or point to a local manifest file located in the data directory. If you have multiple server instances that use different keyring components use a local manifest file in each data directory to load the correct keyring component for that instance.
Warning
Enable only one keyring plugin or one keyring component at a time for each server instance. Enabling multiple keyring plugins or keyring components or mixing keyring plugins or keyring components is not supported and may result in data loss.
For more information, see Installing and Uninstalling Components .
The following is an example of a global manifest file that does not use local manifests:
{
"read_local_manifest": false,
"components": "file://component_keyring_kmip"
}
The following is an example of a global manifest file that points to a local manifest file:
{
"read_local_manifest": true
}
The following is an example of a local manifest file:
{
"components": "file://component_keyring_kmip"
}
The configuration settings are either in a global configuration file or a local configuration file. The settings are the same.
Example of a configuration file in JSON format
{
"server_addr": "127.0.0.1",
"server_port": "5696",
"client_ca": "client_certificate.pem",
"client_key": "client_key.pem",
"server_ca": "root_certificate.pem"
}
For more information, see Keyring Component installation .
Use the Amazon Key Management Service (AWS KMS)
Percona Server for MySQL supports the Amazon Key Management Service (AWS KMS) . Percona Server generates the keyring keys. Amazon Web Services (AWS) encrypts the keyring data.
The AWS KMS lets you create and manage cryptographic keys across AWS services. For more information, see the AWS Key Management Service Documentation .
To use the AWS KMS component, do the following:
-
Have an AWS user account. This account has an access key and a secret key.
-
Create a KMS key ID. The KMS key can then be referenced in the configuration either by its ID, alias (the key can have any number of aliases), or ARN.
Component installation
The component must be installed with a manifest. A keyring component is not loaded with the --early-plugin-load option on the server. The server uses a manifest and the component consults its configuration file during initialization. You should only load a keyring component with a manifest file. Do not use the INSTALL_COMPONENT statement, which loads the keyring components too late in the startup sequence of the server. For example, InnoDB requires the component, but because the components are registered in the mysql.component table, this table is loaded after InnoDB initialization.
You should create a global manifest file named mysqld.my in the installation directory and, optionally, create a local manifest file, also named mysqld.my in a data directory.
To install a keyring component, do the following:
-
Write a manifest in a valid JSON format
-
Write a configuration file
A manifest file indicates which component to load. If the manifest file does not exist, the server does not load the component associated with that file. During startup, the server reads the global manifest file from the installation directory. The global manifest file can contain the required information or point to a local manifest file located in the data directory. If you have multiple server instances that use different keyring components use a local manifest file in each data directory to load the correct keyring component for that instance.
Warning
Enable only one keyring plugin or one keyring component at a time for each server instance. Enabling multiple keyring plugins or keyring components or mixing keyring plugins or keyring components is not supported and may result in data loss.
For more information, see Installing and Uninstalling Components .
The following example is a global manifest file that does not use local manifests:
{
"read_local_manifest": false,
"components": "file://component_keyring_kms"
}
The following is an example of a global manifest file that points to a local manifest file:
{
"read_local_manifest": true
}
The following is an example of a local manifest file:
{
"components": "file://component_keyring_kms"
}
The configuration settings are either in a global configuration file or a local configuration file. The settings are the same.
The KMS configuration file has the following options:
-
read_local_config
-
path - the location of the JSON keyring database file.
-
read_only - if true, the keyring cannot be modified.
-
kms_key - the identifier of an AWS KMS master key. The user must create this key before creating the manifest file. The identifier can be one of the following:
-
UUID
-
Alias
-
ARN
-
For more information, see Finding the key ID and key ARN .
-
region - the AWS where the KMS is stored. Any HTTP request connect to this region.
-
auth_key - an AWS user authentication key. The user must have access to the KMS key.
-
secret_access_key - the secret key (API “password”) for the AWS user.
Note
The configuration file contains authentication information. Only the MySQL process should be able to read this file.
Example of a configuration file in JSON format
{
"read_local_config": "true/false",
"path": "/usr/local/mysql/keyring-mysql/aws-keyring-data",
"region": "eu-central-1",
"kms_key": "UUID, alias or ARN as displayed by the KMS console",
"auth_key": "AWS user key",
"secret_access_key": "AWS user secret key"
}
For more information, see Keyring Component installation .
Encrypt File-Per-Table Tablespace
The file_per_table tablespace inherits the default schema encryption setting. Use the ENCRYPTION clause in the in CREATE TABLE statement to explicitly set the encryption.
CREATE TABLE ... ENCRYPTION='Y';
ENCRYPTION clause. The ALTER TABLE statement without the ENCRYPTION clause does not change the encryption state.
ALTER TABLE ... ENCRYPTION='Y';
If the table_encryption_privilege_check is enabled, the TABLE_ENCRYPTION_ADMIN privilige is required to change the file_per_table encryption setting from the default schema encryption.
Encrypt schema or general tablespace
Percona Server for MySQL uses the same encryption architecture as MySQL, a two-tier system consisting of a master key and tablespace keys. The master key can be changed, or rotated in the keyring, as needed. Each tablespace key, when decrypted, remains the same.
The feature requires the keyring plugin.
Set the default for schemas and general tablespace encryption
The tables in a general tablespace are either all encrypted or all unencrypted. A tablespace cannot contain a mixture of encrypted tables and unencrypted tables.
The encryption of a schema or a general tablespace is determined by the
default_table_encryption variable unless you specify the
ENCRYPTION clause in the CREATE SCHEMA or CREATE TABLESPACE statement.
You can set the default_table_encryption variable in an individual
connection.
SET default_table_encryption=ON;
default_table_encryption
| Option | Description |
|---|---|
| Command-line | default-table-encryption |
| Scope | Session |
| Dynamic | Yes |
| Data type | Text |
| Default | OFF |
Defines the default encryption setting for schemas and general tablespaces. The variable allows you to create or alter schemas or tablespaces without specifying the ENCRYPTION clause. The default encryption setting applies only to schemas and general tablespaces and is not applied to the MySQL system tablespace.
The variable has the following possible options:
| Value | Description |
|---|---|
ON |
New tables are encrypted. Add ENCRYPTION="N" to the CREATE TABLE or ALTER TABLE statement to create unencrypted tables. |
OFF |
By default, new tables are unencrypted. Add ENCRYPTION="Y" to the CREATE TABLE or ALTER TABLE statement to create encrypted tables. |
Note
The ALTER TABLE statement changes the current encryption mode only if you use the ENCRYPTION clause.
innodb_encrypt_online_alter_logs
| Option | Description |
|---|---|
| Command-line | –innodb-encrypt-online-alter-logs |
| Scope | Global |
| Dynamic | Yes |
| Data type | Boolean |
| Default | OFF |
This variable simultaneously turns on the encryption of files used by InnoDB for full-text search using parallel sorting, building indexes using merge sort, and online DDL logs created by InnoDB for online DDL. Encryption is available for file merges used in queries and backend processes.
Use ENCRYPTION
If you do not set the default encryption setting, you can create general
tablespaces with the ENCRYPTION setting.
CREATE TABLESPACE tablespace_name ENCRYPTION='Y';
All tables contained in the tablespace are either encrypted or not encrypted.
You cannot encrypt only some of the tables in a general tablespace. This
feature extends the CREATE TABLESPACE statement to
accept the ENCRYPTION='Y/N' option.
The option is a tablespace attribute and is not allowed with the CREATE TABLE or SHOW CREATE TABLE statement except with file-per-table tablespaces.
In an encrypted general tablespace, an attempt to create an unencrypted table generates the following error:
CREATE TABLE t3 (a INT, b TEXT) TABLESPACE foo ENCRYPTION='N';
Expected output
ERROR 1478 (HY0000): InnoDB: Tablespace 'foo' can contain only ENCRYPTED tables.
The server diagnoses an attempt to create or move tables, including partitioned ones, to a general tablespace with an incompatible encryption setting and aborts the process.
If you must move tables between incompatible tablespaces, create tables with the same structure in another tablespace and run INSERT INTO SELECT from each of the source tables into the destination tables.
Export an encrypted general tablespace
You can only export encrypted file-per-table tablespaces
Encrypt system tablespace
By default, the system tablespace, which contains the system database and the data dictionary tables, is unencrypted. To change the encryption requires the CREATE TABLESPACE privilege on all tables in the instance.
In an ALTER TABLESPCE statement, add the ENCRYPTION option with the tablespace name to enable encryption.
ALTER TABLESPACE mysql ENCRYPTION='Y';
ENCRYPTION option to ‘N”.
ALTER TABLESPACE mysql ENCRYPTION='N';
Encrypt doublewrite file pages
InnoDB encrypts doublewrite file pages associated with encrypted tablespaces automatically. Doublewrite files can contain the following page types:
- Unencrypted
- Uncompressed
- Encrypted
- Compressed
Encrypt temporary files
For InnoDB user-created temporary tables are created in a temporary tablespace
file and use the innodb_temp_tablespace_encrypt variable.
The CREATE TEMPORARY TABLE does not support the ENCRYPTION clause. The TABLESPACE clause cannot be set to innodb_temporary.
The global temporary tablespace datafile ibtmp1 contains the temporary table
undo logs while intrinsic temporary tables and user-created temporary tables
are located in the encrypted session temporary tablespace.
To create new temporary tablespaces unencrypted, the following variables must
be set to OFF at runtime:
-
innodb_temp_tablespace_encrypt -
default_table_encryption
Any existing encrypted user-created temporary files and intrinsic temporary tables remain in an encrypted session.
Temporary tables are only destroyed when the session is disconnected.
The default_table_encryption setting in my.cnf determines if a temporary table is encrypted.
If the innodb_temp_tablespace_encrypt = “OFF” and the
default_table_encryption =”ON”, the user-created temporary tables are
encrypted. The temporary tablespace data file ibtmp1, which contains undo
logs, is not encrypted.
If the innodb_temp_tablespace_encrypt is “ON” for the system tablespace,
InnoDB generates an encryption key and encrypts the system’s temporary
tablespace. If you reset the encryption to “OFF”, all subsequent pages are
written to an unencrypted tablespace. Any generated keys are not erased to
allow encrypted tables and undo data to be decrypted.
For each temporary file, an encryption key has the following attributes:
-
Generated locally
-
Maintained in memory for the lifetime of the temporary file
-
Discarded with the temporary file
encrypt_tmp_files
| Option | Description |
|---|---|
| Command-line | –encrypt_tmp_files |
| Scope | Global |
| Dynamic | No |
| Data type | Boolean |
| Default | OFF |
This variable turns “ON” the encryption of temporary files created by the Percona Server for MySQL. The default value is OFF.
innodb_temp_tablespace_encrypt
| Option | Description |
|---|---|
| Command-line | innodb-temp-tablespace-encrypt |
| Scope | Global |
| Dynamic | Yes |
| Data type | Boolean |
| Default | OFF |
When this variable is set to ON, the server encrypts the global temporary
tablespace and has the .ibtmp1 file extension and the session temporary tablespace and has the .ibt file extension.
The variable does not enforce the encryption of currently open temporary files and does not rebuild the system’s temporary tablespace to encrypt data that has already been written.
Log encryption
Describes the redo log encryption and the undo log encryption.
Redo Log encryption
Use the innodb_redo_log_encrypt option to enable or disable redo log data encryption. By default, the encryption of the redo log is disabled.
InnoDB uses the tablespace encryption key to encrypt the redo log data. If the encryption is enabled, when the server encrypts and writes the redo log data to the disk. When the server reads the redo log data from disk, the data is decrypted.
Changing the encryption does not change existing redo log pages. Setting the option to ON, any existing redo log pages remain unencrypted; writing new pages to disk encrypts them. Setting the option to OFF, any existing encrypted pages remain encrypted; writing new pages to disk are unencrypted.
The metadata for the redo log encryption includes the tablespace encryption key and is stored the in redo log file header. Removing the encryption metadata disables the redo log encryption.
Without the keyring component or the encryption key, a normal restart is not possible. InnoDB scans the redo log pages during startup. If the encryption options are not available, InnoDB cannot scan these pages. A forced startup without the redo logs is possible.
Option
innodb_redo_log_encrypt
| Variable | Description |
|---|---|
| Command-line | --innodb-redo-log-encrypt[= {ON \| OFF}] |
| Dynamic | Yes |
| Scope | Global |
| Data type | Boolean |
| Default | OFF |
| Option | Description |
|---|---|
| ON | This option is a compatibility alias for the master_key. Any existing redo log pages remain unencrypted; new pages are encrypted when written to disk. |
| OFF | Any existing encrypted pages remain encrypted; new pages are unencrypted. |
Determines the encryption for the table redo log data. The default option for the variable is OFF.
Undo Log encryption
Use the innodb_undo_log_encrypt option to enable or disable undo log data encryption. By default, the option to encrypt the undo log data is disabled.
InnoDB uses the tablespace encryption key to encrypt the undo log data. If the encryption is enabled, when the server encrypts and writes the undo log data to the disk. When the server reads the undo log data from disk, the data is decrypted.
Changing the encryption does not change existing undo log pages. Setting the option to ON, any existing pages remain unencrypted; writing new pages to disk encrypts them. Setting the option to OFF, any existing encrypted pages remain encrypted; writing new pages to disk are unencrypted.
The metadata for the redo log encryption includes the tablespace encryption key and is stored the in undo log file header.
The server requires the keyring component used to encrypt log data until that data is truncated, even if the current option setting is OFF. When the undo tablespace is truncated, the encryption header is removed.
innodb_undo_log_encrypt
| Option | Description |
|---|---|
| Command-line | --innodb-undo-log-encrypt[= {ON \| OFF}] |
| Scope | Global |
| Dynamic | Yes |
| Data type | Boolean |
| Default | OFF |
This system variable defines the encryption status for the undo log data. The default setting is OFF, which disables the encryption.
Rotate the master encryption key
Rotate the master encryption key periodically and if the key has been compromised.
Rotating the master encryption key changes that key and tablespace keys are re-encrypted and updated in the tablespace headers. The rotation only succeeds if all operations are successful. If the rotation is interrupted, the operation is rolled forward when the server restarts.
The rotation operation does not affect tablespace data. To change a tablespace key, disable and then re-enable encryption for that tablespace.
The ENCRYPTION_KEY_ADMIN privilege is required to rotate the master encryption key.
InnoDB reads the encryption data from the tablespace header, if certain tablespace keys have been encrypted with the prior master key, InnoDB retrieves the master key from the keyring to decrypt the tablespace key. InnoDB re-encrypts the tablespace key with the new Master key.
Rotate the master encryption key with following statement:
ALTER INSTANCE ROTATE INNODB MASTER KEY;
The rotation operation must complete before any tablespace encryption operation can begin.
Verify the encryption for tables, tablespaces, and schemas
If a general tablespace contains tables, check the table information to see if the table is encrypted. When the general tablespace contains no tables, you may verify if the tablespace is encrypted or not.
For single tablespaces, verify the ENCRYPTION option using INFORMATION_SCHEMA.TABLES and the CREATE OPTIONS settings.
SELECT TABLE_SCHEMA, TABLE_NAME, CREATE_OPTIONS FROM
INFORMATION_SCHEMA.TABLES WHERE CREATE_OPTIONS LIKE '%ENCRYPTION%';
Expected output
+----------------------+-------------------+------------------------------+
| TABLE_SCHEMA | TABLE_NAME | CREATE_OPTIONS |
+----------------------+-------------------+------------------------------+
|sample | t1 | ENCRYPTION="Y" |
+----------------------+-------------------+------------------------------+
A flag field in the INFORMATION_SCHEMA.INNODB_TABLESPACES has bit number
13 set if the tablespace is encrypted. This bit can be checked with the flag &
8192 expression in the following way:
SELECT space, name, flag, (flag & 8192) != 0 AS encrypted FROM
INFORMATION_SCHEMA.INNODB_TABLESPACES WHERE name in ('foo', 'test/t2', 'bar',
'noencrypt');
The encrypted table metadata is contained in the
INFORMATION_SCHEMA.INNODB_TABLESPACES_ENCRYPTION table. You must have the
Process privilege to view the table information.
Note
This table is in tech preview and may change in future releases.
DESCRIBE INNODB_TABLESPACES_ENCRYPTION;
Expected output
+-----------------------------+--------------------+-----+----+--------+------+
| Field | Type | Null| Key| Default| Extra|
+-----------------------------+--------------------+-----+----+--------+------+
| SPACE | int(11) unsigned | NO | | | |
| NAME | varchar(655) | YES | | | |
| ENCRYPTION_SCHEME | int(11) unsigned | NO | | | |
| KEYSERVER_REQUESTS | int(11) unsigned | NO | | | |
| MIN_KEY_VERSION | int(11) unsigned | NO | | | |
| CURRENT_KEY_VERSION | int(11) unsigned | NO | | | |
| KEY_ROTATION_PAGE_NUMBER | bigint(21) unsigned| YES | | | |
| KEY_ROTATION_MAX_PAGE_NUMBER| bigint(21) unsigned| YES | | | |
| CURRENT_KEY_ID | int(11) unsigned | NO | | | |
| ROTATING_OR_FLUSHING | int(1) unsigned | NO | | | |
+-----------------------------+--------------------+-----+----+--------+------+
To identify encryption-enabled schemas, query the INFORMATION_SCHEMA.SCHEMATA table:
SELECT SCHEMA_NAME, DEFAULT_ENCRYPTION FROM
INFORMATION_SCHEMA.SCHEMATA WHERE DEFAULT_ENCRYPTION='YES';
Expected output
+------------------------------+---------------------------------+
| SCHEMA_NAME | DEFAULT_ENCRYPTION |
+------------------------------+---------------------------------+
| samples | YES |
+------------------------------+---------------------------------+
The SHOW CREATE SCHEMA statement returns the DEFAULT ENCRYPTION clause.
Replicate
Manage group replication flow control
In replication, flow control prevents one member from falling too far behind the cluster and avoids excessive buffering. A cluster is not required to keep members in sync together for replication. The pending transactions in the relay log only increase for the lagging replica. Each member sends statistics to the group.
Flow control sets a threshold on the queue for transactions waiting in the certification queue or the transactions waiting in the applier queue. If the thresholds are exceeded, and during the duration that they are exceeded, flow control adjusts the writer members to the capacity of the delayed member. This action ensures that all members are in sync.
Flow controls work asynchronously and depend on the following:
- Monitoring the throughput and queue sizes of each member
- Throttling members to avoid writing beyond the capacity available
The following system variables set flow control behavior for Group Replication:
- group_replication_flow_control_mode
- group_replication_flow_control_certifier_threshold
- group_replication_flow_control_applier_threshold
Flow control is enabled and disabled by selecting a value in the group_replication_flow_control_mode variable. Flow control can also be enabled on the certifier or applier level or both and sets the threshold level.
Group replication system variables
| variable name |
|---|
| group_replication_auto_evict_timeout |
| group_replication_certification_loop_chunk_size |
| group_replication_certification_loop_sleep_time |
| group_replication_flow_control_mode |
group_replication_auto_evict_timeout
The variable is in tech preview mode. Before using the variable in production, we recommend that you test restoring production from physical backups in your environment, and also use the alternative backup method for redundancy.
| Option | Description |
|---|---|
| Command-line | –group-replication-auto-evict-timeout |
| Dynamic | Yes |
| Scope | Global |
| Type | Integer |
| Default value | 0 |
| Maximum Value | 65535 |
| Unit | seconds |
The value can be changed while Group Replication is running. The change takes effect immediately. Every node in the group can have a different timeout value, but, to avoid unexpected exits, we recommend that all nodes have the same value.
The variable specifies a period of time in seconds before a node is automatically evicted if the node exceeds the flow control threshold. The default value is 0, which disables the eviction. To set the timeout, change the value with a number higher than zero.
In single-primary mode, the primary server ignores the timeout.
group_replication_certification_loop_chunk_size
| Option | Description |
|---|---|
| Command-line | –group-replication-certification-loop-chunk-size |
| Dynamic | Yes |
| Scope | Global |
| Data type | ulong |
| Default value | 0 |
Defines the size of the chunk that must be processed during the certifier garbage collection phase after which the client transactions are allowed to interleave. The default value is 0.
The minimum value is 0. The maximum value is 4294967295.
group_replication_certification_loop_sleep_time
| Option | Description |
|---|---|
| Command-line | –group-replication-certification-loop-sleep-time |
| Dynamic | Yes |
| Scope | Global |
| Data type | ulong |
| Default value | 0 |
Defines the sleep time in microseconds that the certifier garbage collection loop allows client transactions to interleave. The default value is 0.
The minimum value is 0. The maximum value is 1000000.
group_replication_flow_control_mode
| Option | Description |
|---|---|
| Command-line | –group_replication_flow_control_mode |
| Dynamic | Yes |
| Scope | Global |
| Data type | Enumeration |
| Default value | Quota |
| Valid values | DISABLED QUOTA MAJORITY |
The “MAJORITY” value is in tech preview mode. Before using the variable in production, we recommend that you test restoring production from physical backups in your environment, and also use the alternative backup method for redundancy.
The variable specifies the mode use for flow control.
Percona Server for MySQL adds the “MAJORITY” value to the group_replication_flow_control_mode variable. In “MAJORITY” mode, flow control is activated only if the majority, more than half the number of members, exceed the flow control threshold. The other values are not changed.
Replication Security
Encrypt binary log files and relay log files
Encrypt the binary log files and the relay log files to protect them from unauthorized viewing. The encryption uses the Advanced Encryption Standard (AES) symmetric block cipher algorithm. Instead of bits, this algorithm works on bytes.
Any supported encryption keyring plugin or component must be installed and configured to use encryption.
Enabling binary log encryption at system start, the server generates a binary log encryption key before iniatializing the binary log and relay logs. The key encrypts a file password for each binary log, if binary logging is enabled, and relay log. Keys generated from the file passwords encrypt the data in the files.
When used by the server, the binary log encryption key is called the binary log master key. This key can be rotated as needed and only the file password for each file is re-encrypted.
The binary log index file and relay log index file is never encrypted. Relay log files are encrypted for all channels.
To review if a binary log file is encrypted or not, use the SHOW BINARY LOGS statement.
If the server is running, the BINLOG_ENCRYPTION_ADMIN privilege is required to enable or disable encryption.
binlog_encryption
| Option | Description |
|---|---|
| Command-line | --binlog-encryption[= {ON \| OFF}] |
| Scope | Global |
| Dynamic | Yes |
| Data type | Boolean |
| Default | OFF |
This system variable enables binary log file encryption and relay log file encryption on the server. The default value is OFF. You can enable encryption for relay log files on a replica without a binary log.
If you set the binlog_encryption to OFF, the server immediately rotates the binary log file and relay log files and all logging is not encrypted. For any previously encrypted files, the server can still read them and they are not decrypted.
Monitor
Audit log plugin
Deprecation notice
The audit log plugin is deprecated in Percona Server for MySQL 8.4 and will be removed in a future release. This deprecation is due to the availability of the audit log filter component, which is the recommended replacement. Users should migrate to this component, which provides equivalent functionality with enhanced flexibility, performance, and filtering capabilities, ensuring continued support for auditing and compliance requirements.
This deprecation affects all installations that rely on the audit log plugin for event logging, compliance auditing, or activity tracking. The plugin will continue to function, but no further development or maintenance is planned.
The audit log plugin and the audit log filter component use different configuration variables and options.
-
Do not attempt to use audit log filter variables, options, or configuration syntax with the deprecated audit log plugin. Doing so can lead to startup failures, unexpected behavior, or data loss.
-
Do not install both audit log plugin and audit log filter component simultaneously.
The audit‑log entries may look different from the 8.0 entries. The audit log plugin itself has not changed, but other server components have, and those changes affect the log output. For example, 8.4 logs a SELECT $$ statement each time a client connects because the client now supports “dollar‑quoted” strings. This feature did not exist in 8.0.
Percona does not plan to modify 8.4 audit logs to match the format or content of 8.0 logs.
Percona Audit Log Plugin provides monitoring and logging of connection and query activity that were performed on specific server. Information about the activity is stored in a log file.
Install the plugin
The audit Log plugin is installed, but, by default, is not enabled when you install Percona Server for MySQL. To check if the plugin is enabled run the following command. This command searches for plugins with names containing the word “audit” in the information_schema.PLUGINS table.
SELECT * FROM information_schema.PLUGINS WHERE PLUGIN_NAME LIKE '%audit%';
The empty result suggests that no such plugins are installed or loaded.
Expected output
Empty set (0.00 sec)
This command checks for system variables whose names start with “audit.”
SHOW variables LIKE 'audit%';
The empty result means that no such system variables exist or are currently defined.
Expected output
Empty set (0.01 sec)
This command lists system variables with names starting with “plugin.” As seen in the example output, it displays the plugin_dir variable, which specifies the directory path where MySQL plugins are stored.
SHOW variables LIKE 'plugin%';
Expected output
+---------------+------------------------+
| Variable_name | Value |
+---------------+------------------------+
| plugin_dir | /usr/lib/mysql/plugin/ |
+---------------+------------------------+
1 row in set (0.00 sec)
Note
The location of the MySQL plugin directory depends on the operating system and may be different on your system.
The following command enables the plugin:
INSTALL PLUGIN audit_log SONAME 'audit_log.so';
Run the following command to verify if the plugin was installed correctly:
SELECT * FROM information_schema.PLUGINS WHERE PLUGIN_NAME LIKE '%audit%'\G
Expected output
*************************** 1. row ***************************
PLUGIN_NAME: audit_log
PLUGIN_VERSION: 0.2
PLUGIN_STATUS: ACTIVE
PLUGIN_TYPE: AUDIT
PLUGIN_TYPE_VERSION: 4.1
PLUGIN_LIBRARY: audit_log.so
PLUGIN_LIBRARY_VERSION: 1.7
PLUGIN_AUTHOR: Percona LLC and/or its affiliates.
PLUGIN_DESCRIPTION: Audit log
PLUGIN_LICENSE: GPL
LOAD_OPTION: ON
1 row in set (0.00 sec)
You can review the audit log variables with the following command:
SHOW variables LIKE 'audit%';
Expected output
+-----------------------------+---------------+
| Variable_name | Value |
+-----------------------------+---------------+
| audit_log_buffer_size | 1048576 |
| audit_log_exclude_accounts | |
| audit_log_exclude_commands | |
| audit_log_exclude_databases | |
| audit_log_file | audit.log |
| audit_log_flush | OFF |
| audit_log_format | OLD |
| audit_log_handler | FILE |
| audit_log_include_accounts | |
| audit_log_include_commands | |
| audit_log_include_databases | |
| audit_log_policy | ALL |
| audit_log_rotate_on_size | 0 |
| audit_log_rotations | 0 |
| audit_log_strategy | ASYNCHRONOUS |
| audit_log_syslog_facility | LOG_USER |
| audit_log_syslog_ident | percona-audit |
| audit_log_syslog_priority | LOG_INFO |
+-----------------------------+---------------+
18 rows in set (0.00 sec)
Log format
The plugin supports the following log formats: OLD, NEW, JSON, and CSV. The OLD format and the NEW format are based on XML. The OLD format defines each log record with XML attributes. The NEW format defines each log record with XML tags. The information logged is the same for all four formats. The audit_log_format variable controls the log format choice.
Format examples
The following formats are available:
<AUDIT_RECORD
NAME="Query"
RECORD="3_2021-06-30T11:56:53"
TIMESTAMP="2021-06-30T11:57:14 UTC"
COMMAND_CLASS="select"
CONNECTION_ID="3"
STATUS="0"
SQLTEXT="select * from information_schema.PLUGINS where PLUGIN_NAME like '%audit%'"
USER="root[root] @ localhost []"
HOST="localhost"
OS_USER=""
IP=""
DB=""
/>
<AUDIT_RECORD>
<NAME>Query</NAME>
<RECORD>16684_2021-06-30T16:07:41</RECORD>
<TIMESTAMP>2021-06-30T16:08:06 UTC</TIMESTAMP>
<COMMAND_CLASS>select</COMMAND_CLASS>
<CONNECTION_ID>2</CONNECTION_ID>
<STATUS>0</STATUS>
<SQLTEXT>select id, holder from one</SQLTEXT>
<USER>root[root] @ localhost []</USER>
<HOST>localhost</HOST>
<OS_USER></OS_USER>
<IP></IP>
<DB></DB>
{"audit_record":{"name":"Query","record":"13149_2021-06-30T15:03:11","timestamp":"2021-06-30T15:07:58 UTC","command_class":"show_databases","connection_id":"2","status":0,"sqltext":"show databases","user":"root[root] @ localhost []","host":"localhost","os_user":"","ip":"","db":""}}
"Query","22567_2021-06-30T16:10:09","2021-06-30T16:19:00 UTC","select","2",0,"select count(*) from one","root[root] @ localhost []","localhost","","",""
Audit log events
The audit Log plugin generates a log of following events.
Audit event indicates that audit logging started or finished. NAME field will be Audit when logging started and NoAudit when logging finished. Audit record also includes server version and command-line arguments.
??? example "Audit event"
```{.text .no-copy}
<AUDIT_RECORD
NAME="Audit"
RECORD="1_2021-06-30T11:56:53"
TIMESTAMP="2021-06-30T11:56:53 UTC"
MYSQL_VERSION="5.7.34-37"
STARTUP_OPTIONS="--daemonize --pid-file=/var/run/mysqld/mysqld.pid"
OS_VERSION="x86_64-debian-linux-gnu"
/>
```
Connect record event will have NAME field Connect when user logged in or login failed, or Quit when connection is closed.
The additional fields for this event are the following:
* `CONNECTION_ID`
* `STATUS`
* `USER`
* `PRIV_USER`
* `OS_LOGIN`
* `PROXY_USER`
* `HOST`
* `IP`
The value for STATUS is 0 for successful logins and non-zero for failed logins.
Disconnect event
<AUDIT_RECORD
NAME="Quit"
RECORD="5_2021-06-29T19:33:03"
TIMESTAMP="2021-06-29T19:34:38Z"
CONNECTION_ID="14"
STATUS="0"
USER="root"
PRIV_USER="root"
OS_LOGIN=""
PROXY_USER=""
HOST="localhost"
IP=""
DB=""
/>
Additional fields for this event are: COMMAND_CLASS (values come from the com_status_vars array in the `sql/mysqld.cc`` file in a MySQL source distribution.
Examples are select, alter_table, create_table, etc.), CONNECTION_ID, STATUS (indicates an error when the vaule is non-zero), SQLTEXT (text of SQL-statement), USER, HOST, OS_USER, IP.
The possible values for the NAME name field for this event are Query, Prepare, Execute, Change user, etc.
Query event
<AUDIT_RECORD
NAME="Query"
RECORD="4_2021-06-29T19:33:03"
TIMESTAMP="2021-06-29T19:33:34Z"
COMMAND_CLASS="show_variables"
CONNECTION_ID="14"
STATUS="0"
SQLTEXT="show variables like 'audit%'"
USER="root[root] @ localhost []"
HOST="localhost"
OS_USER=""
IP=""
DB=""
/>
Stream the audit log to syslog
To stream the audit log to syslog you’ll need to set audit_log_handler variable to SYSLOG. To control the syslog file handler, the following variables can be used: audit_log_syslog_ident, audit_log_syslog_facility, and audit_log_syslog_priority These variables have the same meaning as appropriate parameters described in the syslog(3) manual.
Note
The actions for the variables: audit_log_strategy, audit_log_buffer_size, audit_log_rotate_on_size, audit_log_rotations are captured only with FILE handler.
Filter methods
You can filter the results by the following methods.
The filtering by user feature adds two new global variables: audit_log_include_accounts and audit_log_exclude_accounts to specify which user accounts should be included or excluded from audit logging.
Only one of these variables can contain a list of users to be either included or excluded, while the other must be NULL. If one of the variables is set to be not NULL (contains a list of users), the attempt to set another one fails. An empty string means an empty list.
Changes of audit_log_include_accounts and audit_log_exclude_accounts do not apply to existing server connections.
The filtering by SQL command type adds two new global variables: audit_log_include_commands and audit_log_exclude_commands to specify which command types should be included or excluded from audit logging.
Only one of these variables can contain a list of command types to be
either included or excluded, while the other needs to be NULL. If one of
the variables is set to be not NULL (contains a list of command types),
the attempt to set another one will fail. An empty string is defined as an empty list.
If both the audit_log_exclude_commands variable and the
audit_log_include_commands variable are NULL, all commands are logged.
The filtering by an SQL database is implemented by two global variables: audit_log_include_databases and audit_log_exclude_databases to specify which databases should be included or excluded from audit logging.
Only one of these variables can contain a list of databases to be either
included or excluded, while the other needs to be NULL. If one of the
variables is set to be not NULL (contains a list of databases), the
attempt to set another one will fail. Empty string means an empty list.
If query is accessing any of databases listed in
audit_log_include_databases, the query will be logged.
If query is accessing only databases listed in
audit_log_exclude_databases, the query will not be logged.
CREATE TABLE statements are logged unconditionally.
Changes of audit_log_include_databases and audit_log_exclude_databases do not apply to existing server connections.
Filter examples
The following are examples of the different filters.
The following example adds users who will be monitored:
SET GLOBAL audit_log_include_accounts = 'user1@localhost,root@localhost';
Expected output
Query OK, 0 rows affected (0.00 sec)
If you try to add users to both the include list and the exclude list, the server returns the following error:
SET GLOBAL audit_log_exclude_accounts = 'user1@localhost,root@localhost';
Expected output
ERROR 1231 (42000): Variable 'audit_log_exclude_accounts' can't be set to the value of 'user1@localhost,root@localhost'
To switch from filtering by included user list to the excluded user list or back,
first set the currently active filtering variable to NULL:
SET GLOBAL audit_log_include_accounts = NULL;
Expected output
Query OK, 0 rows affected (0.00 sec)
SET GLOBAL audit_log_exclude_accounts = 'user1@localhost,root@localhost';
Expected output
Query OK, 0 rows affected (0.00 sec)
SET GLOBAL audit_log_exclude_accounts = "'user'@'host'";
Expected output
Query OK, 0 rows affected (0.00 sec)
SET GLOBAL audit_log_exclude_accounts = '''user''@''host''';
Expected output
Query OK, 0 rows affected (0.00 sec)
SET GLOBAL audit_log_exclude_accounts = '\'user\'@\'host\'';
Expected output
Query OK, 0 rows affected (0.00 sec)
To see which user accounts have been added to the exclude list, run the following command:
SELECT @@audit_log_exclude_accounts;
Expected output
+------------------------------+
| @@audit_log_exclude_accounts |
+------------------------------+
| 'user'@'host' |
+------------------------------+
1 row in set (0.00 sec)
Account names from mysql.user table are logged in the audit log. For example when you create a user:
CREATE USER 'user1'@'%' IDENTIFIED BY '111';
Expected output
Query OK, 0 rows affected (0.00 sec)
When user1 connects from localhost, the user is listed:
<AUDIT_RECORD
NAME="Connect"
RECORD="2_2021-06-30T11:56:53"
TIMESTAMP="2021-06-30T11:56:53 UTC"
CONNECTION_ID="6"
STATUS="0"
USER="user1" ;; this is a 'user' part of account
PRIV_USER="user1"
OS_LOGIN=""
PROXY_USER=""
HOST="localhost" ;; this is a 'host' part of account
IP=""
DB=""
/>
To exclude user1 from logging in Percona Server for MySQL 8.4, set:
SET GLOBAL audit_log_exclude_accounts = 'user1@%';
The value can be NULL or comma separated list of accounts in form
user@host or 'user'@'host' (if user or host contains comma).
The available command types can be listed by running:
SELECT name FROM performance_schema.setup_instruments WHERE name LIKE "statement/sql/%" ORDER BY name;
Expected output
+------------------------------------------+
| name |
+------------------------------------------+
| statement/sql/alter_db |
| statement/sql/alter_db_upgrade |
| statement/sql/alter_event |
| statement/sql/alter_function |
| statement/sql/alter_procedure |
| statement/sql/alter_server |
| statement/sql/alter_table |
| statement/sql/alter_tablespace |
| statement/sql/alter_user |
| statement/sql/analyze |
| statement/sql/assign_to_keycache |
| statement/sql/begin |
| statement/sql/binlog |
| statement/sql/call_procedure |
| statement/sql/change_db |
| statement/sql/change_master |
...
| statement/sql/xa_rollback |
| statement/sql/xa_start |
+------------------------------------------+
145 rows in set (0.00 sec)
You can add commands to the include filter by running:
SET GLOBAL audit_log_include_commands= 'set_option,create_db';
Create a database with the following command:
CREATE DATABASE sample;
Expected output
<AUDIT_RECORD>
<NAME>Query</NAME>
<RECORD>24320_2021-06-30T17:44:46</RECORD>
<TIMESTAMP>2021-06-30T17:45:16 UTC</TIMESTAMP>
<COMMAND_CLASS>create_db</COMMAND_CLASS>
<CONNECTION_ID>2</CONNECTION_ID>
<STATUS>0</STATUS>
<SQLTEXT>CREATE DATABASE sample</SQLTEXT>
<USER>root[root] @ localhost []</USER>
<HOST>localhost</HOST>
<OS_USER></OS_USER>
<IP></IP>
<DB></DB>
</AUDIT_RECORD>
To switch the command type filtering type from included type list to the excluded list
or back, first reset the currently-active list to NULL:
SET GLOBAL audit_log_include_commands = NULL;
Expected output
Query OK, 0 rows affected (0.00 sec)
SET GLOBAL audit_log_exclude_commands= 'set_option,create_db';
Expected output
Query OK, 0 rows affected (0.00 sec)
A stored procedure has the call_procedure command type. All
the statements executed within the procedure have the same type
call_procedure as well.
To add databases to be monitored, run:
SET GLOBAL audit_log_include_databases = 'test,mysql,db1';
Expected output
Query OK, 0 rows affected (0.00 sec)
SET GLOBAL audit_log_include_databases= 'db1','db3';
Expected output
Query OK, 0 rows affected (0.00 sec)
If you you try to add databases to both include and exclude lists server will show you the following error:
SET GLOBAL audit_log_exclude_databases = 'test,mysql,db1';
Error message
ERROR 1231 (42000): Variable 'audit_log_exclude_databases can't be set to the value of 'test,mysql,db1'
To switch from filtering by included database list to the excluded one or back,
first set the currently active filtering variable to NULL:
SET GLOBAL audit_log_include_databases = NULL;
Expected output
Query OK, 0 rows affected (0.00 sec)
SET GLOBAL audit_log_exclude_databases = 'test,mysql,db1';
Expected output
Query OK, 0 rows affected (0.00 sec)
System variables
audit_log_strategy
| Option | Description |
|---|---|
| Command Line: | Yes |
| Scope: | Global |
| Dynamic: | No |
| Data type | String |
| Default value | ASYNCHRONOUS |
| Allowed values | ASYNCHRONOUS, PERFORMANCE, SEMISYNCHRONOUS, SYNCHRONOUS |
This variable is used to specify the audit log strategy, possible values are:
-
ASYNCHRONOUS- (default) log using memory buffer, do not drop messages if buffer is full -
PERFORMANCE- log using memory buffer, drop messages if buffer is full -
SEMISYNCHRONOUS- log directly to file, do not flush and sync every event -
SYNCHRONOUS- log directly to file, flush and sync every event
This variable has effect only when audit_log_handler is set to FILE.
audit_log_file
| Option | Description |
|---|---|
| Command Line: | Yes |
| Scope: | Global |
| Dynamic: | No |
| Data type | String |
| Default value | audit.log |
This variable is used to specify the filename that’s going to store the audit log. It can contain the path relative to the datadir or absolute path.
audit_log_flush
| Option | Description |
|---|---|
| Command Line: | Yes |
| Scope: | Global |
| Dynamic: | Yes |
| Data type | String |
| Default value | OFF |
When this variable is set to ON log file will be closed and reopened.
audit_log_buffer_size
| Option | Description |
|---|---|
| Command Line: | Yes |
| Scope: | Global |
| Dynamic: | No |
| Data type | Numeric |
| Default value | 1 Mb |
This variable can be used to specify the size of memory buffer used for logging, used when audit_log_strategy variable is set to ASYNCHRONOUS or PERFORMANCE values. This variable has effect only when audit_log_handler is set to FILE.
audit_log_exclude_accounts
| Option | Description |
|---|---|
| Command Line: | Yes |
| Scope: | Global |
| Dynamic: | Yes |
| Data type | String |
This variable is used to specify the list of users for which
Filtering by user is applied. The value can be NULL or comma
separated list of accounts in form user@host or 'user'@'host' (if user
or host contains comma). If this variable is set, then
audit_log_include_accounts must be unset, and vice versa.
audit_log_exclude_commands
| Option | Description |
|---|---|
| Command Line: | Yes |
| Scope: | Global |
| Dynamic: | Yes |
| Data type | String |
This variable is used to specify the list of commands for which
Filtering by SQL command type is applied. The value can be NULL or
comma separated list of commands. If this variable is set, then
audit_log_include_commands must be unset, and vice versa.
audit_log_exclude_databases
| Option | Description |
|---|---|
| Command Line: | Yes |
| Scope: | Global |
| Dynamic: | Yes |
| Data type | String |
Use this variable to specify the databases to be filtered. The value can be NULL or a comma-separated list of databases if you set this variable, unset audit_log_include_databases, and vice versa.
audit_log_format
| Option | Description |
|---|---|
| Command Line: | Yes |
| Scope: | Global |
| Dynamic: | No |
| Data type | String |
| Default value | OLD |
| Allowed values | OLD, NEW, CSV, JSON |
This variable is used to specify the audit log format. The audit log plugin
supports four log formats: OLD, NEW, JSON, and CSV. OLD and
NEW formats are based on XML, where the former outputs log record properties
as XML attributes and the latter as XML tags. Information logged is the same in
all four formats.
audit_log_include_accounts
| Option | Description |
|---|---|
| Command Line: | Yes |
| Scope: | Global |
| Dynamic: | Yes |
| Data type | String |
This variable is used to specify the list of users for which
Filtering by user is applied. The value can be NULL or comma
separated list of accounts in form user@host or 'user'@'host' (if user
or host contains comma). If this variable is set, then
audit_log_exclude_accounts must be unset, and vice versa.
audit_log_include_commands
| Option | Description |
|---|---|
| Command Line: | Yes |
| Scope: | Global |
| Dynamic: | Yes |
| Data type | String |
This variable is used to specify the list of commands for which
Filtering by SQL command type is applied. The value can be NULL or
comma separated list of commands. If this variable is set, then
audit_log_exclude_commands must be unset, and vice versa.
audit_log_include_databases
| Option | Description |
|---|---|
| Command Line: | Yes |
| Scope: | Global |
| Dynamic: | Yes |
| Data type | String |
This variable defines the list of databases to be filtered. You can set the value to NULL or a comma-separated list of databases. If you set this variable, you must unset audit_log_exclude_databases; the opposite is true.
audit_log_policy
| Option | Description |
|---|---|
| Command Line: | Yes |
| Scope: | Global |
| Dynamic: | Yes |
| Data type | String |
| Default | ALL |
| Allowed values | ALL, LOGINS, QUERIES, NONE |
This variable is used to specify which events should be logged. Possible values are:
-
ALL- all events will be logged -
LOGINS- only logins will be logged -
QUERIES- only queries will be logged -
NONE- no events will be logged
audit_log_rotate_on_size
| Option | Description |
|---|---|
| Command Line: | Yes |
| Scope: | Global |
| Dynamic: | Yes |
| Data type | Numeric |
| Default value | 0 |
This variable is measured in bytes and specifies the maximum size of the audit log file. Upon reaching this size, the audit log will be rotated. The rotated log files are present in the same directory as the current log file. The sequence number is appended to the log file name upon rotation.
If the value is set to 0 (the default), the audit log files won’t rotate.
Set the audit_log_handler to FILE to enable this variable.
audit_log_rotations
| Option | Description |
|---|---|
| Command Line: | Yes |
| Scope: | Global |
| Dynamic: | Yes |
| Data type | Numeric |
| Default value | 0 |
This variable is used to specify how many log files should be kept when
audit_log_rotate_on_size variable is set to non-zero value. This
variable has effect only when audit_log_handler is set to FILE.
audit_log_handler
| Option | Description |
|---|---|
| Command Line: | Yes |
| Scope: | Global |
| Dynamic: | No |
| Data type | String |
| Default value | FILE |
| Allowed values | FILE, SYSLOG |
This variable is used to configure where the audit log will be written. If it is
set to FILE, the log will be written into a file specified by
audit_log_file variable. If it is set to SYSLOG, the audit log
will be written to syslog.
audit_log_syslog_ident
| Option | Description |
|---|---|
| Command Line: | Yes |
| Scope: | Global |
| Dynamic: | No |
| Data type | String |
| Default value | percona-audit |
This variable is used to specify the ident value for syslog. This variable
has the same meaning as the appropriate parameter described in the syslog(3)
manual.
audit_log_syslog_facility
| Option | Description |
|---|---|
| Command Line: | Yes |
| Scope: | Global |
| Dynamic: | No |
| Data type | String |
| Default value | LOG_USER |
This variable is used to specify the facility value for syslog. This
variable has the same meaning as the appropriate parameter described in the
syslog(3) manual.
audit_log_syslog_priority
| Option | Description |
|---|---|
| Command Line: | Yes |
| Scope: | Global |
| Dynamic: | No |
| Data type | String |
| Default value | LOG_INFO |
| Allowed values | LOG_EMERG, LOG_ALERT, LOG_CRIT, LOG_ERR, LOG_WARNING, LOG_NOTICE, LOG_INFO, LOG_DEBUG |
This variable is used to specify the severity level for syslog. The
audit_log_syslog_priority variable does not include the facility; it only
selects the severity level (LOG_EMERG … LOG_DEBUG).
The full syslog priority that syslog() receives is built internally by OR-ing
the configured facility (audit_log_syslog_facility) with this level.
The default LOG_INFO means “ordinary informational messages”; you can raise or
lower the level as needed, while the facility stays at its default unless you
change it explicitly.
For more details about syslog priority levels, see the syslog(3) manual.
Status Variables
Audit_log_buffer_size_overflow
| Option | Description |
|---|---|
| Scope: | Global |
| Data type | Numeric |
The number of times an audit log entry was either dropped or written directly to the file due to its size being bigger than audit_log_buffer_size variable.
Jemalloc memory allocation profiling
Percona Server for MySQL can take advantage of the memory-profiling ability of the jemalloc allocator. This ability provides a method to investigate memory-related issues.
Requirements
This memory-profiling requires jemalloc_detected. This read-only variable returns true if jemalloc with the profiling-enabled option is being used by Percona Server for MySQL.
As root, customize jemalloc with the following flags:
| Option | Description |
|---|---|
| –enable-stats | Enables statistics-gathering ability |
| –enable-prof | Enables heap profiling and the ability to detect leaks. |
Using LD_PRELOAD. Build the library, configure the malloc configuration with the prof:true string, and then use LD_PRELOAD to preload the libjemalloc.so library. Percona Server for MySQL detects jemalloc with profiling enabled automatically when properly configured.
The following is an example of the required commands:
./configure --enable-stats --enable-prof && make && make install
export MALLOC_CONF=prof:true
export LD_PRELOAD=/usr/lib/libjemalloc.so
Use Percona Server for MySQL with jemalloc with profiling enabled
To detect if jemalloc is set, run the following command:
SELECT @@jemalloc_detected;
To enable jemalloc profiling in a MySQL client, run the following command:
set global jemalloc_profiling=on;
The malloc_stats_totals table provides statistics, in bytes, of the memory usage.
The following example commands display this result:
use performance_schema;
SELECT * FROM malloc_stats_totals;
Expected output
+------------+------------+------------+------------+-------------+------------+
| ALLOCATED | ACTIVE | MAPPED | RESIDENT | RETAINED | METADATA |
+------------+------------+------------+------------+-------------+------------+
| 390977528 | 391012352 | 405291008 | 520167424 | 436813824 | 9933744 |
+------------+------------+------------+------------+-------------+------------+
1 row in set (0.00 sec)
The malloc_stats table provides cumulative totals, in bytes, of several statistics per allocation size type (small, large, and huge).
The following example commands display this result:
use performance_schema;
SELECT * FROM malloc_stats ORDER BY TYPE DESC LIMIT 3;
Expected output
+--------+-------------+-------------+-------------+-------------+
| TYPE | ALLOCATED | NMALLOC | NDALLOC | NRESQUESTS |
+--------+-------------+-------------+-------------+-------------+
| small | 23578872 | 586156 | 0 | 2649417 |
| large | 367382528 | 2218 | 0 | 6355 |
| huge | 0 | 0 | 0 | 0 |
+--------+-------------+-------------+-------------+-------------+
3 rows in set (0.00 sec)
Dumping the profile
The profiling samples the malloc() calls and stores the sampled stack traces in a separate location in memory. These samples can be dumped into the filesystem. A dump returns a detailed view of the state of the memory.
The process is global; therefore, only a single concurrent run is available. Each dump creates a new file with a unique timestamp, and previous dumps are retained unless manually deleted.
Use the following command to create a profile dump file:
flush memory profile;
The generated memory profile dumps are written to the /tmp directory.
You can analyze the dump files with jeprof program, which must be installed on the host system and available in the system PATH. This program is a C program that post-processes the dump files in their raw format. While jeprof can work with dumps from different jemalloc versions, compatibility issues may occur with significantly different versions.
To verify the dump, run the following command:
ls /tmp/jeprof_mysqld*
Expected output
/tmp/jeprof_mysqld.1.0.170013202213
Then analyze the profile:
jeprof --show_bytes /usr/sbin/mysqld /tmp/jeprof_mysqld.1.0.170013202213
You can also access the memory profile to plot a graph of the memory use. This ability requires that jeprof and dot are available in the system PATH. For the graph to display useful information, the binary file must contain debug symbol information.
Important considerations
-
Ensure the MySQL process has write permissions to
/tmp -
Profile dumps can be large; monitor available disk space
-
Profiling has performance overhead and should be used judiciously
Run the following command:
jeprof --dot /usr/sbin/mysqld /tmp/jeprof_mysqld.1.0.170013202213 > /tmp/jeprof1.dot
dot -Tpng /tmp/jeprof1.dot > /tmp/jeprof1.png
Note
An example of allocation graph .
PERFORMANCE_SCHEMA tables
The following tables are implemented to retrieve memory allocation statistics for a running instance or return the cumulative number of allocations requested or allocations returned for a running instance.
More information about the stats that are returned can be found in jemalloc .
malloc_stats_totals
The current stats for allocations. All measurements are in bytes.
| Column Name | Description |
|---|---|
| ALLOCATED | The total amount the application allocated |
| ACTIVE | The total amount allocated by the application of active pages. A multiple of the page size and this value is greater than or equal to the stats.allocated value. The sum does not include allocator metadata pages and stats.arenas.[i].pdirty or stats.arenas.[i].pmuzzy. |
| MAPPED | The total amount in chunks that are mapped by the allocator in active extents. This value does not include inactive chunks. The value is at least as large as the stats.active and is a multiple of the chunk size. |
| RESIDENT | A maximum number the allocator has mapped in physically resident data pages. All allocator metadata pages and unused dirty pages are included in this value. Pages may not be physically resident if they correspond to demand-zeroed virtual memory that has not yet been touched. This value is a maximum rather than a precise value and is a multiple of the page size. The value is greater than the stats.active. |
| RETAINED | The amount retained by the virtual memory mappings of the operating system. This value does not include any returned mappings. This type of memory, usually de-committed, untouched, or purged. The value is associated with physical memory and is excluded from mapped memory statistics. |
| METADATA | The total amount dedicated to metadata. This value contains the base allocations which are used for bootstrap-sensitive allocator metadata structures. Transparent huge pages usage is not included. |
malloc_stats
The cumulative statistics for allocations and deallocations for a running instance.
| Column Name | Description |
|---|---|
| Type | The type of object: small, large, and huge |
| ALLOCATED | The number of bytes that are currently allocated to the application. |
| NMALLOC | A cumulative number of times an allocation was requested from the arena’s bins. The number includes times when the allocation satisfied an allocation request or filled a relevant tcache if opt.tcache is enabled. |
| NDALLOC | A cumulative number of times an allocation was returned to the arena’s bins. The number includes times when the allocation was deallocated or flushed the relevant tcache if opt.tcache is enabled. |
| NREQUESTS | The cumulative number of allocation requests satisfied. |
System variables
The following variables have been added:
jemalloc_detected
Description: This read-only variable returns true if jemalloc with profiling enabled is detected. The following options are required:
-
Jemalloc is installed and compiled with profiling enabled
-
Percona Server for MySQL is configured to use jemalloc by using the environment variable
LD_PRELOAD. -
The environment variable
MALLOC_CONFis set toprof:true.
Properties:
-
Scope: Global
-
Variable Type: Boolean
-
Default Value: false
jemalloc_profiling
Description: Enables jemalloc profiling. The variable requires jemalloc_detected.
-
Command Line: –jemalloc_profiling[=(OFF|ON)]
-
Config File: Yes
-
Scope: Global
-
Dynamic: Yes
-
Variable Type: Boolean
-
Default Value: OFF
Disable profiling
To disable jemalloc profiling, in a MySQL client, run the following command:
set global jemalloc_profiling=off;
User statistics
This feature adds several INFORMATION_SCHEMA tables, several commands, and the userstat variable. The tables and commands can be used to understand the server activity better and identify the source of the load.
The functionality is disabled by default and must be enabled by setting userstat to ON. It works by keeping several hash tables in memory. To avoid contention over global mutexes, each connection has its own local statistics, which are occasionally merged into the global statistics, and the local statistics are then reset to 0.
System variables
userstat
| Option | Description |
|---|---|
| Command-line | Yes |
| Config file | Yes |
| Scope | Global |
| Dynamic | Yes |
| Data type | BOOLEAN |
| Default | OFF |
| Range | ON/OFF |
Enables or disables collection of statistics. The default is OFF, meaning no statistics are gathered. This is to ensure that the statistics collection doesn’t cause any extra load on the server unless desired.
thread_statistics
| Option | Description |
|---|---|
| Command-line | Yes |
| Config file | Yes |
| Scope | Global |
| Dynamic | Yes |
| Data type | BOOLEAN |
| Default | OFF |
| Range | ON/OFF |
Enables or disables collection of thread statistics. The default is OFF, meaning no thread statistics are gathered. This is to ensure that the statistics collection doesn’t cause any extra load on the server unless desired. The variable userstat must be enabled as well in order for thread statistics to be collected.
INFORMATION_SCHEMA Tables
INFORMATION_SCHEMA.CLIENT_STATISTICS
| Column Name | Description |
|---|---|
| ‘CLIENT’ | ‘The IP address or hostname from which the connection originated.’ |
| ‘TOTAL_CONNECTIONS’ | ‘The number of connections created for this client.’ |
| ‘CONCURRENT_CONNECTIONS’ | ‘The number of concurrent connections for this client.’ |
| ‘CONNECTED_TIME’ | ‘The cumulative number of seconds elapsed while there were connections from this client.’ |
| ‘BUSY_TIME’ | ‘The cumulative number of seconds there was activity on connections from this client.’ |
| ‘CPU_TIME’ | ‘The cumulative CPU time elapsed, in seconds, while servicing this client’s connections.’ |
| ‘BYTES_RECEIVED’ | ‘The number of bytes received from this client’s connections.’ |
| ‘BYTES_SENT’ | ‘The number of bytes sent to this client’s connections.’ |
| ‘BINLOG_BYTES_WRITTEN’ | ‘The number of bytes written to the binary log from this client’s connections.’ |
| ‘ROWS_FETCHED’ | ‘The number of rows fetched by this client’s connections.’ |
| ‘ROWS_UPDATED’ | ‘The number of rows updated by this client’s connections.’ |
| ‘TABLE_ROWS_READ’ | ‘The number of rows read from tables by this client’s connections. (It may be different from ROWS_FETCHED.)’ |
| ‘SELECT_COMMANDS’ | ‘The number of SELECT commands executed from this client’s connections.’ |
| ‘UPDATE_COMMANDS’ | ‘The number of UPDATE commands executed from this client’s connections.’ |
| ‘OTHER_COMMANDS’ | ‘The number of other commands executed from this client’s connections.’ |
| ‘COMMIT_TRANSACTIONS’ | ‘The number of COMMIT commands issued by this client’s connections.’ |
| ‘ROLLBACK_TRANSACTIONS’ | ‘The number of ROLLBACK commands issued by this client’s connections.’ |
| ‘DENIED_CONNECTIONS’ | ‘The number of connections denied to this client.’ |
| ‘LOST_CONNECTIONS’ | ‘The number of this client’s connections that were terminated uncleanly.’ |
| ‘ACCESS_DENIED’ | ‘The number of times this client’s connections issued commands that were denied.’ |
| ‘EMPTY_QUERIES’ | ‘The number of times this client’s connections sent empty queries to the server.’ |
This table holds statistics about client connections. The Percona version of the feature restricts this table’s visibility to users who have the SUPER or PROCESS privilege.
For example:
SELECT * FROM INFORMATION_SCHEMA.CLIENT_STATISTICS\G
Expected output
*************************** 1. row ***************************
CLIENT: 10.1.12.30
TOTAL_CONNECTIONS: 20
CONCURRENT_CONNECTIONS: 0
CONNECTED_TIME: 0
BUSY_TIME: 93
CPU_TIME: 48
BYTES_RECEIVED: 5031
BYTES_SENT: 276926
BINLOG_BYTES_WRITTEN: 217
ROWS_FETCHED: 81
ROWS_UPDATED: 0
TABLE_ROWS_READ: 52836023
SELECT_COMMANDS: 26
UPDATE_COMMANDS: 1
OTHER_COMMANDS: 145
COMMIT_TRANSACTIONS: 1
ROLLBACK_TRANSACTIONS: 0
DENIED_CONNECTIONS: 0
LOST_CONNECTIONS: 0
ACCESS_DENIED: 0
EMPTY_QUERIES: 0
INFORMATION_SCHEMA tables
INFORMATION_SCHEMA.INDEX_STATISTICS
| Column Name | Description |
|---|---|
| ‘TABLE_SCHEMA’ | ‘The schema (database) name.’ |
| ‘TABLE_NAME’ | ‘The table name.’ |
| ‘INDEX_NAME’ | ‘The index name (as visible in SHOW CREATE TABLE).’ |
| ‘ROWS_READ’ | ‘The number of rows read from this index.’ |
This table shows statistics on index usage. An older version of the feature contained a single column that had the TABLE_SCHEMA, TABLE_NAME, and INDEX_NAME columns concatenated together. The Percona version of the feature separates these into three columns. Users can see entries only for tables to which they have SELECT access.
This table makes it possible to do many things that were difficult or impossible previously. For example, you can use it to find unused indexes and generate DROP commands to remove them.
Example:
SELECT * FROM INFORMATION_SCHEMA.INDEX_STATISTICS WHERE TABLE_NAME='tables_priv';
Expected output
+--------------+-----------------------+--------------------+-----------+
| TABLE_SCHEMA | TABLE_NAME | INDEX_NAME | ROWS_READ |
+--------------+-----------------------+--------------------+-----------+
| mysql | tables_priv | PRIMARY | 2 |
+--------------+-----------------------+--------------------+-----------+
Note
The current implementation of index statistics doesn’t support partitioned tables.
INFORMATION_SCHEMA.TABLE_STATISTICS
| Column Name | Description |
|---|---|
| ‘TABLE_SCHEMA’ | ‘The schema (database) name.’ |
| ‘TABLE_NAME’ | ‘The table name.’ |
| ‘ROWS_READ’ | ‘The number of rows read from the table.’ |
| ‘ROWS_CHANGED’ | ‘The number of rows changed in the table.’ |
| ‘ROWS_CHANGED_X_INDEXES’ | ‘The number of rows changed in the table, multiplied by the number of indexes changed.’ |
This table is similar in function to the INDEX_STATISTICS table.
For example:
SELECT * FROM INFORMATION_SCHEMA.TABLE_STATISTICS WHERE TABLE_NAME=``tables_priv``;
Expected output
+--------------+-------------------------------+-----------+--------------+------------------------+
| TABLE_SCHEMA | TABLE_NAME | ROWS_READ | ROWS_CHANGED | ROWS_CHANGED_X_INDEXES |
+--------------+-------------------------------+-----------+--------------+------------------------+
| mysql | tables_priv | 2 | 0 | 0 |
+--------------+-------------------------------+-----------+--------------+------------------------+
Note
The current implementation of table statistics doesn’t support partitioned tables.
INFORMATION_SCHEMA.THREAD_STATISTICS
| Column Name | Description |
|---|---|
| ‘THREAD_ID’ | ‘Thread ID’ |
| ‘TOTAL_CONNECTIONS’ | ‘The number of connections created from this thread.’ |
| ‘CONNECTED_TIME’ | ‘The cumulative number of seconds elapsed while there were connections from this thread.’ |
| ‘BUSY_TIME’ | ‘The cumulative number of seconds there was activity from this thread.’ |
| ‘CPU_TIME’ | ‘The cumulative CPU time elapsed while servicing this thread.’ |
| ‘BYTES_RECEIVED’ | ‘The number of bytes received from this thread.’ |
| ‘BYTES_SENT’ | ‘The number of bytes sent to this thread.’ |
| ‘BINLOG_BYTES_WRITTEN’ | ‘The number of bytes written to the binary log from this thread.’ |
| ‘ROWS_FETCHED’ | ‘The number of rows fetched by this thread.’ |
| ‘ROWS_UPDATED’ | ‘The number of rows updated by this thread.’ |
| ‘TABLE_ROWS_READ’ | ‘The number of rows read from tables by this tread.’ |
| ‘SELECT_COMMANDS’ | ‘The number of SELECT commands executed from this thread.’ |
| ‘UPDATE_COMMANDS’ | ‘The number of UPDATE commands executed from this thread.’ |
| ‘OTHER_COMMANDS’ | ‘The number of other commands executed from this thread.’ |
| ‘COMMIT_TRANSACTIONS’ | ‘The number of COMMIT commands issued by this thread.’ |
| ‘ROLLBACK_TRANSACTIONS’ | ‘The number of ROLLBACK commands issued by this thread.’ |
| ‘DENIED_CONNECTIONS’ | ‘The number of connections denied to this thread.’ |
| ‘LOST_CONNECTIONS’ | ‘The number of thread connections that were terminated uncleanly.’ |
| ‘ACCESS_DENIED’ | ‘The number of times this thread issued commands that were denied.’ |
| ‘EMPTY_QUERIES’ | ‘The number of times this thread sent empty queries to the server.’ |
| ‘TOTAL_SSL_CONNECTIONS’ | ‘The number of thread connections that used SSL.’ |
In order for this table to be populated with statistics, the additional variable thread_statistics should be set to ON.
INFORMATION_SCHEMA.USER_STATISTICS
| Column Name | Description |
|---|---|
| ‘USER’ | ‘The username. The value #mysql_system_user# appears when there is no username (such as for the replica SQL thread).’ |
| ‘TOTAL_CONNECTIONS’ | ‘The number of connections created from this user.’ |
| ‘CONCURRENT_CONNECTIONS’ | ‘The number of concurrent connections for this user.’ |
| ‘CONNECTED_TIME’ | ‘The cumulative number of seconds elapsed while there were connections from this user.’ |
| ‘BUSY_TIME’ | ‘The cumulative number of seconds there was activity on connections from this user.’ |
| ‘CPU_TIME’ | ‘The cumulative CPU time elapsed, in seconds, while servicing this user’s connections.’ |
| ‘BYTES_RECEIVED’ | ‘The number of bytes received from this user’s connections.’ |
| ‘BYTES_SENT’ | ‘The number of bytes sent to this user’s connections.’ |
| ‘BINLOG_BYTES_WRITTEN’ | ‘The number of bytes written to the binary log from this user’s connections.’ |
| ‘ROWS_FETCHED’ | ‘The number of rows fetched by this user’s connections.’ |
| ‘ROWS_UPDATED’ | ‘The number of rows updated by this user’s connections.’ |
| ‘TABLE_ROWS_READ’ | ‘The number of rows read from tables by this user’s connections. (It may be different from ROWS_FETCHED.)’ |
| ‘SELECT_COMMANDS’ | ‘The number of SELECT commands executed from this user’s connections.’ |
| ‘UPDATE_COMMANDS’ | ‘The number of UPDATE commands executed from this user’s connections.’ |
| ‘OTHER_COMMANDS’ | ‘The number of other commands executed from this user’s connections.’ |
| ‘COMMIT_TRANSACTIONS’ | ‘The number of COMMIT commands issued by this user’s connections.’ |
| ‘ROLLBACK_TRANSACTIONS’ | ‘The number of ROLLBACK commands issued by this user’s connections.’ |
| ‘DENIED_CONNECTIONS’ | ‘The number of connections denied to this user.’ |
| ‘LOST_CONNECTIONS’ | ‘The number of this user’s connections that were terminated uncleanly.’ |
| ‘ACCESS_DENIED’ | ‘The number of times this user’s connections issued commands that were denied.’ |
| ‘EMPTY_QUERIES’ | ‘The number of times this user’s connections sent empty queries to the server.’ |
This table contains information about user activity. The Percona version of the patch restricts this table’s visibility to users who have the SUPER or PROCESS privilege.
The table gives answers to questions such as which users cause the most load, and whether any users are being abusive. It also lets you measure how close to capacity the server may be. For example, you can use it to find out whether replication is likely to start falling behind.
Example:
SELECT * FROM INFORMATION_SCHEMA.USER_STATISTICS\G
Expected output
*************************** 1. row ***************************
USER: root
TOTAL_CONNECTIONS: 5592
CONCURRENT_CONNECTIONS: 0
CONNECTED_TIME: 6844
BUSY_TIME: 179
CPU_TIME: 72
BYTES_RECEIVED: 603344
BYTES_SENT: 15663832
BINLOG_BYTES_WRITTEN: 217
ROWS_FETCHED: 9793
ROWS_UPDATED: 0
TABLE_ROWS_READ: 52836023
SELECT_COMMANDS: 9701
UPDATE_COMMANDS: 1
OTHER_COMMANDS: 2614
COMMIT_TRANSACTIONS: 1
ROLLBACK_TRANSACTIONS: 0
DENIED_CONNECTIONS: 0
LOST_CONNECTIONS: 0
ACCESS_DENIED: 0
EMPTY_QUERIES: 0
Commands Provided
-
FLUSH CLIENT_STATISTICS -
FLUSH INDEX_STATISTICS -
FLUSH TABLE_STATISTICS -
FLUSH THREAD_STATISTICS -
FLUSH USER_STATISTICS
These commands discard the specified type of stored statistical information.
-
SHOW CLIENT_STATISTICS -
SHOW INDEX_STATISTICS -
SHOW TABLE_STATISTICS -
SHOW THREAD_STATISTICS -
SHOW USER_STATISTICS
These commands are another way to display the information you can get from the INFORMATION_SCHEMA tables. The commands accept WHERE clauses. They also accept but ignore LIKE clauses.
Status Variables
Com_show_client_statistics
| Option | Description |
|---|---|
| Scope | Global/Session |
| Data type | numeric |
The Com_show_client_statistics statement counter variable indicates the number of times the statement SHOW CLIENT_STATISTICS has been executed.
Com_show_index_statistics
| Option | Description |
|---|---|
| Scope | Global/Session |
| Data type | numeric |
The Com_show_index_statistics statement counter variable indicates the number of times the statement SHOW INDEX_STATISTICS has been executed.
Com_show_table_statistics
| Option | Description |
|---|---|
| Scope | Global/Session |
| Data type | numeric |
The Com_show_table_statistics statement counter variable indicates the number of times the statement SHOW TABLE_STATISTICS has been executed.
Com_show_thread_statistics
| Option | Description |
|---|---|
| Scope | Global/Session |
| Data type | numeric |
The Com_show_thread_statistics statement counter variable indicates the number of times the statement SHOW THREAD_STATISTICS has been executed.
Com_show_user_statistics
| Option | Description |
|---|---|
| Scope | Global/Session |
| Data type | numeric |
The Com_show_user_statistics statement counter variable indicates the number of times the statement SHOW USER_STATISTICS has been executed.
Slow query log
This feature adds microsecond time resolution and additional statistics to the slow query log output. It lets you enable or disable the slow query log at runtime, adds logging for the replica SQL thread, and adds fine-grained control over what and how much to log into the slow query log.
You can use Percona-Toolkit’s pt-query-digest tool to aggregate similar queries together and report on those that consume the most execution time.
System Variables
log_slow_filter
| Option | Description |
|---|---|
| Command-line | Yes |
| Config file | Yes |
| Scope | Global, Session |
| Dynamic | Yes |
Filters the slow log by the query’s execution plan. The value is a comma-delimited string, and can contain any combination of the following values:
-
full_scan: The query performed a full table scan. -
full_join: The query performed a full join (a join without indexes). -
tmp_table: The query created an implicit internal temporary table. -
tmp_table_on_disk: The query’s temporary table was stored on disk. -
filesort: The query used a filesort. -
filesort_on_disk: The filesort was performed on disk.
Values are OR’ed together. If the string is empty, then the filter is disabled. If it is not empty, then queries will only be logged to the slow log if their execution plan matches one of the types of plans present in the filter.
For example, to log only queries that perform a full table scan, set the value to full_scan. To log only queries that use on-disk temporary storage for intermediate results, set the value to tmp_table_on_disk,filesort_on_disk.
log_slow_rate_type
| Option | Description |
|---|---|
| Command-line | Yes |
| Config file | Yes |
| Scope | Global |
| Dynamic | yes |
| Data type | Enumerated |
| Default | session, query |
Specifies semantic of log_slow_rate_limit - session or query.
log_slow_rate_limit
| Option | Description |
|---|---|
| Command-line | Yes |
| Config file | Yes |
| Scope | Global, session |
| Dynamic | yes |
| Default | 1 |
| Range | 1-1000 |
Behavior of this variable depends on the selected log_slow_rate_type.
Specifies that only a fraction of session/query should be logged. Logging is enabled for every nth session/query. By default, n is 1, so logging is enabled for every session/query. Please note: when log_slow_rate_type is session rate limiting is disabled for the replication thread.
Logging all queries might consume I/O bandwidth and cause the log file to grow large.
-
When log_slow_rate_type is
session, this option lets you log full sessions, so you have complete records of sessions for later analysis; but you can rate-limit the number of sessions that are logged. Note that this feature will not work well if your application uses any type of connection pooling or persistent connections. Note that you change log_slow_rate_limit insessionmode, you should reconnect for get effect. -
When log_slow_rate_type is
query, this option lets you log just some queries for later analysis. For example, if you set the value to 100, then one percent of queries will be logged.
Note that every query has global unique query_id and every connection can has it own (session) log_slow_rate_limit.
Decision “log or no” calculated in following manner:
-
if
log_slow_rate_limitis 1 - log every query -
If
log_slow_rate_limit1 - randomly log every 1/log_slow_rate_limitquery.
This allows flexible setup logging behavior.
For example, if you set the value to 100, then one percent of sessions/queries will be logged. In Percona Server for MySQL information about the log_slow_rate_limit has been added to the slow query log. This means that if the log_slow_rate_limit is effective it will be reflected in the slow query log for each written query.
Expected output
Log_slow_rate_type: query Log_slow_rate_limit: 10
log_slow_sp_statements
| Option | Description |
|---|---|
| Command-line | Yes |
| Config file | Yes |
| Scope | Global |
| Dynamic | Yes |
| Data type | Enumerated |
| Default | session |
| Range | session, query |
If TRUE, statements executed by stored procedures are logged to the slow if it is open.
Percona Server for MySQL implemented improvements for logging of stored procedures to the slow query log:
-
Each query from a stored procedure is now logged to the slow query log individually
-
CALLitself isn’t logged to the slow query log anymore as this would be counting twice for the same query which would lead to incorrect results -
Queries that were called inside of stored procedures are annotated in the slow query log with the stored procedure name in which they run.
Example of the improved stored procedure slow query log entry:
mysqlDELIMITER //
mysqlCREATE PROCEDURE improved_sp_log()
BEGIN
SELECT * FROM City;
SELECT * FROM Country;
END//
mysqlDELIMITER ;
mysqlCALL improved_sp_log();
When we check the slow query log after running the stored procedure, with log_slow_sp_statements set to TRUE, it should look like this:
Expected output
# Time: 150109 11:38:55
# User@Host: root[root] @ localhost []
# Thread_id: 40 Schema: world Last_errno: 0 Killed: 0
# Query_time: 0.012989 Lock_time: 0.000033 Rows_sent: 4079 Rows_examined: 4079 Rows_affected: 0 Rows_read: 4079
# Bytes_sent: 161085
# Stored routine: world.improved_sp_log
SET timestamp=1420803535;
SELECT * FROM City;
# User@Host: root[root] @ localhost []
# Thread_id: 40 Schema: world Last_errno: 0 Killed: 0
# Query_time: 0.001413 Lock_time: 0.000017 Rows_sent: 4318 Rows_examined: 4318 Rows_affected: 0 Rows_read: 4318
# Bytes_sent: 194601
# Stored routine: world.improved_sp_log
SET timestamp=1420803535;
If variable log_slow_sp_statements is set to FALSE:
-
Entry is added to a slow-log for a
CALLstatement only and not for any of the individual statements run in that stored procedure -
Execution time is reported for the
CALLstatement as the total execution time of theCALLincluding all its statements
If we run the same stored procedure with the log_slow_sp_statements is set to FALSE slow query log should look like this:
Expected output
# Time: 150109 11:51:42
# User@Host: root[root] @ localhost []
# Thread_id: 40 Schema: world Last_errno: 0 Killed: 0
# Query_time: 0.013947 Lock_time: 0.000000 Rows_sent: 4318 Rows_examined: 4318 Rows_affected: 0 Rows_read: 4318
# Bytes_sent: 194612
SET timestamp=1420804302;
CALL improved_sp_log();
Note
Support for logging stored procedures doesn’t involve triggers, so they won’t be logged even if this feature is enabled.
log_slow_verbosity
| Option | Description |
|---|---|
| Command-line | Yes |
| Config file | Yes |
| Scope | Global, session |
| Dynamic | Yes |
Specifies how much information to include in your slow log. The value is a comma-delimited string, and can contain any combination of the following values:
-
microtime: Log queries with microsecond precision. -
query_plan: Log information about the query’s execution plan. -
innodb: Log InnoDB statistics. -
minimal: Equivalent to enabling justmicrotime. -
standard: Equivalent to enablingmicrotime,query_plan. -
full: Equivalent to all other values OR’ed together without theprofilingandprofiling_use_getrusageoptions. -
profiling: Enables profiling of all queries in all connections. -
profiling_use_getrusage: Enables usage of the getrusage function. -
query_info: Enables printingQuery_tablesandQuery_digestinto the slow query log. These fields are disabled by default.
Values are OR’ed together.
For example, to enable microsecond query timing and InnoDB statistics, set this option to microtime,innodb or standard. To turn all options on, set the option to full.
slow_query_log_use_global_control
| Option | Description |
|---|---|
| Command-line | Yes |
| Config file | Yes |
| Scope | Global |
| Dynamic | Yes |
| Default | None |
Specifies which variables have global scope instead of local. For such variables, the global variable value is used in the current session, but without copying this value to the session value. Value is a “flag” variable - you can specify multiple values separated by commas
-
none: All variables use local scope -
log_slow_filter: Global variable log_slow_filter has effect (instead of local) -
log_slow_rate_limit: Global variable log_slow_rate_limit has effect (instead of local) -
log_slow_verbosity: Global variable log_slow_verbosity has effect (instead of local) -
long_query_time: Global variable long_query_time has effect (instead of local) -
min_examined_row_limit: Global variablemin_examined_row_limithas effect (instead of local) -
allGlobal variables has effect (instead of local)
slow_query_log_always_write_time
| Option | Description |
|---|---|
| Command-line | Yes |
| Config file | Yes |
| Scope | Global |
| Dynamic | Yes |
| Default | 10 |
This variable can be used to specify the query execution time after which the query will be written to the slow query log. It can be used to specify an additional execution time threshold for the slow query log, that, when exceeded, will cause a query to be logged unconditionally, that is, log_slow_rate_limit will not apply to it.
Other information
Changes to the log format
The feature adds more information to the slow log output.
Expected output
# Time: 130601 8:01:06.058915
# User@Host: root[root] @ localhost [] Id: 42
# Schema: imdb Last_errno: 0 Killed: 0
# Query_time: 7.725616 Lock_time: 0.000328 Rows_sent: 4 Rows_examined: 1543720 Rows_affected: 0
# Bytes_sent: 272 Tmp_tables: 0 Tmp_disk_tables: 0 Tmp_table_sizes: 0
# Full_scan: Yes Full_join: No Tmp_table: No Tmp_table_on_disk: No
# Filesort: No Filesort_on_disk: No Merge_passes: 0
SET timestamp=1370073666;
SELECT id,title,production_year FROM title WHERE title = 'Bambi';
Another example (log_slow_verbosity =profiling):
Expected output
# Time: 130601 8:03:20.700441
# User@Host: root[root] @ localhost [] Id: 43
# Schema: imdb Last_errno: 0 Killed: 0
# Query_time: 7.815071 Lock_time: 0.000261 Rows_sent: 4 Rows_examined: 1543720 Rows_affected: 0
# Bytes_sent: 272
# Profile_starting: 0.000125 Profile_starting_cpu: 0.000120
Profile_checking_permissions: 0.000021 Profile_checking_permissions_cpu: 0.000021
Profile_Opening_tables: 0.000049 Profile_Opening_tables_cpu: 0.000048 Profile_init: 0.000048
Profile_init_cpu: 0.000049 Profile_System_lock: 0.000049 Profile_System_lock_cpu: 0.000048
Profile_optimizing: 0.000024 Profile_optimizing_cpu: 0.000024 Profile_statistics: 0.000036
Profile_statistics_cpu: 0.000037 Profile_preparing: 0.000029 Profile_preparing_cpu: 0.000029
Profile_executing: 0.000012 Profile_executing_cpu: 0.000012 Profile_Sending_data: 7.814583
Profile_Sending_data_cpu: 7.811634 Profile_end: 0.000013 Profile_end_cpu: 0.000012
Profile_query_end: 0.000014 Profile_query_end_cpu: 0.000014 Profile_closing_tables: 0.000023
Profile_closing_tables_cpu: 0.000023 Profile_freeing_items: 0.000051
Profile_freeing_items_cpu: 0.000050 Profile_logging_slow_query: 0.000006
Profile_logging_slow_query_cpu: 0.000006
# Profile_total: 7.815085 Profile_total_cpu: 7.812127
SET timestamp=1370073800;
SELECT id,title,production_year FROM title WHERE title = 'Bambi';
Notice that the Killed: \` keyword is followed by zero when the
query successfully completes. If the query was killed, the ``Killed:`
keyword is followed by a number other than zero:
| Killed Numeric Code | Exception |
|---|---|
| 0 | NOT_KILLED |
| 1 | KILL_BAD_DATA |
| 1053 | ER_SERVER_SHUTDOWN (see MySQL Documentation) |
| 1317 | ER_QUERY_INTERRUPTED (see MySQL Documentation) |
| 3024 | ER_QUERY_TIMEOUT (see MySQL Documentation) |
| Any other number | KILLED_NO_VALUE (Catches all other cases) |
Connection and Schema Identifier
Each slow log entry now contains a connection identifier, so you can trace all the queries coming from a single connection. This is the same value that is shown in the Id column in SHOW FULL PROCESSLIST or returned from the CONNECTION_ID() function.
Each entry also contains a schema name, so you can trace all the queries whose default database was set to a particular schema.
Expected output
# Id: 43 Schema: imdb
Microsecond time resolution and extra row information
This is the original functionality offered by the microslow feature. Query_time and Lock_time are logged with microsecond resolution.
The feature also adds information about how many rows were examined for SELECT queries, and how many were analyzed and affected for UPDATE, DELETE, and INSERT queries,
Expected output
# Query_time: 0.962742 Lock_time: 0.000202 Rows_sent: 4 Rows_examined: 1543719 Rows_affected: 0
Values and context:
-
Rows_examined: Number of rows scanned -SELECT -
Rows_affected: Number of rows changed -UPDATE,DELETE,INSERT
Memory footprint
The feature provides information about the amount of bytes sent for the result of the query and the number of temporary tables created for its execution - differentiated by whether they were created on memory or on disk - with the total number of bytes used by them.
Expected output
# Bytes_sent: 8053 Tmp_tables: 1 Tmp_disk_tables: 0 Tmp_table_sizes: 950528
Values and context:
-
Bytes_sent: The amount of bytes sent for the result of the query -
Tmp_tables: Number of temporary tables created on memory for the query -
Tmp_disk_tables: Number of temporary tables created on disk for the query -
Tmp_table_sizes: Total Size in bytes for all temporary tables used in the query
Query plan information
Each query can be executed in various ways. For example, it may use indexes or do a full table scan, or a temporary table may be needed. These are the things that you can usually see by running EXPLAIN on the query. The feature will now allow you to see the most important facts about the execution in the log file.
Expected output
# Full_scan: Yes Full_join: No Tmp_table: No Tmp_table_on_disk: No
# Filesort: No Filesort_on_disk: No Merge_passes: 0
The values and their meanings are documented with the log_slow_filter option.
InnoDB usage information
The final part of the output is the InnoDB usage statistics. MySQL currently shows many per-session statistics for operations with SHOW SESSION STATUS, but that does not include those of InnoDB, which are always global and shared by all threads. This feature lets you see those values for a given query.
Expected output
# InnoDB_IO_r_ops: 6415 InnoDB_IO_r_bytes: 105103360 InnoDB_IO_r_wait: 0.001279
# InnoDB_rec_lock_wait: 0.000000 InnoDB_queue_wait: 0.000000
# InnoDB_pages_distinct: 6430
Values:
-
innodb_IO_r_ops: Counts the number of page read operations scheduled. The actual number of read operations may be different, but since this can be done asynchronously, there is no good way to measure it. -
innodb_IO_r_bytes: Similar to innodb_IO_r_ops, but the unit is bytes. -
innodb_IO_r_wait: Shows how long (in seconds) it took InnoDB to actually read the data from storage. -
innodb_rec_lock_wait: Shows how long (in seconds) the query waited for row locks. -
innodb_queue_wait: Shows how long (in seconds) the query spent either waiting to enter the InnoDB queue or inside that queue waiting for execution. -
innodb_pages_distinct: Counts approximately the number of unique pages the query accessed. The approximation is based on a small hash array representing the entire buffer pool, because it could take a lot of memory to map all the pages. The inaccuracy grows with the number of pages accessed by a query, because there is a higher probability of hash collisions.
If the query did not use InnoDB tables, that information is written into the log instead of the above statistics.
Related reading
Process list
This page describes Percona changes to both the standard MySQL SHOW PROCESSLIST command and the standard MySQL INFORMATION_SCHEMA table PROCESSLIST.
INFORMATION_SCHEMA Tables
INFORMATION_SCHEMA.PROCESSLIST
This table implements modifications to the standard MySQL INFORMATION_SCHEMA table PROCESSLIST.
| Column Name | Description |
|---|---|
| ‘ID’ | ‘The connection identifier.’ |
| ‘USER’ | ‘The MySQL user who issued the statement.’ |
| ‘HOST’ | ‘The host name of the client issuing the statement.’ |
| ‘DB’ | ‘The default database, if one is selected, otherwise NULL.’ |
| ‘COMMAND’ | ‘The type of command the thread is executing.’ |
| ‘TIME’ | ‘The time in seconds that the thread has been in its current state.’ |
| ‘STATE’ | ‘An action, event, or state that indicates what the thread is doing.’ |
| ‘INFO’ | ‘The statement that the thread is executing, or NULL if it is not executing any statement.’ |
| ‘TIME_MS’ | ‘The time in milliseconds that the thread has been in its current state.’ |
| ‘ROWS_EXAMINED’ | ‘The number of rows examined by the statement being executed (NOTE: This column is not updated for each examined row so it does not necessarily show an up-to-date value while the statement is executing. It only shows a correct value after the statement has completed.).’ |
| ‘ROWS_SENT’ | ‘The number of rows sent by the statement being executed.’ |
| ‘TID’ | ‘The Linux Thread ID. For Linux, this corresponds to light-weight process ID (LWP ID) and can be seen in the ps -L output. In case when Thread Pool is enabled, “TID” is not null for only currently executing statements and statements received via “extra” connection.’ |
Example output
Table PROCESSLIST:
SELECT * FROM INFORMATION_SCHEMA.PROCESSLIST;
Expected output
+----+------+-----------+--------------------+---------+------+-----------+---------------------------+---------+-----------+---------------+
| ID | USER | HOST | DB | COMMAND | TIME | STATE | INFO | TIME_MS | ROWS_SENT | ROWS_EXAMINED |
+----+------+-----------+--------------------+---------+------+-----------+---------------------------+---------+-----------+---------------+
| 12 | root | localhost | information_schema | Query | 0 | executing | select * from processlist | 0 | 0 | 0 |
+----+------+-----------+--------------------+---------+------+-----------+---------------------------+---------+-----------+---------------+
Additional INFORMATION_SCHEMA tables
This document lists the additional INFORMATION_SCHEMA tables provided by Percona Server for MySQL that are not documented elsewhere in this documentation.
Temporary tables
Note
This feature implementation is considered tech preview quality.
Only the temporary tables that were explicitly created with CREATE TEMPORARY TABLE or ALTER TABLE are shown, and not the ones created to process complex queries.
INFORMATION_SCHEMA.GLOBAL_TEMPORARY_TABLES
| Column Name | Description |
|---|---|
| ‘SESSION_ID’ | ‘MySQL connection id’ |
| ‘TABLE_SCHEMA’ | ‘Schema in which the temporary table is created’ |
| ‘TABLE_NAME’ | ‘Name of the temporary table’ |
| ‘ENGINE’ | ‘Engine of the temporary table’ |
| ‘NAME’ | ‘Internal name of the temporary table’ |
| ‘TABLE_ROWS’ | ‘Number of rows of the temporary table’ |
| ‘AVG_ROW_LENGTH’ | ‘Average row length of the temporary table’ |
| ‘DATA_LENGTH’ | ‘Size of the data (Bytes)’ |
| ‘INDEX_LENGTH’ | ‘Size of the indexes (Bytes)’ |
| ‘CREATE_TIME’ | ‘Date and time of creation of the temporary table’ |
| ‘UPDATE_TIME’ | ‘Date and time of the latest update of the temporary table’ |
This table holds information on the temporary tables that exist for all connections. No special privileges are required to query this table.
INFORMATION_SCHEMA.TEMPORARY_TABLES
| Column Name | Description |
|---|---|
| ‘SESSION_ID’ | ‘MySQL connection id’ |
| ‘TABLE_SCHEMA’ | ‘Schema in which the temporary table is created’ |
| ‘TABLE_NAME’ | ‘Name of the temporary table’ |
| ‘ENGINE’ | ‘Engine of the temporary table’ |
| ‘NAME’ | ‘Internal name of the temporary table’ |
| ‘TABLE_ROWS’ | ‘Number of rows of the temporary table’ |
| ‘AVG_ROW_LENGTH’ | ‘Average row length of the temporary table’ |
| ‘DATA_LENGTH’ | ‘Size of the data (Bytes)’ |
| ‘INDEX_LENGTH’ | ‘Size of the indexes (Bytes)’ |
| ‘CREATE_TIME’ | ‘Date and time of creation of the temporary table’ |
| ‘UPDATE_TIME’ | ‘Date and time of the latest update of the temporary table’ |
This table holds information on the temporary tables existing for the running connection.
Additional PERFORMANCE_SCHEMA tables
This document lists the additional PERFORMANCE_SCHEMA tables provided by Percona Server for MySQL that are not documented elsewhere.
performance_schema.account_failed_login_lock_status
The performance_schema.account_failed_login_lock_status table is available in Percona Server for MySQL 8.4.7-7 and later. The table exposes information about temporary account locking from the MySQL internal Access Control List (ACL) cache.
This table is read-only. Users need SELECT privilege on the performance_schema database or on this specific table to access its contents.
Note
If an account is locked using the CREATE USER or ALTER USER statements with the ACCOUNT LOCK clause, the ACCOUNT LOCK status is not captured in the account_failed_login_lock_status table. The server records the ACCOUNT LOCK state in the mysql.user table.
| Column Name | Data Type | Description |
|---|---|---|
USER |
CHAR(..) |
The MySQL user name |
HOST |
CHAR(..) |
The MySQL host name |
IS_TRACKING_ACTIVE |
enum('YES','NO') |
Indicates whether failed login tracking is enabled for the account |
MAX_ATTEMPTS |
INTEGER |
Maximum number of failed login attempts allowed before account is locked (corresponds to FAILED_LOGIN_ATTEMPTS clause value in CREATE USER statement) |
PASSWORD_LOCK_DAYS |
INTEGER |
Number of days for which account will be temporarily locked after exceeding the MAX_ATTEMPTS limit. Set to -1 if account is locked forever (corresponds to PASSWORD_LOCK_TIME clause value in CREATE USER) |
IS_LOCKED |
BOOLEAN |
Indicates if account is temporarily locked by failed login lock tracking. NULL if tracking is not enabled for account |
REMAINING_ATTEMPTS |
INTEGER |
Number of failed login attempts remaining before account will be locked. NULL if tracking is not enabled for account |
REMAINING_DAYS_LOCKED |
INTEGER |
Number of days for which account is locked due to failed login lock tracking. -1 means that account is locked “forever” (until server restart/FLUSH PRIVILEGES or specific account unlock). NULL if tracking is not enabled for account |
Troubleshoot
Troubleshooting overview
Use this section when something goes wrong or you need to diagnose an issue with Percona Server for MySQL. The topics below point you to the right guide.
Review Get help from Percona for ways that we can work with you.
Topics
| Topic | When to use it |
|---|---|
| Use PMM Advisors | Run automated checks on your database settings and get recommendations. |
| Too many connections warning | Diagnose and address connection limit messages in the log. |
| Handle corrupted tables | React when InnoDB encounters a corrupted table without crashing the server. |
| Thread-based profiling | Profile queries and understand where time is spent. |
| Stack trace | Capture and interpret stack traces for debugging. |
| Core dumps (libcoredumper) | Capture and analyze core dumps for crash diagnosis. |
Troubleshooting by topic
These guides live under their topic sections but are useful when you are troubleshooting:
| Topic | Guide |
|---|---|
| SELinux | Troubleshoot SELinux issues |
| AppArmor | Troubleshoot AppArmor profiles |
| SQL | Troubleshoot SQL code |
What to do next
- Get help from Percona — community forum and expert support
- Documentation home — return to the main guide
- Quickstart guide — get a fresh installation up and running
Use Percona Monitoring and Management (PMM) Advisors
Percona Monitoring and Management (PMM) provides several categories of Advisors. Each Advisor contains a set of automated checks. These checks investigate your database settings for a specific range of possible issues.
The PMM Server automatically downloads the Advisors if the Advisors and
Telemetry options are enabled in Configuration > Settings > Advanced Settings.
Both options are enabled by default.
Need Additional Guidance?
If you encounter complex advisor recommendations or require expert interpretation, Percona Support offers professional assistance to help you optimize your database configuration and resolve any identified issues.
See also
Too many connections warning
If the log_error_verbosity system variable is set to 2 or higher, this
feature generates the Too many connections warning in the log.
Troubleshooting Connection Issues
For comprehensive guidance on managing database connections and performance, Percona Support can provide expert assistance in diagnosing and resolving connection management challenges.
Handle corrupted tables
When a server subsystem tries to access a corrupted table, the server may crash. If this outcome is not desirable when a corrupted table is encountered, set the new system innodb_corrupt_table_action variable to a value which allows the ongoing operation to continue without crashing the server.
The server error log registers attempts to access corrupted table pages.
Interacting with the innodb_force_recovery variable
The innodb_corrupt_table_action variable may work in conjunction with the innodb_force_recovery variable which considerably reduces the effect of InnoDB subsystems running in the background.
If the innodb_force_recovery option is <4, corrupted pages are lost and the server may continue to run due to the innodb_corrupt_table_action variable having a non-default value.
Complex Database Recovery Scenarios
Navigating table corruption and recovery can be challenging. Percona Support offers expert guidance for complex database recovery and optimization strategies.
For more information about the innodb_force_recovery variable, see Forcing InnoDB Recovery from the MySQL Reference Manual.
This feature adds a system variable.
System variables
innodb_corrupt_table_action
| Option | Description |
|---|---|
| Command-line | Yes |
| Config file | Yes |
| Scope | Global |
| Dynamic | Yes |
| Data type | ULONG |
| Default | assert |
| Range | assert, warn, salvage |
-
Enabling
innodb_file_per_tableand using theassertvalue creates an assertion failure which causes XtraDB to intentionally crash the server. This action is expected when detecting corrupted data in a single-table tablespace. -
Enabling
innodb_file_per_tableand using thewarnvalue causes XtraDB to pass the table corruption ascorrupt tableinstead of crashing the server. Detecting the file as corrupt also disables the file I/O for that data file, except for the deletion operation. -
Enabling
innodb_file_per_tableand using thesalvagevalue causes XtraDB to allow read access to the corrupted tablespace but ignores any corrupted pages.
Thread based profiling
Percona Server for MySQL now uses thread based profiling by default, instead of process based profiling. This was implemented because with process based profiling, threads on the server, other than the one being profiled, can affect the profiling information.
Thread based profiling is using the information provided by the kernel getrusage function. Since the 2.6.26 kernel version, thread based resource usage is available with the RUSAGE_THREAD. This means that the thread based profiling will be used if you’re running the 2.6.26 kernel or newer, or if the RUSAGE_THREAD has been ported back.
This feature is enabled by default if your system supports it, in other cases it uses process based profiling.
Performance Profiling Challenges?
For advanced performance tuning and profiling strategies, Percona Support provides expert consultation to optimize your database performance.
Stack trace
Developers use the stack trace in the debug process, either an interactive investigation or during the post-mortem. No configuration is required to generate a stack trace.
Stack trace adds the following:
| Name | Description |
|---|---|
| Prints binary BuildID | The Strip utility removes unneeded sections and debugging |
| information to reduce the size. This method is standard with | |
| containers where the image size is essential. The BuildID lets | |
| you resolve the stack trace when the Strip utility removes the | |
| binary symbols table. | |
| Print the server version information | The version information establishes the starting point for |
| analysis. Some applications, such as MySQL, only print this | |
| information to a log on startup, and when the crash occurs, the | |
| log may be large, rotated, or truncated. |
Need Help Interpreting Stack Traces?
Percona Support offers expert debugging and performance analysis to help you understand complex stack trace diagnostics.
Using libcoredumper
A core dump file is the documented moment of a computer when either the computer or an application exits. Developers examine the dump as one of the tasks when searching for the cause of a failure.
The libcoredumper is a free and Open Source fork of google-coredumper,
enhanced to work on newer Linux versions, and GCC and CLANG.
ARM64 not supported
The libcoredumper is not supported on ARM64 (aarch64) platforms. Use
standard core dumps (for example, core-file) or kernel core handling if you need
crash dumps on ARM64.
Need Help Interpreting Stack Traces?
Percona Support offers expert debugging and performance analysis to help you understand complex stack trace diagnostics.
Enabling the libcoredumper
Enable core dumps for troubleshooting purposes on supported platforms.
To enable the libcoredumper, add the coredumper variable to the
mysqld section of my.cnf. This variable is independent of the
older core-file variable.
The variable can have the following possible values:
| Value | Description |
|---|---|
| Blank | The core dump is saved under MySQL datadir and named core. |
| A path ending with / | The core dump is saved under the specified directory and named core. |
| Full path with a filename | The core dump is saved under the specified directory and filename |
Restart the server.
Verifying the libcoredumper is active
MySQL writes to the log when generating a core file and delegates the core dump operation to the Linux kernel.
Writing a core file
MySQL using the libcoredumper to generate the file creates the following
message in the log:
Writing a core file using lib coredumper
Every core file adds a crash timestamp instead of a PID for the following reasons:
- Correlates the core file with the crash. MySQL prints a UTC timestamp on the crash log.
10:02:09 UTC - mysqld got signal 11;
- Stores multiple core files.
Note
For example, operators and containers run as the process id of PID 1. If the process ID is used to identify the core file, each container crash generates a core dump that overwrites the previous core file.
Complex Core Dump Analysis?
Percona Support offers expert debugging and in-depth analysis of core dump diagnostics to help you resolve critical system issues.
Disabling the libcoredumper
You can disable the libcoredumper. A core file may contain sensitive data and takes disk space.
To disable the libcoredumper you must do the following:
-
In the
mysqldsection of my.cnf, remove thelibcoredumpervariable. -
Restart the server.
Storage engines
Percona XtraDB storage engine
The Percona XtraDB storage engine
Percona XtraDB is an enhanced version of the InnoDB storage engine, designed to better scale on modern hardware. It also includes a variety of other features useful in high-performance environments. It is fully backward compatible, and so can be used as a drop-in replacement for standard InnoDB.
Percona XtraDB includes all of InnoDB ‘s robust, reliable ACID-compliant
design and advanced MVCC architecture, and builds on that solid foundation
with more features, more tunability, more metrics, and more scalability. In
particular, it is designed to scale better on many cores, use memory more
efficiently, and be more convenient and useful. The new features are
specially designed to alleviate some of InnoDB’s limitations. We choose
features and fixes based on customer requests and on our best judgment of
real-world needs as a high-performance consulting company.
Percona XtraDB engine will not have further binary releases, it is distributed as part of the Percona Server for MySQL.
Improved MEMORY storage engine
A Fixed Row Format (FRF) is used in the MEMORY storage engine. The fixed row format imposes restrictions on the type of columns as it assigns in advance a limited amount of memory per row. This renders a VARCHAR field in a CHAR field in practice and makes it impossible to have a TEXT or BLOB field with that engine implementation.
To overcome this limitation, the Improved MEMORY Storage Engine is introduced in this release for supporting true VARCHAR, VARBINARY, TEXT, and BLOB fields in the MEMORY tables.
This implementation is based on the Dynamic Row Format (DFR) introduced by the mysql-heap-dynamic-rows patch.
DFR is used to store column values in a variable-length form, thus helping to decrease the memory footprint of those columns and making possible BLOB and TEXT fields and real VARCHAR and VARBINARY.
Unlike the fixed implementation, each column value in DRF uses only as much space as required. Variable-length values can use up to 4 bytes to store the actual value length, and only the necessary number of blocks is used to store the value.
Rows in DFR are represented internally by multiple memory blocks, which means that a single row can consist of multiple blocks organized into one set. Each row occupies at least one block, there can not be multiple rows within a single block. Block size can be configured when creating a table (see below).
This DFR implementation has two caveats regarding ordering and indexes.
Caveats
Ordering of rows
In the absence of ORDER BY, records may be returned in a different order than the previous MEMORY implementation.
This is not a bug. Any application relying on a specific order without an ORDER BY clause may deliver unexpected results. A specific order without ORDER BY is a side effect of a storage engine and query optimizer implementation which may and will change between minor MySQL releases.
Indexing
It is currently impossible to use indexes on BLOB columns due to some limitations of the Dynamic Row Format. Trying to create such an index will fail with the following error:
Expected output
BLOB column '<name>' can't be used in key specification with the used table type.
Restrictions
For performance reasons, a mixed solution is implemented: the fixed format is used at the beginning of the row, while the dynamic one is used for the rest of it.
The size of the fixed-format portion of the record is chosen automatically on CREATE TABLE and cannot be changed later. This, in particular, means that no indexes can be created later with CREATE INDEX or ALTER TABLE when the dynamic row format is used.
All values for columns used in indexes are stored in fixed format at the first block of the row, then the following columns are handled with DRF.
This sets two restrictions to tables:
-
the order of the fields and therefore,
-
the minimum size of the block used in the table.
Ordering of columns
The columns used in fixed format must be defined before the dynamic ones in the CREATE TABLE statement. If this requirement is not met, the engine will not be able to add blocks to the set for these fields and they will be treated as fixed.
Minimum block size
The block size has to be big enough to store all fixed-length information in the first block. If not, the CREATE TABLE or ALTER TABLE statements will fail (see below).
Limitations
MyISAM tables are still used for query optimizer internal temporary tables where the MEMORY tables could be used now instead: for temporary tables containing large VARCHAR\`s, ``BLOB, andTEXT` columns.
Setting row format
Taking the restrictions into account, the Improved MEMORY Storage Engine will choose DRF over FRF at the moment of creating the table according to following criteria:
-
There is an implicit request of the user in the column types OR
-
There is an explicit request of the user AND the overhead incurred by
DFRis beneficial.
Implicit request
The implicit request by the user is taken when there is at least one BLOB or TEXT column in the table definition. If there are none of these columns and no relevant option is given, the engine will choose FRF.
For example, this will yield the use of the dynamic format:
CREATE TABLE t1 (f1 VARCHAR(32), f2 TEXT, PRIMARY KEY (f1)) ENGINE=HEAP;
While this will not:
CREATE TABLE t1 (f1 VARCHAR(16), f2 VARCHAR(16), PRIMARY KEY (f1)) ENGINE=HEAP;
Explicit request
The explicit request is set with one of the following options in the CREATE TABLE statement:
-
KEY_BLOCK_SIZE = <value> -
Requests the DFR with the specified block size (in bytes)
Despite its name, the KEY_BLOCK_SIZE option refers to a block size used to store data rather then indexes. The reason for this is that an existing CREATE TABLE option is reused to avoid introducing new ones.
The Improved MEMORY Engine checks whether the specified block size is large enough to keep all key column values. If it is too small, table creation will abort with an error.
After DRF is requested explicitly and there are no BLOB or TEXT columns in the table definition, the Improved MEMORY Engine will check if using the dynamic format provides any space saving benefits as compared to the fixed one:
-
if the fixed row length is less than the dynamic block size (plus the dynamic row overhead - platform dependent) OR
-
there isn’t any variable-length columns in the table or
VARCHARfields are declared with length 31 or less,
the engine will revert to the fixed format as it is more space efficient in such case. The row format being used by the engine can be checked using SHOW TABLE STATUS.
Examples
CREATE TABLE t1 (f1 VARCHAR(32), f2 VARCHAR(32), f3 VARCHAR(32), f4 VARCHAR(32), PRIMARY KEY (f1)) KEY_BLOCK_SIZE=124 ENGINE=HEAP;
SHOW TABLE STATUS LIKE 't1';
Expected output
Name Engine Version Rows Avg_row_length Data_length Max_data_length Index_length Data_free Auto_increment Create_time Update_time Check_time Collation Checksum Create_options Comment
t1 MEMORY 10 X 0 X 0 0 NULL NULL NULL NULL latin1_swedish_ci NULL KEY_BLOCK_SIZE=124
Implementation details
MySQL MEMORY tables keep data in arrays of fixed-size chunks. These chunks are organized into two groups of HP_BLOCK structures:
-
group1contains indexes, with oneHP_BLOCKper key (part ofHP_KEYDEF), -
group2contains record data, with a singleHP_BLOCKfor all records.
While columns used in indexes are usually small, other columns in the table may need to accommodate larger data. Typically, larger data is placed into VARCHAR or BLOB columns.
The Improved MEMORY Engine implements the concept of dataspace, HP_DATASPACE, which incorporates the HP_BLOCK structures for the record data, adding more information for managing variable-sized records.
Variable-size records are stored in multiple “chunks”, which means that a single record of data (a database “row”) can consist of multiple chunks organized into one “set”, contained in HP_BLOCK structures.
In variable-size format, one record is represented as one or many chunks depending on the actual data, while in fixed-size mode, one record is always represented as one chunk. The index structures would always point to the first chunk in the chunkset.
Variable-size records are necessary only in the presence of variable-size columns. The Improved Memory Engine will be looking for BLOB or VARCHAR columns with a declared length of 32 or more. If no such columns are found, the table will be switched to the fixed-size format. You should always put such columns at the end of the table definition in order to use the variable-size format.
Whenever data is being inserted or updated in the table, the Improved Memory Engine will calculate how many chunks are necessary.
For INSERT operations, the engine only allocates new chunksets in the recordspace. For UPDATE operations it will modify the length of the existing chunkset if necessary, unlinking unnecessary chunks at the end, or allocating and adding more if a larger length is needed.
When writing data to chunks or copying data back to a record, fixed-size columns are copied in their full format, while VARCHAR and BLOB columns are copied based on their actual length, skipping any NULL values.
When allocating a new chunkset of N chunks, the engine will try to allocate chunks one-by-one, linking them as they become allocated. For allocating a single chunk, it will attempt to reuse a deleted (freed) chunk. If no free chunks are available, it will try to allocate a new area inside a HP_BLOCK.
When freeing chunks, the engine will place them at the front of a free list in the dataspace, each one containing a reference to the previously freed chunk.
The allocation and contents of the actual chunks varies between fixed and variable-size modes:
-
Format of a fixed-size chunk:
-
uchar[]* Withsizeof=chunk_dataspace_length, but at leastsizeof(uchar\*)bytes. It keeps actual data or pointer to the next deleted chunk, wherechunk_dataspace_lengthequals to full record length -
uchar* Status field (1 means “in use”, 0 means “deleted”)
-
-
Format of a variable-size chunk:
-
uchar[]* Withsizeof=chunk_dataspace_length, but at leastsizeof(uchar\*)bytes. It keeps actual data or pointer to the next deleted chunk, wherechunk_dataspace_lengthis set according to table’skey_block_size -
uchar\** Pointer to the next chunk in this chunkset, or NULL for the last chunk -
uchar* Status field (1 means “first”, 0 means “deleted”, 2 means “linked”)
-
Total chunk length is always aligned to the next sizeof(uchar\*).
See also
Improved InnoDB I/O scalability
Because InnoDB is a complex storage engine it must be configured properly in order to perform at its best. Some points are not configurable in standard InnoDB. The goal of this feature is to provide a more exhaustive set of options for XtraDB.
System variables
innodb_flush_method
| Option | Description |
|---|---|
| Command-line | Yes |
| Config file | Yes |
| Scope | Global |
| Dynamic | No |
| Data type | Enumeration |
| Default | NULL |
| Allowed values | fsync, O_DSYNC, O_DIRECT, O_DIRECT_NO_FSYNC, littlesync, nosync |
The following values are allowed:
-
fdatasync: usefsync()to flush data, log, and parallel doublewrite files. -
O_SYNC: useO_SYNCto open and flush the log and parallel doublewrite files; usefsync()to flush the data files. Do not usefsync()to flush the parallel doublewrite file. -
O_DIRECT: use O_DIRECT to open the data files andfsync()system call to flush data, log, and parallel doublewrite files. -
O_DIRECT_NO_FSYNC: use O_DIRECT to open the data files and parallel doublewrite files, but does not use thefsync()system call to flush the data files, log files, and parallel doublewrite files. Do not use this option for the XFS file system.
Note
On an ext4 filesystem, set innodb_log_write_ahead_size to match the filesystem’s write-ahead block size. This variable avoids unaligned AIO/DIO warnings.
Status variables
The following information has been added to SHOW ENGINE INNODB STATUS to confirm the checkpointing activity:
The current checkpoint age target
The current age of the oldest page modification which has not been flushed to disk yet.
The current age of the last checkpoint
...
---
LOG
---
Log sequence number 0 1059494372
Log flushed up to 0 1059494372
Last checkpoint at 0 1055251010
Max checkpoint age 162361775
Checkpoint age target 104630090
Modified age 4092465
Checkpoint age 4243362
0 pending log writes, 0 pending chkp writes
...
Enforcing storage engine
Percona Server for MySQL implements a variable to enforce the use of a specific storage engine.
When this variable is specified and a user tries to create a table using an
explicit storage engine that is not the specified enforced engine, the user
will get either an error if the NO_ENGINE_SUBSTITUTION SQL mode is enabled
or a warning if NO_ENGINE_SUBSTITUTION is disabled and the table
will be created anyway using the enforced engine (this is consistent with the
default MySQL way of creating the default storage engine if other engines
are not available unless NO_ENGINE_SUBSTITUTION is set).
In case a user tries to enable enforce_storage_engine with an engine that isn’t available, the system will not start.
Note
If you’re using enforce_storage_engine, you must either disable
it before doing mysql_upgrade or perform mysql_upgrade with server
started with --skip-grants-tables.
System variables
enforce_storage_engine
| Option | Description |
|---|---|
| Command Line: | Yes |
| Config file | Yes |
| Scope: | Global |
| Dynamic: | No |
| Data type | String |
| Default value | NULL |
This variable is not case sensitive.
Example
Adding following option to my.cnf will start the server with InnoDB as enforced storage engine.
enforce_storage_engine=InnoDB
Extended show engine InnoDB status
This feature reorganizes the output of SHOW ENGINE INNODB STATUS
to improve readability and to provide additional information. The
variable innodb_show_locks_held controls the umber of
locks held to print for each InnoDB transaction.
This feature modified the SHOW ENGINE INNODB STATUS command as follows:
-
Added extended information about InnoDB internal hash table sizes (in bytes) in the
BUFFER POOL AND MEMORYsection; also added buffer pool size in bytes. -
Added additional LOG section information.
Other information
- Author / Origin: Baron Schwartz, https://lists.mysql.com/internals/35174
System variables
innodb_show_locks_held
| Option | Description |
|---|---|
| Command-line | Yes |
| Config file | Yes |
| Scope | Global |
| Dynamic | Yes |
| Data type | ULONG |
| Default | 10 |
| Range | 0 - 1000 |
Specifies the number of locks held to print for each InnoDB transaction in
SHOW ENGINE INNODB STATUS.
innodb_print_lock_wait_timeout_info
| Option | Description |
|---|---|
| Command-line | Yes |
| Config file | Yes |
| Scope | Global |
| Dynamic | Yes |
| Data type | Boolean |
| Default | OFF |
Makes InnoDB to write information about all lock wait timeout errors into the log file.
This allows to find out details about the failed transaction, and, most
importantly, the blocking transaction. Query string can be obtained from EVENTS_STATEMENTS_CURRENT table, based on the
PROCESSLIST_ID field, which corresponds to thread_id from the log
output.
Taking into account that blocking transaction is often a multiple statement one, following query can be used to obtain blocking thread statements history:
SELECT s.SQL_TEXT FROM performance_schema.events_statements_history s
INNER JOIN performance_schema.threads t ON t.THREAD_ID = s.THREAD_ID
WHERE t.PROCESSLIST_ID = %d
UNION
SELECT s.SQL_TEXT FROM performance_schema.events_statements_current s
INNER JOIN performance_schema.threads t ON t.THREAD_ID = s.THREAD_ID
WHERE t.PROCESSLIST_ID = %d;
The PROCESSLIST_ID in this example is exactly the thread id from error log output.
Status variables
The status variables here contain information available in the output of SHOW
ENGINE INNODB STATUS, organized by the sections SHOW ENGINE INNODB STATUS
displays. If you are familiar with the output of SHOW ENGINE INNODB STATUS,
you will probably already recognize the information these variables contain.
BACKGROUND THREAD
The following variables contain information in the BACKGROUND THREAD
section of the output from SHOW ENGINE INNODB STATUS.
Expected output
-----------------
BACKGROUND THREAD
-----------------
srv_master_thread loops: 1 srv_active, 0 srv_shutdown, 11844 srv_idle
srv_master_thread log flush and writes: 11844
InnoDB has a source thread which performs background tasks depending on the server state, once per second. If the server is under workload, the source thread runs the following: performs background table drops; performs change buffer merge, adaptively; flushes the redo log to disk; evicts tables from the dictionary cache if needed to satisfy its size limit; makes a checkpoint. If the server is idle: performs background table drops, flushes and/or checkpoints the redo log if needed due to the checkpoint age; performs change buffer merge at full I/O capacity; evicts tables from the dictionary cache if needed; and makes a checkpoint.
Innodb_background_log_sync
| Option | Description |
|---|---|
| Scope | Global |
| Data type | Numeric |
This variable shows the number of times the InnoDB source thread has written and flushed the redo log.
SEMAPHORES
The following variables contain information in the SEMAPHORES section of
the output from SHOW ENGINE INNODB STATUS. An example of that output is:
Expected output
----------
SEMAPHORES
----------
OS WAIT ARRAY INFO: reservation count 9664, signal count 11182
Mutex spin waits 20599, rounds 223821, OS waits 4479
RW-shared spins 5155, OS waits 1678; RW-excl spins 5632, OS waits 2592
Spin rounds per wait: 10.87 mutex, 15.01 RW-shared, 27.19 RW-excl
INSERT BUFFER AND ADAPTIVE HASH INDEX
The following variables contain information in the INSERT BUFFER AND ADAPTIVE
HASH INDEX section of the output from SHOW ENGINE INNODB STATUS. An
example of that output is:
Expected output
-------------------------------------
INSERT BUFFER AND ADAPTIVE HASH INDEX
-------------------------------------
Ibuf: size 1, free list len 6089, seg size 6091,
44497 inserts, 44497 merged recs, 8734 merges
0.00 hash searches/s, 0.00 non-hash searches/s
Innodb_ibuf_free_list
| Option | Description |
|---|---|
| Scope | Global |
| Data type | Numeric |
Innodb_ibuf_segment_size
| Option | Description |
|---|---|
| Scope | Global |
| Data type | Numeric |
LOG
The following variables contain information in the LOG section of the
output from SHOW ENGINE INNODB STATUS. An example of that output is:
Expected output
LOG
---
Log sequence number 10145937666
Log flushed up to 10145937666
Pages flushed up to 10145937666
Last checkpoint at 10145937666
Max checkpoint age 80826164
Checkpoint age target 78300347
Modified age 0
Checkpoint age 0
0 pending log writes, 0 pending chkp writes
9 log i/o's done, 0.00 log i/o's/second
Log tracking enabled
Log tracked up to 10145937666
Max tracked LSN age 80826164
Innodb_lsn_current
| Option | Description |
|---|---|
| Scope | Global |
| Data type | Numeric |
This variable shows the current log sequence number.
Innodb_lsn_flushed
| Option | Description |
|---|---|
| Scope | Global |
| Data type | Numeric |
This variable shows the current maximum LSN that has been written and flushed to disk.
Innodb_lsn_last_checkpoint
| Option | Description |
|---|---|
| Scope | Global |
| Data type | Numeric |
This variable shows the LSN of the latest completed checkpoint.
Innodb_checkpoint_age
| Option | Description |
|---|---|
| Scope | Global |
| Data type | Numeric |
This variable shows the current InnoDB checkpoint age, i.e., the difference between the current LSN and the LSN of the last completed checkpoint.
BUFFER POOL AND MEMORY
The following variables contain information in the BUFFER POOL AND MEMORY
section of the output from SHOW ENGINE INNODB STATUS. An example of that
output is:
Expected output
----------------------
BUFFER POOL AND MEMORY
----------------------
Total memory allocated 137363456; in additional pool allocated 0
Total memory allocated by read views 88
Internal hash tables (constant factor + variable factor)
Adaptive hash index 2266736 (2213368 + 53368)
Page hash 139112 (buffer pool 0 only)
Dictionary cache 729463 (554768 + 174695)
File system 824800 (812272 + 12528)
Lock system 333248 (332872 + 376)
Recovery system 0 (0 + 0)
Dictionary memory allocated 174695
Buffer pool size 8191
Buffer pool size, bytes 134201344
Free buffers 7481
Database pages 707
Old database pages 280
Modified db pages 0
Pending reads 0
Pending writes: LRU 0, flush list 0 single page 0
Pages made young 0, not young 0
0.00 youngs/s, 0.00 non-youngs/s
Pages read 707, created 0, written 1
0.00 reads/s, 0.00 creates/s, 0.00 writes/s
No buffer pool page gets since the last printout
Pages read ahead 0.00/s, evicted without access 0.00/s, Random read ahead 0.00/s
LRU len: 707, unzip_LRU len: 0
Innodb_mem_adaptive_hash
| Option | Description |
|---|---|
| Scope | Global |
| Data type | Numeric |
This variable shows the current size, in bytes, of the adaptive hash index.
Innodb_mem_dictionary
| Option | Description |
|---|---|
| Scope | Global |
| Data type | Numeric |
This variable shows the current size, in bytes, of the InnoDB in-memory data dictionary info.
Innodb_mem_total
| Option | Description |
|---|---|
| Scope | Global |
| Data type | Numeric |
This variable shows the total amount of memory, in bytes, InnoDB has allocated in the process heap memory.
Innodb_buffer_pool_pages_LRU_flushed
| Option | Description |
|---|---|
| Scope | Global |
| Data type | Numeric |
This variable shows the total number of buffer pool pages which have been flushed from the LRU list, i.e., too old pages which had to be flushed in order to make buffer pool room to read in new data pages.
Innodb_buffer_pool_pages_made_not_young
| Option | Description |
|---|---|
| Scope | Global |
| Data type | Numeric |
This variable shows the number of times a buffer pool page was not marked as accessed recently in the LRU list because of innodb_old_blocks_time variable setting.
Innodb_buffer_pool_pages_made_young
| Option | Description |
|---|---|
| Scope | Global |
| Data type | Numeric |
This variable shows the number of times a buffer pool page was moved to the young end of the LRU list due to its access, to prevent its eviction from the buffer pool.
Innodb_buffer_pool_pages_old
| Option | Description |
|---|---|
| Scope | Global |
| Data type | Numeric |
This variable shows the total number of buffer pool pages which are considered to be old according to the Making the Buffer Pool Scan Resistant manual page.
TRANSACTIONS
The following variables contain information in the TRANSACTIONS section of
the output from SHOW INNODB STATUS. An example of that output is:
Expected output
------------
TRANSACTIONS
------------
Trx id counter F561FD
Purge done for trx's n:o < F561EB undo n:o < 0
History list length 19
LIST OF TRANSACTIONS FOR EACH SESSION:
---TRANSACTION 0, not started, process no 993, OS thread id 140213152634640
mysql thread id 15933, query id 32109 localhost root
show innodb status
---TRANSACTION F561FC, ACTIVE 29 sec, process no 993, OS thread id 140213152769808 updating or deleting
mysql tables in use 1, locked 1
Innodb_max_trx_id
| Option | Description |
|---|---|
| Scope | Global |
| Data type | Numeric |
This variable shows the next free transaction id number.
Innodb_oldest_view_low_limit_trx_id
| Option | Description |
|---|---|
| Scope | Global |
| Data type | Numeric |
This variable shows the highest transaction id, above which the current oldest open read view does not see any transaction changes. Zero if there is no open view.
Innodb_purge_trx_id
| Option | Description |
|---|---|
| Scope | Global |
| Data type | Numeric |
This variable shows the oldest transaction id whose records have not been purged yet.
Innodb_purge_undo_no
| Option | Description |
|---|---|
| Scope | Global |
| Data type | Numeric |
INFORMATION_SCHEMA Tables
The following table contains information about the oldest active transaction in the system.
INFORMATION_SCHEMA.XTRADB_READ_VIEW
The data type for the following columns is BIGINT UNSIGNED. The columns contain 64-bit integers.
| Column Name | Description |
|---|---|
| ‘READ_VIEW_LOW_LIMIT_TRX_NUMBER’ | This is the highest transactions number at the time the view was created. |
| ‘READ_VIEW_UPPER_LIMIT_TRX_ID’ | This is the highest transactions ID at the time the view was created. This means that it should not see newer transactions with IDs bigger than or equal to that value. |
| ‘READ_VIEW_LOW_LIMIT_TRX_ID’ | This is the latest committed transaction ID at the time the oldest view was created. This means that it should see all transactions with IDs smaller than or equal to that value. |
The following table contains information about the memory usage for InnoDB/XtraDB hash tables.
INFORMATION_SCHEMA.XTRADB_INTERNAL_HASH_TABLES
| Column Name | Description |
|---|---|
| ‘INTERNAL_HASH_TABLE_NAME’ | Hash table name |
| ‘TOTAL_MEMORY’ | Total amount of memory |
| ‘CONSTANT_MEMORY’ | Constant memory |
| ‘VARIABLE_MEMORY’ | Variable memory |
Other reading
Show storage engines
This feature changes the comment field displayed when the SHOW STORAGE ENGINES command is executed and XtraDB is the storage engine.
Before the Change:
show storage engines;
Expected output
+------------+---------+----------------------------------------------------------------+--------------+------+------------+
| Engine | Support | Comment | Transactions | XA | Savepoints |
+------------+---------+----------------------------------------------------------------+--------------+------+------------+
| InnoDB | YES | Supports transactions, row-level locking, and foreign keys | YES | YES | YES |
...
+------------+---------+----------------------------------------------------------------+--------------+------+------------+
After the Change:
show storage engines;
Expected output
+------------+---------+----------------------------------------------------------------------------+--------------+------+------------+
| Engine | Support | Comment | Transactions | XA | Savepoints |
+------------+---------+----------------------------------------------------------------------------+--------------+------+------------+
| InnoDB | YES | Percona-XtraDB, Supports transactions, row-level locking, and foreign keys | YES | YES | YES |
...
+------------+---------+----------------------------------------------------------------------------+--------------+------+------------+
Compressed columns with dictionaries
The per-column compression feature is a data type modifier, independent from
user-level SQL and InnoDB data compression, that causes the data stored in the
column to be compressed on writing to storage and decompressed on reading. For
all other purposes, the data type is identical to the one without the modifier,
i.e. no new data types are created. Compression is done by using the zlib
library.
Additionally, it is possible to pre-define a set of strings for each compressed column to achieve a better compression ratio on relatively small individual data items.
This feature provides:
-
a better compression ratio for text data which consists of a large number of predefined words (e.g. JSON or XML) using compression methods with static dictionaries
-
a way to select columns in the table to compress (in contrast to the InnoDB row compression method). This feature is based on a patch provided by Weixiang Zhai.
Specifications
The feature is limited to InnoDB/XtraDB storage engine and to columns of the following data types:
-
BLOB(includingTINYBLOB,MEDIUMBLOB,LONGBLOG) -
TEXT(includingTINYTEXT,MEDUUMTEXT,LONGTEXT) -
VARCHAR(includingNATIONAL VARCHAR) -
VARBINARY -
JSON
A compressed column is declared by using the syntax that extends the existing
COLUMN_FORMAT modifier: COLUMN_FORMAT COMPRESSED. If this modifier is
applied to an unsupported column type or storage engine, an error is returned.
The compression can be specified:
-
when creating a table:
CREATE TABLE ... (..., foo BLOB COLUMN_FORMAT COMPRESSED, ...); -
when altering a table and modifying a column to the compressed format:
ALTER TABLE ... MODIFY [COLUMN] ... COLUMN_FORMAT COMPRESSED, orALTER TABLE ... CHANGE [COLUMN] ... COLUMN_FORMAT COMPRESSED.
Unlike Oracle MySQL, compression is applicable to generated stored columns. Use this syntax extension as follows:
CREATE TABLE t1(
id INT,
a BLOB,
b JSON COLUMN_FORMAT COMPRESSED,
g BLOB GENERATED ALWAYS AS (a) STORED COLUMN_FORMAT COMPRESSED WITH COMPRESSION_DICTIONARY numbers
) ENGINE=InnoDB;
To decompress a column, specify a value other than COMPRESSED to
COLUMN_FORMAT: FIXED, DYNAMIC, or DEFAULT. If there is a column
compression/decompression request in an ALTER TABLE, it is forced to the
COPY algorithm.
Two new variables: innodb_compressed_columns_zip_level and innodb_compressed_columns_threshold have been implemented.
Compression dictionary support
To achieve a better compression ratio on relatively small individual data items, it is possible to predefine a compression dictionary, which is a set of strings for each compressed column.
Compression dictionaries can be represented as a list of words in the form of a
string (a comma or any other character can be used as a delimiter although not
required). In other words, a, bb, ccc, a bb ccc, and abbccc will have
the same effect. However, the latter is more compact. The Quote symbol
quoting is handled by regular SQL quoting. The maximum supported dictionary length is 32506 bytes (zlib limitation).
The compression dictionary is stored in a new system InnoDB table. As this table is of the data dictionary kind, concurrent reads are allowed, but writes are serialized, and reads are blocked by writes. Table read through old read views are not supported, similar to InnoDB internal DDL transactions.
Interaction with innodb_force_recovery variable
Compression dictionary operations are treated like DDL operations with the
exception when innodb_force_value is set to 3: with values
less than 3, compression dictionary operations are allowed, and with
values >= 3, they are forbidden.
Example
In order to use the compression dictionary, you need to create it. This can be done by running:
SET @dictionary_data = 'one' 'two' 'three' 'four';
Expected output
Query OK, 0 rows affected (0.00 sec)
CREATE COMPRESSION_DICTIONARY numbers (@dictionary_data);
Expected output
Query OK, 0 rows affected (0.00 sec)
To create a table that has both compression and compressed dictionary support you should run:
CREATE TABLE t1(
id INT,
a BLOB COLUMN_FORMAT COMPRESSED,
b BLOB COLUMN_FORMAT COMPRESSED WITH COMPRESSION_DICTIONARY numbers
) ENGINE=InnoDB;
The following example shows how to insert a sample of JSON data into the table:
SET @json_value =
'[\n'
' {\n'
' "one" = 0,\n'
' "two" = 0,\n'
' "three" = 0,\n'
' "four" = 0\n'
' },\n'
' {\n'
' "one" = 0,\n'
' "two" = 0,\n'
' "three" = 0,\n'
' "four" = 0\n'
' },\n'
' {\n'
' "one" = 0,\n'
' "two" = 0,\n'
' "three" = 0,\n'
' "four" = 0\n'
' },\n'
' {\n'
' "one" = 0,\n'
' "two" = 0,\n'
' "three" = 0,\n'
' "four" = 0\n'
' }\n'
']\n'
;
INSERT INTO t1 VALUES(0, @json_value, @json_value);
Query OK, 1 row affected (0.01 sec)
INFORMATION_SCHEMA Tables
This feature implements two new INFORMATION_SCHEMA tables.
INFORMATION_SCHEMA.COMPRESSION_DICTIONARY
| Column Name | Description |
|---|---|
| ‘BIGINT(21)_UNSIGNED dict_version’ | ‘dictionary version’ |
| ‘VARCHAR(64) dict_name’ | ‘dictionary name’ |
| ‘BLOB dict_data’ | ‘compression dictionary string’ |
This table provides a view of the internal compression dictionary. The
SUPER privilege is required to query it.
INFORMATION_SCHEMA.COMPRESSION_DICTIONARY_TABLES
| Column Name | Description |
|---|---|
| ‘BIGINT(21)_UNSIGNED table_schema’ | ‘table schema’ |
| ‘BIGINT(21)_UNSIGNED table_name’ | ‘table ID from INFORMATION_SCHEMA.INNODB_SYS_TABLES’ |
| ‘BIGINT(21)_UNSIGNED column_name’ | ‘column position (starts from 0 as in INFORMATION_SCHEMA.INNODB_SYS_COLUMNS)’ |
| ‘BIGINT(21)_UNSIGNED dict_name’ | ‘dictionary ID’ |
This table provides a view over the internal table that stores the mapping
between the compression dictionaries and the columns using them. The SUPER
privilege is require to query it.
Limitations
Compressed columns cannot be used in indices (neither on their own nor as parts of composite keys).
Note
CREATE TABLE t2 AS SELECT \* FROM t1 will create a new table with a compressed column, whereas CREATE TABLE t2 AS SELECT CONCAT(a,'') AS a FROM t1 will not create compressed columns.
At the same time, after executing the CREATE TABLE t2 LIKE t1 statement, t2.a will have the COMPRESSED attribute.
ALTER TABLE ... DISCARD/IMPORT TABLESPACE is not supported for tables with
compressed columns. To export and import tablespaces with compressed columns,
you uncompress them first with: ALTER TABLE ... MODIFY ...
COLUMN_FORMAT DEFAULT.
mysqldump command line parameters
By default, with no additional options, mysqldump will generate a MySQL
compatible SQL output.
All /\*!50633 COLUMN_FORMAT COMPRESSED \*/ and /\*!50633 COLUMN_FORMAT
COMPRESSED WITH COMPRESSION_DICTIONARY <dictionary> \*/ won’t be in the dump.
When a new option enable-compressed-columns is specified, all
/\*!50633 COLUMN_FORMAT COMPRESSED \*/ will be left intact and all /\*!50633
COLUMN_FORMAT COMPRESSED WITH COMPRESSION_DICTIONARY <dictionary> \*/ will be
transformed into /\*!50633 COLUMN_FORMAT COMPRESSED \*/. In this mode, the
dump will contain the necessary SQL statements to create compressed columns,
but without dictionaries.
When a new enable-compressed-columns-with-dictionaries option is specified, dump will contain all compressed column attributes and compression dictionary.
Moreover, the following dictionary creation fragments will be added before
CREATE TABLE statements which are going to use these dictionaries for the
first time.
/*!50633 DROP COMPRESSION_DICTIONARY IF EXISTS <dictionary>; */
/*!50633 CREATE COMPRESSION_DICTIONARY <dictionary>(...); */
Two new options add-drop-compression-dictionary and
skip-add-drop-compression-dictionary will control if /\*!50633 DROP
COMPRESSION_DICTIONARY IF EXISTS <dictionary> \*/ part from previous paragraph
will be skipped or not. By default, add-drop-compression-dictionary
the mode will be used.
When both enable-compressed-columns-with-dictionaries and
--tab=<dir> (separate file for each table) options are specified, necessary
compression dictionaries will be created in each output file using the
following fragment (regardless of the values of
add-drop-compression-dictionary and
skip-add-drop-compression-dictionary options).
/*!50633 CREATE COMPRESSION_DICTIONARY IF NOT EXISTS <dictionary>(...); */
System variables
innodb_compressed_columns_zip_level
| Option | Description |
|---|---|
| Command-line | Yes |
| Config file | Yes |
| Scope | Global |
| Dynamic | Yes |
| Data type | Numeric |
| Default | 6 |
| Range | 0-9 |
This variable is used to specify the compression level used for compressed
columns. Specifying 0 will use no compression, 1 the fastest, and 9
the best compression. The default value is 6.
innodb_compressed_columns_threshold
| Option | Description |
|---|---|
| Command-line | Yes |
| Config file | Yes |
| Scope | Global |
| Dynamic | Yes |
| Data type | Numeric |
| Default | 96 |
| Range | 1 - 2^64-1 (or 2^32-1 for 32-bit release) |
By default, a value being inserted will be compressed if its length exceeds innodb_compressed_columns_threshold bytes. Otherwise, it will be stored in the raw (uncompressed) form.
Please also note that because of the nature of some data, the compressed representation can be longer than the original value. In this case, it does not make sense to store such values in compressed form as Percona Server for MySQL would have to waste both memory space and CPU resources for unnecessary decompression. Therefore, even if the length of such non-compressible values exceeds innodb_compressed_columns_threshold, they will be stored in an uncompressed form (however, an attempt to compress them will still be made).
This parameter can be tuned to skip unnecessary attempts of data compression for values that are known in advance by the user to have a bad compression ratio of their first N bytes.
InnoDB full-text search improvements
Ignoring stopword list
By default, all Full-Text Search indexes check the stopwords list , to see if any indexed elements contain words on that list.
Using this list for n-gram indexes isn’t always suitable, for example, any
item that contains a or i will be ignored. Another word that can’t be
searched is east, this one will find no matches because a is on the
FTS stopword list.
To resolve this issue, Percona Server for MySQL has the
innodb_ft_ignore_stopwords variable to control whether
InnoDB Full-Text Search should ignore the stopword list.
Although this variable is introduced to resolve n-gram issues, it affects all Full-Text Search indexes as well.
Being a stopword doesn’t just mean being one of the predefined
words from the list. Tokens shorter than innodb_ft_min_token_size or longer than innodb_ft_max_token_size are also considered stopwords. Therefore, when
innodb_ft_ignore_stopwords is set to ON even for non-ngram
FTS, innodb_ft_min_token_size / innodb_ft_max_token_size will be
ignored meaning that in this case very short and very long words will
also be indexed.
System variables
innodb_ft_ignore_stopwords
| Option | Description |
|---|---|
| Command-line | Yes |
| Config file | Yes |
| Scope | Session, Global |
| Dynamic | Yes |
| Data type | Boolean |
| Default | OFF |
When enabled, this variable will instruct InnoDB Full Text Search parser to ignore the stopword list when building/updating an FTS index.
XtraDB performance improvements for I/O-bound highly-concurrent workloads
Priority refill for the buffer pool free list
In highly-concurrent I/O-bound workloads the following situation may happen:
-
Buffer pool free lists are used faster than they are refilled by the LRU cleaner thread.
-
Buffer pool free lists become empty and more and more query and utility (i.e., purge) threads stall, checking whether a buffer pool free list has became non-empty, sleeping, performing single-page LRU flushes.
-
The number of buffer pool free list mutex waiters increases.
-
When the LRU manager thread (or a single page LRU flush by a query thread) finally produces a free page, it is starved from putting it on the buffer pool free list as it must acquire the buffer pool free list mutex too. However, being one thread in up to hundreds, the chances of a prompt acquisition are low.
This is addressed by delegating all the LRU flushes to the to the LRU manager thread, never attempting to evict a page or perform a LRU single page flush by a query thread, and introducing a backoff algorithm to reduce buffer pool free list mutex pressure on empty buffer pool free lists. This is controlled through a new system variable innodb_empty_free_list_algorithm.
innodb_empty_free_list_algorithm
| Option | Description |
|---|---|
| Command-line: | Yes |
| Config file: | Yes |
| Scope: | Global |
| Dynamic: | Yes |
| Data type: | legacy, backoff |
| Default | legacy |
When legacy option is set, server will use the upstream algorithm and when
the backoff is selected, Percona implementation will be used.
Multi-threaded LRU flusher
This feature has been removed in Percona Server for MySQL 8.3.0-1.
Percona Server for MySQL features a true multi-threaded LRU flushing. In this scheme, each buffer pool instance has its own dedicated LRU manager thread that is tasked with performing LRU flushes and evictions to refill the free list of that buffer pool instance. Existing multi-threaded flusher no longer does any LRU flushing and is tasked with flush list flushing only.
-
All threads still synchronize on each coordinator thread iteration. If a particular flushing job is stuck on one of the worker threads, the rest will idle until the stuck one completes.
-
The coordinator thread heuristics focus on flush list adaptive flushing without considering the state of free lists, which might be in need of urgent refill for a subset of buffer pool instances on a loaded server.
-
LRU flushing is serialized with flush list flushing for each buffer pool instance, introducing the risk that the right flushing mode will not happen for a particular instance because it is being flushed in the other mode.
The following InnoDB metrics are no longer accounted, as their semantics do
not make sense under the current LRU flushing design:
buffer_LRU_batch_flush_avg_time_slot, buffer_LRU_batch_flush_avg_pass,
buffer_LRU_batch_flush_avg_time_thread,
buffer_LRU_batch_flush_avg_time_est.
The need for InnoDB recovery thread writer threads is also removed, consequently all associated code is deleted.
innodb_sched_priority_master
| Option | Description |
|---|---|
| Command-line: | Yes |
| Config file: | Yes |
| Scope: | Global |
| Dynamic: | Yes |
| Data type: | Boolean |
This variable can be added to the configuration file.
Multiple page asynchronous I/O requests
The I/O unit size in InnoDB is only one page, even if the server doing read ahead. A 16KB
I/O unit size is too small for sequential reads, and less efficient than a larger I/O unit size. InnoDB uses Linux asynchronous I/O (aio) by default. By submitting multiple, consecutive 16KB read requests at the same time, Linux internally merges the requests and
reads more efficiently.
This feature is able to submit multiple page I/O requests and works in the background. You can manage the feature with the [linear read-ahead technique]. This technique adds pages to the buffer pool based on the buffer pool pages being accessed sequentially. The innodb_read_ahead_threshold configuration parameter controls this operation.
On a HDD RAID 1+0 environment , more than 1000MB/s disk reads can be achieved by submitting 64 consecutive pages requests at once, while only 160MB/s disk reads is shown by submitting single page request.
Status variables
Innodb_buffered_aio_submitted
| Option | Description |
|---|---|
| Scope: | Global |
| Data type: | Numeric |
This variable shows the number of submitted buffered asynchronous I/O requests.
Other reading
Prefix index queries optimization
Percona Server for MySQL has ported Prefix Index Queries Optimization feature from Facebook patch for MySQL.
Prior to this InnoDB would always fetch the clustered index for all prefix columns in an index, even when the value of a particular record was smaller than the prefix length. This implementation optimizes that case to use the record from the secondary index and avoid the extra lookup.
Status variables
Innodb_secondary_index_triggered_cluster_reads
| Option | Description |
|---|---|
| Scope: | Global |
| Data type: | Numeric |
This variable shows the number of times secondary index lookup triggered cluster lookup.
Innodb_secondary_index_triggered_cluster_reads_avoided
| Option | Description |
|---|---|
| Scope: | Global |
| Data type: | Numeric |
This variable shows the number of times prefix optimization avoided triggering cluster lookup.
Limit the estimation of records in a Query
Important
This feature is a tech preview. Before using this feature in production, we recommend that you test restoring production from physical backups in your environment, and also use the alternative backup method for redundancy.
This page describes an alternative when running queries against a large number of table partitions. When a query runs, InnoDB estimates the records in each partition. This process can result in more pages read and more disk I/O, if the buffer pool must fetch the pages from disk. This process increases the query time if there are a large number of partitions.
The addition of two variables makes it possible to override records_in_range which effectively bypasses the process.
Warning
The use of these variables may result in improper index selection by the optimizer.
innodb_records_in_range
| Option | Description |
|---|---|
| Command-line: | --innodb-records-in-range |
| Scope: | Global |
| Dynamic: | Yes |
| Data type: | Numeric |
| Default | 0 |
Important
This feature is a tech preview. Before using this feature in production, we recommend that you test restoring production from physical backups in your environment, and also use the alternative backup method for redundancy.
The variable provides a method to limit the number of records estimated for a query.
SET @@GLOBAL.innodb_records_in_range=100;
100
innodb_force_index_records_in_range
| Option | Description |
|---|---|
| Command-line: | --innodb-force-index-records-in-range |
| Scope: | Global |
| Dynamic: | Yes |
| Data type: | Numeric |
| Default | 0 |
Important
This feature is a tech preview. Before using this feature in production, we recommend that you test restoring production from physical backups in your environment, and also use the alternative backup method for redundancy.
This variable provides a method to override the records_in_range result when a FORCE INDEX is used in a query.
SET @@GLOBAL.innodb_force_index_records_in_range=100;
100
Using the favor_range_scan optimizer switch
Important
This feature is a tech preview. Before using this feature in production, we recommend that you test restoring production from physical backups in your environment, and also use the alternative backup method for redundancy.
In specific scenarios, the optimizer chooses to scan a table instead of using a range scan. The conditions are the following:
-
Table with an extremely large number of rows
-
Compound primary keys made of two or more columns
-
WHERE clause contains multiple range conditions
The optimizer_switch controls the optimizer behavior. The favor_range_scan switch arbitrarily lowers the cost of a range scan by a factor of 10.
The available values are:
-
ON
-
OFF (Default)
-
DEFAULT
SET optimizer_switch='favor_range_scan=on';
InnoDB page fragmentation counters
InnoDB page fragmentation is caused by random insertion or deletion from a secondary index. This means that the physical ordering of the index pages on the disk is not same as the index ordering of the records on the pages. As a consequence this means that some pages take a lot more space and that queries which require a full table scan can take a long time to finish.
To provide more information about the InnoDB page fragmentation Percona Server for MySQL now provides the following counters as status variables: Innodb_scan_pages_contiguous, Innodb_scan_pages_disjointed, Innodb_scan_data_size, Innodb_scan_deleted_recs_size, and Innodb_scan_pages_total_seek_distance.
Status variables
Innodb_scan_pages_contiguous
| Option | Description |
|---|---|
| Scope | Session |
| Data type | Numeric |
This variable shows the number of contiguous page reads inside a query.
Innodb_scan_pages_disjointed
| Option | Description |
|---|---|
| Scope | Session |
| Data type | Numeric |
This variable shows the number of disjointed page reads inside a query.
Innodb_scan_data_size
| Option | Description |
|---|---|
| Scope | Session |
| Data type | Numeric |
This variable shows the size of data in all InnoDB pages read inside a
query (in bytes) - calculated as the sum of page_get_data_size(page) for
every page scanned.
Innodb_scan_deleted_recs_size
| Option | Description |
|---|---|
| Scope | Session |
| Data type | Numeric |
This variable shows the size of deleted records (marked as deleted in
page_delete_rec_list_end()) in all InnoDB pages read inside a query
(in bytes) - calculated as the sum of page_header_get_field(page,
PAGE_GARBAGE) for every page scanned.
Innodb_scan_pages_total_seek_distance
| Option | Description |
|---|---|
| Scope | Session |
| Data type | Numeric |
This variable shows the total seek distance when moving between pages.
Related reading
Percona MyRocks
Percona MyRocks introduction
MyRocks is a storage engine for MySQL based on RocksDB , an embeddable, persistent key-value store. Percona MyRocks is an implementation for Percona Server for MySQL .
The RocksDB store is based on the log-structured merge-tree (or LSM tree). It is optimized for fast storage and combines outstanding space and write efficiency with acceptable read performance. As a result, MyRocks has the following advantages compared to other storage engines, if your workload uses fast storage, such as SSD:
-
Requires less storage space
-
Provides more storage endurance
-
Ensures better IO capacity
Important
The latest MyRocks storage engine is based on recent RocksDB source code, with minor modifications applied by Percona.
To check the RocksDB version currently used by MyRocks, run the following command:
$ head storage/rocksdb/rocksdb/HISTORY.md
Expected output
...
## 8.5.1 (08/31/2023)
...
Percona MyRocks Installation Guide
Differences between Percona MyRocks and Facebook MyRocks
Percona MyRocks installation guide
Percona MyRocks is distributed as a separate package that can be enabled as a plugin for Percona Server for MySQL 8.4 and later versions.
Note
File formats across different MyRocks variants may not be compatible. Percona Server for MySQL supports only Percona MyRocks. Migrating from one variant to another requires a logical data dump and reload.
Install Percona MyRocks
It is recommended to install Percona software from official repositories:
-
Configure Percona repositories as described in Percona Software Repositories Documentation .
-
Install Percona MyRocks using the corresponding package manager:
$ sudo apt install percona-server-rocksdb$ sudo dnf install percona-server-rocksdb
After installation, you should see the following output:
Expected output
* This release of |Percona Server| is distributed with RocksDB storage engine.
* Run the following script to enable the RocksDB storage engine in Percona Server:
$ ps-admin --enable-rocksdb -u <mysql_admin_user> -p[mysql_admin_pass] [-S <socket>] [-h <host> -P <port>]
Enable MyRocks with ps-admin
Run the ps-admin script as system root user or with sudo
and provide the MySQL root user credentials
to properly enable the RocksDB (MyRocks) storage engine:
$ sudo ps-admin --enable-rocksdb -u root -pPassw0rd
Expected output
Checking if RocksDB plugin is available for installation ...
INFO: ha_rocksdb.so library for RocksDB found at /usr/lib64/mysql/plugin/ha_rocksdb.so.
Checking RocksDB engine plugin status...
INFO: RocksDB engine plugin is not installed.
Installing RocksDB engine...
INFO: Successfully installed RocksDB engine plugin.
Note
When you use the ps-admin script to enable Percona MyRocks, it performs the following:
-
Disables Transparent huge pages
-
Installs and enables the RocksDB plugin
If the script returns no errors, Percona MyRocks should be successfully enabled on the server. You can verify it as follows:
SHOW ENGINES;
Expected output
+---------+---------+----------------------------------------------------------------------------+--------------+------+------------+
| Engine | Support | Comment | Transactions | XA | Savepoints |
+---------+---------+----------------------------------------------------------------------------+--------------+------+------------+
| ROCKSDB | YES | RocksDB storage engine | YES | YES | YES |
...
| InnoDB | DEFAULT | Percona-XtraDB, Supports transactions, row-level locking, and foreign keys | YES | YES | YES |
+---------+---------+----------------------------------------------------------------------------+--------------+------+------------+
10 rows in set (0.00 sec)
Note that the RocksDB engine is not set to be default,
new tables will still be created using the InnoDB (XtraDB) storage engine.
To make RocksDB storage engine default,
set default-storage-engine=rocksdb in the [mysqld] section
of my.cnf and restart Percona Server for MySQL.
Alternatively, you can add ENGINE=RocksDB
after the CREATE TABLE statement
for every table that you create.
Install MyRocks plugins
You can install MyRocks manually with a series of INSTALL PLUGIN statements. You must have the INSERT privilege for the mysql.plugin system table.
The following statements install MyRocks:
INSTALL PLUGIN ROCKSDB SONAME 'ha_rocksdb.so';
INSTALL PLUGIN ROCKSDB_CFSTATS SONAME 'ha_rocksdb.so';
INSTALL PLUGIN ROCKSDB_DBSTATS SONAME 'ha_rocksdb.so';
INSTALL PLUGIN ROCKSDB_PERF_CONTEXT SONAME 'ha_rocksdb.so';
INSTALL PLUGIN ROCKSDB_PERF_CONTEXT_GLOBAL SONAME 'ha_rocksdb.so';
INSTALL PLUGIN ROCKSDB_CF_OPTIONS SONAME 'ha_rocksdb.so';
INSTALL PLUGIN ROCKSDB_GLOBAL_INFO SONAME 'ha_rocksdb.so';
INSTALL PLUGIN ROCKSDB_COMPACTION_HISTORY SONAME 'ha_rocksdb.so';
INSTALL PLUGIN ROCKSDB_COMPACTION_STATS SONAME 'ha_rocksdb.so';
INSTALL PLUGIN ROCKSDB_ACTIVE_COMPACTION_STATS SONAME 'ha_rocksdb.so';
INSTALL PLUGIN ROCKSDB_DDL SONAME 'ha_rocksdb.so';
INSTALL PLUGIN ROCKSDB_INDEX_FILE_MAP SONAME 'ha_rocksdb.so';
INSTALL PLUGIN ROCKSDB_LOCKS SONAME 'ha_rocksdb.so';
INSTALL PLUGIN ROCKSDB_TRX SONAME 'ha_rocksdb.so';
INSTALL PLUGIN ROCKSDB_DEADLOCK SONAME 'ha_rocksdb.so';
Remove Percona MyRocks
It will not be possible to access tables created using the RocksDB engine
with another storage engine after you remove Percona MyRocks.
If you need this data, alter the tables to another storage engine.
For example, to alter the City table to InnoDB, run the following:
ALTER TABLE City ENGINE=InnoDB;
To disable and uninstall the RocksDB engine plugins,
use the ps-admin script as follows:
$ sudo ps-admin --disable-rocksdb -u root -pPassw0rd
Expected output
Checking RocksDB engine plugin status...
INFO: RocksDB engine plugin is installed.
Uninstalling RocksDB engine plugin...
INFO: Successfully uninstalled RocksDB engine plugin.
After the engine plugins have been uninstalled, remove the Percona MyRocks package:
=== "Debian or Ubuntu"
```shell
$ sudo apt remove percona-server-rocksdb-8.4
```
=== "RHEL or derivatives"
```shell
$ sudo yum remove percona-server-rocksdb-80.x86_64
```
Finally, remove all the MyRocks Server Variables
from the configuration file (my.cnf)
and restart Percona Server for MySQL.
Uninstall MyRocks plugins
You can uninstall the plugins for MyRocks. You must have the DELETE privilege for the mysql.plugin system table.
The following statements remove the MyRocks plugins:
UNINSTALL PLUGIN ROCKSDB;
UNINSTALL PLUGIN ROCKSDB_CFSTATS;
UNINSTALL PLUGIN ROCKSDB_DBSTATS;
UNINSTALL PLUGIN ROCKSDB_PERF_CONTEXT;
UNINSTALL PLUGIN ROCKSDB_PERF_CONTEXT_GLOBAL;
UNINSTALL PLUGIN ROCKSDB_CF_OPTIONS;
UNINSTALL PLUGIN ROCKSDB_GLOBAL_INFO;
UNINSTALL PLUGIN ROCKSDB_COMPACTION_HISTORY;
UNINSTALL PLUGIN ROCKSDB_COMPACTION_STATS;
UNINSTALL PLUGIN ROCKSDB_ACTIVE_COMPACTION_STATS;
UNINSTALL PLUGIN ROCKSDB_DDL;
UNINSTALL PLUGIN ROCKSDB_INDEX_FILE_MAP;
UNINSTALL PLUGIN ROCKSDB_LOCKS;
UNINSTALL PLUGIN ROCKSDB_TRX;
UNINSTALL PLUGIN ROCKSDB_DEADLOCK;
Updated supported features
The following is a list of the latest supported features:
-
Percona Server for MySQLsupports
SELECT FOR UPDATE SKIP LOCKED/NOWAIT. The transaction isolation level must beREAD COMMITTED. -
Percona Server for MySQL adds the ability to cancel ongoing manual compactions. The cancel methods are the following:
-
Using either Control+C (from a session) or KILL (from another session) for client sessions running manual compactions by
SET GLOBAL rocksdb_compact_cf (variable). -
Using a global variable
rocksdb_cancel_manual_compactionsto cancel all ongoing manual compactions.
-
-
Percona Server for MySQL adds supported for Generated Columns and index are supported.
-
Percona Server for MySQL adds support for explicit DEFAULT value expressions .
MyRocks limitations
Online DDL limitations
MyRocks has limited support for Online DDL operations due to the lack of atomic DDL. As a result the schema changes are more restricted compared to InnoDB.
Traditional MyRocks DDL behavior
| Operation type | Examples | ALGORITHM |
|---|---|---|
| Index operations | ADD INDEX, DROP INDEX, RENAME INDEX |
INPLACE (always) |
| Column changes | ADD COLUMN, DROP COLUMN, MODIFY COLUMN |
COPY (full table rebuild) |
| Metadata changes | RENAME TABLE, some RENAME COLUMN operations |
May be INSTANT |
Note: MyRocks does not support atomic DDL. Even metadata-only operations may require a full table rebuild, depending on the nature of the change.
Partition management support
MyRocks supports INPLACE partition management for certain operations:
ALTER TABLE t1 DROP PARTITION p1, ALGORITHM=INPLACE;
ALTER TABLE t1 ADD PARTITION (PARTITION p2 VALUES LESS THAN (MAXVALUE)), ALGORITHM=INPLACE;
VALUES LESS THAN, fall back to the COPY algorithm.
Note: Dropping a partition permanently deletes any data stored in it unless that data is reassigned to another partition.
Instant DDL support
MyRocks provides limited Instant DDL support that is disabled by default, and you can activate the specific instant operations you need by setting the appropriate configuration variables.
| Configuration variable | Enables Instant DDL for |
|---|---|
rocksdb_enable_instant_ddl_for_append_column=ON |
ALTER TABLE ... ADD COLUMN |
rocksdb_enable_instant_ddl_for_column_default_changes=ON |
ALTER/MODIFY COLUMN … DEFAULT |
rocksdb_enable_instant_ddl_for_drop_index_changes=ON |
ALTER TABLE ... DROP INDEX |
rocksdb_enable_instant_ddl_for_table_comment_changes=ON |
ALTER TABLE ... COMMENT |
Note: Instant DDL in MyRocks is applied only when both of the following conditions are met:
- The configuration variable is set to
ON. - The
ALTER TABLEstatement explicitly includesALGORITHM=INSTANT.
For example:
SET GLOBAL rocksdb_enable_instant_ddl_for_table_comment_changes = ON;
ALTER TABLE my_table COMMENT = 'New comment', ALGORITHM=INSTANT;
If either condition is missing:
- When the variable is
ONbutALGORITHM=INSTANTis omitted, MyRocks falls back to the default (non‑instant) algorithm. - When the variable is
OFF, anyALTER TABLE … ALGORITHM=INSTANTstatement fails with an error.
Unsupported InnoDB features in MyRocks
You should also consider the following:
-
All collations are supported on
CHARandVARCHARindexed columns. By default, MyRocks prevents creating indexes with non-binary collations (includinglatin1). You can optionally use it by setting rocksdb_strict_collation_exceptions tot1(table names with regex format), but non-binary covering indexes other thanlatin1(excludinggerman1) still require a primary key lookup to return theCHARorVARCHARcolumn. -
Either
ORDER BY DESCorORDER BY ASCis slow. This is because of “Prefix Key Encoding” feature in RocksDB. See https://www.slideshare.net/matsunobu/myrocks-deep-dive/58 for details. By default, ascending scan is faster and descending scan is slower. If the “reverse column family” is configured, then descending scan will be faster and ascending scan will be slower. Note that InnoDB also imposes a cost when the index is scanned in the opposite order. -
When converting from large MyISAM/InnoDB tables, either by using the
ALTERorINSERT INTO SELECTstatements it’s recommended that you check the Data loading documentation and create MyRocks tables as below (in case the table is sufficiently big it will cause the server to consume all the memory and then be terminated by the OOM killer):
SET session sql_log_bin=0;
SET session rocksdb_bulk_load=1;
ALTER TABLE large_myisam_table ENGINE=RocksDB;
SET session rocksdb_bulk_load=0;
Expected output
.. warning::
If you are loading large data without enabling :ref:`rocksdb_bulk_load`
or :ref:`rocksdb_commit_in_the_middle`, please make sure transaction
ize is small enough. All modifications of the ongoing transactions are
kept in memory.
-
With partitioned tables that use the MyRocks storage engine, the upgrade only works with native partitioning.
-
Percona Server for MySQL 8.4 and Unicode 9.0.0 standards have defined a change in the handling of binary collations. These collations are handled as NO PAD, trailing spaces are included in key comparisons. A binary collation comparison may result in two unique rows inserted and does not generate a`DUP_ENTRY` error. MyRocks key encoding and comparison does not account for this character set attribute.
Not supported on MyRocks
MyRocks does not support the following:
-
Operating as either a source or a replica in any replication topology that is not exclusively row-based. Statement-based and mixed-format binary logging is not supported. For more information, see Replication Formats .
-
Using multi-valued indexes . InnoDB supports this feature.
-
Using spatial data types .
-
Using the Clone Plugin and the Clone Plugin API. InnoDB supports either these features.
-
Using encryption in tables. At this time, during an
ALTER TABLEoperation, MyRocks mistakenly detects all InnoDB tables as encrypted. Therefore, any attempt toALTERan InnoDB table to MyRocks fails.As a workaround, we recommend a manual move of the table. The following steps are the same as the
ALTER TABLE ... ENGINE=...process:-
Use
SHOW CREATE TABLE ...to return the InnoDB table definition. -
With the table definition as the source, perform a
CREATE TABLE ... ENGINE=RocksDB. -
In the new table, use
INSERT INTO <new table> SELECT \* FROM <old table>.
Note
With MyRocks and with large tables, it is recommended to set the session variable
rocksdb_bulk_load=1during the load to prevent running out of memory. This recommendation is because of the MyRocks large transaction limitation. For more information, see MyRocks Data Loading -
Differences between Percona MyRocks and Facebook MyRocks
The original MyRocks was developed by Facebook and works with their implementation of MySQL. Percona MyRocks is a branch of MyRocks for Percona Server for MySQL and includes the following differences from the original implementation:
- The behavior of the
START TRANSACTION WITH CONSISTENT SNAPSHOTstatement depends on the transaction isolation level .
| Storage Engine | Transaction isolation level | |
|---|---|---|
READ COMMITTED |
REPEATABLE READ |
|
| InnoDB | Success | Success |
| Facebook MyRocks | Fail | Success (MyRocks engine only; read-only, as all MyRocks engine snapshots) |
| Percona MyRocks | Fail with any DML which would violate the read-only snapshot constraint | Success (read-only snapshots independent of the engines in use) |
- Percona MyRocks includes the
lz4andzstdstatically linked libraries.
MyRocks Information Schema tables
When you install the MyRocks plugin for MySQL, the Information Schema is extended to include the following tables:
ROCKSDB_GLOBAL_INFO
Columns
| Column Name | Type |
|---|---|
| TYPE | varchar(513) |
| NAME | varchar(513) |
| VALUE | varchar(513) |
ROCKSDB_CFSTATS
Columns
| Column Name | Type |
|---|---|
| CF_NAME | varchar(193) |
| STAT_TYPE | varchar(193) |
| VALUE | bigint(8) |
ROCKSDB_TRX
This table stores mappings of RocksDB transaction identifiers to MySQL client identifiers to enable associating a RocksDB transaction with a MySQL client operation.
Columns
| Column Name | Type |
|---|---|
| TRANSACTION_ID | bigint(8) |
| STATE | varchar(193) |
| NAME | varchar(193) |
| WRITE_COUNT | bigint(8) |
| LOCK_COUNT | bigint(8) |
| TIMEOUT_SEC | int(4) |
| WAITING_KEY | varchar(513) |
| WAITING_COLUMN_FAMILY_ID | int(4) |
| IS_REPLICATION | int(4) |
| SKIP_TRX_API | int(4) |
| READ_ONLY | int(4) |
| HAS_DEADLOCK_DETECTION | int(4) |
| NUM_ONGOING_BULKLOAD | int(4) |
| THREAD_ID | int(8) |
| QUERY | varchar(193) |
ROCKSDB_CF_OPTIONS
Columns
| Column Name | Type |
|---|---|
| CF_NAME | varchar(193) |
| OPTION_TYPE | varchar(193) |
| VALUE | varchar(193) |
ROCKSDB_ACTIVE_COMPACTION_STATS
Columns
| Column Name | Type |
|---|---|
| THREAD_ID | bigint |
| CF_NAME | varchar(193) |
| INPUT_FILES | varchar(513) |
| OUTPUT_FILES | varchar(513) |
| COMPACTION_REASON | varchar(513) |
ROCKSDB_COMPACTION_HISTORY
Columns
| Column Name | Type |
|---|---|
| THREAD_ID | bigint |
| CF_NAME | varchar(513) |
| INPUT_LEVEL | integer |
| OUTPUT_LEVEL | integer |
| INPUT_FILES | varchar(513) |
| OUTPUT_FILES | varchar(513) |
| COMPACTION_REASON | varchar(513) |
| START_TIMESTAMP | bigint |
| END_TIMESTAMP | bigint |
ROCKSDB_COMPACTION_STATS
Columns
| Column Name | Type |
|---|---|
| CF_NAME | varchar(193) |
| LEVEL | varchar(513) |
| TYPE | varchar(513) |
| VALUE | double |
ROCKSDB_DBSTATS
Columns
| Column Name | Type |
|---|---|
| STAT_TYPE | varchar(193) |
| VALUE | bigint(8) |
ROCKSDB_DDL
Columns
| Column Name | Type |
|---|---|
| TABLE_SCHEMA | varchar(193) |
| TABLE_NAME | varchar(193) |
| PARTITION_NAME | varchar(193) |
| INDEX_NAME | varchar(193) |
| COLUMN_FAMILY | int(4) |
| INDEX_NUMBER | int(4) |
| INDEX_TYPE | smallint(2) |
| KV_FORMAT_VERSION | smallint(2) |
| TTL_DURATION | bigint(8) |
| INDEX_FLAGS | bigint(8) |
| CF | varchar(193) |
| AUTO_INCREMENT | bigint(8) unsigned |
ROCKSDB_INDEX_FILE_MAP
Columns
| Column Name | Type |
|---|---|
| COLUMN_FAMILY | int(4) |
| INDEX_NUMBER | int(4) |
| SST_NAME | varchar(193) |
| NUM_ROWS | bigint(8) |
| DATA_SIZE | bigint(8) |
| ENTRY_DELETES | bigint(8) |
| ENTRY_SINGLEDELETES | bigint(8) |
| ENTRY_MERGES | bigint(8) |
| ENTRY_OTHERS | bigint(8) |
| DISTINCT_KEYS_PREFIX | varchar(400) |
ROCKSDB_LIVE_FILES_METADATA
| Column Name | Type |
|---|---|
| CF_NAME | varchar(193) |
| LEVEL | varchar(513) |
| NAME | varchar(513) |
| DB_PATH | varchar(513) |
| FILE_NUMBER | bigint |
| FILE_TYPE | varchar(193) |
| SIZE | bigint |
| RELATIVE_FILENAME | varchar(193) |
| DIRECTORY | varchar(513) |
| TEMPERATURE | varchar(193) |
| FILE_CHECKSUM | varchar(513) |
| FILE_CHECKSUM_FUNC_NAME | varchar(193) |
| SMALLEST_SEQNO | bigint |
| LARGEST_SEQNO | bigint |
| SMALLEST_KEY | varchar(513) |
| LARGEST_KEY | varchar(513) |
| NUM_READS_SAMPLED | bigint |
| BEING_COMPACTED | tinyint |
| NUM_ENTRIES | bigint |
| NUM_DELETIONS | bigint |
| OLDEST_BLOB_FILE_NUMBER | bigint |
| OLDEST_ANCESTER_TIME | bigint |
| FILE_CREATION_TIME | bigint |
ROCKSDB_LOCKS
This table contains the set of locks granted to MyRocks transactions.
Columns
| Column Name | Type |
|---|---|
| COLUMN_FAMILY_ID | int(4) |
| TRANSACTION_ID | bigint |
| KEY | varchar(513) |
| MODE | varchar(32) |
ROCKSDB_PERF_CONTEXT
Columns
| Column Name | Type |
|---|---|
| TABLE_SCHEMA | varchar(193) |
| TABLE_NAME | varchar(193) |
| PARTITION_NAME | varchar(193) |
| STAT_TYPE | varchar(193) |
| VALUE | bigint(8) |
ROCKSDB_PERF_CONTEXT_GLOBAL
Columns
| Column Name | Type |
|---|---|
| STAT_TYPE | varchar(193) |
| VALUE | bigint(8) |
ROCKSDB_DEADLOCK
This table records information about deadlocks.
Columns
| Column Name | Type |
|---|---|
| DEADLOCK_ID | bigint(8) |
| TRANSACTION_ID | bigint(8) |
| CF_NAME | varchar(193) |
| WAITING_KEY | varchar(513) |
| LOCK_TYPE | varchar(193) |
| INDEX_NAME | varchar(193) |
| TABLE_NAME | varchar(193) |
| ROLLED_BACK | bigint(8) |
MyRocks server variables
The MyRocks server variables expose configuration of the underlying RocksDB engine. There several ways to set these variables:
-
For production deployments, you should have all variables defined in the configuration file.
-
Dynamic variables can be changed at runtime using the
SETstatement. -
If you want to test things out, you can set some of the variables when starting
mysqldusing corresponding command-line options.
If a variable was not set in either the configuration file or as a command-line option, the default value is used.
Also, all variables can exist in one or both of the following scopes:
-
Global scope defines how the variable affects overall server operation.
-
Session scope defines how the variable affects operation for individual client connections.
Variable table
Variable definitions
rocksdb_access_hint_on_compaction_start
| Option | Description |
|---|---|
| Command-line | –rocksdb-access-hint-on-compaction-start |
| Dynamic | No |
| Scope | Global |
| Data type | String or numeric |
| Default | NORMAL or 1 |
[Removed: 8.4.5-5] As of Percona Server for MySQL 8.4.5-5, the rocksdb-access-hint-on-compaction-start variable has been removed.
Specifies the file access pattern once a compaction is started, applied to all input files of a compaction. Possible values are:
-
0=NONE -
1=NORMAL(default) -
2=SEQUENTIAL -
3=WILLNEED
rocksdb_advise_random_on_open
| Option | Description |
|---|---|
| Command-line | –rocksdb-advise-random-on-open |
| Dynamic | No |
| Scope | Global |
| Data type | Boolean |
| Default | ON |
Specifies whether to hint the underlying file system that the file access pattern is random, when a data file is opened. Enabled by default.
rocksdb_allow_concurrent_memtable_write
| Option | Description |
|---|---|
| Command-line | –rocksdb-allow-concurrent-memtable-write |
| Dynamic | No |
| Scope | Global |
| Data type | Boolean |
| Default | OFF |
Specifies whether to allow multiple writers to update memtables in parallel. Disabled by default.
rocksdb_allow_mmap_reads
| Option | Description |
|---|---|
| Command-line | –rocksdb-allow-mmap-reads |
| Dynamic | No |
| Scope | Global |
| Data type | Boolean |
| Default | OFF |
Specifies whether to allow the OS to map a data file into memory for reads. Disabled by default. If you enable this, make sure that rocksdb_use_direct_reads is disabled.
rocksdb_allow_mmap_writes
| Option | Description |
|---|---|
| Command-line | –rocksdb-allow-mmap-writes |
| Dynamic | No |
| Scope | Global |
| Data type | Boolean |
| Default | OFF |
Specifies whether to allow the OS to map a data file into memory for writes. Disabled by default.
rocksdb_allow_to_start_after_corruption
| Option | Description |
|---|---|
| Command-line | –rocksdb_allow_to_start_after_corruption |
| Dynamic | No |
| Scope | Global |
| Data type | Boolean |
| Default | OFF |
Specifies whether to allow server to restart once MyRocks reported data corruption. Disabled by default.
Once corruption is detected server writes marker file (named ROCKSDB_CORRUPTED) in the data directory and aborts. If marker file exists, then mysqld exits on startup with an error message. The restart failure will continue until the problem is solved or until mysqld is started with this variable turned on in the command line.
Note
Not all memtables support concurrent writes.
rocksdb_allow_unsafe_alter
| Option | Description |
|---|---|
| Command-line | –rocksdb-allow-unsafe-alter |
| Dynamic | No |
| Scope | Global |
| Data type | Boolean |
| Default | OFF |
Enables crash unsafe INPLACE ADD|DROP partition.
rocksdb_alter_column_default_inplace
| Option | Description |
|---|---|
| Command-line | –rocksdb-alter-column-default-inplace |
| Dynamic | Yes |
| Scope | Global |
| Data type | Boolean |
| Default | ON |
Allows an inplace alter for the ALTER COLUMN default operation.
rocksdb_alter_table_comment_inplace
| Option | Description |
|---|---|
| Command-line | –rocksdb_alter_table_comment_inplace |
| Dynamic | Yes |
| Scope | Global |
| Data type | Boolean |
| Default | OFF |
Allows changing ALTER TABLE COMMENT inplace.
This variable is disabled (OFF) by default.
rocksdb_base_background_compactions
| Option | Description |
|---|---|
| Command-line | –rocksdb-base-background-compactions |
| Dynamic | No |
| Scope | Global |
| Data type | Numeric |
| Default | 1 |
Specifies the suggested number of concurrent background compaction jobs,
submitted to the default LOW priority thread pool in RocksDB. The default is 1.
The allowed range of values is from -1 to 64. The maximum value depends on the
rocksdb_max_background_compactions variable. This variable was
replaced with rocksdb_max_background_jobs, which automatically
decides how many threads to allocate toward flush/compaction.
rocksdb_blind_delete_primary_key
| Option | Description |
|---|---|
| Command-line | –rocksdb-blind-delete-primary-key |
| Dynamic | Yes |
| Scope | Global, Session |
| Data type | Boolean |
| Default | OFF |
Skips verifying if rows exists before executing deletes. The following conditions must be met:
-
The variable is enabled
-
Only a single table listed in the
DELETEstatement -
The table has only a primary key with no secondary keys
rocksdb_block_cache_numshardbits
| Option | Description |
|---|---|
| Command-line | –rocksdb-block-cache-numshardbits |
| Dynamic | No |
| Scope | Global |
| Data type | Numeric |
| Default | -1 |
This variable specifies the number of shards ,numShardBits, for the block cache in RocksDB. The cache is sharded into 2^numShardBits shards by the key hash.
The default value is -1. The -1 value means that RocksDB automatically determines the number of shards for the block cache based on the cache capacity.
The minimum value is -1 and the maximum value is 8.
rocksdb_block_cache_size
| Option | Description |
|---|---|
| Command-line | –rocksdb-block-cache-size |
| Dynamic | Yes |
| Scope | Global |
| Data type | Numeric |
| Default | 536870912 |
This variable sets the RocksDB LRU block cache size. This memory is reserved for the block cache and supplements any filesystem caching.
The minimum value is 1024, representing the size of a single block.
The default value is 536870912.
The maximum value is 9223372036854775807.
rocksdb_block_restart_interval
| Option | Description |
|---|---|
| Command-line | –rocksdb-block-restart-interval |
| Dynamic | No |
| Scope | Global |
| Data type | Numeric |
| Default | 16 |
Specifies the number of keys for each set of delta encoded data.
Default value is 16.
Allowed range is from 1 to 2147483647.
rocksdb_block_size
| Option | Description |
|---|---|
| Command-line | –rocksdb-block-size |
| Dynamic | No |
| Scope | Global |
| Data type | Numeric |
| Default | 16 KB |
Specifies the size of the data block for reading RocksDB data files.
The default value is 16 KB.
The allowed range is from 1024 to 18446744073709551615 bytes.
Version changes
In Percona Server for MySQL 8.4.7-7, the maximum value was changed to 4294967296 bytes (4 GiB).
rocksdb_block_size_deviation
| Option | Description |
|---|---|
| Command-line | –rocksdb-block-size-deviation |
| Dynamic | No |
| Scope | Global |
| Data type | Numeric |
| Default | 10 |
Specifies the threshold for free space allowed in a data block
(see rocksdb_block_size).
If there is less space remaining,
close the block (and write to new block).
Default value is 10, meaning that the block is not closed
until there is less than 10 bits of free space remaining.
Allowed range is from 1 to 2147483647.
rocksdb_bulk_load
| Option | Description |
|---|---|
| Command-line | –rocksdb-bulk-load |
| Dynamic | Yes |
| Scope | Global, Session |
| Data type | Boolean |
| Default | OFF |
Specifies whether to use bulk load: MyRocks will ignore checking keys for uniqueness or acquiring locks during transactions. Disabled by default. Enable this only if you are certain that there are no row conflicts, for example, when setting up a new MyRocks instance from a MySQL dump.
When the rocksdb_bulk_load variable is enabled, it behaves as if the variable rocksdb_commit_in_the_middle is enabled, even if the variable rocksdb_commit_in_the_middle is disabled.
rocksdb_bulk_load_allow_sk
| Option | Description |
|---|---|
| Command-line | –rocksdb-bulk-load-allow-sk |
| Dynamic | Yes |
| Scope | Global, Session |
| Data type | Boolean |
| Default | OFF |
Enabling this variable allows secondary keys to be added using the bulk loading
feature. This variable can be enabled or disabled only when the rocksdb_bulk_load is OFF.
rocksdb_bulk_load_allow_unsorted
| Option | Description |
|---|---|
| Command-line | –rocksdb-bulk-load-allow-unsorted |
| Dynamic | Yes |
| Scope | Global, Session |
| Data type | Boolean |
| Default | OFF |
By default, the bulk loader requires its input to be sorted in the primary key order. If enabled, unsorted inputs are allowed too, which are then sorted by the bulkloader itself, at a performance penalty.
rocksdb_bulk_load_compression_parallel_threads
| Option | Description |
|---|---|
| Dynamic | Yes |
| Scope | Global, Session |
| Data type | Numeric |
| Default | 1 |
| Minimum | 1 |
| Maximum | 1024 |
Added in Percona Server for MySQL 8.4.5-5
Specifies the number of parallel worker threads used to compress SST data blocks during bulk load.
rocksdb_bulk_load_enable_unique_key_check
| Option | Description |
|---|---|
| Dynamic | Yes |
| Scope | Global, Session |
| Data type | Bool |
| Default | OFF |
Added in Percona Server for MySQL 8.4.5-5.
Controls whether the unique key constraint is checked during bulk loading. This setting can only be changed when bulk loading is disabled.
rocksdb_bulk_load_fail_if_not_bottommost_level
| Option | Description |
|---|---|
| Command-line | –rocksdb_bulk_load_fail_if_not_bottommost_level |
| Dynamic | Yes |
| Scope | Global, Session |
| Data type | Boolean |
| Default | OFF |
When this variable is enabled, the bulk load fails if an sst file created during bulk load cannot be placed to the bottommost level in the rocksdb.
This variable can be enabled or disabled only when the rocksdb_bulk_load is OFF.
This variable is disabled (OFF) by default.
Warning
When rocksdb_bulk_load_fail_if_not_bottommost_level is disabled, it may cause severe performance impact.
rocksdb_bulk_load_partial_index
| Option | Description |
|---|---|
| Command-line | –rocksdb-bulk-load-partial-index |
| Dynamic | Yes |
| Scope | Local |
| Data type | Boolean |
| Default | ON |
Materializes partial index during bulk load instead of leaving the index empty.
rocksdb_bulk_load_size
| Option | Description |
|---|---|
| Command-line | –rocksdb-bulk-load-size |
| Dynamic | Yes |
| Scope | Global, Session |
| Data type | Numeric |
| Default | 1000 |
Specifies the number of keys to accumulate
before committing them to the storage engine when bulk load is enabled
(see rocksdb_bulk_load).
Default value is 1000,
which means that a batch can contain up to 1000 records
before they are implicitly committed.
Allowed range is from 1 to 1073741824.
rocksdb_bulk_load_use_sst_partitioner
| Option | Description |
|---|---|
| Command-line | –rocksdb_bulk_load_use_sst_partitioner |
| Dynamic | Yes |
| Scope | Global, Session |
| Data type | Boolean |
| Default | OFF |
If enabled, this variable uses sst partitioner to split sst files to ensure bulk load sst files can be ingested to bottommost level.
This variable is disabled (OFF) by default.
rocksdb_bytes_per_sync
| Option | Description |
|---|---|
| Command-line | –rocksdb-bytes-per-sync |
| Dynamic | Yes |
| Scope | Global |
| Data type | Numeric |
| Default | 0 |
Specifies how often should the OS sync files to disk
as they are being written, asynchronously, in the background.
This operation can be used to smooth out write I/O over time.
Default value is 0 meaning that files are never synced.
Allowed range is up to 18446744073709551615.
rocksdb_cache_dump
| Option | Description |
|---|---|
| Command-line | –rocksdb-cache-dump |
| Dynamic | No |
| Scope | Global |
| Data type | Boolean |
| Default | ON |
Includes RocksDB block cache content in core dump. This variable is enabled by default.
rocksdb_cache_high_pri_pool_ratio
| Option | Description |
|---|---|
| Command-line | –rocksdb-cache-high-pri-pool-ratio |
| Dynamic | No |
| Scope | Global |
| Data type | Double |
| Default | 0.0 |
This variable specifies the size of the block cache high-pri pool. The default value and minimum value is 0.0. The maximum value is 1.0.
rocksdb_cache_index_and_filter_blocks
| Option | Description |
|---|---|
| Command-line | –rocksdb-cache-index-and-filter-blocks |
| Dynamic | No |
| Scope | Global |
| Data type | Boolean |
| Default | ON |
Specifies whether RocksDB should use the block cache for caching the index and bloomfilter data blocks from each data file. Enabled by default. If you disable this feature, RocksDB allocates additional memory to maintain these data blocks.
rocksdb_cache_index_and_filter_with_high_priority
| Option | Description |
|---|---|
| Command-line | –rocksdb-cache-index-and-filter-with-high-priority |
| Dynamic | No |
| Scope | Global |
| Data type | Boolean |
| Default | ON |
Specifies whether RocksDB should use the block cache with high priority for caching the index and bloomfilter data blocks from each data file. Enabled by default. If you disable this feature, RocksDB allocates additional memory to maintain these data blocks.
rocksdb_cancel_manual_compactions
| Option | Description |
|---|---|
| Command-line | –rocksdb-cancel-manual-compactions |
| Dynamic | Yes |
| Scope | Global |
| Data type | Boolean |
| Default | OFF |
Cancels all ongoing manual compactions.
rocksdb_charge_memory
| Option | Description |
|---|---|
| Command-line | –rocksdb_charge_memory |
| Dynamic | No |
| Scope | Global |
| Data type | Boolean |
| Default | OFF |
This variable is tech preview and may be removed in the future releases.
Turns on RocksDB memory-charging related features (BlockBasedTableOptions::cache_usage_options.options.charged) from cnf files. This variable is related to rocksdb_use_write_buffer_manager.
This variable is disabled (OFF) by default.
rocksdb_check_iterate_bounds
| Option | Description |
|---|---|
| Command-line | –rocksdb-check-iterate-bounds |
| Dynamic | Yes |
| Scope | Global, Session |
| Data type | Boolean |
| Default | ON |
This variable enables checking the upper and lower bounds of the RocksDB iterator during iteration. The default value in ON which means this variable is enabled.
rocksdb_checksums_pct
| Option | Description |
|---|---|
| Command-line | –rocksdb-checksums-pct |
| Dynamic | Yes |
| Scope | Global, Session |
| Data type | Numeric |
| Default | 100 |
Specifies the percentage of rows to be checksummed.
Default value is 100 (checksum all rows).
Allowed range is from 0 to 100.
rocksdb_collect_sst_properties
| Option | Description |
|---|---|
| Command-line | –rocksdb-collect-sst-properties |
| Dynamic | No |
| Scope | Global |
| Data type | Boolean |
| Default | ON |
Specifies whether to collect statistics on each data file to improve optimizer behavior. Enabled by default.
rocksdb_column_default_value_as_expression
| Option | Description |
|---|---|
| Command-line | –rocksdb_column_default_value_as_expression |
| Dynamic | Yes |
| Scope | Global |
| Data type | Boolean |
| Default | ON |
Allows to set a function as the default value for a column.
This variable is enabled (ON) by default.
rocksdb_commit_in_the_middle
| Option | Description |
|---|---|
| Command-line | –rocksdb-commit-in-the-middle |
| Dynamic | Yes |
| Scope | Global |
| Data type | Boolean |
| Default | OFF |
Specifies whether to commit rows implicitly when a batch contains more than the value of rocksdb_bulk_load_size.
This option should only be enabled at the time of data import because it may cause locking errors.
This variable is disabled by default. When the rocksdb_bulk_load variable is enabled, it behaves as if the variable rocksdb_commit_in_the_middle is enabled, even if the variable rocksdb_commit_in_the_middle is disabled.
rocksdb_commit_time_batch_for_recovery
| Option | Description |
|---|---|
| Command-line | –rocksdb-commit-time-batch-for-recovery |
| Dynamic | Yes |
| Scope | Global, Session |
| Data type | Boolean |
| Default | OFF |
Specifies whether to write the commit time write batch into the database or not.
Note
If the commit time write batch is only useful for recovery, then writing to WAL is enough.
rocksdb_compact_cf
| Option | Description |
|---|---|
| Command-line | –rocksdb-compact-cf |
| Dynamic | Yes |
| Scope | Global |
| Data type | String |
| Default |
Specifies the name of the column family to compact.
rocksdb_compact_lzero_now
| Option | Description |
|---|---|
| Command-line | –rocksdb-compact-lzero-now |
| Dynamic | Yes |
| Scope | Global |
| Data type | Boolean |
| Default | OFF |
This variable acts as a trigger. Set the variable to ON, rocksdb-compact-lzero-now=ON, to immediately compact all the Level 0 (L0) files. After all the L0 files are compacted, the variable value automatically switches to OFF.
rocksdb_compaction_readahead_size
[Changed in 8.4.5-5] The default value of rocksdb_compaction_readahead_size has changed from 0 to 2097152.
| Option | Description |
|---|---|
| Command-line | –rocksdb-compaction-readahead-size |
| Dynamic | Yes |
| Scope | Global |
| Data type | Numeric |
| Default | 2097152 (Prior to 8.4.5-5, the default was 0) |
Specifies the size of reads to perform ahead of compaction.
The default value is now 2097152.
Set this to at least 2 megabytes (16777216)
when using MyRocks with spinning disks
to ensure sequential reads instead of random.
Maximum allowed value is 18446744073709551615.
Note
If you set this variable to a non-zero value, rocksdb_new_table_reader_for_compaction_inputs is enabled.
rocksdb_compaction_sequential_deletes
| Option | Description |
|---|---|
| Command-line | –rocksdb-compaction-sequential-deletes |
| Dynamic | Yes |
| Scope | Global |
| Data type | Numeric |
| Default | 149999 |
Specifies the threshold to trigger compaction on a file if it has more than this number of sequential delete markers.
The default value is 149999.
Maximum allowed value is 2000000 (two million delete markers).
Note
Depending on workload patterns, MyRocks can potentially maintain large numbers of delete markers, which increases latency of queries. This compaction feature will reduce latency, but may also increase the MyRocks write rate. Use this variable together with rocksdb_compaction_sequential_deletes_file_size to only perform compaction on large files.
rocksdb_compaction_sequential_deletes_count_sd
| Option | Description |
|---|---|
| Command-line | –rocksdb-compaction-sequential-deletes-count-sd |
| Dynamic | Yes |
| Scope | Global |
| Data type | Boolean |
| Default | ON |
Specifies whether to count single deletes as delete markers recognized by rocksdb_compaction_sequential_deletes.
The default value is ON which means the variable is enabled.
rocksdb_compaction_sequential_deletes_file_size
| Option | Description |
|---|---|
| Command-line | –rocksdb-compaction-sequential-deletes-file-size |
| Dynamic | Yes |
| Scope | Global |
| Data type | Numeric |
| Default | 0 |
Specifies the minimum file size required to trigger compaction on it
by rocksdb_compaction_sequential_deletes.
Default value is 0,
meaning that compaction is triggered regardless of file size.
Allowed range is from -1 to 9223372036854775807.
rocksdb_compaction_sequential_deletes_window
| Option | Description |
|---|---|
| Command-line | –rocksdb-compaction-sequential-deletes-window |
| Dynamic | Yes |
| Scope | Global |
| Data type | Numeric |
| Default | 150000 |
Specifies the size of the window for counting delete markers by rocksdb_compaction_sequential_deletes. Default value is 150000.
Allowed range is up to 2000000 (two million).
rocksdb_concurrent_prepare
| Option | Description |
|---|---|
| Command-line | –rocksdb-concurrent_prepare |
| Dynamic | No |
| Scope | Global |
| Data type | Boolean |
| Default | ON |
When enabled this variable allows/encourages threads that are using
two-phase commit to prepare in parallel. This variable was
renamed in upstream to rocksdb_two_write_queues.
rocksdb_converter_record_cached_length
| Option | Description |
|---|---|
| Command-line | –rocksdb_converter_record_cached_length |
| Dynamic | Yes |
| Scope | Global |
| Data type | Numeric |
| Default | 0 |
Specifies the maximum number of bytes to cache on table handler for encoding table record data.
If the used memory exceeds rocksdb_converter_record_cached_length, the memory is released when the handler is returned to the table handler cache.
The minimum value is 0 (zero) that means there is no limit.
The maximum value is UINT64_MAX (0xffffffffffffffff).
The default value is 0(zero) that means there is no limit.
rocksdb_corrupt_data_action
| Option | Description |
|---|---|
| Command-line | –rocksdb_corrupt_data_action |
| Dynamic | Yes |
| Scope | Global |
| Data type | enum { ERROR = 0, ABORT_SERVER, WARNING }; |
| Default | ERROR |
This variable controls the behavior when hitting the data corruption in MyRocks.
You can select one of the following actions:
-
ERROR- fail the query with the errorHA_ERR_ROCKSDB_CORRUPT_DATA -
ABORT_SERVER- crash the server -
WARNING- pass the query with warning
The default value is ERROR that means the query fails with the error HA_ERR_ROCKSDB_CORRUPT_DATA.
rocksdb_create_checkpoint
| Option | Description |
|---|---|
| Command-line | –rocksdb-create-checkpoint |
| Dynamic | Yes |
| Scope | Global |
| Data type | String |
| Default |
Specifies the directory where MyRocks should create a checkpoint. Empty by default.
rocksdb_create_if_missing
| Option | Description |
|---|---|
| Command-line | –rocksdb-create-if-missing |
| Dynamic | No |
| Scope | Global |
| Data type | Boolean |
| Default | ON |
Specifies whether MyRocks should create its database if it does not exist. Enabled by default.
rocksdb_create_missing_column_families
| Option | Description |
|---|---|
| Command-line | –rocksdb-create-missing-column-families |
| Dynamic | No |
| Scope | Global |
| Data type | Boolean |
| Default | OFF |
Specifies whether MyRocks should create new column families if they do not exist. Disabled by default.
rocksdb_create_temporary_checkpoint
| Option | Description |
|---|---|
| Command-line | –rocksdb-create-temporary-checkpoint |
| Dynamic | Yes |
| Scope | Session |
| Data type | String |
When specified it will create a temporary RocksDB ‘checkpoint’ or ‘snapshot’ in the datadir. If the session ends with an existing checkpoint, or if the variable is reset to another value, the checkpoint will get removed. This variable should be used by backup tools. Prolonged use or other misuse can have serious side effects to the server instance.
rocksdb_datadir
| Option | Description |
|---|---|
| Command-line | –rocksdb-datadir |
| Dynamic | No |
| Scope | Global |
| Data type | String |
| Default | ./.rocksdb |
Specifies the location of the MyRocks data directory. By default, it is created in the current working directory.
rocksdb_db_write_buffer_size
| Option | Description |
|---|---|
| Command-line | –rocksdb-db-write-buffer-size |
| Dynamic | No |
| Scope | Global |
| Data type | Numeric |
| Default | 0 |
Specifies the maximum size of all memtables used to store writes in MyRocks
across all column families. When this size is reached, the data is flushed
to persistent media.
The default value is 0.
The allowed range is up to 18446744073709551615.
rocksdb_deadlock_detect
| Option | Description |
|---|---|
| Command-line | –rocksdb-deadlock-detect |
| Dynamic | Yes |
| Scope | Global, Session |
| Data type | Boolean |
| Default | OFF |
Specifies whether MyRocks should detect deadlocks. Disabled by default.
rocksdb_deadlock_detect_depth
| Option | Description |
|---|---|
| Command-line | –rocksdb-deadlock-detect-depth |
| Dynamic | Yes |
| Scope | Global, Session |
| Data type | Numeric |
| Default | 50 |
Specifies the number of transactions deadlock detection will traverse through before assuming deadlock.
rocksdb_debug_cardinality_multiplier
| Option | Description |
|---|---|
| Command-line | –rocksdb-debug-cardinality-multiplier |
| Dynamic | Yes |
| Scope | Global |
| Data type | UINT |
| Default | 2 |
The cardinality multiplier used in tests. The minimum value is 0. The maximum value is 2147483647 (INT_MAX).
Version changes
In Percona Server for MySQL 8.4.7-7, the minimum value was changed to 1.
rocksdb_debug_manual_compaction_delay
| Option | Description |
|---|---|
| Command-line | –rocksdb-debug-manual-compaction-delay |
| Dynamic | Yes |
| Scope | Global |
| Data type | UINT |
| Default | 0 |
Only use this variable when debugging.
This variable specifies a sleep, in seconds, to simulate long-running compactions. The minimum value is 0. The maximum value is 4292967295 (UINT_MAX).
rocksdb_debug_optimizer_no_zero_cardinality
| Option | Description |
|---|---|
| Command-line | –rocksdb-debug-optimizer-no-zero-cardinality |
| Dynamic | Yes |
| Scope | Global |
| Data type | Boolean |
| Default | ON |
Specifies whether MyRocks should prevent zero cardinality by always overriding it with some value.
rocksdb_debug_skip_bloom_filter_check_on_iterator_bounds
| Option | Description |
|---|---|
| Command-line | –rocksdb-debug-skip-bloom-filter-check-on-iterator-bounds |
| Dynamic | Yes |
| Scope | Global |
| Data type | Boolean |
| Default | OFF |
Added in Percona Server for MySQL 8.4.5-5
Allows setting iterator bounds in RocksDB even when the query range conditions would normally enable Bloom filter usage.
rocksdb_debug_ttl_ignore_pk
| Option | Description |
|---|---|
| Command-line | –rocksdb-debug-ttl-ignore-pk |
| Dynamic | Yes |
| Scope | Global |
| Data type | Boolean |
| Default | OFF |
For debugging purposes only. If true, compaction filtering will not occur on Primary Key TTL data. This variable is a no-op in non-debug builds.
rocksdb_debug_ttl_read_filter_ts
| Option | Description |
|---|---|
| Command-line | –rocksdb_debug-ttl-read-filter-ts |
| Dynamic | Yes |
| Scope | Global |
| Data type | Numeric |
| Default | 0 |
For debugging purposes only. Overrides the TTL read
filtering time to time + debug_ttl_read_filter_ts.
A value of 0 denotes that the variable is not set.
This variable is a no-op in non-debug builds.
rocksdb_debug_ttl_rec_ts
| Option | Description |
|---|---|
| Command-line | –rocksdb-debug-ttl-rec-ts |
| Dynamic | Yes |
| Scope | Global |
| Data type | Numeric |
| Default | 0 |
For debugging purposes only. Overrides the TTL of
records to now() + debug_ttl_rec_ts.
The value can be ± to simulate a record inserted in the past vs a record
inserted in the future . A value of 0 denotes that the
variable is not set.
This variable is a no-op in non-debug builds.
rocksdb_debug_ttl_snapshot_ts
| Option | Description |
|---|---|
| Command-line | –rocksdb-debug-ttl-snapshot-ts |
| Dynamic | Yes |
| Scope | Global |
| Data type | Numeric |
| Default | 0 |
For debugging purposes only. Sets the snapshot during
compaction to now() + rocksdb_debug_set_ttl_snapshot_ts.
The value can be ± to simulate a snapshot in the past vs a
snapshot created in the future . A value of 0 denotes
that the variable is not set. This variable is a no-op in
non-debug builds.
rocksdb_default_cf_options
| Option | Description |
|---|---|
| Command-line | –rocksdb-default-cf-options |
| Dynamic | No |
| Scope | Global |
| Data type | String |
The dafault value is:
block_based_table_factory= {cache_index_and_filter_blocks=1;filter_policy=bloomfilter:10:false;whole_key_filtering=1};level_compaction_dynamic_level_bytes=true;optimize_filters_for_hits=true;compaction_pri=kMinOverlappingRatio;compression=kLZ4Compression;bottommost_compression=kLZ4Compression;
Specifies the default column family options for MyRocks. On startup, the server applies this option to all existing column families. This option is read-only at runtime.
rocksdb_delayed_write_rate
| Option | Description |
|---|---|
| Command-line | –rocksdb-delayed-write-rate |
| Dynamic | Yes |
| Scope | Global |
| Data type | Numeric |
| Default | 16777216 |
Specifies the write rate in bytes per second, which should be used
if MyRocks hits a soft limit or threshold for writes.
Default value is 16777216 (16 MB/sec).
Allowed range is from 0 to 18446744073709551615.
rocksdb_delete_cf
| Option | Description |
|---|---|
| Command-line | –rocksdb-delete-cf |
| Dynamic | Yes |
| Scope | Global |
| Data type | String |
| Default | “” |
Deletes the column family by name. The default value is “” , an empty string.
For example:
SET @@global.ROCKSDB_DELETE_CF = 'cf_primary_key';
rocksdb_delete_obsolete_files_period_micros
| Option | Description |
|---|---|
| Command-line | –rocksdb-delete-obsolete-files-period-micros |
| Dynamic | No |
| Scope | Global |
| Data type | Numeric |
| Default | 21600000000 |
Specifies the period in microseconds to delete obsolete files
regardless of files removed during compaction.
Default value is 21600000000 (6 hours).
Allowed range is up to 9223372036854775807.
rocksdb_disable_file_deletions
| Option | Description |
|---|---|
| Command-line | –rocksdb-disable-file-deletions |
| Dynamic | Yes |
| Scope | Session |
| Data type | Boolean |
| Default | OFF |
It allows a client to temporarily disable RocksDB deletion
of old WAL and .sst files for the purposes of making a consistent
backup. If the client session terminates for any reason after disabling
deletions and has not re-enabled deletions, they will be explicitly
re-enabled. This variable should be used by backup tools. Prolonged
use or other misuse can have serious side effects to the server instance.
rocksdb_disable_instant_ddl
| Option | Description |
|---|---|
| Command-line | –rocksdb_disable_instant_ddl |
| Dynamic | Yes |
| Scope | Global |
| Data type | Boolean |
| Default | OFF |
[Deprecated: 8.4.5-5] The rocksdb_disable_instant_ddl variable is deprecated and will be removed in a future version. Its default value has changed to OFF as of this version.
Disables Instant DDL during ALTER TABLE operations.
Prior to Percona Server for MySQL 8.4.5-5, this variable was enabled (ON) by default.
rocksdb_enable_bulk_load_api
| Option | Description |
|---|---|
| Command-line | –rocksdb-enable-bulk-load-api |
| Dynamic | No |
| Scope | Global |
| Data type | Boolean |
| Default | ON |
Specifies whether to use the SSTFileWriter feature for bulk loading,
This feature bypasses the memtable,
but requires keys to be inserted into the table
in either ascending or descending order.
Enabled by default.
If disabled, bulk loading uses the normal write path via the memtable
and does not require keys to be inserted in any order.
rocksdb_enable_delete_range_for_drop_index
| Option | Description |
|---|---|
| Command-line | –rocksdb_enable_delete_range_for_drop_index |
| Dynamic | Yes |
| Scope | Global |
| Data type | Boolean |
| Default | OFF |
Enables drop table / index by calling the DeleteRange.
This option is disabled (OFF) by default.
rocksdb_enable_insert_with_update_caching
| Option | Description |
|---|---|
| Command-line | –rocksdb-enable-insert-with-update-caching |
| Dynamic | Yes |
| Scope | Global |
| Data type | Boolean |
| Default | ON |
Specifies whether to enable optimization where the read is cached from a failed insertion attempt in INSERT ON DUPLICATE KEY UPDATE.
rocksdb_enable_instant_ddl
| Option | Description |
|---|---|
| Command-line | –rocksdb-enable-instant-ddl |
| Dynamic | Yes |
| Scope | Global |
| Data type | Boolean |
| Default | ON |
Added in Percona Server for MySQL 8.4.5-5.
Enables Instant DDL during ALTER TABLE operations when possible. If set
to OFF, no DDL operations can be executed as instant.
rocksdb_enable_instant_ddl_for_append_column
| Option | Description |
|---|---|
| Command-line | –rocksdb-enable-instant-ddl-for-append-column |
| Dynamic | Yes |
| Scope | Global |
| Data type | Boolean |
| Default | OFF |
Added in Percona Server for MySQL 8.4.5-5.
Enables Instant DDL specifically for appending columns during ALTER TABLE
operations.
rocksdb_enable_instant_ddl_for_column_default_changes
| Option | Description |
|---|---|
| Command-line | –rocksdb-enable-instant-ddl-for-column-default-changes |
| Dynamic | Yes |
| Scope | Global |
| Data type | Boolean |
| Default | OFF |
Added in Percona Server for MySQL 8.4.5-5.
Enables Instant DDL for changes to column defaults during ALTER TABLE
operations.
rocksdb_enable_instant_ddl_for_drop_index_changes
| Option | Description |
|---|---|
| Command-line | –rocksdb-enable-instant-ddl-for-drop-index-changes |
| Dynamic | Yes |
| Scope | Global |
| Data type | Boolean |
| Default | OFF |
Added in Percona Server for MySQL 8.4.5-5.
Enables Instant DDL for dropping indexes during ALTER TABLE operations.
rocksdb_enable_instant_ddl_for_table_comment_changes
| Option | Description |
|---|---|
| Command-line | –rocksdb-enable-instant-ddl-for-table-comment-changes |
| Dynamic | Yes |
| Scope | Global |
| Data type | Boolean |
| Default | OFF |
Added in Percona Server for MySQL 8.4.5-5.
Enables Instant DDL for changes to table comments during ALTER TABLE
operations.
rocksdb_enable_iterate_bounds
| Option | Description |
|---|---|
| Command-line | –rocksdb-enable-iterate-bounds |
| Dynamic | Yes |
| Scope | Global, Local |
| Data type | Boolean |
| Default | ON |
Enables the rocksdb iterator upper bounds and lower bounds in read options.
rocksdb_enable_pipelined_write
| Option | Description |
|---|---|
| Command-line | –rocksdb-enable-pipelined-write |
| Dynamic | No |
| Scope | Global |
| Data type | Boolean |
| Default | OFF |
DBOptions::enable_pipelined_write for RocksDB.
If enable_pipelined_write is ON, a separate write thread is maintained for WAL write and memtable write. A write thread first enters the WAL writer queue and then the memtable writer queue. A pending thread on the WAL writer queue only waits for the previous WAL write operations but does not wait for memtable write operations. Enabling the feature may improve write throughput and reduce latency of the prepare phase of a two-phase commit.
rocksdb_enable_remove_orphaned_dropped_cfs
| Option | Description |
|---|---|
| Command-line | –rocksdb-enable-remove-orphaned-dropped-cfs |
| Dynamic | Yes |
| Scope | Global |
| Data type | Boolean |
| Default | ON |
Enables the removal of dropped column families (cfs) from metadata if the cfs do not exist in the cf manager.
The default value is ON.
rocksdb_enable_thread_tracking
| Option | Description |
|---|---|
| Command-line | –rocksdb-enable-thread-tracking |
| Dynamic | No |
| Scope | Global |
| Data type | Boolean |
| Default | OFF |
Specifies whether to enable tracking the status of threads
accessing the database.
Disabled by default.
If enabled, thread status will be available via GetThreadList().
rocksdb_enable_ttl
| Option | Description |
|---|---|
| Command-line | –rocksdb-enable-ttl |
| Dynamic | No |
| Scope | Global |
| Data type | Boolean |
| Default | ON |
Specifies whether to keep expired TTL records during compaction. Enabled by default. If disabled, expired TTL records will be dropped during compaction.
rocksdb_enable_ttl_read_filtering
| Option | Description |
|---|---|
| Command-line | –rocksdb-enable-ttl-read-filtering |
| Dynamic | Yes |
| Scope | Global |
| Data type | Boolean |
| Default | ON |
For tables with TTL, expired records are skipped/filtered out during processing and in query results. Disabling this will allow these records to be seen, but as a result rows may disappear in the middle of transactions as they are dropped during compaction. Use with caution.
rocksdb_enable_udt_in_mem
| Option | Description |
|---|---|
| Command-line | –rocksdb-enable-udt-in-mem |
| Dynamic | Yes |
| Scope | Global |
| Data type | Boolean |
| Default | OFF |
Added in Percona Server for MySQL 8.4.5-5.
[Not yet implemented.]
Enables the user-defined timestamp in memtable feature to support Hybrid Logical Clock (HLC) snapshot reads in MyRocks.
rocksdb_enable_write_thread_adaptive_yield
| Option | Description |
|---|---|
| Command-line | –rocksdb-enable-write-thread-adaptive-yield |
| Dynamic | No |
| Scope | Global |
| Data type | Boolean |
| Default | OFF |
Specifies whether the MyRocks write batch group leader should wait up to the maximum allowed time before blocking on a mutex. Disabled by default. Enable it to increase throughput for concurrent workloads.
rocksdb_error_if_exists
| Option | Description |
|---|---|
| Command-line | –rocksdb-error-if-exists |
| Dynamic | No |
| Scope | Global |
| Data type | Boolean |
| Default | OFF |
Specifies whether to report an error when a database already exists. Disabled by default.
rocksdb_error_on_suboptimal_collation
| Option | Description |
|---|---|
| Command-line | –rocksdb-error-on-suboptimal-collation |
| Dynamic | No |
| Scope | Global |
| Data type | Boolean |
| Default | ON |
Specifies whether to report an error instead of a warning if an index is created on a char field where the table has a sub-optimal collation (case insensitive). Enabled by default.
rocksdb_file_checksums
[Changed in 8.4.5-5] The rocksdb_file_checksums variable’s default value changed from OFF to CHECKSUMS_OFF, and its data type changed to Enum= CHECKSUMS_OFF, CHECKSUMS_WRITE_ONLY, CHECKSUMS_WRITE_AND_VERIFY.
| Option | Description |
|---|---|
| Command-line | –rocksdb-file-checksums |
| Dynamic | No |
| Scope | Global |
| Data type | Enum= CHECKSUMS_OFF, CHECKSUMS_WRITE_ONLY, CHECKSUMS_WRITE_AND_VERIFY |
| Default | CHECKSUMS_OFF (Prior to 8.4.5-5, the default was OFF) |
This variable controls whether to write and check RocksDB file-level checksums. The possible values are:
-
CHECKSUMS_OFF: Disables checksums. -
CHECKSUMS_WRITE_ONLY: Writes checksums but skips verification on database open. -
CHECKSUMS_WRITE_AND_VERIFY: Writes checksums and verifies them when the database is opened.
Prior to Percona Server for MySQL 8.4.5-5, the default value was OFF, and the data type was a Boolean (where OFF equated to disabled).
rocksdb_flush_log_at_trx_commit
| Option | Description |
|---|---|
| Command-line | –rocksdb-flush-log-at-trx-commit |
| Dynamic | Yes |
| Scope | Global, Session |
| Data type | Numeric |
| Default | 1 |
Specifies whether to sync on every transaction commit, similar to innodb_flush_log_at_trx_commit . Enabled by default, which ensures ACID compliance.
Possible values:
-
0: Do not sync on transaction commit. This provides better performance, but may lead to data inconsistency in case of a crash. -
1: Sync on every transaction commit. This is set by default and recommended as it ensures data consistency, but reduces performance. -
2: Sync every second.
rocksdb_flush_memtable_on_analyze
| Option | Description |
|---|---|
| Command-line | –rocksdb-flush-memtable-on-analyze |
| Dynamic | Yes |
| Scope | Global, Session |
| Data type | Boolean |
| Default | ON |
Specifies whether to flush the memtable when running ANALYZE on a table.
Enabled by default.
This ensures accurate cardinality
by including data in the memtable for calculating stats.
rocksdb_force_compute_memtable_stats
| Option | Description |
|---|---|
| Command-line | –rocksdb-force-compute-memtable-stats |
| Dynamic | Yes |
| Scope | Global |
| Data type | Boolean |
| Default | ON |
Specifies whether data in the memtables should be included for calculating index statistics used by the query optimizer. Enabled by default. This provides better accuracy, but may reduce performance.
rocksdb_force_compute_memtable_stats_cachetime
| Option | Description |
|---|---|
| Command-line | –rocksdb-force-compute-memtable-stats-cachetime |
| Dynamic | Yes |
| Scope | Global |
| Data type | Numeric |
| Default | 60000000 |
Specifies for how long the cached value of memtable statistics should be used instead of computing it every time during the query plan analysis.
rocksdb_force_flush_memtable_and_lzero_now
| Option | Description |
|---|---|
| Command-line | –rocksdb-force-flush-memtable-and-lzero-now |
| Dynamic | Yes |
| Scope | Global |
| Data type | Boolean |
| Default | OFF |
Works similar to rocksdb_force_flush_memtable_now but also flushes all L0 files.
rocksdb_force_flush_memtable_now
| Option | Description |
|---|---|
| Command-line | –rocksdb-force-flush-memtable-now |
| Dynamic | Yes |
| Scope | Global |
| Data type | Boolean |
| Default | OFF |
Forces MyRocks to immediately flush all memtables out to data files.
Warning
Use with caution! Write requests will be blocked until all memtables are flushed.
rocksdb_force_index_records_in_range
| Option | Description |
|---|---|
| Command-line | –rocksdb-force-index-records-in-range |
| Dynamic | Yes |
| Scope | Global, Session |
| Data type | Numeric |
| Default | 1 |
Specifies the value used to override the number of rows
returned to query optimizer when FORCE INDEX is used.
Default value is 1.
Allowed range is from 0 to 2147483647.
Set to 0 if you do not want to override the returned value.
rocksdb_hash_index_allow_collision
| Option | Description |
|---|---|
| Command-line | –rocksdb-hash-index-allow-collision |
| Dynamic | No |
| Scope | Global |
| Data type | Boolean |
| Default | ON |
Specifies whether hash collisions are allowed. Enabled by default, which uses less memory. If disabled, full prefix is stored to prevent hash collisions.
rocksdb_ignore_unknown_options
| Option | Description |
|---|---|
| Command-line | |
| Dynamic | No |
| Scope | Global |
| Data type | Boolean |
| Default | ON |
When enabled, it allows RocksDB to receive unknown options and not exit.
rocksdb_index_type
| Option | Description |
|---|---|
| Command-line | –rocksdb-index-type |
| Dynamic | No |
| Scope | Global |
| Data type | Enum |
| Default | kBinarySearch |
Specifies the type of indexing used by MyRocks:
-
kBinarySearch: Binary search (default). -
kHashSearch: Hash search.
rocksdb_info_log_level
| Option | Description |
|---|---|
| Command-line | –rocksdb-info-log-level |
| Dynamic | Yes |
| Scope | Global |
| Data type | Enum |
| Default | error_level |
Specifies the level for filtering messages written by MyRocks
to the mysqld log.
-
debug_level: Maximum logging (everything including debugging log messages) -
info_level -
warn_level -
error_level(default) -
fatal_level: Minimum logging (only fatal error messages logged)
rocksdb_invalid_create_option_action
| Option | Description |
|---|---|
| Command-line | –rocksdb-invalid-create-option-action |
| Dynamic | Yes |
| Scope | Global |
| Data type | Enum: LOG, PUSH_WARNING, PUSH_ERROR |
| Default | LOG |
Added in Percona Server for MySQL 8.4.5-5.
Controls the behavior when creating a table encounters an error related to RocksDB options. You can choose to only log the error, pass the query and give users a warning, or fail the query.
rocksdb_io_error_action
| Option | Description |
|---|---|
| Command-line | –rocksdb-io-error-action |
| Dynamic | Yes |
| Scope | Global |
| Data type | Enum: ABORT_SERVER, IGNORE_ERROR |
| Default | ABORT_SERVER |
Added in Percona Server for MySQL 8.4.5-5.
Controls the behavior when an I/O error occurs within RocksDB. By default,
MyRocks aborts the server and refuses to start. Setting this option to
IGNORE_ERROR suppresses the error instead.
rocksdb_is_fd_close_on_exec
| Option | Description |
|---|---|
| Command-line | –rocksdb-is-fd-close-on-exec |
| Dynamic | No |
| Scope | Global |
| Data type | Boolean |
| Default | ON |
Specifies whether child processes should inherit open file jandles. Enabled by default.
rocksdb_keep_log_file_num
| Option | Description |
|---|---|
| Command-line | –rocksdb-keep-log-file-num |
| Dynamic | No |
| Scope | Global |
| Data type | Numeric |
| Default | 1000 |
Specifies the maximum number of info log files to keep.
Default value is 1000.
Allowed range is from 1 to 18446744073709551615.
rocksdb_large_prefix
| Option | Description |
|---|---|
| Command-line | –rocksdb-large-prefix |
| Dynamic | Yes |
| Scope | Global |
| Data type | Boolean |
| Default | ON |
[Removed: 8.4.5-5] As of Percona Server for MySQL 8.4.5-5, the rocksdb_large_prefix variable has been removed.
This variable is deprecated in Percona Server for MySQL 8.3.0-1 and will be removed in a future release.
When enabled, this option allows index key prefixes longer than 767 bytes (up to 3072 bytes). The values for rocksdb_large_prefix should be the same between source and replica.
rocksdb_lock_scanned_rows
| Option | Description |
|---|---|
| Command-line | –rocksdb-lock-scanned-rows |
| Dynamic | Yes |
| Scope | Global, Session |
| Data type | Boolean |
| Default | OFF |
Specifies whether to hold the lock on rows that are scanned during UPDATE
and not actually updated.
Disabled by default.
rocksdb_lock_wait_timeout
| Option | Description |
|---|---|
| Command-line | –rocksdb-lock-wait-timeout |
| Dynamic | Yes |
| Scope | Global, Session |
| Data type | Numeric |
| Default | 1 |
Specifies the number of seconds MyRocks should wait to acquire a row lock
before aborting the request.
Default value is 1.
Allowed range is up to 1073741824.
rocksdb_log_file_time_to_roll
| Option | Description |
|---|---|
| Command-line | –rocksdb-log-file-time-to-roll |
| Dynamic | No |
| Scope | Global |
| Data type | Numeric |
| Default | 0 |
Specifies the period (in seconds) for rotating the info log files.
Default value is 0, meaning that the log file is not rotated.
Allowed range is up to 18446744073709551615.
rocksdb_manifest_preallocation_size
| Option | Description |
|---|---|
| Command-line | –rocksdb-manifest-preallocation-size |
| Dynamic | No |
| Scope | Global |
| Data type | Numeric |
| Default | 0 |
Specifies the number of bytes to preallocate for the MANIFEST file
used by MyRocks to store information
about column families, levels, active files, etc.
Default value is 0.
Allowed range is up to 18446744073709551615.
Note
A value of 4194304 (4 MB) is reasonable to reduce random I/O on XFS.
rocksdb_manual_compaction_bottommost_level
| Option | Description |
|---|---|
| Command-line | –rocksdb-manual-compaction-bottommost-level |
| Dynamic | Yes |
| Scope | Local |
| Data type | Enum |
| Default | kForceOptimized |
Option for bottommost level compaction during manual compaction:
-
kSkip - Skip bottommost level compaction
-
kIfHaveCompactionFilter - Only compact bottommost level if there is a compaction filter
-
kForce - Always compact bottommost level
-
kForceOptimized - Always compact bottommost level but in bottommost level avoid double-compacting files created in the same compaction
rocksdb_manual_compaction_threads
| Option | Description |
|---|---|
| Command-line | –rocksdb-manual-compaction-threads |
| Dynamic | Yes |
| Scope | Local |
| Data type | INT |
| Default | 0 |
The variable defines the number of RocksDB threads to run for a manual compaction. The minimum value is 0. The maximum value is 120.
rocksdb_manual_wal_flush
| Option | Description |
|---|---|
| Command-line | –rocksdb-manual-wal-flush |
| Dynamic | No |
| Scope | Global |
| Data type | Boolean |
| Default | ON |
This variable can be used to disable automatic/timed WAL flushing and instead rely on the application to do the flushing.
rocksdb_master_skip_tx_api
| Option | Description |
|---|---|
| Command-line | |
| Dynamic | Yes |
| Scope | Global, Session |
| Data type | Boolean |
| Default | OFF |
When enabled, uses the WriteBatch API, which is faster. The session does not hold any lock on row access. This variable is not effective on replica.
Note
Due to the disabled row locks, improper use of the variable can cause data corruption or inconsistency.
rocksdb_max_background_compactions
| Option | Description |
|---|---|
| Command-line | –rocksdb-max-background-compactions |
| Dynamic | Yes |
| Scope | Global |
| Data type | Numeric |
| Default | -1 |
Sets DBOptions:: max_background_compactions for RocksDB.
The default value is -1 The allowed range is -1 to 64.
This variable was replaced
by rocksdb_max_background_jobs, which automatically decides how
many threads to allocate towards flush/compaction.
rocksdb_max_background_flushes
| Option | Description |
|---|---|
| Command-line | –rocksdb-max-background-flushes |
| Dynamic | No |
| Scope | Global |
| Data type | Numeric |
| Default | -1 |
Sets DBOptions:: max_background_flushes for RocksDB.
The default value is -1. The allowed range is -1 to 64.
This variable has been replaced
by rocksdb_max_background_jobs, which automatically decides how
many threads to allocate towards flush/compaction.
rocksdb_max_background_jobs
| Option | Description |
|---|---|
| Command-line | –rocksdb-max-background-jobs |
| Dynamic | Yes |
| Scope | Global |
| Data type | Numeric |
| Default | 2 |
This variable replaced rocksdb_base_background_compactions, rocksdb_max_background_compactions, and rocksdb_max_background_flushes variables. This variable specifies the maximum number of background jobs. It automatically decides how many threads to allocate towards flush/compaction. It was implemented to reduce the number of (confusing) options users and can tweak and push the responsibility down to RocksDB level.
rocksdb_max_bottom_pri_background_compactions
| Option | Description |
|---|---|
| Command-line | –rocksdb_max_bottom_pri_background_compactions |
| Dynamic | No |
| Data type | Unsigned integer |
| Default | 0 |
Creates a specified number of threads, sets a lower CPU priority, and letting compactions use them. The maximum compaction concurrency is capped by rocksdb_max_background_compactions or rocksdb_max_background_jobs
The minimum value is 0 and the maximum value is 64.
rocksdb_max_compaction_history
| Option | Description |
|---|---|
| Command-line | –rocksdb-max-compaction-history |
| Dynamic | Yes |
| Scope | Global |
| Data type | Unsigned integer |
| Default | 64 |
The minimum value is 0 and the maximum value is UINT64_MAX.
Tracks the history for at most rockdb_mx_compaction_history completed compactions. The history is in the INFORMATION_SCHEMA.ROCKSDB_COMPACTION_HISTORY table.
rocksdb_max_file_opening_threads
| Option | Description |
|---|---|
| Command-line | –rocksdb-max-file-opening-threads |
| Dynamic | No |
| Scope | Global |
| Data type | Numeric |
| Default | 16 |
This variable sets DBOptions::max_file_opening_threads for RocksDB. The default value is 16. The minimum value is 1 and the maximum value is 2147483647 (INT_MAX).
Version changes
In Percona Server for MySQL 8.4.7-7, the maximum value was changed to 262144.
rocksdb_max_latest_deadlocks
| Option | Description |
|---|---|
| Command-line | –rocksdb-max-latest-deadlocks |
| Dynamic | Yes |
| Scope | Global |
| Data type | Numeric |
| Default | 5 |
Specifies the maximum number of recent deadlocks to store.
rocksdb_max_log_file_size
| Option | Description |
|---|---|
| Command-line | –rocksdb-max-log-file-size |
| Dynamic | No |
| Scope | Global |
| Data type | Numeric |
| Default | 0 |
Specifies the maximum size for info log files,
after which the log is rotated.
Default value is 0, meaning that only one log file is used.
Allowed range is up to 18446744073709551615.
Also see rocksdb_log_file_time_to_roll.
rocksdb_max_manifest_file_size
| Option | Description |
|---|---|
| Command-line | –rocksdb-manifest-log-file-size |
| Dynamic | No |
| Scope | Global |
| Data type | Numeric |
| Default | 18446744073709551615 |
Specifies the maximum size of the MANIFEST data file, after which it is rotated. Default value is also the maximum, making it practically unlimited: only one manifest file is used.
rocksdb_max_manual_compactions
| Option | Description |
|---|---|
| Command-line | –rocksdb-max-manual-compactions |
| Dynamic | Yes |
| Scope | Global |
| Data type | UINT |
| Default | 10 |
The variable defines the maximum number of pending plus ongoing manual compactions. The default value and the minimum value is 0. The maximum value is 4294967295 (UNIT_MAX).
rocksdb_max_open_files
| Option | Description |
|---|---|
| Command-line | –rocksdb-max-open-files |
| Dynamic | No |
| Scope | Global |
| Data type | Numeric |
| Default | 1000 |
Specifies the maximum number of file handles opened by MyRocks.
Values in the range between 0 and open_files_limit
are taken as they are. If rocksdb_max_open_files value is
greater than open_files_limit, it will be reset to ½ of
open_files_limit, and a warning will be emitted to the mysqld
error log. A value of -2 denotes auto tuning: just sets
rocksdb_max_open_files value to ½ of open_files_limit.
Finally, -1 means no limit, i.e. an infinite number of file handles.
Warning
Setting rocksdb_max_open_files to -1 is dangerous, as the server may quickly run out of file handles in this case.
rocksdb_max_row_locks
| Option | Description |
|---|---|
| Command-line | –rocksdb-max-row-locks |
| Dynamic | Yes |
| Scope | Global |
| Data type | Numeric |
| Default | 1048576 |
Specifies the limit on the maximum number of row locks a transaction can have before it fails. Default value is also the maximum, making it practically unlimited: transactions never fail due to row locks.
rocksdb_max_subcompactions
| Option | Description |
|---|---|
| Command-line | –rocksdb-max-subcompactions |
| Dynamic | No |
| Scope | Global |
| Data type | Numeric |
| Default | 1 |
Specifies the maximum number of threads allowed for each compaction job.
Default value of 1 means no subcompactions (one thread per compaction job).
Allowed range is up to 64.
rocksdb_max_total_wal_size
| Option | Description |
|---|---|
| Command-line | –rocksdb-max-total-wal-size |
| Dynamic | No |
| Scope | Global |
| Data type | Numeric |
| Default | 2 GB |
Specifies the maximum total size of WAL (write-ahead log) files,
after which memtables are flushed.
Default value is 2 GB
The allowed range is up to 9223372036854775807.
rocksdb_merge_buf_size
| Option | Description |
|---|---|
| Command-line | –rocksdb-merge-buf-size |
| Dynamic | Yes |
| Scope | Global |
| Data type | Numeric |
| Default | 67108864 |
Specifies the size (in bytes) of the merge-sort buffers
used to accumulate data during secondary key creation.
New entries are written directly to the lowest level in the database,
instead of updating indexes through the memtable and L0.
These values are sorted using merge-sort,
with buffers set to 64 MB by default (67108864).
Allowed range is from 100 to 18446744073709551615.
rocksdb_merge_combine_read_size
| Option | Description |
|---|---|
| Command-line | –rocksdb-merge-combine-read-size |
| Dynamic | Yes |
| Scope | Global |
| Data type | Numeric |
| Default | 1073741824 |
Specifies the size (in bytes) of the merge-combine buffer
used for the merge-sort algorithm
as described in rocksdb_merge_buf_size.
Default size is 1 GB (1073741824).
Allowed range is from 100 to 18446744073709551615.
rocksdb_merge_tmp_file_removal_delay_ms
| Option | Description |
|---|---|
| Command-line | –rocksdb_merge_tmp_file_removal_delay_ms |
| Dynamic | Yes |
| Scope | Global, Session |
| Data type | Numeric |
| Default | 0 |
Fast secondary index creation creates merge files when needed. After finishing secondary index creation, merge files are removed. By default, the file removal is done without any sleep, so removing GBs of merge files within <1s may happen, which will cause trim stalls on Flash. This variable can be used to rate limit the delay in milliseconds.
rocksdb_new_table_reader_for_compaction_inputs
| Option | Description |
|---|---|
| Command-line | –rocksdb-new-table-reader-for-compaction-inputs |
| Dynamic | No |
| Scope | Global |
| Data type | Boolean |
| Default | OFF |
Specifies whether MyRocks should create a new file descriptor and table reader for each compaction input. Disabled by default. Enabling this may increase memory consumption, but will also allow pre-fetch options to be specified for compaction input files without impacting table readers used for user queries.
rocksdb_no_block_cache
| Option | Description |
|---|---|
| Command-line | –rocksdb-no-block-cache |
| Dynamic | No |
| Scope | Global |
| Data type | Boolean |
| Default | OFF |
Specifies whether to disable the block cache for column families. Variable is disabled by default, meaning that using the block cache is allowed.
rocksdb_no_create_column_family
| Option | Description |
|---|---|
| Command-line | –rocksdb-no-create-column-family |
| Dynamic | No |
| Scope | Global |
| Data type | Boolean |
| Default | ON |
Controls the processing of the column family name given in the COMMENT
clause in the CREATE TABLE or ALTER TABLE statement in case the column family
name does not refer to an existing column family.
If rocksdb_no_create_column_family is set to NO, a new column family will be created and the new index will be placed into it.
If rocksdb_no_create_column_family is set to YES, no new column family will be created and the index will be placed into the default column family. A warning is issued in this case informing that the specified column family does not exist and cannot be created.
rocksdb_override_cf_options
| Option | Description |
|---|---|
| Command-line | –rocksdb-override-cf-options |
| Dynamic | No |
| Scope | Global |
| Data type | String |
| Default |
Specifies option overrides for each column family. Empty by default.
rocksdb_paranoid_checks
| Option | Description |
|---|---|
| Command-line | –rocksdb-paranoid-checks |
| Dynamic | No |
| Scope | Global |
| Data type | Boolean |
| Default | ON |
Specifies whether MyRocks should re-read the data file as soon as it is created to verify correctness. Enabled by default.
rocksdb_partial_index_blind_delete
| Option | Description |
|---|---|
| Command-line | –rocksdb_partial_index_blind_delete |
| Dynamic | Yes |
| Scope | Global |
| Data type | Boolean |
| Default | ON |
If enabled, the server does not read from the partial index to check if the key exists before deleting the partial index and the delete marker is unconditionally written.
If the variable is disabled (OFF), the server always reads from partial index to check if key exists before deleting the partial index.
This variable is enabled (ON) by default.
rocksdb_partial_index_ignore_killed
| Option | Description |
|---|---|
| Command-line | –rocksdb-partial-index-ignore-killed |
| Dynamic | Yes |
| Scope | Global |
| Data type | Boolean |
| Default | ON |
If this variable is set to ON, the partial index materialization ignores the killed flag and continues materialization until completion. If queries are killed during materialization due to timeout, the work done so far is wasted, and the killed query will likely be retried later, hitting the same issue.
The dafault value is ON which means this variable is enabled.
rocksdb_partial_index_sort_max_mem
| Option | Description |
|---|---|
| Command-line | –rocksdb-partial-index-sort-max-mem |
| Dynamic | Yes |
| Scope | Local |
| Data type | Unsigned Integer |
| Default | 0 |
Maximum memory to use when sorting an unmaterialized group for partial indexes. The 0(zero) value is defined as no limit.
rocksdb_pause_background_work
| Option | Description |
|---|---|
| Command-line | –rocksdb-pause-background-work |
| Dynamic | Yes |
| Scope | Global |
| Data type | Boolean |
| Default | OFF |
Specifies whether MyRocks should pause all background operations. Disabled by default. There is no practical reason for a user to ever use this variable because it is intended as a test synchronization tool for the MyRocks MTR test suites.
Warning
If someone were to set a rocksdb_force_flush_memtable_now to
1 while rocksdb_pause_background_work is set to 1,
the client that issued the rocksdb_force_flush_memtable_now=1 will be
blocked indefinitely until rocksdb_pause_background_work
is set to 0.
rocksdb_perf_context_level
| Option | Description |
|---|---|
| Command-line | –rocksdb-perf-context-level |
| Dynamic | Yes |
| Scope | Global, Session |
| Data type | Numeric |
| Default | 0 |
Specifies the level of information to capture with the Perf Context plugins.
The default value is 0.
The allowed range is up to 5.
| Value | Description |
|---|---|
| 1 | Disable perf stats |
| 2 | Enable only count stats |
| 3 | Enable count stats and time stats except for mutexes |
| 4 | Enable count stats and time stats, except for wall time or CPU time for mutexes |
| 5 | Enable all count stats and time stats |
rocksdb_persistent_cache_path
| Option | Description |
|---|---|
| Command-line | –rocksdb-persistent-cache-path |
| Dynamic | No |
| Scope | Global |
| Data type | String |
| Default |
Specifies the path to the persistent cache. Set this together with rocksdb_persistent_cache_size_mb.
rocksdb_persistent_cache_size_mb
| Option | Description |
|---|---|
| Command-line | –rocksdb-persistent-cache-size-mb |
| Dynamic | No |
| Scope | Global |
| Data type | Numeric |
| Default | 0 |
Specifies the size of the persisten cache in megabytes.
Default is 0 (persistent cache disabled).
Allowed range is up to 18446744073709551615.
Set this together with rocksdb_persistent_cache_path.
rocksdb_pin_l0_filter_and_index_blocks_in_cache
| Option | Description |
|---|---|
| Command-line | –rocksdb-pin-l0-filter-and-index-blocks-in-cache |
| Dynamic | No |
| Scope | Global |
| Data type | Boolean |
| Default | ON |
Specifies whether MyRocks pins the filter and index blocks in the cache if rocksdb_cache_index_and_filter_blocks is enabled. Enabled by default.
rocksdb_print_snapshot_conflict_queries
| Option | Description |
|---|---|
| Command-line | –rocksdb-print-snapshot-conflict-queries |
| Dynamic | Yes |
| Scope | Global |
| Data type | Boolean |
| Default | OFF |
Specifies whether queries that generate snapshot conflicts should be logged to the error log. Disabled by default.
rocksdb_protection_bytes_per_key
| Option | Description |
|---|---|
| Command-line | –rocksdb_protection_bytes_per_key |
| Dynamic | Yes |
| Scope | Global, Session |
| Data type | Numeric |
| Default | 0 |
This variable is used to configure WriteOptions::protection_bytes_per_key. The default value is 0 (disabled). When this variable is set to 1, 2, 4, or 8, it uses that number of bytes per key value to protect entries in the WriteBatch.
The minimum value is 0.
The maximum value is ULONG_MAX (0xFFFFFFFF).
rocksdb_rate_limiter_bytes_per_sec
| Option | Description |
|---|---|
| Command-line | –rocksdb-rate-limiter-bytes-per-sec |
| Dynamic | Yes |
| Scope | Global |
| Data type | Numeric |
| Default | 0 |
Specifies the maximum rate at which MyRocks can write to media
via memtable flushes and compaction.
Default value is 0 (write rate is not limited).
Allowed range is up to 9223372036854775807.
rocksdb_read_free_rpl
| Option | Description |
|---|---|
| Command-line | –rocksdb-read-free-rpl |
| Dynamic | Yes |
| Scope | Global |
| Data type | Enum |
| Default | OFF |
Uses read-free replication, which allows no row lookup during replication, on the replica.
The options are the following:
-
OFF - Disables the variable
-
PK_SK - Enables the variable on all tables with a primary key
-
PK_ONLY - Enables the variable on tables where the only key is the primary key
rocksdb_read_free_rpl_tables
| Option | Description |
|---|---|
| Command-line | –rocksdb-read-free-rpl-tables |
| Dynamic | Yes |
| Scope | Global, Session |
| Data type | String |
| Default |
We recommend that you use rocksdb_read_free_rpl instead of this variable.
This variable lists tables (as a regular expression) that should use read-free replication on the replica (that is, replication without row lookups). Empty by default.
rocksdb_records_in_range
| Option | Description |
|---|---|
| Command-line | –rocksdb-records-in-range |
| Dynamic | Yes |
| Scope | Global, Session |
| Data type | Numeric |
| Default | 0 |
Specifies the value to override the result of records_in_range().
Default value is 0.
Allowed range is up to 2147483647.
rocksdb_reset_stats
| Option | Description |
|---|---|
| Command-line | –rocksdb-reset-stats |
| Dynamic | Yes |
| Scope | Global |
| Data type | Boolean |
| Default | OFF |
Resets MyRocks internal statistics dynamically (without restarting the server).
rocksdb_rollback_on_timeout
| Option | Description |
|---|---|
| Command-line | –rocksdb-rollback-on-timeout |
| Dynamic | Yes |
| Scope | Global |
| Data type | Boolean |
| Default | OFF |
By default, only the last statement on a transaction is rolled back. If --rocksdb-rollback-on-timeout=ON, a transaction timeout causes a rollback of the entire transaction.
rocksdb_rpl_skip_tx_api
| Option | Description |
|---|---|
| Command-line | –rocksdb-rpl-skip-tx-api |
| Dynamic | No |
| Scope | Global |
| Data type | Boolean |
| Default | OFF |
Specifies whether write batches should be used for replication thread instead of the transaction API. Disabled by default.
There are two conditions which are necessary to use it: row replication format and replica operating in super read only mode.
rocksdb_seconds_between_stat_computes
| Option | Description |
|---|---|
| Command-line | –rocksdb-seconds-between-stat-computes |
| Dynamic | Yes |
| Scope | Global |
| Data type | Numeric |
| Default | 3600 |
Specifies the number of seconds to wait
between recomputation of table statistics for the optimizer.
During that time, only changed indexes are updated.
Default value is 3600.
Allowed is from 0 to 4294967295.
rocksdb_signal_drop_index_thread
| Option | Description |
|---|---|
| Command-line | –rocksdb-signal-drop-index-thread |
| Dynamic | Yes |
| Scope | Global |
| Data type | Boolean |
| Default | OFF |
Signals the MyRocks drop index thread to wake up.
rocksdb_sim_cache_size
| Option | Description |
|---|---|
| Command-line | –rocksdb-sim-cache-size |
| Dynamic | No |
| Scope | Global |
| Data type | Numeric |
| Default | 0 |
Enables the simulated cache, which allows us to figure out the hit/miss rate with a specific cache size without changing the real block cache.
rocksdb_skip_bloom_filter_on_read
| Option | Description |
|---|---|
| Command-line | –rocksdb-skip-bloom-filter-on_read |
| Dynamic | Yes |
| Scope | Global, Session |
| Data type | Boolean |
| Default | OFF |
Specifies whether bloom filters should be skipped on reads. Disabled by default (bloom filters are not skipped).
rocksdb_skip_fill_cache
| Option | Description |
|---|---|
| Command-line | –rocksdb-skip-fill-cache |
| Dynamic | Yes |
| Scope | Global, Session |
| Data type | Boolean |
| Default | OFF |
Specifies whether to skip caching data on read requests. Disabled by default (caching is not skipped).
rocksdb_skip_locks_if_skip_unique_check
| Option | Description |
|---|---|
| Command-line | rocksdb_skip_locks_if_skip_unique_check |
| Dynamic | Yes |
| Scope | Global |
| Data type | Boolean |
| Default | OFF |
Skip row locking when unique checks are disabled.
rocksdb_sst_mgr_rate_bytes_per_sec
| Option | Description |
|---|---|
| Command-line | –rocksdb-sst-mgr-rate-bytes-per-sec |
| Dynamic | Yes |
| Scope | Global, Session |
| Data type | Numeric |
| Default | 0 |
Specifies the maximum rate for writing to data files.
Default value is 0. This option is not effective on HDD.
Allowed range is from 0 to 18446744073709551615.
rocksdb_stats_dump_period_sec
| Option | Description |
|---|---|
| Command-line | –rocksdb-stats-dump-period-sec |
| Dynamic | No |
| Scope | Global |
| Data type | Numeric |
| Default | 600 |
Specifies the period in seconds for performing a dump of the MyRocks statistics
to the info log.
Default value is 600.
Allowed range is up to 2147483647.
rocksdb_stats_level
| Option | Description |
|---|---|
| Command-line | –rocksdb-stats-level |
| Dynamic | Yes |
| Scope | Global |
| Data type | Numeric |
| Default | 0 |
Controls the RocksDB statistics level. The default value is “0” (kExceptHistogramOrTimers), which is the fastest level. The maximum value is “4”.
rocksdb_stats_recalc_rate
| Option | Description |
|---|---|
| Command-line | –rocksdb-stats-recalc-rate |
| Dynamic | No |
| Scope | Global |
| Data type | Numeric |
| Default | 0 |
Specifies the number of indexes to recalculate per second. Recalculating index statistics periodically ensures it to match the actual sum from SST files.
Default value is 0. Allowed range is up to 4294967295.
rocksdb_store_row_debug_checksums
| Option | Description |
|---|---|
| Command-line | –rocksdb-store-row-debug-checksums |
| Dynamic | Yes |
| Scope | Global |
| Data type | Boolean |
| Default | OFF |
Specifies whether to include checksums when writing index or table records. Disabled by default.
rocksdb_strict_collation_check
| Option | Description |
|---|---|
| Command-line | –rocksdb-strict-collation-check |
| Dynamic | Yes |
| Scope | Global |
| Data type | Boolean |
| Default | ON |
[Removed: 8.4.5-5] As of Percona Server for MySQL 8.4.5-5, the rocksdb_strict_collation_check variable has been removed.
Specifies whether to check and verify that table indexes have proper collation settings. Enabled by default.
rocksdb_strict_collation_exceptions
| Option | Description |
|---|---|
| Command-line | –rocksdb-strict-collation-exceptions |
| Dynamic | Yes |
| Scope | Global |
| Data type | String |
| Default |
[Removed: 8.4.5-5] As of Percona Server for MySQL 8.4.5-5, the rocksdb_strict_collation_exceptions variable has been removed.
Lists tables (as a regular expression) that should be excluded from verifying case-sensitive collation enforced by rocksdb_strict_collation_check. Empty by default.
rocksdb_table_cache_numshardbits
| Option | Description |
|---|---|
| Command-line | –rocksdb-table-cache-numshardbits |
| Dynamic | No |
| Scope | Global |
| Data type | Numeric |
| Default | 6 |
Specifies the number if table caches.
The default value is 6.
The allowed range is from 0 to 19.
rocksdb_table_stats_background_thread_nice_value
| Option | Description |
|---|---|
| Command-line | –rocksdb-table-stats-background-thread-nice-value |
| Dynamic | Yes |
| Scope | Global |
| Data type | Numeric |
| Default | 19 |
The nice value for index stats. The minimum = -20 (THREAD_PRIO_MIN) The maximum = 19 (THREAD_PRIO_MAX)
rocksdb_table_stats_max_num_rows_scanned
| Option | Description |
|---|---|
| Command-line | –rocksdb-table-stats-max-num-rows-scanned |
| Dynamic | Yes |
| Scope | Global |
| Data type | Numeric |
| Default | 0 |
The maximum number of rows to scan in a table scan based on
a cardinality calculation.
The minimum is 0 (every modification triggers a stats recalculation).
The maximum is 18,446,744,073,709,551,615.
rocksdb_table_stats_recalc_threshold_count
| Option | Description |
|---|---|
| Command-line | –rocksdb-table-stats-recalc-threshold-count |
| Dynamic | Yes |
| Scope | Global |
| Data type | Numeric |
| Default | 100 |
The number of modified rows to trigger a stats recalculation. This is a
dependent variable for stats recalculation.
The minimum is 0.
The maximum is 18,446,744,073,709,551,615.
rocksdb_table_stats_recalc_threshold_pct
| Option | Description |
|---|---|
| Command-line | –rocksdb-table-stats-recalc-threshold-pct |
| Dynamic | Yes |
| Scope | Global |
| Data type | Numeric |
| Default | 10 |
The percentage of the number of modified rows over the total number of rows
to trigger stats recalculations. This is a dependent variable for stats
recalculation.
The minimum value is 0
The maximum value is 100 (RDB_TBL_STATS_RECALC_THRESHOLD_PCT_MAX).
rocksdb_table_stats_sampling_pct
| Option | Description |
|---|---|
| Command-line | –rocksdb-table-stats-sampling-pct |
| Dynamic | Yes |
| Scope | Global |
| Data type | Numeric |
| Default | 10 |
Specifies the percentage of entries to sample
when collecting statistics about table properties.
Default value is 10.
Allowed range is from 0 to 100.
rocksdb_table_stats_skip_system_cf
| Option | Description |
|---|---|
| Command-line | –rocksdb-table-stats-skip-system-cf |
| Dynamic | Yes |
| Scope | Global |
| Data type | Boolean |
| Default | OFF |
Added in Percona Server for MySQL 8.4.5-5.
Determines whether to skip recording table statistics for the system column family.
rocksdb_table_stats_use_table_scan
| Option | Description |
|---|---|
| Command-line | –rocksdb-table-stats-use-table-scan |
| Dynamic | Yes |
| Scope | Global |
| Data type | Boolean |
| Default | OFF. |
Enables table-scan-based index calculations. The default value is OFF.
rocksdb_tmpdir
| Option | Description |
|---|---|
| Command-line | –rocksdb-tmpdir |
| Dynamic | Yes |
| Scope | Global, Session |
| Data type | String |
| Default |
Specifies the path to the directory for temporary files during DDL operations.
rocksdb_trace_block_cache_access
| Option | Description |
|---|---|
| Command-line | –rocksdb-trace-block-cache-access |
| Dynamic | Yes |
| Scope | Global |
| Data type | String |
| Default | "" |
Defines the block cache trace option string. The format is sampling frequency: max_trace_file_size:trace_file_name. The sampling frequency value and max_trace_file_size value are positive integers. The block accesses are saved to the rocksdb_datadir/block_cache_traces/trace_file_name. The default value is an empty string.
rocksdb_trace_queries
| Option | Description |
|---|---|
| Command-line | –rocksdb-trace-queries |
| Dynamic | Yes |
| Scope | Global |
| Data type | String |
| Default | "" |
This variable is a trace option string. The format is sampling_frequency:max_trace_file_size:trace_file_name. The sampling_frequency and max_trace_file_size are positive integers. The queries are saved to the rocksdb_datadir/queries_traces/trace_file_name.
rocksdb_trace_sst_api
| Option | Description |
|---|---|
| Command-line | –rocksdb-trace-sst-api |
| Dynamic | Yes |
| Scope | Global |
| Data type | Boolean |
| Default | OFF |
Specifies whether to generate trace output in the log
for each call to SstFileWriter.
Disabled by default.
rocksdb_track_and_verify_wals_in_manifest
| Option | Description |
|---|---|
| Command-line | –rocksdb-track-and-verify-wals-in-manifest |
| Dynamic | No |
| Scope | Global |
| Data type | Boolean |
| Default | ON |
DBOptions::track_and_verify_wals_in_manifest for RocksDB.
rocksdb_two_write_queues
| Option | Description |
|---|---|
| Command-line | –rocksdb-track-and-verify-wals-in-manifest |
| Dynamic | No |
| Scope | Global |
| Data type | Boolean |
| Default | ON |
When enabled this variable allows/encourages threads that are using
two-phase commit to prepare in parallel.
rocksdb_unsafe_for_binlog
| Option | Description |
|---|---|
| Command-line | –rocksdb-unsafe-for-binlog |
| Dynamic | Yes |
| Scope | Global, Session |
| Data type | Boolean |
| Default | OFF |
Specifies whether to allow statement-based binary logging which may break consistency. Disabled by default.
rocksdb_update_cf_options
| Option | Description |
|---|---|
| Command-line | –rocksdb-update-cf-options |
| Dynamic | No |
| Scope | Global |
| Data type | String |
| Default |
Specifies option updates for each column family. Empty by default.
rocksdb_use_adaptive_mutex
| Option | Description |
|---|---|
| Command-line | –rocksdb-use-adaptive-mutex |
| Dynamic | No |
| Scope | Global |
| Data type | Boolean |
| Default | OFF |
Specifies whether to use adaptive mutex which spins in user space before resorting to the kernel. Disabled by default.
rocksdb_use_default_sk_cf
| Option | Description |
|---|---|
| Command-line | –rocksdb-use-default-sk-cf |
| Dynamic | No |
| Scope | Global |
| Data type | Boolean |
| Default | OFF |
Use default_sk column family for secondary keys.
rocksdb_use_direct_io_for_flush_and_compaction
| Option | Description |
|---|---|
| Command-line | –rocksdb-use-direct-io-for-flush-and-compaction |
| Dynamic | No |
| Scope | Global |
| Data type | Boolean |
| Default | OFF |
Specifies whether to write to data files directly, without caches or buffers. Disabled by default.
rocksdb_use_direct_reads
| Option | Description |
|---|---|
| Command-line | –rocksdb-use-direct-reads |
| Dynamic | No |
| Scope | Global |
| Data type | Boolean |
| Default | OFF |
Specifies whether to read data files directly, without caches or buffers. Disabled by default. If you enable this, make sure that rocksdb_allow_mmap_reads is disabled.
rocksdb_use_fsync
| Option | Description |
|---|---|
| Command-line | –rocksdb-use-fsync |
| Dynamic | No |
| Scope | Global |
| Data type | Boolean |
| Default | OFF |
Specifies whether MyRocks should use fsync instead of fdatasync
when requesting a sync of a data file.
Disabled by default.
rocksdb_use_hyper_clock_cache
| Option | Description |
|---|---|
| Command-line | –rocksdb_use_hyper_clock_cache |
| Dynamic | No |
| Scope | Global |
| Data type | Boolean |
| Default | OFF |
If enabled, this variable uses HyperClockCache instead of default LRUCache for RocksDB.
This variable is disabled (OFF) by default.
rocksdb_use_io_uring
| Option | Description |
|---|---|
| Command-line | –rocksdb-use-io-uring |
| Dynamic | Yes |
| Scope | Global |
| Data type | Boolean |
| Default | OFF |
Added in Percona Server for MySQL 8.4.5-5.
Enables the use of io_uring for RocksDB.
rocksdb_use_write_buffer_manager
| Option | Description |
|---|---|
| Command-line | –rocksdb_use_write_buffer_manager |
| Dynamic | No |
| Scope | Global |
| Data type | Boolean |
| Default | OFF |
This variable is tech preview and may be removed in the future releases.
Allows to turn on the write buffer manager (WriteBufferManager) from cnf files. This variable is related to rocksdb_charge_memory.
rocksdb_validate_tables
| Option | Description |
|---|---|
| Command-line | –rocksdb-validate-tables |
| Dynamic | No |
| Scope | Global |
| Data type | Numeric |
| Default | 1 |
Specifies whether to verify that MySQL data dictionary is equal to the MyRocks data dictionary.
-
0: do not verify. -
1: verify and fail on error (default). -
2: verify and continue with error.
rocksdb_verify_row_debug_checksums
| Option | Description |
|---|---|
| Command-line | –rocksdb-verify-row-debug-checksums |
| Dynamic | Yes |
| Scope | Global, Session |
| Data type | Boolean |
| Default | OFF |
Specifies whether to verify checksums when reading index or table records. Disabled by default.
rocksdb_wal_bytes_per_sync
| Option | Description |
|---|---|
| Command-line | –rocksdb-wal-bytes-per-sync |
| Dynamic | Yes |
| Scope | Global |
| Data type | Numeric |
| Default | 0 |
Specifies how often should the OS sync WAL (write-ahead log) files to disk
as they are being written, asynchronously, in the background.
This operation can be used to smooth out write I/O over time.
Default value is 0, meaning that files are never synced.
Allowed range is up to 18446744073709551615.
rocksdb_wal_dir
| Option | Description |
|---|---|
| Command-line | –rocksdb-wal-dir |
| Dynamic | No |
| Scope | Global |
| Data type | String |
| Default |
Specifies the path to the directory where MyRocks stores WAL files.
rocksdb_wal_recovery_mode
| Option | Description |
|---|---|
| Command-line | –rocksdb-wal-recovery-mode |
| Dynamic | Yes |
| Scope | Global |
| Data type | Numeric |
| Default | 2 |
Specifies the level of tolerance when recovering write-ahead logs (WAL) files after a system crash.
The following are the options:
-
0: if the last WAL entry is corrupted, truncate the entry and either start the server normally or refuse to start. -
1: if a WAL entry is corrupted, the server fails to start and does not recover from the crash. -
2(default): if a corrupted WAL entry is detected, truncate all entries after the detected corrupted entry. You can select this setting for replication replicas. -
3: If a corrupted WAL entry is detected, skip only the corrupted entry and continue the apply WAL entries. This option can be dangerous.
rocksdb_wal_size_limit_mb
| Option | Description |
|---|---|
| Command-line | –rocksdb-wal-size-limit-mb |
| Dynamic | No |
| Scope | Global |
| Data type | Numeric |
| Default | 0 |
Specifies the maximum size of all WAL files in megabytes
before attempting to flush memtables and delete the oldest files.
Default value is 0 (never rotated).
Allowed range is up to 9223372036854775807.
rocksdb_wal_ttl_seconds
| Option | Description |
|---|---|
| Command-line | –rocksdb-wal-ttl-seconds |
| Dynamic | No |
| Scope | Global |
| Data type | Numeric |
| Default | 0 |
Specifies the timeout in seconds before deleting archived WAL files.
Default is 0 (archived WAL files are never deleted).
Allowed range is up to 9223372036854775807.
rocksdb_whole_key_filtering
| Option | Description |
|---|---|
| Command-line | –rocksdb-whole-key-filtering |
| Dynamic | No |
| Scope | Global |
| Data type | Boolean |
| Default | ON |
Specifies whether the bloomfilter should use the whole key for filtering instead of just the prefix. Enabled by default. Make sure that lookups use the whole key for matching.
rocksdb_write_batch_flush_threshold
| Option | Description |
|---|---|
| Command-line | –rocksdb-write-batch-flush-threshold |
| Dynamic | Yes |
| Scope | Local |
| Data type | Integer |
| Default | 0 |
This variable specifies the maximum size of the write batch in bytes before flushing. Only valid if rockdb_write_policy is WRITE_UNPREPARED. There is no limit if the variable is set to the default setting.
rocksdb_write_batch_max_bytes
| Option | Description |
|---|---|
| Command-line | –rocksdb-write-batch-max-bytes |
| Dynamic | Yes |
| Scope | Global |
| Data type | Numeric |
| Default | 0 |
Specifies the maximum size of a RocksDB write batch in bytes. 0 means no
limit. In case user exceeds the limit following error will be shown:
ERROR HY000: Status error 10 received from RocksDB: Operation aborted: Memory
limit reached.
rocksdb_write_disable_wal
| Option | Description |
|---|---|
| Command-line | –rocksdb-write-disable-wal |
| Dynamic | Yes |
| Scope | Global, Session |
| Data type | Boolean |
| Default | OFF |
Lets you temporarily disable writes to WAL files, which can be useful for bulk loading.
rocksdb_write_ignore_missing_column_families
| Option | Description |
|---|---|
| Command-line | –rocksdb-write-ignore-missing-column-families |
| Dynamic | Yes |
| Scope | Global, Session |
| Data type | Boolean |
| Default | OFF |
Specifies whether to ignore writes to column families that do not exist. Disabled by default (writes to non-existent column families are not ignored).
rocksdb_write_policy
| Option | Description |
|---|---|
| Command-line | –rocksdb-write-policy |
| Dynamic | No |
| Scope | Global |
| Data type | String |
| Default | write_committed |
Specifies when two-phase commit data are written into the database.
Allowed values are write_committed, write_prepared, and
write_unprepared.
| Value | Description |
|---|---|
write_committed |
Data written at commit time |
write_prepared |
Data written after the prepare phase of a two-phase transaction |
write_unprepared |
Data written before the prepare phase of a two-phase transaction |
MyRocks status variables
MyRocks status variables provide details about the inner workings of the storage engine and they can be useful in tuning the storage engine to a particular environment.
You can view these variables and their values by running:
SHOW STATUS LIKE 'rocksdb%';
The following global status variables are available:
rocksdb_rows_deleted
This variable shows the number of rows that were deleted from MyRocks tables.
rocksdb_rows_inserted
This variable shows the number of rows that were inserted into MyRocks tables.
rocksdb_rows_read
This variable shows the number of rows that were read from MyRocks tables.
rocksdb_rows_unfiltered_no_snapshot
This variable shows how many reads need TTL and have no snapshot timestamp.
rocksdb_rows_updated
This variable shows the number of rows that were updated in MyRocks tables.
rocksdb_rows_expired
This variable shows the number of expired rows in MyRocks tables.
rocksdb_system_rows_deleted
This variable shows the number of rows that were deleted from MyRocks system tables.
rocksdb_system_rows_inserted
This variable shows the number of rows that were inserted into MyRocks system tables.
rocksdb_system_rows_read
This variable shows the number of rows that were read from MyRocks system tables.
rocksdb_system_rows_updated
This variable shows the number of rows that were updated in MyRocks system tables.
rocksdb_memtable_total
This variable shows the memory usage, in bytes, of all memtables.
rocksdb_memtable_unflushed
This variable shows the memory usage, in bytes, of all unflushed memtables.
rocksdb_queries_point
This variable shows the number of single row queries.
rocksdb_queries_range
This variable shows the number of multi/range row queries.
rocksdb_covered_secondary_key_lookups
This variable shows the number of lookups via the secondary index that returned all fields requested directly from the secondary index.
rocksdb_additional_compactions_trigger
This variable shows the number of triggered additional compactions. MyRocks triggers an additional compaction if (number of deletions / number of entries) > (rocksdb_compaction_sequential_deletes / rocksdb_compaction_sequential_deletes_window) in the SST file.
rocksdb_block_cache_add
This variable shows the number of blocks added to block cache.
rocksdb_block_cache_add_failures
This variable shows the number of failures when adding blocks to block cache.
rocksdb_block_cache_bytes_read
This variable shows the number of bytes read from cache.
rocksdb_block_cache_bytes_write
This variable shows the number of bytes written into cache.
rocksdb_block_cache_data_add
This variable shows the number of data blocks added to block cache.
rocksdb_block_cache_data_bytes_insert
This variable shows the number of bytes of data blocks inserted into cache.
rocksdb_block_cache_data_hit
This variable shows the number of cache hits when accessing the data block from the block cache.
rocksdb_block_cache_data_miss
This variable shows the number of cache misses when accessing the data block from the block cache.
rocksdb_block_cache_filter_add
This variable shows the number of filter blocks added to block cache.
rocksdb_block_cache_filter_bytes_evict
This variable shows the number of bytes of bloom filter blocks removed from cache.
rocksdb_block_cache_filter_bytes_insert
This variable shows the number of bytes of bloom filter blocks inserted into cache.
rocksdb_block_cache_filter_hit
This variable shows the number of times cache hit when accessing filter block from block cache.
rocksdb_block_cache_filter_miss
This variable shows the number of times cache miss when accessing filter block from block cache.
rocksdb_block_cache_hit
This variable shows the total number of block cache hits.
rocksdb_block_cache_index_add
This variable shows the number of index blocks added to block cache.
rocksdb_block_cache_index_bytes_evict
This variable shows the number of bytes of index block erased from cache.
rocksdb_block_cache_index_bytes_insert
This variable shows the number of bytes of index blocks inserted into cache.
rocksdb_block_cache_index_hit
This variable shows the total number of block cache index hits.
rocksdb_block_cache_index_miss
This variable shows the number of times cache hit when accessing index block from block cache.
rocksdb_block_cache_miss
This variable shows the total number of block cache misses.
rocksdb_block_cache_compressed_hit
This variable shows the number of hits in the compressed block cache.
rocksdb_block_cache_compressed_miss
This variable shows the number of misses in the compressed block cache.
rocksdb_bloom_filter_prefix_checked
This variable shows the number of times bloom was checked before creating iterator on a file.
rocksdb_bloom_filter_prefix_useful
This variable shows the number of times the check was useful in avoiding iterator creation (and thus likely IOPs).
rocksdb_bloom_filter_useful
This variable shows the number of times bloom filter has avoided file reads.
rocksdb_bytes_read
This variable shows the total number of uncompressed bytes read. It could be either from memtables, cache, or table files.
rocksdb_bytes_written
This variable shows the total number of uncompressed bytes written.
rocksdb_compact_read_bytes
This variable shows the number of bytes read during compaction
rocksdb_compact_write_bytes
This variable shows the number of bytes written during compaction.
rocksdb_compaction_key_drop_new
This variable shows the number of key drops during compaction because it was overwritten with a newer value.
rocksdb_compaction_key_drop_obsolete
This variable shows the number of key drops during compaction because it was obsolete.
rocksdb_compaction_key_drop_user
This variable shows the number of key drops during compaction because user compaction function has dropped the key.
rocksdb_flush_write_bytes
This variable shows the number of bytes written during flush.
rocksdb_get_hit_l0
This variable shows the number of Get() queries served by L0.
rocksdb_get_hit_l1
This variable shows the number of Get() queries served by L1.
rocksdb_get_hit_l2_and_up
This variable shows the number of Get() queries served by L2 and up.
rocksdb_get_updates_since_calls
This variable shows the number of calls to GetUpdatesSince function.
Useful to keep track of transaction log iterator refreshes
rocksdb_iter_bytes_read
This variable shows the number of uncompressed bytes read from an iterator. It includes size of key and value.
rocksdb_memtable_hit
This variable shows the number of memtable hits.
rocksdb_memtable_miss
This variable shows the number of memtable misses.
rocksdb_no_file_closes
This variable shows the number of time file were closed.
rocksdb_no_file_errors
This variable shows number of errors trying to read in data from an sst file.
rocksdb_no_file_opens
This variable shows the number of time file were opened.
rocksdb_num_iterators
This variable shows the number of currently open iterators.
rocksdb_number_block_not_compressed
This variable shows the number of uncompressed blocks.
rocksdb_number_db_next
This variable shows the number of calls to next.
rocksdb_number_db_next_found
This variable shows the number of calls to next that returned data.
rocksdb_number_db_prev
This variable shows the number of calls to prev.
rocksdb_number_db_prev_found
This variable shows the number of calls to prev that returned data.
rocksdb_number_db_seek
This variable shows the number of calls to seek.
rocksdb_number_db_seek_found
This variable shows the number of calls to seek that returned data.
rocksdb_number_deletes_filtered
This variable shows the number of deleted records that were not required to be written to storage because key did not exist.
rocksdb_number_keys_read
This variable shows the number of keys read.
rocksdb_number_keys_updated
This variable shows the number of keys updated, if inplace update is enabled.
rocksdb_number_keys_written
This variable shows the number of keys written to the database.
rocksdb_number_merge_failures
This variable shows the number of failures performing merge operator actions in RocksDB.
rocksdb_number_multiget_bytes_read
This variable shows the number of bytes read during RocksDB
MultiGet() calls.
rocksdb_number_multiget_get
This variable shows the number MultiGet() requests to RocksDB.
rocksdb_number_multiget_keys_read
This variable shows the keys read via MultiGet().
rocksdb_number_reseeks_iteration
This variable shows the number of times reseek happened inside an iteration to skip over large number of keys with same userkey.
rocksdb_number_sst_entry_delete
This variable shows the total number of delete markers written by MyRocks.
rocksdb_number_sst_entry_merge
This variable shows the total number of merge keys written by MyRocks.
rocksdb_number_sst_entry_other
This variable shows the total number of non-delete, non-merge, non-put keys written by MyRocks.
rocksdb_number_sst_entry_put
This variable shows the total number of put keys written by MyRocks.
rocksdb_number_sst_entry_singledelete
This variable shows the total number of single delete keys written by MyRocks.
rocksdb_number_stat_computes
This variable isn’t used anymore and will be removed in future releases.
rocksdb_number_superversion_acquires
This variable shows the number of times the superversion structure has been acquired in RocksDB, this is used for tracking all of the files for the database.
rocksdb_number_superversion_cleanups
rocksdb_number_superversion_releases
rocksdb_rate_limit_delay_millis
This variable was removed in Percona Server for MySQL Percona Server 5.7.23-23 .
rocksdb_row_lock_deadlocks
This variable shows the total number of deadlocks that have been detected since the instance was started.
rocksdb_row_lock_wait_timeouts
This variable shows the total number of row lock wait timeouts that have been detected since the instance was started.
rocksdb_snapshot_conflict_errors
This variable shows the number of snapshot conflict errors occurring during write transactions that forces the transaction to rollback.
rocksdb_stall_l0_file_count_limit_slowdowns
This variable shows the slowdowns in write due to L0 being close to full.
rocksdb_stall_locked_l0_file_count_limit_slowdowns
This variable shows the slowdowns in write due to L0 being close to full and compaction for L0 is already in progress.
rocksdb_stall_l0_file_count_limit_stops
This variable shows the stalls in write due to L0 being full.
rocksdb_stall_locked_l0_file_count_limit_stops
This variable shows the stalls in write due to L0 being full and compaction for L0 is already in progress.
rocksdb_stall_pending_compaction_limit_stops
This variable shows the stalls in write due to hitting limits set for max number of pending compaction bytes.
rocksdb_stall_pending_compaction_limit_slowdowns
This variable shows the slowdowns in write due to getting close to limits set for max number of pending compaction bytes.
rocksdb_stall_memtable_limit_stops
This variable shows the stalls in write due to hitting max number of
memTables allowed.
rocksdb_stall_memtable_limit_slowdowns
This variable shows the slowdowns in writes due to getting close to max number of memtables allowed.
rocksdb_stall_total_stops
This variable shows the total number of write stalls.
rocksdb_stall_total_slowdowns
This variable shows the total number of write slowdowns.
rocksdb_stall_micros
This variable shows how long (in microseconds) the writer had to wait for compaction or flush to finish.
rocksdb_wal_bytes
This variables shows the number of bytes written to WAL.
rocksdb_wal_group_syncs
This variable shows the number of group commit WAL file syncs that have occurred.
rocksdb_wal_synced
This variable shows the number of times WAL sync was done.
rocksdb_write_other
This variable shows the number of writes processed by another thread.
rocksdb_write_self
This variable shows the number of writes that were processed by a requesting thread.
rocksdb_write_timedout
This variable shows the number of writes ending up with timed-out.
rocksdb_write_wal
This variable shows the number of Write calls that request WAL.
Gap locks detection
The Gap locks detection is based on a Facebook MySQL patch.
If a transactional storage engine does not support gap locks (for example
MyRocks) and a gap lock is being attempted while the transaction isolation
level is either REPEATABLE READ or SERIALIZABLE, the following SQL
error will be returned to the client and no actual gap lock will be taken
on the effected rows.
Error message
ERROR HY000: Using Gap Lock without full unique key in multi-table or multi-statement transactions is not allowed. You need to either rewrite queries to use all unique key columns in WHERE equal conditions, or rewrite to single-table, single-statement transaction.
Data loading
By default, MyRocks configurations are optimized for short transactions, and not for data loading. MyRocks has a couple of special session variables to speed up data loading dramatically.
Sorted bulk loading
If your data is guaranteed to be loaded in primary key order, then this method is recommended. This method works by dropping any secondary keys first, loading data into your table in primary key order, and then restoring the secondary keys via Fast Secondary Index Creation.
Creating secondary indexes
When loading data into empty tables, it is highly recommended to drop all
secondary indexes first, then loading data, and adding all secondary indexes
after finishing loading data. MyRocks has a feature called Fast Secondary
Index Creation. Fast Secondary Index Creation is automatically used when
executing CREATE INDEX or ALTER TABLE ... ADD INDEX. With Fast
Secondary Index Creation, the secondary index entries are directly written
to bottommost RocksDB levels and bypassing compaction. This significantly
reduces total write volume and CPU time for decompressing and compressing
data on higher levels.
Loading data
As described above, loading data is highly recommended for tables with primary key only (no secondary keys), with all secondary indexes added after loading data.
When loading data into MyRocks tables, there are two recommended session variables:
SET session sql_log_bin=0;
SET session rocksdb_bulk_load=1;
When converting from large MyISAM/InnoDB tables, either by using the ALTER
or INSERT INTO SELECT statements it’s recommended that you
create MyRocks tables as below (in case the table is sufficiently big it will
cause the server to consume all the memory and then be terminated by the OOM
killer):
SET session sql_log_bin=0;
SET session rocksdb_bulk_load=1;
ALTER TABLE large_myisam_table ENGINE=RocksDB;
SET session rocksdb_bulk_load=0;
Using sql_log_bin=0 avoids writing to binary logs.
With rocksdb_bulk_load set to 1, MyRocks enters special mode to
write all inserts into bottommost RocksDB levels, and skips writing data into
MemTable and the following compactions. This is very efficient way to load
data.
The rocksdb_bulk_load mode operates with a few conditions:
-
None of the data being bulk loaded can overlap with existing data in the table. The easiest way to ensure this is to always bulk load into an empty table, but the mode will allow loading some data into the table, doing other operations, and then returning and bulk loading addition data if there is no overlap between what is being loaded and what already exists.
-
The data may not be visible until bulk load mode is ended (i.e. the rocksdb_bulk_load is set to zero again). The method that is used is building up SST files which will later be added as-is to the database. Until a particular SST has been added the data will not be visible to the rest of the system, thus issuing a
SELECTon the table currently being bulk loaded will only show older data and will likely not show the most recently added rows. Ending the bulk load mode will cause the most recent SST file to be added. When bulk loading multiple tables, starting a new table will trigger the code to add the most recent SST file to the system – as a result, it is inadvisable to interleaveINSERTstatements to two or more tables during bulk load mode.
By default, the rocksdb_bulk_load mode expects all data be inserted in primary key order (or reversed order). If the data is in the reverse order (i.e. the data is descending on a normally ordered primary key or is ascending on a reverse ordered primary key), the rows are cached in chunks to switch the order to match the expected order.
Inserting one or more rows out of order will result in an error and may result in some of the data being inserted in the table and some not. To resolve the problem, one can either fix the data order of the insert, truncate the table, and restart.
Unsorted bulk loading
If your data is not ordered in primary key order, then this method is recommended. With this method, secondary keys do not need to be dropped and restored. However, writing to the primary key no longer goes directly to SST files, and are written to temporary files for sorted first, so there is extra cost to this method.
To allow for loading unsorted data:
SET session sql_log_bin=0;
SET session rocksdb_bulk_load_allow_unsorted=1;
SET session rocksdb_bulk_load=1;
...
SET session rocksdb_bulk_load=0;
SET session rocksdb_bulk_load_allow_unsorted=0;
Note that rocksdb_bulk_load_allow_unsorted can only be changed when
rocksdb_bulk_load is disabled (set to 0). In this case, all
input data will go through an intermediate step that writes the rows to
temporary SST files, sorts them rows in the primary key order, and then writes
to final SST files in the correct order.
Other approaches
If rocksdb_commit_in_the_middle is enabled, MyRocks implicitly
commits every rocksdb_bulk_load_size records (default is 1,000)
in the middle of your transaction. If your data loading fails in the middle of
the statement (LOAD DATA or bulk INSERT), rows are not entirely rolled
back, but some of rows are stored in the table. To restart data loading, you’ll
need to truncate the table and loading data again.
Warning
If you are loading large data without enabling rocksdb_bulk_load or rocksdb_commit_in_the_middle, please make sure transaction size is small enough. All modifications of the ongoing transactions are kept in memory.
Other reading
-
Data Loading - this document has been used as a source for writing this documentation
Reference
Percona Server for MySQL 8.4 variables
System variables
| Name | Cmd-Line | Option File | Var Scope | Dynamic |
|---|---|---|---|---|
| csv_mode | Yes | Yes | Both | Yes |
| enforce_storage_engine | Yes | Yes | Global | No |
| expand_fast_index_creation | Yes | No | Both | Yes |
| extra_max_connections | Yes | Yes | Global | Yes |
| extra_port | Yes | Yes | Global | No |
| have_backup_locks | Yes | No | Global | No |
| have_backup_safe_binlog_info | Yes | No | Global | No |
| have_snapshot_cloning | Yes | No | Global | No |
| innodb_cleaner_lsn_age_factor | Yes | Yes | Global | Yes |
| innodb_corrupt_table_action | Yes | Yes | Global | Yes |
| innodb_empty_free_list_algorithm | Yes | Yes | Global | Yes |
| innodb_encrypt_online_alter_logs | Yes | Yes | Global | Yes |
| innodb_encrypt_tables | Yes | Yes | Global | Yes |
| innodb_kill_idle_transaction | Yes | Yes | Global | Yes |
| innodb_max_bitmap_file_size | Yes | Yes | Global | Yes |
| innodb_max_changed_pages | Yes | Yes | Global | Yes |
| innodb_print_lock_wait_timeout_info | Yes | Yes | Global | Yes |
| innodb_show_locks_held | Yes | Yes | Global | Yes |
| innodb_temp_tablespace_encrypt | Yes | Yes | Global | No |
| innodb_track_changed_pages | Yes | Yes | Global | No |
| keyring_vault_config | Yes | Yes | Global | Yes |
| keyring_vault_timeout | Yes | Yes | Global | Yes |
| log_slow_filter | Yes | Yes | Both | Yes |
| log_slow_rate_limit | Yes | Yes | Both | Yes |
| log_slow_rate_type | Yes | Yes | Global | Yes |
| log_slow_sp_statements | Yes | Yes | Global | Yes |
| log_slow_verbosity | Yes | Yes | Both | Yes |
| log_warnings_suppress | Yes | Yes | Global | Yes |
| proxy_protocol_networks | Yes | Yes | Global | No |
| query_response_time_flush | Yes | No | Global | No |
| query_response_time_range_base | Yes | Yes | Global | Yes |
| query_response_time_stats | Yes | Yes | Global | Yes |
| secure_log_path | Yes | Yes | Global | No |
| slow_query_log_always_write_time | Yes | Yes | Global | Yes |
| slow_query_log_use_global_control | Yes | Yes | Global | Yes |
| thread_pool_high_prio_mode | Yes | Yes | Both | Yes |
| thread_pool_high_prio_tickets | Yes | Yes | Both | Yes |
| thread_pool_idle_timeout | Yes | Yes | Global | Yes |
| thread_pool_max_threads | Yes | Yes | Global | Yes |
| thread_pool_oversubscribe | Yes | Yes | Global | Yes |
| thread_pool_size | Yes | Yes | Global | Yes |
| thread_pool_stall_limit | Yes | Yes | Global | No |
| thread_statistics | Yes | Yes | Global | Yes |
| userstat | Yes | Yes | Global | Yes |
| version_comment | Yes | Yes | Global | Yes |
| version_suffix | Yes | Yes | Global | Yes |
Status variables
| Name | Var Type | Var Scope |
|---|---|---|
| Binlog_snapshot_file | String | Global |
| Binlog_snapshot_position | Numeric | Global |
| Com_lock_binlog_for_backup | Numeric | Both |
| Com_lock_tables_for_backup | Numeric | Both |
| Com_show_client_statistics | Numeric | Both |
| Com_show_index_statistics | Numeric | Both |
| Com_show_table_statistics | Numeric | Both |
| Com_show_thread_statistics | Numeric | Both |
| Com_show_user_statistics | Numeric | Both |
| Com_unlock_binlog | Numeric | Both |
| Innodb_background_log_sync | Numeric | Global |
| Innodb_buffer_pool_pages_LRU_flushed | Numeric | Global |
| Innodb_buffer_pool_pages_made_not_young | Numeric | Global |
| Innodb_buffer_pool_pages_made_young | Numeric | Global |
| Innodb_buffer_pool_pages_old | Numeric | Global |
| Innodb_checkpoint_age | Numeric | Global |
| Innodb_checkpoint_max_age | Numeric | Global |
| Innodb_ibuf_free_list | Numeric | Global |
| Innodb_ibuf_segment_size | Numeric | Global |
| Innodb_lsn_current | Numeric | Global |
| Innodb_lsn_flushed | Numeric | Global |
| Innodb_lsn_last_checkpoint | Numeric | Global |
| Innodb_max_trx_id | Numeric | Global |
| Innodb_mem_adaptive_hash | Numeric | Global |
| Innodb_mem_dictionary | Numeric | Global |
| Innodb_oldest_view_low_limit_trx_id | Numeric | Global |
| Innodb_purge_trx_id | Numeric | Global |
| Innodb_purge_undo_no | Numeric | Global |
| Threadpool_idle_threads | Numeric | Global |
| Threadpool_threads | Numeric | Global |
List of features available in Percona Server for MySQL releases
| Percona Server for MySQL 5.7 | Percona Server for MySQL 8.0 |
|---|---|
| Improved Buffer Pool Scalability | Improved Buffer Pool Scalability |
| Improved InnoDB I/O Scalability | Improved InnoDB I/O Scalability |
| Multiple Adaptive Hash Search Partitions | Multiple Adaptive Hash Search Partitions |
| Atomic write support for Fusion-io devices | Atomic write support for Fusion-io devices |
| Query Cache Enhancements | Feature not implemented |
| Improved NUMA support | Improved NUMA support |
| Thread Pool | Thread Pool |
| Suppress Warning Messages | Suppress Warning Messages |
| Ability to change the database for mysqlbinlog | Ability to change the database for mysqlbinlog |
| Fixed Size for the Read Ahead Area | Fixed Size for the Read Ahead Area |
| Improved MEMORY Storage Engine | Improved MEMORY Storage Engine |
| Restricting the number of binlog files | Restricting the number of binlog files |
| Ignoring missing tables in mysqldump | Ignoring missing tables in mysqldump |
| Too Many Connections Warning | Too Many Connections Warning |
| Handle Corrupted Tables | Handle Corrupted Tables |
| Lock-Free SHOW SLAVE STATUS | Lock-Free SHOW REPLICA STATUS |
| Expanded Fast Index Creation | Expanded Fast Index Creation |
| Percona Toolkit UDFs | Percona Toolkit UDFs |
| Support for Fake Changes | Support for Fake Changes |
| Kill Idle Transactions | Kill Idle Transactions |
| XtraDB changed page tracking | XtraDB changed page tracking |
| Enforcing Storage Engine | Replaced with upstream implementation |
| Utility user | Utility user |
| Extending the secure-file-priv server option | Extending the secure-file-priv server option |
| Expanded Program Option Modifiers | Feature not implemented |
| PAM Authentication Plugin | PAM Authentication Plugin |
| Log Archiving for XtraDB | Log Archiving for XtraDB |
| User Statistics | User Statistics |
| Slow Query Log | Slow Query Log |
| Count InnoDB Deadlocks | Count InnoDB Deadlocks |
| Log All Client Commands (syslog) | Log All Client Commands (syslog) |
| Response Time Distribution | Feature not implemented |
| Show Storage Engines | Show Storage Engines |
| Show Lock Names | Show Lock Names |
| Process List | Process List |
| Misc. INFORMATION_SCHEMA Tables | Misc. INFORMATION_SCHEMA Tables |
| Extended Show Engine InnoDB Status | Extended Show Engine InnoDB Status |
| Thread Based Profiling | Thread Based Profiling |
| XtraDB Performance Improvements for I/O-Bound Highly-Concurrent Workloads | XtraDB Performance Improvements for I/O-Bound Highly-Concurrent Workloads |
| Page cleaner thread tuning | Page cleaner thread tuning |
| Statement Timeout | Statement Timeout |
| Extended SELECT INTO OUTFILE/DUMPFILE | Extended SELECT INTO OUTFILE/DUMPFILE |
| Per-query variable statement | Per-query variable statement |
| Extended mysqlbinlog | Extended mysqlbinlog |
| Slow Query Log Rotation and Expiration | Slow Query Log Rotation and Expiration |
| Metrics for scalability measurement | Feature not implemented |
| Audit Log | Audit Log |
| Backup Locks | Backup Locks |
| CSV engine mode for a standard-compliant quote and comma parsing | CSV engine mode for a standard-compliant quote and comma parsing |
| Super read-only | Super read-only |
Other reading
Percona Server for MySQL feature comparison
Percona Server for MySQL is a free, fully compatible, enhanced, and open source drop-in replacement for any MySQL database. It provides superior performance, scalability, and instrumentation.
Percona Server for MySQL is trusted by thousands of enterprises to provide better performance and concurrency for their most demanding workloads. It delivers higher value to MySQL server users with optimized performance, greater performance scalability and availability, enhanced backups, and increased visibility.
We provide these benefits by significantly enhancing Percona Server for MySQL as compared to the standard MySQL database server:
| Features | Percona Server for MySQL 8.4 | MySQL 8.4 |
|---|---|---|
| Open Source | Yes | Yes |
| ACID Compliance | Yes | Yes |
| Multi-Version Concurrency Control | Yes | Yes |
| Row-Level Locking | Yes | Yes |
| Automatic Crash Recovery | Yes | Yes |
| Table Partitioning | Yes | Yes |
| Views | Yes | Yes |
| Subqueries | Yes | Yes |
| Triggers | Yes | Yes |
| Stored Procedures | Yes | Yes |
| Foreign Keys | Yes | Yes |
| Window Functions | Yes | Yes |
| Common Table Expressions | Yes | Yes |
| Geospatial Features (GIS, SRS) | Yes | Yes |
| GTID Replication | Yes | Yes |
| Group Replication | Yes | Yes |
| MyRocks Storage Engine | Yes | No |
| Improvements for Developers | Percona Server for MySQL 8.4 | MySQL 8.4 |
|---|---|---|
| NoSQL Socket-Level Interface | Yes | Yes |
| X API Support | Yes | Yes |
| JSON Functions | Yes | Yes |
| InnoDB Full-Text Search Improvements | Yes | No |
| Extra Hash/Digest Functions | Yes | No |
| Instrumentation and Troubleshooting Features | Percona Server for MySQL 8.4 | MySQL 8.4 |
|---|---|---|
| INFORMATION_SCHEMA Tables | 95 | 65 |
| Global Performance and Status Counters | 853 | 434 |
| Optimizer Histograms | Yes | Yes |
| Per-Table Performance Counters | Yes | No |
| Per-Index Performance Counters | Yes | No |
| Per-User Performance Counters | Yes | No |
| Per-Client Performance Counters | Yes | No |
| Per-Thread Performance Counters | Yes | No |
| Global Query Response Time Statistics | Yes | No |
| Enhanced SHOW INNODB ENGINE STATUS | Yes | No |
| Undo Segment Information | Yes | No |
| Temporary Tables Information | Yes | No |
| Extended Slow Query Logging | Yes | No |
| User Statistics | Yes | No |
| Performance and Scalability Features | Percona Server for MySQL 8.4 | MySQL 8.4 |
|---|---|---|
| InnoDB Resource Groups | Yes | Yes |
| Configurable Page Sizes | Yes | Yes |
| Contention-Aware Transaction Scheduling | Yes | Yes |
| Improved Scalability By Splitting Mutexes | Yes | No |
| Improved MEMORY Storage Engine | Yes | No |
| Improved Flushing | Yes | No |
| Parallel Doublewrite Buffer | Yes | Yes |
| Configurable Fast Index Creation | Yes | No |
| Per-Column Compression for VARCHAR/BLOB and JSON | Yes | No |
| Compressed Columns with Dictionaries | Yes | No |
| Security Features | Percona Server for MySQL 8.4 | MySQL 8.4 |
|---|---|---|
| SQL Roles | Yes | Yes |
| SHA-2 Based Password Hashing | Yes | Yes |
| Password Rotation Policy | Yes | Yes |
| PAM Authentication Plugin | Yes | Enterprise-Only |
| Encryption Features | Percona Server for MySQL 8.4 | MySQL 8.4 |
|---|---|---|
| Storing Keyring in a File | Yes | Yes |
| Storing Keyring in Hashicorp Vault | Yes | Enterprise Only |
| Encrypt InnoDB Data | Yes | Yes |
| Encrypt InnoDB Logs | Yes | Yes |
| Encrypt Built-In InnoDB Tablespaces (General, System, Undo, Temp) | Yes | Yes |
| Encrypt Binary Logs | Yes | No |
| Encrypt Temporary Files | Yes | No |
| Enforce Encryption | Yes | No |
| Operational Improvements | Percona Server for MySQL 8.4 | MySQL 8.4 |
|---|---|---|
| Atomic DDL | Yes | Yes |
| Transactional Data Dictionary | Yes | Yes |
| Instant DDL | Yes | Yes |
| SET PERSIST | Yes | Yes |
| Invisible Indexes | Yes | Yes |
| Threadpool | Yes | Enterprise-Only |
| Backup Locks | Yes | No |
| Extended SHOW GRANTS | Yes | No |
| Improved Handling of Corrupted Tables | Yes | No |
| Ability to Kill Idle Transactions | Yes | No |
| Improvements to START TRANSACTION WITH CONSISTENT SNAPSHOT | Yes | No |
| Features for Running Database as a Service (DBaaS) | Percona Server for MySQL 8.4 | MySQL 8.4 |
|---|---|---|
| Enforce a Specific Storage Engine | Yes | Yes |
Understand version numbers
A version number identifies the innovtion product release. The product contains the latest features, improvements, and bug fixes at the time of that release.
| 8.1.0 | -1 | |—|—|—| | Base version | Minor build version |
Percona uses semantic version numbering, which follows the pattern of base version and build version. Percona assigns unique, non-negative integers in increasing order for each version release. The version number combines the base MySQL 8.4 version number and the minor build version.
The version numbers for Percona Server for MySQL 8.4.8-8 define the following information:
-
Base version - the leftmost numbers indicate MySQL 8.4 version used as a base.
-
Minor build version - an internal number that increases by one every time Percona Server for MySQL is released.
Development of Percona Server for MySQL
Percona Server for MySQL is an open source project to produce a distribution of the MySQL Server with improved performance, scalability and diagnostics.
Submit changes
We keep the trunk in a constant state of stability to allow for a release at any time and to minimize wasted time by developers due to broken code.
Overview
At Percona we use Git for source control, GitHub for code hosting, and Jira for release management.
We change our software to implement new features and/or to fix bugs. Refactoring could be classed either as a new feature or a bug depending on the scope of work.
New features and bugs are targeted to specific releases. A release is part of a series. For example, 2.4 is a series in Percona XtraBackup and 2.4.15, 2.4.16, and 2.4.17 are releases in this series.
Code is proposed for merging in the form of pull requests on GitHub.
For Percona Server for MySQL, we have several Git branches on which development occurs: 5.5, 5.6, 5.7, and 8.0. As Percona Server for MySQL is not a traditional project, instead of being a set of patches against an existing product, these branches are not related. In other words, we do not merge from one release branch to another. To have your changes in several branches, you must propose branches to each release branch.
Making a change to a project
In this case, we are going to use percona-xtrabackup as an example. The
workflow is similar for Percona Server for MySQL, but the patch will need to be modified
in all release branches of Percona Server for MySQL.
-
git branch https://github.com/percona/percona-xtrabackup/featureX(where ‘featureX’ is a sensible name for the task at hand) -
(developer makes changes in featureX, testing locally)
-
The Developer pushes to
https://github.com/percona/username/percona-xtrabackup/featureX -
The developer can submit a pull request to https://github.com/percona/percona-xtrabackup,
-
Code undergoes a review
-
Once code is accepted, it can be merged
If the change also applies to a stable release (e.g. 2.4) then changes should be made on a branch of 2.4 and merged to a branch of the trunk. In this case, there should be two branches run through the param build and two merge proposals (one for the stable release and one with the changes merged to the trunk). This prevents somebody else from having to guess how to merge your changes.
Percona Server for MySQL
The same process for Percona Server for MySQL, but we have several different branches (and merge requests).
Telemetry and data collection
Percona Server for MySQL includes two telemetry systems. Each system is optional.
-
Installation-time telemetry runs once at package install or container startup.
-
Continuous telemetry uses a database (DB) component and the
percona-telemetry-agenthost process. The pair collects metrics and sends them on a daily schedule.
You control whether to share telemetry data. Disable either system, or both, when you do not want anonymous usage data sent to Percona.
Percona does not collect personal information. All telemetry data is anonymous. See the Percona Privacy policy .
Packages, compressed archives (tarballs), and Docker images include telemetry. Tarball deployments require the telemetry agent and a writable directory under /usr/local/percona/telemetry.
Telemetry overview
Telemetry reports anonymous deployment and usage metrics to Percona. Percona uses the data to prioritize fixes and feature work. Telemetry does not include database names, credentials, or user data.
Installation-time telemetry
Installation-time telemetry runs once. The process collects host and version metadata during package installation or container startup. The process does not run again after installation completes.
Installation-time telemetry file example
The following JSON shows a typical installation-time payload:
[{"id" : "c416c3ee-48cd-471c-9733-37c2886f8231",
"product_family" : "PRODUCT_FAMILY_PS",
"instanceId" : "6aef422e-56a7-4530-af9d-94cc02198343",
"createTime" : "2026-03-26T15:43:18Z",
"metrics":
[{"key" : "deployment","value" : "PACKAGE"},
{"key" : "pillar_version","value" : "8.4.8-8"},
{"key" : "OS","value" : "Oracle Linux Server 10"},
{"key" : "hardware_arch","value" : "x86_64 x86_64"}]}]
Disable installation-time telemetry
Installation-time telemetry is enabled by default. Set the environment variable PERCONA_TELEMETRY_DISABLE=1 before you install packages or start a container. The variable does not disable continuous telemetry. Installation-time telemetry uses PERCONA_TELEMETRY_DISABLE; continuous telemetry uses the server option percona_telemetry_disable.
sudo PERCONA_TELEMETRY_DISABLE=1 apt install percona-server-server
sudo PERCONA_TELEMETRY_DISABLE=1 dnf install percona-server-server
docker run -d -e MYSQL_ROOT_PASSWORD=test1234# -e PERCONA_TELEMETRY_DISABLE=1 --name=percona-server percona/percona-server:8.4
Continuous telemetry
Continuous telemetry combines a Percona telemetry DB component with the percona-telemetry-agent service. The component writes metrics files on disk. The agent uploads the files to the Percona telemetry service. The agent waits 24 hours after startup before the first upload attempt.
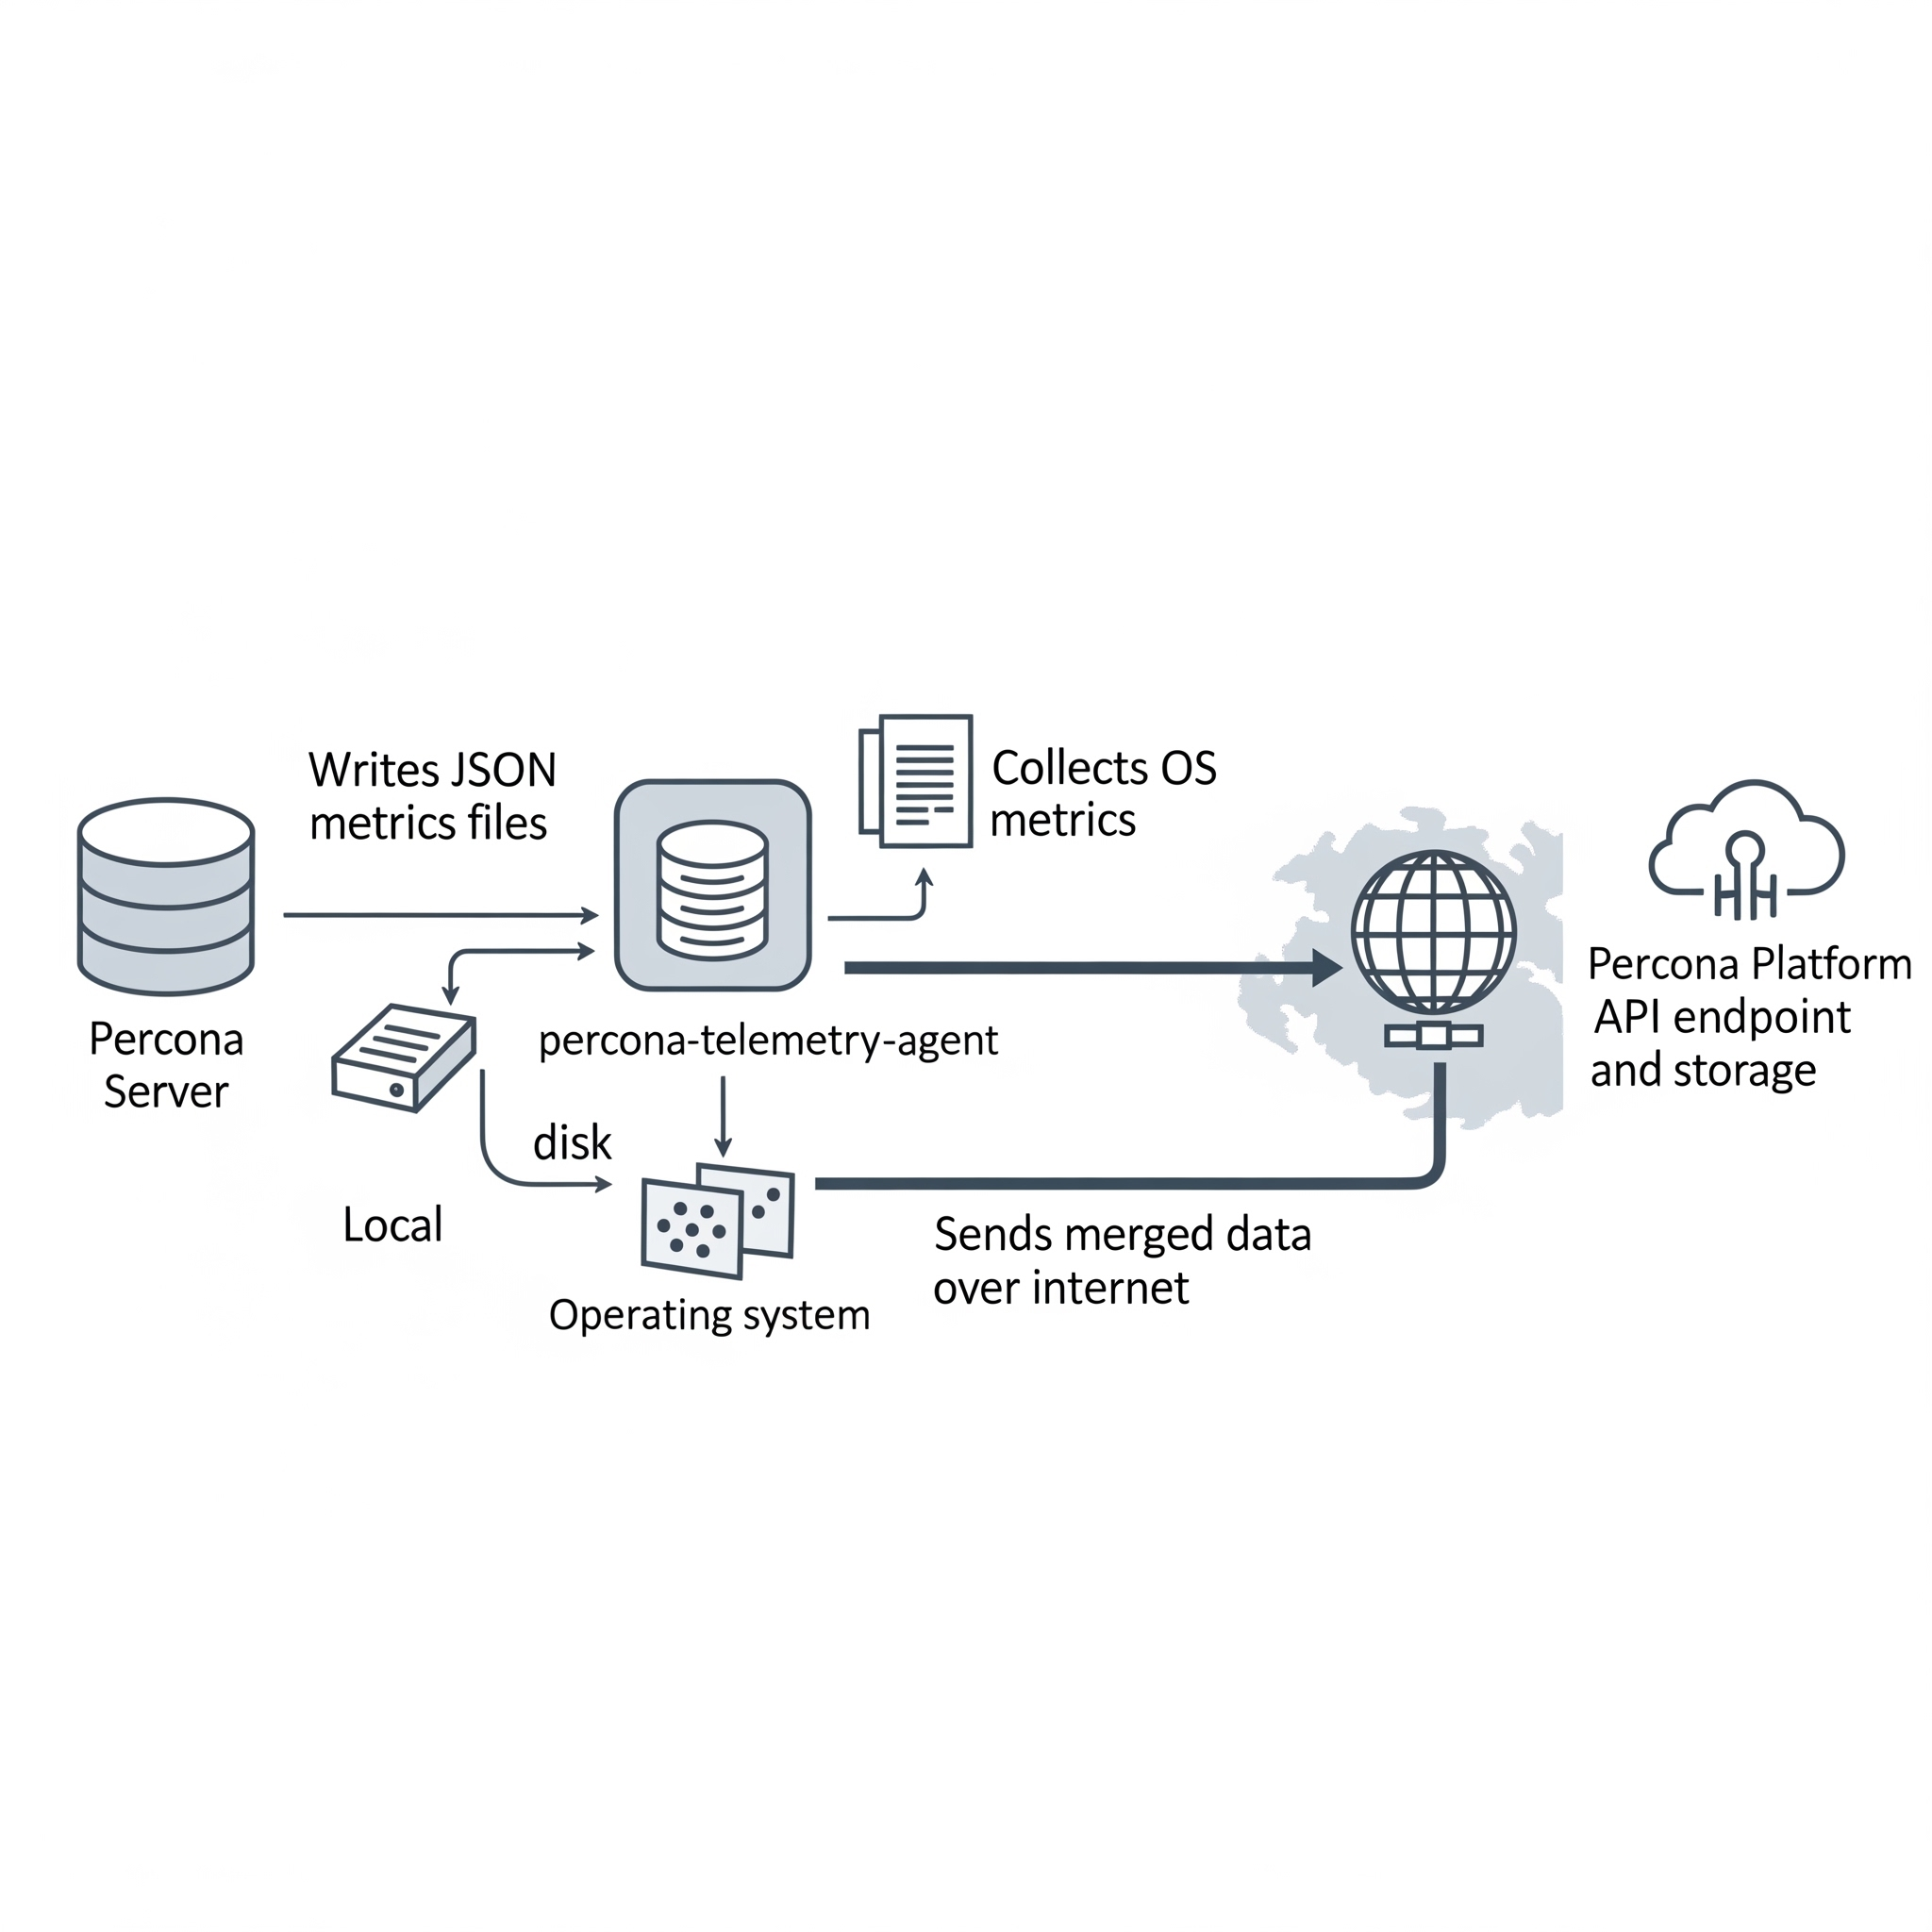
Elements of the continuous telemetry system
The continuous telemetry system includes these host-side and platform-side pieces:
| Piece | Role |
|---|---|
| Percona telemetry DB component | Collects metrics inside the server and writes a metrics file on disk |
| Metrics file | JavaScript Object Notation (JSON) file on the host that stores collected metrics |
Telemetry agent (percona-telemetry-agent) |
Host process that collects operating system metrics, reads metrics files, merges payloads, and queries the package manager for Percona packages |
| Telemetry service | Application programming interface (API) endpoint that receives telemetry payloads |
| Telemetry storage | Long-term storage for telemetry data on the Percona platform |
Overview of the DB component
Percona Server for MySQL installs the telemetry DB component by default. The component registers as file://component_percona_telemetry.
The DB component performs these tasks:
-
Collects database metrics once per day
-
Writes a timestamped
.jsonfile under the telemetry directory -
Retains metrics files for seven days and deletes older files before creating a new file
The DB component does not collect these data types:
-
Database names
-
User names or credentials
-
Application or user data
Locations of metrics files and telemetry history
The telemetry root path on the host is /usr/local/percona/telemetry.
Product-specific directories use the following paths under the root:
| Product | Path |
|---|---|
| Percona Server for MySQL | ${telemetry root}/ps/ |
Percona Server for MongoDB (mongod) |
${telemetry root}/psmdb/ |
Percona Server for MongoDB (mongos) |
${telemetry root}/psmdbs/ |
| Percona XtraDB Cluster | ${telemetry root}/pxc/ |
| PostgreSQL products | ${telemetry root}/pg/ |
After a successful upload, the agent stores a copy under ${telemetry root}/history/.
Metrics file format
Metrics files use JSON. Percona may extend the schema in future releases. Production files can list many active_plugins entries. The following example shows the core fields:
{
"db_instance_id": "e83c568c-e140-11ee-8320-7e207666b18a",
"pillar_version": "8.4.8-8",
"active_plugins": [
"binlog",
"caching_sha2_password",
"InnoDB",
"PERFORMANCE_SCHEMA"
],
"active_components": [
"file://component_percona_telemetry"
],
"uptime": "6185",
"databases_count": "7",
"databases_size": "33149",
"se_engines_in_use": [
"InnoDB"
],
"replication_info": {
"is_semisync_source": "1",
"is_replica": "1"
}
}
Percona telemetry agent
The percona-telemetry-agent process runs on the database host. The agent manages JSON files under the telemetry root path.
The agent follows the following schedule:
-
Log file path:
/var/log/percona/telemetry-agent.log -
First 24 hours: no collection and no upload
-
After 24 hours: one upload attempt per day, with up to five retries on failure
-
After a successful upload: copy the file to
history/and delete the source file from the DB component directory -
When the telemetry directory has no Percona product files: send nothing
Network access and corporate proxies
Continuous telemetry uploads use Hypertext Transfer Protocol Secure (HTTPS). The default endpoint is:
https://check.percona.com/v1/telemetry/GenericReport
Firewall teams must allow outbound HTTPS on port 443 to check.percona.com. Override the endpoint with PERCONA_TELEMETRY_URL or the --telemetry.url argument for percona-telemetry-agent.
To send traffic through a corporate proxy, add environment variables in a systemd drop-in for percona-telemetry-agent.service:
[Service]
Environment="HTTPS_PROXY=http://PROXY_HOST:PROXY_PORT"
Environment="NO_PROXY=localhost,127.0.0.1"
Apply the drop-in and restart the agent:
sudo systemctl edit percona-telemetry-agent
sudo systemctl daemon-reload
sudo systemctl restart percona-telemetry-agent
Replace PROXY_HOST and PROXY_PORT with your proxy hostname and port.
Air-gapped and isolated networks
Upload failures trigger five retries. The agent then waits until the next daily check. Unsent metrics files remain on disk until an upload succeeds.
Disk use stays bounded in isolated networks:
-
The DB component retains seven days of metrics files and prunes older files before each daily write, regardless of upload status
-
The agent prunes archived history on a seven-day interval (
PERCONA_TELEMETRY_HISTORY_KEEP_INTERVAL, default 604800 seconds)
Disable continuous telemetry to stop new metrics files and outbound uploads.
Telemetry agent configuration
The agent reads these environment variables at startup. Restart the service after you change a value.
| Variable | Default | Description |
|---|---|---|
PERCONA_TELEMETRY_ROOT_PATH |
/usr/local/percona/telemetry |
Root directory for metrics and history files |
PERCONA_TELEMETRY_CHECK_INTERVAL |
86400 |
Seconds between upload checks |
PERCONA_TELEMETRY_RESEND_INTERVAL |
60 |
Seconds between retry attempts after a failed upload |
PERCONA_TELEMETRY_HISTORY_KEEP_INTERVAL |
604800 |
Seconds between history directory cleanup runs |
PERCONA_TELEMETRY_URL |
https://check.percona.com/v1/telemetry/GenericReport |
Upload endpoint URL |
Telemetry agent payload example
{
"reports": [
{
"id": "B5BDC47B-B717-4EF5-AEDF-41A17C9C18BB",
"createTime": "2026-03-26T15:44:54Z",
"instanceId": "B5BDC47B-B717-4EF5-AEDF-41A17C9C18BA",
"productFamily": "PRODUCT_FAMILY_PS",
"metrics": [
{
"key": "OS",
"value": "Ubuntu"
},
{
"key": "pillar_version",
"value": "8.4.8-8"
}
]
}
]
}
Telemetry agent payload fields
Each report object uses these fields:
| Field | Description |
|---|---|
id |
Random universally unique identifier (UUID) version 4 for the request |
createTime |
Request timestamp |
instanceId |
Host ID from the metrics file, /usr/local/percona/telemetry_uuid, or a generated UUID version 4 when the file is absent |
productFamily |
Product family derived from the metrics file path, such as PRODUCT_FAMILY_PS |
metrics |
Key and value pairs from the metrics file |
Operating system metrics in each upload
Each upload can include these operating system keys:
| Key | Description |
|---|---|
OS |
Operating system name |
hardware_arch |
CPU architecture |
deployment |
Deployment method, such as PACKAGE or DOCKER |
installed_packages |
Installed Percona packages with name, version, and repository when available |
The agent queries the local package manager. The query matches only package names that fit Percona patterns, including percona-*, Percona-*, proxysql*, pmm, etcd*, haproxy, patroni, pg*, postgis, and wal2json. The agent does not report non-Percona packages.
Disable continuous telemetry
Continuous telemetry is enabled by default. Complete the steps in the following order.
Restart required
Steps 1 and 3 require a server or service restart. Plan a maintenance window before you change telemetry settings in production.
-
Add the server option
percona_telemetry_disable=1under[mysqld]inmy.cnf, or in an included option file. Restart the server. The server option prevents the telemetry component from loading after restart. Do not rely onUNINSTALL COMPONENTalone. A restart withoutpercona_telemetry_disable=1can reload telemetry. -
Run
UNINSTALL COMPONENT "file://component_percona_telemetry";to stop metrics file generation. -
Stop and disable
percona-telemetry-agentas described in Disable the telemetry agent.
These steps disable continuous telemetry only. For install-time opt-out, see Disable installation-time telemetry.
Disable the telemetry agent
Stopping the agent blocks uploads. The DB component continues to write metrics files until you uninstall the component.
Run both commands for a permanent disable:
sudo systemctl stop percona-telemetry-agent
sudo systemctl disable percona-telemetry-agent
systemctl stop ends the running agent process. systemctl disable prevents the agent from starting at boot.
To pause the agent until the next host reboot, run sudo systemctl stop percona-telemetry-agent only. Do not run disable when you plan to re-enable the agent after reboot.
Agent dependencies and removal
The telemetry agent is a mandatory package dependency for Percona Server for MySQL. Review package dependencies before you remove the agent.
Package manager behavior differs:
-
DNF can remove the agent when you remove the last dependent package. Removing the agent alone can remove Percona Server for MySQL when dependencies require the agent.
-
APT may keep the agent after you remove only the server package. Use
apt autoremovewhen appropriate. Removing the agent without checking dependencies can affect the server package.
Verify continuous telemetry is disabled
Run these checks from the MySQL client and on the host.
Confirm the telemetry component is absent:
SELECT component_urn
FROM mysql.component
WHERE component_urn LIKE '%telemetry%';
Expected output when telemetry is disabled
Empty set (0.00 sec)
Confirm the disable option is set:
SHOW GLOBAL VARIABLES LIKE 'percona_telemetry_disable';
Expected output when telemetry is disabled
+---------------------------+-------+
| Variable_name | Value |
+---------------------------+-------+
| percona_telemetry_disable | ON |
+---------------------------+-------+
1 row in set (0.00 sec)
Confirm the agent is inactive on the host:
systemctl is-enabled percona-telemetry-agent
systemctl is-active percona-telemetry-agent
After a permanent disable, is-enabled returns disabled and is-active returns inactive.
Disable the DB component
The DB telemetry component can write metrics files for seven days while the agent is stopped. Uninstall the component after you set percona_telemetry_disable=1 and restart the server. See the ordered steps in Disable continuous telemetry.
UNINSTALL COMPONENT "file://component_percona_telemetry";
Add percona_telemetry_disable=1 to my.cnf when the line is missing, then restart:
[mysqld]
percona_telemetry_disable=1
Related reading
Trademark policy
This Trademark Policy is to ensure that users of Percona-branded products or services know that what they receive has really been developed, approved, tested, and maintained by Percona. Trademarks help to prevent confusion in the marketplace, by distinguishing one company’s or person’s products and services from another’s.
Percona owns a number of marks, including but not limited to Percona, XtraDB, Percona XtraDB, XtraBackup, Percona XtraBackup, Percona Server for MySQL, and Percona Live, plus the distinctive visual icons and logos associated with these marks. Both the unregistered and registered marks of Percona are protected.
Use of any Percona trademark in the name, URL, or another identifying characteristic of any product, service, website, or other use is not permitted without Percona’s written permission with the following three limited exceptions.
First, you may use the appropriate Percona mark when making a nominative fair use reference to a bona fide Percona product.
Second, when Percona has released a product under a version of the GNU General Public License (“GPL”), you may use the appropriate Percona mark when distributing a verbatim copy of that product in accordance with the terms and conditions of the GPL.
Third, you may use the appropriate Percona mark to refer to a distribution of GPL-released Percona software that has been modified with minor changes for the sole purpose of allowing the software to operate on an operating system or hardware platform for which Percona has not yet released the software, provided that those third party changes do not affect the behavior, functionality, features, design or performance of the software. Users who acquire this Percona-branded software receive substantially exact implementations of the Percona software.
Percona reserves the right to revoke this authorization at any time in its sole discretion. For example, if Percona believes that your modification is beyond the scope of the limited license granted in this Policy or that your use of the Percona mark is detrimental to Percona, Percona will revoke this authorization. Upon revocation, you must immediately cease using the applicable Percona mark. If you do not immediately cease using the Percona mark upon revocation, Percona may take action to protect its rights and interests in the Percona mark. Percona does not grant any license to use any Percona mark for any other modified versions of Percona software; such use will require our prior written permission.
Neither trademark law nor any of the exceptions set forth in this Trademark Policy permit you to truncate, modify, or otherwise use any Percona mark as part of your own brand. For example, if XYZ creates a modified version of the Percona Server for MySQL, XYZ may not brand that modification as “XYZ Percona Server” or “Percona XYZ Server”, even if that modification otherwise complies with the third exception noted above.
In all cases, you must comply with applicable law, the underlying license, and this Trademark Policy, as amended from time to time. For instance, any mention of Percona trademarks should include the full trademarked name, with proper spelling and capitalization, along with attribution of ownership to Percona Inc. For example, the full proper name for XtraBackup is Percona XtraBackup. However, it is acceptable to omit the word “Percona” for brevity on the second and subsequent uses, where such omission does not cause confusion.
In the event of doubt as to any of the conditions or exceptions outlined in this Trademark Policy, please contact [email protected] for assistance and we will do our very best to be helpful.
Index of INFORMATION_SCHEMA tables
This is a list of the INFORMATION_SCHEMA TABLES that exist in Percona Server for MySQL with XtraDB. The entry for each table points to the page in the documentation where it’s described.
Frequently asked questions
Q: Will Percona Server for MySQL with XtraDB invalidate our MySQL support?
A: We don’t know the details of your support contract. You should check with your Oracle representative. We have heard anecdotal stories from MySQL Support team members that they have customers who use Percona Server for MySQL with XtraDB, but you should not base your decision on that.
Q: Will we have to GPL our whole application if we use Percona Server for MySQL with XtraDB?
A: This is a common misconception about the GPL. We suggest reading the Free Software Foundation ‘s excellent reference material on the GPL Version 2 , which is the license that applies to MySQL and therefore to Percona Server for MySQL with XtraDB. That document contains links to many other documents which should answer your questions. Percona is unable to give legal advice about the GPL.
Q: Do I need to install Percona client libraries?
A: No, you don’t need to change anything on the clients. Percona Server for MySQL is 100% compatible with all existing client libraries and connectors.
Q: When using the Percona XtraBackup to set up a replication replica on Debian-based systems I’m getting: “ERROR 1045 (28000): Access denied for user ‘debian-sys-maint’@’localhost’ (using password: YES)”
A: In case you’re using the init script on Debian-based system to start mysqld,
be sure that the password for debian-sys-maint user has been updated and
it’s the same as that user’s password from the server that the backup has been
taken from. The password can be seen and updated in
/etc/mysql/debian.cnf. For more information on how to set up a
replication replica using Percona XtraBackup see this how-to ).
Copyright and licensing information
Documentation licensing
Percona Server for MySQL documentation is (C)2009-2026 Percona LLC and/or its affiliates and is distributed under the Creative Commons Attribution 4.0 International License .
Software license
Percona Server for MySQL is built upon MySQL from Oracle. Along with making our own modifications, we merge in changes from other sources such as community contributions and changes from MariaDB.
The original SHOW USER/TABLE/INDEX statistics code came from Google.
Percona does not require copyright assignment.
See the COPYING files accompanying the software distribution.
Glossary
ACID
Set of properties that guarantee database transactions are processed reliably. Stands for Atomicity, Consistency, Isolation, Durability.
Atomicity
Atomicity means that database operations are applied following a “all or nothing” rule. A transaction is either fully applied or not at all.
Atomic DDL (Data Definition Language)
Atomic DDL (Data Definition Language) refers to the concept where DDL operations such as CREATE, ALTER, DROP, or RENAME statements are executed in a way that ensures atomicity, meaning they either fully succeed or have no effect at all.
This means that if a DDL statement fails, the database automatically rolls back any partial changes, leaving the schema in a consistent state.
Consistency
Consistency means that each transaction that modifies the database takes it from one consistent state to another.
Durability
Once a transaction is committed, it will remain so.
Foreign Key
A referential constraint between two tables. Example: A purchase order in the purchase_orders table must have been made by a customer that exists in the customers table.
General Availability (GA)
A finalized version of the product which is made available to the general public. It is the final stage in the software release cycle.
Isolation
The Isolation requirement means that no transaction can interfere with another.
InnoDB
A Storage Engine for MySQL and derivatives (Percona Server, MariaDB) originally written by Innobase Oy, since acquired by Oracle. It provides ACID compliant storage engine with foreign key support. As of MySQL version 5.5, InnoDB became the default storage engine on all platforms.
Jenkins
Jenkins is a continuous integration system that we use to help ensure the continued quality of the software we produce. It helps us achieve the aims of:
-
no failed tests in the trunk on any platform
-
aid developers in ensuring merge requests build and test on all platform
-
no known performance regressions (without a damn good explanation).
LSN
The Log Sequence Number (LSN) is an 8-byte number. Every data change adds an entry to the redo log and generates an LSN. The server increments the LSN with every change.
MariaDB
A fork of MySQL that is maintained primarily by Monty Program AB. It aims to add features, and fix bugs while maintaining 100% backward compatibility with MySQL.
my.cnf
The file name of the default MySQL configuration file.
MyISAM
A MySQL Storage Engine that was the default until MySQL 5.5.
MySQL
An open source database that has spawned several distributions and forks. MySQL AB was the primary maintainer and distributor until bought by Sun Microsystems, which was then acquired by Oracle. As Oracle owns the MySQL trademark, the term MySQL is often used for the Oracle distribution of MySQL as distinct from the drop-in replacements such as MariaDB and Percona Server for MySQL.
NUMA
Non-Uniform Memory Access (NUMA ) is a computer memory design used in multiprocessing, where the memory access time depends on the memory location relative to a processor. Under NUMA, a processor can access its own local memory faster than non-local memory, that is, memory local to another processor or memory shared between processors. The whole system may still operate as one unit, and all memory is basically accessible from everywhere but at a potentially higher latency and lower performance.
Percona Server for MySQL
The Percona branch of MySQL with performance and management improvements.
Storage Engine
A storage engine is a piece of software that implements the details of data storage and retrieval for a database system. This term is primarily used within the MySQL ecosystem due to it being the first widely used relational database to have an abstraction layer around storage. It is analogous to a Virtual File System layer in an Operating System. A VFS layer allows an operating system to read and write multiple file systems (e.g. FAT, NTFS, XFS, ext3) and a Storage Engine layer allows a database server to access tables stored in different engines (for example, MyISAM or InnoDB).
Tech Preview
A tech preview item can be a feature, a variable, or a value within a variable. The term designates that the item is not yet ready for production use and is not included in support by SLA. A tech preview item is included in a release so that users can provide feedback. The item is either updated and released as general availability(GA) or removed if not useful. The item’s functionality can change from tech preview to GA.
XtraDB
The Percona improved version of InnoDB provides performance, features, and reliability above what is shipped by Oracle in InnoDB.
How we use artificial intelligence
The technical writer oversees the integration of AI-driven tools and platforms into the documentation workflow, ensuring that AI-generated text meets the standards for clarity, coherence, and accuracy. While AI assists in tasks such as content generation, language enhancement, and formatting optimization, the technical writer is responsible for validating and refining the output to ensure its suitability for the intended audience.
Throughout the documentation process, the technical writer reviews the quality and relevance of AI-generated content in detail and with critical judgment. By leveraging their expertise in language, communication, and subject matter knowledge, the technical writer collaborates with AI systems to refine and tailor the documentation to meet the specific needs and preferences of the audience.
While AI accelerates the documentation process and enhances productivity, the technical writer verifies the information’s accuracy and maintains consistency in terminology, style, and tone. The technical writer ensures that the final document reflects the company’s commitment to excellence.
Documentation Index by Alphabet
A
Files:
- Adaptive network buffers
- Additional INFORMATION_SCHEMA tables
- Additional PERFORMANCE_SCHEMA tables
- Additional SELinux tools and management
- AppArmor profile modes
- Apt pinning the Percona Server for MySQL 8.4 packages
- Audit Log Filter compression and encryption
- Audit Log Filter file format overview
- Audit Log Filter file naming conventions
- Audit Log Filter format - JSON
- Audit Log Filter format - XML (new style)
- Audit Log Filter format - XML (old style)
- Audit log filter functions, options, and variables
- Audit Log Filter overview
- Audit Log Filter restrictions
- Audit Log Filter security
- Audit log plugin
- Authentication methods
Keywords:
- audit — Audit Log Filter compression and encryption, Audit Log Filter file format overview, Audit Log Filter format - JSON, Audit Log Filter file naming conventions, Audit Log Filter format - XML (new style), Audit Log Filter format - XML (old style), Audit Log Filter overview, Audit Log Filter restrictions, Audit Log Filter security, Audit log filter functions, options, and variables, Audit log plugin, Configure AppArmor, Disable Audit Log Filter logging, Filter the Audit Log Filter logs, Index, Percona Server for MySQL 8.4 - Documentation, Install the audit log filter, Manage the Audit Log Filter files, List of features available in Percona Server for MySQL releases, Reading Audit Log Filter files, Restrict dynamic log file locations, Triggers, Uninstall Audit Log Filter, Upgrade from plugins to components, Write audit_log_filter definitons
- authentication — Breaking and incompatible changes in 8.4, Compatibility and removed items in 8.4, Audit Log Filter format - XML (new style), Audit Log Filter format - XML (old style), Authentication methods, Build APT packages, Percona Server for MySQL feature comparison, FIDO authentication plugin, Index, Using LDAP authentication plugins, LDAP authentication plugin system variables, PAM authentication plugin, List of features available in Percona Server for MySQL releases, Percona Toolkit updates for 8.4, Post-installation, Install Percona Server for MySQL and create a database on Ubuntu, Upgrade checklist for 8.4, Upgrade from 8.0 to 8.4 overview, Use the Amazon Key Management Service (AWS KMS)
- authorization — Trademark policy
B
Files:
- Backup and restore overview
- Backup locks
- Binary logs and replication improvements
- Binary tarball file names available based on the Percona Server for MySQL version
- Breaking and incompatible changes in 8.4
- Build APT packages
Keywords:
- backup — Compatibility and removed items in 8.4, Backup locks, Backup and restore overview, Data at Rest Encryption, Introduction to Databases and SQL, DELETE statement, Use Docker Compose and named volumes, Extended mysqldump, Frequently asked questions, Percona Server for MySQL feature comparison, Group replication system variables, Index, MyRocks server variables, List of features available in Percona Server for MySQL releases, Install Percona Server for MySQL and create a database on Ubuntu, Quickstart - Run Percona Server for MySQL container images with Docker, Next steps, Install Percona Server for MySQL and create a database on Oracle Linux, Start transaction with consistent snapshot, Upgrade checklist for 8.4, Upgrade procedures for 8.4, Upgrade strategies, Upgrade from 8.0 to 8.4 overview, Uninstall Percona Server for MySQL
- binary — Breaking and incompatible changes in 8.4, Compatibility and removed items in 8.4, Install Percona Server for MySQL 8.4 from a binary tarball, Binary tarball file names available based on the Percona Server for MySQL version, Managing binary log disk space, Binary logs and replication improvements, Build APT packages, MySQL Clone plugin, Data at Rest Encryption, Data masking overview, Common data types, Encrypt binary log files and relay log files, Percona Server for MySQL feature comparison, Index, Install Percona Server for MySQL, js_lang type conversions, JSON in Percona Server for MySQL, Suppress warning messages, Data loading, MyRocks server variables, The Percona XtraDB storage engine, Post-installation, Files in packages built for Percona Server for MySQL Pro, Secure Percona Server for MySQL with SELinux, Slow query log rotation and expiration, SQL operators, Stack trace, Start transaction with consistent snapshot, Thread pool, Upgrade procedures for 8.4, Upgrade from 8.0 to 8.4 overview, User statistics, UUID_VX component
- binlog — Binary logs and replication improvements, Index, MyRocks server variables, List of features available in Percona Server for MySQL releases, Start transaction with consistent snapshot
- buffer — Defaults and tuning guidance for 8.4, Adaptive network buffers, Multiple page asynchronous I/O requests, Audit log filter functions, options, and variables, Data at Rest Encryption, Percona Server for MySQL feature comparison, Extended show engine InnoDB status, js_lang type conversions, Kill idle transaction, MyRocks server variables, List of features available in Percona Server for MySQL releases, Limit the estimation of records in a Query, Restrict dynamic log file locations, Slow query log, XtraDB performance improvements for I/O-bound highly-concurrent workloads
C
Files:
- Common data types
- Common SQL commands
- Common SQL errors
- Compatibility and removed items in 8.4
- Compile Percona Server for MySQL from source
- Compressed columns with dictionaries
- Configure AppArmor
- Copyright and licensing information
- Create a table
Keywords:
- cache — Breaking and incompatible changes in 8.4, Additional PERFORMANCE_SCHEMA tables, Use an APT repository to install Percona Server for MySQL 8.4, Backup locks, Data masking component functions and variables, Data masking overview, Extended show engine InnoDB status, MyRocks server variables, MyRocks status variables, List of features available in Percona Server for MySQL releases, Trigger updates
- cluster — Compatibility and removed items in 8.4, DEB repository package list - Percona Server for MySQL 8.4, Audit Log Filter restrictions, Manage group replication flow control, Percona Server for MySQL 8.4 - Documentation, Prefix index queries optimization, Next steps, Install using DNF
- column — Additional PERFORMANCE_SCHEMA tables, Audit Log Filter overview, Compressed columns with dictionaries, Create a table, Common data types, Extended mysqldump, Percona Server for MySQL feature comparison, Improved MEMORY storage engine, Index, Extended show engine InnoDB status, INSERT statement, js_lang stored procedure and function overview, Troubleshoot js_lang procedures and functions, JSON in Percona Server for MySQL, Additional INFORMATION_SCHEMA tables, Modify a table, MyRocks column families, Percona MyRocks introduction, MyRocks Information Schema tables, MyRocks limitations, MyRocks server variables, PERCONA_SEQUENCE_TABLE(n) function, Performance Schema MyRocks changes, Process list, Install Percona Server for MySQL and create a database on Ubuntu, Quickstart - Run Percona Server for MySQL container images with Docker, Install Percona Server for MySQL and create a database on Oracle Linux, SELECT statement, SEQUENCE_TABLE(n) function, Slow query log, Common SQL errors, Start transaction with consistent snapshot, Troubleshoot SQL code, UPDATE statement, User statistics, Write audit_log_filter definitons
- compression — Audit Log Filter compression and encryption, Audit Log Filter file naming conventions, Audit log filter functions, options, and variables, Compressed columns with dictionaries, Percona Server for MySQL feature comparison, Index, MyRocks column families
- connection — Adaptive network buffers, Use an APT repository to install Percona Server for MySQL 8.4, Audit Log Filter format - JSON, Audit Log Filter format - XML (new style), Audit Log Filter format - XML (old style), Audit Log Filter overview, Audit log plugin, Backup locks, Binary logs and replication improvements, Encrypt schema or general tablespace, Encryption functions, Filter the Audit Log Filter logs, Index, Percona Server for MySQL 8.4 - Documentation, js_lang Console API, js_lang stored procedure and function overview, Troubleshoot js_lang procedures and functions, Kill idle transaction, Using LDAP authentication plugins, LDAP authentication plugin system variables, Too many connections warning, Additional INFORMATION_SCHEMA tables, Process list, Install Percona Server for MySQL and create a database on Ubuntu, Quickstart - Run Percona Server for MySQL container images with Docker, Slow query log, Thread pool, Trigger updates, Use the keyring vault component, User statistics, Utility user, Write audit_log_filter definitons, Install using DNF
D
Files:
- Data at Rest Encryption
- Data loading
- Data masking component functions and variables
- Data masking overview
- DEB repository package list - Percona Server for MySQL 8.4
- Defaults and tuning guidance for 8.4
- DELETE statement
- Development of Percona Server for MySQL
- Differences between Percona MyRocks and Facebook MyRocks
- Disable AppArmor
- Disable Audit Log Filter logging
- Docker environment variables
- Downgrade from Percona Server for MySQL Pro
- Downgrade Percona Server for MySQL
Keywords:
- DDL — Backup locks, Binary logs and replication improvements, Common SQL commands, Compressed columns with dictionaries, Encrypt schema or general tablespace, Percona Server for MySQL feature comparison, Glossary, Expanded fast index creation, MyRocks limitations, MyRocks server variables, Common SQL errors, Write audit_log_filter definitons
- DML — Common SQL commands, Expanded fast index creation, Differences between Percona MyRocks and Facebook MyRocks, Trigger updates, Write audit_log_filter definitons
E
Files:
- Encrypt binary log files and relay log files
- Encrypt doublewrite file pages
- Encrypt File-Per-Table Tablespace
- Encrypt schema or general tablespace
- Encrypt system tablespace
- Encrypt temporary files
- Encryption functions
- Enforcing storage engine
- Error handling in stored procedures
- Expanded fast index creation
- Extended mysqldump
- Extended SELECT INTO OUTFILE/DUMPFILE
- Extended SET VAR optimizer hint
- Extended show engine InnoDB status
Keywords:
- encryption — Use an APT repository to install Percona Server for MySQL 8.4, Audit Log Filter compression and encryption, Audit Log Filter file naming conventions, Audit log filter functions, options, and variables, Data at Rest Encryption, Encrypt binary log files and relay log files, Encrypt File-Per-Table Tablespace, Log encryption, Encrypt system tablespace, Encrypt schema or general tablespace, Encrypt temporary files, Encryption functions, Percona Server for MySQL feature comparison, FIPS compliance, Index, Install Percona Server for MySQL and create a database on Ubuntu, Quickstart - Run Percona Server for MySQL container images with Docker, Next steps, Rotate the master encryption key, Use the keyring vault component, Use the Key Management Interoperability Protocol (KMIP), Verify the encryption for tables, tablespaces, and schemas
- engine — DEB repository package list - Percona Server for MySQL 8.4, Audit Log Filter overview, MySQL Clone plugin, Compressed columns with dictionaries, Running Percona Server for MySQL in a Docker Container, Enforcing storage engine, Extended mysqldump, Extended SET VAR optimizer hint, Percona Server for MySQL feature comparison, Glossary, Improved MEMORY storage engine, Index, Percona Server for MySQL 8.4 - Documentation, Improved InnoDB I/O scalability, Extended show engine InnoDB status, Percona MyRocks installation guide, js_lang stored procedure and function overview, Additional INFORMATION_SCHEMA tables, Data loading, Differences between Percona MyRocks and Facebook MyRocks, Gap locks detection, Percona MyRocks introduction, MyRocks limitations, MyRocks server variables, MyRocks status variables, List of features available in Percona Server for MySQL releases, The Percona XtraDB storage engine, Quickstart - Run Percona Server for MySQL container images with Docker, Next steps, Show storage engines, SQL syntax, Upgrade procedures for 8.4, Use the keyring vault component, Use the Key Management Interoperability Protocol (KMIP), Yum repository package list - Percona Server for MySQL 8.4
- error — Use an APT repository to install Percona Server for MySQL 8.4, Audit Log Filter format - XML (new style), Audit Log Filter format - XML (old style), Audit Log Filter restrictions, Audit log filter functions, options, and variables, Backup locks, Binary logs and replication improvements, Compressed columns with dictionaries, Data masking component functions and variables, Common data types, Disable AppArmor, Running Percona Server for MySQL in a Docker Container, Encrypt schema or general tablespace, Enforcing storage engine, Extended SELECT INTO OUTFILE/DUMPFILE, Frequently asked questions, FIDO authentication plugin, Filter the Audit Log Filter logs, FIPS compliance, Functions, Improved MEMORY storage engine, Index, Handle corrupted tables, Extended show engine InnoDB status, INSERT statement, Install the audit log filter, INSTALL COMPONENT, js_lang Console API, js_lang stored procedure and function overview, Troubleshoot js_lang procedures and functions, js_lang type conversions, js_lang component system variables, Kill idle transaction, LDAP authentication plugin system variables, Suppress warning messages, Data loading, Gap locks detection, MyRocks limitations, MyRocks server variables, PAM authentication plugin, Install Percona Server for MySQL and create a database on Ubuntu, Next steps, Restrict dynamic log file locations, Secure Percona Server for MySQL with SELinux, SQL conventions, Common SQL errors, SQL syntax, Error handling in stored procedures, Variables in stored procedures, functions, and triggers, Stored Procedures, Triggers, Troubleshoot SQL code, Percona Toolkit UDFs, UNINSTALL COMPONENT, Uninstall the js_lang component, Upgrade checklist for 8.4, Use the keyring vault component, Utility user, UUID_VX component, Write audit_log_filter definitons, Install using DNF
- event — Audit Log Filter file format overview, Audit Log Filter format - JSON, Audit Log Filter format - XML (new style), Audit Log Filter format - XML (old style), Audit log filter functions, options, and variables, Audit log plugin, Binary logs and replication improvements, Configure AppArmor, Filter the Audit Log Filter logs, Process list, Reading Audit Log Filter files, Slow query log, Trademark policy, Transaction management, Write audit_log_filter definitons
F
Files:
- FIDO authentication plugin
- Files in packages built for Percona Server for MySQL Pro
- Filter the Audit Log Filter logs
- FIPS compliance
- Frequently asked questions
- Functions
G
Files:
Keywords:
Files:
I
Files:
- Improved InnoDB I/O scalability
- Improved MEMORY storage engine
- Index
- Index of INFORMATION_SCHEMA tables
- InnoDB full-text search improvements
- InnoDB page fragmentation counters
- INSERT statement
- INSTALL COMPONENT
- Install js_lang component
- Install Percona Server for MySQL
- Install Percona Server for MySQL and create a database on Oracle Linux
- Install Percona Server for MySQL and create a database on Ubuntu
- Install Percona Server for MySQL from a source tarball
- Install Percona Server for MySQL using downloaded RPM packages
- Install Percona Server for MySQL 8.4 from a binary tarball
- Install Percona Server for MySQL 8.4 using downloaded DEB packages
- Install the audit log filter
- Install the data masking component
- Install using DNF
- Introduction to database tables
- Introduction to Databases and SQL
- Isolation levels
Keywords:
- index — Breaking and incompatible changes in 8.4, Defaults and tuning guidance for 8.4, Backup locks, Backup and restore overview, Binary logs and replication improvements, Copyright and licensing information, Encrypt binary log files and relay log files, Percona Server for MySQL feature comparison, Improved MEMORY storage engine, Index, Index of INFORMATION_SCHEMA tables, Expanded fast index creation, InnoDB page fragmentation counters, InnoDB full-text search improvements, Extended show engine InnoDB status, Percona MyRocks installation guide, Install Percona Server for MySQL, JSON in Percona Server for MySQL, Updated supported features, MyRocks column families, Data loading, MyRocks limitations, MyRocks server variables, MyRocks status variables, List of features available in Percona Server for MySQL releases, Prefix index queries optimization, Limit the estimation of records in a Query, Install Percona Server for MySQL and create a database on Ubuntu, Next steps, Upgrade checklist for 8.4, Use the keyring vault component, User statistics, UUID_VX component
- InnoDB — Defaults and tuning guidance for 8.4, Multiple page asynchronous I/O requests, Backup locks, MySQL Clone plugin, Compressed columns with dictionaries, Data at Rest Encryption, Encrypt doublewrite file pages, Log encryption, Encrypt schema or general tablespace, Encrypt temporary files, Enforcing storage engine, Extended SET VAR optimizer hint, Percona Server for MySQL feature comparison, Glossary, Index, Index of INFORMATION_SCHEMA tables, Percona Server for MySQL 8.4 - Documentation, Handle corrupted tables, Expanded fast index creation, InnoDB page fragmentation counters, InnoDB full-text search improvements, Improved InnoDB I/O scalability, Extended show engine InnoDB status, Percona MyRocks installation guide, Kill idle transaction, Suppress warning messages, Data loading, Differences between Percona MyRocks and Facebook MyRocks, Gap locks detection, MyRocks limitations, MyRocks server variables, List of features available in Percona Server for MySQL releases, The Percona XtraDB storage engine, Prefix index queries optimization, Limit the estimation of records in a Query, Next steps, Rotate the master encryption key, Slow query log, Start transaction with consistent snapshot, Upgrade checklist for 8.4, Upgrade strategies, XtraDB performance improvements for I/O-bound highly-concurrent workloads
J
Files:
- Jemalloc memory allocation profiling
- js_lang component system variables
- js_lang Console API
- js_lang privileges
- js_lang stored function or procedure
- js_lang stored procedure and function overview
- js_lang type conversions
- JSON in Percona Server for MySQL
Keywords:
- join — Slow query log
K
Files:
L
Files:
- LDAP authentication plugin system variables
- Limit the estimation of records in a Query
- List of features available in Percona Server for MySQL releases
- Log encryption
Keywords:
- lock — Additional PERFORMANCE_SCHEMA tables, Backup locks, Extended mysqldump, Extended show engine InnoDB status, Modify a table, Gap locks detection, MyRocks server variables, MyRocks status variables, List of features available in Percona Server for MySQL releases, Stored Procedures, Thread pool
- log — Breaking and incompatible changes in 8.4, Defaults and tuning guidance for 8.4, Audit Log Filter compression and encryption, Audit Log Filter file format overview, Audit Log Filter format - JSON, Audit Log Filter file naming conventions, Audit Log Filter format - XML (new style), Audit Log Filter format - XML (old style), Audit Log Filter overview, Audit Log Filter restrictions, Audit Log Filter security, Audit log filter functions, options, and variables, Audit log plugin, Managing binary log disk space, Binary logs and replication improvements, MySQL Clone plugin, Configure AppArmor, Data at Rest Encryption, Data masking overview, Disable Audit Log Filter logging, Running Percona Server for MySQL in a Docker Container, Encrypt binary log files and relay log files, Log encryption, Percona Server for MySQL feature comparison, FIDO authentication plugin, Filter the Audit Log Filter logs, FIPS compliance, Glossary, Manage group replication flow control, Index, Percona Server for MySQL 8.4 - Documentation, Handle corrupted tables, Improved InnoDB I/O scalability, Extended show engine InnoDB status, Install the audit log filter, js_lang Console API, js_lang stored procedure and function overview, Kill idle transaction, LDAP authentication plugin system variables, Using libcoredumper, Too many connections warning, Suppress warning messages, Managing AppArmor profiles, Manage the Audit Log Filter files, MyRocks column families, Percona MyRocks introduction, MyRocks server variables, MyRocks status variables, PAM authentication plugin, List of features available in Percona Server for MySQL releases, Performance Schema MyRocks changes, Post-installation, Install Percona Server for MySQL and create a database on Ubuntu, Install Percona Server for MySQL and create a database on Oracle Linux, Reading Audit Log Filter files, Restrict dynamic log file locations, Secure Percona Server for MySQL with SELinux, Slow query log, Slow query log rotation and expiration, Stack trace, Start transaction with consistent snapshot, Troubleshoot AppArmor profiles, Troubleshoot SELinux issues, Uninstall Audit Log Filter, Upgrade checklist for 8.4, Upgrade from plugins to components, User statistics, Utility user, Write audit_log_filter definitons
- LSN — Glossary, Extended show engine InnoDB status
M
Files:
- Manage group replication flow control
- Manage SELinux modes
- Manage the Audit Log Filter files
- Managing AppArmor profiles
- Managing binary log disk space
- Modify a table
- Multiple page asynchronous I/O requests
- MyRocks column families
- MyRocks Information Schema tables
- MyRocks limitations
- MyRocks server variables
- MyRocks status variables
- MySQL Clone plugin
- MySQL upgrade paths and supported methods
Keywords:
- monitoring — Breaking and incompatible changes in 8.4, Compatibility and removed items in 8.4, Use Percona Monitoring and Management (PMM) Advisors, Use an APT repository to install Percona Server for MySQL 8.4, Audit log plugin, Manage group replication flow control, Index, Percona Server for MySQL 8.4 - Documentation, js_lang stored procedure and function overview, Kill idle transaction, The ProcFS plugin, Install Percona Server for MySQL and create a database on Ubuntu, Next steps, Install Percona Server for MySQL and create a database on Oracle Linux, Thread pool, Write audit_log_filter definitons, Install using DNF
- mysql — Breaking and incompatible changes in 8.4, Compatibility and removed items in 8.4, Defaults and tuning guidance for 8.4, Adaptive network buffers, Additional PERFORMANCE_SCHEMA tables, Multiple page asynchronous I/O requests, AppArmor profile modes, Secure Percona Server for MySQL with AppArmor, Install Percona Server for MySQL 8.4 using downloaded DEB packages, DEB repository package list - Percona Server for MySQL 8.4, Apt pinning the Percona Server for MySQL 8.4 packages, Use an APT repository to install Percona Server for MySQL 8.4, Run Percona Server for MySQL 8.4 after APT repository installation, Uninstall Percona Server for MySQL 8.4 using the APT package manager, Audit Log Filter format - JSON, Audit Log Filter format - XML (new style), Audit Log Filter format - XML (old style), Audit log filter functions, options, and variables, Audit log plugin, Authentication methods, Backup locks, Backup and restore overview, Install Percona Server for MySQL 8.4 from a binary tarball, Binary tarball file names available based on the Percona Server for MySQL version, Binary logs and replication improvements, Build APT packages, MySQL Clone plugin, Common SQL commands, Compile Percona Server for MySQL from source, Compressed columns with dictionaries, Configure AppArmor, Copyright and licensing information, Data at Rest Encryption, Data masking component functions and variables, Data masking overview, Common data types, Development of Percona Server for MySQL, Disable AppArmor, Use Docker Compose and named volumes, Docker environment variables, Running Percona Server for MySQL in a Docker Container, Downgrade from Percona Server for MySQL Pro, Downgrade Percona Server for MySQL, Percona Software Download instructions, Encrypt schema or general tablespace, Encrypt temporary files, Encryption functions, Enforcing storage engine, Extended SELECT INTO OUTFILE/DUMPFILE, Extended SET VAR optimizer hint, Review effective privileges with SHOW EFFECTIVE GRANTS, Frequently asked questions, Percona Server for MySQL feature comparison, FIDO authentication plugin, Filter the Audit Log Filter logs, FIPS compliance, Functions, Get help from Percona, Glossary, Manage group replication flow control, Group replication system variables, Improved MEMORY storage engine, Index, Index of INFORMATION_SCHEMA tables, Percona Server for MySQL 8.4 - Documentation, Handle corrupted tables, Expanded fast index creation, InnoDB page fragmentation counters, InnoDB full-text search improvements, Extended show engine InnoDB status, INSERT statement, Install the audit log filter, Percona MyRocks installation guide, Install Percona Server for MySQL, Isolation levels, Jemalloc memory allocation profiling, js_lang stored procedure and function overview, js_lang component system variables, JSON in Percona Server for MySQL, Kill idle transaction, Using LDAP authentication plugins, LDAP authentication plugin system variables, Using libcoredumper, Too many connections warning, Suppress warning messages, Managing AppArmor profiles, Additional INFORMATION_SCHEMA tables, Modify a table, Updated supported features, MyRocks column families, Data loading, Differences between Percona MyRocks and Facebook MyRocks, Gap locks detection, Percona MyRocks introduction, MyRocks Information Schema tables, MyRocks limitations, MyRocks server variables, MyRocks status variables, MySQL upgrade paths and supported methods, PAM authentication plugin, PERCONA_SEQUENCE_TABLE(n) function, Percona Server for MySQL 8.4 variables, List of features available in Percona Server for MySQL releases, Percona Toolkit updates for 8.4, The Percona XtraDB storage engine, Performance Schema MyRocks changes, Post-installation, Prefix index queries optimization, Files in packages built for Percona Server for MySQL Pro, Process list, The ProcFS plugin, Support for PROXY protocol, Limit the estimation of records in a Query, Install Percona Server for MySQL and create a database on Ubuntu, Quickstart - Run Percona Server for MySQL container images with Docker, Next steps, Overview, Install Percona Server for MySQL and create a database on Oracle Linux, Restrict dynamic log file locations, SELECT statement, SELinux contexts and labels, Secure Percona Server for MySQL with SELinux, SEQUENCE_TABLE(n) function, Understand version numbers, Slow query log, Slow query log rotation and expiration, Install Percona Server for MySQL from a source tarball, SQL conventions, SQL operators, SQL syntax, SSL improvements, Stack trace, Start transaction with consistent snapshot, Variables in stored procedures, functions, and triggers, Telemetry on Percona Server for MySQL, Thread based profiling, Thread pool, Trademark policy, Transaction management, Trigger updates, Troubleshoot SQL code, Percona Toolkit UDFs, Upgrade checklist for 8.4, Upgrade from plugins to components, Upgrade procedures for 8.4, Upgrade strategies, Upgrade from 8.0 to 8.4 overview, Use the keyring file component, Use the keyring vault component, Use the Amazon Key Management Service (AWS KMS), Use the Key Management Interoperability Protocol (KMIP), Utility user, UUID_VX component, Write audit_log_filter definitons, XtraDB performance improvements for I/O-bound highly-concurrent workloads, Install Percona Server for MySQL using downloaded RPM packages, Yum repository package list - Percona Server for MySQL 8.4, Install using DNF, Run Percona Server for MySQL, Uninstall Percona Server for MySQL
N
Files:
O
Files:
P
Files:
- PAM authentication plugin
- Percona MyRocks installation guide
- Percona MyRocks introduction
- Percona Server for MySQL feature comparison
- Percona Server for MySQL 8.4 - Documentation
- Percona Server for MySQL 8.4 variables
- Percona Software Download instructions
- Percona Toolkit UDFs
- Percona Toolkit updates for 8.4
- PERCONA_SEQUENCE_TABLE(n) function
- Performance Schema MyRocks changes
- Post-installation
- Prefix index queries optimization
- Process list
Keywords:
- percona — Breaking and incompatible changes in 8.4, Compatibility and removed items in 8.4, Defaults and tuning guidance for 8.4, Adaptive network buffers, Additional PERFORMANCE_SCHEMA tables, Use Percona Monitoring and Management (PMM) Advisors, Secure Percona Server for MySQL with AppArmor, Install Percona Server for MySQL 8.4 using downloaded DEB packages, DEB repository package list - Percona Server for MySQL 8.4, Apt pinning the Percona Server for MySQL 8.4 packages, Use an APT repository to install Percona Server for MySQL 8.4, Run Percona Server for MySQL 8.4 after APT repository installation, Uninstall Percona Server for MySQL 8.4 using the APT package manager, Audit log filter functions, options, and variables, Audit log plugin, Backup locks, Backup and restore overview, Install Percona Server for MySQL 8.4 from a binary tarball, Binary tarball file names available based on the Percona Server for MySQL version, Binary logs and replication improvements, Build APT packages, Compile Percona Server for MySQL from source, Compressed columns with dictionaries, Configure AppArmor, Copyright and licensing information, Data at Rest Encryption, Data masking component functions and variables, Data masking overview, Common data types, Development of Percona Server for MySQL, Disable AppArmor, Use Docker Compose and named volumes, Docker environment variables, Running Percona Server for MySQL in a Docker Container, Downgrade from Percona Server for MySQL Pro, Downgrade Percona Server for MySQL, Percona Software Download instructions, Encrypt schema or general tablespace, Encrypt temporary files, Encryption functions, Enforcing storage engine, Extended SELECT INTO OUTFILE/DUMPFILE, Extended SET VAR optimizer hint, Review effective privileges with SHOW EFFECTIVE GRANTS, Frequently asked questions, Percona Server for MySQL feature comparison, FIDO authentication plugin, FIPS compliance, Get help from Percona, Glossary, Group replication system variables, Index, Index of INFORMATION_SCHEMA tables, Percona Server for MySQL 8.4 - Documentation, Handle corrupted tables, Expanded fast index creation, InnoDB page fragmentation counters, InnoDB full-text search improvements, Extended show engine InnoDB status, Install the audit log filter, Percona MyRocks installation guide, Install Percona Server for MySQL, Jemalloc memory allocation profiling, JSON in Percona Server for MySQL, Keyring components overview, Using LDAP authentication plugins, Using libcoredumper, Too many connections warning, Managing AppArmor profiles, Additional INFORMATION_SCHEMA tables, Modify a table, Updated supported features, Differences between Percona MyRocks and Facebook MyRocks, Percona MyRocks introduction, MyRocks server variables, MyRocks status variables, MySQL upgrade paths and supported methods, PAM authentication plugin, PERCONA_SEQUENCE_TABLE(n) function, Percona Server for MySQL 8.4 variables, List of features available in Percona Server for MySQL releases, Percona Toolkit updates for 8.4, The Percona XtraDB storage engine, Prefix index queries optimization, Files in packages built for Percona Server for MySQL Pro, Process list, The ProcFS plugin, Install Percona Server for MySQL and create a database on Ubuntu, Quickstart - Run Percona Server for MySQL container images with Docker, Next steps, Overview, Install Percona Server for MySQL and create a database on Oracle Linux, Secure Percona Server for MySQL with SELinux, SEQUENCE_TABLE(n) function, Understand version numbers, Slow query log, Slow query log rotation and expiration, Install Percona Server for MySQL from a source tarball, SQL operators, SQL syntax, SSL improvements, Stack trace, Start transaction with consistent snapshot, Telemetry on Percona Server for MySQL, Thread based profiling, Trademark policy, Transaction management, Trigger updates, Percona Toolkit UDFs, Upgrade checklist for 8.4, Upgrade from plugins to components, Upgrade procedures for 8.4, Upgrade strategies, Upgrade from 8.0 to 8.4 overview, Use the keyring file component, Use the keyring vault component, User statistics, Use the Amazon Key Management Service (AWS KMS), Use the Key Management Interoperability Protocol (KMIP), Utility user, Write audit_log_filter definitons, XtraDB performance improvements for I/O-bound highly-concurrent workloads, Install Percona Server for MySQL using downloaded RPM packages, Yum repository package list - Percona Server for MySQL 8.4, Install using DNF, Run Percona Server for MySQL, Uninstall Percona Server for MySQL
- performance — Defaults and tuning guidance for 8.4, DEB repository package list - Percona Server for MySQL 8.4, Use an APT repository to install Percona Server for MySQL 8.4, Audit log filter functions, options, and variables, Audit log plugin, Authentication methods, Binary logs and replication improvements, Data masking component functions and variables, Data masking overview, Common data types, Introduction to Databases and SQL, DELETE statement, Development of Percona Server for MySQL, Running Percona Server for MySQL in a Docker Container, Downgrade Percona Server for MySQL, Encryption functions, Percona Server for MySQL feature comparison, Functions, Get help from Percona, Glossary, Improved MEMORY storage engine, Index, Percona Server for MySQL 8.4 - Documentation, Extended show engine InnoDB status, INSERT statement, Isolation levels, js_lang stored procedure and function overview, Kill idle transaction, Using libcoredumper, Too many connections warning, Percona MyRocks introduction, MyRocks server variables, List of features available in Percona Server for MySQL releases, The Percona XtraDB storage engine, Performance Schema MyRocks changes, The ProcFS plugin, Install Percona Server for MySQL and create a database on Ubuntu, Quickstart - Run Percona Server for MySQL container images with Docker, Next steps, Overview, Install Percona Server for MySQL and create a database on Oracle Linux, Restrict dynamic log file locations, Secure Percona Server for MySQL with SELinux, Slow query log, SQL syntax, Stack trace, Start transaction with consistent snapshot, Error handling in stored procedures, Stored Procedures, Introduction to database tables, Thread based profiling, Thread pool, Trademark policy, Trigger updates, Triggers, UPDATE statement, Upgrade checklist for 8.4, Upgrade from 8.0 to 8.4 overview, UUID_VX component, Views, Write audit_log_filter definitons, XtraDB performance improvements for I/O-bound highly-concurrent workloads, Install Percona Server for MySQL using downloaded RPM packages, Yum repository package list - Percona Server for MySQL 8.4, Install using DNF
- plugin — Breaking and incompatible changes in 8.4, Compatibility and removed items in 8.4, DEB repository package list - Percona Server for MySQL 8.4, Audit log plugin, Authentication methods, Build APT packages, MySQL Clone plugin, Data at Rest Encryption, Encrypt binary log files and relay log files, Encrypt schema or general tablespace, Extended SET VAR optimizer hint, Percona Server for MySQL feature comparison, FIDO authentication plugin, Index, Index of INFORMATION_SCHEMA tables, Percona Server for MySQL 8.4 - Documentation, Install the audit log filter, Percona MyRocks installation guide, Using LDAP authentication plugins, LDAP authentication plugin system variables, MyRocks Information Schema tables, PAM authentication plugin, List of features available in Percona Server for MySQL releases, Post-installation, The ProcFS plugin, Thread pool, Uninstall Audit Log Filter, Upgrade checklist for 8.4, Upgrade from plugins to components, Upgrade from 8.0 to 8.4 overview, Use the keyring file component, Yum repository package list - Percona Server for MySQL 8.4
- privilege — Breaking and incompatible changes in 8.4, Additional PERFORMANCE_SCHEMA tables, Audit Log Filter overview, Backup locks, Binary logs and replication improvements, Compressed columns with dictionaries, Create a table, Data masking component functions and variables, Introduction to Databases and SQL, Disable Audit Log Filter logging, Encrypt binary log files and relay log files, Encrypt system tablespace, Review effective privileges with SHOW EFFECTIVE GRANTS, FIDO authentication plugin, Filter the Audit Log Filter logs, Install the data masking component, Install js_lang component, Percona MyRocks installation guide, js_lang privileges, js_lang stored function or procedure, Manage the Audit Log Filter files, Post-installation, The ProcFS plugin, Install Percona Server for MySQL and create a database on Ubuntu, Install Percona Server for MySQL and create a database on Oracle Linux, Rotate the master encryption key, UNINSTALL COMPONENT, User statistics, Verify the encryption for tables, tablespaces, and schemas, Write audit_log_filter definitons, Install using DNF
Q
Files:
Keywords:
- query — Adaptive network buffers, Audit Log Filter format - JSON, Audit Log Filter overview, Audit log plugin, Binary logs and replication improvements, Compressed columns with dictionaries, Data masking component functions and variables, Use Docker Compose and named volumes, Encryption functions, Percona Server for MySQL feature comparison, FIDO authentication plugin, Filter the Audit Log Filter logs, Functions, Improved MEMORY storage engine, Index, Index of INFORMATION_SCHEMA tables, Percona Server for MySQL 8.4 - Documentation, InnoDB page fragmentation counters, Extended show engine InnoDB status, JSON in Percona Server for MySQL, Additional INFORMATION_SCHEMA tables, MyRocks Information Schema tables, MyRocks server variables, List of features available in Percona Server for MySQL releases, The ProcFS plugin, Limit the estimation of records in a Query, Install Percona Server for MySQL and create a database on Ubuntu, Quickstart - Run Percona Server for MySQL container images with Docker, Install Percona Server for MySQL and create a database on Oracle Linux, Restrict dynamic log file locations, Slow query log, Slow query log rotation and expiration, SQL basics, SQL operators, SQL syntax, Thread pool, Trigger updates, Troubleshoot SQL code, Upgrade checklist for 8.4, Upgrade from 8.0 to 8.4 overview, UUID_VX component, Verify the encryption for tables, tablespaces, and schemas, Views, Write audit_log_filter definitons, XtraDB performance improvements for I/O-bound highly-concurrent workloads
R
Files:
- Reading Audit Log Filter files
- Restrict dynamic log file locations
- Review effective privileges with SHOW EFFECTIVE GRANTS
- Rotate the master encryption key
- Run Percona Server for MySQL
- Run Percona Server for MySQL 8.4 after APT repository installation
- Running Percona Server for MySQL in a Docker Container
Keywords:
- redo — Defaults and tuning guidance for 8.4, Data at Rest Encryption, Log encryption, Glossary, Extended show engine InnoDB status, Post-installation, Upgrade checklist for 8.4
- replication — Breaking and incompatible changes in 8.4, Compatibility and removed items in 8.4, Audit Log Filter restrictions, Backup and restore overview, Binary logs and replication improvements, Data masking overview, Downgrade Percona Server for MySQL, Frequently asked questions, Percona Server for MySQL feature comparison, Manage group replication flow control, Group replication system variables, Index, Suppress warning messages, MyRocks limitations, MyRocks server variables, MySQL upgrade paths and supported methods, Percona Toolkit updates for 8.4, Slow query log, Slow query log rotation and expiration, Start transaction with consistent snapshot, Upgrade checklist for 8.4, Upgrade strategies, Upgrade from 8.0 to 8.4 overview, User statistics
- restore — Defaults and tuning guidance for 8.4, Backup and restore overview, Binary logs and replication improvements, Index, Expanded fast index creation, Install Percona Server for MySQL and create a database on Ubuntu, Quickstart - Run Percona Server for MySQL container images with Docker, Next steps, Install Percona Server for MySQL and create a database on Oracle Linux, Transaction management, Troubleshoot SELinux issues, Upgrade checklist for 8.4, Upgrade procedures for 8.4, Upgrade strategies, Upgrade from 8.0 to 8.4 overview
- row — Breaking and incompatible changes in 8.4, Backup locks, Binary logs and replication improvements, Compressed columns with dictionaries, Data masking overview, Percona Server for MySQL feature comparison, Improved MEMORY storage engine, INSERT statement, JSON in Percona Server for MySQL, Kill idle transaction, Additional INFORMATION_SCHEMA tables, MyRocks server variables, MyRocks status variables, PERCONA_SEQUENCE_TABLE(n) function, Process list, Install Percona Server for MySQL and create a database on Ubuntu, Quickstart - Run Percona Server for MySQL container images with Docker, Install Percona Server for MySQL and create a database on Oracle Linux, SEQUENCE_TABLE(n) function, Slow query log, UNINSTALL COMPONENT, UPDATE statement, Upgrade checklist for 8.4
S
Files:
- Secure Percona Server for MySQL with AppArmor
- Secure Percona Server for MySQL with SELinux
- SELECT statement
- SELinux contexts and labels
- SEQUENCE_TABLE(n) function
- Show storage engines
- Slow query log
- Slow query log rotation and expiration
- SQL basics
- SQL conventions
- SQL operators
- SQL syntax
- SSL improvements
- Stack trace
- Start transaction with consistent snapshot
- Stored Procedures
- Support for PROXY protocol
- Suppress warning messages
Keywords:
- schema — Defaults and tuning guidance for 8.4, Backup and restore overview, MySQL Clone plugin, Compressed columns with dictionaries, Common data types, Docker environment variables, Encrypt File-Per-Table Tablespace, Encrypt schema or general tablespace, Glossary, Index, Index of INFORMATION_SCHEMA tables, Additional INFORMATION_SCHEMA tables, Percona MyRocks introduction, MyRocks Information Schema tables, MyRocks limitations, Performance Schema MyRocks changes, Post-installation, The ProcFS plugin, Install Percona Server for MySQL and create a database on Ubuntu, Quickstart - Run Percona Server for MySQL container images with Docker, Install Percona Server for MySQL and create a database on Oracle Linux, Secure Percona Server for MySQL with SELinux, Slow query log, Triggers, Upgrade checklist for 8.4, User statistics, Utility user, Views, Write audit_log_filter definitons
- snapshot — Backup locks, MySQL Clone plugin, Percona Server for MySQL feature comparison, Index, Differences between Percona MyRocks and Facebook MyRocks, MyRocks server variables, MyRocks status variables, Start transaction with consistent snapshot
- SSL — Compatibility and removed items in 8.4, FIPS compliance, Index, LDAP authentication plugin system variables, Percona Toolkit updates for 8.4, SSL improvements, User statistics
- storage engine — DEB repository package list - Percona Server for MySQL 8.4, Audit Log Filter overview, MySQL Clone plugin, Compressed columns with dictionaries, Enforcing storage engine, Extended mysqldump, Extended SET VAR optimizer hint, Percona Server for MySQL feature comparison, Glossary, Improved MEMORY storage engine, Index, Improved InnoDB I/O scalability, Percona MyRocks installation guide, Differences between Percona MyRocks and Facebook MyRocks, Gap locks detection, Percona MyRocks introduction, MyRocks server variables, MyRocks status variables, List of features available in Percona Server for MySQL releases, The Percona XtraDB storage engine, Show storage engines, SQL syntax, Upgrade procedures for 8.4, Yum repository package list - Percona Server for MySQL 8.4
T
Files:
- Telemetry on Percona Server for MySQL
- The Percona XtraDB storage engine
- The ProcFS plugin
- Thread based profiling
- Thread pool
- Too many connections warning
- Trademark policy
- Transaction management
- Trigger updates
- Triggers
- Troubleshoot AppArmor profiles
- Troubleshoot js_lang procedures and functions
- Troubleshoot SELinux issues
- Troubleshoot SQL code
Keywords:
- table — Breaking and incompatible changes in 8.4, Compatibility and removed items in 8.4, Additional PERFORMANCE_SCHEMA tables, Multiple page asynchronous I/O requests, Audit Log Filter format - JSON, Audit Log Filter file naming conventions, Audit Log Filter format - XML (new style), Audit Log Filter format - XML (old style), Audit Log Filter overview, Audit log filter functions, options, and variables, Audit log plugin, Backup locks, Binary logs and replication improvements, MySQL Clone plugin, Common SQL commands, Compressed columns with dictionaries, Copyright and licensing information, Create a table, Data at Rest Encryption, Data masking component functions and variables, Data masking overview, Common data types, Introduction to Databases and SQL, DELETE statement, Use Docker Compose and named volumes, Encrypt File-Per-Table Tablespace, Log encryption, Encrypt schema or general tablespace, Encrypt temporary files, Enforcing storage engine, Review effective privileges with SHOW EFFECTIVE GRANTS, Percona Server for MySQL feature comparison, FIDO authentication plugin, Filter the Audit Log Filter logs, Glossary, Improved MEMORY storage engine, Index, Index of INFORMATION_SCHEMA tables, Handle corrupted tables, Expanded fast index creation, InnoDB page fragmentation counters, Extended show engine InnoDB status, INSERT statement, Install the data masking component, Percona MyRocks installation guide, JSON in Percona Server for MySQL, Additional INFORMATION_SCHEMA tables, Modify a table, Updated supported features, MyRocks column families, Data loading, MyRocks Information Schema tables, MyRocks limitations, MyRocks server variables, MyRocks status variables, PERCONA_SEQUENCE_TABLE(n) function, Performance Schema MyRocks changes, Post-installation, Process list, Limit the estimation of records in a Query, Install Percona Server for MySQL and create a database on Ubuntu, Quickstart - Run Percona Server for MySQL container images with Docker, Install Percona Server for MySQL and create a database on Oracle Linux, SELECT statement, SEQUENCE_TABLE(n) function, Slow query log, Stack trace, Introduction to database tables, Trigger updates, Triggers, Troubleshoot SQL code, UNINSTALL COMPONENT, UPDATE statement, User statistics, Utility user, UUID_VX component, Verify the encryption for tables, tablespaces, and schemas, Views, Write audit_log_filter definitons
- tech preview — Data masking component functions and variables, Glossary, Group replication system variables, Additional INFORMATION_SCHEMA tables, MyRocks server variables, Limit the estimation of records in a Query, Verify the encryption for tables, tablespaces, and schemas
- thread — Percona Server for MySQL feature comparison, Filter the Audit Log Filter logs, Index, Extended show engine InnoDB status, js_lang stored procedure and function overview, MyRocks server variables, MyRocks status variables, PAM authentication plugin, List of features available in Percona Server for MySQL releases, Process list, Slow query log, Thread based profiling, Thread pool, User statistics, XtraDB performance improvements for I/O-bound highly-concurrent workloads
- timeout — Group replication system variables, Extended show engine InnoDB status, Troubleshoot js_lang procedures and functions, Kill idle transaction, MyRocks server variables, List of features available in Percona Server for MySQL releases, Use the keyring vault component
- TLS — Breaking and incompatible changes in 8.4, LDAP authentication plugin system variables, Percona Toolkit updates for 8.4, Upgrade checklist for 8.4
- transaction — Backup locks, Managing binary log disk space, Binary logs and replication improvements, Common SQL commands, Create a table, Introduction to Databases and SQL, Percona Server for MySQL feature comparison, Glossary, Index, Extended show engine InnoDB status, Isolation levels, Kill idle transaction, Modify a table, Updated supported features, Data loading, Differences between Percona MyRocks and Facebook MyRocks, Gap locks detection, MyRocks Information Schema tables, MyRocks limitations, MyRocks server variables, MyRocks status variables, SQL syntax, Start transaction with consistent snapshot, Introduction to database tables, Thread pool, Transaction management, Views
- trigger — Breaking and incompatible changes in 8.4, Audit Log Filter restrictions, Index, Data loading, MyRocks server variables, Install Percona Server for MySQL and create a database on Ubuntu, Quickstart - Run Percona Server for MySQL container images with Docker, Install Percona Server for MySQL and create a database on Oracle Linux, Variables in stored procedures, functions, and triggers, Trigger updates, Triggers, Troubleshoot SELinux issues
U
Files:
- Understand version numbers
- Uninstall Audit Log Filter
- UNINSTALL COMPONENT
- Uninstall Percona Server for MySQL
- Uninstall Percona Server for MySQL 8.4 using the APT package manager
- Uninstall the data masking component
- Uninstall the js_lang component
- UPDATE statement
- Updated supported features
- Upgrade checklist for 8.4
- Upgrade from 8.0 to 8.4 overview
- Upgrade from plugins to components
- Upgrade procedures for 8.4
- Upgrade strategies
- Use an APT repository to install Percona Server for MySQL 8.4
- Use Docker Compose and named volumes
- Use Percona Monitoring and Management (PMM) Advisors
- Use the Amazon Key Management Service (AWS KMS)
- Use the Key Management Interoperability Protocol (KMIP)
- Use the keyring file component
- Use the keyring vault component
- User statistics
- Using LDAP authentication plugins
- Using libcoredumper
- Utility user
- UUID_VX component
Keywords:
- undo — Defaults and tuning guidance for 8.4, Data at Rest Encryption, Log encryption, Encrypt temporary files, Percona Server for MySQL feature comparison, Kill idle transaction, Transaction management, UNINSTALL COMPONENT, Upgrade checklist for 8.4, Upgrade from 8.0 to 8.4 overview
- user — Breaking and incompatible changes in 8.4, Additional PERFORMANCE_SCHEMA tables, Use an APT repository to install Percona Server for MySQL 8.4, Run Percona Server for MySQL 8.4 after APT repository installation, Audit Log Filter compression and encryption, Audit Log Filter format - XML (new style), Audit Log Filter format - XML (old style), Audit Log Filter overview, Audit Log Filter restrictions, Audit log filter functions, options, and variables, Audit log plugin, Authentication methods, Backup and restore overview, Binary logs and replication improvements, MySQL Clone plugin, Compressed columns with dictionaries, Copyright and licensing information, Create a table, Data at Rest Encryption, Data masking component functions and variables, Data masking overview, Common data types, Introduction to Databases and SQL, Docker environment variables, Running Percona Server for MySQL in a Docker Container, Encrypt temporary files, Encryption functions, Enforcing storage engine, Review effective privileges with SHOW EFFECTIVE GRANTS, Frequently asked questions, Percona Server for MySQL feature comparison, FIDO authentication plugin, Filter the Audit Log Filter logs, Improved MEMORY storage engine, Index, Index of INFORMATION_SCHEMA tables, Percona MyRocks installation guide, Isolation levels, js_lang Console API, js_lang stored procedure and function overview, js_lang privileges, Troubleshoot js_lang procedures and functions, JSON in Percona Server for MySQL, Using LDAP authentication plugins, LDAP authentication plugin system variables, MyRocks column families, MyRocks server variables, MyRocks status variables, PAM authentication plugin, List of features available in Percona Server for MySQL releases, Post-installation, Process list, The ProcFS plugin, Install Percona Server for MySQL and create a database on Ubuntu, Quickstart - Run Percona Server for MySQL container images with Docker, Install Percona Server for MySQL and create a database on Oracle Linux, SELinux contexts and labels, Secure Percona Server for MySQL with SELinux, SQL syntax, Introduction to database tables, Telemetry on Percona Server for MySQL, Percona Toolkit UDFs, Upgrade from plugins to components, User statistics, Use the Amazon Key Management Service (AWS KMS), Utility user, UUID_VX component, Write audit_log_filter definitons, Install using DNF
- utf8mb4 — js_lang type conversions, UUID_VX component
- UUID — Compatibility and removed items in 8.4, Binary logs and replication improvements, Data masking component functions and variables, Index, Use the Amazon Key Management Service (AWS KMS), UUID_VX component
V
Files:
- Variables in stored procedures, functions, and triggers
- Verify the encryption for tables, tablespaces, and schemas
- Views
Keywords:
- view — Additional SELinux tools and management, Audit Log Filter security, Audit log filter functions, options, and variables, Binary logs and replication improvements, Compressed columns with dictionaries, Use Docker Compose and named volumes, Running Percona Server for MySQL in a Docker Container, Review effective privileges with SHOW EFFECTIVE GRANTS, Extended show engine InnoDB status, Manage SELinux modes, MyRocks status variables, The ProcFS plugin, SELinux contexts and labels, Secure Percona Server for MySQL with SELinux, Start transaction with consistent snapshot, Triggers, Verify the encryption for tables, tablespaces, and schemas, Views, Write audit_log_filter definitons, Install Percona Server for MySQL using downloaded RPM packages
W
Files:
X
Files:
Keywords:
- xtrabackup — Compatibility and removed items in 8.4, Backup locks, Backup and restore overview, Binary logs and replication improvements, Data at Rest Encryption, Development of Percona Server for MySQL, Use Docker Compose and named volumes, Frequently asked questions, Install Percona Server for MySQL, Next steps, Trademark policy, Upgrade checklist for 8.4, Upgrade from 8.0 to 8.4 overview
- XtraDB — Compatibility and removed items in 8.4, Compressed columns with dictionaries, Frequently asked questions, Percona Server for MySQL feature comparison, Glossary, Index, Index of INFORMATION_SCHEMA tables, Percona Server for MySQL 8.4 - Documentation, Handle corrupted tables, Improved InnoDB I/O scalability, Extended show engine InnoDB status, Percona MyRocks installation guide, List of features available in Percona Server for MySQL releases, The Percona XtraDB storage engine, Next steps, Show storage engines, Start transaction with consistent snapshot, Trademark policy, XtraDB performance improvements for I/O-bound highly-concurrent workloads, Install using DNF
Y
Files: