Upgrade
PMM 2 End-of-Life
PMM 2 reached end-of-life on October 31, 2025. Migrate to PMM3 for new features, security updates, and ongoing support.
Plan the upgrade order
Upgrade PMM Server first
Make sure to upgrade the PMM Server before you upgrade the PMM Client.
Ensure that the PMM Server version is higher than or equal to the PMM Client version. Otherwise, there might be configuration issues, thus leading to failure in the client-server communication as PMM Server might not be able to identify all the parameters in the configuration.
For example, for a PMM Server version 2.25.0, the PMM Client version should be 2.25.0 or 2.24.0. If the PMM Client version is 2.26.0, PMM might not work as expected.
Staged upgrade approach
When upgrading PMM from older versions (2.30.0 and below), we recommend following a staged approach: first, upgrade to version 2.33.0, and then proceed to the latest version.
This sequential upgrading process ensures that PMM’s internal components are migrated and updated correctly.
Update the Server
Known issues for older versions
-
Upgrading to PMM 2.32.0 from older versions fails. We recommend upgrading directly to 2.33 or the latest version. For more information, see the troubleshooting topic.
-
PMM versions prior to 2.33.0 may not show the latest versions available with instances created from the AWS marketplace in specific environments, including AWS. For a solution, see the troubleshooting section.
Client and server components are installed and updated separately.
PMM Server can run natively, as a Docker image, a virtual appliance, or an AWS cloud instance. Each has its own installation and update steps.
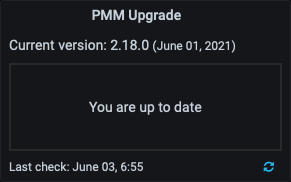
The preferred and simplest way to update PMM Server is with the PMM Upgrade panel on the Home page.

The panel shows:
- the current server version and release date;
- whether the server is up to date;
- the last time a check was made for updates.
Click the refresh button to manually check for updates. If an update is available, click the Update button to install the indicated version.
See also
Updating a PMM-Agent
There are two primary methods to update the PMM Agent, depending on your initial installation method:
- Using your operating system’s package manager.
- Updating from a tarball.
Package Manager method
The package manager method is generally more convenient and efficient. Percona provides the percona-release package, which helps you install Percona software, including the PMM Agent. The PMM Agent is available from the pmm-client repository.
To deploy a new version of the Agent via package manager, simply replace the currently installed package with the latest version of the PMM Agent or with a specific version.
Install the latest PMM Agent version
Run the commands below to install the latest PMM Agent version via package manager and keep your existing Agent configuration during the update process.
percona-release enable pmm2-client
apt update
apt install pmm2-client
percona-release enable pmm2-client
yum update pmm2-client
Deploy a specific version
To deploy a specific version of the PMM Agent via package manager, check the available versions and then provide the full name of the package. For example:
 yum --showduplicates search pmm2-client
 pmm2-client-2.41.1-6.el9.x86_64 : Percona Monitoring and Management Client (pmm-agent)
 pmm2-client-2.41.2-6.el9.x86_64 : Percona Monitoring and Management Client (pmm-agent)
 pmm2-client-2.42.0-6.el9.x86_64 : Percona Monitoring and Management Client (pmm-agent)

 yum update pmm2-client-2.41.2-6.el9.x86_64
apt-cache madison pmm2-client
pmm2-client | 2.42.0-6.focal | http://repo.percona.com/pmm2-client/apt focal/main amd64 Packages
pmm2-client | 2.41.2-6.focal | http://repo.percona.com/pmm2-client/apt focal/main amd64 Packages
pmm2-client | 2.41.1-6.focal | http://repo.percona.com/pmm2-client/apt focal/main amd64 Packages

apt install pmm2-client=2.42.0-6.focal
Tarball method
If you initially installed the PMM Agent from a tarball, you can update it by replacing the currently installed package with the latest version:
- Download
tar.gzwithpmm2-client. - Extract the tarball.
- Run
./install_tarballscript with the-uflag.
Important
The configuration file will be overwritten if you do not provide the -u flag while the pmm-agent is updated.
Upgrade from PMM 1
Because of the significant architectural changes between PMM1 and PMM2, there is no direct upgrade path. The approach to making the switch from PMM version 1 to 2 is a gradual transition, outlined in this blog post.
In short, it involves first standing up a new PMM2 server on a new host and connecting clients to it. As new data is reported to the PMM2 server, old metrics will age with the retention period (30 days, by default), at which point you’ll be able to shut down your existing PMM1 server.
Any alerts configured through the Grafana UI will have to be recreated due to the target dashboard id’s not matching between PMM1 and PMM2. In this instance we recommend moving to Alertmanager recipes in PMM2 for alerting which, for the time being, requires a separate Alertmanager instance. We are working on integrating this natively into PMM2 Server and expect to support your existing Alertmanager rules.