Install Percona XtraDB Cluster on OpenShift
Percona Operator for Percona XtrabDB Cluster is a Red Hat Certified Operator . This means that Percona Operator is portable across hybrid clouds and fully supports the Red Hat OpenShift lifecycle.
To install Percona XtraDB Cluster on OpenShift, you need to do the following:
-
First, install the Percona Operator for MySQL Deployment,
-
Next, use the Operator to deploy Percona XtraDB Cluster.
Installation options
You can install Percona Operator for MySQL on OpenShift in two ways:
- Using the Operator Lifecycle Manager (OLM) via the OpenShift web console
- Using the command-line interface with
occommands
Choose the method that best fits your workflow.
Install via the Operator Lifecycle Manager (OLM)
Prerequisites
Before you start, ensure you have the following:
- You can log in to the OLM console
- You have the ARN role assigned to your OLM user (for OpenShift 4.20).
Install the Operator Deployment
Follow these steps to deploy the Operator:
- Login to the OLM and navigate to the Ecosystem -> Software Catalog.
-
Search for “Percona Operator for MySQL”, select “Percona Operator for MySQL based on Percona XtraDB Cluster”. You may need to change the project for your user:
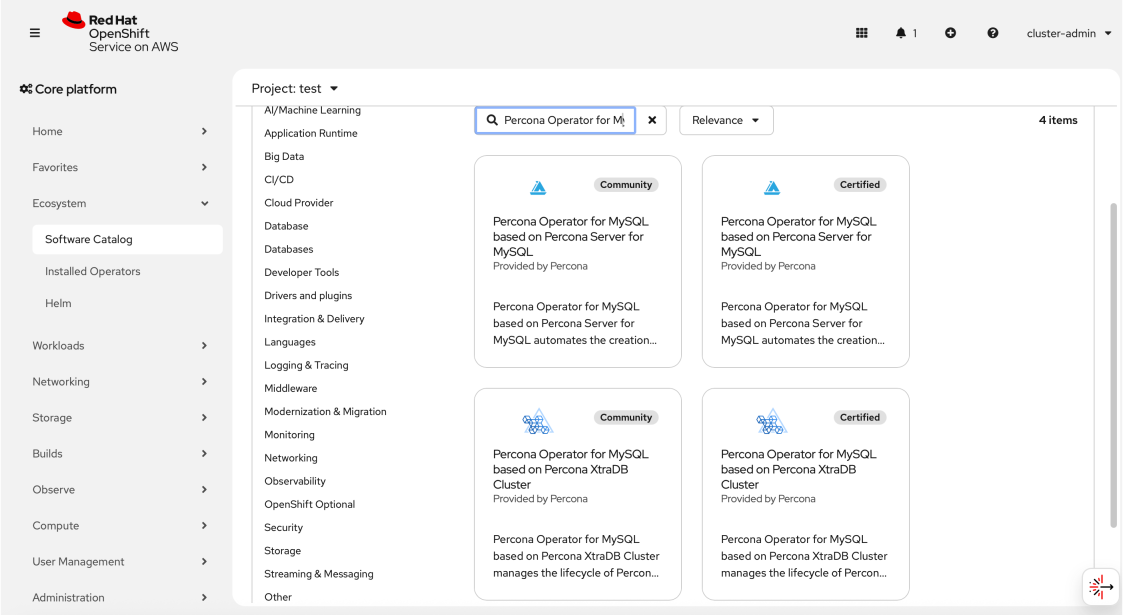
Then click “Continue”, and “Install”.
-
A new page opens where you choose the Operator version and the Namespace / OpenShift project you would like to install the Operator into. You can create a namespace (an OpenShift project) right away by clicking the Create Project and filling in project details like name, display name and description.
For OpenShift 4.20, you also need to specify the ARN role assigned to your user
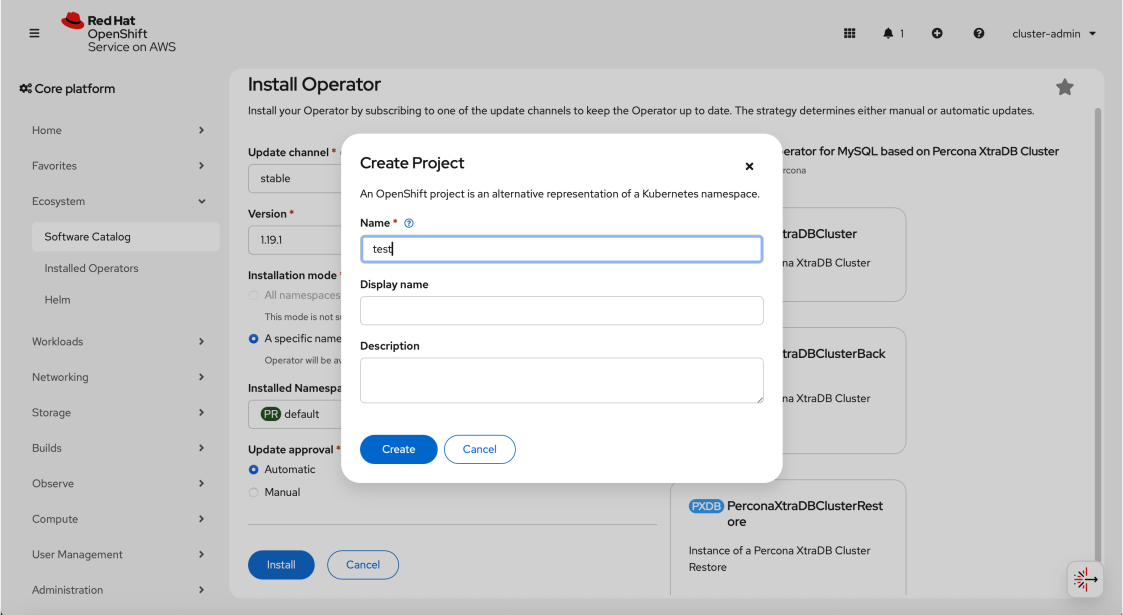
Note
To install the Operator in multi-namespace (cluster-wide) mode, choose values with
-cwsuffix for the channel and version, and select the “All namespaces on the cluster” radio button for the installation mode instead of choosing a specific Namespace: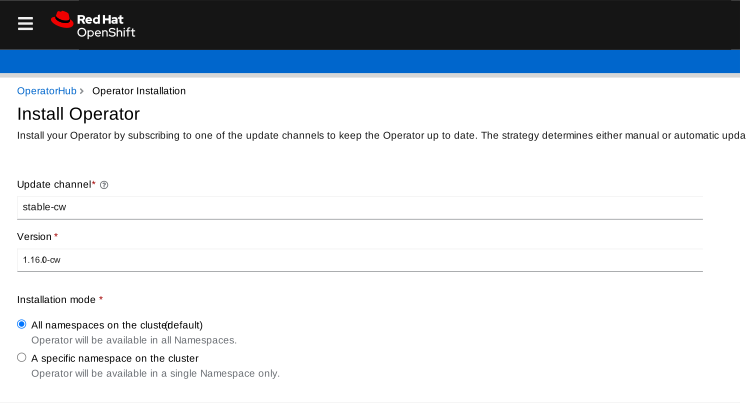
Click “Install” to install the Operator.
-
You can track the installation flow by clicking the link on the updated page. You will be redirected to the Installed Operators tab. Your installed Operator will appear there.
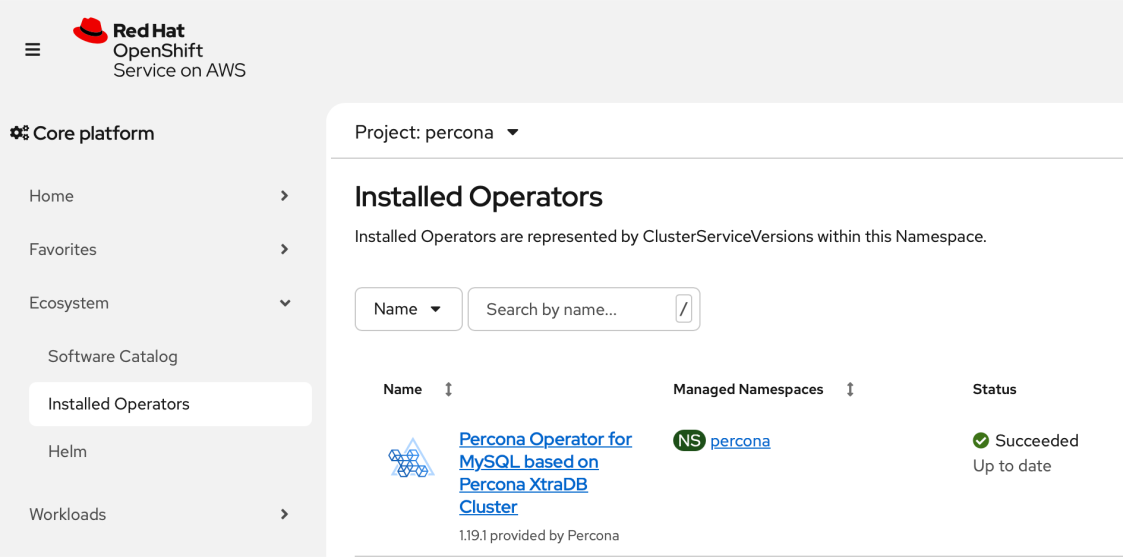
Deploy Percona XtraDB Cluster
Now you can deploy Percona Server for MySQL
- Click the Operator you installed.
- On the Details page, find the PerconaXtraDBCluster Custom Resource.
-
Click “Create instance”.
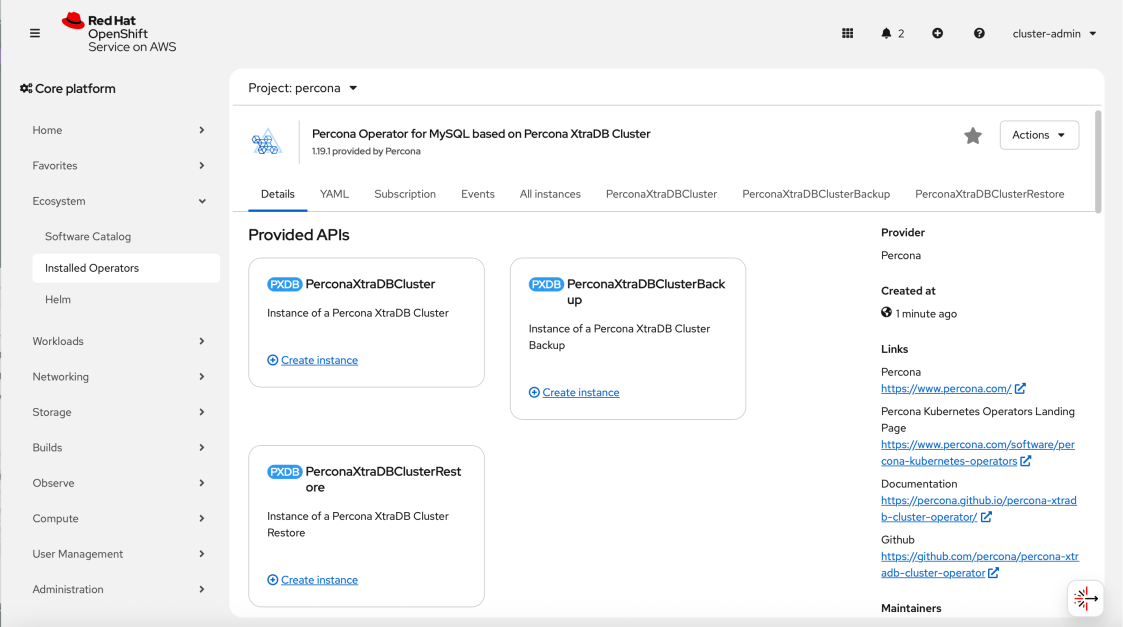
-
Edit the Custom Resource manifest to fine-tune your cluster configuration. Refer to Custom Resource reference for the description of available options
-
Click “Create”
-
Upon successful installation, you should see the “Ready” status for the database cluster.
Install via the command-line interface
Install the Operator Deployment
The following steps install the latest version of the Operator with default parameters. To install a specific version, replace the v1.20.0 tag with your value. See the full list of tags in the Operator repository on GitHub.
To install the Operator with customized parameters, see Install Percona XtraDB Cluster with customized parameters.
Choose the approach that fits your needs:
- Quick install — Apply a single bundle file. Use this when you want to get started quickly with default settings.
- Step-by-step install — Run each installation step separately. Use this when you want more control over the installation process or you need to customize the installation.
For a quick and streamlined installation, you can use the deploy/bundle.yaml file. By applying this file, Kubernetes creates the Custom Resource Definition, sets up role-based access control and installs the Operator in one single action. This method is recommended for most users, as it simplifies the installation process.
The steps are the following:
-
Clone the
percona-xtradb-cluster-operatorrepository. Pay attention to specify the right branch with the-boption while cloning the code on this step:git clone -b v1.20.0 https://github.com/percona/percona-xtradb-cluster-operator cd percona-xtradb-cluster-operator -
For OpenShift 4.19. Edit the
deploy/bundle.yamlfile.- Locate the Deployment custom resource for the Operator.
- Update the
spec.imagefield to
docker.io/percona/percona-xtradb-cluster-operator:1.20.0 -
Create the namespace
oc new-project pxc -
Create the Custom Resource Definition, RBAC (role-based access control) and the Operator deployment.
oc apply --server-side -f deploy/bundle.yaml
If you prefer to install each component manually, follow these steps:
-
Clone the repository. Pay attention to specify the right branch with the
-boption while cloning the code on this step:git clone -b v1.20.0 https://github.com/percona/percona-xtradb-cluster-operator cd percona-xtradb-cluster-operator -
Create the Custom Resource Definition (CRD)
The CRD extends Kubernetes with new resource types required by the operator. This step only needs to be done once.
oc apply --server-side -f deploy/crd.yamlNote
Setting the Custom Resource Definition requires your user to have cluster-admin privileges.
If you want to manage your Percona XtraDB Cluster with a non-privileged user, grant the necessary permissions by applying the following cluster role:
oc create clusterrole pxc-admin --verb="*" --resource=perconaxtradbclusters.pxc.percona.com,perconaxtradbclusters.pxc.percona.com/status,perconaxtradbclusterbackups.pxc.percona.com,perconaxtradbclusterbackups.pxc.percona.com/status,perconaxtradbclusterrestores.pxc.percona.com,perconaxtradbclusterrestores.pxc.percona.com/status
oc adm policy add-cluster-role-to-user pxc-admin <some-user>
If you have cert-manager installed, run these commands to manage certificates with a non-privileged user:
oc create clusterrole cert-admin --verb="*" --resource=issuers.certmanager.k8s.io,certificates.certmanager.k8s.io oc adm policy add-cluster-role-to-user cert-admin <some-user> -
Create a new project for the cluster
oc new-project pxc -
Set up RBAC (Role-Based Access Control)
Apply the RBAC configuration to define roles and permissions for the operator:
oc apply -f deploy/rbac.yaml -
For OpenShift 4.19 Edit the
deploy/operator.yamland update thespec.imagefield todocker.io/percona/percona-xtradb-cluster-operator:1.20.0:spec: containers: - command: ... image: docker.io/percona/percona-xtradb-cluster-operator:1.20.0 -
Deploy the Operator
oc apply -f deploy/operator.yaml
For more details about users and roles, see the OpenShift documentation .
Install Percona XtraDB Cluster
After installing the Operator, you can deploy Percona XtraDB Cluster. This section guides you through the process of setting up secrets, certificates, and creating your first cluster.
Before you start
Export the namespace where you deployed the Operator as an environment variable:
export NAMESPACE=<new-project>
Step 1: Configure secrets (optional)
By default, the Operator generates users Secrets automatically, so you don’t have to do anything. Yet if you wish to use your own Secrets, here’s how:
-
Edit the
deploy/secrets.yamlfile to set up your MySQL users and passwords:apiVersion: v1 kind: Secret metadata: name: cluster1-secrets type: Opaque stringData: root: root_password xtrabackup: backup_password monitor: monitory proxyadmin: admin_password # pmmserverkey: my_pmm_server_key # pmmservertoken: my_pmm_server_token operator: operatoradmin replication: repl_password -
Create the Secret with the following command:
oc create -f deploy/secrets.yaml -n $NAMESPACETo learn more about secrets, see Users.
Step 2: Configure certificates (optional)
The Operator handles certificate generation automatically so don’t have to do anything. However, if you need custom certificates:
- Generate your certificates
- Create a secret with your certificates
- Reference the secret in your cluster configuration
See TLS instructions for the steps.
Step 3: Deploy the database cluster
-
To deploy Percona XtraDB Cluster means to create a Custom Resource for it in OpenShift. The Operator holds a collection of controllers that create and manage this Custom Resource:
The Custom Resource is described by the
deploy/cr.yamlfile. So to create it, you need to apply this file as follows:oc apply -f deploy/cr.yaml -n $NAMESPACEThe creation process may take some time. When the process is over your cluster will obtain the
readystatus. You can check it with the following command:oc get pxcExpected output
NAME       ENDPOINT                   STATUS   PXC   PROXYSQL   HAPROXY   AGE
cluster1   cluster1-haproxy.default   ready    3                3         5m51s
Verify the cluster operation
It may take ten minutes to get the cluster started. When the oc get pxc
command output shows you the cluster status as ready, you can try to connect
to the cluster.
To connect to Percona XtraDB Cluster you will need the password for the root user. Passwords are stored in the Secrets object.
Here’s how to get it:
-
List the Secrets objects.
The Secrets object you are interested in has theoc get secretscluster1-secretsname by default. -
Use the following command to get the password of the
rootuser. Substitute the<namespace>placeholder with your value (and use the different Secrets object name instead of thecluster1-secrets, if needed):oc get secret cluster1-secrets -n <namespace> --template='{{.data.root | base64decode}}{{"\n"}}' -
Run a container with
mysqltool and connect its console output to your terminal. The following command does this, naming the new Podpercona-client:oc run -n <namespace> -i --rm --tty percona-client --image=percona/percona-xtradb-cluster:8.4.8-8.1 --restart=Never -- bash -ilExecuting it may require some time to deploy the corresponding Pod.
-
Now run the
mysqltool in thepercona-clientcommand shell using the password obtained from the Secret instead of the<root_password>placeholder. The command will look different depending on whether your cluster provides load balancing with HAProxy (the default choice) or ProxySQL:mysql -h cluster1-haproxy -uroot -p'<root_password>'mysql -h cluster1-proxysql -uroot -p'<root_password>'This command will connect you to the MySQL server.
Created: September 19, 2022