![]()
Percona XtraBackup
Documentation
8.4.0-6 (June 24, 2026)
Percona XtraBackup 8.4 Documentation
This documentation is for the latest release: Percona XtraBackup 8.4.0-6 release notes.
Percona XtraBackup is an open source hot backup utility for MySQL-based servers that keep your database fully available during planned maintenance windows.
Whether it is a 24x7 highly loaded server or a low-transaction-volume Percona XtraBackup is designed to make backups seamless without disrupting the performance of the server in a production environment. Percona XtraBackup (PXB) is a 100% open source backup solution with commercial support available for organizations who want to benefit from comprehensive, responsive, and cost-flexible database support for MySQL.
Percona XtraBackup features
Taking your backup with Percona XtraBackup is easy. Follow our documentation guides, and you’ll be set up in quickly.
Installation guides
Find the best installation solution with our step-by-step installation instructions.
Binaries
Learn about the Percona XtraBackup binaries: xtrabackup, xbcloud, xbcrypt, and xbstream.
Backup management
Learn about the different types of backups and how to take them.
Supported storage engines
Percona XtraBackup 8.4 supports backing up data from the following storage engines only on MySQL 8.4 and Percona Server for MySQL 8.4, including Percona XtraDB Cluster 8.4:
-
InnoDB
-
XtraDB
-
MyISAM
-
MyRocks
It does not support backups on MySQL 8.0 or 9.x servers.
Percona XtraBackup 8.4 can take full backups of databases using the MyRocks storage engine.
Limitations
Percona XtraBackup 8.4 does not support backing up of databases created in versions before 8.4 of MySQL, Percona Server for MySQL or Percona XtraDB Cluster.
Incremental backups for MyRocks are not optimized. Each time you run an incremental backup, all MyRocks files are copied, even if they haven’t changed since the previous backup.
InnoDB tables are locked while copying non-InnoDB data.
Get help from Percona
Our documentation guides are packed with information, but they can’t cover everything you need to know about Percona XtraBackup. They also won’t cover every scenario you might come across. Don’t be afraid to try things out and ask questions when you get stuck.
Percona’s Community Forum
Be a part of a space where you can tap into a wealth of knowledge from other database enthusiasts and experts who work with Percona’s software every day. While our service is entirely free, keep in mind that response times can vary depending on the complexity of the question. You are engaging with people who genuinely love solving database challenges.
We recommend visiting our Community Forum . It’s an excellent place for discussions, technical insights, and support around Percona database software. If you’re new and feeling a bit unsure, our FAQ and Guide for New Users ease you in.
If you have thoughts, feedback, or ideas, the community team would like to hear from you at Any ideas on how to make the forum better? . We’re always excited to connect and improve everyone’s experience.
Percona experts
Percona experts bring years of experience in tackling tough database performance issues and design challenges.
We understand your challenges when managing complex database environments. That’s why we offer various services to help you simplify your operations and achieve your goals.
| Service | Description |
|---|---|
| 24/7 Expert Support | Our dedicated team of database experts is available 24/7 to assist you with any database issues. We provide flexible support plans tailored to your specific needs. |
| Hands-On Database Management | Our managed services team can take over the day-to-day management of your database infrastructure, freeing up your time to focus on other priorities. |
| Expert Consulting | Our experienced consultants provide guidance on database topics like architecture design, migration planning, performance optimization, and security best practices. |
| Comprehensive Training | Our training programs help your team develop skills to manage databases effectively, offering virtual and in-person courses. |
We’re here to help you every step of the way. Whether you need a quick fix or a long-term partnership, we’re ready to provide your expertise and support.
Release notes
Percona XtraBackup 8.4 release notes index
Percona XtraBackup 8.4.0-6 (2026-06-24)
Get started with Quickstart Guide for Percona XtraBackup.
Release highlights
Percona XtraBackup 8.4.0-6 release includes new features, improvements and bug fixes.
-
Percona XtraBackup introduces the
--check-tablesoption to validate the structural integrity of InnoDB B-tree indexes during the--preparephase. Validation during--preparehelps detect corrupted indexes before restore or production deployment. -
Percona XtraBackup introduces backup size reporting for successful backups. Percona XtraBackup now records backup size in
xtrabackup_infoand reports the same information in the XtraBackup error log. Backup size reporting helps estimate storage requirements, check that backups work correctly, and plan restores for compressed and streamed backups. -
Percona XtraBackup adds support for Azure Storage accounts with Hierarchical Namespace (HNS) enabled in
xbcloud delete. Percona XtraBackup now correctly removes backups from Azure Data Lake Storage Gen2 environments where deletion previously failed due to unsupported HNS behavior. -
Percona XtraBackup improves
--copy-backand--move-backhandling for backups created from servers with non-default InnoDB configuration paths. Percona XtraBackup now automatically processes configuration values stored inbackup-my.cnf, avoiding restore failures caused by custominnodb_data_file_pathand related settings. -
Percona XtraBackup improves sparse file handling efficiency by removing redundant
fallocate(PUNCH_HOLE)calls fromlocal_write_sparse. -
Percona XtraBackup improves incremental backup speed for instances containing around one million tables, reducing the time required for incremental backups to complete.
We recommend that you download the Percona XtraBackup for the same platform as the MySQL-compatible server. For example, if your server is on an ARM64 platform, you should download and use the Percona XtraBackup for ARM64 for that operating system.
New features
PXB-3328: Adds the --check-tables option to validate InnoDB B-tree index integrity during the --prepare phase. The option detects structural corruption in backup files before restore or deployment.
PXB-3747: Adds backup size reporting for successful backups. Percona XtraBackup now records backup size in xtrabackup_info and reports the same information in the XtraBackup error log.
Improvements
PXB-3643: Adds support for Azure Storage accounts with Hierarchical Namespace (HNS) enabled in xbcloud delete. Percona XtraBackup now correctly removes backups from Azure Data Lake Storage Gen2 environments where deletion previously failed due to unsupported HNS behavior.
PXB-3458: Improves --copy-back and --move-back handling for backups created from servers with non-default InnoDB configuration paths. Percona XtraBackup now automatically processes configuration values stored in backup-my.cnf, avoiding restore failures caused by custom innodb_data_file_path and related settings.
PXB-3658: Improves sparse file handling efficiency by removing redundant fallocate(PUNCH_HOLE) calls from local_write_sparse.
Bug fixes
PXB-3568: Fixed an issue where xtrabackup terminated unexpectedly on RHEL 9 when using --compress=lz4.
PXB-3759: Fixed an issue where xtrabackup terminated unexpectedly when redo log encryption was enabled and innodb_log_buffer_size exceeded 16 MB.
PXB-3762: Fixed an issue where xtrabackup --backup --transition-key terminated unexpectedly on servers where undo tablespace encryption keys existed only in redo logs.
PXB-3543: Fixed an issue where incremental backups on instances containing around one million tables completed significantly slower than expected.
Packaging notes
- Percona XtraBackup 8.4 adds support for Ubuntu 26.04.
Additional resources
Install Percona XtraBackup 8.4.0-6
The Percona XtraBackup GitHub repository
Download product binaries, packages, and tarballs at Percona Product Downloads
Percona XtraBackup 8.4.0-5 (2025-12-17)
Get started with Quickstart Guide for Percona XtraBackup.
Release highlights
Announcement – Discontinuation of the Percona PRO Program
Percona has consolidated its build offerings. The Pro builds are no longer required. All features from the Percona XtraBackup 8.4.x Pro build series have been merged into the main open source Community release. The Reduced backup lock time feature, originally introduced in Percona XtraBackup Pro 8.4.0-2 for Pro builds, is now included in the Community release starting with Percona XtraBackup 8.4.0-5.
We recommend that you download the Percona XtraBackup for the same platform as the MySQL-compatible server. For example, if your server is on an ARM64 platform, you should download and use the Percona XtraBackup for ARM64 for that operating system.
Improvement
PXB-2724: The --move-back option was not applied when restoring RocksDB files, causing the restore process to always perform a file copy instead of moving the files back to their original location.
Bug fix
PXB-3624: Fixed an issue where xbcloud could exit because libcurl attempted to use a libev event loop after it had already been shut down. xbcloud will throw a warning with libcurl 8.11.x versions and may still exit due to CVE-2025-0665. The issue is resolved in libcurl 8.12.0 and later.
Packaging and build notes
-
Percona XtraBackup 8.4 adds support for Debian 13.
-
Percona XtraBackup 8.4 has ended support for Ubuntu 20.04.
Additional resources
Install Percona XtraBackup 8.4.0-5
The Percona XtraBackup GitHub repository
Download product binaries, packages, and tarballs at Percona Product Downloads
Percona XtraBackup 8.4.0-4 (2025-08-21)
Get started with Quickstart Guide for Percona XtraBackup.
Release highlights
This release provides improvements and bug fixes.
We recommend that you download the Percona XtraBackup for the same platform as the MySQL-compatible server. For example, if your server is on an ARM64 platform, you should download and use the Percona XtraBackup for ARM64 for that operating system.
Bug fixes
PXB-3571: If you use transition keys with --lock-ddl=reduced, XtraBackup does not save the encrypted tablespace keys in the xtrabackup_keys file. Consequently, XtraBackup prepare fails when it later attempts to open the encrypted tablespace.
PXB-3470: When streaming a backup that has been compressed (using lz4 or zstd with the --compress option), the decompression process, whether performed by xbstream --decompress or xtrabackup --decompress, requires a significant amount of time.
Platform support
- Percona XtraBackup 8.4.0-4 supports Red Hat Enterprise Linux 10.
Additional resources
Install Percona XtraBackup 8.4.0-4
The Percona XtraBackup GitHub repository
Download product binaries, packages, and tarballs at Percona Product Downloads
Percona XtraBackup 8.4.0-3 (2025-05-29)
Get started with Quickstart Guide for Percona XtraBackup.
Release highlights
This release provides improvements and bug fixes.
We recommend that you download the Percona XtraBackup for the same platform as the MySQL-compatible server. For example, if your server is on an ARM64 platform, you should download and use the Percona XtraBackup for ARM64 for that operating system.
Improvements
PXB-3427: Percona XtraBackup now prepares incremental backups faster. The --prepare command directly applies the .delta files. To speed up this process, use the --parallel=X option, replacing X with the number of threads you want to use simultaneously. This option applies the delta files concurrently. For more information, see Prepare an incremental backup.
PXB-3199: The xbcloud put operations were updated to include support for ObjectLock-enabled AWS S3 buckets (Thanks to volver for contributing the fix for this issue.)
Bug fixes
- PXB-3426: Fix xtrabackup crashes caused by Key Management Interoperability Protocol (KMIP) component keyring usage.
Pro build bug fixes
PXB-3279: Removed the requirement for the --lock-ddl=reduced option to configure the number of open file handles to match the number of files in the server data directory. This limitation previously made the feature difficult to use on large instances with millions of IBD files.
Additional resources
Install Percona XtraBackup 8.4.0-3
The Percona XtraBackup GitHub repository
Download product binaries, packages, and tarballs at Percona Product Downloads
Percona XtraBackup 8.4.0-2 (2024-12-18)
Get started with Quickstart Guide for Percona XtraBackup.
Release highlights
Percona XtraBackup 8.4.0-2 merges the MySQL 8.4 code base and introduces Percona XtraBackup 8.4.0-2 Pro build, in addition to the regular community builds.
Percona XtraBackup 8.4.0-2 Pro build includes the capabilities that are typically requested by large enterprises. These Pro builds are specifically created and tested by Percona, and the corresponding packages are supported only for Percona customers with a valid subscription.
Percona XtraBackup 8.4.0-2 Pro build is available for the following platforms:
-
Oracle Linux 9
-
Ubuntu (22.04)
-
Ubuntu (24.04)
-
Debian (12)
Percona XtraBackup 8.4.0-2 Pro build includes the Reduced backup lock time feature. With the addition of the --lock-ddl=REDUCED option this feature minimizes the time the server remains locked by xtrabackup during both full and incremental backups. Now, you can execute Data Definition Language (DDL) operations while the backup is in progress.
Benefits
The --lock-ddl=REDUCED option features are as follows:
-
Acquire and release the backup lock quickly: The backup process minimizes the time it holds the backup lock, allowing for concurrent DDL operations.
Comparing the backup duration with –lock-ddl=REDUCED
While we strive to provide accurate performance benchmarks, real-world results may vary depending on your hardware and software configurations.
The following tables illustrate the approximate time differences between
--lock-ddl=ONand--lock-ddl=REDUCEDfor local and cloud backups (Amazon S3). TheImprovement (X times)column shows how many times less the server is locked by xtrabackup using--lock-ddl=REDUCEDcompared to--lock-ddl=ON.Data size in gigabytes Backup duration with –lock-ddl=ON in seconds Backup duration with –lock-ddl=REDUCED in seconds Improvement (X times) 50 GB 460.2 sec 2.169 sec 212.17 100 GB 901.8 sec 1.305 sec 691.03 200 GB 1820.4 sec 1.347 sec 1351.45 400 GB 3580.2 sec 1.24 sec 2887.26 500 GB 5436 sec 1.264 sec 4300.63 Data size in gigabytes Backup duration with –lock-ddl=ON in seconds Backup duration with –lock-ddl=REDUCED in seconds Improvement (X times) 50 GB 469.8 sec 3.859 sec 121.74 100 GB 927.6 sec 4.072 sec 227.80 200 GB 1851.6 sec 4.408 sec 420.05 400 GB 3888 sec 3.948 sec 984.80 500 GB 4896 sec 4.065 sec 1204.43 Using
--lock-ddl=REDUCEDleads to a dramatic reduction in backup time compared to--lock-ddl=ON, especially with larger data sizes. -
Track changes with redo logs: Redo logs record all file-level changes, ensuring data consistency during the backup process.
- Handle DDL operations: The backup process generates metadata files to account for any DDL operations that occur while the backup is in progress.
- Ensure consistency: The
--preparestep processes generated metadata files and uses redo and undo logs to create a consistent database state.
Limitations
-
Certain DDL operations consume significant resources, and xtrabackup simultaneously requires I/O to copy and read files. This requirement can increase resource demand from DDL operations during the backup process.
-
The master key rotation with the
ALTER INSTANCE ROTATE INNODB MASTER KEYis prohibited while backup is in progress. -
Backups may be larger because new
DDLoperations are executed concurrently on the server, and the files generated by the server are included in the backup. Additionally, certainDDLoperations, such asADD INDEXor encryption changes to existing data files, will cause the data files to be recopied, increasing the backup size. -
The number of open file handles in your operating system should be configured to match the number of files in the server data directory.
-
Taking a backup using page tracking is not supported with
--lock-ddl=REDUCEDoption.
Pro features
PXB-3269: Reduces the time the server is locked by xtrabackup during full and incremental backups.
Bug fixes
-
PXB-3399: Taking a backup on a replica failed (Thanks to Hubertus Krogmann for reporting this issue.)
-
PXB-3168: Taking a backup under high write load failed with
log block numbers mismatcherror. This fix was originally made for version 8.0 and later added to version 8.4. This fix was accidentally omitted in a previous release.
Additional resources
Install Percona XtraBackup 8.4.0-2
The Percona XtraBackup GitHub repository
Download product binaries, packages, and tarballs at Percona Product Downloads
Percona XtraBackup 8.4.0-1 (2024-08-20)
Get started with Quickstart Guide for Percona XtraBackup.
Release highlights
Percona XtraBackup 8.4.0-1 is based on MySQL 8.4 Long Term Supported (LTS) Release. This release allows taking backups of Percona Server for MySQL and MySQL 8.4.0, 8.4.1, 8.4.2 and future 8.4 LTS releases.
Use the Percona XtraBackup 8.0 series to take backups of Percona Server for MySQL 8.0.x and MySQL 8.0.x series.
Use the Percona XtraBackup Innovation series, the latest version is 8.3.0-1, to take backups of Percona Server for MySQL Innovation series and MySQL Innovation series.
Improvements
Implementations inherited from the Innovation releases
- PXB-3155: The Percona Server for MySQL 8.0 series implemented the keyring_vault plugin. In the Innovation series and 8.4 version, the server shifts to a component infrastructure, the keyring’s functionality remains the same. Percona XtraBackup 8.4.0-1 supports the
keyring_vaultcomponent. Users can back up their encrypted data after they convert from thekeyring_vaultplugin to thekeyring_vaultcomponent.
Bug fixes
- PXB-3302: When a MySQL instance had an exceptionally large number of Global Transaction Identifier (GTID) sets, the
GTID of the last changein the Xtrabackup log output got truncated. This truncation did not occur in the full output found in thextrabackup_binlog_infoandxtrabackup_infofiles.
Deprecated or removed
-
The terms MASTER and SLAVE have been replaced with SOURCE and REPLICA to align with MySQL 8.4.0. Find the full list of removed (MASTER/SLAVE) terminology in the MySQL Deprecation and Removal Notes.
-
Percona XtraBackup 8.4.0-1 removes support for the Keyring file plugin. Use the Keyring file component instead.
-
The
--statsmode of operation for the xtrabackup binary has been removed.
Additional resources
Install Percona XtraBackup 8.4.0-1
The Percona XtraBackup GitHub repository
Download product binaries, packages, and tarballs at Percona Product Downloads
Quickstart Guide
Quickstart overview
Percona XtraBackup performs online, non-blocking physical backups for Percona Server for MySQL and MySQL databases. This quickstart guide uses Docker to demonstrate backup and restore operations.
For alternative installation methods, see Installation.
Why use Docker for this quickstart
Docker containers isolate applications from the host system. Running Percona XtraBackup in a container provides the following benefits:
-
No installation required on the host system
-
Consistent environment across different operating systems
-
Complete removal leaves no residual files
For production deployments, see Installation for package-based installation options.
Supported configurations
Verify your environment meets the following requirements before starting.
Supported servers
Percona XtraBackup 8.4 supports the following MySQL-compatible servers:
-
MySQL Server
-
Percona Server for MySQL
-
Percona XtraDB Cluster
Supported storage engines
Percona XtraBackup 8.4 supports the following storage engines:
-
InnoDB
-
MyISAM
-
MyRocks
-
XtraDB
Version requirements
Percona XtraBackup 8.4 requires databases created with the 8.4 series or later. Databases created with earlier MySQL, Percona Server for MySQL, or Percona XtraDB Cluster versions are not supported.
For detailed version compatibility information, see Server and backup version comparison.
Prerequisites
Both learning paths require Docker installed on your system. Each tutorial includes specific setup instructions for Percona Server for MySQL.
Choose your learning path
This quickstart offers two paths based on your experience level and goals:
| Path | Best for | Time | Topics covered |
|---|---|---|---|
| Basic quickstart | First-time users learning core concepts | 15-20 min | Single backup, restore, validation |
| Docker Compose tutorial | Production-oriented users | 30-40 min | Backup profiles, validation testing, disaster recovery |
Basic quickstart
The basic quickstart teaches core Percona XtraBackup operations using individual Docker commands:
-
Create a backup volume
-
Take and prepare a full backup
-
Restore a backup to a new container
-
Validate restored data
Docker Compose tutorial
The Docker Compose tutorial demonstrates a production-ready backup workflow with separate services for backup, validation, and restore:
-
Configure Docker Compose with backup profiles
-
Validate backups before relying on them for recovery
-
Simulate a disaster scenario
-
Execute a complete restore operation
-
Understand file permission requirements
Terminology
This quickstart uses the following terms:
| Term | Definition |
|---|---|
| Container | The Docker container running Percona XtraBackup or Percona Server |
| Instance | The MySQL database server process running inside a container |
| Volume | Docker persistent storage that survives container restarts |
| Prepared backup | A backup with transaction logs applied, ready for restoration |
For additional terminology, see Glossary.
Take a backup with Docker
This tutorial describes how to create a backup volume, run Percona XtraBackup in a Docker container, and take a prepared backup of a Percona Server for MySQL database.
Learning objectives
This tutorial covers the following tasks:
-
Create a Docker volume to store backup files
-
Connect Percona XtraBackup to a running Percona Server container
-
Take a full backup using
xtrabackup --backup -
Prepare the backup using
xtrabackup --prepare
Prerequisites
Complete the following steps before starting this tutorial:
-
Install Docker on your system
-
Start Percona Server in a Docker container - Creates the
psmysqlcontainer with themydbdatabase andemployeestable
Architecture overview
Percona XtraBackup runs in a separate Docker container and connects to the Percona Server for MySQL container. This connection allows the backup tool to access the database files for backup and restore operations.
For more information about how Percona XtraBackup works, see How Percona XtraBackup works.
Step 1: Create a backup volume
Docker volumes provide persistent storage that remains accessible across container restarts and updates. Creating a dedicated backup volume offers the following benefits:
-
Data persists independently of container lifecycle
-
Multiple containers can access the same backup data
-
Backup files remain available for restore operations
Create the backup volume with the following command:
docker volume create backupvol
Expected output
backupvol
Step 2: Take and prepare the backup
The backup process requires connecting the Percona XtraBackup container to the Percona Server container. The --user root option grants the necessary permissions to access the MySQL data directory.
Understand the command options
The following table describes each option used in the backup command:
| Option | Description |
|---|---|
--name pxb |
Assigns the name pxb to the container |
--volumes-from psmysql |
Mounts volumes from the psmysql container to access database files |
-v backupvol:/backup_84 |
Mounts the backupvol volume at /backup_84 inside the container |
-it |
Allocates a pseudo-terminal for interactive password entry |
--user root |
Runs the container as root to access the MySQL data directory |
--password |
Prompts for the MySQL root password |
Run the backup command
Select the command for your system architecture:
docker run --name pxb --volumes-from psmysql -v backupvol:/backup_84 -it --user root percona/percona-xtrabackup:8.4 /bin/bash -c "xtrabackup --backup --datadir=/var/lib/mysql/ --target-dir=/backup_84 --user=root --password; xtrabackup --prepare --target-dir=/backup_84"
docker run --name pxb --volumes-from psmysql -v backupvol:/backup_84 -it --user root percona/percona-xtrabackup:8.4-aarch64 /bin/bash -c "xtrabackup --backup --datadir=/var/lib/mysql/ --target-dir=/backup_84 --user=root --password; xtrabackup --prepare --target-dir=/backup_84"
Enter the password secret when prompted:
2024-10-07T13:55:47.640100-00:00 0 [Note] [MY-011825] [Xtrabackup] recognized server arguments: --datadir=/var/lib/mysql/
2024-10-07T13:55:47.641887-00:00 0 [Note] [MY-011825] [Xtrabackup] recognized client arguments: --backup=1 --target-dir=/backup_84 --user=root --password
Enter password:
Expected output
xtrabackup version 8.4.0-1 based on MySQL server 8.4.0 Linux (x86_64) (revision id: 3792f907)
2024-10-07T13:55:51.255518-00:00 0 [Note] [MY-011825] [Xtrabackup] perl binary not found. Skipping the version check
2024-10-07T13:55:51.256080-00:00 0 [Note] [MY-011825] [Xtrabackup] Connecting to MySQL server host: localhost, user: root, password: set, port: not set, socket: not set
2024-10-07T13:55:51.270222-00:00 0 [Note] [MY-011825] [Xtrabackup] Using server version 8.4.0-1
2024-10-07T13:55:51.272839-00:00 0 [Note] [MY-011825] [Xtrabackup] Executing LOCK TABLES FOR BACKUP

...

2024-10-07T13:55:55.550829-00:00 0 [Note] [MY-011825] [Xtrabackup] completed OK!
The command executes two xtrabackup operations:
-
xtrabackup --backup- Copies data files from/var/lib/mysql/to/backup_84 -
xtrabackup --prepare- Applies transaction logs to make the backup consistent
For more information about the backup and prepare process, see Create a full backup and Prepare a full backup.
Password visibility
Specifying the password directly with --password=secret exposes the password in docker ps, docker history, and system process listings. Use the interactive prompt for production environments.
Step 3: Verify the backup
Check the backup container logs to confirm the backup completed:
docker container logs pxb
Expected output
...
2024-10-07T13:55:55.550829-00:00 0 [Note] [MY-011825] [Xtrabackup] completed OK!
The message completed OK! confirms the backup and prepare operations finished.
Summary
This tutorial covered the following completed tasks:
-
Created the
backupvolDocker volume for backup storage -
Connected the Percona XtraBackup container to the
psmysqldatabase container -
Executed
xtrabackup --backupto copy database files -
Executed
xtrabackup --prepareto make the backup consistent
The backup stored in backupvol is ready for restoration.
Next steps
Restore the backup
This tutorial describes how to restore a Percona XtraBackup backup to a new database container. The tutorial also covers validating the restored data.
Learning objectives
This tutorial covers the following tasks:
-
Create a restore target container
-
Use
xtrabackup --copy-backto restore physical backup files -
Fix file permissions required for MySQL to start
-
Validate restored data accessibility
Prerequisites
Complete the following quickstart steps before starting this tutorial:
-
Start Percona Server in a Docker container - Creates the
psmysqlcontainer with themydbdatabase -
Take a backup - Creates the
backupvolvolume containing your prepared backup
Understanding host terminal vs container
This tutorial requires running commands in two different places:
| Location | Description | Prompt example |
|---|---|---|
| Host terminal | Your computer’s command line where you run docker commands |
$ or % |
| MySQL client | Inside a container, connected to the database | mysql> |
Commands starting with docker always run on your host terminal. SQL commands like SELECT run inside the MySQL client.
Verify the backup volume
Before proceeding, verify the backup volume exists.
If you are still in the MySQL client from the previous tutorial, exit to return to your host terminal:
exit
Expected output
Bye
Run the following command on your host terminal to verify the backup volume:
docker volume ls
Expected output
DRIVER    VOLUME NAME
local     backupvol
Confirm backupvol appears in the list. If the volume does not exist, complete the Take a backup tutorial first.
Restore process overview
Restoring a physical backup requires copying the backup files to a MySQL data directory. In Docker environments, the restore process requires the following steps:
-
Create a target container - A Percona Server container receives the restored data
-
Stop the target database - MySQL cannot run while the restore process overwrites data files
-
Clear the data directory - The target directory must be empty before restoration
-
Copy the backup files - The
xtrabackup --copy-backcommand transfers the files -
Fix file permissions - Restored files have
rootownership, but MySQL runs as themysqluser
For more information about the restore process, see Restore full, incremental, and compressed backups.
Step 1: Create a restore target container
Create a second Percona Server container named ps-restore-target as the restore destination. This configuration simulates restoring to a different server, a common disaster recovery scenario.
-
Create a Docker volume for the restore target:
docker volume create restore_dataExpected output
restore_dataThis volume stores the restored database files.
-
Start a Percona Server container:
docker run -d -p 3307:3306 --name ps-restore-target -e MYSQL_ROOT_PASSWORD=secret -v restore_data:/var/lib/mysql percona/percona-server:8.4docker run -d -p 3307:3306 --name ps-restore-target -e MYSQL_ROOT_PASSWORD=secret -v restore_data:/var/lib/mysql percona/percona-server:8.4-aarch64Expected output
4501d5524461b4483d414bd218d49ed4f47599add7d7fb81e157951a7a52f3d1The following table describes each option:
Option Purpose -dRuns the container in background mode -p 3307:3306Maps to port 3307 to avoid conflicts with the original database on port 3306 --name ps-restore-targetAssigns a descriptive container name -e MYSQL_ROOT_PASSWORD=secretSets the root password, which MySQL requires for initialization -v restore_data:/var/lib/mysqlMounts the volume for data storage -
Wait 30 seconds for container initialization, then verify the container status:
docker ps --filter name=ps-restore-targetExpected output
CONTAINER ID   IMAGE                       COMMAND                  CREATED          STATUS          PORTS                               NAMES
4501d552446    percona/percona-server:8.4  "/docker-entrypoint.…"   30 seconds ago   Up 29 seconds   33060/tcp, 0.0.0.0:3307->3306/tcp   ps-restore-target
Step 2: Prepare the target for restore
Stop the database and clear the data directory before restoring. The xtrabackup --copy-back command requires an empty target directory.
-
Stop the restore target container:
docker stop ps-restore-targetExpected output
ps-restore-targetDatabase must be stopped
MySQL locks data files while running. Overwriting locked files causes corruption or errors.
-
Clear the data directory:
The
--rmoption creates a temporary container. Docker removes this container automatically after the command completes.docker run --volumes-from ps-restore-target -v backupvol:/backup_84 -it --rm --user root percona/percona-xtrabackup:8.4 /bin/bash -c "rm -rf /var/lib/mysql/*"docker run --volumes-from ps-restore-target -v backupvol:/backup_84 -it --rm --user root percona/percona-xtrabackup:8.4-aarch64 /bin/bash -c "rm -rf /var/lib/mysql/*"If the command succeeds, the output is empty.
This command performs the following actions:
-
Mounts the
restore_datavolume through--volumes-from ps-restore-target -
Runs as
rootto obtain file deletion permissions -
Removes all files from
/var/lib/mysql/
-
Step 3: Restore the backup files
Copy the backup files from backupvol to the restore target data directory.
-
Run the restore command:
docker run --volumes-from ps-restore-target -v backupvol:/backup_84 -it --rm --user root percona/percona-xtrabackup:8.4 /bin/bash -c "xtrabackup --copy-back --datadir=/var/lib/mysql/ --target-dir=/backup_84"docker run --volumes-from ps-restore-target -v backupvol:/backup_84 -it --rm --user root percona/percona-xtrabackup:8.4-aarch64 /bin/bash -c "xtrabackup --copy-back --datadir=/var/lib/mysql/ --target-dir=/backup_84"Expected output
2024-10-07T14:08:59.127166-00:00 0 [Note] [MY-011825] [Xtrabackup] recognized server arguments: --datadir=/var/lib/mysql/
2024-10-07T14:08:59.128951-00:00 0 [Note] [MY-011825] [Xtrabackup] recognized client arguments: --copy-back=1 --target-dir=/backup_84
xtrabackup version 8.4.0-1 based on MySQL server 8.4.0 Linux (x86_64) (revision id: 3792f907)
2024-10-07T14:08:59.129407-00:00 0 [Note] [MY-011825] [Xtrabackup] cd to /backup_84/

...

2024-10-07T14:08:59.129407-00:00 0 [Note] [MY-011825] [Xtrabackup] Done: Copying ./ibtmp1 to /var/lib/mysql/ibtmp1
2024-10-07T14:08:59.129407-00:00 0 [Note] [MY-011825] [Xtrabackup] completed OK!
The following table describes each xtrabackup option:
Option Purpose --copy-backCopies backup files to the data directory; use --move-backto move files instead--datadirSpecifies the destination directory for restored files --target-dirSpecifies the source directory containing the prepared backup For a complete list of options, see xtrabackup option reference.
Step 4: Fix file permissions
The restored files have root ownership because the restore command ran as root. MySQL runs as the mysql user and cannot read files owned by root.
-
Change ownership of the restored files:
docker run --volumes-from ps-restore-target -v backupvol:/backup_84 -it --rm --user root percona/percona-xtrabackup:8.4 /bin/bash -c "chown -R mysql:mysql /var/lib/mysql/"docker run --volumes-from ps-restore-target -v backupvol:/backup_84 -it --rm --user root percona/percona-xtrabackup:8.4-aarch64 /bin/bash -c "chown -R mysql:mysql /var/lib/mysql/"If the command succeeds, the output is empty.
Required step
Skipping the
chowncommand causes MySQL to fail with permission errors:[ERROR] [MY-010187] [Server] Could not open file '/var/lib/mysql/ibdata1' for reading: Permission deniedFor more information about file permissions, see Permissions.
-
Start the restore target container:
docker start ps-restore-targetExpected output
ps-restore-target -
Check the container logs to verify MySQL started:
docker logs ps-restore-target 2>&1 | tail -5Expected output
2024-10-07T14:10:15.123456Z 0 [System] [MY-013576] [InnoDB] InnoDB initialization has started.
2024-10-07T14:10:15.234567Z 0 [System] [MY-013577] [InnoDB] InnoDB initialization has ended.
2024-10-07T14:10:15.345678Z 0 [System] [MY-011323] [Server] X Plugin ready for connections.
2024-10-07T14:10:15.345678Z 0 [System] [MY-010931] [Server] /usr/sbin/mysqld: ready for connections. Version: '8.4.0-1'  socket: '/var/lib/mysql/mysql.sock'  port: 3306  Percona Server (GPL), Release 1, Revision 238b3c02.
The message
ready for connectionsconfirms the server started.
Step 5: Validate the restored data
Connect to the restored database and verify data integrity.
-
Connect to the restored database:
docker exec -it ps-restore-target mysql -uroot -pExpected output
Enter password:
Welcome to the MySQL monitor.  Commands end with ; or \g.
Your MySQL connection id is 10
Server version: 8.4.0-1 Percona Server (GPL), Release 1, Revision 238b3c02

Copyright (c) 2009-2024 Percona LLC and/or its affiliates
Copyright (c) 2000, 2024, Oracle and/or its affiliates.

Oracle is a registered trademark of Oracle Corporation and/or its
affiliates. Other names may be trademarks of their respective
owners.

Type 'help;' or '\h' for help. Type '\c' to clear the current input statement.

mysql>
Enter the password
secretwhen prompted. -
Verify the
mydbdatabase exists:SHOW DATABASES;Expected output
+--------------------+ | Database | +--------------------+ | information_schema | | mydb | | mysql | | performance_schema | | sys | +--------------------+ 5 rows in set (0.03 sec) -
Query the
employeestable data:SELECT * FROM mydb.employees;Expected output
+----+--------------------+-----------------------------------+-------------+
| id | name               | email                             | country     |
+----+--------------------+-----------------------------------+-------------+
|  1 | Erasmus Richardson | [email protected] | England     |
|  2 | Jenna French       | [email protected]        | Canada      |
|  3 | Alfred Dejesus     | [email protected]                  | Austria     |
|  4 | Hamilton Puckett   | [email protected]          | Canada      |
|  5 | Michal Brzezinski  | [email protected]                   | Poland      |
|  6 | Zofia Lis          | [email protected]               | Poland      |
|  7 | Aisha Yakubu       | [email protected]             | Nigeria     |
|  8 | Miguel Cardenas    | [email protected]                 | Peru        |
|  9 | Luke Jansen        | [email protected]                  | Netherlands |
| 10 | Roger Pettersen    | [email protected]                | Norway      |
+----+--------------------+-----------------------------------+-------------+
10 rows in set (0.00 sec)
The data restoration completed.
-
Exit the MySQL client:
exitExpected output
Bye
Summary
This tutorial covered the following completed tasks:
-
Created a restore target container named
ps-restore-target -
Prepared the target by stopping MySQL and clearing the data directory
-
Restored backup files using
xtrabackup --copy-back -
Fixed file permissions with
chown -R mysql:mysql -
Validated data recovery
Next steps
Clean up quickstart resources
This tutorial describes how to remove the Docker containers, images, and volumes created during the quickstart.
Resources to remove
The following table lists all resources created during the quickstart tutorials:
| Resource | Type | Created in |
|---|---|---|
psmysql |
Container | Percona Server quickstart |
ps-restore-target |
Container | Restore the backup |
pxb |
Container | Take a backup with Docker |
backupvol |
Volume | Take a backup with Docker |
restore_data |
Volume | Restore the backup |
Step 1: Exit the MySQL client
If the MySQL client session remains open, exit the session before removing containers.
-
Exit the MySQL command client:
exitExpected output
ByeAlternative commands:
\qorquit
Step 2: Remove Docker containers
Remove the containers created during the quickstart. The -f option forces removal of running containers.
-
Remove the restore target container:
docker container rm ps-restore-target -fExpected output
ps-restore-target -
Remove the Percona Server container:
docker container rm psmysql -fExpected output
psmysql -
Remove the Percona XtraBackup container:
docker container rm pxb -fExpected output
pxb
Step 3: Remove Docker images (optional)
Remove the Docker images to free disk space. Skip this step to retain images for future use.
-
Remove the Percona Server image:
docker image rmi percona/percona-server:8.4Expected output
Untagged: percona/percona-server:8.4 Untagged: percona/percona-server@sha256:... Deleted: sha256:... -
Remove the Percona XtraBackup image:
docker image rmi percona/percona-xtrabackup:8.4Expected output
Untagged: percona/percona-xtrabackup:8.4
Untagged: percona/percona-xtrabackup@sha256:...
Deleted: sha256:...
Step 4: Remove Docker volumes
Remove the volumes that stored database and backup data.
Permanent data loss
Removing volumes permanently deletes all stored data. Verify the data is no longer needed before proceeding.
{.power-number}
-
Remove the backup volume:
docker volume rm backupvolExpected output
backupvol -
Remove the restore target volume:
docker volume rm restore_dataExpected output
restore_data
Verify resource removal
Confirm all quickstart resources have been removed with the following commands:
docker ps -a --filter "name=psmysql" --filter "name=ps-restore-target" --filter "name=pxb"
docker volume ls --filter "name=backupvol" --filter "name=restore_data"
Expected output
CONTAINER ID   IMAGE     COMMAND   CREATED   STATUS    PORTS     NAMES

DRIVER    VOLUME NAME
Empty results confirm resource removal completed.
Summary
This tutorial covered the removal of the following quickstart resources:
-
Three Docker containers:
psmysql,ps-restore-target,pxb -
Two Docker images:
percona/percona-server:8.4,percona/percona-xtrabackup:8.4 -
Two Docker volumes:
backupvol,restore_data
For information about running Percona XtraBackup in production environments, see Installation.
Next step
Next steps
This page provides recommendations for continuing your Percona XtraBackup learning after completing the quickstart.
Continue learning Percona XtraBackup
The following resources expand on the concepts covered in the quickstart:
| Topic | Description |
|---|---|
| Create incremental backups | Back up only changed data to reduce backup time and storage |
| Create compressed backups | Reduce backup size with compression |
| Encrypt backups | Protect backup data with encryption |
| Stream backups to cloud storage | Send backups directly to S3, GCS, or Azure |
Docker Compose tutorial
For a production-ready approach to backup validation and disaster recovery, follow the Docker Compose backup and restore tutorial. This tutorial covers the following topics:
-
Configure Docker Compose with backup profiles
-
Validate backups before relying on them for recovery
-
Simulate and recover from a disaster scenario
-
Understand file permission requirements for containerized restores
Production installation
The quickstart uses Docker for demonstration purposes. For production environments, install Percona XtraBackup directly on the database server.
See Installation for package-based installation options.
Related Percona products
The following Percona products work with Percona XtraBackup:
| Product | Purpose | Documentation |
|---|---|---|
| Percona Server for MySQL | MySQL-compatible database with performance enhancements | Installation |
| Percona XtraDB Cluster | High-availability MySQL clustering with Galera | Installation |
| Percona Monitoring and Management | Database monitoring and performance analysis | Quickstart |
| Percona Toolkit | Command-line tools for MySQL administration | Documentation |
How Percona XtraBackup works
About Percona XtraBackup
This page gives a short overview of Percona XtraBackup: what it is, why use it, and where to go next in the docs.
What is Percona XtraBackup?
Percona XtraBackup is the an open source, free MySQL hot backup software that performs non-blocking backups for InnoDB and XtraDB databases.
Percona XtraBackup makes hot backups for Percona Server for MySQL and MySQL-compatible servers. It supports streaming, compressed, and incremental backups, and encryption.
Benefits
With Percona XtraBackup you can:
-
Complete a backup quickly and reliably
-
Process transactions uninterrupted during a backup
-
Save on disk space and network bandwidth
-
Verify backup automatically
Support
Percona’s enterprise-grade commercial MySQL Support contracts include support for Percona XtraBackup. We recommend support for critical production deployments.
Supported storage engines
Percona XtraBackup can back up data from InnoDB, XtraDB, MyISAM, and MyRocks tables on MySQL 8.4 servers as well as Percona Server for MySQL 8.4.
Percona XtraBackup supports the MyRocks storage engine. Percona XtraBackup copies all MyRocks files on every backup. Incremental backups for MyRocks are not truly incremental: each one copies all MyRocks files, whether or not those files were already in a full or earlier incremental backup.
Where to go next
| If you want to… | Go to |
|---|---|
| Get running quickly | Quickstart guide |
| Install on your system | Installation |
| Understand how backups work | How Percona XtraBackup works |
| See backup types and workflows | Backup overview |
| Use the backup tools (xtrabackup, xbcloud, xbcrypt, xbstream) | Binaries overview |
Percona XtraBackup features
The following is a short list of the Percona XtraBackup features:
-
Creates hot InnoDB backups without pausing your database
-
Makes incremental backups of MySQL
-
Streams compressed MySQL backups to another server
-
Moves tables between MySQL servers on-line
-
Creates new MySQL replication replicas easily
-
Backs up MySQL without adding load to the server
-
Performs throttling based on the number of IO operations per second
-
Exports individual tables from a full InnoDB backup
Percona XtraBackup automatically uses backup locks, a lightweight alternative to FLUSH TABLES WITH READ LOCK available in Percona Server, to copy non-InnoDB data. This operation avoids blocking DML queries that modify InnoDB tables.
See also
How Percona XtraBackup works
Percona XtraBackup is based on InnoDB’s crash-recovery functionality. It copies your InnoDB data files, which results in data that is internally inconsistent; but then it performs crash recovery on the files to make them a consistent, usable database again.
This works because InnoDB maintains a redo log, also called the transaction log. This contains a record of every change to InnoDB data. When InnoDB starts, it inspects the data files and the transaction log, and performs two steps. It applies committed transaction log entries to the data files, and it performs an undo operation on any transactions that modified data but did not commit.
The --register-redo-log-consumer parameter is disabled by default. When enabled, this parameter lets Percona XtraBackup register as a redo log consumer at the start of the backup. The server does not remove a redo log that Percona XtraBackup (the consumer) has not yet copied. The consumer reads the redo log and manually advances the log sequence number (LSN). The server blocks the writes during the process. Based on the redo log consumption, the server determines when it can purge the log.
Percona XtraBackup remembers the LSN when it starts, and then copies the data files. The operation takes time, and the files may change, then LSN reflects the state of the database at different points in time. Percona XtraBackup also runs a background process that watches the transaction log files, and copies any changes. Percona XtraBackup does this continually. The transaction logs are written in a round-robin fashion, and can be reused.
Percona XtraBackup uses Backup locks where available as a lightweight alternative to FLUSH TABLES WITH READ LOCK. MySQL 8.4 allows acquiring an instance level backup lock via the LOCK INSTANCE FOR BACKUP statement.
Locking is only done for MyISAM and other non-InnoDB tables after Percona XtraBackup finishes backing up all InnoDB/XtraDB data and logs. Percona XtraBackup uses this automatically to copy non-InnoDB data to avoid blocking DML queries that modify InnoDB tables.
Important
The BACKUP_ADMIN privilege is required to query the
performance_schema_log_status for either LOCK
INSTANCE FOR BACKUP or LOCK TABLES FOR BACKUP.
xtrabackup tries to avoid backup locks and FLUSH TABLES WITH READ LOCK
when the instance contains only InnoDB tables. In this case, xtrabackup
obtains binary log coordinates from performance_schema.log_status. FLUSH
TABLES WITH READ LOCK is still required in MySQL 8.4 when xtrabackup is
started with the --slave-info. The log_status table in Percona
Server for MySQL 8.4 is extended to include the relay log coordinates, so no locks are
needed even with the --slave-info option.
When backup locks are supported by the server, xtrabackup first copies
InnoDB data, runs the LOCK TABLES FOR BACKUP and then copies the MyISAM
tables. Once this is done, the backup of the files will
begin. It will backup .frm, .MRG, .MYD, .MYI, .CSM,
.CSV, .sdi and .par files.
After that xtrabackup will use LOCK BINLOG FOR BACKUP to block all
operations that might change either binary log position or
Exec_Source_Log_Pos or Exec_Gtid_Set (i.e. source binary log coordinates
corresponding to the current SQL thread state on a replication replica) as
reported by SHOW BINARY LOG STATUS or SHOW REPLICA STATUS. xtrabackup will then finish copying
the REDO log files and fetch the binary log coordinates. After this is completed
xtrabackup will unlock the binary log and tables.
Finally, the binary log position will be printed to STDERR and xtrabackup
will exit returning 0 if all went OK.
Note that the STDERR of xtrabackup is not written in any file. You will
have to redirect it to a file, for example, xtrabackup OPTIONS 2> backupout.log.
It will also create the following files in the directory of the backup.
Prepare phase
This phase involves two primary operations: applying the redo log and the undo log.
Redo Log Application (Physical Operation)
XtraBackup directly applies changes recorded in the redo log to specific page offsets within the tablespace (IBD file). This is a physical operation, meaning it works at the page level, without regard for rows or transactions.
It’s important to understand that the redo log might contain uncommitted transactions, as the server can flush or write these to the log. Therefore, the redo log application doesn’t inherently guarantee transactional consistency.
Undo Log Application (Logical Operation)
Following the redo log application, XtraBackup uses the undo log to logically roll back changes from any uncommitted transactions present in the redo log.
Undo log records are of two types: INSERT and UPDATE. Each record contains a table_id, which XtraBackup uses to locate the table definition.
To perform the rollback, XtraBackup initializes the InnoDB engine and data dictionary, then uses Serialized Dictionary Information (SDI) from the tablespace (a JSON representation of the table) to parse index pages and apply undo operations.
Tables are loaded as evictable, and XtraBackup scans data dictionary indexes to relate table_id to tablespace, which is used during rollback. User tables are loaded only when needed for rollback. This design significantly reduces memory and I/O usage, speeds up the --prepare phase, and improves Percona XtraDB Cluster SST performance.
Achieving Consistency: Redo, Undo, and MyISAM
The --prepare phase ensures that InnoDB tables are rolled forward to the point where the backup completed, not rolled back to where it began. This point aligns with the time a FLUSH TABLES WITH READ LOCK was taken, which is crucial for maintaining consistency with MyISAM tables.
Therefore, after the --prepare phase, both InnoDB and MyISAM tables are eventually consistent with each other.
Restore a backup
To restore a backup with xtrabackup you can use the --copy-back or
--move-back options.
xtrabackup will read from the my.cnf the variables datadir,
innodb_data_home_dir, innodb_data_file_path,
innodb_log_group_home_dir and check that the directories exist.
It will copy the MyISAM tables, indexes, etc. (.MRG, .MYD,
.MYI, .CSM, .CSV, .sdi,
and par files) first, InnoDB tables and indexes next and the log files at
last. It will preserve file’s attributes when copying them, you may have to
change the files’ ownership to mysql before starting the database server, as
they will be owned by the user who created the backup.
Alternatively, the --move-back option may be used to
restore a backup. This option is similar to --copy-back
with the only difference that instead of copying files it moves them to their
target locations. As this option removes backup files, it must be used with
caution. It is useful in cases when there is not enough free disk space to hold
both data files and their backup copies.
Differences between a logical backup and Percona XtraBackup
You’ll notice several key differences when transitioning from a logical database backup to Percona XtraBackup. A logical backup contains the database contents as SQL or similar logical data (tables, schemas, procedures); see the Glossary. A physical backup copies the database’s raw data files from disk; see the Glossary. The following table summarizes how they differ.
| Type | Logical backup | Physical backup |
|---|---|---|
| Definition | Contains logical data (tables, schemas, procedures). | Copies entire database directories and files. |
| Method | Exported as binary files using EXPORT/IMPORT tools. | Copies raw data files directly from the database. |
| Data contents | Includes data structure (schema, tables, procedures). | Contains complete data (structure, tables, transactions). |
| Instance Independence | Can be restored on any other machine or environment. | Tied to the specific database instance and environment. |
| OS-level restoration | Not suitable for OS-level restoration. | Suitable for full disaster recovery scenarios. |
| Granularity | Granular recovery of specific components (for example, one table or schema). | Typically full restore; XtraBackup also supports partial backup and restore individual tables. |
| Performance | For full backup/restore, slower (SQL parsing and execution); partial restore of one table can be faster. | For full backup/restore, faster (direct file copying); bottleneck is often disk or network I/O. |
| Use cases | Data migration, platform-independent copies, version or engine change. | Full database restoration, disaster recovery. |
| Security | Unencrypted dumps are human-readable; security depends on encryption and access control. | Binary files are less directly readable when unencrypted; security depends on encryption and access control for both. |
Physical backups are suitable for OS-level restoration (copying back the database files and directory structure) and full disaster recovery (recovering systems and data after a major failure). Percona XtraBackup is designed to perform hot backups (backups taken while the database is running and in use) of MySQL, Percona Server for MySQL, and other MySQL-compatible databases without interrupting database services. XtraBackup performs physical backups by copying the data files; impact on server performance is often relatively low compared to blocking backup methods, but it depends on I/O load and workload. XtraBackup includes backup compression and encryption, and a streaming backup option for large databases or transferring backups to another server. Many logical backup tools (for example, a plain mysqldump run) do not build in compression, encryption, or streaming; you can add them via external pipelines, while XtraBackup provides these in one tool. XtraBackup also integrates with Percona Toolkit and Percona Monitoring and Management (PMM) for monitoring and management.
Another difference is the support for incremental backups with XtraBackup. You can back up only the data that has changed since the last full backup, significantly reducing the time and storage requirements compared to a full logical backup.
Logical backups in more detail
A logical backup contains copies of information about a database, such as tables, schemas (the structure of the database: tables, columns, indexes), and procedures (reusable SQL code stored in the database). Commonly, these backups are exported as binary or text files using export/import tools (for example, mysqldump).
Logical backups focus on the data structure and SQL statements. You can back up a selected set of data or exclude specific data during the export, saving time and storage. They contain only structural information about the database, not instance-specific details (that is, details tied to one running copy of the database server).
For full backup and full restore, logical backups are usually slower than physical backups because of SQL parsing and execution; for restoring a single table, a logical dump of that table can be faster than preparing and extracting from a physical backup. A logical backup does not preserve the file system-level security settings, user accounts, privileges, or authentication settings. During restoration, you must manually reconfigure these settings.
You can restore a logical backup on any other machine and in different environments. Logical backups provide granular recovery (restoring only selected parts, such as individual tables or schemas) instead of the whole database. The recovery process can be more involved because it may require recreating the data structure.
Use logical backups when restoring or moving a database copy to another environment; they are well suited to platform-independent data migration (restoring on different operating systems or hardware). When the goal is to change MySQL version, storage engine, or move to another database product, logical backup or logical export is often the only practical option—physical backups are tied to the same engine and often the same minor version.
When unencrypted, logical backup files (for example, SQL from mysqldump) are human-readable, so anyone with access can read sensitive data. Both logical and physical backups need access control and encryption for strong security.
Physical backups and Percona XtraBackup in more detail
Percona XtraBackup is a physical backup tool. It copies the database’s data files and log files from disk while the server is running (hot backup), then uses a prepare step to apply redo and undo so the copy is consistent. Because it works at the file level, full backup and full restore are usually faster than with logical backups, and the result is suitable for same-version, same-engine restore and for disaster recovery.
XtraBackup supports full, incremental, and compressed backups, plus encryption and streaming to remote storage. You can also take partial backups or back up individual partitions, and restore individual tables when needed. Backup impact on the server is usually moderate; it depends on I/O load and is often lower than with blocking methods such as FLUSH TABLES WITH READ LOCK.
Use physical backups with XtraBackup when you need fast, non-blocking backups and restores on the same MySQL-compatible server (same or compatible version and engine). For migrating to a different version, engine, or database product, use logical backup or export instead.
Backup process overview
Percona Xtrabackup is a tool that allows you to create backups of MySQL or MariaDB databases. It works by copying the data files and the binary log files of the server, while ensuring that the data is consistent and not corrupted by ongoing transactions. Percona Xtrabackup can also prepare the backup files for restoration, apply incremental backups, and stream the backup files to another server or storage device.
Backup types
You can take and prepare the following types of backups:
-
Full backup - a backup of all the contents of the database
-
Incremental backup - a backup of only the files that have changed since the last full backup
-
Compressed backup - a backup of all the contents of the database with applying a compression algorithm that reduces the size of the data to be stored
-
Partial backup - a backup of only the files that have changed in a specific folder or a set of folders, rather than the entire database
-
Individual partitions backup - a backup of an individual partition
Backup restoration
Backup strategy and backup policy
In conversation, “backup strategy,” “backup policy,” and “backup plan” are used interchangeably, but the terms have distinct meanings.
A backup strategy is an overall approach or methodology for backing up the data in a database system. The strategy includes the decisions and considerations for what data to back up, how frequently backups should be taken, what backup methods and technologies to use, where to store the backup files, and what steps should be taken to ensure data integrity and the ability to recover.
A backup strategy typically involves business requirements, the Recovery Point Objective (RPO), the maximum acceptable data loss in case of system failure or disaster, and the Recovery Time Objective (RTO), the acceptable downtime for restoring the system after a failure, and compliance regulations.
A backup policy defines the guidelines, rules, or standards for specific procedures and practices for implementing the backup strategy. The policy outlines the following:
- Detailed steps and parameters for performing backups
- Retention periods
- Backup types
- Backup verification methods
- Error handling procedures
- Security measures
A backup plan, based on the backup strategy and the backup policy, is a detailed operation document that specifies how to execute the backup strategy in actionable steps and defines the timelines for backup activities. A backup plan can include the following details:
- Who performs the backup
- When backups are scheduled
- How backups are monitored and audited
- What actions to take in case of backup failures or emergencies
Types of backup
A full backup copies all data to a storage location. This type of backup creates a complete copy of the data set. The benefit of a full backup is a quick recovery since the data is stored in one place. However, this type of backup is also the most time-consuming and storage-intensive; it duplicates all data regardless of whether it has changed since the last backup.
An incremental backup only copies data that has changed since the last backup, whether that was a full or another incremental backup. This method is faster and more storage-efficient than a full backup. However, the recovery can be slower because you must restore each set of changes in sequence.
For more information, see the example of using a full backup with incremental backups.
Backup policy defined
The backup policy sets the guidelines and objectives for data protection, while the backup strategy provides the roadmap for achieving those objectives.
A backup policy may state that all customer data must be backed up daily, with a full backup at the start of each week and incremental backups taken each business day. These definitions are based on business and compliance needs. The policy also defines how long backups should be retained based on legal or regulatory requirements.
The difference between a backup policy and a backup strategy lies in their scope and detail. A backup policy is more about the following:
-
What — What should be backed up and may include information on compliance and governance
-
When — When should you do backups
The backup strategy contains the how — how the backups are scheduled and includes information on the backup technologies and the restoration process. The backup strategy details the use of specific backup software, the configuration of backup schedules, the process for monitoring backup success, and the necessary steps for restoring data.
Backup policy best practices
An effective backup policy is crucial for safeguarding an organization’s data integrity and availability. Here are some best practices to consider:
| Best Practice | Description |
|---|---|
| Regularly Update and Review | Ensure the backup policy is a living document, updated to reflect changes in technology, business processes, and regulations. |
| Clearly Define Roles and Responsibilities | Assign specific individuals or teams for executing backups, monitoring success, and managing restoration. |
| Adopt the 3-2-1 Backup Rule | Have 3 data copies, store them on 2 different media types, and keep 1 copy offsite. |
| Ensure Comprehensive Coverage | The policy should cover all critical data, applications, and systems to avoid data loss gaps. |
| Encrypt Backup Data | Protect backups with encryption, especially for offsite or cloud storage. |
| Test Backups Regularly | Regularly test backup processes to ensure data can be effectively restored. |
| Implement a Disaster Recovery Plan | Integrate the backup policy with a broader disaster recovery plan for data loss scenarios. |
| Use Reliable Backup Software and Hardware | Invest in proven technologies with robust backup and restoration capabilities. |
| Monitor Backup Procedures | Continuously monitor procedures to ensure they function as intended and identify issues promptly. |
| Train Staff | Educate relevant staff on the importance of backups and their role in the process. |
| Document the Backup Process | Maintain thorough documentation of the backup process, including schedules, technologies, and restoration procedures. |
| Define Service Level Agreements (SLAs) | Establish clear SLAs for backup and recovery times to set expectations and ensure accountability. |
| Comply with Legal and Regulatory Requirements | Ensure the policy complies with relevant laws and regulations regarding data retention and protection. |
| Plan for Scalability | Design the policy to accommodate future data volume growth and infrastructure changes. |
| Conduct Periodic Risk Assessments | Regularly assess data risks and adjust the backup policy to mitigate those risks. |
By adhering to these best practices, organizations can create a robust backup policy that protects their data and supports their business continuity and disaster recovery strategies. The effectiveness of a backup policy depends not only on its creation but on its implementation and ongoing management. Regular reviews, updates, and staff training ensure the backup policy remains relevant and effective.
Backup policy example
An example of a backup policy might include the following components:
| Aspect | Details |
|---|---|
| Purpose | To define the procedures and responsibilities for backing up organizational data to ensure its availability in case of data loss. |
| Scope | This policy applies to all data, hardware, and software in the organization’s information systems. |
| Policy Statement | The organization shall maintain a regular backup schedule for all critical data. Full backups are to be performed weekly, with incremental backups occurring daily. All backups must be encrypted and stored in a secure, off-site location. |
| Roles and Responsibilities | The IT department is responsible for executing backups as scheduled. The department head will ensure that backup procedures are followed and reviewed regularly. |
| Backup Procedures | The IT department must use approved software and hardware. Data to be backed up includes, but is not limited to, customer information, financial records, and operational data. |
| Data Retention | Retain the backup data for five years or as required by law or industry regulations. |
| Disaster Recovery | In the event of data loss, the IT department shall follow the disaster recovery plan to restore data from the most recent backup. |
| Review and Testing | Review the backup policy and procedures annually. Test the backup and restoration procedures quarterly to ensure they are effective. |
Test the backups
You must test the effectiveness of your backups and demonstrate that you can recover your data in the event of loss or corruption. Here are several methods to assess the reliability of your backup system:
| Aspect | Details |
|---|---|
| Perform Regular Test Restores | The most reliable way to test backups is to periodically restore the data to a separate system. This verifies the backup’s integrity and the restoration process’s functionality. |
| Monitor Backup Reports | Regularly review backup reports and logs for any errors or failures during the backup process. This can help identify issues early before they become critical problems. |
| Check for Data Consistency | Compare the original data with the backed-up data to ensure consistency. This can be done by checking file sizes, using checksums, or employing other data validation techniques. You can use pt-table-checksum from Percona Toolkit. |
| Simulate Disaster Scenarios | Conducting a simulated disaster recovery exercise can help determine how well your backup system will perform under stress and identify any gaps in your recovery plan. |
| Audit Backup Procedures | Regular audits of the backup procedures can ensure that the backups are being performed in accordance with the established policies and that the backup system is functioning as expected. |
| Validate Backup Configuration | Ensure that the backup configuration is correct and that all necessary data is being backed up. This includes checking backup schedules, retention policies, and the scope of the data backed up. |
| Verify Security Measures | Confirm that the backup data is secure and that encryption and other security measures are functioning correctly to protect against unauthorized access. |
| Evaluate Recovery Time Objectives | Measure how long it takes to restore data from backups and compare this with your recovery time objectives to ensure they align with your business requirements. |
| Assess Backup Media Reliability | Regularly check the physical and logical condition of the backup media, whether it’s tape, disk, or cloud storage, to ensure it’s in good working order. |
| Conduct Incremental Backup Tests | Test the restoration of incremental backups to ensure that they work in conjunction with full backups and that the data can be restored to a specific point in time. |
| Review Backup Software Updates | Keep the backup software updated and test after updates to ensure new versions or patches do not introduce issues with the backup or restoration processes. |
| Check for Compatibility Issues | Ensure that the backup system is compatible with all the software and data formats used in your organization to avoid restoration issues. |
| Document Test Results | Keep detailed records of all backup tests, including the scope, date, issues encountered, and resolutions. This documentation is invaluable for troubleshooting and improving the backup process. |
By implementing these methods, you can be confident that your backup system protects your data and that you can recover your data when necessary. Regular testing and monitoring are key to maintaining an effective backup strategy and ensuring business continuity.
Common challenges
Common backup challenges often include issues such as damaged backups, missing or failed backups, maintaining legacy systems, adhering to strict privacy and security regulations, and managing the costs associated with data backup. To overcome these challenges, organizations can adopt several strategies.
Implementing a modern, reliable backup solution that includes automated data consistency checking can help protect against damaged backups. Regular recovery tests can ensure that data is recoverable and not corrupt. For missing or failed backups, it’s essential to have a robust monitoring system that alerts IT staff to any issues with the backup process, allowing for immediate action to rectify problems before they escalate.
Maintaining legacy systems can be addressed by gradually phasing out older technology and replacing it with more current, supported solutions. Adhering to privacy and security regulations requires a thorough understanding of the laws and standards that apply to an organization’s industry and geography. Implementing encryption and access controls can help ensure that backups are secure and compliant. Finally, managing the costs of data backup involves careful planning and budgeting, including the total cost of ownership of backup solutions.
In addition to these strategies, follow best practices such as the 3-2-1 backup rule (three copies of data on two different media, with one copy stored offsite), regular testing and validation of backups, clear documentation of backup procedures, and continuous training for staff involved in the backup process.
Disaster recovery plan
A disaster recovery plan (DRP) is a structured approach with detailed instructions for responding to unplanned incidents such as natural disasters, power outages, cyber-attacks, and other disruptive events.
| Section | Description |
|---|---|
| Introduction | This section outlines the purpose of the plan, its scope, and the types of disasters it covers. It also includes the plan’s objectives, such as minimizing downtime and data loss. |
| Roles and Responsibilities | This part defines the disaster recovery team’s specific roles. It lists the contact information for each team member and outlines the chain of command. |
| Incident Response | This section provides the steps to detect, report, and assess damage caused by a disaster. It includes procedures for immediate response to limit the impact on operations. |
| Plan Activation | Here, the criteria for launching the disaster recovery plan are detailed. It specifies who has the authority to activate the plan and under what circumstances. |
| Communication Plan | This part details how communication should be handled during a disaster, including internal communication with employees and external communication with customers, suppliers, and the media. |
| Recovery Strategies | This section outlines the strategies for restoring hardware, software, and data that are critical to resuming business operations. It includes prioritized actions for recovery and the resources required. |
| Data Backup Procedures | Detailed instructions for restoring data from backups are provided here. It includes the locations of backups, the types of backups (full, incremental), and the backup schedule. |
| Site Relocation | If the primary business location is compromised, this part of the plan details the process for moving operations to an alternate site. |
| Plan Testing and Maintenance | This section describes the schedule for regular testing of the DRP to ensure its effectiveness. It also outlines the process for updating the plan as the business and technology environment changes. |
| Appendices | The appendices may include site maps, network diagrams, floor plans, and any other documentation that supports disaster recovery efforts. |
A DRP should be tailored to the specific needs of the organization and should be reviewed and tested regularly to ensure it remains effective and up-to-date.
Backup example
This example demonstrates how to set up daily full backups and hourly incremental backups using Percona XtraBackup 8.4 with a MySQL 8.4-compatible database server.
Assumptions
- Percona XtraBackup 8.4 is installed on your system.
- A MySQL 8.4-compatible database server (for example, Percona Server for MySQL 8.4) is running.
- You have created dedicated directories for storing backups and the backup user can write to them:
/backups/mysql/full— for daily full backups/backups/mysql/incr— for hourly incremental backups
Credentials and security
Using --password on the command line exposes the password in process lists (for example, ps). For production, use a configuration file or a login path (for example, --login-path) instead of passing the password on the command line.
Daily full backup script
The following script defines the server details such as hostname, username, password, data directory, and backup directory. Replace these with your actual values. The script:
- Defines the server credentials
- Generates a timestamp with the
datecommand for the full backup filename - Uses
xtrabackupwith the--backupoption for a full backup - Specifies the directory to store the backup with
--target-dir - Uses
--datadirto point to the location of your MySQL data files - Provides the credentials with
--userand--passwordto access the database server - Creates the target directory if it does not exist
- Runs the backup and reports success or failure based on the exit code
The script does not verify that the backup completed successfully; consider checking the exit code of xtrabackup and only then echoing success or writing to logs.
#!/bin/bash
# Set server details (replace with your actual values)
SERVER_HOST="your_server_hostname"
SERVER_USER="your_db_username"
SERVER_PASSWORD="your_db_password"
DATA_DIR="/var/lib/mysql" # Replace with your data directory path
BACKUP_DIR="/backups/mysql/full"
# Get current date for filename
TODAY=$(date +%Y-%m-%d)
FULL_BACKUP_FILENAME="${BACKUP_DIR}/${TODAY}"
# Ensure target directory exists
mkdir -p "${FULL_BACKUP_FILENAME}"
# Run xtrabackup with full backup command
if xtrabackup --backup \
--target-dir="${FULL_BACKUP_FILENAME}" \
--datadir="${DATA_DIR}" \
--user="${SERVER_USER}" \
--password="${SERVER_PASSWORD}"; then
echo "Daily full backup completed at $(date)"
else
echo "Daily full backup FAILED at $(date)" >&2
exit 1
fi
Running the daily script
You can schedule this script to run automatically using cron. For example, to run it every day at midnight (00:00), add this line to your crontab:
0 0 * * * /path/to/daily_full_backup.sh
Hourly incremental backup script
This script uses the same server details as the daily script. It retrieves the current date and hour for the incremental backup filename. The core command uses xtrabackup with the --backup and --incremental options for an incremental backup. --target-dir specifies the directory to store the incremental backup. --incremental-basedir must point to the base directory of a completed full or incremental backup. This example uses the most recent full backup as the base: ls -t lists full backups by modification time (newest first), and head -n 1 selects that newest directory. The script checks that the base directory exists before running and reports success or failure based on the exit code.
#!/bin/bash
# Set server details (same as daily script)
SERVER_HOST="your_server_hostname"
SERVER_USER="your_db_username"
SERVER_PASSWORD="your_db_password"
DATA_DIR="/var/lib/mysql" # Replace with your data directory path
BACKUP_DIR="/backups/mysql/incr"
# Get current date and hour for filename
TODAY=$(date +%Y-%m-%d)
HOUR=$(date +%H) # Get current hour (00-23)
INCR_BACKUP_FILENAME="${BACKUP_DIR}/${TODAY}_${HOUR}"
# Set the base directory to the most recent full backup (newest first: ls -t, then head -n 1)
LATEST_FULL=$(ls -t /backups/mysql/full 2>/dev/null | head -n 1)
if [ -z "${LATEST_FULL}" ]; then
echo "No full backup found; cannot take incremental backup" >&2
exit 1
fi
BASE_DIR="/backups/mysql/full/${LATEST_FULL}"
# Ensure target directory exists
mkdir -p "${INCR_BACKUP_FILENAME}"
# Run xtrabackup with incremental backup command
if xtrabackup --backup \
--incremental \
--target-dir="${INCR_BACKUP_FILENAME}" \
--incremental-basedir="${BASE_DIR}" \
--user="${SERVER_USER}" \
--password="${SERVER_PASSWORD}"; then
echo "Hourly incremental backup completed at $(date)"
else
echo "Hourly incremental backup FAILED at $(date)" >&2
exit 1
fi
Incremental base directory
For a chain of incremental backups, you can set the base to the most recent incremental backup directory instead of the full backup, so each incremental is based on the previous one. The example above bases each hourly backup on the latest full backup for simplicity.
Schedule so the full backup completes before incrementals
Each incremental must be based on a completed full or incremental backup. If the daily full runs at midnight and can take more than an hour, the 01:00 incremental might still see “latest full” as yesterday’s backup, and the 02:00 incremental might see today’s. That produces two different chains. Ensure the full backup finishes before the first incremental that depends on it: for example, run the full at 00:00 and start incrementals at 02:00, or use a wrapper that runs the first incremental only after the full has completed.
Running the hourly script
Schedule this script to run every hour using cron:
0 * * * * /path/to/hourly_incremental_backup.sh
Restore chain
To restore from a full backup and its incrementals you must:
- Prepare the full backup once (apply redo only, no incremental yet).
- Apply each incremental in order (oldest to newest) to the same target directory.
- Prepare again (apply redo and undo) so the backup is consistent.
All incrementals that you apply must form a single chain from one full backup: each incremental is based on the previous one or on the full. Do not mix incrementals from different full backups in one restore. For step-by-step commands, see Prepare a full backup, Prepare an incremental backup, and Restore full and incremental backups.
Next steps
- Prepare a full backup and prepare an incremental backup before restore.
- Restore full and incremental backups when you need to recover data.
XtraBackup backup files
This document provides a guide to the files and directory structure generated by the Xtrabackup tool. This information is essential for system administrators and database professionals who need to understand how to manage and restore backups.
Root backup directory files
After a successful backup, the following files will be found in the directory specified by the --target-dir option. These files contain critical metadata used for the restoration process.
| File Name | Purpose | Notes |
|---|---|---|
xtrabackup_info |
Metadata about the backup, including the Xtrabackup version, start time, and server’s MySQL version. | The file is essential for all backups. |
xtrabackup_binlog_info |
Stores the binary log coordinates (position and file name) at the exact moment the backup completed. | The file is critical for point-in-time recovery. |
xtrabackup_checkpoints |
Contains key checkpoint information that Xtrabackup uses to ensure a consistent restore. | The file is essential for all backups. |
xtrabackup_logfile |
A copy of the InnoDB transaction log file from the server. | The log file is crucial during the prepare stage to roll back uncommitted transactions and apply committed ones. |
backup-my.cnf |
A snapshot of the server’s configuration file at the time of the backup. | The file is useful for understanding the server’s state when the backup was taken. |
xtrabackup_gtid_info |
The GTID set at the time of backup. | This file is only present if Global Transaction Identifiers (GTIDs) are enabled on the server. |
xtrabackup_slave_info |
Replication metadata, including the master’s binary log file and position. | This file is only created if the server is a replica. The file is used to set up the restored server as a new replica. |
xtrabackup_tablespaces |
Stores metadata about the external tablespaces. On restore, xtrabackup uses this information to ensure that these tablespaces are correctly restored to the same external paths. | The file is essential when innodb_file_per_table is enabled and the tablespaces are not stored in the main data directory. |
ib_buffer_pool |
A dump of the InnoDB buffer pool. | This optional file is created if buffer pool dumping is enabled (innodb_buffer_pool_dump_at_shutdown). The file is not used for the restore operation, but the file can be used to warm up the buffer pool of the restored instance, improving performance. |
Database subdirectories
In addition to the files in the root directory, Xtrabackup creates subdirectories for each database present at the time of the backup. These directories contain the actual table data.
-
*.ibdfiles for InnoDB tables: These files store the table data and indexes. Their presence is dependent on theinnodb_file_per_tablesetting being enabled in the MySQL configuration. -
*.sdifiles for non-InnoDB tables: These contain serialized data dictionary information for tables.
Incremental Backups
When you perform an incremental backup, two additional files are created in the backup directory. These files are used in the apply-log phase of the restore process to merge the incremental changes into a full backup.
-
.delta: This file contains the actual data changes from the InnoDB tables since the last full or incremental backup. -
meta: This file stores metadata about the incremental backup. During thepreparephase, the information in the.metafile is apply the changes in the.deltafile to the InnoDB tablespace.
After processing the .delta files, xtrabackup applies the redo log.
Verify backup contents
After a backup operation, you can quickly list the contents of your backup directory using the ls command with the following options:
ls -lhR /backups/<backup-directory>
This command provides a detailed, human-friendly, and recursive listing of the entire directory tree.
-
l(long format): Provides a comprehensive view of each file’s metadata, including permissions, owner, group, size, and the timestamp of the last modification. This information is useful for confirming who has access to the backup and when it was created. -
h(human-readable): Displays file sizes in a user-friendly format (for example,1.2K,50M,1.5G). You can quickly scan and understand the sizes of the backup files manually converting the size to bytes. -
R(recursive): Lists the contents of all subdirectories, not just the top level. This operation is crucial for verifying that all database subdirectories and their contents are included in the backup.
Features
Backup features
LRU dump backup
Percona XtraBackup includes a saved buffer pool dump into a backup to enable
reducing the warm up time. It restores the buffer pool state from
ib_buffer_pool file after restart. Percona XtraBackup discovers
ib_buffer_pool and backs it up automatically.
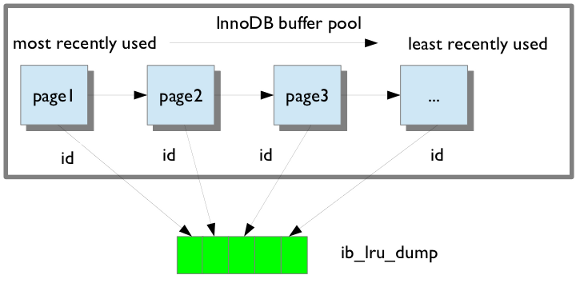
If the buffer restore option is enabled in my.cnf, buffer pool will be in
the warm state after backup is restored.
Find the information on how to save and restore the buffer pool dump in Saving and Restoring the Buffer Pool State .
Throttling backups
xtrabackup does not block database activity during a backup, but xtrabackup generates additional disk input/output (I/O) activity. On systems with limited I/O capacity, this can affect database performance.
Use the --throttle option to limit the backup rate.
How throttling works
Use the --throttle option to minimize backup impact on system performance. By limiting the number of 10 MB chunks processed per second, you primarily limit data throughput, which in turn reduces overall I/O pressure on the system.
When used with the --backup option, --throttle limits the rate of read and write operations performed during the copy process. For incremental backups, the limit applies only to read operations.
For example:
--throttle=1limits processing to approximately 10 MB/s--throttle=10limits processing to approximately 100 MB/s
By default, throttling is disabled, and xtrabackup runs at the maximum rate permitted by the system.
On write-heavy systems, overly aggressive throttling can cause backups to fall behind redo log generation, see Redo log wraparound risk.
When to use throttling
Use the --throttle option in the following scenarios:
-
High-traffic production systems
On latency-sensitive workloads, unthrottled backups can cause I/O contention. This can increase query latency as the database waits for disk operations to complete. -
Limited storage throughput (cloud environments)
On platforms such as AWS with provisioned IOPS or burst limits (for example, EBS volumes), unthrottled backups can exceed available I/O capacity. This may degrade overall system performance when limits are reached. -
Systems with slower storage
On HDDs or lower-performance SSDs, higher latency and seek times limit the number of concurrent I/O operations. Throttling prevents backups from saturating the storage subsystem. -
Multi-tenant or co-located environments
When multiple services share the same host, unthrottled backups can consume available I/O bandwidth and affect other applications.
Resource monitoring: finding your baseline
Before setting a throttle value, understand your storage subsystem limits. If your disk is already near saturation, an unthrottled backup can introduce significant I/O wait and increase query latency.
Use the following tools to observe disk utilization and validate your throttle settings.
iostat (sysstat)
Use:
iostat -xz 1
Key metrics:
-
aqu-sz- average queue size, a better indicator of saturation. Values consistently above 1 suggest the device cannot keep up with demand. -
await— average time (ms) for I/O requests. Increasing values during backup indicate growing latency. -
%util— indicates how busy the device is (time spent servicing I/O), not saturation. A device can show 100% utilization and still have spare capacity.
pidstat (sysstat)
Use pidstat to monitor per-process I/O activity.
Note
pidstat requires root privileges (or appropriate capabilities) to display system-wide I/O activity. Without this, output may be incomplete.
pidstat -d 1
Key notes:
-
Shows read/write throughput per process (including xtrabackup and mysqld).
-
Helps distinguish I/O generated by xtrabackup from that of the MySQL server.
-
Commonly available as part of the
sysstatpackage. -
When run without elevated privileges, it only shows processes owned by the current user.
pv (Pipe Viewer)
For streaming backups, pv can display real-time throughput:
xtrabackup --backup --throttle=5 --stream=xbstream \
| pv \
| gzip > backup.xb.gz
This helps verify whether the effective throughput matches the configured throttle, although compression (gzip) may become a bottleneck on CPU-constrained systems.
Configuration guidelines
Select a throttle value based on available I/O capacity and workload requirements. Use the insights from resource monitoring to select and refine an appropriate throttle value.
Typical starting points:
-
Busy systems:
--throttle=1–5 -
Moderate load:
--throttle=5–20 -
Dedicated backup window: no throttling
Note
If the throttle value is too low, the backup may not keep up with the rate of transaction log generation and may not complete.
Adjust the value based on observed system performance.
Redo log wraparound risk (important)
When using --throttle, backups may become too slow to keep up with redo log generation rate on busy systems.
Because the InnoDB redo log is a circular buffer with limited size, it can wrap around before xtrabackup has finished reading it. When this happens, the backup fails with an error similar to:
xtrabackup: error: expected log block no. ..., but got no. ...
xtrabackup: error: it looks like InnoDB log has wrapped around before xtrabackup could process all records
xtrabackup: Error: xtrabackup_copy_logfile() failed
This issue is more likely on write-heavy systems or when using very low throttle values.
There are two primary ways to prevent this issue:
Option 1: Increase redo log capacity (recommended)
SET GLOBAL innodb_redo_log_capacity = <larger value>;
Increasing redo log size:
-
Reduces the risk of wraparound during throttled backups.
-
Improves write performance under heavy load.
-
May increase crash recovery time.
Option 2: Prevent redo log wraparound
Use the --register-redo-log-consumer option to prevent redo log wraparound by coordinating with the server.
However:
-
It can block or significantly delay write operations if xtrabackup cannot keep up.
-
It is best suited for replicas, where replication lag is acceptable.
Advanced tuning scenarios
On high-performance storage (for example, NVMe), consider using higher --parallel values (4–8) with little or no throttling.
On shared or limited environments (such as cloud volumes):
-
Identify your provisioned IOPS or throughput limits.
-
Start with approximately 50% of available I/O capacity, then adjust based on observed latency and workload behavior.
-
Use moderate
--parallelvalues (2–4) to ensure consistent utilization without overwhelming the system.
Interaction with –parallel
The --throttle and --parallel options control different aspects of backup performance and can be used together. If --parallel is set too high without adjusting --throttle, threads may compete for the limited throughput, reducing efficiency.
How they work together
--throttlesets a global limit on backup throughput.--parallelcontrols the number of worker threads copying data.
If both are used:
- All threads share the same throttle limit.
- Increasing
--paralleldoes not increase total throughput beyond the throttle limit.
For example:
--throttle=10(approximately 100 MB/s total)--parallel=4
Each thread will average approximately 25 MB/s to stay within the global limit.
Why use both
Using both options allows you to:
- Improve efficiency when backing up many small tables (via parallelism)
- Control overall I/O impact (via throttling)
This is especially useful on systems with mixed workloads.
Example usage
A) Streaming backup with throttling
Limit the backup speed to approximately 50 MB/s:
xtrabackup --backup --throttle=5 --stream=xbstream \
| pv \
| gzip > backup.xb.gz
B) Testing throttling behavior
To measure the effective throughput of --throttle without interference from compression or disk writes:
xtrabackup --backup --throttle=2 --stream=xbstream 2>/dev/null \
| pv \
| cat > /dev/null
This setup ensures:
-
No disk write bottleneck
-
No CPU bottleneck from compression
-
Clean pv output (stderr from xtrabackup is suppressed)
Use this method to validate that the configured throttle produces the expected throughput.
Local backup with throttling
Limit the backup to approximately 100 MB/s:
xtrabackup --backup --target-dir=/backups/full --throttle=10
Expected output
xtrabackup: Starting backup
xtrabackup: Throttling set to 10 chunks per second
...
xtrabackup: completed OK!
Incremental backup with throttling
For incremental backups, the limit applies only to read operations. Redo log copying continues independently and may become a bottleneck if the backup is throttled too aggressively.
xtrabackup \
--backup \
--target-dir=/backups/inc1 \
--incremental-basedir=/backups/full \
--throttle=5
Expected output
xtrabackup: Starting incremental backup
xtrabackup: Throttling set to 5 chunks per second
...
xtrabackup: completed OK!
Store backup history on the server
Percona XtraBackup supports storing the backups history on the server. Storing backup history on
the server was implemented to provide users with additional information about
backups that are being taken. Backup history information will be stored in the
PERCONA_SCHEMA.XTRABACKUP_HISTORY table.
To use this feature the following options are available:
-
--history=: This option enables the history feature and allows the user to specify a backup series name that will be placed within the history record. -
--incremental-history-name=: This option allows an incremental backup to be made based on a specific history series by name. xtrabackup will search the history table looking for the most recent (highest to_lsn) backup in the series and take theto_lsnvalue to use as it’s starting lsn. This is mutually exclusive with--incremental-history-uuid,--incremental-basedirand--incremental-lsnoptions. If no valid LSN can be found (no series by that name) xtrabackup will return with an error. -
--incremental-history-uuid=: Allows an incremental backup to be made based on a specific history record identified by UUID. xtrabackup will search the history table looking for the record matching UUID and take the to_lsnvalue to use as it’s starting LSN. This options is mutually exclusive with--incremental-basedir,--incremental-lsnand--incremental-history-nameoptions. If no valid LSN can be found (no record by that UUID or missingto_lsn), xtrabackup will return with an error.
Note
Backup that’s currently being performed will NOT exist in the xtrabackup_history table within the resulting backup set as the record will not be added to that table until after the backup has been taken.
If you want access to backup history outside of your backup set in the case of
some catastrophic event, you will need to either perform a mysqldump,
partial backup or SELECT * on the history table after xtrabackup
completes and store the results with you backup set.
For the necessary privileges, see Permissions and Privileges Needed.
PERCONA_SCHEMA.XTRABACKUP_HISTORY table
This table contains the information about the previous server
backups. Information about the backups will only be written if the backup was
taken with --history option.
| Column Name | Description |
|---|---|
| uuid | Unique backup id |
| name | User provided name of backup series. There may be multiple entries with the same name used to identify related backups in a series. |
| tool_name | Name of tool used to take backup |
| tool_command | Exact command line given to the tool with –password and –encryption_key obfuscated |
| tool_version | Version of tool used to take backup |
| ibbackup_version | Version of the xtrabackup binary used to take backup |
| server_version | Server version on which backup was taken |
| start_time | Time at the start of the backup |
| end_time | Time at the end of the backup |
| lock_time | Amount of time, in seconds, spent calling and holding locks for FLUSH TABLES WITH READ LOCK |
| binlog_pos | Binlog file and position at end of FLUSH TABLES WITH READ LOCK |
| innodb_from_lsn | LSN at beginning of backup which can be used to determine prior backups |
| innodb_to_lsn | LSN at end of backup which can be used as the starting lsn for the next incremental |
| partial | Is this a partial backup, if N that means that it’s the full backup |
| incremental | Is this an incremental backup |
| format | Description of result format (xbstream) |
| compressed | Is this a compressed backup |
| encrypted | Is this an encrypted backup |
Limitations
-
--historyoption must be specified only on the command line and not within a configuration file in order to be effective. -
--incremental-history-nameand--incremental-history-uuidoptions must be specified only on the command line and not within a configuration file in order to be effective.
Backup size reporting
Overview
Percona XtraBackup reports the size of every successful backup in xtrabackup_info and reports the same values in the XtraBackup error log.
Backup size reporting helps estimate storage requirements, check that backups work correctly, and plan restores for compressed and streamed backups.
Version changes
Percona XtraBackup 8.4.0-6 introduces backup size reporting.
Why external tools cannot accurately measure backup size
External tools cannot reliably determine the final size of XtraBackup output in many backup configurations.
Backup size often differs from the MySQL datadir size because Percona XtraBackup also copies redo log data generated during the backup process.
Several backup features further change the final output size:
-
--stream=xbstreamadds xbstream metadata -
--compressreduces the final backup size according to data compressibility -
Sparse InnoDB tablespaces affect filesystem size reporting
-
Streaming and cloud uploads may not produce local backup files for measurement
-
Compression, encryption, and streaming pipelines prevent external tools from accurately calculating final backup size
Compressed backups also require sufficient free space during decompression and restore. Reporting the uncompressed backup size helps estimate restore storage requirements before recovery operations begin.
How backup size reporting works
Percona XtraBackup records backup size at the end of every successful backup. Backup size reporting is enabled by default and requires no additional configuration.
Percona XtraBackup calculates backup size after all backup operations complete, including:
-
Compression
-
Encryption
-
xbstream formatting
-
Sparse file handling
For sparse InnoDB tablespaces, Percona XtraBackup counts only written data fragments and excludes filesystem hole ranges.
The reported backup size matches the exact number of bytes written to the backup destination.
Compressed backups additionally report:
-
uncompressed_backup_size -
Compression ratio
Percona XtraBackup calculates uncompressed_backup_size separately from the final compressed backup size so that the reported value reflects the logical backup size before compression.
Percona XtraBackup stores the reported values in:
-
xtrabackup_info -
XtraBackup error log
Reported values
| Field | Description |
|---|---|
backup_size |
Final backup output size in bytes |
uncompressed_backup_size |
Total uncompressed logical backup size in bytes |
| Compression ratio | Ratio between uncompressed_backup_size and backup_size reported in the XtraBackup error log |
xtrabackup_info
Percona XtraBackup writes backup size metadata to xtrabackup_info in the backup output.
Depending on backup configuration, xtrabackup_info in the backup output may be:
-
Plaintext
-
Compressed
-
Encrypted
-
Embedded inside an xbstream archive
Streamed backups store xtrabackup_info inside the xbstream output.
If xtrabackup_info is not plaintext, you can create a separate plaintext copy of xtrabackup_info using the --extra-lsndir=<dir> option.
Note
Files created in the --extra-lsndir=<dir> directory are not part of the backup.
XtraBackup error log
Percona XtraBackup prints information about backup size near the end of the backup operation before the completed OK! message.
The log output includes:
-
Human-readable size
-
Exact byte count
-
Compression ratio
Output
Uncompressed backup example
The following example shows xtrabackup_info from a backup created with --target-dir.
uuid = 122a291d-48b0-11f1-9d76-047bcbcb6b7e
name =
tool_name = xtrabackup
tool_command = --backup --no-defaults --user=root --socket=/tmp/pxb-folder/mysql.sock --target-dir=/tmp/pxb-folder/backup --extra-lsndir=/tmp/pxb-folder/lsndir --datadir=/tmp/pxb-folder/datadir
tool_version = 8.4.0-6
ibbackup_version = 8.4.0-6
server_version = 8.4.8-8
server_flavor = Percona Server (GPL), Release 8, Revision 1c288264
start_time = 2026-05-05 19:27:26
end_time = 2026-05-05 19:27:28
lock_time = 0
binlog_pos = filename 'binlog.000002', position '158'
innodb_from_lsn = 0
innodb_to_lsn = 24785178
partial = N
incremental = N
format = file
compressed = N
encrypted = N
lock_ddl_type = ON
backup_size = 88689086
The XtraBackup error log contains the corresponding backup size entry:
2026-05-05T19:27:28.140024+01:00 0 [Note] [MY-011825] [Xtrabackup] Backup size: 84.58 MiB (88689086 bytes)
2026-05-05T19:27:29.382428+01:00 0 [Note] [MY-011825] [Xtrabackup] completed OK!
Compressed backup example
Compressed backups additionally report the uncompressed backup size and compression ratio.
The following example shows the final lines of xtrabackup_info with backup size values reported in bytes:
backup_size = 1832398
uncompressed_backup_size = 88689148
The XtraBackup error log contains the corresponding output:
2026-05-05T19:27:42.851038+01:00 0 [Note] [MY-011825] [Xtrabackup] Backup size: 1.75 MiB (1832398 bytes)
2026-05-05T19:27:42.851055+01:00 0 [Note] [MY-011825] [Xtrabackup] Uncompressed backup size: 84.58 MiB (88689148 bytes)
2026-05-05T19:27:42.851065+01:00 0 [Note] [MY-011825] [Xtrabackup] Compression ratio: 48.40x
Percona XtraBackup calculates the compression ratio as:
uncompressed_backup_size / backup_size
xbstream features
Take a streaming backup
Percona XtraBackup supports streaming mode. Streaming mode sends a backup to STDOUT in the xbstream format instead of copying the files to the backup directory.
This method allows you to use other programs to filter the output of the backup, providing greater flexibility for storage of the backup. For example, compression is achieved by piping the output to a compression utility. One of the benefits of streaming backups and using Unix pipes is that the backups can be automatically encrypted.
To use the streaming feature, run the --stream option.
xtrabackup --stream
xtrabackup uses xbstream to stream all of the data files to STDOUT, in a
special xbstream format. After it finishes streaming all of the data files
to STDOUT, it stops xtrabackup and streams the saved log file too.
When compression is enabled, xtrabackup compresses the output data, except for the meta and non-InnoDB files which are not compressed, using the specified compression algorithm. Percona XtraBackup supports the following compression algorithms:
Zstandard (ZSTD)
The Zstandard (ZSTD) is a fast lossless compression algorithm that targets real-time compression scenarios and better compression ratios. ZSTD is the default compression algorithm for the --compress option.
To compress files using the ZSTD compression algorithm, use the --compress option:
xtrabackup --backup --compress --target-dir=/data/backup
The resulting files have the \*.zst format.
You can specify ZSTD compression level with the --compress-zstd-level(=#) option. The default value is 1.
xtrabackup –backup –compress –compress-zstd-level=1 –target-dir=/data/backup
lz4
To compress files using the lz4 compression algorithm, set the --compress option to lz4:
xtrabackup --backup --compress=lz4 --target-dir=/data/backup
The resulting files have the \*.lz4 format.
To decompress files, use the --decompress option.
In case backups were both compressed and encrypted, they must be decrypted before they are uncompressed.
| Task | Command |
|---|---|
Stream the backup into an archive named backup.xbstream |
xtrabackup --backup --stream > backup.xbstream |
Stream the backup into a compressed archive named backup.xbstream |
xtrabackup --backup --stream --compress > backup.xbstream |
| Encrypt the backup | xtrabackup --backup --stream \|gzip \| openssl des3 -salt -k 'password' -out backup.xbstream.gz.des3 |
| Unpack the backup to the current directory | xbstream -x < backup.xbstream |
| Send the backup compressed directly to another host and unpack it | xtrabackup --backup --compress --stream | ssh user@otherhost "xbstream -x" |
Send the backup to another server using netcat |
On the destination host:nc -l 9999 | cat - > /data/backups/backup.xbstreamOn the source host: xtrabackup --backup --stream | nc desthost 9999 |
| Send the backup to another server using a one-liner | ssh user@desthost “( nc -l 9999 > /data/backups/backup.xbstream & )” && xtrabackup --backup --stream | nc desthost 9999 |
| Throttle the throughput to 10MB/sec using the pipe viewer tool | xtrabackup --backup --stream | pv -q -L10m ssh user@desthost “cat - > /data/backups/backup.xbstream” |
| Checksum the backup during the streaming | On the destination host:nc -l 9999 | tee >(sha1sum > destination_checksum) > /data/backups/backup.xbstreamOn the source host: xtrabackup --backup --stream | tee >(sha1sum > source_checksum) | nc desthost 9999Compare the checksums on the source host: cat source_checksum 65e4f916a49c1f216e0887ce54cf59bf3934dbadCompare the checksums on the destination host: cat destination_checksum 65e4f916a49c1f216e0887ce54cf59bf3934dbad |
| Parallel compression with parallel copying backup | xtrabackup --backup --compress --compress-threads=8 --stream --parallel=4 > backup.xbstream |
Important
The streamed backup must be prepared before restoration. Streaming mode does not prepare the backup.
Accelerate the backup process
Copy with the --parallel and --compress-threads options
When making a local or streaming backup with xbstream binary, multiple files
can be copied at the same time when using the --parallel option. This
option specifies the number of threads created by xtrabackup to copy data
files.
To take advantage of this option either the multiple tablespaces option must be enabled (innodb_file_per_table) or the shared tablespace must be stored in multiple ibdata files with the innodb_data_file_path option. Having multiple files for the database (or splitting one into many) doesn’t have a measurable impact on performance.
As this feature is implemented at the file level, concurrent file transfer can sometimes increase I/O throughput when doing a backup on highly fragmented data files, due to the overlap of a greater number of random read requests. You should consider tuning the filesystem also to obtain the maximum performance (e.g. checking fragmentation).
If the data is stored on a single file, this option has no effect.
To use this feature, simply add the option to a local backup, for example:
xtrabackup --backup --parallel=4 --target-dir=/path/to/backup
By using the xbstream in streaming backups, you can additionally speed up the
compression process with the --compress-threads option. This option
specifies the number of threads created by xtrabackup for for parallel data
compression. The default value for this option is 1.
To use this feature, simply add the option to a local backup, for example:
xtrabackup --backup --stream=xbstream --compress --compress-threads=4 --target-dir=./ > backup.xbstream
Before applying logs, compressed files will need to be uncompressed.
The --rsync option
In order to speed up the backup process and to minimize the time FLUSH TABLES
WITH READ LOCK is blocking the writes, the option --rsync should be
used. When this option is specified, xtrabackup uses rsync to copy all
non-InnoDB files instead of spawning a separate cp for each file, which can
be much faster for servers with a large number of databases or
tables. xtrabackup will call the rsync twice, once before the FLUSH
TABLES WITH READ LOCK and once during to minimize the time the read lock is
being held. During the second rsync call, it will only synchronize the
changes to non-transactional data (if any) since the first call performed before
the FLUSH TABLES WITH READ LOCK. Note that Percona XtraBackup will use
[Backup locks] where available as a lightweight alternative to FLUSH TABLES WITH READ
LOCK.
Percona XtraBackup uses these locks automatically to copy non-InnoDB data to avoid blocking Data manipulation language (DML) queries that modify InnoDB tables. Find more information in Backup locks
Note
This option cannot be used together with the --stream option.
Prepare features
InnoDB B-tree integrity validation during prepare
Overview
The --check-tables option validates the structural integrity of InnoDB B-tree indexes during the --prepare phase. Validation during --prepare helps detect corrupted indexes before restore or production deployment.
Version changes
Percona XtraBackup 8.4.0-6 introduces the --check-tables option.
Why checksum validation is not enough
Percona XtraBackup verifies InnoDB page checksums during --backup. These checks ensure that the backup contains checksum-valid pages at backup time.
Checksum validation detects physical corruption within individual pages, including:
-
Torn-page corruption
-
Write corruption
-
Transfer corruption
-
Storage or filesystem corruption
When the server modifies a page while XtraBackup copies it, XtraBackup retries the copy until the checksum becomes consistent. The retry process prevents partially modified pages from entering the backup.
A successful backup therefore guarantees checksum-valid pages, but checksum validation alone cannot guarantee a fully valid restore.
Corruption can happen after backup creation
A backup can become corrupted after creation because of storage or filesystem issues.
During --prepare, XtraBackup only re-validates pages involved in redo application. Pages outside redo processing may never undergo another checksum check.
For this reason, running CHECK TABLE after restore remains a recommended practice. CHECK TABLE forces page reads and validates both checksums and structural consistency.
Checksums do not verify page relationships
Checksum validation only confirms that the bytes within a page match the checksum stored in the page header.
XtraBackup does not validate B-tree structure or relationships between pages during backup. As a result, structurally corrupted pages can still enter the backup if those pages remain checksum-valid on the source server.
Structural corruption rarely occurs and usually results from server bugs, backup tool bugs, storage failures, or filesystem-level corruption.
Structural corruption can break B-tree page relationships, page metadata consistency, and external LOB references. For a complete list of detected corruption conditions, see Detected corruption conditions.
How --check-tables works
The --check-tables option executes btr_validate_index() on every index that is present and active in the InnoDB data dictionary for each .ibd tablespace, using the number of threads specified by --parallel. --check-tables detects structural inconsistencies that page checksum verification cannot detect. The option applies only to InnoDB tables.
In addition to structural validation, when --check-tables is used, XtraBackup verifies page checksums during InnoDB B-tree index traversal and performs additional checksum verification of the system tablespace (ibdata*) and undo tablespaces (undo*.ibu).
Percona XtraBackup runs validation during the --prepare phase after applying the redo log. The validation process operates in read-only mode against backup files and does not modify backup contents. Validation continues after detecting corruption so that Percona XtraBackup can report all problematic tables and indexes in a single run.
For each tablespace, Percona XtraBackup:
-
Loads index metadata
-
Identifies committed indexes
-
Executes
btr_validate_index()on each index -
Traverses B-tree pages and validates structural relationships
-
Reports detected inconsistencies
The option also works with:
-
Parallel execution through
--parallel -
Workflows that use
--apply-log-only -
Transportable tablespace export with
--export
Detected corruption conditions
The validation process performs the following structural checks:
| Check | Detected condition |
|---|---|
| Broken sibling links | Invalid sibling-page or parent-page navigation pointers |
PAGE_INDEX_ID mismatches |
Page index ID does not match index metadata |
| Minimum-record flag validation | Minimum-record flag is missing or invalid |
| Parent-child pointer validation | Child page boundaries do not match parent node structure |
| External LOB validation | Shared, freed, or out-of-bounds LOB page references |
| All-zero page detection | Page contains only zero bytes |
| PRIMARY and secondary index record-count validation | Record count mismatch between the PRIMARY index and secondary indexes |
Offloading CHECK TABLE
Similar to the InnoDB CHECK TABLE command, the --check-tables option validates InnoDB tables. However, Percona XtraBackup performs this validation offline on backup files during the --prepare phase, avoiding any performance impact on a live production server.
Validation during --prepare moves structural integrity verification from restored database instances to the backup preparation workflow. A backup or staging host can run validation without starting MySQL on the restored backup.
Using --check-tables during --prepare provides the following operational benefits:
-
Eliminates the need to start a MySQL server on restored backups solely for structural validation
-
Moves validation workload away from running production systems
-
Detects structural corruption earlier in the backup validation workflow
-
Detects corruption before restore or deployment
Parallel execution
The --check-tables option uses the existing --parallel infrastructure from Percona XtraBackup. Worker threads process tablespaces independently.
Each worker thread:
-
Retrieves a tablespace from the shared queue
-
Loads metadata for the tablespace
-
Validates committed indexes
-
Reports validation results
Limitations
The --check-tables option has the following limitations:
-
Validation applies only to InnoDB tables and does not validate MyISAM or RocksDB tables
-
Validation runs only during
--prepare -
Validation increases CPU and I/O usage on the backup host
-
Runtime depends on the number of tablespaces and indexes
-
For incremental backups, use
--check-tablesonly during the final prepare stage because the option verifies all tables and indexes each time it runs -
Checksum corruption may cause XtraBackup to abort with an assertion failure instead of exiting gracefully
Usage
The --check-tables option uses the thread count specified by --parallel. Start with --parallel=8 and adjust the value according to CPU availability and disk I/O capacity on the backup host.
Validate a full backup
xtrabackup --prepare --check-tables \
--target-dir=/backups/full \
--parallel=8
Validate an incremental backup
The --check-tables option can be used together with --apply-log-only. However, because validation scans all tables and indexes each time it runs, it’s recommended using the option during the final prepare stage of an incremental backup.
xtrabackup --prepare --check-tables \
--target-dir=/backups/full \
--parallel=8
Validate and export tablespaces
xtrabackup --prepare --export --check-tables \
--target-dir=/backups/full \
--parallel=8
Output
A successful validation operation typically ends with a message similar to:
2026-05-15T15:41:57.808327+01:00 2 [Note] [MY-011825] [Xtrabackup] Checking: mysql/replication_group_member_actions
2026-05-15T15:41:57.808630+01:00 2 [Note] [MY-011825] [Xtrabackup] Checking: mysql/replication_group_configuration_version
2026-05-15T15:41:57.808810+01:00 2 [Note] [MY-011825] [Xtrabackup] Checking: mysql/server_cost
2026-05-15T15:41:57.808998+01:00 2 [Note] [MY-011825] [Xtrabackup] Checking: mysql/engine_cost
2026-05-15T15:41:57.809190+01:00 2 [Note] [MY-011825] [Xtrabackup] Checking: mysql/proxies_priv
2026-05-15T15:41:57.809511+01:00 2 [Note] [MY-011825] [Xtrabackup] Checking: mysql/ndb_binlog_index
2026-05-15T15:41:58.051499+01:00 0 [Note] [MY-011825] [Xtrabackup] All table checks passed.
A failed validation operation returns a non-zero exit code. During validation, XtraBackup logs each table as it processes it:
2026-05-15T13:42:23.691691+01:00 2 [Note] [MY-011825] [Xtrabackup] Checking: test/t1
2026-05-15T13:42:23.697349+01:00 2 [Note] [MY-011825] [Xtrabackup] Checking: test/t_lob
2026-05-15T13:42:23.782555+01:00 2 [Note] [MY-011825] [Xtrabackup] Checking: mysql/dd_properties
2026-05-15T13:42:23.782835+01:00 2 [Note] [MY-011825] [Xtrabackup] Checking: mysql/innodb_dynamic_metadata
...
If validation detects corruption, XtraBackup reports the affected tables and ends with the following summary message:
2026-05-15T13:42:24.670469+01:00 0 [ERROR] [MY-011825] [Xtrabackup] Table check failed. The backup may be corrupted.
The log contains detailed information for each detected inconsistency.
Corruption examples
-
Sibling page relationships corruption.
Expected output
2026-05-15T13:42:20.270268+01:00 2 [ERROR] [MY-013051] [InnoDB] In pages [page id: space=2, page number=5] and [page id: space=2, page number=6] of index PRIMARY of table test.t1 InnoDB: broken FIL_PAGE_NEXT or FIL_PAGE_PREV links -
Parent-to-child page references corruption.
Expected output
2026-05-15T13:38:12.343921+01:00 2 [ERROR] [MY-011825] [InnoDB] B-tree corruption: page 0 is empty but is not the root page in index PRIMARY. Possible all-zero (unflushed) page. -
Page ownership metadata corruption.
Expected output
2026-05-15T13:38:12.343894+01:00 2 [ERROR] [MY-011866] [InnoDB] Page index id 0 != data dictionary index id 204 -
Minimum-record markers corruption.
Expected output
2026-05-15T13:42:27.237530+01:00 2 [ERROR] [MY-014011] [InnoDB] Minimum record flag is wrongly set to rec on page '4' at level '0' for index 'PRIMARY' of table 'sys/sys_config'. -
External LOB page ownership corruption.
Expected output
2026-05-15T13:42:34.475996+01:00 2 [ERROR] [MY-011825] [InnoDB] Invalid record! External LOB first page cannot be shared between two records 2026-05-15T13:42:34.476009+01:00 2 [ERROR] [MY-011825] [InnoDB] The external LOB first page is [page id: space=4294967294, page number=1002] 2026-05-15T13:42:34.476014+01:00 2 [ERROR] [MY-011825] [InnoDB] The first occurrence of the external LOB first page is in record : page_no: 992 with heap_no: 4
Restore features
Point-in-time recovery
Recovering up to particular moment in database’s history can be done with xtrabackup and the binary logs of the server.
Note that the binary log contains the operations that modified the database from a point in the past. You need a full datadir as a base, and then you can apply a series of operations from the binary log to make the data match what it was at the point in time you want.
Run the following commands as root or use the sudo command.
xtrabackup --backup --target-dir=/path/to/backup
xtrabackup --prepare --target-dir=/path/to/backup
For more details on these procedures, see Creating a backup and Preparing a backup.
Now, suppose that some time has passed, and you want to restore the database to a certain point in the past, having in mind that there is the constraint of the point where the snapshot was taken.
To find out what is the situation of binary logging in the server, execute the following queries:
SHOW BINARY LOGS;
Expected output
+------------------+-----------+
| Log_name | File_size |
+------------------+-----------+
| mysql-bin.000001 | 126 |
| mysql-bin.000002 | 1306 |
| mysql-bin.000003 | 126 |
| mysql-bin.000004 | 497 |
+------------------+-----------+
and
SHOW MASTER STATUS;
Expected output
+------------------+----------+--------------+------------------+
| File | Position | Binlog_Do_DB | Binlog_Ignore_DB |
+------------------+----------+--------------+------------------+
| mysql-bin.000004 | 497 | | |
+------------------+----------+--------------+------------------+
The first query will tell you which files contain the binary log and the second
one which file is currently being used to record changes, and the current
position within it. Those files are stored usually in the datadir
(unless other location is specified when the server is started with the
--log-bin= option).
To find out the position of the snapshot taken, see the
xtrabackup_binlog_info at the backup’s directory:
cat /path/to/backup/xtrabackup_binlog_info
Expected output
mysql-bin.000003 57
This will tell you which file was used at moment of the backup for the binary log and its position. That position will be the effective one when you restore the backup:
xtrabackup --copy-back --target-dir=/path/to/backup
As the restoration will not affect the binary log files (you may need to adjust file permissions, see Restoring a Backup), the next step is extracting the queries from the binary log with mysqlbinlog starting from the position of the snapshot and redirecting it to a file
mysqlbinlog /path/to/datadir/mysql-bin.000003 /path/to/datadir/mysql-bin.000004 \
--start-position=57 > mybinlog.sql
Note that if you have multiple files for the binary log, as in the example, you have to extract the queries with one process, as shown above.
Inspect the file with the queries to determine which position or date
corresponds to the point-in-time wanted. Once determined, pipe it to the
server. Assuming the point is 11-12-25 01:00:00:
mysqlbinlog /path/to/datadir/mysql-bin.000003 /path/to/datadir/mysql-bin.000004 \
--start-position=57 --stop-datetime="11-12-25 01:00:00" | mysql -u root -p
and the database will be rolled forward up to that Point-In-Time.
FLUSH TABLES WITH READ LOCK option
The FLUSH TABLES WITH READ LOCK option does the following with a global read lock:
-
Closes all open tables
-
Locks all tables for all databases
Release the lock with UNLOCK TABLES.
Note
FLUSH TABLES WITH READ LOCK does not prevent inserting rows into the log tables.
To ensure consistent backups, use the FLUSH TABLES WITH READ LOCK option before taking a non-InnoDB file backup. The option does not affect long-running queries.
Enabling FLUSH TABLES WITH READ LOCK when the server has long-running queries can leave the server in a read-only mode until the queries finish. If the server is in either the Waiting for table flush or the Waiting for source to send event state, stopping the FLUSH TABLES WITH READ LOCK operation does not help. Stop any long-running queries to return to normal operation.
To prevent the server staying in a read-only mode until the queries finish, xtrabackup does the following:
-
checks if any queries run longer than specified in
--ftwrl-wait-threshold. If xtrabackup finds such queries, xtrabackup waits for one second and checks again. If xtrabackup waits longer than specified in--ftwrl-wait-timeout, the backup is aborted. As soon as xtrabackup finds no queries running longer than specified in--ftwrl-wait-threshold, xtrabackup issues the global lock. -
kills all queries or only the SELECT queries which prevent the global lock from being acquired.
Note
All operations described in this section have no effect when Backup locks are used.
Percona XtraBackup uses backup locks where available as a lightweight alternative to FLUSH TABLES WITH READ
LOCK. This operation automatically copies non-InnoDB data and avoids blocking DML queries that modify InnoDB tables.
Wait for queries to finish
You should issue a global lock when no long queries are running. Waiting to issue the global lock for extended period of time is not a good method. The wait can extend the time needed for
backup to take place. The –ftwrl-wait-timeout option can limit the
waiting time. If it cannot issue the lock during this
time, xtrabackup stops the option, exits with an error message, and backup is
not be taken.
The option’s default value is zero (0), which turns off the option.
Another possibility is to specify the type of query to wait on. In this case
--ftwrl-wait-query-type.
The possible values are all and
update. When all is used xtrabackup will wait for all long running
queries (execution time longer than allowed by --ftwrl-wait-threshold)
to finish before running the FLUSH TABLES WITH READ LOCK. When update is
used xtrabackup will wait on UPDATE/ALTER/REPLACE/INSERT queries to
finish.
The time needed for a specific query to complete is hard to predict. We assume that the long-running queries will not finish in a timely manner. Other queries which run for a short time finish quickly. xtrabackup uses the value of
–ftwrl-wait-threshold option to specify the long-running queries
and will block a global lock. To use this option
xtrabackup user should havePROCESSandCONNECTION_ADMIN` privileges.
Kill the blocking queries
The second option is to kill all the queries which prevent from acquiring the
global lock. In this case, all queries which run longer than FLUSH TABLES WITH READ LOCK are potential blockers. Although all queries can be killed,
additional time can be specified for the short running queries to finish using
the --kill-long-queries-timeout option. This option specifies a query time limit. After the specified time is reached, the server kills the query. The default value is zero, which turns this
feature off.
The --kill-long-query-type option can be used to specify all or only
SELECT queries that are preventing global lock from being acquired. To use this option xtrabackup user should have PROCESS and CONNECTION_ADMIN privileges.
Options summary
-
--ftwrl-wait-timeout(seconds) - how long to wait for a good moment. Default is 0, not to wait. -
--ftwrl-wait-query-type- which long queries should be finished beforeFLUSH TABLES WITH READ LOCKis run. Default is all. -
--ftwrl-wait-threshold(seconds) - how long query should be running before we consider it long running and potential blocker of global lock. -
--kill-long-queries-timeout(seconds) - how many time we give for queries to complete afterFLUSH TABLES WITH READ LOCKis issued before start to kill. Default if0, not to kill. -
--kill-long-query-type- which queries should be killed oncekill-long-queries-timeouthas expired.
Example
Running the xtrabackup with the following options will cause xtrabackup to spend no longer than 3 minutes waiting for all queries older than 40 seconds to complete.
xtrabackup --backup --ftwrl-wait-threshold=40 \
--ftwrl-wait-query-type=all --ftwrl-wait-timeout=180 \
--kill-long-queries-timeout=20 --kill-long-query-type=all \
--target-dir=/data/backups/
After FLUSH TABLES WITH READ LOCK is issued, xtrabackup will wait for 20
seconds for lock to be acquired. If lock is still not acquired after 20 seconds,
it will kill all queries which are running longer that the FLUSH TABLES WITH READ LOCK.
Improved log statements
Percona XtraBackup is an open-source command-line utility. Command-line tools have limited interaction with the background operations and the logs provide the progress of an operation or more information about errors.
The error logs did not have a standard structure and the log statements varied in the following ways:
- The backup log statement header has the name of the module,
xtrabackup, which generated the statement but no timestamp:
xtrabackup: recognized client arguments: --parallel=4 --target-dir=/data/backups/ --backup=1
Expected output
./bin/xtrabackup version 8.4.0-6 based on MySQL server 8.4 Linux (x86_64) (revision id: b0f75188ca3)
- The copy-back log statement has a timestamp but no module name. The timestamp is a mix of UTC and the local timezone.
220322 19:05:13 [01] Copying undo_001 to /data/backups/undo_001
- The following prepare log statements do not have header information, which makes diagnosing an issue more difficult.
Completed space ID check of 1008 files.
Initializing buffer pool, total size = 128.000000M, instances = 1, chunk size =128.000000M
Completed initialization of buffer pool
If the mysqld execution user is authorized, page cleaner thread priority can be changed. See the man page of setpriority().
Log statement structure
The improved log structure is displayed in the backup, prepare, move-back/copy-back error logs.
Each log statement has the following attributes:
-
Timestamp - a timestamp for when the event occurred in a UTC format.
-
Severity - the severity level of a statement indicates the importance of an event.
-
ID - this identifier is currently not used but may be used in future versions.
-
Context - the name of the module that issued the log statement, such as XtraBackup, InnoDB, or Server.
-
Message - a description of the event generated by the module.
An example of a prepare log that is generated with the improved structure.
The uniformity of the headers makes it easier to follow an operation’s progress
or review the log to diagnose issues.
Expected output
2022-03-22T19:15:36.142247+05:30 0 [Note] [MY-011825] [Xtrabackup] This target seems to be not prepared yet.
2022-03-22T19:15:36.142792+05:30 0 [Note] [MY-013251] [InnoDB] Number of pools: 1
2022-03-22T19:15:36.149212+05:30 0 [Note] [MY-011825] [Xtrabackup] xtrabackup_logfile detected: size=8388608, start_lsn=(33311656)
2022-03-22T19:15:36.149998+05:30 0 [Note] [MY-011825] [Xtrabackup] using the following InnoDB configuration for recovery:
2022-03-22T19:15:36.150023+05:30 0 [Note] [MY-011825] [Xtrabackup] innodb_data_home_dir = .
2022-03-22T19:15:36.150036+05:30 0 [Note] [MY-011825] [Xtrabackup] innodb_data_file_path = ibdata1:12M:autoextend
2022-03-22T19:15:36.150078+05:30 0 [Note] [MY-011825] [Xtrabackup] innodb_log_group_home_dir = .
2022-03-22T19:15:36.150095+05:30 0 [Note] [MY-011825] [Xtrabackup] innodb_log_files_in_group = 1
2022-03-22T19:15:36.150111+05:30 0 [Note] [MY-011825] [Xtrabackup] innodb_log_file_size = 8388608
2022-03-22T19:15:36.151667+05:30 0 [Note] [MY-011825] [Xtrabackup] inititialize_service_handles suceeded
2022-03-22T19:15:36.151903+05:30 0 [Note] [MY-011825] [Xtrabackup] using the following InnoDB configuration for recovery:
2022-03-22T19:15:36.151926+05:30 0 [Note] [MY-011825] [Xtrabackup] innodb_data_home_dir = .
2022-03-22T19:15:36.151954+05:30 0 [Note] [MY-011825] [Xtrabackup] innodb_data_file_path = ibdata1:12M:autoextend
2022-03-22T19:15:36.151976+05:30 0 [Note] [MY-011825] [Xtrabackup] innodb_log_group_home_dir = .
2022-03-22T19:15:36.151991+05:30 0 [Note] [MY-011825] [Xtrabackup] innodb_log_files_in_group = 1
2022-03-22T19:15:36.152004+05:30 0 [Note] [MY-011825] [Xtrabackup] innodb_log_file_size = 8388608
2022-03-22T19:15:36.152021+05:30 0 [Note] [MY-011825] [Xtrabackup] Starting InnoDB instance for recovery.
2022-03-22T19:15:36.152035+05:30 0 [Note] [MY-011825] [Xtrabackup] Using 104857600 bytes for buffer pool (set by --use-memory parameter)
InnoDB Redo Log Archiving
A physical backup includes raw copies of database contents and related files, such as configuration files and logs. During crash recovery, InnoDB uses the redo log to correct data from incomplete transactions. The redo log contains entries that restore the database to a consistent state. An LSN value identifies the position of data in the redo log.
InnoDB continuously appends data to the redo log. When a file fills, InnoDB creates a new file. The checkpoint process truncates old data and removes obsolete files.
If the server generates redo logs faster than the backup system can store them, the backup may fall behind and risk data loss. This can happen when the server is under heavy load or when the backup storage is slower than the redo log storage.
Pre-archiving strategies
Before redo log archiving, users relied on the following strategies:
-
Increase the redo log size
-
Check for I/O congestion if read speed is slow
-
Check for I/O or network congestion if write speed is slow
-
Schedule backups during off-peak hours
When to Use Redo Log Archiving
Use redo log archiving when:
-
You see heavy write activity during backups.
-
Increasing redo log size alone does not prevent wrap-around during long backups.
-
I/O congestion slows read or write throughput to the backup target.
-
You cannot schedule backups during low-traffic periods.
Enable redo log archiving
Redo log archiving allows the server to write redo logs to a separate directory for backup purposes. To enable archiving, follow these steps:
-
Create one or more archive directories and set ownership and permissions so the
mysqldOS user can write to them. -
Register those directories with the
innodb_redo_log_archive_dirsglobal variable, then start archiving with theinnodb_redo_log_archive_start()function.
Create an archive directory
Before enabling redo log archiving, create a directory to store archived redo logs. The system user running mysqld must own the directory and have read and write access.
Use the following commands to create and secure the directory:
sudo mkdir -p /var/lib/mysql-redo-archive/backup1
sudo chown -R mysql:mysql /var/lib/mysql-redo-archive
sudo chmod -R 700 /var/lib/mysql-redo-archive/
-
mkdir -pcreates the directory and any missing parent directories -
chownassigns ownership to the mysql user -
chmodrestricts access to the owner only
Ensure that the path you use matches the label and directory in your innodb_redo_log_archive_dirs configuration.
Adjust mysql:mysql if your MySQL server runs under a different user or group.
Register the Archive Directory
The innodb_redo_log_archive_dirs variable defines labeled archive paths. Use a semicolon to separate multiple entries. Each entry uses the format label:/path/to/archive.
Set and persist the variable:
SET PERSIST innodb_redo_log_archive_dirs='backup1:/var/lib/mysql-redo-archive/';
Verify the configuration:
SHOW GLOBAL VARIABLES LIKE 'innodb_redo_log_ar%';
Expected output
+------------------------------+--------------------------------------+
| Variable_name                | Value                                |
+------------------------------+--------------------------------------+
| innodb_redo_log_archive_dirs | backup1:/var/lib/mysql-redo-archive/ |
+------------------------------+--------------------------------------+
1 row in set (0.0025 sec)
Start and stop archiving
Users with the INNODB_REDO_LOG_ARCHIVE privilege can start or stop archiving with the following functions:
-
innodb_redo_log_archive_start(label, label) -
innodb_redo_log_archive_stop(label)
Start archiving
To begin archiving redo logs, call innodb_redo_log_archive_start(). This function activates the archiving process for the specified label and writes redo log data to the associated directory.
Use the same label defined in the innodb_redo_log_archive_dirs variable. The function requires the INNODB_REDO_LOG_ARCHIVE privilege.
SELECT innodb_redo_log_archive_start('backup1','backup1');
-
The first argument is the label used in the configuration
-
The second argument is the destination label for the archive stream
If successful, the function returns 0. A non-zero value indicates an error.
Stop archiving
To stop redo log archiving, call innodb_redo_log_archive_stop(). This function halts the archiving process for the specified label and closes the associated archive stream.
You must use the same label as when you started archiving. The function requires the INNODB_REDO_LOG_ARCHIVE privilege.
SELECT innodb_redo_log_archive_stop('backup1');
- The argument is the label defined in the archive configuration
If successful, the function returns 0. A non-zero value indicates an error.
Troubleshooting redo log archiving
If redo log archiving fails or behaves unexpectedly, check the following:
-
Confirm that the archive directory exists and is writable by the
mysqlduser -
Verify that the label matches the one defined in
innodb_redo_log_archive_dirs -
Ensure that the user calling the function has the
INNODB_REDO_LOG_ARCHIVEprivilege -
Check for SELinux or AppArmor restrictions that may block access to the archive path
-
Review the MySQL error log for messages related to archiving failures
-
If using Percona XtraBackup, run it as the same user that owns the mysqld process
-
Look for “Permission denied” errors in the backup log output
The archiving functions return 0 on success. Any other value indicates a failure that requires investigation.
Run Percona XtraBackup with archiving
Percona XtraBackup supports redo log archiving. If the archive directory is not configured, XtraBackup creates a temporary directory. Run XtraBackup as the same user that owns the mysqld process. If permissions are incorrect, XtraBackup returns a “Permission denied” error and skips archiving.
Run XtraBackup as the mysql user:
sudo -H -u mysql bash
xtrabackup --no-lock=1 --compress --parallel=4 \
  --host=localhost --user=root --password='password_string' \
  --backup=1 --target-dir=/Backup/13oct \
  2> /tmp/b0-with-redo-archiving-as-mysql-os-user.log
Use the following command to verify that archiving has occurred:
cat /tmp/b0-with-redo-archiving-as-mysql-os-user.log
Expected output
[Note] [MY-011825] [Xtrabackup] recognized server arguments: --datadir=/var/lib/mysql
[Note] [MY-011825] [Xtrabackup] recognized client arguments: --no-lock=1 --compress --parallel=4 --host=localhost --user=root --password=* --backup=1 --target-dir=/Backup/22Aug  xtrabackup version 8.4.0-3 based on MySQL server 8.4.0-3 Linux (aarch64) (revision id: cccec763) 250721 13:36:02  version_check Connecting to MySQL server with DSN 'dbi:mysql:;mysql_read_default_group=xtrabackup;host=localhost' as 'root'  (using password: YES). 250721 13:36:02  version_check Connected to MySQL server 250721 13:36:02  version_check Executing a version check against the server... 250721 13:36:02  version_check Done.
   [Note] [MY-011825] [Xtrabackup] Connecting to MySQL server host: localhost, user: root, password: set, port: not set, socket: not set
   [Note] [MY-011825] [Xtrabackup] Using server version 8.4.0-3
...
[Note] [MY-011825] [Xtrabackup] xtrabackup redo_log_arch_dir is set to
backup1:/var/lib/mysql-redo-archive/
[Note] [MY-011825] [Xtrabackup] Waiting for archive file
'/var/lib/mysql-redo-archive//1692711362986/archive.94f4ab58-3d1c-11ee-9e4f-0af1fd7c44c9.000001.log'
[Note] [MY-011825] [Xtrabackup] >> log scanned up to (19630018)
...
Look for messages confirming the use of the archive directory and successful log scanning.
Reduced backup lock time
The --lock-ddl=REDUCED option reduces the time the server remains locked by xtrabackup during full and incremental backups. This allows you to perform Data Definition Language (DDL) operations while the backup is in progress.
Version changes
-
Percona XtraBackup Pro 8.4.0-2 adds the
--lock-ddl=REDUCEDoption to the Pro build. -
Percona XtraBackup 8.4.0-5 adds the
--lock-ddl=REDUCEDoption to the Community release.
Benefits
The --lock-ddl=REDUCED option features are as follows:
-
Acquire and release the backup lock quickly: The backup process minimizes the time the server holds the backup lock, allowing for concurrent DDL operations.
Comparing the backup lock duration with –lock-ddl=REDUCED
While we strive to provide accurate performance benchmarks, real-world results may vary depending on your hardware and software configurations.
The following tables illustrate the approximate time differences between
--lock-ddl=ONand--lock-ddl=REDUCEDfor local and cloud backups (Amazon S3). TheImprovement (X times)column shows how many times less the server is locked by xtrabackup using--lock-ddl=ONcompared to--lock-ddl=REDUCED.Data size in gigabytes Backup lock duration with –lock-ddl=ON in seconds Backup lock duration with –lock-ddl=REDUCED in seconds Improvement (X times) 50 GB 460.2 sec 2.169 sec 212.17 100 GB 901.8 sec 1.305 sec 691.03 200 GB 1820.4 sec 1.347 sec 1351.45 400 GB 3580.2 sec 1.24 sec 2887.26 500 GB 5436 sec 1.264 sec 4300.63 Data size in gigabytes Backup lock duration with –lock-ddl=ON in seconds Backup lock duration with –lock-ddl=REDUCED in seconds Improvement (X times) 50 GB 469.8 sec 3.859 sec 121.74 100 GB 927.6 sec 4.072 sec 227.80 200 GB 1851.6 sec 4.408 sec 420.05 400 GB 3888 sec 3.948 sec 984.80 500 GB 4896 sec 4.065 sec 1204.43 Using
--lock-ddl=REDUCEDsignificantly reduces the time DDL operations are blocked during backup, although the total backup time remains unchanged. The data size particularly impacts the lock duration - larger databases benefit more from this reduced locking approach. -
Track changes with redo logs: Redo logs record all file-level changes, ensuring data consistency during the backup process.
- Handle DDL operations: The backup process generates metadata files to account for any DDL operations that occur while the backup is in progress.
- Ensure consistency: The
--preparestep processes generated metadata files and uses redo and undo logs to create a consistent database state. - Reduce replication lag: When you take a backup with
--safe-slave-backupand--lock-ddl=reducedenabled, the SQL thread on the replica server is stopped for less time, reducing replication lag.
Limitations
-
Certain DDL operations consume significant resources, and xtrabackup requires I/O to copy and read files simultaneously. This requirement can increase resource demand from DDL operations during the backup process.
-
The master key rotation with the
ALTER INSTANCE ROTATE INNODB MASTER KEYis prohibited while backup is in progress. -
Backups may be larger because new
DDLoperations are executed concurrently on the server, and the files generated by the server are included in the backup. Additionally, certainDDLoperations, such asADD INDEXor encryption changes to existing data files, will cause the data files to be recopied, increasing the backup size. -
The number of open file handles in your operating system should be configured to match the number of files in the server data directory.
-
Taking a backup using page tracking is not supported with
--lock-ddl=REDUCEDoption.
How the --lock-ddl=REDUCED option works
Percona Server for MySQL implemented LOCK TABLES FOR BACKUP to block DDL operations on a server. xtrabackup utilizes this lock during the backup process to ensure that any DDL operation does not corrupt the backup. With MySQL-compatible servers xtrabackup utilizes LOCK INSTANCE FOR BACKUP to lock the server during the backup. The lock does not affect the Data Manipulation Language (DML) operations. By default, xtrabackup enables the --lock-ddl=ON option to apply the backup lock at the start of the backup.
Taking backup with the --lock-ddl=REDUCED option includes the following phases:
Phase 1: Operations performed without the lock
Warning
If your database contains encrypted tables, do not use the ALTER INSTANCE ROTATE MASTER KEY command during Phase 1. Running this command with encrypted tables present can cause backup operations to fail.
The following operations are performed without the lock:
- Parse and copy the redo logs from the checkpoint up to the current
LSN, and start tracking new file operations. - Start the redo log thread to copy the redo logs.
- Track file operations by parsing the
MLOG_FILE_*records from the redo log. These records help track changes in the files being backed up to ensure consistency. - Copy the
.ibdfiles.
Phase 2: Operations performed under the lock
The following operations are performed under the lock:
- Take the backup lock on the server to prevent new DDL operations, such as creating or altering tables.
- Copy
non-InnoDBfiles. - Check the file operations that were tracked and recopy the tablespaces.
- Create additional
metadatafiles to perform the required actions (deletions or renames) on the already copied files. This approach ensures that the backup remains consistent and accurate without disrupting the streaming process. This is particularly important for streaming backups. - Gather a sync point from all engines (InnoDB LSN, binlog, GTID, etc.) by querying the
log_status. - Stop the redo thread once it copies at least up to sync point at step 4.
- Release the backup lock on the server.
The list of metadata files
| File | Description |
|---|---|
.new |
For new files that are created while the backup in progress and for files that need to be recopied due to encryption or ADD INDEX operations. |
.del |
For deleted files. For a file that has been copied by backup but deleted while the backup is in progress, create a space_id.del file. |
.ren |
For a file that has been copied but renamed while the backup is in progress, create a space_id.ren file. This file should contain the new file name. |
.crpt |
For files that cannot be fully copied due to encryption changes. These files will be recopied, and a .crpt file will be created for the existing file. |
.new.meta |
Similar to .new, but for incremental backups. |
.new.delta |
Similar to .new, but for incremental backups. Create t1.ibd.meta and t1.ibd.delta instead of t1.ibd. |
Phase 3. Handling new metadata files in --prepare
The following operations are performed to ensure data remains intact and consistent:
- Remove the
.crptfiles that match the name after stripping the extension. This step is crucial before theIBDscan because these files are incomplete (they can be zero size). - Perform a scan to create a mapping of
space_idto file names. - Delete the file matching the
space_idusingspace_id.del. In case of incremental backups, also delete the corresponding.new.metaand.new.deltafiles. - Rename the file matching the
space_idto the name specified in the file usingspace_id.ren. - Replace the file that matches the name without the
.newextension using the.newextension. - Replace the
metaanddeltafiles that match the name without the.newin the name using.new.metaand.new.delta.
After Phase 3 is completed, the regular crash recovery starts.
Smart memory estimation
Percona XtraBackup supports the Smart memory estimation feature. With this feature, Percona XtraBackup computes the memory required for prepare phase, while copying redo log entries during the backup phase. Percona XtraBackup also considers the number of InnoDB pages to be fetched from the disk.
Percona XtraBackup performs the backup procedure in two steps:
-
Creates a backup
To create a backup, Percona XtraBackup copies your InnoDB data files. While copying the files, Percona XtraBackup runs a background process that watches the InnoDB redo log, also called the transaction log, and copies changes from it.
-
Prepares a backup
During the
preparephase, Percona XtraBackup performs crash recovery against the copied data files using the copied transaction log file. Percona XtraBackup reads all the redo log entries into memory, categorizes them by space id and page id, reads the relevant pages into memory, and checks the log sequence number (LSN) on the page and on the redo log record. If the redo log LSN is more recent than the page LSN, Percona XtraBackup applies the redo log changes to the page.To
preparea backup, Percona Xtrabackup uses InnoDB Buffer Pool memory. Percona Xtrabackup reserves memory to load 256 pages into the buffer pool. The remaining memory is used for hashing/categorizing the redo log entries.The available memory is controlled by the
--use-memoryoption. If the available memory on the buffer pool is insufficient, the work is performed in multiple batches. After the batch is processed, the memory is freed to release space for the next batch. This process greatly impacts performance as an InnoDB page holds data from multiple rows. If a change on a page happens in different batches, that page is fetched and evicted numerous times.
How does Smart memory estimation work
To run prepare, Percona XtraBackup checks the server’s available free memory and uses that memory up to the limit specified in the --use-free-memory-pct option. Due to backward compatibility, the default value for the --use-free-memory-pct option is 0 (zero), which defines the option as disabled. For example, if you set --use-free-memory-pct=50, then 50% of the free memory is used to prepare a backup.
You can enable or disable the memory estimation during the backup phase with the --estimate-memory option. The default value is OFF. Enable the memory estimation with --estimate-memory=ON:
xtrabackup --backup --estimate-memory=ON --target-dir=/data/backups/
In the prepare phase, enable the --use-free-memory-pct option by specifying the percentage of free memory to be used to prepare a backup. The --use-free-memory-pct value must be larger than 0.
For example:
xtrabackup --prepare --use-free-memory-pct=50 --target-dir=/data/backups/
Example of Smart memory estimation usage
The examples of how Smart memory estimation can improve the time spent on prepare in Percona XtraBackup:
We back up 16, 32, and 64 tables using sysbench. Each set contains 1M rows. In the backup phase, we enable Smart memory estimation with --estimate-memory=ON. In the prepare phase, we set --use-free-memory-pct=50, and Percona XtraBackup uses 50% of the free memory to prepare a backup. The backup is run on an ec2 c4.8xlarge instance (36 vCPUs / 60GB memory / General Purpose SSD (gp2)).
During each --backup, the following sysbench is run:
sysbench --db-driver=mysql --db-ps-mode=disable --mysql-user=sysbench --mysql-password=sysbench --table_size=1000000 --tables=${NUM_OF_TABLES} --threads=24 --time=0 --report-interval=1 /usr/share/sysbench/oltp_write_only.lua run
The following table shows the backup details (all measurements are in Gigabytes):
| Used memory | Size of XtraBackup log | Size of backup | |
|---|---|---|---|
| 16 tables | 3.375 | 0.7 | 4.7 |
| 32 tables | 8.625 | 2.6 | 11 |
| 64 tables | 18.5 | 5.6 | 22 |
-
Used memory - the amount of memory required by Percona XtraBackup with
--use-free-memory-pct=50 -
Size of XtraBackup log - the size of Percona XtraBackup log file (redo log entries copied during the backup)
-
Size of backup - the size of the resulting backup folder
Prepare executed without Smart memory estimation uses the default of 128MB for the buffer pool.
The results are the following:
Note
The following results are based on tests in a specific environment. Your results may vary.
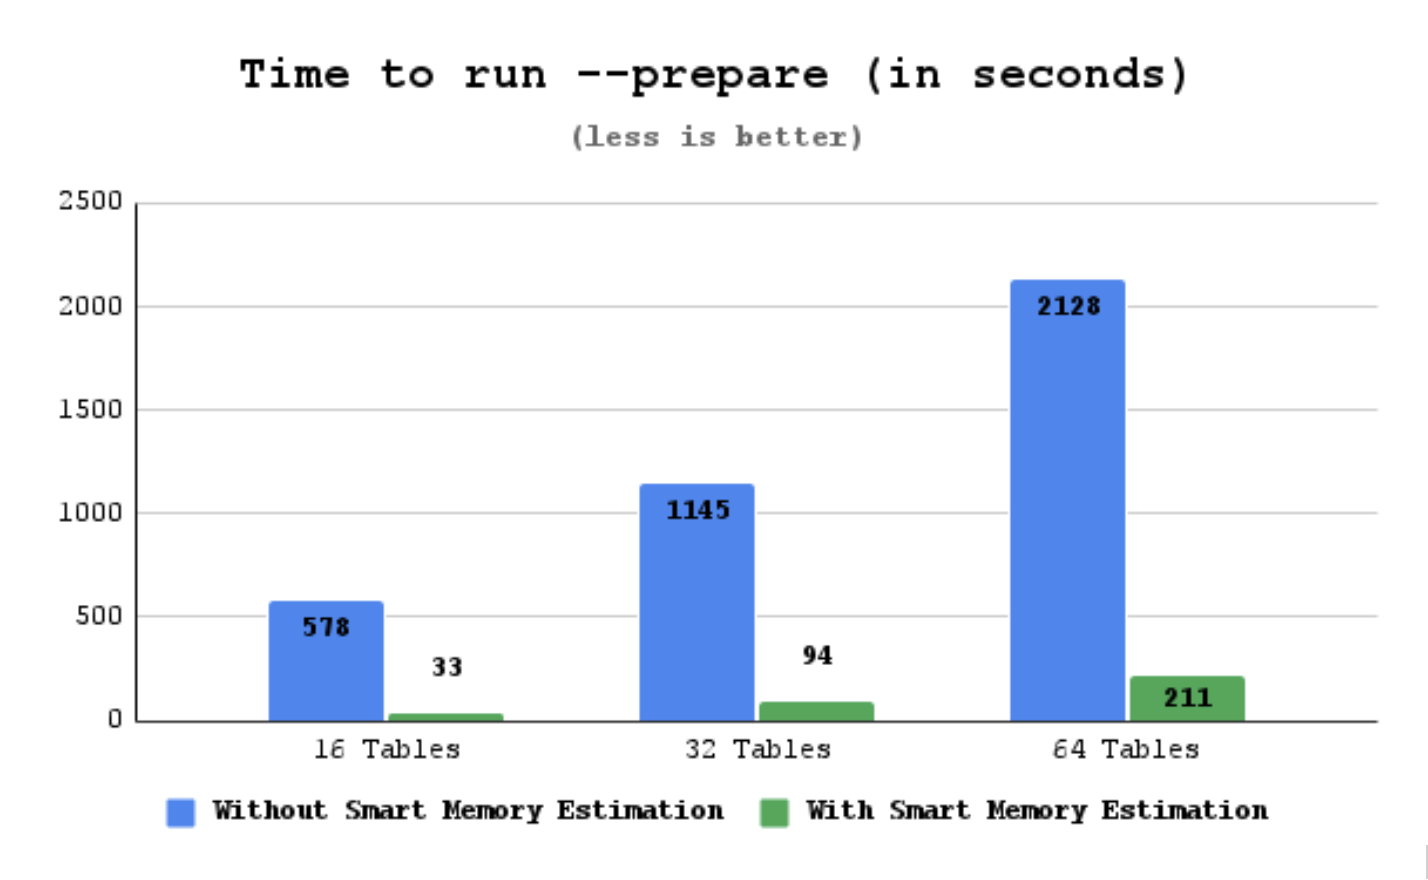
-
16 tables result - prepare time dropped to ~5.7% of the original time. An improvement in recovery time of about 17x.
-
32 tables result - prepare time dropped to ~8,2% of the original time. An improvement in recovery time of about 12x.
-
64 tables result - prepare time dropped to ~9.9% of the original time. An improvement in recovery time of about 10x.
Work with binary logs
The xtrabackup binary integrates with the log_status table. This integration enables xtrabackup to print out the backup’s corresponding binary log position, so that you can use this binary log position to provision a new replica or perform point-in-time recovery.
Find the binary log position
You can find the binary log position corresponding to a backup after the backup has been taken. If your backup is from a server with binary logging enabled, xtrabackup creates a file named xtrabackup_binlog_info in the target directory. This file contains the binary log file name and position of the exact point when the backup was taken.
Expected output during the backup stage
210715 14:14:59 Backup created in directory '/backup/'
MySQL binlog position: filename 'binlog.000002', position '156'
. . .
210715 14:15:00 completed OK!
Point-in-time recovery
To perform a point-in-time recovery from an xtrabackup backup, you should prepare and restore the backup, and then replay binary logs from the point shown in the xtrabackup_binlog_info file.
Find a more detailed procedure in the Point-in-time recovery document.
Set up a new replication replica
To set up a new replica, you should prepare the backup, and restore it to the data directory of your new replication replica. In the CHANGE_REPLICATION_SOURCE_TO with the appropriate options command, use the binary log filename and position shown in the xtrabackup_binlog_info file to start replication.
A more detailed procedure is found in How to setup a replica for replication in 6 simple steps with Percona XtraBackup.
xbcloud features
FIFO data sink
Percona XtraBackup implements a data sink that uses the first in, first out (FIFO) method. With the FIFO data sink feature, users with a streaming capacity of 10Gbps (typically on a Local Area Network (LAN)) can benefit from faster backups by streaming data in parallel to an object storage.
FIFO data sink options
Percona XtraBackup implements the following options:
--fifo-streams=#- specifies the number of FIFO files to use for parallel data stream. To disable FIFO data sink and send stream to STDOUT, set--fifo-streams=1. The default value is1(STDOUT) to ensure the backward compatibility. The--fifo-streamsvalue must match on both the XtraBackup and xbcloud sides.--fifo-dir=name- specifies a directory to write Named Pipe.--fifo-timeout=#- specifies the number of seconds to wait for the other end to open the stream for reading. The default value is60seconds.
How to enable FIFO data sink
To use FIFO data sink, you can either run two commands in separate terminal sessions or run xtrabackup in the background.
For example, run the following commands in separate terminal sessions:
xtrabackup --backup --stream --fifo-streams=2 --fifo-dir=/tmp/fifo
xbcloud put --fifo-streams=2 --fifo-dir=/tmp/fifo full
Run xtrabackup in the background with the following commands:
xtrabackup --backup --stream --fifo-streams=2 --fifo-dir=/tmp/fifo &
xbcloud put --fifo-streams=2 --fifo-dir=/tmp/fifo full
Stream to an object storage
When taking a backup, you can save the files locally or stream the files to either a different server or an object storage.
When you stream backups to Amazon S3 compatible storage using LAN with a streaming capacity of 10Gbps, XtraBackup can use multiple FIFO streams to stream the backups faster.
XtraBackup spawns multiple copy threads and each copy thread reads a data chunk from a specific file. Then multiple FIFO files are created to store the data from XtraBackup. Each XtraBackup copy thread writes the data chunks to a specific FIFO file. Xbcloud reads from the FIFO streams and uploads data to an object storage using an async request. The xbcloud event handler executes the callback depending on the response from the object storage (success or failure).
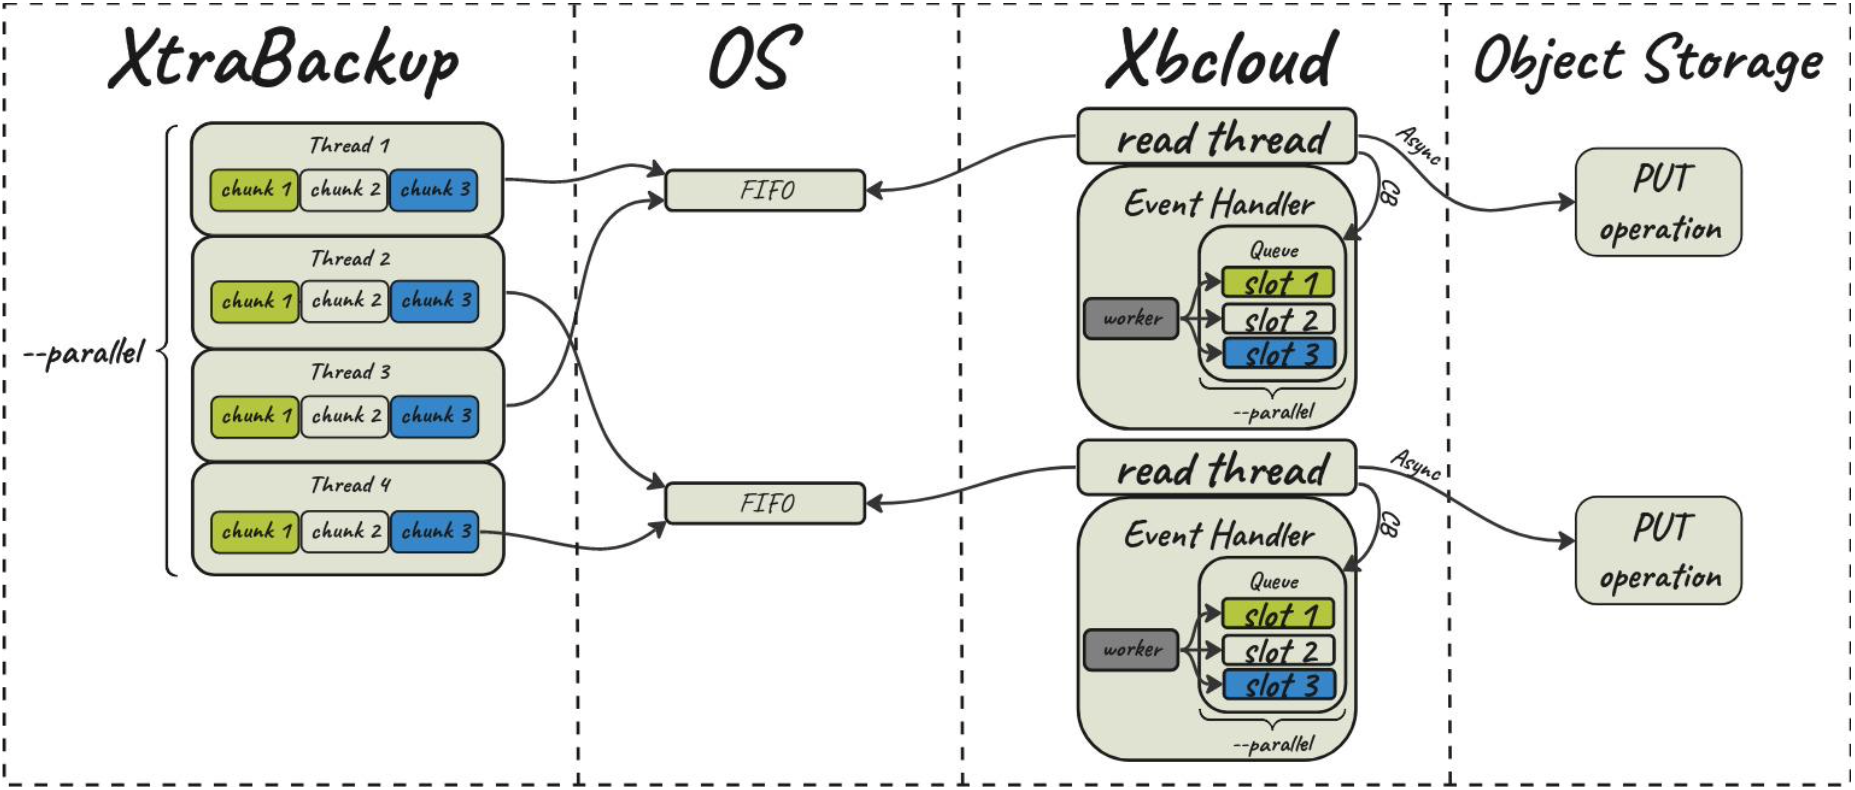
Performance improvement
Consider an example of using a FIFO data sink compared to the STDOUT method.
The database has 1TB of data in multiple tables. The link speed between the source server and destination server using MinIO is ~ 9.2 Gbps.
Both STDOUT and FIFO data sink scenarios push 1TB of data from two servers.
For the FIFO data sink we configure 8 parallel streams with --fifo-streams=8 both for XtraBackup and xbcloud.
The results are the following:
- The
STDOUTmethod takes 01:25:24 to push 1TB of data using 239 MBps (1.8 Gbps). - The
FIFOmethod, using 8 streams, takes 00:16:01 to push 1TB of data using 1.15 GBps (9.2 Gbps).
Exponential backoff
Exponential backoff increases the chances for the completion of a backup or a restore operation. For example, a chunk upload or download may fail if you have an unstable network connection or other network issues. This feature adds an exponential backoff, or sleep, time and then retries the upload or download.
When a chunk upload or download operation fails, xbcloud checks the reason
for the failure. This failure can be a CURL error or an HTTP error, or a
client-specific error. If the error is listed in the Retriable errors list,
xbcloud pauses for a calculated time before retrying the operation until
that time reaches the --max-backoff value.
The operation is retried until the --max-retries value is reached. If the
chunk operation fails on the last retry, xbcloud aborts the process.
The default values are the following:
-
–max-backoff = 300000 (5 minutes)
-
–max-retries = 10
You can adjust the number of retries by adding the --max-retries
parameter and adjust the maximum length of time between retries by adding
the --max-backoff parameter to an xbcloud command.
Since xbcloud does multiple asynchronous requests in parallel, a calculated
value, measured in milliseconds, is used for max-backoff. This algorithm
calculates how many milliseconds to sleep before the next retry. A number
generated is based on the combining the power of two (2), the number of
retries already attempted and adds a random number between 1 and 1000. This
number avoids network congestion if multiple chunks have the same backoff
value. If the default values are used, the final retry attempt to be
approximately 17 minutes after the first try. The number is no longer
calculated when the milliseconds reach the --max-backoff setting. At that
point, the retries continue by using the --max-backoff setting until
the max-retries parameter is reached.
Retriable errors
We retry for the following CURL operations:
-
CURLE_GOT_NOTHING
-
CURLE_OPERATION_TIMEOUT
-
CURLE_RECV_ERROR
-
CURLE_SEND_ERROR
-
CURLE_SEND_FAIL_REWIND
-
CURLE_PARTIAL_FILE
-
CURLE_SSL_CONNECT_ERROR
We retry for the following HTTP operation status codes:
-
503
-
500
-
504
-
408
Each cloud provider may return a different CURL error or an HTTP error,
depending on the issue. Add new errors by setting the following
variables --curl-retriable-errors or --http-retriable-errors on the
command line or in my.cnf or in a custom configuration file under
the [xbcloud] section. You can add multiple errors using a comma-separated list of codes.
The error handling is enhanced when using the --verbose output. This
output specifies which error caused xbcloud to fail and what parameter a
user must add to retry on this error.
The following is an example of a verbose output:
Expected output
210701 14:34:23 /work/pxb/ins/8.4/bin/xbcloud: Operation failed. Error: Server returned nothing (no headers, no data)
210701 14:34:23 /work/pxb/ins/8.4/bin/xbcloud: Curl error (52) Server returned nothing (no headers, no data) is not configured as retriable. You can allow it by adding --curl-retriable-errors=52 parameter
Example
The following example adjusts the maximum number of retries and the maximum time between retries.
xbcloud [options] --max-retries=5 --max-backoff=10000
The following list describes the process using --max-backoff=10000:
-
The chunk
xtrabackup_logfile.00000000000000000006fails to upload the first time and sleeps for 2384 milliseconds. -
The same chunk fails for the second time and the sleep time is increased to 4387 milliseconds.
-
The same chunk fails for the third time and the sleep time is increased to 8691 milliseconds.
-
The same chunk fails for the fourth time. The
max-backoffparameter has been reached. All retries sleep the same amount of time after reaching the parameter. -
The same chunk is successfully uploaded.
An example of the output for this setting
210702 10:07:05 /work/pxb/ins/8.4/bin/xbcloud: Operation failed. Error: Server returned nothing (no headers, no data)
210702 10:07:05 /work/pxb/ins/8.4/bin/xbcloud: Sleeping for 2384 ms before retrying backup3/xtrabackup_logfile.00000000000000000006
. . .
210702 10:07:23 /work/pxb/ins/8.4/bin/xbcloud: Operation failed. Error: Server returned nothing (no headers, no data)
210702 10:07:23 /work/pxb/ins/8.4/bin/xbcloud: Sleeping for 4387 ms before retrying backup3/xtrabackup_logfile.00000000000000000006
. . .
210702 10:07:52 /work/pxb/ins/8.4/bin/xbcloud: Operation failed. Error: Failed sending data to the peer
210702 10:07:52 /work/pxb/ins/8.4/bin/xbcloud: Sleeping for 8691 ms before retrying backup3/xtrabackup_logfile.00000000000000000006
. . .
210702 10:08:47 /work/pxb/ins/8.4/bin/xbcloud: Operation failed. Error: Failed sending data to the peer
210702 10:08:47 /work/pxb/ins/8.4/bin/xbcloud: Sleeping for 10000 ms before retrying backup3/xtrabackup_logfile.00000000000000000006
. . .
210702 10:10:12 /work/pxb/ins/8.4/bin/xbcloud: successfully uploaded chunk: backup3/xtrabackup_logfile.00000000000000000006, size: 8388660
Binaries
Percona XtraBackup binaries overview
Percona XtraBackup provides a comprehensive suite of command-line tools for MySQL database backup and recovery operations. This document introduces the four core binaries that form the foundation of Percona XtraBackup’s functionality, helping you understand when and how to use each tool effectively.
Prerequisites
Before using Percona XtraBackup binaries, ensure you have:
-
Appropriate database privileges for backup operations
-
Sufficient disk space for backup storage
-
Network access (for cloud storage operations)
Core binaries
xtrabackup
Purpose: The primary backup and restore utility for MySQL databases.
Key Capabilities:
-
Creates hot backups without locking tables
-
Supports full, incremental, and compressed backups
-
Handles InnoDB, MyISAM, and other storage engines
-
Provides point-in-time recovery capabilities
Common Use Cases:
-
Daily full database backups
-
Incremental backup strategies
-
Database migration and cloning
-
Disaster recovery preparation
Basic Syntax:
Run the following commands as root or use the sudo command.
# Create a full backup
xtrabackup --backup --target-dir=/backup/full

# Create an incremental backup
xtrabackup --backup --target-dir=/backup/inc1 --incremental-basedir=/backup/full

# Prepare a backup for restore
xtrabackup --prepare --target-dir=/backup/full
Documentation: xtrabackup Overview
Command Line Options: xtrabackup Options
xbcloud
Purpose: Cloud storage management for backup files.
Key Capabilities:
-
Uploads and downloads backups to/from cloud providers
-
Supports Amazon S3, Google Cloud Storage, Azure Blob Storage, and MinIO
-
Handles large backup files efficiently
-
Provides parallel upload/download operations
Common Use Cases:
-
Off-site backup storage
-
Cross-region backup replication
-
Cloud-based disaster recovery
-
Backup archival and long-term storage
Basic Syntax:
Run the following commands as root or use the sudo command.
# Upload backup to S3
xbcloud put s3://my-bucket/backup/ --storage=s3 --s3-bucket=my-bucket

# Download backup from S3
xbcloud get s3://my-bucket/backup/ --storage=s3 --s3-bucket=my-bucket
Documentation: xbcloud Overview
Command Line Options: xbcloud Options
xbcrypt
Purpose: Encryption and decryption of backup files.
Key Capabilities:
-
Encrypts backup files using AES encryption
-
Supports multiple encryption algorithms
-
Provides secure key management
-
Handles both individual files and backup streams
Common Use Cases:
-
Securing sensitive database backups
-
Compliance with data protection regulations
-
Secure backup transmission
-
Long-term encrypted storage
Basic Syntax:
Run the following commands as root or use the sudo command.
# Encrypt a backup file
xbcrypt --encrypt --encrypt-key-file=/path/to/keyfile --input=/backup/backup.xbstream

# Decrypt a backup file
xbcrypt --decrypt --encrypt-key-file=/path/to/keyfile --input=/backup/backup.xbstream.encrypted
Documentation: xbcrypt Overview
Command Line Options: xbcrypt Options
xbstream
Purpose: Streaming backup data for efficient handling of large files.
Key Capabilities:
-
Streams backup data to and from files
-
Supports compression and decompression
-
Handles backup streaming over networks
-
Works with standard Unix pipes and redirection
Common Use Cases:
-
Streaming backups over network connections
-
Real-time backup processing
-
Integration with other backup tools
-
Efficient handling of large backup files
Basic Syntax:
Run the following commands as root or use the sudo command.
# Extract a streamed backup
xbstream -x -C /restore/directory < backup.xbstream

# Create a streamed backup
xtrabackup --backup --stream=xbstream | xbstream -c -C /backup/directory
Documentation: xbstream Overview
Command Line Options: xbstream Options
Common workflows
Basic backup workflow
-
Create a full backup using
xtrabackup -
Optionally encrypt using
xbcrypt -
Upload to cloud storage using
xbcloud -
Verify backup integrity
Incremental backup strategy
-
Create initial full backup
-
Create incremental backups based on the full backup
-
Stream incremental backups using
xbstream -
Store encrypted backups in cloud storage
Disaster recovery workflow
-
Download backup from cloud storage
-
Decrypt backup files if necessary
-
Prepare backup using
xtrabackup --prepare -
Restore database from prepared backup
Code examples
Complete backup and upload workflow
Run the following commands as root or use the sudo command.
# Create encrypted backup
xtrabackup --backup --target-dir=/tmp/backup --encrypt=AES256 --encrypt-key-file=/etc/mysql/backup.key

# Stream and compress backup
xtrabackup --backup --stream=xbstream --encrypt=AES256 --encrypt-key-file=/etc/mysql/backup.key | \
  xbstream -c -C /tmp/backup

# Upload to cloud storage
xbcloud put s3://my-backup-bucket/$(date +%Y%m%d)/ --storage=s3 --s3-bucket=my-backup-bucket
Restore from cloud storage
Run the following commands as root or use the sudo command.
# Download backup from cloud
xbcloud get s3://my-backup-bucket/20241201/ --storage=s3 --s3-bucket=my-backup-bucket

# Decrypt backup
xbcrypt --decrypt --encrypt-key-file=/etc/mysql/backup.key --input=/tmp/backup/backup.xbstream.encrypted

# Prepare and restore
xtrabackup --prepare --target-dir=/tmp/backup
xtrabackup --copy-back --target-dir=/tmp/backup
Next steps
Now that you understand the core binaries, consider these next steps:
-
Installation: Follow the installation guide for your operating system
-
Configuration: Review configuration options for your environment
-
Quick Start: Try the quickstart guide for hands-on experience
-
Advanced Topics: Explore point-in-time recovery and replication setup
Related documentation
The xtrabackup binary
Overview of the xtrabackup binary
The xtrabackup binary compiles in C and connects directly to InnoDB libraries and standard MySQL client libraries. The tool performs point-in-time backups for InnoDB and XtraDB tables and captures schema definitions, MyISAM tables, and other server components.
The InnoDB libraries apply logs to data files and preserve data consistency during the backup process. The MySQL client libraries parse command-line options and configuration files and simplify user interaction.
The xtrabackup binary runs in three modes:
-
Backup mode captures data and logs
-
Prepare mode applies logs to create a consistent snapshot
-
Print-param mode displays internal parameters and supports debugging and configuration validation
Beginner DevOps users benefit from the tool’s automation and reliability, while seasoned DBAs leverage its precision and flexibility to manage complex backup strategies across production environments.
Key features
-
Hot backups enable backup operations without locking the database and allow uninterrupted access
-
Incremental backups capture only changes since the last backup and reduce time and storage requirements
-
Compression reduces backup file size and accelerates transfer speeds
-
Encryption secures backup data and protects sensitive information during storage and transmission
Benefits
-
Data integrity supports point-in-time recovery and minimizes the risk of data loss
-
Broad compatibility backs up both InnoDB and MyISAM tables and includes schema definitions
-
Streamlined recovery simplifies the restoration process and reduces downtime during critical events
Use cases
-
Production backups support live environments that require consistent, non-disruptive backup strategies. DevOps teams schedule hot backups during peak hours to avoid downtime, while DBAs monitor performance and validate backup integrity
-
Disaster recovery enables rapid restoration after hardware failures, data corruption, or security breaches. Teams use xtrabackup to maintain offsite replicas or cloud-based archives that reduce recovery time objectives
-
Development and testing provides clean, restorable datasets for staging environments. Developers reset databases to known states for testing schema changes, debugging, or validating migrations
-
Cloud migration simplifies the transfer of large datasets between on-premises and cloud platforms. Administrators use xtrabackup to create consistent snapshots and restore them across different infrastructure layers
-
Compliance auditing preserves historical data states for regulatory reviews. Organizations retain encrypted backups to meet retention policies and demonstrate data governance practices
Security considerations
-
File protection requires strong encryption during backup creation and secure storage afterward. Administrators configure encryption keys and enforce access controls to prevent unauthorized access.
-
Access management defines roles and permissions for backup operations. Only authorized users should initiate backups, restore data, or access archived files
-
Data masking removes or obfuscates sensitive fields before exporting backups for non-production use. DevOps teams sanitize personally identifiable information to comply with privacy regulations such as GDPR or HIPAA
-
Transport security ensures encrypted transmission of backup files over networks. Teams use secure protocols like SCP, SFTP, or HTTPS to prevent interception during transfer
-
Organizations rotate keys regularly and store them in secure vaults or hardware security modules to reduce exposure risks.
Community contributions
Users engage with the Percona community to share tips, ask questions, and exchange experiences. The Percona Forum provides a space for discussion and collaboration: https://forums.percona.com/c/mysql-mariadb/percona-xtrabackup/10
Limitations
-
Learning curve challenges new users with a wide range of options and modes. DevOps teams benefit from guided documentation and community support to accelerate onboarding
-
Resource consumption affects system performance during backup operations, especially on large datasets. DBAs monitor system load and schedule backups during low-traffic periods to minimize impact
-
Library dependencies introduce potential issues when InnoDB or MySQL client libraries encounter problems. Teams validate library versions and test compatibility before deployment
Additional resources
Explore the following sections for more guidance:
-
Configuration options appear on configure xtrabackup
-
Command-line options: A comprehensive list of command-line options is available on xtrabackup option reference
-
Implementation details: Review technical insights and architecture on xtrabackup implementation details
xtrabackup implementation details
This page contains notes on various internal aspects of the xtrabackup tool’s operation.
File permissions
xtrabackup opens the source data files in read-write mode, although it does not modify the files. This means that you must run xtrabackup as a user who has permission to write the data files. The reason for opening the files in read-write mode is that xtrabackup uses the embedded InnoDB libraries to open and read the files, and InnoDB opens them in read-write mode because it normally assumes it is going to write to them.
Tune the OS buffers
Because xtrabackup reads large amounts of data from the filesystem, it uses
posix_fadvise() where possible, to instruct the operating system not to try
to cache the blocks it reads from disk. Without this hint, the operating system
would prefer to cache the blocks, assuming that xtrabackup is likely to need
them again, which is not the case. Caching such large files can place pressure
on the operating system’s virtual memory and cause other processes, such as the
database server, to be swapped out. The xtrabackup tool avoids this with the
following hint on both the source and destination files:
posix_fadvise(file, 0, 0, POSIX_FADV_DONTNEED)
In addition, xtrabackup asks the operating system to perform more aggressive read-ahead optimizations on the source files:
posix_fadvise(file, 0, 0, POSIX_FADV_SEQUENTIAL)
Copy data files
When copying the data files to the target directory, xtrabackup reads and
writes 1 MB of data at a time. This is not configurable. When copying the log
file, xtrabackup reads and writes 512 bytes at a time. This is also not
possible to configure, and matches InnoDB’s behavior (workaround exists in
Percona Server for MySQL because it has an option to tune
innodb_log_block_size for XtraDB, and in that case Percona XtraBackup will match the tuning).
After reading from the files, xtrabackup iterates over the 1MB buffer a page
at a time, and checks for page corruption on each page with InnoDB’s
buf_page_is_corrupted() function. If the page is corrupt, it re-reads and
retries up to 10 times for each page. It skips this check on the doublewrite
buffer.
The xtrabackup command-line options
Here you can find all of the command-line options for the xtrabackup binary.
Modes of operation
You invoke xtrabackup in one of the following modes:
-
--backupmode to make a backup in a target directory -
--preparemode to restore data from a backup (created in--backupmode) -
--copy-backto copy data from a backup to the original location; to move the data instead of copying the data, use the alternate--move-backmode.
When you intend to run xtrabackup in any of these modes, use the following syntax:
xtrabackup [--defaults-file=#] --backup|--prepare|--copy-back| [OPTIONS]
For example, the --prepare mode is applied as follows:
xtrabackup --prepare --target-dir=/data/backup/mysql/
For all modes, the default options are read from the xtrabackup and mysqld configuration groups from the following files in the given order:
-
/etc/my.cnf -
/etc/mysql/my.cnf -
/usr/etc/my.cnf -
~/.my.cnf.
As the first parameter to xtrabackup in place of the --defaults-file,
you may supply one of the following:
-
--print-defaults- prints the argument list and exit. -
--no-defaults- forbids reading options from any file but the login file. -
--defaults-file- reads the default options from the given file. -
--defaults-extra-file- reads the specified additional file after the global files. -
--defaults-group-suffix- reads the configuration groups with the given suffix. The effective group name is constructed by concatenating the default configuration groups (xtrabackup and mysqld) with the given suffix. -
--login-path- reads the given path from the login file.
InnoDB options
A large group of InnoDB options is usually read from the my.cnf configuration file, so xtrabackup boots up its embedded InnoDB in the same configuration as your current server. You typically do not
need to specify them explicitly. These options have the same behavior in InnoDB
and XtraDB. See --innodb-miscellaneous for more information.
Options
apply-log-only
Usage: --apply-log-only
This option causes only the redo stage to be performed when preparing a backup. It is essential for incremental backups.
backup
Usage: --backup
Make a backup and place it in --target-dir. See Create a full backup
backup-lock-timeout
Usage: --backup-lock-timeout
The timeout in seconds for attempts to acquire metadata locks.
backup-lock-retry-count
Usage: --backup-lock-retry-count
The number of attempts to acquire metadata locks.
backup-locks
Usage: --backup-locks
This option controls if Backup locks are used instead of FLUSH TABLES
WITH READ LOCK on the backup stage. The option has no effect when the server does not support backup locks. This option is enabled by default,
disable with --no-backup-locks.
check-privileges
Usage: check-privileges
This option checks if Percona XtraBackup has all the required privileges. If a required privilege is missing for the current operation, the operation terminates and prints an error message. If a privilege is not needed for the current operation but is missing and may be necessary for another XtraBackup operation, the operation is not aborted, and a warning is printed.
Example output
```{.text .no-copy}
xtrabackup: Error: missing required privilege LOCK TABLES on *.*
xtrabackup: Warning: missing required privilege REPLICATION CLIENT on *.*
```
check-tables
Usage: --check-tables
Introduced in Percona XtraBackup 8.4.0-6.
Enables InnoDB B-tree structural validation during the --prepare phase after redo log application completes.
The option runs btr_validate_index() on every committed index in each .ibd tablespace in the backup. Validation detects structural inconsistencies that page checksum verification cannot detect, including broken B-tree relationships, invalid page metadata, and inconsistent external LOB references.
Percona XtraBackup runs validation in read-only mode and does not modify backup data. The option supports --apply-log-only, --parallel, and --export.
If validation detects corruption, xtrabackup reports the affected tables and returns a non-zero exit code after completing all checks.
For more information, see InnoDB B-tree integrity validation during prepare.
close-files
Usage: --close-files
Do not keep files opened. When xtrabackup opens a tablespace, xtrabackup normally doesn’t close its file handle. This operation allows xtrabackup to handle the DDL operations correctly. However, if the number of tablespaces is huge and can not fit into any limit, there is an option to close file handles once they are no longer accessed. Percona XtraBackup can produce inconsistent backups with this option enabled. Use at your own risk.
compress
Usage: --compress
This option tells xtrabackup to compress all output data, including the
transaction log and metadata files, using either the ZSTD or the lz4 compression algorithm. ZSTD is the default compression algorithm.
--compress produces \*.zst files. You can extract the contents of these files using the --decompress option. You can specify the ZSTD compression level with the --compress-zstd-level option.
--compress=lz4 produces \*.lz4 files. You can extract the contents of
these files by using the lz4 program.
compress-chunk-size
Usage: --compress-chunk-size=#
Size of working buffer(s) for compression threads in bytes. The default value is 64K.
compress-threads
Usage: --compress-threads=#
This option specifies the number of worker threads xtrabackup uses for parallel data compression. This option defaults to 1 and can be used with parallel file copying.
For example, --parallel=4 --compress --compress-threads=2
creates four I/O threads that read and pipe the data to two compression threads.
compress-zstd-level
Usage: --compress-zstd-level=#
This option specifies ZSTD compression level. Compression levels provide a trade-off between the compression speed and the compressed files’ size. A lower compression level provides faster compression speed but larger file sizes. A higher compression level provides lower compression speed but smaller file sizes. For example, set level 1 if the compression speed is the most important for you. Set level 19 if the size of the compressed files is the most important.
The default value is 1. Allowed range of values is from 1 to 19.
copy-back
Usage: --copy-back
Copy all the files in a previously made backup from the backup directory to
their original locations. This option will not copy over existing files
unless the --force-non-empty-directories option is specified.
core-file
Usage: --core-file
Write core on fatal signals.
databases
Usage: --databases=#
This option specifies a list of databases and tables that should be backed
up. The option accepts the list of the form "databasename1[.table_name1]
databasename2[.table_name2] . . .".
databases-exclude
Usage: --databases-exclude=name
Databases are excluded based on name. This option operates the same way as --databases but excludes the matched names from the backup.
This option has a higher priority than --databases.
databases-file
Usage: --databases-file=#
This option specifies the path to the file containing the list of databases
and tables that should be backed up. The file can contain the list elements
of the form databasename1[.table_name1], one element per line.
datadir
Usage: --datadir=DIRECTORY
The source directory for the backup. This should be the same as the datadir
for your server, so it should be read from my.cnf if that
exists; otherwise, specify the directory on the command line.
When combined with the --copy-back or the
--move-back option, this option refers to the destination directory.
To perform a backup, you must have the
READ and EXECUTE permissions at a filesystem level in the
server’s datadir.
debug-sleep-before-unlock
Usage: --debug-sleep-before-unlock=#
This option is only used by the xtrabackup test suite.
debug-sync
Usage: --debug-sync=name
This option is only used by the xtrabackup test suite.
decompress
Usage: --decompress
Decompresses all files in a backup previously
made with the --compress option. The
--parallel option lets multiple files be
decrypted simultaneously.
Percona XtraBackup does not automatically remove the compressed files. Users should use the --remove-original option to clean up the backup directory.
decompress-threads
Usage: --decompress-threads=#
Force xbstream to use the specified number of threads for decompressing.
decrypt
Usage: --decrypt=ENCRYPTION-ALGORITHM
Decrypts all files with the xbcrypt extension in a backup
previously made with --encrypt option. The
--parallel option lets multiple files be
decrypted simultaneously. Percona XtraBackup doesn’t
automatically remove the encrypted files; use --remove-original`](#remove-original) option.
defaults-extra-file
Usage: --defaults-extra-file=[MY.CNF]
Read this file after the global files are read. The option must be the first option on the command line.
defaults-file
Usage: --defaults-file=[MY.CNF]
Only read default options from the given file. The value must be the first option on the command line and cannot be a symbolic link.
defaults-group
Usage: --defaults-group=GROUP-NAME
This option sets the group that should be read from the configuration file and is needed for mysqld_multi deployments.
defaults-group-suffix
Usage: --defaults-group-suffix=#
Also reads groups with concat(group, suffix).
dump-innodb-buffer-pool
Usage: --dump-innodb-buffer-pool
This option controls creating a new dump of the buffer pool content.
The xtrabackup binary requests the server to start the buffer pool dump. This operation may take time to complete and is done in the background. The beginning of a backup with the option reports that the dump has been completed.
xtrabackup --backup --dump-innodb-buffer-pool --target-dir=/home/user/backup
By default, this option is set to OFF.
If innodb_buffer_pool_dump_status reports that there is a running dump of the buffer pool, xtrabackup waits for the dump to complete
using the value of --dump-innodb-buffer-pool-timeout
The file ib_buffer_pool stores the tablespace ID and page ID
data used to warm up the buffer pool sooner.
dump-innodb-buffer-pool-pct
Usage: --dump-innodb-buffer-pool-pct
This option contains the percentage of the most recently used buffer pool pages to dump.
This option is effective if --dump-innodb-buffer-pool option is set
to ON. If this option contains a value, xtrabackup sets the MySQL
system variable innodb_buffer_pool_dump_pct . As soon as the buffer pool
dump completes or is stopped (see
--dump-innodb-buffer-pool-timeout), the value of the MySQL system
variable is restored.
dump-innodb-buffer-pool-timeout
Usage: --dump-innodb-buffer-pool-timeout
This option contains the number of seconds that xtrabackup should
monitor the value of innodb_buffer_pool_dump_status to
determine if the buffer pool dump has been completed.
This option is used in combination with
--dump-innodb-buffer-pool. By default, it is set to 10 seconds.
encrypt
Usage: --encrypt=ENCRYPTION_ALGORITHM
This option instructs xtrabackup to encrypt backup copies of InnoDB data
files using the algorithm specified in the ENCRYPTION_ALGORITHM. Currently
supported algorithms are: AES128, AES192 and AES256
encrypt-key
Usage: --encrypt-key=ENCRYPTION_KEY
A proper length encryption key to use. This key can be viewed as part of the process info. We do not recommend using this option with uncontrolled access to the machine.
encrypt-key-file
Usage: --encrypt-key-file=ENCRYPTION_KEY_FILE
The name of a file where the raw key of the appropriate length can be read from. The file must be a simple binary (or text) file that contains exactly the key to be used.
It is passed directly to the xtrabackup child process. See the xtrabackup documentation for more details.
encrypt-threads
Usage: --encrypt-threads=#
This option specifies the number of worker threads that will be used for parallel encryption/decryption. See the xtrabackup documentation for more details.
encrypt-chunk-size
Usage: --encrypt-chunk-size=#
This option specifies the size of the internal working buffer for each encryption thread, measured in bytes. It is passed directly to the xtrabackup child process.
To adjust the chunk size for encrypted files, use --read-buffer-size and this option.
estimate-memory
Usage: --estimate-memory=#
The option lets you enable or disable the Smart memory estimation feature. The default value is OFF. Enable the feature by setting --estimate-memory=ON in the backup phase and setting the --use-free-memory-pct option in the --prepare phase. If the --estimate-memory setting is disabled, the --use-free-memory-pct setting is ignored.
An example of how to enable the Smart memory estimation feature:
$ xtrabackup --backup --estimate-memory=ON --target-dir=/data/backups/
$ xtrabackup --prepare --use-free-memory-pct=50 --target-dir=/data/backups/
export
Usage: --export
Create files necessary for exporting tables. For more details, see Restore individual tables.
extra-lsndir
Usage: --extra-lsndir=DIRECTORY
(for –backup): save an extra copy of the xtrabackup_checkpoints
and xtrabackup_info files in the specified directory.
force-non-empty-directories
Usage: --force-non-empty-directories
When specified, the --copy-backand–move-back` options transfer files to non-empty directories. No existing files are overwritten. If files that need to
be copied/moved from the backup directory already exist in the destination
directory, the operation fails with an error.
ftwrl-wait-timeout
Usage: --ftwrl-wait-timeout=SECONDS
This option specifies the time in seconds that xtrabackup should wait for
queries that would block FLUSH TABLES WITH READ LOCK before running it.
If there are still such queries when the timeout expires, xtrabackup
terminates with an error.
The default value is 0, xtrabackup does not wait
for queries to complete and starts FLUSH TABLES WITH READ LOCK
immediately. Where supported, xtrabackup automatically uses the Backup locks as a lightweight alternative to FLUSH TABLES WITH READ LOCK to copy
non-InnoDB data to avoid blocking DML queries that modify the InnoDB tables.
ftwrl-wait-threshold
Usage: --ftwrl-wait-threshold=SECONDS
This option specifies the query run time threshold which is used by
xtrabackup to detect long-running queries with a non-zero value of
--ftwrl-wait-timeout. FLUSH TABLES WITH READ LOCK
is not started until such long-running queries exist.
This option has no effect if --ftwrl-wait-timeout is 0. The default value
is 60 seconds. The xtrabackup binary automatically uses Backup locks as a lightweight alternative to FLUSH TABLES WITH READ LOCK to copy
non-InnoDB data to avoid blocking DML queries that modify InnoDB tables when backup locks are supported.
ftwrl-wait-query-type
Usage: --ftwrl-wait-query-type=all|updateThis option specifies which queries can be completed before xtrabackup issues the global lock. The default value is all.
galera-info
Usage: --galera-info
This option creates the xtrabackup_galera_info file, which contains the local node state at the backup time. This option should be used when
performing the backup of a Percona XtraDB Cluster. The option has no effect when Backup locks are used to create the backup.
generate-new-master-key
Usage: --generate-new-master-key
Generate a new master key when doing a copy-back.
generate-transition-key
Usage: --generate-transition-key
xtrabackup needs to access the same keyring file or vault server during prepare and copy-back operations but it should not depend on whether the server keys have been purged.
--generate-transition-key creates and adds to the keyring
a transition key for xtrabackup to use if the master key used for
encryption is not found because that key has been rotated and purged.
get-server-public-key
Usage: --get-server-public-key
Get the server public key
help
Usage: --help
This option displays information about how to run the program along with supported options and variables with the default values, where appropriate.
history
Usage: --history=NAME
This option enables the tracking of backup history in the
PERCONA_SCHEMA.xtrabackup_history table. You can specify a history series name placed with the current backup’s history record.
host
Usage: --host=HOST
This option accepts a string argument that specifies the host to use when connecting to the database server with TCP/IP. It is passed to the mysql child process without alteration. See mysql –help for details.
incremental-basedir
Usage: --incremental-basedir=DIRECTORY
This is the directory that contains the full backup, which is the base dataset for the incremental backups.
incremental-dir
Usage: --incremental-dir=DIRECTORY
This is the directory where the incremental backup is combined with the full backup to make a new full backup.
incremental-force-scan
Usage: --incremental-force-scan
When creating an incremental backup, force a full scan of the data pages in that instance.
incremental-history-name
Usage: --incremental-history-name=name
This option specifies the name of the backup series stored in the
PERCONA_SCHEMA.xtrabackup_history used as a base for an incremental backup. xtrabackup searches the history table looking for the most
recent (highest innodb_to_lsn), successful backup in the series and takes the to_lsn`` value to use as the startinglsn` for the incremental
backup.
This options is mutually exclusive with
--incremental-history-uuid, --incremental-basedir, and
--incremental-lsn.
If no valid lsn can be found, either no series by that name or no successful backups by that name, xtrabackup returns an error.
The option is used with the --incremental option.
incremental-history-uuid
Usage: --incremental-history-uuid=name
This option specifies the Universal Unique Identifier (UUID) of the history record in PERCONA_SCHEMA.xtrabackup_history used as the base for an incremental backup.
This options is mutually exclusive with --incremental-history-name, --incremental-basedir, and
--incremental-lsn.
If there is no success record with that UUID, xtrabackup returns an error.
The option is used with the -–incremental option.
incremental-lsn
Usage: --incremental-lsn=LSN
When creating an incremental backup, you can specify the log sequence number
(LSN), a single 64-bit integer, instead of the --incremental-basedir.
Important
Percona XtraBackup does not detect if an incorrect LSN value is specified; the backup is unusable. Be careful!
innodb
Usage: --innodb=name
This option is ignored for MySQL option compatibility.
innodb-miscellaneous
Usage: --innodb-miscellaneous
xtrabackup boots up its embedded InnoDB with the same configuration as your current server using the InnoDB options read from that server'smy.cnf` file. You do not need to specify these options explicitly.
These options behave the same in either InnoDB or XtraDB.
keyring-file-data
Usage: --keyring-file-data=FILENAME
Defines the path to the keyring file. You can combine this option with
--xtrabackup-plugin-dir.
kill-long-queries-timeout
Usage: --kill-long-queries-timeout=SECONDS
This option specifies the number of seconds xtrabackup waits between
starting FLUSH TABLES WITH READ LOCK and killing those queries that block
it. The default value is 0 (zero) seconds, which means xtrabackup does not kill
any queries.
To use this option xtrabackup user should have the
PROCESS and SUPER privileges.
Where supported, xtrabackup
automatically uses Backup locks as a lightweight alternative to FLUSH TABLES WITH READ LOCK to copy non-InnoDB data to avoid blocking DML queries that modify InnoDB tables.
kill-long-query-type
Usage: --kill-long-query-type=all|select
This option specifies which queries should be killed to unblock the global lock. The default value is “select”.
lock-ddl
Usage: --lock-ddl
Enabled by default to ensure that any DDL event does not corrupt the backup. Any DML events continue to occur. A DDL lock protects table and view definitions.
The available values are the following:
| Option | Description |
|---|---|
--lock-ddl=ON |
The backup lock is enabled and is taken at the beginning of the backup. |
--lock-ddl=OFF |
The backup lock is not taken. |
--lock-ddl=REDUCED |
The option value has been added in Percona XtraBackup 8.4.0-2 to reduce the time the instance remains under backup lock. The backup lock is taken after copying the .ibd files and before copying the non-InnoDB files. |
With the --lock-ddl=ON option the backup process is as follows:
-
Set a backup lock on the server to prevent any DDL operations, such as creating or altering tables.
-
Parse and copy the redo logs from the checkpoint up to the current
Log Sequence Number(LSN), and start tracking new file operations. -
Identify and copy the
.ibdfiles. -
Copy
non-InnoDBfiles. -
Gather a sync point from all engines (InnoDB LSN, binlog, Global Transaction Identifier (GTID), etc.) by querying the log status.
-
Stop the redo thread once it copies at least up to sync point.
-
Release the backup lock on the server.
If the backup lock is disabled with the --lock-ddl=OFF option, a backup continues while concurrent DDL operations are executed. These backups may be invalid and may fail at either the backup or the --prepare step.
Use a safe-slave-backup option to stop a SQL replica thread before copying the InnoDB files.
lock-ddl-per-table
Usage: --lock-ddl-per-table
Deprecated in Percona XtraBackup 8.0. Use the –lock-ddl option instead
Lock DDL for each table before xtrabackup starts to copy it and until the backup is completed.
lock-ddl-timeout
Usage: --lock-ddl-timeout
If LOCK TABLES FOR BACKUP or LOCK INSTANCE FOR BACKUP does not return
within a given time, abort the backup.
log
Usage: --log
This option is ignored for MySQL
log-bin
Usage: --log-bin
The base name for the log sequence.
log-bin-index
Usage: --log-bin-index=name
The file that stores the names for binary log files.
log-copy-interval
Usage: --log-copy-interval=#
This option specifies the time interval between checks done by the log copying thread in milliseconds. The default value is 1 second.
login-path
Usage: --login-path
Read the given path from the login file.
move-back
Usage: --move-back
Move all files in a previous backup from the backup directory to their original locations.
Use this option with caution since the operation removes backup files.
no-backup-locks
Usage: --no-backup-locks
Explicity disables the --backup-locks option which is enabled by default.
no-defaults
Usage: --no-defaults
The default options are only read from the login file.
no-lock
Usage: --no-lock
Disables the table lock with FLUSH TABLES WITH READ
LOCK. Use it only if all your tables are InnoDB and you do not care
about the binary log position of the backup. This option shouldn’t be used if any DDL statements are being executed or updates are
happening on non-InnoDB tables; this includes the system MyISAM tables in the
mysql database. Otherwise, those operations could lead to an inconsistent backup.
Where supported, xtrabackup will automatically use Backup locks as a lightweight alternative to FLUSH TABLES WITH READ LOCK to copy
non-InnoDB data to avoid blocking DML queries that modify InnoDB tables.
If you consider using this option because your backups fail to acquire
the lock, maybe incoming replication events prevent
the lock from succeeding. Try the --safe-slave-backup option to stop the replication replica thread momentarily. The --safe-slave-backup option may help the backup to succeed and avoid using this option.
no-server-version-check
Usage: --no-server-version-check
The --no-server-version-check option disables the server version check.
The default behavior runs a check that compares the source system version to the Percona XtraBackup version. If the source system version is higher than the XtraBackup version, the backup is aborted with a message.
Adding the option overrides this check, and the backup proceeds, but there may be issues with the backup.
See Server Version and Backup Version Comparison for more information.
no-version-check
Usage: --no-version-check
This option disables the version check.
If you do not pass this option, xtrabackup implicitly enables the
automatic version check in the --backup mode.
To disable the version check, invoke xtrabackup and explicitly pass this option.
When the automatic version check is enabled, xtrabackup performs a version check against the server on the backup stage after creating a server connection. xtrabackup sends the following information to the server:
-
MySQL flavour and version
-
Operating system name
-
Percona Toolkit version
-
Perl version
Each piece of information has a unique identifier. This identifier is a MD5 hash value that Percona Toolkit uses to obtain statistics about its use. This information is a random UUID; no client information is collected or stored.
open-files-limit
Usage: --open-files-limit=#
The maximum number of file descriptors to reserve with setrlimit git .
parallel
Usage: --parallel=#
The --parallel option specifies the number of threads to use to copy multiple data
files concurrently when creating a backup. The default value is 1 (that is, no
concurrent transfer). In Percona XtraBackup 2.3.10 and newer, the --parallel option
can be used with the --copy-back option to copy the user
data files in parallel (redo logs and system tablespaces are copied in the
main thread).
Before Percona XtraBackup 8.4.0-3, the --parallel option didn’t have any effect on the prepare phase.
Starting with Percona XtraBackup 8.4.0-3, using --parallel=X has effect on the prepare phase. It will now use X threads to apply the changes from .delta files to the IBD files. This option processes multiple delta files simultaneously, improving storage performance and accelerating incremental backups, particularly with numerous InnoDB Data (IBD) files. The option remains effective even if IBD files are unchanged between backups and efficiently handles empty delta files.
When using --parallel in the prepare phase, always specify a numeric value. The recommended minimum value is 4 (for example, --parallel=4).
Note that each thread operates on a single file. If you have a large delta file, there is still only one thread that processes that .delta file. Parallelization occurs at the file level, not within individual files.
password
Usage: --password=PASSWORD
This option accepts a string argument that specifies the password used when connecting to the database.
plugin-load
Usage: --plugin-load
A list of plugins to load.
port
Usage: --port=PORT
This option accepts a string argument specifying the TCP/IP port used to connect to the database server. This option is passed to the mysql child process without alteration.
prepare
Usage: --prepare
Makes xtrabackup perform a recovery on a backup created with --backup, so that the backup data is ready to use.
For details, see Prepare a full backup.
print-defaults
Usage: --print-defaults
Prints the program argument list and exit and must be the first option on the command line.
print-param
Usage: --print-param
Prints the parameters that can be used for copying the data files back to their original locations to restore them.
read-buffer-size
Usage: --read-buffer-size
Set the read buffer size. The given value is scaled up to page size. The default size is 10MB. Use this option to increase the xbcloud/xbstream chunk size from the default size.
To adjust the chunk size for encrypted files, use --read-buffer-size and --encrypt-chunk-size.
register-redo-log-consumer
Usage: --register-redo-log-consumer
This option is disabled by default.
When enabled, this options lets Percona XtraBackup register as a redo log consumer at the start of the backup. The server does not remove a redo log that Percona XtraBackup (the consumer) has not yet copied. The consumer reads the redo log and manually advances the log sequence number (LSN). The server blocks the writes during the process. The server determines when to purge the log based on the redo log consumption.
remove-original
Usage: --remove-original
This option removes .qp, .xbcrypt and .qp.xbcrypt files after decryption and decompression.
rocksdb-datadir
Usage: --rocksdb-datadir
Names the RocksDB data directory
rocksdb-wal-dir
Usage: --rocksdb-wal-dir
RocksDB WAL directory.
rocksdb-checkpoint-max-age
Usage: --rocksdb-checkpoint-max-age
The checkpoint cannot be older than this number of seconds when the backup is complete.
rocksdb-checkpoint-max-count
Usage: --rocksdb-checkpoint-max-count
Complete the backup even if the checkpoint age requirement has not been met after this number of checkpoints.
rollback-prepared-trx
Usage: --rollback-prepared-trx
Force rollback prepared InnoDB transactions.
rsync
Usage: --rsync
Uses the rsync utility to optimize local file transfers. The xtrabackup binary uses rsync to copy all non-InnoDB files instead of spawning a separate cp for each file, which can be much faster for servers with many databases or tables.
You cannot use this option with --stream.
safe-slave-backup
Usage: --safe-slave-backup
When specified, xtrabackup stops the replica SQL thread just before
running FLUSH TABLES WITH READ LOCK and waits to start the backup operation until Replica_open_temp_tables`` inSHOW STATUS` is zero.
If there are no open temporary tables, the backup takes place, otherwise the SQL thread is started and stopped until there are no open temporary tables. The backup fails if Replica_open_temp_tables does not become zero after
--safe-slave-backup-timeout seconds. The replication SQL thread is restarted when the backup is complete.
This option is implemented to deal with replication and temporary tables and isn’t necessary with row-based replication.
Using a safe-slave-backup option stops the SQL replica thread before copying the InnoDB files.
safe-slave-backup-timeout
Usage: --safe-slave-backup-timeout=SECONDS
How many seconds the --safe-slave-backup option waits for the Replica_open_temp_tables to become zero. The default value is 300 seconds.
secure-auth
Usage: --secure-auth
Refuse the client from connecting to the server if it uses the old protocol. This option is enabled by default. Disable this options with –skip-secure-auth.
server-id
Usage: --server-id=#
The server instance being backed up.
server-public-key-path
Usage: --server-public-key-path
The file path to the server public RSA key in the PEM format.
skip-tables-compatibility-check
Usage: --skip-tables-compatibility-check
See --tables-compatibility-check.
slave-info
Usage: --slave-info
This option is useful when backing up a replication replica server. It prints
the binary log position of the source server. It also writes the binary log
coordinates to the xtrabackup_slave_info file as a CHANGE REPLICATION SOURCE TO
command.
A new replica for this source can be set up by starting a replica server on this backup and issuing a CHANGE REPLICATION SOURCE TO command with the binary log
position saved in the xtrabackup_slave_info file.
socket
Usage: --socket
This option accepts a string argument that specifies the socket to use when connecting to the local database server with a UNIX domain socket. It is passed to the MySQL child process without alteration. See mysql –help for details.
ssl
Usage: --ssl
Enable secure connection.
ssl-ca
Usage: --ssl-ca
The path of the file contains a list of trusted SSL CAs.
ssl-capath
Usage: --ssl-capath
The directory path that contains trusted SSL CA files in PEM format.
ssl-cert
Usage: --ssl-cert
The path of the file contains the X509 certificate in PEM format.
ssl-cipher
Usage: --ssl-cipher
The list of the permitted ciphers to use for connection encryption.
ssl-crl
Usage: --ssl-crl
The path of the file that contains certificate revocation lists.
ssl-crlpath
Usage: --ssl-crlpath
The path of the directory that contains the certificate revocation list files.
ssl-fips-mode
Usage: --ssl-fips-mode
The SSL FIPS mode applies only for OpenSSL; permitted values are OFF, ON, and STRICT.
ssl-key
Usage: --ssl-key
The path of the file that contains the X509 key in PEM format.
ssl-mode
Usage: --ssl-mode
The security state of connection to the server.
ssl-verify-server-cert
Usage: --ssl-verify-server-cert
Verify the server certificate Common Name value against the hostname used when connecting to the server.
stream
Usage: --stream=FORMAT
Stream all backup files to the standard output in the specified format. Currently, this option only supports the xbstream format.
strict
Usage: --strict
If this option is specified, xtrabackup fails with an error when invalid parameters are passed.
tables
Usage: --tables=name
A regular expression against which the full table name in the databasename.tablename format is matched. If the name matches, the
table is backed up. See Create a partial backup.
tables-compatibility-check
Usage: --tables-compatibility-check
Enables the engine compatibility warning. The default value is
ON. To disable the engine compatibility warning, use --skip-tables-compatibility-check`](#skip-tables-compatibility-check).
tables-exclude
Usage: --tables-exclude=name
Filtering by regexp for table names. Operates the same
way as --tables, but matched names are excluded from
backup. Note that this option has a higher priority than
--tables.
tables-file
Usage: --tables-file=name
A file containing one table name per line in databasename.tablename format.
The backup will be limited to the specified tables.
target-dir
Usage: --target-dir=DIRECTORY
This option specifies the destination directory for the backup. If the
directory does not exist, xtrabackup creates it. If the directory
does exist and is empty, xtrabackup will succeed.
xtrabackup does not overwrite existing files, however, the operation fails with the operating system error 17, file exists.
If this option is a relative path, it is interpreted as relative to the current working directory from which xtrabackup is executed.
To perform a backup, you need READ, WRITE, and EXECUTE
permissions at a filesystem level for the directory that you supply as the
value of --target-dir.
innodb-temp-tablespaces-dir
Usage: --innodb-temp-tablespaces-dir=DIRECTORY
The location of the directory for the temp tablespace files. This path can be absolute.
throttle
Usage: --throttle=#
This option limits the number of chunks copied per second. The chunk size is 10 MB.
To limit the bandwidth to 10 MB/s, set the option to 1.
tls-ciphersuites
Usage: --tls-ciphersuites
The TLS v1.3 cipher to use.
tls-version
Usage: --tls-version
Defines which TLS version to use. The permitted values are: TLSv1, TLSv1.1, TLSv1.2, TLSv1.3.
tmpdir
Usage: --tmpdir=name
Specify the directory used to store temporary files during the backup
transition-key
Usage: --transition-key=name
This option is used to enable processing the backup without accessing the keyring vault server. In this case, xtrabackup derives the AES encryption key from the specified passphrase and uses it to encrypt the tablespace keys of tablespaces being backed up.
If --transition-key does not have any
value, xtrabackup will ask for it. The same passphrase should be
specified for the --prepare command.
use-free-memory-pct
Usage: --use-free-memory-pct
This option lets you configure the Smart memory estimation feature. The option controls the amount of free memory that can be used to --prepare a backup. The default value is 0 (zero), which defines the option as disabled. For example, if you set --use-free-memory-pct=50, then 50% of the free memory is used to prepare a backup. The maximum allowed value is 100.
This option works only if --estimate-memory option is enabled. If the --estimate-memory option is disabled, the --use-free-memory-pct setting is ignored.
An example of how to enable the Smart memory estimation feature:
$ xtrabackup --backup --estimate-memory=ON --target-dir=/data/backups/
$ xtrabackup --prepare --use-free-memory-pct=50 --target-dir=/data/backups/
use-memory
Usage: --use-memory
This option affects how much memory is allocated and is similar to innodb_buffer_pool_size. This option is only relevant in the --prepare phase. The default value is 100MB. The recommended value is between 1GB to 2GB. Multiple values are supported if you provide the unit (1MB, 1M, 1GB, 1G).
user
Usage: --user=USERNAME
This option specifies the MySQL username used when connecting to the server if that’s not the current user. The option accepts a string argument. See mysql –help for details.
version
Usage: --version
This option prints xtrabackup version and exits.
xtrabackup-plugin-dir
Usage: --xtrabackup-plugin-dir=DIRNAME
The absolute path to the directory that contains the keyring plugin.
Configure xtrabackup
All the xtrabackup configuration is done through options, which behave
exactly like standard MySQL program options: they can be specified either at
the command-line, or through a file such as /etc/my.cnf.
The xtrabackup binary reads the [mysqld] and [xtrabackup] sections
from any configuration files, in that order. That is so that it can read its
options from your existing MySQL installation, such as the datadir or
some of the InnoDB options. If you want to override these, just specify them
in the [xtrabackup] section, and because it is read later, it will take
precedence.
You don’t need to put any configuration in your my.cnf. You can specify the options on the command-line. Normally, the only thing you may find convenient to place in the [xtrabackup] section
of your my.cnf file is the target_dir option. This options adds a default path to the
directory for backups.
The following is an example:
[xtrabackup]
target_dir = /data/backups/
This manual assumes you do not have any file-based configuration for xtrabackup and shows the command-line options.
Please see the option and variable reference for details on all the configuration options.
The xtrabackup binary does not accept exactly the same syntax in the
my.cnf file as the mysqld server binary does. For historical
reasons, the mysqld server binary accepts parameters with a
--set-variable=<variable>=<value> syntax, which xtrabackup does not
understand. If your my.cnf file has such configuration directives, you
should rewrite them in the --variable=value syntax.
System configuration and NFS volumes
The xtrabackup tool requires no special configuration on most systems.
However, the storage where the --target-dir is located
must behave properly when fsync() is called. In particular, we have noticed
that if you mount the NFS volume without the sync option the NFS
volume does not sync the data. As a result, if you back up to an NFS
volume mounted with the async
option, and then try to prepare the backup from a different server that also
mounts that volume, the data might appear to be corrupt. Use the
sync mount option to avoid this issue.
The xbcrypt binary
The xbcrypt binary overview
To support encryption and decryption of the backups, a new tool xbcrypt was
introduced to Percona XtraBackup.
This utility has been modeled after The xbstream binary to perform encryption and decryption outside of Percona XtraBackup.
The XBCRYPT_ENCRYPTION_KEY environment variable is only used in place of the --encrypt_key=name option. You can use the environment variable or command line option. If you use both, the command line option takes precedence over the value specified in the environment variable.
The xbcrypt command-line options
Usage:
xbcrypt[OPTIONS]
The xbcrypt binary has the following command line options:
decrypt
usage: -d --decrypt
Decrypt data input to output.
encrypt-algo
usage: -a=name --encrypt-algo=name
Defines the name of the encryption algorithm.
encrypt-chunk-size
usage: -s=# --encrypt-chunk-size=#
Defines the size of the working buffer for encryption in bytes. The default value is 64000.
encrypt-key
usage: -k=name --encrypt-key=name
The name of the encryption key.
encrypt-key-file
usage: -f=name --encrypt-key-file=name
The name of the file that contains the encryption key.
encrypt-threads
usage: --encrypt-threads=#
This option specifies the number of worker threads used for parallel encryption/decryption. The default value is 1.
input
usage: -i=name --input=name
Defines the name of the optional input file. If the name is not specified, the input reads from the standard input.
output
usage: -o=name --output=name
Defines the name of the optional output file. If this name is not specified, the output is written to the standard output.
read-buffer-size
usage: --read-buffer-size=#
Read the buffer size. The default value is 10MB.
verbose
usage: -v --verbose
Display status in verbose mode.
The xbstream binary
The xbstream binary overview
To support simultaneous compression and streaming, the xbstream binary was added to Percona XtraBackup, along with the xbstream format and tar format. These additions were required to overcome some limitations of traditional archive formats such as tar, cpio, and others, which did not allow streaming dynamically generated files.
Other advantages of xbstream over traditional streaming/archive format include streaming multiple files concurrently (so it is possible to use streaming in the xbstream format together with the –parallel option) and more compact data storage.
For details on the command-line options, see xbcloud command-line options. When available, the utility tries to minimize its impact on the OS page cache by using the appropriate posix_fadvise() calls.
When compression is enabled with xtrabackup all data is compressed, including the transaction log file and metadata files, using the specified compression algorithm. Read more about supported compression algorithms in the Create a compressed backup document.
The xbstream command-line options
xbstream -c [OPTIONS]
xbstream -x [OPTIONS]
This utility has a tar-like interface.
The xbstream binary has the following options:
absolute-names
Usage: -absolute-names
Do not strip the leading // (slashes) from the file names when creating archives.
c
Usage: -c
Streams files specified on the command line to its standard output.
decompress
Usage: --decompress
Decompress the individual backup files
decompress-threads
Usage: --decompress-threads=#
The number of threads for parallel data decompression. The default value is 1.
decrypt
Usage: --decrypt=name
Specifies that xbstream automatically decrypts encrypted files when extracting input stream. The supported values are: AES128, AES192, and AES256.
You can specify either --encrypt-key or --encrypt-key-file to provide the encryption key, but do not use both options.
directory
Usage: --directory=name
Change the current directory to this named directory before streaming or extracting.
encrypt-key
Usage: --encrypt-key=name
Specify the encryption key used. Do not use this option with --encrypt-key-file; these options are mutually exclusive.
encrypt-key-file
Usage: --encrypt-key-file=name
Specify the file that contains the encryption key. Do not use this option with --encrypt-key; these options are mutually exclusive.
encrypt-threads
Usage: --encrypt-threads-=#
Specify the number of threads for parallel data encryption. The default value is 1.
extract
Usage: --extract
Extract to disk the files from the stream to the standard input.
fifo-dir
Usage: --fifo-dir=name
The directory used to read or write named pipes.
fifo-streams
Usage: --fifo-streams=#
The number of FIFO files (named pipes) to use for parallel data file streaming. To disable the option and send the stream to STDOUT, set the value to 1.
fifo-timeout
Usage: --fifo-timeout=#
The number of seconds to wait for the other end to open the stream. The default value is 60.
parallel
Usage: --parallel=#
Defines the number of worker threads for reading or writing.
x
Usage: -x
Extracts files from the stream read from its
standard input to the current directory unless specified otherwise with the
-c option. Support for parallel extraction with the --parallel
option
verbose
Usage: --verbose
Print verbose output
The xbcloud binary
The xbcloud binary overview
xbcloud is a cloud storage utility that works with Percona XtraBackup to upload, download, and manage database backups in cloud storage. It enables you to stream backups directly to cloud storage without requiring local disk space, making it ideal for large database environments.
What’s in this document
-
What xbcloud does - Core operations and capabilities
-
Supported cloud storage providers - Available storage options
-
Key features - Streaming, chunking, and advanced features
-
Usage - Common usage patterns and examples
-
Supplying parameters - Configuration methods
-
Advanced usage patterns - Incremental backups and partial restore
What xbcloud does
xbcloud provides three essential operations:
- put - Upload backups to cloud storage
- get - Download backups from cloud storage
- delete - Remove backups from cloud storage
These operations work seamlessly with xtrabackup’s streaming capabilities, allowing you to create a complete backup pipeline that streams data directly from your database to cloud storage.
Supported cloud storage providers
xbcloud supports multiple cloud storage providers:
- Amazon S3 and S3-compatible services (MinIO, Wasabi, Digital Ocean Spaces)
- OpenStack Swift
- Google Cloud Storage
- Microsoft Azure
For detailed configuration instructions, see the individual provider guides:
- Using the xbcloud binary with Amazon S3
- Using the xbcloud binary with Swift
- Using the xbcloud binary with Google Cloud Storage
- Using the xbcloud binary with Microsoft Azure Cloud Storage
- Using the xbcloud binary with MinIO
Key features
Streaming backups
xbcloud accepts input via pipes from xbstream, enabling direct streaming from xtrabackup to cloud storage without requiring local storage space.
Chunked storage
Backups are stored as separate objects with names like backup_name/database/table.ibd.NNN..., where NNN... is a zero-padded serial number. The default chunk size is 10MB, which you can adjust using --read-buffer-size.
Advanced features
- Exponential Backoff - Automatically retries failed operations with increasing delays
- FIFO data sink - Enables parallel streaming for high-bandwidth networks (10Gbps+)
Important
To prevent intermittent backup failures, update the curl utility.
Usage
This section shows common xbcloud usage patterns. All examples use Amazon S3 for consistency, but the same principles apply to other storage providers.
Creating a full backup
A full backup captures the entire database at a point in time. The following command creates a full backup and uploads it to S3:
xtrabackup --backup --stream=xbstream --target-dir=/tmp/backup | \
xbcloud put --storage=s3 --s3-bucket=my-backups --s3-region=us-west-2 full_backup_$(date +%Y%m%d)
This command: 1. Creates a backup using xtrabackup in streaming mode 2. Pipes the backup data to xbcloud 3. Uploads the backup to the S3 bucket with a timestamped name
Creating an incremental backup
An incremental backup only includes changes since the last backup (full or incremental). First, create the incremental backup:
xtrabackup --backup --stream=xbstream --incremental-basedir=/tmp/backup \
--target-dir=/tmp/inc-backup | \
xbcloud put --storage=s3 --s3-bucket=my-backups --s3-region=us-west-2 inc_backup_$(date +%Y%m%d_%H%M)
Restoring from cloud storage
To restore a backup, download it from cloud storage and prepare it:
# Download the backup
xbcloud get --storage=s3 --s3-bucket=my-backups --s3-region=us-west-2 full_backup_20240101 | \
xbstream -xv -C /tmp/restore

# Prepare the backup for use
xtrabackup --prepare --target-dir=/tmp/restore
Partial restore
You can restore specific tables without downloading the entire backup:
# Download only specific tables
xbcloud get --storage=s3 --s3-bucket=my-backups --s3-region=us-west-2 \
full_backup_20240101 ibdata1 sakila/payment.ibd > /tmp/partial.xbs

# Extract the partial backup
xbstream -xv -C /tmp/partial < /tmp/partial.xbs
Note
In a Bash shell, the $? parameter returns the exit code
from the last binary. If you use pipes, the
${PIPESTATUS[x]} array parameter returns the exit code for each
binary in the pipe string.
xtrabackup --backup --stream=xbstream --target-dir=/storage/backups/ | xbcloud put [options] full_backup
...
${PIPESTATUS[x]}
0 0
true | false
echo $?
1

# with PIPESTATUS
true | false
echo ${PIPESTATUS[0]} ${PIPESTATUS[1]}
0 1
Supplying parameters
Each storage type has mandatory parameters that you can supply on the command line, in a configuration file, and via environment variables.
Configuration files
The parameters the values of which do not change frequently can be stored in
my.cnf or in a custom configuration file. The following example is a
template of configuration options under the [xbcloud] group:
[xbcloud]
storage=s3
s3-endpoint=http://localhost:9000/
s3-access-key=minio
s3-secret-key=minio123
s3-bucket=backupsx
s3-bucket-lookup=path
s3-api-version=4
Note
If you explicitly use a parameter on the command line and in a configuration file, xbcloud uses the value provided on the command line.
Environment variables
Environment variables provide a secure way to configure xbcloud without exposing credentials in command lines or scripts. xbcloud automatically maps environment variables to their corresponding command-line parameters.
How precedence works
When the same parameter is specified in multiple ways, xbcloud uses this precedence order (highest to lowest):
- Command-line parameters
- Configuration file values
- Environment variables
Common environment variables
Each storage provider uses different environment variable names:
- Amazon S3:
AWS_ACCESS_KEY_ID,AWS_SECRET_ACCESS_KEY,AWS_DEFAULT_REGION - OpenStack Swift:
OS_AUTH_URL,OS_USERNAME,OS_PASSWORD - Microsoft Azure:
AZURE_STORAGE_ACCOUNT,AZURE_CONTAINER_NAME,AZURE_ACCESS_KEY - Google Cloud:
GOOGLE_ACCESS_KEY,GOOGLE_SECRET_KEY,GOOGLE_BUCKET_NAME
Example usage
Set environment variables for your storage provider:
# For Amazon S3
export AWS_ACCESS_KEY_ID="your-access-key"
export AWS_SECRET_ACCESS_KEY="your-secret-key"
export AWS_DEFAULT_REGION="us-west-2"

# Now use xbcloud without specifying credentials
xtrabackup --backup --stream=xbstream | xbcloud put s3://my-bucket/backup-$(date +%Y%m%d)
For complete environment variable reference and advanced usage patterns, see Using environment variable files (.env) with xbcloud.
Security best practices
Environment variable files (.env) provide a secure way to manage xbcloud credentials without exposing sensitive information in command lines or scripts. These files store your cloud storage credentials and configuration settings, making them easy to manage and share across different environments while keeping them out of version control.
For detailed guidance on using .env files with xbcloud, including setup instructions, security best practices, and troubleshooting tips, see Using environment variable files (.env) with xbcloud.
-
Never commit environment variables to version control
-
Use environment variable files (
.env) that are excluded from version control -
Set appropriate file permissions on environment variable files (600 or 400)
-
Use IAM roles and instance profiles when possible instead of access keys
-
Rotate credentials regularly
-
Use temporary credentials (session tokens) for short-term access
Troubleshooting
Environment variables not being recognized:
-
Verify the variable name matches exactly (case-sensitive)
-
Check that the variable is exported:
export VARIABLE_NAME="value" -
Confirm the variable is set:
echo $VARIABLE_NAME -
Test with a simple command first
Common issues:
-
Mixed authentication methods: Avoid mixing environment variables with command-line parameters for the same setting
-
Incorrect variable names: Double-check the exact environment variable names for your storage type
-
Missing exports: Ensure variables are exported, not just set locally
For detailed examples and storage-specific configuration, see the individual storage provider documentation:
Shortcuts
For all operations (put, get, and delete), you can use a shortcut to specify the storage type, bucket name, and backup name as one parameter instead of using three distinct parameters (–storage, –s3-bucket, and backup name per se).
Note
Use the following format: storage-type://bucket-name/backup-name
In this example s3 refers to a storage type, operator-testing is a bucket name, and bak22 is the backup name.
xbcloud get s3://operator-testing/bak22 ...
This shortcut expands as follows:
xbcloud get --storage=s3 --s3-bucket=operator-testing bak22 ...
You can supply the mandatory parameters on the command line, configuration files, and in environment variables.
Additional parameters
xbcloud accepts additional parameters that you can use with any storage
type. The --md5 parameter computes the MD5 hash value of the backup
chunks. The result is stored in files that following the backup_name.md5
pattern.
xtrabackup --backup --stream=xbstream \
--parallel=8 2>backup.log | xbcloud put s3://operator-testing/bak22 \
--parallel=8 --md5 2>upload.log
You may use the --header parameter to pass an additional HTTP
header with the server side encryption while specifying a customer key.
An example of using the --header for AES256 encryption.
xtrabackup --backup --stream=xbstream --parallel=4 | \
xbcloud put s3://operator-testing/bak-enc/ \
--header="X-Amz-Server-Side-Encryption-Customer-Algorithm: AES256" \
--header="X-Amz-Server-Side-Encryption-Customer-Key: CuStoMerKey=" \
--header="X-Amz-Server-Side-Encryption-Customer-Key-MD5: CuStoMerKeyMd5==" \
--parallel=8
The --header parameter is also useful to set the access control list (ACL)
permissions: --header="x-amz-acl: bucket-owner-full-control
Advanced usage patterns
Incremental backup workflow
Incremental backups capture only changes since the last backup, making them faster and more storage-efficient. Here’s the complete workflow using S3:
Step 1: Create the base full backup
xtrabackup --backup --stream=xbstream --target-dir=/tmp/base | \
xbcloud put --storage=s3 --s3-bucket=my-backups --s3-region=us-west-2 \
full_backup_20240101
Step 2: Create incremental backups
xtrabackup --backup --stream=xbstream --incremental-basedir=/tmp/base \
--target-dir=/tmp/inc1 | \
xbcloud put --storage=s3 --s3-bucket=my-backups --s3-region=us-west-2 \
inc_backup_20240101_1200
Step 3: Restore incremental backups
To restore from incremental backups, you must download and prepare them in sequence:
# Download and prepare the full backup
xbcloud get --storage=s3 --s3-bucket=my-backups --s3-region=us-west-2 \
full_backup_20240101 | xbstream -xv -C /tmp/restore

xtrabackup --prepare --apply-log-only --target-dir=/tmp/restore

# Download and apply the incremental backup
xbcloud get --storage=s3 --s3-bucket=my-backups --s3-region=us-west-2 \
inc_backup_20240101_1200 | xbstream -xv -C /tmp/inc1

xtrabackup --prepare --apply-log-only --target-dir=/tmp/restore \
--incremental-dir=/tmp/inc1

# Final prepare step
xtrabackup --prepare --target-dir=/tmp/restore
Note
Accelerate the prepare phase for incremental backups with many InnoDB Data (IBD) files by using the --parallel option to process delta files concurrently. When using --parallel in the prepare phase, always specify a numeric value. The recommended minimum value is 4 (for example, --parallel=4).
xtrabackup --prepare --apply-log-only \
--target-dir=/tmp/restore \
--incremental-dir=/tmp/inc1 --parallel=4

xtrabackup --prepare --target-dir=/tmp/restore --parallel=4
Partial restore
You can restore specific tables without downloading the entire backup:
# Download only specific tables
xbcloud get --storage=s3 --s3-bucket=my-backups --s3-region=us-west-2 \
full_backup_20240101 ibdata1 sakila/payment.ibd > /tmp/partial.xbs

# Extract the partial backup
xbstream -xv -C /tmp/partial < /tmp/partial.xbs
Next steps
Now that you understand the basics of xbcloud, here are the recommended next steps:
-
Choose your storage provider Review the supported cloud storage providers and select the one that best fits your needs
-
Set up authentication Follow the provider-specific guide to configure credentials:
- Using the xbcloud binary with Swift
- Using the xbcloud binary with Google Cloud Storage
- Using the xbcloud binary with Microsoft Azure Cloud Storage
-
Configure security Learn about secure credential management with Using environment variable files (.env) with xbcloud
-
Explore advanced features Review the xbcloud command-line options for detailed parameter reference
-
Test your setup Start with a simple full backup using the examples in the Usage section
For troubleshooting and additional help, see the Troubleshooting section or contact Percona support.
Using environment variable files (.env) with xbcloud
Environment variable files (.env) are a common way to manage configuration settings and sensitive credentials. Here’s how to use them with xbcloud:
Creating a .env file
Create a .env file in your project directory or a secure location:
S3 example
# Example .env file for S3
AWS_ACCESS_KEY_ID=AKIAIOSFODNN7EXAMPLE
AWS_SECRET_ACCESS_KEY=wJalrXUtnFEMI/K7MDENG/bPxRfiCYEXAMPLEKEY
AWS_DEFAULT_REGION=us-west-2
AWS_ENDPOINT=https://s3.us-west-2.amazonaws.com
Swift example
# Example .env file for Swift
OS_AUTH_URL=http://192.168.1.100:5000/v3
OS_USERNAME=admin
OS_PASSWORD=secret
OS_PROJECT_DOMAIN=default
OS_USER_DOMAIN=default
Azure example
# Example .env file for Azure
AZURE_STORAGE_ACCOUNT=mystorageaccount
AZURE_CONTAINER_NAME=backups
AZURE_ACCESS_KEY=your-access-key-here
Loading environment variables
Environment variables from .env files are not automatically loaded by the shell. You need to explicitly load them before running xbcloud. Here are three methods to accomplish this:
Method 1: using source or . command
The source command (or its shorthand .) reads and executes commands from a file in the current shell environment. This makes all variables from the .env file available to subsequent commands in the same shell session.
# Load the environment variables
source .env
# or
. .env

# Now run xbcloud
xtrabackup --backup --stream=xbstream | xbcloud put s3://my-bucket/backup-$(date +%Y%m%d)
Method 2: using env command
The env command runs another program with a modified environment. Combined with cat .env | xargs, it reads the .env file and passes the variables as arguments to env, which then sets them for the command that follows.
You can run xbcloud with variables loaded from a .env file in a single command:
# Run xbcloud with environment variables from file
env $(cat .env | xargs) xtrabackup --backup --stream=xbstream | xbcloud put s3://my-bucket/backup-$(date +%Y%m%d)
This approach is convenient but fragile:
-
This method can break if values contain spaces, quotes, or special shell characters (!, &, $, etc.).
-
Quoting inside .env files doesn’t always survive the
xargsparsing.
For sensitive credentials or values with special characters, Method 1 or Method 3 is safer.
Method 3: using export with a script
This method creates a shell script that loads environment variables and runs the backup command. The set -a command automatically exports all variables that are set, making them available to child processes. This is useful for automation because it bundles variable loading and the backup command together.
Create a script that loads the environment variables:
#!/bin/bash
# load-env.sh

set -a  # automatically export all variables
source .env
set +a  # stop automatically exporting

# Run your backup command
xtrabackup --backup --stream=xbstream | \
  xbcloud put s3://my-bucket/backup-$(date +%Y%m%d)
Make it executable and run:
chmod +x load-env.sh
./load-env.sh
Security best practices
-
File permissions: Set restrictive permissions on your
.envfile:chmod 600 .env # Only owner can read/write -
Gitignore: Add
.envto your.gitignorefile to prevent committing sensitive data:echo ".env" >> .gitignore -
Template file: Create a
.env.examplefile with placeholder values:# .env.example AWS_ACCESS_KEY_ID=your-access-key-here AWS_SECRET_ACCESS_KEY=your-secret-key-here AWS_DEFAULT_REGION=us-west-2 -
Location: Store
.envfiles in a secure location, not in your project root if possible:# Store in a secure directory /etc/xtrabackup/.env /home/backup/.env
Complete example
Here’s a complete example of using a .env file with xbcloud. This example demonstrates the full workflow from creating the environment file to running a backup:
# 1. Create the .env file
cat > /secure/path/.env << EOF
AWS_ACCESS_KEY_ID=AKIAIOSFODNN7EXAMPLE
AWS_SECRET_ACCESS_KEY=wJalrXUtnFEMI/K7MDENG/bPxRfiCYEXAMPLEKEY
AWS_DEFAULT_REGION=us-west-2
AWS_ENDPOINT=https://s3.us-west-2.amazonaws.com
EOF

# 2. Set secure permissions
chmod 600 /secure/path/.env

# 3. Load environment variables and run backup
source /secure/path/.env
xtrabackup --backup --stream=xbstream --target-dir=/tmp/backup | \
xbcloud put s3://my-backup-bucket/backup-$(date +%Y%m%d-%H%M%S)
This example shows the complete process:
-
Step 1: The
cat > /secure/path/.env << EOFcommand creates a new.envfile using a here document. The<< EOFsyntax allows you to write multiple lines until it encounters theEOFmarker, making it easy to create files with multiple environment variables. -
Step 2: The
chmod 600command sets file permissions so that only the owner can read and write the file (no access for group or others), which is essential for protecting sensitive credentials. -
Step 3: The
sourcecommand loads the environment variables from the.envfile into the current shell session, then the backup pipeline runs: -
xtrabackup --backup --stream=xbstream --target-dir=/tmp/backupcreates a backup and streams it in xbstream format -
The pipe (
|) passes the streamed backup data to the next command -
xbcloud put s3://my-backup-bucket/backup-$(date +%Y%m%d-%H%M%S)uploads the backup to the S3 bucket with a timestamped name
Troubleshooting .env files
-
Check if variables are loaded:
source .env echo $AWS_ACCESS_KEY_ID # Should show your access key -
Verify file format: Ensure no spaces around the
=sign:# Correct AWS_ACCESS_KEY_ID=value # Incorrect (will not work) AWS_ACCESS_KEY_ID = value -
Handle special characters: Quote values with special characters:
OS_PASSWORD="my-password-with-special-chars!" -
Comments: Use
#for comments in.envfiles:# This is a comment AWS_ACCESS_KEY_ID=your-key-here
Integration with scripts and automation
For automated backups, you can create a wrapper script:
#!/bin/bash
# backup-script.sh

# Load environment variables
if [ -f "/secure/path/.env" ]; then
    source /secure/path/.env
else
    echo "Error: .env file not found"
    exit 1
fi

# Run backup
xtrabackup --backup --stream=xbstream --target-dir=/tmp/backup | \
xbcloud put s3://my-backup-bucket/backup-$(date +%Y%m%d-%H%M%S)

echo "Backup completed successfully"
This approach provides a secure, maintainable way to manage xbcloud credentials and configuration without exposing sensitive information in command lines or scripts.
The xbcloud command-line options
Usage:
$ xbcloud put [OPTIONS]
$ xbcloud get [OPTIONS]
$ xbcloud delete [OPTIONS]
This document contains information on general options and the options available when you select the Swift authentication version using swift-auth-version.
The xbcloud binary has the following general command line options:
azure-access-key
Usage: --azure-access-key=name
The name of the Azure access-key
azure-container-name
Usage: --azure-container-name=name
The name of the Azure container
azure-development-storage
Usage: --azure-development-storage=name
If you run the Azurite emulator , use this option, and it works with the default credentials provided by Azurite. You can overwrite these default credentials with other options.
azure-endpoint
Usage: --azure-endpoint=name
The name of the Azure endpoint
azure-storage-account
Usage: --azure-storage-account=name
The name of the Azure storage account
azure-tier-class
Usage: --azure-tier-class=name
The name of the Azure tier-class. The possible values are:
-
Hot
-
Cool
-
Archive
cacert
Usage: --cacert=name
The path to the file with Certificate Authority (CA) certificates.
curl-retriable-errors
Usage: --curl-retriable-errors=name
Add a new cURL error code as retriable. For multiple codes, use a comma-separated list.
fifo-dir
Usage: --fifo-dir=name
The directory used to read or write named pipes. In the put mode, xbcloud reads from the named pipes. In the get mode, xbcloud writes to the named pipes.
fifo-streams
Usage: --fifo-streams=#
The number of parallel FIFO stream threads.
fifo-timeout
Usage: --fifo-timeout=#
The number of seconds to wait for the other end to open the stream. The default value is 60.
google-access-key
Usage: --google-access-key=name
The Google Cloud storage access key
google-bucket-name
Usage: --google-bucket-name=name
The Google Cloud storage bucket name
google-endpoint
Usage: --google-endpoint=name
The Google Cloud storage endpoint
google-region
Usage: --google-region=name
The Google Cloud storage region
google-secret-key
Usage: --google-secret-key=name
The Google Cloud storage secret key
google-session-token
Usage: --google-session-token=name
The Google Cloud storage session-token
google-storage-class
Usage: --google-storage-class=name
The Google Cloud storage storage class
The possible values are the following:
-
STANDARD
-
NEARLINE
-
COLDLINE
-
ARCHIVE
header
Usage: --header=name
Extra header
http-retriable-errors
Usage: --http-retriable-errors=name
Add a new http error code as retriable. For multiple codes, use a comma-separated list.
insecure
Usage: --insecure
Do not verify the certificate of the server.
max-backoff
Usage: --max-backoff=#
The maximum backoff delay, in milliseconds, between chunk upload or chunk download retries. The default value is 300000.
max-retries
Usage: --max-retires=#
The number of retries for chunk uploads or downloads after a failure. The default value is 10.
md5
Usage: --md5=name
Uploads an MD5 file into the backup directory.
parallel
Usage: --parallel=#
Defines the maximum number of concurrent upload/download requests. The default value is 1.
s3-access-key
Usage: --s3-access-key=name
The name of the s3 access key
s3-api-version
Usage: --s3-api-version=name
The name of the s3 API version
s3-bucket
Usage: --s3-bucket=name
The name of the s3 bucket
s3-bucket-lookup
Usage: --s3-bucket-lookup=name
The name of the s3 bucket lookup method
s3-endpoint
Usage: --s3-endpoint=name
The name of the s3 endpoint
s3-region
Usage: --s3-region=name
The name of the s3 region
s3-secret-key
Usage: --s3-secret-key=name
The name of the s3 secret key
s3-session-token
Usage: --s3-session-token=name
The name of the s3 session token
s3-storage-class
Usage: --s3-storage-class=name
The name of the s3 storage class and is used to pass custom storage class names provided by the other s3 implementations, such as MinIO.
The possible values are:
-
STANDARD
-
STANDARD_ID
-
GLACIER
storage
Usage: --storage=[S3|SWIFT|GOOGLE|AZURE]
Defines the Cloud storage option. xbcloud supports Swift, MinIO, Google, Azure, and AWS S3. The default value is swift.
swift-auth-url
Usage: --swift-auth-url=name
The Base URL of the Swift authentication service.
swift-container
Usage: --swift-container=name
The Swift container used to store backups.
swift-key
Usage: --swift-key
The Swift key/password (X-Auth-Key)
swift-storage-url
Usage: --swift-storage-url=name
If a name is specified, the xbcloud attempts to get the object-store endpoint for a given region from the keystone response. This option overrides that value.
swift-user
Usage: --swift-user=name
The Swift user name (X-Auth-User).
timeout
Usage: --timeout=#
The number of seconds to wait for activity on the TCP connection. The default value is 120. If the value is 0 (zero), there is no timeout.
verbose
Usage: --verbose
Turns on the cURL tracing.
Swift authentication options
The Swift specification describes several authentication options . The xbcloud tool can authenticate against keystone with API version 2 and 3.
swift-auth-version
Usage: --swift-auth-version=name
Defines the swift authentication version used.
The possible values are the following:
-
1.0- TempAuth -
2.0- Keystone v2.0 -
3- Keystone v3.
The default value is 1.0.
If --swift-auth-version=2, the additional options are:
swift-password
Usage: --swift-password=name
Swift password for the user
swift-region
Usage: --swift-region=name
Swift region object-store endpoint
swift-tenant
Usage: --swift-tenant=name
The Swift tenant name
Either of the --swift-tenant or --swift-tenant-id can be defined, but you should not use both options together. Both of these options are optional.
swift-tenant-id
Usage: --swift-tenant-id=name
The Swift tenant ID
Either of the --swift-tenant or --swift-tenant-id can be defined, but you should not use both options together. Both of these options are optional.
If --swift-auth-version=3, the additional options are:
swift-domain
Usage: --swift-domain=name
The Swift domain name
swift-domain-id
Usage: --swift-domain-id=name
The Swift domain ID
swift-project
Usage: --swift-project=name
The Swift project name
swift-project-domain
Usage: --swift-project-domain=name
The Swift domain name
swift-project-domain-id
Usage: --swift-project-domain-id=name
The Swift domain ID
swift-project-id
Usage: --swift-project-id=name
The Swift project ID
swift-user-id
Usage: --swift-user-id=name
The Swift user ID
Use the xbcloud binary
Use the xbcloud binary with Amazon S3
Create a full backup with Amazon S3
xtrabackup --backup --stream=xbstream --extra-lsndir=/tmp --target-dir=/tmp | \
xbcloud put --storage=s3 \
--s3-endpoint='s3.amazonaws.com' \
--s3-access-key='YOUR-ACCESSKEYID' \
--s3-secret-key='YOUR-SECRETACCESSKEY' \
--s3-bucket='mysql_backups'
--parallel=10 \
$(date -I)-full_backup
The following options are available when using Amazon S3:
| Option | Details |
|---|---|
| –s3-access-key | Use to supply the AWS access key ID |
| –s3-secret-key | Use to supply the AWS secret access key |
| –s3-bucket | Use supply the AWS bucket name |
| –s3-region | Use to specify the AWS region. The default value is us-east-1 |
| –s3-api-version = |
Select the signing algorithm. The default value is AUTO. In this case, xbcloud will probe. |
| –s3-bucket-lookup = |
Specify whether to use bucket.endpoint.com or endpoint.com/bucket*style requests. The default value is AUTO. In this case, xbcloud will probe. |
| –s3-storage-class= |
Specify the S3 storage class . The default storage class depends on the provider. The name options are the following:
|
Permissions setup
Following the principle of “least-privilege”, these are the minimum bucket permissions needed for xbcloud to write backups to S3: LIST/PUT/GET/DELETE.
The following example shows the policy definition for writing to the xbcloud-testing bucket on the AWS S3 storage.
{
    "Version": "2012-10-17",
    "Statement": [
        {
            "Effect": "Allow",
            "Action": [
                "s3:ListBucket"
            ],
            "Resource": "arn:aws:s3:::xbcloud-testing"
        },
        {
            "Effect": "Allow",
            "Action": [
                "s3:PutObject",
                "s3:PutObjectAcl",
                "s3:GetObject",
                "s3:GetObjectAcl",
                "s3:DeleteObject"
            ],
            "Resource": "arn:aws:s3:::xbcloud-testing/*"
        }
    ]
}
Environment variables
The following environment variables are recognized. xbcloud maps them automatically to corresponding parameters applicable to the selected storage.
-
AWS_ACCESS_KEY_ID (or ACCESS_KEY_ID)
-
AWS_SECRET_ACCESS_KEY (or SECRET_ACCESS_KEY)
-
AWS_DEFAULT_REGION (or DEFAULT_REGION)
-
AWS_ENDPOINT (or ENDPOINT)
-
AWS_CA_BUNDLE
Restore with S3
xbcloud get s3://operator-testing/bak22 \
--s3-endpoint=https://storage.googleapis.com/ \
--parallel=10 2>download.log | xbstream -x -C restore --parallel=8
Use the xbcloud binary with an IAM instance profile
You can use the IAM instance profile when running xbcloud from an EC2 instance.
An authentication system has two elements:
- Who am I?
- What can I do?
A role defines “what can I do.” A role provides a method to define a collection of permissions. Roles are assigned to users, services and EC2 instances, the “who am I” element.
The IAM instance profile is the “who” for an EC2 instance and assumes the IAM role, which has permissions. The instance profile has the same name as the IAM role.
An IAM instance profile does not need the --s3-secret-key nor the --s3-access-key if they are running xbcloud from an Amazon EC2 instance. To configure or attach an instance metadata to an EC2 instance, see How can I grant my Amazon EC2 instance access to an Amazon S3 bucket .
An example of the command:
$ xtrabackup ... | xbcloud put --storage=s3 --s3-bucket=bucket-name backup-name
The xbcloud binary outputs a connect message when successful.
Expected output
221121 13:16:26 Using instance metadata for access and secret key
221121 13:16:26 xbcloud: Successfully connected.
An important consideration is that the instance metadata has a time to live (TTL) of 6 hours. A backup that takes more than that time contains Expired token errors. Use Exponential Backoff to retry the upload after fetching new keys from the instance metadata.
Output when keys have expired
221121 13:04:52 xbcloud: S3 error message: The provided token has expired.
221121 13:04:52 xbcloud: Sleeping for 2384 ms before retrying test/mysql.ibd.00000000000000000002 [1]
221121 13:04:55 xbcloud: S3 error message: The provided token has expired.
221121 13:04:55 xbcloud: Sleeping for 2887 ms before retrying test/mysql.ibd.00000000000000000003 [1]
221121 13:04:58 xbcloud: S3 error message: The provided token has expired.
221121 13:04:58 xbcloud: Sleeping for 2778 ms before retrying test/undo_002.00000000000000000000 [1]
221121 13:05:00 xbcloud: S3 error message: The provided token has expired.
221121 13:05:00 xbcloud: Sleeping for 2916 ms before retrying test/undo_002.00000000000000000001 [1]
221121 13:05:03 xbcloud: S3 error message: The provided token has expired.
221121 13:05:03 xbcloud: Sleeping for 2794 ms before retrying test/undo_002.00000000000000000002 [1]
221121 13:05:06 xbcloud: S3 error message: The provided token has expired.
221121 13:05:06 xbcloud: Sleeping for 2336 ms before retrying test/undo_001.00000000000000000000 [1]
221121 13:05:09 xbcloud: successfully uploaded chunk: test/mysql.ibd.00000000000000000002, size: 5242923
221121 13:05:09 xbcloud: successfully uploaded chunk: test/mysql.ibd.00000000000000000003, size: 23
221121 13:05:09 xbcloud: successfully uploaded chunk: test/undo_002.00000000000000000000, size: 10485802
221121 13:05:09 xbcloud: successfully uploaded chunk: test/undo_002.00000000000000000001, size: 6291498
221121 13:05:09 xbcloud: successfully uploaded chunk: test/undo_002.00000000000000000002, size: 22
221121 13:05:09 xbcloud: successfully uploaded chunk: test/undo_001.00000000000000000000, size: 10485802
221121 13:05:10 xbcloud: successfully uploaded chunk: test/undo_001.00000000000000000001, size: 6291498
221121 13:05:10 xbcloud: successfully uploaded chunk: test/undo_001.00000000000000000002, size: 22
. . .
221121 13:05:18 xbcloud: successfully uploaded chunk: test/xtrabackup_tablespaces.00000000000000000001, size: 36
221121 13:05:19 xbcloud: Upload completed.
Use the xbcloud binary with Swift
Create a full backup with Swift
The following example shows how to make a full backup and upload it to Swift.
$ xtrabackup --backup --stream=xbstream --extra-lsndir=/tmp --target-dir=/tmp | \
xbcloud put --storage=swift \
--swift-container=test \
--swift-user=test:tester \
--swift-auth-url=http://192.168.8.80:8080/ \
--swift-key=testing \
--parallel=10 \
full_backup
The following OpenStack environment variables are also recognized and mapped automatically to the corresponding swift parameters (--storage=swift):
-
OS_AUTH_URL
-
OS_TENANT_NAME
-
OS_TENANT_ID
-
OS_USERNAME
-
OS_PASSWORD
-
OS_USER_DOMAIN
-
OS_USER_DOMAIN_ID
-
OS_PROJECT_DOMAIN
-
OS_PROJECT_DOMAIN_ID
-
OS_REGION_NAME
-
OS_STORAGE_URL
-
OS_CACERT
Restore with Swift
xbcloud get [options] <name> [<list-of-files>] | xbstream -x
The following example shows how to fetch and restore the backup from Swift:
xbcloud get --storage=swift \
--swift-container=test \
--swift-user=test:tester \
--swift-auth-url=http://192.168.8.80:8080/ \
--swift-key=testing \
full_backup | xbstream -xv -C /tmp/downloaded_full

xbcloud delete --storage=swift --swift-user=xtrabackup \
--swift-password=xtrabackup123! --swift-auth-version=3 \
--swift-auth-url=http://openstack.ci.percona.com:5000/ \
--swift-container=mybackup1 --swift-domain=Default
Command-line options
xbcloud has the following command line options:
–storage(=[swift|s3|google])
Cloud storage option. xbcloud supports Swift, MinIO, and AWS S3.
The default value is swift.
–swift-auth-url()
The URL of the Swift cluster
–swift-storage-url()
The xbcloud tries to get the object-store URL for a given region (if any are specified) from the keystone response. You can override that URL by passing –swift-storage-url=URL argument.
–swift-user()
The Swift username (X-Auth-User, specific to Swift)
–swift-key()
The Swift key/password (X-Auth-Key, specific to Swift)
–swift-container()
The container to back up into (specific to Swift)
–parallel(=N)
The maximum number of concurrent upload/download requests. The default value is 1.
–cacert()
The path to the file with CA certificates
–insecure()
Do not verify server’s certificate
Swift authentication options
The Swift specification describes several authentication options . The xbcloud tool can authenticate against keystone with API version 2 and 3.
–swift-auth-version()
Specifies the swift authentication version. The possible values are: 1.0 -
TempAuth, 2.0 - Keystone v2.0, and 3 - Keystone v3. The default value is
1.0.
For v2 additional options are:
–swift-tenant()
Swift tenant name
–swift-tenant-id()
Swift tenant ID
–swift-region()
Swift endpoint region
–swift-password()
Swift password for the user
For v3 additional options are:
–swift-user-id()
Swift user ID
–swift-project()
Swift project name
–swift-project-id()
Swift project ID
–swift-domain()
Swift domain name
–swift-domain-id()
Swift domain ID
Use the xbcloud binary with Google Cloud Storage
Create a full backup with Google Cloud Storage
The support for Google Cloud Storage is implemented using the interoperability mode. This mode was especially designed to interact with cloud services compatible with Amazon S3.
See also
xtrabackup --backup --stream=xbstream --extra-lsndir=/tmp --target-dir=/tmp | \
xbcloud put --storage=google \
--google-endpoint=`storage.googleapis.com` \
--google-access-key='YOUR-ACCESSKEYID' \
--google-secret-key='YOUR-SECRETACCESSKEY' \
--google-bucket='mysql_backups'
--parallel=10 \
$(date -I)-full_backup
The following options are available when using Google Cloud Storage:
-
–google-access-key =
-
–google-secret-key =
-
–google-bucket =
-
–google-storage-class=name
Note
The Google storage class name options are the following:
-
STANDARD
-
NEARLINE
-
COLDLINE
-
ARCHIVE
Use the xbcloud binary with Microsoft Azure Cloud Storage
The xbcloud binary adds support for the Microsoft Azure Cloud Storage using the REST API.
Options
The following are the options, environment variables, and descriptions for uploading a backup to Azure using the REST API. The environment variables are recognized by xbcloud, which maps them automatically to the corresponding parameters:
| Option name | Environment variables | Description |
|---|---|---|
| –azure-storage-account=name | AZURE_STORAGE_ACCOUNT | An Azure storage account is a unique namespace to access and store your Azure data objects. |
| –azure-container-name=name | AZURE_CONTAINER_NAME | A container name is a valid DNS name that conforms to the Azure naming rules |
| –azure-access-key=name | AZURE_ACCESS_KEY | A generated key that can be used to authorize access to data in your account using the Shared Key authorization. |
| –azure-endpoint=name | AZURE_ENDPOINT | The endpoint allows clients to securely access data |
| –azure-tier-class=name | AZURE_STORAGE_CLASS | Cloud tier can decrease the local storage required while maintaining the performance. When enabled, this feature has the following categories: Hot - Frequently accessed or modified data Cool - Infrequently accessed or modified data Archive - Rarely accessed or modified data |
Test your Azure applications with the Azurite open-source emulator . For testing purposes, the xbcloud binary adds the --azure-development-storage option that uses the default access_key and storage account of azurite and testcontainer for the container. You can overwrite these options, if needed.
Usage
All the available options for xbcloud, such as parallel, max-retries, and others, can be used. For more information, see the xbcloud binary overview.
Examples
An example of an xbcloud backup.
xtrabackup --backup --stream=xbstream  |
xbcloud put backup_name --azure-storage-account=pxbtesting --azure-access-key=$AZURE_KEY --azure-container-name=test --storage=azure
An example of restoring a backup from xbcloud.
xbcloud get backup_name  --azure-storage-account=pxbtesting
--azure-access-key=$AZURE_KEY --azure-container-name=test --storage=azure --parallel=10 2>download.log | xbstream -x -C restore
An example of deleting a backup from xbcloud.
xbcloud delete backup_name --azure-storage-account=pxbtesting
--azure-access-key=$AZURE_KEY --azure-container-name=test --storage=azure
An example of using a shortcut restore.
xbcloud get azure://operator-testing/bak22 ...
Use the xbcloud binary with MinIO
Create a full backup with MinIO
xtrabackup --backup --stream=xbstream --extra-lsndir=/tmp --target-dir=/tmp | \
xbcloud put --storage=s3 \
--s3-endpoint='play.minio.io:9000' \
--s3-access-key='YOUR-ACCESSKEYID' \
--s3-secret-key='YOUR-SECRETACCESSKEY' \
--s3-bucket='mysql_backups'
--parallel=10 \
$(date -I)-full_backup
Install
Install overview
We recommend that you install Percona XtraBackup 8.4 from the official Percona software repositories using the appropriate package manager for your system:
Installation alternatives
Percona also provides the following methods:
-
Install Percona XtraBackup from a Binary Tarball with all the required files and binaries for a manual installation
Before installing Percona XtraBackup with any of these methods, we recommend that you review the release notes and Server version and backup version comparison.
Before you start
Server version and backup version comparison
A MySQL change to a feature, such as the structure of a redo log record, can cause older versions of Percona XtraBackup to fail. To ensure that you can back up and restore your data, use a Percona XtraBackup version that is equal to your source server major version. This means if you use Percona XtraBackup 8.4.x, you can safely back up the source server from 8.4.x to 8.4.xx.
See also
The --no-server-version-check option performs the following test.
Before the backup/prepare starts, XtraBackup compares the source server version to
the Percona XtraBackup version. If the source server version is greater
than the XtraBackup major version, XtraBackup stops the backup and returns an
error message. This comparison prevents a failed backup or a corrupted
backup due to source server changes.
The parameter checks for the following scenarios:
-
The source server and the PXB major version are the same, the backup proceeds
-
The source server is greater than the PXB major version, and the parameter is not overridden, the backup is stopped and returns an error message
-
The source server is less than the PXB major version, and the parameter is not overridden, the backup is stopped and returns an error message
-
The source server is greater than the PXB major version up to the last release in the LTS series, and the parameter is overridden, the backup proceeds
Explicitly adding the --no-server-version-check parameter, like the
example, overrides the parameter and the backup proceeds.
$ xtrabackup --backup --no-server-version-check --target-dir=$mysql/backup1
Overriding the --no-server-version-check parameter allows taking backups using a Percona XtraBackup version that is equal to a version of your source server up to the last release in the LTS series. This means if you use Percona XtraBackup 8.4.x, you can back up the source server from 8.4.x to 8.4.xx.
When you override the parameter, the following events can happen:
-
Backup fails
-
Creates a corrupted backup
-
Backup successful
Connection and privileges needed
Percona XtraBackup needs to be able to connect to the database server and perform operations on the server and the datadir when creating a backup, when preparing in some scenarios and when restoring it. In order to do so, there are privileges and permission requirements on its execution that must be fulfilled.
Privilege refers to the operations that a system user is permitted to do in the database server. They are set at the database server and only apply to users in the database server.
Permissions are those which permits a user to perform operations on the system, like reading, writing or executing on a certain directory or start/stop a system service. They are set at a system level and only apply to system users.
When xtrabackup is used, there are two actors involved: the user invoking the program - a system user - and the user performing action in the database server - a database user. Note that these are different users in different places, even though they may have the same username.
All the invocations of xtrabackup in this documentation assume that the system user has the appropriate permissions, and you are providing the relevant options for connecting the database server - besides the options for the action to be performed - and the database user has adequate privileges.
Connect to the server
Run the following commands as root or use the sudo command.
The database user used to connect to the server and its password are specified
by the --user and --password option:
xtrabackup --user=DVADER --password=14MY0URF4TH3R --backup \
--target-dir=/data/bkps/
If you don’t use the --user option, Percona XtraBackup will assume
the database user whose name is the system user executing it.
Other connection options
According to your system, you may need to specify one or more of the following options to connect to the server:
| Option | Description |
|---|---|
| -port | Use this port when connecting to the database with TCP/IP |
| -socket | Use this socket when connecting to the local database. |
| -host | Use this host when connecting to the database server with TCP/IP |
These options are passed to the mysql child process without
alteration, see mysql --help for details.
Note
In case of multiple server instances, the correct connection parameters (port, socket, host) must be specified in order for xtrabackup to talk to the correct server.
Privileges needed
Once connected to the server, in order to perform a backup you need
READ and EXECUTE permissions at a filesystem level in the server’s datadir.
The database user needs the following privileges to back up tables or databases:
-
RELOADandFLUSH_TABLESin order to runFLUSH TABLES WITH READ LOCK. -
The
BACKUP_ADMINprivilege is needed to query the performance_schema.log_status table, and runLOCK INSTANCE FOR BACKUP,LOCK BINLOG FOR BACKUP, orLOCK TABLES FOR BACKUP. TheBACKUP_ADMINprivilege is required to use the Page tracking feature. -
REPLICATION CLIENTin order to obtain the binary log position, -
CREATE TABLESPACEin order to import tables (see Restoring Individual Tables), -
PROCESSin order to runSHOW ENGINE INNODB STATUS(which is mandatory), and optionally to see all threads which are running on the server (see FLUSH TABLES WITH READ LOCK option), -
REPLICATION_SLAVE_ADMINin order to start/stop the replication threads in a replication environment, -
CREATEprivilege in order to create the PERCONA_SCHEMA.xtrabackup_history database and table, -
ALTERprivilege in order to upgrade the PERCONA_SCHEMA.xtrabackup_history database and table, -
INSERTprivilege in order to add history records to the PERCONA_SCHEMA.xtrabackup_history table, -
SELECTprivilege in order to use--incremental-history-nameor--incremental-history-uuidin order for the feature to look up theinnodb_to_lsnvalues in the PERCONA_SCHEMA.xtrabackup_history table. -
SELECTprivilege on the keyring_component_status table to view the attributes and status of the installed keyring component when in use. -
SELECTprivilege on the replication_group_members table to validate if the instance is part of group replication cluster.
A SQL example of creating a database user with the minimum privileges required to take full backups would be:
CREATE USER 'bkpuser'@'localhost' IDENTIFIED BY 's3cr%T';
GRANT BACKUP_ADMIN, PROCESS, RELOAD, LOCK TABLES, REPLICATION CLIENT ON *.* TO 'bkpuser'@'localhost';
GRANT SELECT ON performance_schema.log_status TO 'bkpuser'@'localhost';
GRANT SELECT ON performance_schema.keyring_component_status TO bkpuser@'localhost';
GRANT SELECT ON performance_schema.replication_group_members TO bkpuser@'localhost';
FLUSH PRIVILEGES;
Query the privileges
To query the privileges that your database user has been granted at the console of the server execute:
SHOW GRANTS;
or for a particular user with:
SHOW GRANTS FOR 'db-user'@'host';
It will display the privileges using the same format as for the GRANT statement .
Note that privileges may vary across versions of the server. To list the exact list of privileges that your server support (and a brief description of them) execute:
SHOW PRIVILEGES;
See also
Permissions needed
We will be referring to permissions to the ability of a user to access and perform changes on the relevant parts of the host’s filesystem, starting/stopping services and installing software.
By privileges, we refer to the abilities of a database user to perform different kinds of actions on the database server.
There are many ways for checking the permission on a file or directory. For
example, ls -ls /path/to/file or stat /path/to/file | grep Access will
do the job:
stat /etc/mysql | grep Access
Expected output
Access: (0755/drwxr-xr-x)  Uid: (    0/    root)   Gid: (    0/    root)
Access: 2011-05-12 21:19:07.129850437 -0300
$ ls -ld /etc/mysql/my.cnf
-rw-r--r-- 1 root root 4703 Apr  5 06:26 /etc/mysql/my.cnf
As in this example, my.cnf is owned by root and not writable for anyone
else. Assuming that you do not have root‘s password, you can check what
permissions you have on these types of files with sudo -l:
sudo -l
Expected output
Password:
You may run the following commands on this host:
(root) /usr/bin/
(root) NOPASSWD: /etc/init.d/mysqld
(root) NOPASSWD: /bin/vi /etc/mysql/my.cnf
(root) NOPASSWD: /usr/local/bin/top
(root) NOPASSWD: /usr/bin/ls
(root) /bin/tail
Being able to execute with sudo scripts in /etc/init.d/, /etc/rc.d/
or /sbin/service is the ability to start and stop services.
Also, If you can execute the package manager of your distribution, you can
install or remove software with it. If not, having rwx permission over a
directory will let you do a local installation of software by compiling it
there. This is a typical situation in many hosting companies’ services.
There are other ways for managing permissions, such as using PolicyKit, Extended ACLs or SELinux, which may be preventing or allowing your access. You should check them in that case.
See also
Percona Software Download instructions
Select the software
Do the following steps to select the software:
- Open Software Downloads
- Locate the Percona Software, for example, Percona XtraBackup
- In
Select Product, select which product, for example, Percona XtraBackup 8.4 - In
Select Product Version, select the version, for example, PERCONA-XTRABACKUP-8.4.0-5 - In
Select Platform, select the operating system, for example, RED HAT ENTERPRISE LINUX / CENTOS/ ORACLE LINUX 9
The easiest method is to download all packages.
Download to a local computer
In Package Download Options, select a specific package or choose the DOWNLOAD ALL PACKAGES button. This action downloads the selected packages to the local computer.
Download to another computer
In Package Download Options, you can do either of the following:
-
Select a specific package and right-click on the arrow next to
DOWNLOAD, and in the drop-down menu, chooseCopy Link Address -
Select
DOWNLOAD ALL PACKAGESand right-click on the arrow, and in the drop-down menu, chooseCopy Link Address
Paste the link in your terminal prompt to download the selected package.
Use APT
Install with the Percona-release Tool on Debian-based Systems
Ready-to-use packages are available from the Percona XtraBackup software repositories and the Percona Software Downloads .
Specific information on the supported platforms, products, and versions is described in [Percona Release Lifecycle Overview].
Install Percona XtraBackup through percona-release
Install Percona XtraBackup, like many other Percona products, with the percona-release package configuration tool. Run the following commands as root or use the sudo command.
-
Use the apt package manager to dowload
percona-release:sudo apt updateExpected output
Get:1 http://security.ubuntu.com/ubuntu jammy-security InRelease [129 kB] Get:2 http://archive.ubuntu.com/ubuntu jammy InRelease [270 kB] Get:3 http://archive.ubuntu.com/ubuntu jammy-updates InRelease [128 kB] Get:4 http://security.ubuntu.com/ubuntu jammy-security/main amd64 Packages [2458 kB] ... Building dependency tree... Done Reading state information... Done All packages are up to date. -
Install the
curldownload utility if it’s not installed:sudo apt install curlExpected output
Reading package lists... Done Building dependency tree... Done Reading state information... Done The following additional packages will be installed: ... Updating certificates in /etc/ssl/certs... 0 added, 0 removed; done.########################################################...] Running hooks in /etc/ca-certificates/update.d... done. -
Download the
percona-releasethe repository package:curl -O https://repo.percona.com/apt/percona-release_latest.generic_all.debExpected output
% Total % Received % Xferd Average Speed Time Time Time Current Dload Upload Total Spent Left Speed 100 16510 100 16510 0 0 29915 0 --:--:-- --:--:-- --:--:-- 30127 -
Install the downloaded package and its dependencies using
apt:sudo apt install gnupg2 lsb-release ./percona-release_latest.generic_all.debExpected output
Reading package lists... Done Building dependency tree... Done Reading state information... Done ... For example, to enable the Percona Distribution for MySQL 8.0 repository use: percona-release setup pdps8.0 Note: To avoid conflicts with older product versions, the percona-release setup command may disable our original repository for some products. For more information, please visit: https://docs.percona.com/percona-software-repositories/percona-release.html Processing triggers for libc-bin (2.35-0ubuntu3.8) ... -
Refresh the local cache to update the package information:
sudo apt updateExpected output
Get:1 http://security.ubuntu.com/ubuntu jammy-security InRelease [129 kB] Get:2 http://archive.ubuntu.com/ubuntu jammy InRelease [270 kB] Get:3 http://archive.ubuntu.com/ubuntu jammy-updates InRelease [128 kB] Get:4 http://security.ubuntu.com/ubuntu jammy-security/main amd64 Packages [2458 kB] ... Building dependency tree... Done Reading state information... Done All packages are up to date. -
Enable the specific percona-release product.
sudo percona-release enable pxb-84-ltsExpected output
* Enabling the Percona Packaging Repository repository Hit:1 http://repo.percona.com/pmm2-client/apt jammy InRelease Hit:2 http://archive.ubuntu.com/ubuntu jammy InRelease Hit:3 http://repo.percona.com/prel/apt jammy InRelease Hit:4 http://security.ubuntu.com/ubuntu jammy-security InRelease Hit:5 http://archive.ubuntu.com/ubuntu jammy-updates InRelease Get:6 http://repo.percona.com/pxb-84-lts/apt jammy InRelease [12.8 kB] Hit:7 http://archive.ubuntu.com/ubuntu jammy-backports InRelease Hit:8 http://repo.percona.com/telemetry/apt jammy InRelease Get:9 http://repo.percona.com/pxb-84-lts/apt jammy/main Sources [855 B] Get:10 http://repo.percona.com/pxb-84-lts/apt jammy/main amd64 Packages [3547 B] Fetched 17.2 kB in 4s (3958 B/s) Reading package lists... Done -
Install Percona XtraBackup.
sudo apt install percona-xtrabackup-84Expected output
Reading package lists... Done Building dependency tree... Done Reading state information... Done The following additional packages will be installed: libaio1 libcurl4-openssl-dev libdbd-mysql-perl libdbi-perl libev4 libgdbm-compat4 libgdbm6 libmysqlclient21 libperl5.34 libpopt0 mysql-common netbase perl perl-modules-5.34 rsync zstd ... Setting up libdbd-mysql-perl:amd64 (4.050-5ubuntu0.22.04.1) ...##############.......] Setting up percona-xtrabackup-84 (8.4.0-1-1.jammy) ...#########################.....] Processing triggers for libc-bin (2.35-0ubuntu3.8) ...###########################...] -
Verify the installation.
xtrabackup --versionExpected output
xtrabackup version 8.4.0-1 based on MySQL server 8.4.0 Linux (x86_64) (revision id: da6e1abd) -
To decompress backups made using
LZ4orZSTDcompression algorithm, install the corresponding package:sudo apt install lz4sudo apt install zstd
Note
For AppArmor profile information, see Working with AppArmor.
See also
To install Percona XtraBackup using downloaded deb packages, see Install Percona XtraBackup 8.4.
To uninstall Percona XtraBackup, see Uninstall Percona XtraBackup 8.4
Files in the DEB package
The following tables show what data each DEB package contains.
| Package | Contains |
|---|---|
| percona-xtrabackup-pxb-84-lts | The latest Percona XtraBackup GA binaries and associated files |
| percona-xtrabackup-dbg-pxb-84-lts | The debug symbols for binaries in percona-xtrabackup-pxb-84-lts |
| percona-xtrabackup-test-pxb-84-lts | The test suite for Percona XtraBackup |
| percona-xtrabackup | The older version of the Percona XtraBackup |
Install using downloaded DEB packages
Download DEB packages of the desired series for your architecture from the Percona Software Downloads . If needed, Percona Software Download instructions are available.
This method requires you to resolve all dependencies and install any missing packages. Always back up your data before making significant system changes.
The following example downloads Percona XtraBackup 8.4.0-6 release package for Ubuntu 22.04. Run the following commands as root or use the sudo command.
-
Use
wgetto download theDEBpackage:wget https://downloads.percona.com/downloads/Percona-XtraBackup-8.4/Percona-XtraBackup-8.4.0-6/binary/debian/jammy/x86_64/percona-xtrabackup-84_8.4.0-6-1.jammy_amd64.deb -
Install Percona XtraBackup by using
dpkg:sudo dpkg -i percona-xtrabackup-84_8.4.0-6-1.jammy_amd64.deb
Common dependencies
| Library Name | Description |
|---|---|
| libmysqlclient | A client library for MySQL, providing essential functions for connecting to and communicating with MySQL databases. |
| libssl | A cryptographic library used for implementing SSL/TLS encryption, necessary for secure data transmission. |
| libcurl | A library that enables data transfer via various protocols such as HTTP, FTP, and others, commonly used for handling web requests. |
| libev | A high-performance event-loop library, often used in network applications for handling asynchronous events efficiently. |
| libgcrypt | A general-purpose cryptographic library that provides encryption, decryption, and cryptographic hashing algorithms. |
| zlib | A compression library used for data compression and decompression, supporting the popular DEFLATE compression algorithm. |
If there are missing dependencies, dpkg shows error messages. Install any missing packages with the following command:
sudo apt-get install -f
Verify the installation
After installation, verify it by checking the version:
xtrabackup --version
Troubleshoot the installation
| Issue | Description |
|---|---|
| Permission denied | Ensure you’re using sudo or have root access for installation commands. |
| Repository issues | If packages are not found, check your yum repository configuration. |
| Incompatible OS version | Double-check your OS version matches the package requirements. |
| Conflicts with existing packages | Consider removing conflicting packages or use a separate environment. |
If you encounter persistent issues, consult the Percona XtraBackup documentation or Get help from Percona.
Apt pinning packages
In some cases you might need to pin the selected packages to avoid the upgrades from the distribution repositories.
The pinning takes place in the preference file. To pin a package, set the Pin-Priority to higher numbers.
Make a new file /etc/apt/preferences.d/00percona.pref. For example, add the following to the preference file:
Package:
Pin: release o=Percona Development Team
Pin-Priority: 1001
For more information about the pinning, check the official debian wiki .
Work with AppArmor
The Linux Security Module implements mandatory access controls (MAC) with AppArmor. Debian and Ubuntu systems install AppArmor by default. AppArmor uses profiles which define which files and permissions are needed for application.
Percona XtraBackup does not have a profile and is not confined by AppArmor.
For a list of common AppArmor commands, see Percona Server for MySQL - AppArmor .
Develop a profile
Download the profile from:
https://github.com/percona/percona-xtrabackup/tree/trunk/packaging/percona/apparmor/apparmor.d
The following profile sections should be updated with your system information, such as location of the backup destination directory.
Expected output
# enable storing backups only in /backups directory
# /backups/** rwk,

# enable storing backups anywhere in caller user home directory
/@{HOME}/** rwk,


# enable storing backups only in /backups directory
# /backups/** rwk,

# enable storing backups anywhere in caller user home directory
/@{HOME}/** rwk,
}

# enable storing backups only in /backups directory
# /backups/** rwk,

# enable storing backups anywhere in caller user home directory
/@{HOME}/** rwk,
}
Move the updated file:
sudo mv usr.sbin.xtrabackup /etc/apparmor.d/
Install the profile with the following command:
sudo apparmor_parser -r -T -W /etc/apparmor.d/usr.sbin.xtrabackup
Run the backup as usual.
No additional AppArmor-related actions are required to restore a backup.
Uninstall Percona XtraBackup 8.4 on Debian and Ubuntu
To completely uninstall Percona XtraBackup, remove all the installed packages. Run the following command as root or use the sudo command.
sudo apt remove percona-xtrabackup-pxb-84-lts
Use YUM
Use a YUM repository to install Percona XtraBackup
Ready-to-use packages are available from the Percona XtraBackup software
repositories and the Percona Software Downloads . The Percona yum repository supports popular RPM-based operating systems, including the Amazon Linux AMI.
Specific information on the supported platforms, products, and versions is described in Percona Software and Platform Lifecycle .
Install Percona XtraBackup from Percona yum repository
To install Percona XtraBackup from Percona yum repository, do the following steps:
-
Install the Percona yum repository by running the following command as the
rootuser or with sudo:sudo yum install \ https://repo.percona.com/yum/percona-release-latest.\ noarch.rpmExpected output
Oracle Linux 9 BaseOS Latest (x86_64) 8.4 MB/s | 43 MB 00:05 Oracle Linux 9 Application Stream Packages (x86 8.6 MB/s | 47 MB 00:05 Last metadata expiration check: 0:00:06 ago on Wed Dec 11 14:12:54 2024. percona-release-latest.noarch.rpm 62 kB/s | 27 kB 00:00 Dependencies resolved. ... For more information, please visit: https://docs.percona.com/percona-software-repositories/percona-release.html Verifying : percona-release-1.0-29.noarch 1/1 Installed: percona-release-1.0-29.noarch Complete! -
Enable the repository:
sudo percona-release enable pxb-84-ltsExpected output
* Enabling the Percona Packaging Repository repository <*> All done! -
Install Percona XtraBackup.
sudo yum install percona-xtrabackup-84Expected output
PMM2 Client release/x86_64 YUM repository 17 kB/s | 7.1 kB 00:00 Percona Release release/noarch YUM repository 5.3 kB/s | 2.0 kB 00:00 Percona Packaging Repository release/x86_64 YUM 95 kB/s | 52 kB 00:00 Percona Telemetry release/x86_64 YUM repository 4.3 kB/s | 1.7 kB 00:00 Dependencies resolved. ... perl-subs-1.03-481.el9.noarch perl-vars-1.05-481.el9.noarch rsync-3.2.3-20.el9.x86_64 zstd-1.5.1-2.el9.x86_64 -
Verify the installation.
xtrabackup --versionExpected output
xtrabackup version 8.4.0-1 based on MySQL server 8.4.0 Linux (x86_64) (revision id: da6e1abd) -
To decompress backups made using
LZ4orZSTDcompression algorithm, install the corresponding package:sudo yum install lz4sudo yum install zstd
See also
To install Percona XtraBackup using downloaded rpm packages, see Install with package manager.
To uninstall Percona XtraBackup, see Uninstall Percona XtraBackup
Files in the RPM package built for Percona XtraBackup 8.4
The following tables show what data each RPM package contains:
| Package | Contains |
|---|---|
| percona-xtrabackup-pxb-84-lts | The latest Percona XtraBackup GA binaries and associated files |
| percona-xtrabackup-pxb-84-lts-debuginfo | The debug symbols for binaries in percona-xtrabackup-pxb-84-lts |
| percona-xtrabackup-test-pxb-84-lts | The test suite for Percona XtraBackup |
| percona-xtrabackup | The older version of the Percona XtraBackup |
Install Percona XtraBackup 8.4 using downloaded RPM packages
Download RPM packages of the desired series for your architecture from the Percona Software Downloads . If needed, Percona Software Download instructions are available.
This method requires you to resolve all dependencies and install any missing packages. Always back up your data before making significant system changes.
The following example downloads Percona XtraBackup 8.4.0-6 release packages for RHEL 9. Run the following commands as root or use the sudo command.
-
Install wget
sudo dnf install wget -
Use
wgetto download theRPMpackage:wget https://downloads.percona.com/downloads/Percona-XtraBackup-8.4/Percona-XtraBackup-8.4.0-6/binary/redhat/9/x86_64/percona-xtrabackup-84-8.4.0-6.1.el9.x86_64.rpm -
Install Percona XtraBackup by running:
sudo dnf install ./percona-xtrabackup-84-8.4.0-6.1.el9.x86_64.rpm
Common dependencies
| Library name | Description |
|---|---|
| libev | A high-performance event-loop library used in asynchronous network applications. |
| libgcrypt | A general-purpose cryptographic library providing encryption, decryption, and hashing algorithms. |
| openssl | A robust library for implementing SSL/TLS encryption and cryptographic functions. |
| zlib | A compression library that supports data compression and decompression using the DEFLATE algorithm. |
| libaio | A library for asynchronous I/O operations, providing non-blocking I/O functionality. |
If dnf reports missing dependencies, it may offer to install them automatically. If not, you can install these dependencies manually using the following example.
sudo dnf install libev libgcrypt openssl zlib libaio
Verify the installation
After installation, verify it by checking the version:
xtrabackup --version
Troubleshoot the installation
| Issue | Description |
|---|---|
| Permission denied | Ensure you’re using sudo or have root access for installation commands. |
| Repository issues | If packages are not found, check your yum repository configuration. |
| Incompatible OS version | Double-check your OS version matches the package requirements. |
| Conflicts with existing packages | Consider removing conflicting packages or use a separate environment. |
If you encounter persistent issues, consult the Percona XtraBackup documentation or Get help from Percona.
Work with SELinux
Percona XtraBackup is installed as an unconfined process running in an undefined domain. SELinux allows unconfined processes almost all access and the processes only use Discretionary Access Control (DAC) rules.
You find the current state of the Percona XtraBackup file with the following command:
ls -Z /usr/bin | grep xtrabackup
Expected output
-rwxr-xr-x. root root system_u:object_r:bin_t:s0 xtrabackup
The SELinux context is the following:
-
user (root)
-
role (object_r)
-
type (bin_t)
-
level (s0)
The unconfined domain supports the network-facing services, which are protected by SELinux. These domains are not exposed. In this configuration, SELinux protects against remote intrusions but local intrusions, which require local access, are not confined.
Percona XtraBackup works locally. The service is not network-facing and cannot be exploited externally. The service interacts only with the local user, who provides the parameters. Percona XtraBackup requires access to the target-dir location.
Confine XtraBackup
You can modify your security configuration to confine Percona XtraBackup. The first question is where to store the backup files. The service requires read and write access to the selected location.
You can use either of the following methods:
-
Allow Percona XtraBackup to write to any location. The user provides any path to the
target-dirparameter. -
Allow Percona XtraBackup to write to a specific location, such as /backups or the user’s home directory.
The first option opens the entire system to read and write. Select the second option to harden your security.
Install SELinux tools
To work with policies, you must install the SELinux tools. To find which package provides the semanage command and install the package. The following is an example on CentOS 7.
yum provides *bin/semanage
Expected output
...
policycoreutils-python-2.5-34.el7.x86_64 : SELinux policy core python utilities
...
To install missing packages, run the following:
sudo yum install -y policycoreutils-python
The following is an example on CentOS 8:
yum provides *bin/semanage
Expected output
...
policycoreutils-python-utils-2.8-16.1.el8.noarch : SELinux policy core python utilities
Run the following to install the missing packages:
sudo yum install -y policycoreutils-python-utils
Create a policy
Use a modular approach to create an SELinux policy. Create a policy module to manage XtraBackup. You must create a .te file for type enforcement, and an optional .fc file for the file contexts.
Use $ ps -efZ | grep xtrabackup to verify the service is not confined by SELinux.
Create the xtrabackup.fc file and add content. This file defines the security contexts.
/usr/bin/xtrabackup    -- gen_context(system_u:object_r:xtrabackup_exec_t,s0)
/usr/bin/xbcrypt    -- gen_context(system_u:object_r:xtrabackup_exec_t,s0)
/usr/bin/xbstream    -- gen_context(system_u:object_r:xtrabackup_exec_t,s0)
/usr/bin/xbcloud    -- gen_context(system_u:object_r:xtrabackup_exec_t,s0)
/backups(/.*)?       system_u:object_r:xtrabackup_data_t:s0
Note
If you are using the /backups directory you must have the last line. If you are storing the backups in the user’s home directory, you can omit this line.
Download the xtrabackup.te file from the following location:
https://github.com/percona/percona-xtrabackup/tree/trunk/packaging/percona/selinx
Note
In the file, the sections in bold should be modified for your system. The fc file can also be downloaded from the same location.
Compile the policy module:
make -f /usr/share/selinux/devel/Makefile xtrabackup.pp
Install the module:
semodule -i xtrabackup.pp
Tag the PXB binaries with the proper SELinux tags, such as xtrabackup_exec_t.
restorecon -v /usr/bin/*
If you store your backups at /backups, restore the tag in that location:
restorecon -v /backups
Note
Remember to add the standard Linux DAC permissions for this directory.
Perform the backup in the standard way.
Uninstall Percona XtraBackup 8.4 on Red Hat Enterprise Linux and CentOS
To completely uninstall Percona XtraBackup, remove all the installed packages:
yum remove percona-xtrabackup
Use binary tarballs
Install from a binary tarball
Binary tarballs are compressed tar archives that contain precompiled executable files, libraries, and other dependencies. You can extract the binary tarballs to any path.
Download the binary tarballs from the Linux - Generic section on Percona Software Downloads .
The following example downloads the tarball. Run the following command as root or use the sudo command.
wget https://downloads.percona.com/downloads/Percona-XtraBackup-8.4/Percona-XtraBackup-8.4.0-1/binary/tarball/percona-xtrabackup-8.4.0-1-Linux-x86_64.glibc2.28.tar.gz
The output displays the following information:
Expected output
--2024-10-09 04:44:36--  https://downloads.percona.com/downloads/Percona-XtraBackup-8.4/Percona-XtraBackup-8.4.0-       1/binary/tarball/percona-xtrabackup-8.4.0-1-Linux-x86_64.glibc2.28.tar.gz
Resolving downloads.percona.com (downloads.percona.com)... 147.135.54.159, 2604:2dc0:200:69f::2
Connecting to downloads.percona.com (downloads.percona.com)|147.135.54.159|:443... connected.
HTTP request sent, awaiting response... 200 OK
Length: 439358509 (419M) [application/gzip]
Saving to: ‘percona-xtrabackup-8.4.0-1-Linux-x86_64.glibc2.28.tar.gz’

percona-xtrabackup-8.4.0-1-Linux-x86_6 100%
[============================================================================>] 419.00M  6.67MB/s    in 94s

2024-10-09 04:46:10 (4.48 MB/s) - ‘percona-xtrabackup-8.4.0-1-Linux-x86_64.glibc2.28.tar.gz’ saved
[439358509/439358509]
Binary tarball file names available
For recent versions of Percona XtraBackup, the tar files are organized by the glibc2 version. You can find this version on your operating system with the following command:
ldd --version
Expected output
ldd (Ubuntu GLIBC 2.35-0ubuntu3.1) 2.35
Copyright (C) 2022 Free Software Foundation, Inc.
This is free software; see the source for copying conditions.  There is NO
warranty; not even for MERCHANTABILITY or FITNESS FOR A PARTICULAR PURPOSE.
Written by Roland McGrath and Ulrich Drepper.
If the glibc2 version from your operating system is not listed, then this Percona Server for MySQL version does not support that operating system.
Binary tarball file name organization
The following lists the platform and the associated full binary file name used by Percona Server for MySQL tar files 8.4.0-6.
| Platform | Percona XtraBackup tarball name | glibc2 version |
|---|---|---|
| Ubuntu 24.04 | Percona-XtraBackup-8.4.0-6-Linux.x86_64.glibc2.39.tar.gz | glibc2.39 |
| Ubuntu 22.04 | Percona-XtraBackup-8.4.0-6-Linux.x86_64.glibc2.35.tar.gz | glibc2.35 |
| Ubuntu 20.04 | Percona-XtraBackup-8.4.0-6-Linux.x86_64.glibc2.31.tar.gz | glibc2.31 |
| Debian 12 | Percona-XtraBackup-8.4.0-6-Linux.x86_64.glibc2.36.tar.gz | glibc2.36 |
| Debian 11 | Percona-XtraBackup-8.4.0-6-Linux.x86_64.glibc2.31.tar.gz | glibc2.31 |
| Red Hat Enterprise 9 | Percona-XtraBackup-8.4.0-6-Linux.x86_64.glibc2.34.tar.gz | glibc2.34 |
| Red Hat Enterprise 8 | Percona-XtraBackup-8.4.0-6-Linux.x86_64.glibc2.28.tar.gz | glibc2.28 |
Download the binary tarballs from Percona Software Downloads .
The following table lists the tarball types in Linux - Generic. Select the Percona XtraBackup 8.4 version, the software or the operating system, and the tarball type for your installation. Binary tarballs support all distributions.
After you have downloaded the binary tarballs, extract the tarball in the file location of your choice. The minimal version contains binary files and libraries but does not include test files or debug symbols. The full version contains binary files, libraries, test files, and debug symbols.
| Type | Name |
|---|---|
| Minimal | percona-xtrabackup-8.4.0-6-Linux.x86_64.glibc2.17-minimal.tar.gz |
| Full | percona-xtrabackup-8.4.0-6-Linux.x86_64.glibc2.17.tar.gz |
| Minimal | percona-xtrabackup-8.4.0-6-Linux-x86_64.glibc2.28-minimal.tar.gz |
| Full | percona-xtrabackup-8.4.0-6-Linux-x86_64.glibc2.28.tar.gz |
| Minimal | percona-xtrabackup-8.4.0-6-Linux-x86_64.glibc2.31-minimal.tar.gz |
| Full | percona-xtrabackup-8.4.0-6-Linux-x86_64.glibc2.31.tar.gz |
| Minimal | percona-xtrabackup-8.4.0-6-Linux-x86_64.glibc2.34-minimal.tar.gz |
| Full | percona-xtrabackup-8.4.0-6-Linux-x86_64.glibc2.34.tar.gz |
| Minimal | percona-xtrabackup-8.4.0-6-Linux-x86_64.glibc2.35-minimal.tar.gz |
| Full | percona-xtrabackup-8.4.0-6-Linux-x86_64.glibc2.35.tar.gz |
| Minimal | percona-xtrabackup-8.4.0-6-Linux-x86_64.glibc2.36-minimal.tar.gz |
| Full | percona-xtrabackup-8.4.0-6-Linux-x86_64.glibc2.36.tar.gz |
| Minimal | percona-xtrabackup-8.4.0-6-Linux-x86_64.glibc2.39-minimal.tar.gz |
| Full | percona-xtrabackup-8.4.0-6-Linux-x86_64.glibc2.39.tar.gz |
Select a different software, such as Ubuntu 20.04 (Focal Fossa), for a tarball for that operating system. You can download the packages together or separately.
Compile from source
Compile and install from source
The following instructions install Percona XtraBackup 8.4. Run the following command as root or use the sudo command.
1. Install Percona XtraBackup from the Git Source Tree
Percona uses the Github revision control system for development. To build the latest Percona Server for MySQL from the source tree, you will need git installed on your system.
You can now fetch the latest Percona XtraBackup 8.4 sources:
git clone https://github.com/percona/percona-xtrabackup.git
cd percona-xtrabackup
git checkout trunk
git submodule update --init --recursive
2. Installation prerequisites
The following packages and tools must be installed to compile Percona XtraBackup from source. These might vary from system to system.
Important
To build **Percona XtraBackup 8.4 from source, you must use cmake
version 3. To check which version is
currently installed, run cmake --version at a command prompt. If the
version is not 3, install cmake3.
This cmake version may be available
in your distribution as a separate package cmake3. For more information, see cmake.org .
sudo apt install bison pkg-config cmake devscripts debconf \
debhelper automake bison ca-certificates libprocps-dev \
libcurl4-openssl-dev cmake debhelper libaio-dev \
libncurses-dev libssl-dev libtool libz-dev libgcrypt-dev libev-dev libprocps-dev \
lsb-release build-essential rsync libdbd-mysql-perl \
libnuma1 socat librtmp-dev libtinfo5 vim-common \
liblz4-tool liblz4-1 liblz4-dev zstd python-docutils
To install the man pages, install the python3-sphinx package first:
sudo apt install python3-sphinx
Percona Xtrabackup requires GCC version 5.3 or higher. If the
version of GCC installed on your system is lower then you may need to
install and enable [the Developer Toolset] on
RPM-based distributions to make sure that you use the latest GCC
compiler and development tools. Then, install cmake and other
dependencies:
sudo yum install cmake openssl-devel libaio libaio-devel automake autoconf \
bison libtool ncurses-devel libgcrypt-devel libev-devel libcurl-devel zlib-devel \
zstd vim-common procps-ng-devel
To install the man pages, install the python3-sphinx package first:
sudo yum install python3-sphinx
3. Generate the build pipeline
At this step, you have cmake run the commands in the CMakeList.txt
file to generate the build pipeline, i.e., a native build environment that will
be used to compile the source code).
-
Change to the directory where you cloned the Percona XtraBackup repository
cd percona-xtrabackup -
Create a directory to store the compiled files and then change to that directory:
mkdir build cd build -
If you use a regular build, run cmake or cmake3. In either case, the options you need to use are the same.
Note
You can build Percona XtraBackup with man pages but this requires
python-sphinx package which isn’t available from that main repositories
for every distribution. If you installed the python-sphinx package you
need to remove the -DWITH_MAN_PAGES=OFF from the following command.
cmake -DBUILD_CONFIG=xtrabackup_release -DWITH_MAN_PAGES=OFF ..
Parameter Information
| Parameter | Description |
|---|---|
-DPROBUILD=1 |
This option enables a Pro build. |
-DBUILD_CONFIG |
This option builds a release/optimized version of the xtrabackup binary. |
-DWITH_MAN_PAGES |
To build Percona XtraBackup man pages, use ON or remove this parameter from the command line (it is ON by default). To install the man pages, install the python3-sphinx package first. |
Important
CMake Error at CMakeLists.txt:367 (MESSAGE): Please do not build in-source. Out-of source builds are highly recommended: you can have multiple builds for the same source, and there is an easy way to do cleanup, simply remove the build directory (note that ‘make clean’ or ‘make distclean’ does not work)
You can force in-source build by invoking cmake with -DFORCE_INSOURCE_BUILD=1.
4. Compile the source code
To compile the source code in your build directory, use the make command.
-
Change to the
builddirectory (created at Step 2: Generating the build pipeline). -
Run the
makecommand. This command may take a long time to complete.makeTo use all CPU threads and make compilation faster please use:
make -j$(nproc --all)
5. Install on the target system
The following command installs all Percona XtraBackup binaries xtrabackup
and tests to default location on the target system: /usr/local/xtrabackup.
Run make install to install Percona XtraBackup to the default location.
sudo make install
Install to a non-default location
You may use the DESTDIR parameter with make install to install Percona
XtraBackup to another location. Make sure that the effective user is able to
write to the destination you choose.
sudo make DESTDIR=<DIR_NAME> install
In fact, the destination directory is determined by the installation layout
(-DINSTALL_LAYOUT) that cmake applies (see
Step 2: Generating the build pipeline). In addition to
the installation directory, this parameter controls a number of other
destinations that you can adjust for your system.
By default, this parameter is set to STANDALONE, which implies the
installation directory to be /usr/local/xtrabackup.
6. Run Percona XtraBackup
After Percona XtraBackup is installed on your system, you may run it by using
the full path to the xtrabackup command:
/usr/local/xtrabackup/bin/xtrabackup
Update your PATH environment variable if you would like to use the command on the command line directly.
$# Setting $PATH on the command line
PATH=$PATH:/usr/local/xtrabackup/bin/xtrabackup

$# Run xtrabackup directly
xtrabackup
Alternatively, you may consider placing a soft link (using ln -s) to one of
the locations listed in your PATH environment variable.
To view the documentation with man, update the MANPATH variable.
Docker
Run a Docker container
Docker allows you to run applications in a lightweight unit called a container.
You can run Percona XtraBackup in a Docker container without installing the product. All required libraries are available in the container. Being a lightweight execution environment, Docker containers enable creating configurations where each program runs in a separate container. You may run Percona Server for MySQL in one container and Percona XtraBackup in another. Docker images offer a range of options.
Create a Docker container based on a Docker image. Docker images for Percona XtraBackup are hosted publicly on Docker Hub .
Run all the commands as root or use the sudo command.
sudo docker create ... percona/percona-xtrabackup --name xtrabackup ...
Scope of this section
This section demonstrates how to back up data on a Percona Server for MySQL running in another Dockers container.
1. Install Docker
Your operating system may already provide a package for docker. However, the versions of Docker provided by your operating system are likely to be outdated.
Use the installation instructions for your operating system available from the Docker site to set up the latest version of docker.
2. Connect to a Percona Server for MySQL container
Percona XtraBackup works in combination with a database server. When running a Docker container for Percona XtraBackup, you can make backups for a database server either installed on the host machine or running in a separate Docker container.
To set up a database server on a host machine or in Docker container, follow the documentation of the supported product that you intend to use with Percona XtraBackup.
sudo docker run -d --name percona-server-mysql \
-e MYSQL_ROOT_PASSWORD=root percona/percona-server:8.4
As soon as Percona Server for MySQL runs, add some data to it. Now, you are ready to make backups with Percona XtraBackup.
Important
When running Percona XtraBackup from a container and connecting to a MySQLserver container, we recommend using the –user root option in the Docker command.
3. Create a Docker container from Percona XtraBackup image
You can create a Docker container based on Percona XtraBackup image with
either docker create or the docker run command. docker create
creates a Docker container and makes it available for starting later.
Docker downloads the Percona XtraBackup image from the Docker Hub. If it is not the first time you use the selected image, Docker uses the image available locally.
sudo docker create --name percona-xtrabackup --volumes-from percona-server-mysql \
percona/percona-xtrabackup  \
xtrabackup --backup --datadir=/var/lib/mysql/ --target-dir=/backup \
--user=root --password=mysql
With parameter name you give a meaningful name to your new Docker container so that you could easily locate it among your other containers.
The volumes-from flag refers to Percona Server for MySQL and indicates
that you intend to use the same data as the Percona Server for MySQL container.
Run the container with exactly the same parameters that were used when the container was created:
sudo docker start -ai percona-xtrabackup
This command starts the percona-xtrabackup container, attaches to its input/output streams, and opens an interactive shell.
The docker run is a shortcut command that creates a Docker container and
then immediately runs it.
sudo docker run --name percona-xtrabackup --volumes-from percona-server-mysql \
percona/percona-xtrabackup
xtrabackup --backup --data-dir=/var/lib/mysql --target-dir=/backup --user=root --password=mysql
Next step
For a complete workflow including backup validation and disaster recovery, see the Docker Compose tutorial.
Docker Compose backup and restore tutorial
This tutorial demonstrates a production-ready approach to backing up, validating, and restoring Percona Server for MySQL using Percona XtraBackup in a Docker Compose environment.
Overview
In a containerized environment, restoring a physical backup requires a strict sequence because you cannot overwrite data files while the database engine is running. Furthermore, physical files recovered by the root user cause permissions errors when the database tries to boot as the mysql user.
This tutorial teaches you to:
- Set up a complete Docker Compose environment with Percona Server and Percona XtraBackup
- Take and prepare a full backup
- Validate that the backup is functional before using it
- Simulate a disaster scenario
- Execute a complete restore operation
- Understand the critical role of file permissions in containerized restores
Prerequisites
- Docker installed on your system
- Docker Compose installed (included with Docker Desktop)
- Basic familiarity with Docker concepts
Architecture
This tutorial uses Docker Compose profiles to separate backup operations into distinct tasks:
| Profile | Service | Purpose |
|---|---|---|
| (default) | psmysql |
Primary Percona Server for MySQL instance |
backup |
pxb-backup |
Takes and prepares backups |
validate |
pxb-validate |
Launches an isolated database from backup files |
restore |
pxb-restore |
Restores backup files to the primary database |
Using profiles ensures that backup, validation, and restore operations only run when explicitly invoked.
Step 1: Set up the project structure
Create a project directory with the following structure:
-
Create the project directory and navigate to it:
mkdir pxb-tutorial && cd pxb-tutorialIf the command executes successfully, the expected output is empty. You are now in the
pxb-tutorialdirectory. -
Create the secrets directory:
mkdir secretsIf the command executes successfully, the expected output is empty.
-
Create the password file:
echo "YourSecurePassword123" > secrets/db_root_pwd.txtIf the command executes successfully, the expected output is empty.
Warning
In production, use a strong, randomly generated password and secure the secrets directory with appropriate file permissions.
-
Verify the project structure:
ls -laExpected output
total 0
drwxr-xr-x  3 user  staff   96 Jun  4 10:00 .
drwxr-xr-x  5 user  staff  160 Jun  4 10:00 ..
drwxr-xr-x  3 user  staff   96 Jun  4 10:00 secrets
Step 2: Create the Docker Compose file
Create a file named docker-compose.yml in your project directory. Select the configuration for your system architecture:
services:
  # Main Database Engine
  psmysql:
    image: percona/percona-server:8.4
    container_name: psmysql
    environment:
      MYSQL_ROOT_PASSWORD_FILE: /run/secrets/db_root_pwd
    volumes:
      - mysql_data:/var/lib/mysql
    ports:
      - "3306:3306"
    secrets:
      - db_root_pwd

  # BACKUP & PREPARE TASK
  pxb-backup:
    image: percona/percona-xtrabackup:8.4
    container_name: pxb_backup
    user: root
    depends_on:
      - psmysql
    volumes:
      - mysql_data:/var/lib/mysql:ro
      - backupvol:/backup_84
    secrets:
      - db_root_pwd
    command: >
      /bin/bash -c "
      export MYSQL_PWD=$$(cat /run/secrets/db_root_pwd);
      xtrabackup --backup --datadir=/var/lib/mysql/ --target-dir=/backup_84 --user=root;
      xtrabackup --prepare --target-dir=/backup_84
      "
    profiles:
      - backup

  # RESTORE TASK (Destructive - Requires psmysql to be stopped)
  pxb-restore:
    image: percona/percona-xtrabackup:8.4
    container_name: pxb_restore
    user: root
    volumes:
      - mysql_data:/var/lib/mysql
      - backupvol:/backup_84
    command: >
      /bin/bash -c "
      echo '==> Clearing current database directory...';
      rm -rf /var/lib/mysql/* &&
      echo '==> Restoring physical data files from backupvol...';
      xtrabackup --copy-back --target-dir=/backup_84 --datadir=/var/lib/mysql/ &&
      echo '==> Fixing file permissions for Percona Server...';
      chown -R mysql:mysql /var/lib/mysql
      "
    profiles:
      - restore

  # VALIDATION TASK (Launches an isolated, temporary DB from the backup)
  pxb-validate:
    image: percona/percona-server:8.4
    container_name: pxb_validate
    environment:
      MYSQL_ROOT_PASSWORD_FILE: /run/secrets/db_root_pwd
    volumes:
      - backupvol:/var/lib/mysql
    ports:
      - "3307:3306"
    secrets:
      - db_root_pwd
    user: root
    entrypoint: >
      /bin/bash -c "
      chown -R mysql:mysql /var/lib/mysql &&
      exec gosu mysql mysqld
      "
    profiles:
      - validate

volumes:
  mysql_data:
  backupvol:

secrets:
  db_root_pwd:
    file: ./secrets/db_root_pwd.txt
services:
  # Main Database Engine
  psmysql:
    image: percona/percona-server:8.4-aarch64
    container_name: psmysql
    environment:
      MYSQL_ROOT_PASSWORD_FILE: /run/secrets/db_root_pwd
    volumes:
      - mysql_data:/var/lib/mysql
    ports:
      - "3306:3306"
    secrets:
      - db_root_pwd

  # BACKUP & PREPARE TASK
  pxb-backup:
    image: percona/percona-xtrabackup:8.4-aarch64
    container_name: pxb_backup
    user: root
    depends_on:
      - psmysql
    volumes:
      - mysql_data:/var/lib/mysql:ro
      - backupvol:/backup_84
    secrets:
      - db_root_pwd
    command: >
      /bin/bash -c "
      export MYSQL_PWD=$$(cat /run/secrets/db_root_pwd);
      xtrabackup --backup --datadir=/var/lib/mysql/ --target-dir=/backup_84 --user=root;
      xtrabackup --prepare --target-dir=/backup_84
      "
    profiles:
      - backup

  # RESTORE TASK (Destructive - Requires psmysql to be stopped)
  pxb-restore:
    image: percona/percona-xtrabackup:8.4-aarch64
    container_name: pxb_restore
    user: root
    volumes:
      - mysql_data:/var/lib/mysql
      - backupvol:/backup_84
    command: >
      /bin/bash -c "
      echo '==> Clearing current database directory...';
      rm -rf /var/lib/mysql/* &&
      echo '==> Restoring physical data files from backupvol...';
      xtrabackup --copy-back --target-dir=/backup_84 --datadir=/var/lib/mysql/ &&
      echo '==> Fixing file permissions for Percona Server...';
      chown -R mysql:mysql /var/lib/mysql
      "
    profiles:
      - restore

  # VALIDATION TASK (Launches an isolated, temporary DB from the backup)
  pxb-validate:
    image: percona/percona-server:8.4-aarch64
    container_name: pxb_validate
    environment:
      MYSQL_ROOT_PASSWORD_FILE: /run/secrets/db_root_pwd
    volumes:
      - backupvol:/var/lib/mysql
    ports:
      - "3307:3306"
    secrets:
      - db_root_pwd
    user: root
    entrypoint: >
      /bin/bash -c "
      chown -R mysql:mysql /var/lib/mysql &&
      exec gosu mysql mysqld
      "
    profiles:
      - validate

volumes:
  mysql_data:
  backupvol:

secrets:
  db_root_pwd:
    file: ./secrets/db_root_pwd.txt
About the $$ syntax
The $$ in the YAML file escapes the $ character for Docker Compose. Docker Compose interprets $ as a variable, so $$ produces a literal $ in the command.
Key configuration details
| Configuration | Explanation |
|---|---|
user: root |
Required for pxb-backup and pxb-restore to access MySQL data files and modify permissions |
mysql_data:/var/lib/mysql:ro |
The :ro flag mounts the volume as read-only for the backup service, ensuring data integrity |
chown -R mysql:mysql |
Resets file ownership after restore; MySQL refuses to start if files are owned by root |
profiles |
Services only start when their profile is explicitly activated |
gosu mysql mysqld |
Drops from root to mysql user before starting the database |
Step 3: Start the primary database and add test data
Start the primary Percona Server instance and create some test data.
-
Start the primary database:
docker compose up -d psmysqlExpected output
[+] Running 3/3 ✔ Network pxb-tutorial_default Created ✔ Volume "pxb-tutorial_mysql_data" Created ✔ Container psmysql Started -
Wait for the database to initialize (about 30 seconds), then connect to it:
docker exec -it psmysql mysql -uroot -pExpected output
Enter password:
Welcome to the MySQL monitor.  Commands end with ; or \g.
Your MySQL connection id is 8
Server version: 8.4.2-2 Percona Server (GPL), Release 2, Revision b575402d

Copyright (c) 2009-2024 Percona LLC and/or its affiliates
Copyright (c) 2000, 2024, Oracle and/or its affiliates.

Oracle is a registered trademark of Oracle Corporation and/or its
affiliates. Other names may be trademarks of their respective
owners.

Type 'help;' or '\h' for help. Type '\c' to clear the current input statement.

mysql>
Enter the password from your secrets file (
YourSecurePassword123) when prompted. -
Create a test database and table:
CREATE DATABASE mydb;Expected output
Query OK, 1 row affected (0.01 sec)USE mydb;Expected output
Database changedCREATE TABLE employees ( id INT AUTO_INCREMENT PRIMARY KEY, name VARCHAR(100), email VARCHAR(100), country VARCHAR(50) );Expected output
Query OK, 0 rows affected (0.03 sec)INSERT INTO employees (name, email, country) VALUES ('Erasmus Richardson', '[email protected]', 'England'), ('Jenna French', '[email protected]', 'Canada'), ('Alfred Dejesus', '[email protected]', 'Austria');Expected output
Query OK, 3 rows affected (0.01 sec) Records: 3 Duplicates: 0 Warnings: 0 -
Verify the data was inserted:
SELECT * FROM employees;Expected output
+----+--------------------+---------------------+---------+ | id | name | email | country | +----+--------------------+---------------------+---------+ | 1 | Erasmus Richardson | [email protected] | England | | 2 | Jenna French | [email protected] | Canada | | 3 | Alfred Dejesus | [email protected] | Austria | +----+--------------------+---------------------+---------+ 3 rows in set (0.00 sec) -
Exit the MySQL client:
exitExpected output
Bye
Step 4: Take and prepare a backup
Run the backup service to create a full backup and prepare it for restoration.
-
Run the backup task:
docker compose run --rm pxb-backupExpected output
xtrabackup version 8.4.0-2 based on MySQL server 8.4.2 Linux (x86_64)
...
[Note] [MY-011825] [Xtrabackup] Executing LOCK TABLES FOR BACKUP
...
[Note] [MY-011825] [Xtrabackup] completed OK!

[Note] [MY-011825] [Xtrabackup] recognized server arguments: --innodb_checksum_algorithm=crc32
...
[Note] [MY-011825] [Xtrabackup] completed OK!
The backup service performs two operations:
xtrabackup --backup: Creates a physical copy of the database filesxtrabackup --prepare: Applies transaction logs to make the backup consistent
Step 5: Validate the backup
Before relying on a backup for disaster recovery, verify that it is functional. The validation service launches an independent, temporary Percona Server instance that boots directly from the backup files.
Why validate?
A backup that has not been tested for recovery provides no guarantee of data protection. Validation proves that backup files are functional before you need them in an emergency.
Do the following to validate the backup:
-
Start the validation container:
docker compose up -d pxb-validateExpected output
[+] Running 1/1 ✔ Container pxb_validate Started -
Check the container logs to ensure it initializes properly:
docker compose logs pxb-validateLook for
ready for connectionsin the output.Expected output
pxb_validate | [System] [MY-010116] [Server] /usr/sbin/mysqld (mysqld 8.4.2-2) starting as process 7 ... pxb_validate | [System] [MY-011323] [Server] X Plugin ready for connections. pxb_validate | [System] [MY-010931] [Server] /usr/sbin/mysqld: ready for connections. -
Connect to the validation instance on port
3307and verify your data:docker exec -it pxb_validate mysql -uroot -p -e "SELECT * FROM mydb.employees;"Enter the password (
YourSecurePassword123) when prompted.Expected output
Enter password: +----+--------------------+---------------------+---------+ | id | name | email | country | +----+--------------------+---------------------+---------+ | 1 | Erasmus Richardson | [email protected] | England | | 2 | Jenna French | [email protected] | Canada | | 3 | Alfred Dejesus | [email protected] | Austria | +----+--------------------+---------------------+---------+ -
Stop the validation container when finished:
docker compose stop pxb-validateExpected output
[+] Stopping 1/1
 ✔ Container pxb_validate  Stopped
Step 6: Simulate a disaster
To practice restoration, simulate total data loss by stopping the primary database and wiping its data volume.
Warning
This step intentionally destroys all data in the primary database. In a real environment, you would only do this if data corruption or loss has already occurred.
Do the following to simulate a disaster:
-
Stop the primary database container:
docker compose stop psmysqlExpected output
[+] Stopping 1/1 ✔ Container psmysql Stopped -
Wipe the production data directory (simulating drive failure or data corruption):
docker compose run --rm --user root psmysql bash -c "rm -rf /var/lib/mysql/*"Expected output
[+] Creating 1/0
 ✔ Container pxb-tutorial-psmysql-run-xxxxx  Created
[+] Running 1/0
 ✔ Container pxb-tutorial-psmysql-run-xxxxx  Started
The command output shows a temporary container being created and run. After execution, no additional output appears because the
rmcommand produces no output on success. -
Verify the database cannot start (optional):
If you attempt to start the database now, it will fail because its data files are missing:
docker compose start psmysqlExpected output
[+] Running 1/1
 ✔ Container psmysql  Started
docker compose logs psmysqlExpected output
psmysql  | [System] [MY-010116] [Server] /usr/sbin/mysqld (mysqld 8.4.2-2) starting as process 1
psmysql  | [System] [MY-013576] [InnoDB] InnoDB initialization has started.
psmysql  | [ERROR] [MY-012224] [InnoDB] Tablespace open failed for '"./ibdata1"'
psmysql  | [ERROR] [MY-012930] [InnoDB] Plugin initialization aborted with error: Generic error.
psmysql  | [ERROR] [MY-010334] [Server] Failed to initialize DD Storage Engine
psmysql  | [ERROR] [MY-010020] [Server] Data Dictionary initialization failed.
psmysql  | [ERROR] [MY-010119] [Server] Aborting
psmysql  | [System] [MY-010910] [Server] /usr/sbin/mysqld: Shutdown complete (mysqld 8.4.2-2)
The logs show that MySQL cannot find its system tablespace (
ibdata1) and fails to start.
Step 7: Execute the restore
Run the restore service to copy the backup files back to the primary database volume and fix file permissions.
-
Stop the primary database if the container is running:
docker compose stop psmysqlExpected output
[+] Stopping 1/1 ✔ Container psmysql Stopped -
Run the restore task:
docker compose run --rm pxb-restoreExpected output
==> Clearing current database directory...
==> Restoring physical data files from backupvol...
xtrabackup version 8.4.0-2 based on MySQL server 8.4.2 Linux (x86_64)
...
[Note] [MY-011825] [Xtrabackup] completed OK!
==> Fixing file permissions for Percona Server...
The restore service performs three operations:
- Clears any residual files from the data directory
- Runs
xtrabackup --copy-backto restore backup files - Runs
chown -R mysql:mysqlto fix file ownership
Step 8: Verify the restoration
Start the primary database and confirm that your data has been recovered.
-
Start the primary database:
docker compose start psmysqlExpected output
[+] Running 1/1 ✔ Container psmysql Started -
Check the logs to ensure it starts successfully:
docker compose logs psmysqlExpected output
psmysql  | [System] [MY-010116] [Server] /usr/sbin/mysqld (mysqld 8.4.2-2) starting as process 1
psmysql  | [System] [MY-013576] [InnoDB] InnoDB initialization has started.
psmysql  | [System] [MY-013577] [InnoDB] InnoDB initialization has ended.
psmysql  | [System] [MY-011323] [Server] X Plugin ready for connections. Bind-address: '::' port: 33060
psmysql  | [System] [MY-010931] [Server] /usr/sbin/mysqld: ready for connections. Version: '8.4.2-2'  socket: '/var/lib/mysql/mysql.sock'  port: 3306  Percona Server (GPL), Release 2, Revision b575402d.
Look for
ready for connectionsin the output to confirm the server started successfully. -
Connect and verify your data is restored:
docker exec -it psmysql mysql -uroot -p -e "SELECT * FROM mydb.employees;"Enter the password (
YourSecurePassword123) when prompted.Expected output
Enter password:
+----+--------------------+---------------------+---------+
| id | name               | email               | country |
+----+--------------------+---------------------+---------+
|  1 | Erasmus Richardson | [email protected] | England |
|  2 | Jenna French       | [email protected]   | Canada  |
|  3 | Alfred Dejesus     | [email protected]  | Austria |
+----+--------------------+---------------------+---------+
Your database has been fully restored from the backup.
Understanding file permissions
One of the most common issues when restoring backups in Docker environments is file permission errors. The following table explains why the chown command is critical:
| Stage | File Owner | Explanation |
|---|---|---|
| After backup | mysql |
Backup preserves original ownership |
After --copy-back |
root |
Files are copied by root user in the restore container |
After chown |
mysql |
Ownership restored; MySQL can start |
If you skip the chown -R mysql:mysql /var/lib/mysql step, MySQL fails to start with permission errors similar to:
[ERROR] [MY-010187] [Server] Could not open file '/var/lib/mysql/ibdata1' for reading: Permission denied
Clean up
To remove all containers, volumes, and resources created by this tutorial:
-
Remove Docker containers and volumes:
docker compose down -vExpected output
[+] Running 5/5 ✔ Container pxb_validate Removed ✔ Container psmysql Removed ✔ Volume pxb-tutorial_mysql_data Removed ✔ Volume pxb-tutorial_backupvol Removed ✔ Network pxb-tutorial_default Removed -
Remove the secrets directory:
rm -rf secrets/If the command executes successfully, the expected output is empty.
-
Optionally, remove the project directory:
cd .. && rm -rf pxb-tutorial/If the command executes successfully, the expected output is empty.
Key takeaways
-
Separation of concerns: Using Docker Compose profiles separates backup, validation, and restore into distinct operations, making each step explicit and auditable.
-
Validation before restore: Always validate backups by booting a temporary database instance from the backup files before relying on them for disaster recovery.
-
The permission gotcha: Physical backups restored by the
rootuser must have ownership changed tomysql:mysqlbefore the database can start. This is a common source of restore failures. -
Prepared backups: Backups must be prepared with
xtrabackup --preparebefore they can be restored or used for validation.
Next steps
- Learn about incremental backups to reduce backup time and storage
- Explore streaming backups for direct-to-cloud storage
- Review backup encryption for securing backup data
How to
Take a full backup
Create a full backup
Command reference
Quick syntax for creating a full backup with common options:
xtrabackup --backup --target-dir=<path> [--user=<user>] [--password=<password>]
| Flag | Required | Description |
|---|---|---|
--backup |
Yes | Runs xtrabackup in backup mode. |
--target-dir=<path> |
Yes | Directory where the backup is stored. Created if it does not exist. |
--user=<user> |
No | MySQL user for connecting to the server (default: current OS user). |
--password=<password> |
No | Password for the MySQL user. Omit to be prompted, or use a login file for security. |
Example with authentication:
xtrabackup --backup --target-dir=/data/backups/ --user=backup --password=secret
To create a backup, run xtrabackup with the --backup
option. You also must specify the --target-dir option, which is where
the backup is stored. If the InnoDB data or log files are not stored
in
the same directory, you must specify their location.
If the
target directory does not exist, xtrabackup creates it. If the directory
does
exist and is empty, xtrabackup succeeds.
xtrabackup does not overwrite existing files. It will fail with operating
system error 17, file exists.
The following command starts the process. Run all the commands as root or use the sudo command.
xtrabackup --backup --target-dir=/data/backups/
This operation stores the backup at /data/backups/. If you specify a
relative path, the target directory is relative to the current directory.
During the backup process, the output shows the copied data files, and a log file thread that scans and copies from the log files.
The following is an example of the output:
Expected output
160906 10:19:17 Finished backing up non-InnoDB tables and files
160906 10:19:17 Executing FLUSH NO_WRITE_TO_BINLOG ENGINE LOGS...
xtrabackup: The latest check point (for incremental): '62988944'
xtrabackup: Stopping log copying thread.
.160906 10:19:18 >> log scanned up to (137343534)
160906 10:19:18 Executing UNLOCK TABLES
160906 10:19:18 All tables unlocked
160906 10:19:18 Backup created in directory '/data/backups/'
160906 10:19:18 [00] Writing backup-my.cnf
160906 10:19:18 [00]        ...done
160906 10:19:18 [00] Writing xtrabackup_info
160906 10:19:18 [00]        ...done
xtrabackup: Transaction log of lsn (26970807) to (137343534) was copied.
160906 10:19:18 completed OK!
The process ends with the following statement; the
value of the <LSN> depends on your system:
xtrabackup: Transaction log of lsn (<LSN>) to (<LSN>) was copied.
Note
Log copying thread checks the transactional log every second to see if there were any new log records written that need to be copied, but there is a chance that the log copying thread might not be able to keep up with the amount of writes that go to the transactional logs, and will hit an error when the log records are overwritten before they could be read.
After the backup is finished, the target directory will contain files such as the following, assuming you have a single InnoDB table test.tbl1 and you are using MySQL’s innodb_file_per_table option:
ls -lh /data/backups/
The result should look like this:
Expected output
total 182M
drwx------  7 root root 4.0K Sep  6 10:19 .
drwxrwxrwt 11 root root 4.0K Sep  6 11:05 ..
-rw-r-----  1 root root  387 Sep  6 10:19 backup-my.cnf
-rw-r-----  1 root root  76M Sep  6 10:19 ibdata1
drwx------  2 root root 4.0K Sep  6 10:19 mysql
drwx------  2 root root 4.0K Sep  6 10:19 performance_schema
drwx------  2 root root 4.0K Sep  6 10:19 sbtest
drwx------  2 root root 4.0K Sep  6 10:19 test
drwx------  2 root root 4.0K Sep  6 10:19 world2
-rw-r-----  1 root root  116 Sep  6 10:19 xtrabackup_checkpoints
-rw-r-----  1 root root  433 Sep  6 10:19 xtrabackup_info
-rw-r-----  1 root root 106M Sep  6 10:19 xtrabackup_logfile
The backup can take a long time, depending on how large the database is. It is safe to cancel at any time, because xtrabackup does not modify the database.
Next step
Prepare a full backup
Command reference
Quick syntax for preparing a full backup:
xtrabackup --prepare --target-dir=<path> [--apply-log-only] [--parallel=<N>]
| Flag | Required | Description |
|---|---|---|
--prepare |
Yes | Runs xtrabackup in prepare mode (applies redo/undo logs for a consistent snapshot). |
--target-dir=<path> |
Yes | Directory containing the backup to prepare. |
--apply-log-only |
No | Apply log only; do not roll back uncommitted transactions. Use when this backup will be the base for incremental backups. |
--parallel=<N> |
No | Use N threads to speed up prepare (for example, --parallel=4). |
Example (full backup, then restore):
xtrabackup --prepare --target-dir=/data/backups/
Example (base for incremental backups):
xtrabackup --prepare --apply-log-only --target-dir=/data/backups/
After creating a backup with the --backup option, you need to prepare the backup and then restore it. Data files are not point-in-time
consistent until they are prepared, because they were copied at different times as the program ran, and they might have been changed while this was happening.
If you try to start InnoDB with these data files, it will detect corruption and stop working to avoid running on damaged data. The --prepare step makes the files perfectly consistent at a single instant in time, so you can run InnoDB on them.
You can run the prepare operation on any machine; it does not need to be on the originating server or the server to which you intend to restore. You can copy the backup to a utility server and prepare it there.
Note that Percona XtraBackup 8.4 can only prepare backups of MySQL 8.4 and Percona Server for MySQL 8.4 databases. Releases prior to 8.4 are not supported.
During the prepare operation, xtrabackup boots up a kind of modified embedded InnoDB (the libraries xtrabackup was linked against). The modifications are necessary to disable InnoDB standard safety checks, such as complaining about the log file not being the right size. This warning is not appropriate for working with backups. These modifications are only for the xtrabackup binary; you do not need a modified InnoDB to use xtrabackup for your backups.
The prepare step uses this “embedded InnoDB” to perform crash recovery on the copied data files, using the copied log file. The prepare step is very simple to use: you simply run xtrabackup with the --prepare option and tell it which directory to prepare, for example, to prepare the previously taken backup run:
xtrabackup --prepare --target-dir=/data/backups/
When this finishes, you should see an InnoDB shutdown with a message such as the following, where again the value of LSN will depend on your system:
Expected output
InnoDB: Shutdown completed; log sequence number 137345046
160906 11:21:01 completed OK!
All following prepares will not change the already prepared data files, you’ll see that output says:
Expected output
xtrabackup: This target seems to be already prepared.
xtrabackup: notice: xtrabackup_logfile was already used to '--prepare'.
It is not recommended to interrupt xtrabackup process while preparing backup because it may cause data files corruption and backup will become unusable. Backup validity is not guaranteed if prepare process was interrupted.
Note
If you intend the backup to be the basis for further incremental backups, you should use the --apply-log-only option when preparing the backup, or you will not be able to apply incremental backups to it. See the documentation on preparing incremental backups for more details.
Next step
Take an incremental backup
Create an incremental backup
xtrabackup supports incremental backups, which means that they can copy only all the data that has changed since the last backup.
Note
Incremental backups on the MyRocks storage engine do not determine if an earlier full backup or incremental backup contains the same files. Percona XtraBackup copies all the MyRocks files each time it takes a backup.
You can perform many incremental backups between each full backup, so you can set up a backup process such as a full backup once a week and an incremental backup every day, or full backups every day and incremental backups every hour.
Incremental backups work because each InnoDB page contains a log sequence number, or LSN. The LSN is the system version number for the entire database. Each page’s LSN shows how recently it was changed.
An incremental backup copies each page which LSN is newer than the previous incremental or full backup’s LSN. An algorithm finds the pages that match the criteria. The algorithm reads the data pages and checks the page LSN.
Create an incremental backup
To make an incremental backup, begin with a full backup as usual. The
xtrabackup binary writes a file called xtrabackup_checkpoints into
the backup’s target directory. This file contains a line showing the
to_lsn, which is the database’s LSN at the end of the backup.
Run the following commands as root or use the sudo command.
Create the full backup with a following command:
xtrabackup --backup --target-dir=/data/backups/base
If you look at the xtrabackup_checkpoints file, you should see similar
content depending on your LSN nuber:
Expected output
backup_type = full-backuped
from_lsn = 0
to_lsn = 1626007
last_lsn = 1626007
compact = 0
recover_binlog_info = 1
Now that you have a full backup, you can make an incremental backup based on it. Use the following command:
xtrabackup --backup --target-dir=/data/backups/inc1 \
--incremental-basedir=/data/backups/base
The /data/backups/inc1/ directory should now contain delta files, such
as ibdata1.delta and test/table1.ibd.delta. These represent the
changes since the LSN 1626007. If you examine the
xtrabackup_checkpoints file in this directory, you should see similar
content to the following:
Expected output
backup_type = incremental
from_lsn = 1626007
to_lsn = 4124244
last_lsn = 4124244
compact = 0
recover_binlog_info = 1
from_lsn is the starting LSN of the backup and for incremental it has to be the same as to_lsn (if it is the last checkpoint) of the previous/base backup.
It’s now possible to use this directory as the base for yet another incremental backup:
xtrabackup --backup --target-dir=/data/backups/inc2 \
--incremental-basedir=/data/backups/inc1
This folder also contains the xtrabackup_checkpoints:
Expected output
backup_type = incremental
from_lsn = 4124244
to_lsn = 6938371
last_lsn = 7110572
compact = 0
recover_binlog_info = 1
Note
In this case you can see that there is a difference between the to_lsn (last checkpoint LSN) and last_lsn (last copied LSN), this means that there was some traffic on the server during the backup process.
Next step
Prepare an incremental backup
The --prepare step for incremental backups differs from full backups. For full backups, committed transactions are replayed from the log file to the data files, and uncommitted transactions are rolled back to ensure consistency. When preparing an incremental backup, you must skip the rollback of uncommitted transactions, as these may still be in progress and could be committed in a subsequent incremental backup. Use the --apply-log-only option when preparing the first full backup to prevent the rollback phase from occurring.
Warning
If you do not use the --apply-log-only option to prevent the rollback phase, then your incremental backups are unusable. After transactions have been rolled back, further incremental backups cannot be applied.
Start by preparing the full backup, then apply the incremental differences to that backup.
For example, you could have the following backups:
/data/backups/base
/data/backups/inc1
/data/backups/inc2
To prepare the base backup, you need to run --prepare as
usual, but prevent the rollback phase:
xtrabackup --prepare --apply-log-only --target-dir=/data/backups/base
The log sequence number should match the to_lsn of the base backup The output should end with text similar to the following:
Expected output
InnoDB: Shutdown completed; log sequence number 1626007
161011 12:41:04 completed OK!
Warning
This backup is actually safe to restore as-is now, even though the rollback phase has been skipped. If you restore the backup and start the server, InnoDB detects that the rollback phase was not performed, and completes the rollback in the background, as InnoDB usually does for a crash recovery. InnoDB notifies you that the database was not shut down normally.
To apply the first incremental backup to the full backup, run the following command:
xtrabackup --prepare --apply-log-only --target-dir=/data/backups/base \
--incremental-dir=/data/backups/inc1
This command applies the delta files to the files in /data/backups/base, which
rolls them forward in time to the time of the incremental backup. The redo log is then applied as usual. The final data is in
/data/backups/base, not in the incremental directory.
You should see an output similar to:
Expected output
incremental backup from 1626007 is enabled.
xtrabackup: cd to /data/backups/base
xtrabackup: This target seems to be already prepared with --apply-log-only.
xtrabackup: xtrabackup_logfile detected: size=2097152, start_lsn=(4124244)
...
xtrabackup: page size for /tmp/backups/inc1/ibdata1.delta is 16384 bytes
Applying /tmp/backups/inc1/ibdata1.delta to ./ibdata1...
...
161011 12:45:56 completed OK!
Again, the LSN should match what you saw from your earlier inspection of
the first incremental backup. If you restore the files from
/data/backups/base, you should see the state of the database as of the first incremental backup.
Faster prepare step with –parallel
For incremental backups with many InnoDB Data (IBD) files, you can significantly reduce prepare time by using the --parallel option. The --parallel option enables the concurrent processing of multiple delta files, thereby maximizing storage bandwidth. The --parallel option is especially beneficial when there are many IBD files, even if the IBD files didn’t change between backups, as empty delta files are processed quickly in parallel.
Version history
Before Percona XtraBackup 8.4.0-3, the --parallel option didn’t have any effect on the prepare phase.
Starting with Percona XtraBackup 8.4.0-3, using --parallel=X has effect on the prepare phase. It will now use X threads to apply the changes from .delta files to the IBD files. When using --parallel in the prepare phase, always specify a numeric value. The recommended minimum value is 4 (for example, --parallel=4).
Note that each thread operates on a single file. If you have a large delta file, there is still only one thread that processes that .delta file. Parallelization occurs at the file level, not within individual files.
An example command with the --parallel option:
xtrabackup --prepare --parallel=4 --apply-log-only --target-dir=/data/backups/base \
--incremental-dir=/data/backups/inc1
Prepare a second incremental backup
Percona XtraBackup does not support using the same incremental backup directory to prepare two copies of backup. Do not run --prepare with the same incremental backup directory (the value of –incremental-dir) more than once.
Preparing the second incremental backup is a similar process: apply the deltas to the (modified) base backup, and you will roll the base backup’s data forward in time to the point of the second incremental backup:
xtrabackup --prepare --target-dir=/data/backups/base \
--incremental-dir=/data/backups/inc2
You can also use the --parallel option here to speed up the process:
xtrabackup --prepare --parallel=4 --target-dir=/data/backups/base \
--incremental-dir=/data/backups/inc2
Note
Use --apply-log-only when merging the incremental backups except for the last one. This is why the previous command does not include the --apply-log-only option. If --apply-log-only is used on the last step, backup remains consistent but the server performs the rollback phase.
Next step
Take an incremental backup using page tracking
To create an incremental backup with page tracking, Percona XtraBackup uses
the MySQL mysqlbackup component. This component provides a list of pages
modified since the last backup, and Percona XtraBackup copies only those
pages. This operation removes the need to scan the pages in the
database. If the majority of pages have not been modified, the page
tracking feature can improve the speed of incremental backups.
Run the following commands as root or use the sudo command.
Install the component
To start using the page tracking functionality, do the following:
-
Install the
mysqlbackupcomponent and enable it on the server:INSTALL COMPONENT "file://component_mysqlbackup"; -
Check whether the
mysqlbackupcomponent is installed successfully:SELECT COUNT(1) FROM mysql.component WHERE component_urn='file://component_mysqlbackup';
Use page tracking
You can enable the page tracking functionality for the full and incremental
backups with the --page-tracking option.
The option has the following benefits:
-
Resets page tracking to the start of the backup. This reset allows the next incremental backup to use page tracking.
-
Allows the use of page tracking for an incremental backup if the page tracking data is available from the backup’s start checkpoint LSN.
Percona XtraBackup processes a list of all the tracked pages in memory. If Percona XtraBackup does not have enough available memory to process this list, the process throws an error and exits. For example, if an incremental backup uses 200GB, Percona XtraBackup can use an additional 100MB of memory to process and store the page tracking data.
The examples of creating full and incremental backups using the --page-tracking option:
xtrabackup --backup --target-dir=$FULL_BACK --page-tracking
xtrabackup --backup --target-dir=$INC_BACKUP
--incremental-basedir=$FULL_BACKUP --page-tracking
After enabling the functionality, the next incremental backup finds changed pages using page tracking.
The first full backup using page tracking, Percona XtraBackup may have a delay. The following is an example of the message:
Expected output
xtrabackup: pagetracking: Sleeping for 1 second, waiting for checkpoint lsn 17852922 /
to reach to page tracking start lsn 21353759
Enable page tracking before creating the first backup to avoid this delay. This method ensures that the page tracking log sequence number (LSN) is higher than the checkpoint LSN of the server.
Start page tracking manually
After the mysqlbackup component is loaded and active on the server, you can start page tracking manually with the following option:
SELECT mysqlbackup_page_track_set(true);
Check the LSN value
Check the LSN value starting from which changed pages are tracked with the following option:
SELECT mysqlbackup_page_track_get_start_lsn();
Stop page tracking
To stop page tracking, use the following command:
SELECT mysqlbackup_page_track_set(false);
Purge page tracking data
When you start page tracking, it creates a file under the server’s datadir to collect data about changed pages. This file grows until you stop the page tracking. If you stop the server and then restart it, page tracking creates a new file but also keeps the old one. The old file continues to grow until you stop the page tracking explicitly.
If you purge the page tracking data, you should create a full backup afterward. To purge the page tracking data, do the following steps:
SELECT mysqlbackup_page_track_set(false);
SELECT mysqlbackup_page_track_purge_up_to(9223372036854775807);
/* Specify the LSN up to which you want to purge page tracking data. /
9223372036854775807 is the highest possible LSN which purges all page tracking files.*/
SELECT mysqlbackup_page_track_set(true);
Known issue
If the index is built in place using an exclusive algorithm and then is added to a table after the last LSN checkpoint, you may generate a bad incremental backup using page tracking. For more details see PS-8032 .
Uninstall the mysqlbackup component
To uninstall the mysqlbackup component, use the following statement:
UNINSTALL COMPONENT "file://component_mysqlbackup"
Take a compressed backup
Create a compressed backup
Percona XtraBackup supports compressed backups. To make a compressed backup, use the --compress option along
with the --backup and --target-dir options. A local or streaming backup can be compressed or decompressed with xbstream.
Run the following commands as root or use the sudo command.
By default, the --compress option uses the zstandard tool that you can install with
the percona-release package configuration tool as follows:
sudo percona-release enable tools
sudo apt update
sudo apt install zstandard
Note
Enable the repository: percona-release enable-only tools release.
If Percona XtraBackup is intended to be used in combination with
the upstream MySQL Server, you only need to enable the tools
repository: percona-release enable-only tools.
Percona XtraBackup supports the following compression algorithms:
Zstandard (ZSTD)
The Zstandard (ZSTD) is a fast lossless compression algorithm that targets real-time compression scenarios and better compression ratios. ZSTD is the default compression algorithm for the --compress option.
To compress files using the ZSTD compression algorithm, use the --compress option:
xtrabackup --backup --compress --target-dir=/data/backup
The resulting files have the \*.zst format.
You can specify ZSTD compression level with the --compress-zstd-level(=#) option. The default value is 1.
xtrabackup –backup –compress –compress-zstd-level=1 –target-dir=/data/backup
lz4
To compress files using the lz4 compression algorithm, set the --compress option to lz4:
xtrabackup --backup --compress=lz4 --target-dir=/data/backup
The resulting files have the \*.lz4 format.
If you want to speed up the compression you can use the parallel
compression, which can be enabled with --compress-threads option.
Following example will use four threads for compression:
xtrabackup --backup --compress --compress-threads=4 \
--target-dir=/data/compressed/
Expected output
...
170223 13:00:38 [01] Compressing ./test/sbtest1.frm to /tmp/compressed/test/sbtest1.frm.qp
170223 13:00:38 [01]        ...done
170223 13:00:38 [01] Compressing ./test/sbtest2.frm to /tmp/compressed/test/sbtest2.frm.qp
170223 13:00:38 [01]        ...done
...
170223 13:00:39 [00] Compressing xtrabackup_info
170223 13:00:39 [00]        ...done
xtrabackup: Transaction log of lsn (9291934) to (9291934) was copied.
170223 13:00:39 completed OK!
Next step
Decompress and prepare a backup
Before you can prepare the backup you need to decompress all the files. Run the following commands as root or use the sudo command.
Decompress a backup
-
To decompress backups made using
LZ4orZSTDcompression algorithm, install the corresponding package.Install on APT systemssudo apt install lz4sudo apt install zstdInstall on YUM systemssudo yum install lz4sudo yum install zstd -
Use the
--decompressoption to decompress the backup.xtrabackup --decompress --target-dir=/data/compressed/Note
--parallelcan be used with--decompressoption to decompress multiple files simultaneously.Percona XtraBackup does not automatically delete compressed files. To clean up the backup directory, use the
--remove-originaloption. If you do not remove the compressed files, these files will not be copied or moved to the datadir when using the--copy-backor--move-backoptions.
Prepare the backup
When the files are decompressed you can prepare the backup with the --prepare option.
xtrabackup --prepare --target-dir=/data/compressed/
Confirmation message
InnoDB: Starting shutdown...
InnoDB: Shutdown completed; log sequence number 9293846
170223 13:39:31 completed OK!
Now the files in /data/compressed/ are ready to be used by the server.
Next step
Take an encrypted backup
Encrypt backups
Percona XtraBackup supports encrypting and decrypting local and streaming backups with the upstream option, adding another protection layer. The
encryption is implemented using the libgcrypt library from GnuPG.
Run all the commands as root or use the sudo command.
Create encrypted backups
The following options create encrypted backups. The
--encrypt-key and --encrypt-key-file options specify the encryption key and are mutually exclusive. You should select one or the other.
-
--encrypt -
--encrypt-key -
--encrypt-key-file
For an encryption key, use a command, such as openssl rand -base64 24, to generate a random alphanumeric string.
encrypt-key option
An example of the xtrabackup command using the --encrypt-key:
xtrabackup --backup --encrypt=AES256 --encrypt-key="{randomly-generated-alphanumeric-string}" --target-dir=/data/backup
encrypt-key-file option
The recommended method uses the command line: echo -n “{randomly-generated-alphanumeric-string}” > /data/backups/keyfile to create the file.
Remember that using the– encrypt-key-file option, your text editor can automatically insert a CRLF (end of line) character in the KEYFILE. This inserted character invalidates the key because the size is wrong.
An example of using the --encrypt-key-file option:
xtrabackup --backup --encrypt=AES256 --encrypt-key-file=/data/backups/keyfile --target-dir=/data/backup
Optimize the encryption process
Additional encrypted backup options, --encrypt-threads and
--encrypt-chunk-size, can speed up the encryption process.
Use the --encrypt-threads option to enable parallel encryption with multiple threads.
The --encrypt-chunk-size option specifies the size, in bytes, of the working encryption buffer for each encryption thread. The default size is 64K.
Decrypt encrypted backups
You can decrypt backups with the xbcrypt binary. The following example encrypts a backup.
You can use the --parallel option and the --decrypt option to decrypt multiple files simultaneously.
for i in `find . -iname "*\.xbcrypt"`; do xbcrypt -d --encrypt-key-file=/root/secret_key --encrypt-algo=AES256 < $i > $(dirname $i)/$(basename $i .xbcrypt) && rm $i; done
The following example shows a decryption process.
xtrabackup --decrypt=AES256 --encrypt-key="{randomly-generated-alphanumeric-string}" --target-dir=/data/backup/
Percona XtraBackup doesn’t automatically remove the encrypted files. You must remove the \*.xbcrypt files manually.
Prepare encrypted backups
After decrypting the backups, prepare the backups with the --prepare option:
xtrabackup --prepare --target-dir=/data/backup/
Restore encrypted backups
xtrabackup offers the --copy-back option to restore a backup to the server’s datadir:
xtrabackup --copy-back --target-dir=/data/backup/
The option copies all the data-related files to the server’s datadir. The server’s my.cnf configuration file determines the location.
You should check the last line of the output for a success message:
Expected output
150318 11:08:13 xtrabackup: completed OK!
Encrypted InnoDB tablespace backups
Percona XtraBackup supports two distinct types of encryption:
-
InnoDB tablespace encryption: The MySQL server handles encryption using keyring components. InnoDB tablespace encryption provides at-rest encryption for physical tablespace data files at the database level.
-
Backup-level encryption: XtraBackup applies an additional encryption layer during the backup process, independent of InnoDB encryption. Backup-level encryption protects backup files themselves.
These encryption types are independent. You can use them separately or together for enhanced security.
InnoDB tablespace encryption
InnoDB supports data encryption for InnoDB tables in file-per-table tablespaces. When accessing an encrypted tablespace, InnoDB uses the master encryption key to decrypt the tablespace key. InnoDB stores the master encryption key in a keyring.
Percona XtraBackup supports the following keyring components:
- keyring_vault
- keyring_file
- Key Management Interoperability Protocol (KMIP)
- Amazon Key Management Service (AWS KMS)
Percona XtraBackup 8.4 and later versions support only component versions of the security features.
Workflow phases
The backup and restore process for encrypted InnoDB tablespaces has three distinct phases, each with different keyring-config requirements:
| Phase | Description | Required | keyring-options |
|---|---|---|---|
| Backup | Run xtrabackup --backup … |
No | The backup does not use any keyring options. |
| Prepare | Run xtrabackup --prepare … |
Yes | You must supply the keyring configuration file matching the keyring component that the MySQL server uses for encryption. |
| Restore | Run xtrabackup --copy-back … or xtrabackup --move-back … (followed by --prepare if using --move-back) |
Yes | You must provide the same keyring-config file. |
Note
If you rotated the keyring using ALTER INSTANCE ROTATE INNODB MASTER KEY, you must use the keyring that was active when you created the backup to prepare and restore the backup.
Configuration file name requirements
The configuration file name must match exactly the expected name for each keyring component. If the file name does not match exactly, XtraBackup ignores the configuration file.
| Component | Expected config-file name |
|---|---|
| Vault | component_keyring_vault.cnf |
| KMS | component_keyring_kms.cnf |
| KMIP | component_keyring_kmip.cnf |
| File | component_keyring_file.cnf |
Keyring component configuration files
Each keyring component requires a configuration file with a specific structure. The following examples show the format for each component type.
keyring_vault configuration
The component_keyring_vault.cnf file uses JSON format:
{
  "vault_url": "${VAULT_URL}",
  "secret_mount_point": "${VAULT_MOUNT_POINT}",
  "secret_mount_point_version": "${VAULT_CONFIG_VERSION}",
  "token": "${VAULT_TOKEN}",
  "vault_ca": "${VAULT_CA}"
}
For information on configuring the keyring vault component on the MySQL server, see Use the keyring vault component .
keyring_file configuration
The component_keyring_file.cnf file uses JSON format:
{
  "path": "/var/lib/mysql-keyring/keyring",
  "read_only": false
}
Warning
XtraBackup does not copy the keyring file into the backup directory. Copy the keyring file manually before preparing.
keyring_kmip configuration
The component_keyring_kmip.cnf file uses JSON format:
{
  "server_addr": "kmip.example.com",
  "server_port": 5696,
  "client_ca": "/path/to/client/ca.pem",
  "client_key": "/path/to/client/key.pem",
  "server_ca": "/path/to/server/ca.pem"
}
keyring_kms configuration
The component_keyring_kms.cnf file uses JSON format:
{
  "path": "/var/lib/mysql-keyring/keyring",
  "read_only": false,
  "region": "us-east-1",
  "auth_key": "your-auth-key",
  "secret_access_key": "your-secret-access-key",
  "kms_key": "your-kms-key-id"
}
Backup and restore with keyring components
XtraBackup uses the component’s configuration file during prepare and restore operations. The MySQL server must use one of the supported keyring components for encryption.
Phase 1: Backup
No keyring configuration is needed:
xtrabackup --backup --target-dir=/data/backup --user=root
Phase 2: Prepare
To prepare the backup, you must provide access to the keyring. The xtrabackup binary does not communicate with the MySQL server or read the default my.cnf configuration file. Specify the keyring configuration file.
File-name restriction
The configuration file name must match exactly the expected name for your keyring component. See Configuration file name requirements for the exact file names required. If the file name does not match exactly, XtraBackup ignores the configuration file.
xtrabackup --prepare --target-dir=/data/backup
Specify the path to your component’s configuration file (for example, /etc/component_keyring_vault.cnf or /var/lib/mysql-keyring/component_keyring_file.cnf).
Phase 3: Restore
After you prepare the backup, restore the backup using --copy-back or --move-back. If you use --move-back, run --prepare again after moving the files. In both cases, provide the same keyring configuration file.
xtrabackup --copy-back --target-dir=/data/backup --datadir=/data/mysql
Or using --move-back:
xtrabackup --move-back --target-dir=/data/backup --datadir=/data/mysql
xtrabackup --prepare --target-dir=/data/mysql
Incremental encrypted InnoDB tablespace backups
The process of taking incremental backups with InnoDB tablespace encryption is similar to taking incremental backups with unencrypted tablespace. The same three-phase workflow applies, with keyring-config requirements in phases 2 and 3.
Phase 1: Backup
Begin with a full backup. The xtrabackup binary writes xtrabackup_checkpoints into the backup’s target directory, which contains the to_lsn (the LSN of the database at the end of the backup).
Create a full backup (no keyring config needed):
xtrabackup --backup --target-dir=/data/backups/base
Make an incremental backup based on the full backup:
xtrabackup --backup --target-dir=/data/backups/inc1 \
--incremental-basedir=/data/backups/base
The --incremental-basedir option specifies the base backup directory.
Use this directory as the base for yet another incremental backup:
xtrabackup --backup --target-dir=/data/backups/inc2 \
--incremental-basedir=/data/backups/inc1
Phase 2: Prepare
The --prepare step for incremental backups requires the keyring configuration. Use --apply-log-only for all incremental backups except the last one to prevent rolling back transactions that might be committed in subsequent incremental backups.
Beginning with the full backup, prepare the full backup and then apply the incremental differences. Prepare the base backup with --apply-log-only. Use the appropriate configuration file name for your keyring component (see Configuration file name requirements):
xtrabackup --prepare --apply-log-only --target-dir=/data/backups/base
Apply the first incremental backup to the full backup using --incremental-dir:
xtrabackup --prepare --apply-log-only --target-dir=/data/backups/base \
--incremental-dir=/data/backups/inc1
Note
If you have many InnoDB Data (IBD) files, speed up the prepare phase for incremental backups by using the --parallel option. This option lets you process multiple delta files simultaneously. When using --parallel in the prepare phase, always specify a numeric value. The recommended minimum value is 4 (for example, --parallel=4).
An example of the backup command using the --parallel option:
xtrabackup --prepare --apply-log-only --target-dir=/data/backups/base \
--incremental-dir=/data/backups/inc1 --parallel=4
Prepare the backup using the same keyring file and type that were used when the backup was created. If the keyring has changed or you upgraded from a plugin to a component between the base and incremental backup, use the keyring from when the first incremental backup was made. If the original keyring is missing or has changed, recover or replace it before restoring. If you cannot recover the keyring, restore from a backup that matches the most recent available keyring.
Preparing the second incremental backup is a similar process: apply the deltas to the (modified) base backup, and you will roll the base backup’s data forward in time to the point of the second incremental backup:
xtrabackup --prepare --target-dir=/data/backups/base \
--incremental-dir=/data/backups/inc2
You can also use the --parallel option here to speed up the process:
xtrabackup --prepare --target-dir=/data/backups/base \
--incremental-dir=/data/backups/inc2 --parallel=4
Note
Use --apply-log-only when merging all incremental backups except for the last one. This is why the previous command does not include the --apply-log-only option. If --apply-log-only is used on the last step, backup remains consistent but the server performs the rollback phase.
Phase 3: Restore
After you prepare the incremental backups, restore them using --copy-back or --move-back. If you use --move-back, run --prepare again after moving the files. In both cases, provide the same keyring configuration file:
xtrabackup --copy-back --target-dir=/data/backups/base --datadir=/data/mysql
Or using --move-back:
xtrabackup --move-back --target-dir=/data/backups/base --datadir=/data/mysql
xtrabackup --prepare --target-dir=/data/mysql
Restore a backup when the keyring is not available
The keyring component method requires access to the same keyring that the server uses. This may not be possible if you prepare the backup on a different server, when keys in the keyring are purged, or when the keyring vault server is unavailable.
Use the --transition-key=<passphrase> option to process the backup without access to the keyring server. The binary derives the AES (Advanced Encryption Standard) encryption key from the specified passphrase and uses the AES encryption key to encrypt tablespace keys.
Create a backup with a passphrase
xtrabackup --backup --user=root -p --target-dir=/data/backup \
--transition-key=MySecretKey
If you specify --transition-key without a value, xtrabackup asks for the passphrase. xtrabackup hides the passphrase value so that the value is not visible in the ps command output.
Prepare a backup with a passphrase
Specify the same passphrase for the prepare command:
xtrabackup --prepare --target-dir=/data/backup \
--transition-key=MySecretKey
You do not need keyring options here, because xtrabackup does not access the keyring in this case.
Restore a backup with a generated key
When you restore a backup, generate a new master key using --generate-new-master-key. The configuration file name must match one of the exact configuration file names listed in Configuration file name requirements:
xtrabackup --copy-back --target-dir=/data/backup --datadir=/data/mysql \
--transition-key=MySecretKey --generate-new-master-key
Specify the path to your component’s configuration file. XtraBackup generates a new master key, stores the new master key in the target keyring, and re-encrypts the tablespace keys using the new master key.
Make a backup with a stored transition key
You can store a transition key in the keyring. In this case, xtrabackup must access the same keyring during prepare and copy-back steps, but xtrabackup does not depend on whether the server keys have been purged. The configuration file name must match one of the exact configuration file names listed in Configuration file name requirements:
- Back up using
--generate-transition-key:
xtrabackup --backup --user=root -p --target-dir=/data/backup \
--generate-transition-key
- Prepare:
xtrabackup --prepare --target-dir=/data/backup
- Copy-back:
xtrabackup --copy-back --target-dir=/data/backup --datadir=/data/mysql \
--generate-new-master-key
Specify the path to your component’s configuration file.
Backup-level encryption
Backup-level encryption is an additional protection layer that XtraBackup applies during the backup process. Backup-level encryption is independent of InnoDB tablespace encryption and protects the backup files themselves. XtraBackup implements the encryption using the libgcrypt library from GnuPG. You can use backup-level encryption on any backup, regardless of whether the source database uses InnoDB tablespace encryption.
Create encrypted backups
To create an encrypted backup, use the --encrypt option along with either --encrypt-key or --encrypt-key-file to specify the encryption key. The --encrypt-key and --encrypt-key-file options are mutually exclusive. Use one or the other, but do not both. If you specify both options, XtraBackup returns an error and exits.
The --encrypt option specifies the encryption algorithm: AES128, AES192, or AES256. To generate an encryption key, use a command such as openssl rand -base64 24.
Using –encrypt-key
xtrabackup --backup --encrypt=AES256 --encrypt-key="{randomly-generated-alphanumeric-string}" --target-dir=/data/backup
Note
The --encrypt-key option exposes the key in process listings. Do not use this option on systems with uncontrolled access.
Using –encrypt-key-file
The recommended method uses --encrypt-key-file to read the key from a file:
echo -n "{randomly-generated-alphanumeric-string}" > /data/backups/keyfile
xtrabackup --backup --encrypt=AES256 --encrypt-key-file=/data/backups/keyfile --target-dir=/data/backup
Warning
When creating the key file, ensure your text editor does not insert a CRLF (end of line) character. This invalidates the key because the size is wrong. Use echo -n to create the file without a trailing newline.
Optimize the encryption process
Additional encrypted backup options can speed up the encryption process: --encrypt-threads (enables parallel encryption with multiple threads) and --encrypt-chunk-size (specifies the size, in bytes, of the working encryption buffer for each encryption thread; the default value is 64K).
Decrypt encrypted backups
To decrypt an encrypted backup, use the --decrypt option. The decryption algorithm must match the algorithm that you used during encryption. You can use the --parallel option with --decrypt to decrypt multiple files simultaneously.
xtrabackup --decrypt=AES256 --encrypt-key-file=/data/backups/keyfile --target-dir=/data/backup
Alternatively, you can use the xbcrypt binary directly:
for i in `find . -iname "*\.xbcrypt"`; do xbcrypt -d --encrypt-key-file=/root/secret_key --encrypt-algo=AES256 < $i > $(dirname $i)/$(basename $i .xbcrypt) && rm $i; done
Note
Percona XtraBackup does not automatically remove the encrypted files after decryption. Remove the *.xbcrypt files manually, or use the --remove-original option.
Prepare encrypted backups
After decrypting the backup, prepare the backup with the --prepare option:
xtrabackup --prepare --target-dir=/data/backup
Take a partial backup
Create a partial backup
xtrabackup supports taking partial backups when the
innodb_file_per_table option is enabled.
Note
Partial backups should be restored by importing tables, not using --copy-back or --move-back. Do not start incremental backups from a partial backup. See Restore a partial backup for details.
The xtrabackup binary fails if you delete any of the matched or listed tables during the backup.
There are multiple ways of specifying which part of data is backed up:
-
Use the
--tablesoption to list the table names -
Use the
--tables-fileoption to list the tables in a file -
Use the
--databasesoption to list the databases -
Use the
--databases-fileoption to list the databases
The following examples assume a database named test that contains tables named t1 and t2. Run all the commands as root or use the sudo command.
The first method involves the xtrabackup –tables option. The option’s
value is a regular expression that is matched against the fully-qualified database name and table name using the databasename.tablename format.
To back up only tables in the test database, use the following
command:
xtrabackup --backup --datadir=/var/lib/mysql --target-dir=/data/backups/ \
--tables="^test[.].*"
To back up only the test.t1 table, use the following command:
xtrabackup --backup --datadir=/var/lib/mysql --target-dir=/data/backups/ \
--tables="^test[.]t1"
The --tables-file option specifies a file that can contain multiple table
names, one table name per line in the file. Only the tables named in the file
will be backed up. Names are matched exactly, case-sensitive, with no pattern or
regular expression matching. The table names must be fully-qualified in
databasename.tablename format.
echo "mydatabase.mytable" > /tmp/tables.txt
xtrabackup --backup --tables-file=/tmp/tables.txt
The ` –databases` option accepts a space-separated list of the databases
and tables to back up in the databasename[.tablename] format. In addition to
this list, make sure to specify the mysql, sys, and
performance_schema databases. These databases are required when restoring
the databases using xtrabackup –copy-back.
Note
Tables processed during the –prepare step may also be added to the backup even if they are not explicitly listed by the parameter if they were created after the backup started.
xtrabackup --databases='mysql sys performance_schema test ...'
The –databases-file option specifies a file that can contain multiple
databases and tables in the databasename[.tablename] format, one element name per line in the file. Names are matched exactly, case-sensitive, with no pattern or regular expression matching.
Note
Tables processed during the –prepare step may also be added to the backup even if they are not explicitly listed by the parameter if they were created after the backup started.
Next step
Prepare a partial backup
Note
Before preparing, make sure you have created a partial backup.
The procedure is analogous to restoring individual tables: apply the logs and use the
--export option:
xtrabackup --prepare --export --target-dir=/path/to/partial/backup
When you use the --prepare option on a partial backup, you
will see warnings about tables that don’t exist. This is because these tables
exist in the data dictionary inside InnoDB, but the corresponding .ibd
files don’t exist. They were not copied into the backup directory. These tables
will be removed from the data dictionary, and when you restore the backup and
start InnoDB, they will no longer exist and will not cause any errors or
warnings to be printed to the log file.
Could not find any file associated with the tablespace ID: 5
Use --innodb-directories to find the tablespace files. If that fails then use -–innodb-force-recovery=1 to ignore this and to permanently lose all changes to the missing tablespace(s).
Next step
Back up individual partitions
Create an individual partitions backup
Percona XtraBackup lets you back up
individual partitions because partitions are regular tables with specially formatted names. The only requirement for this feature is to enable the innodb_file_per_table option
on the server.
There is one caveat about using this kind of backup: you can not copy back the prepared backup. Restoring partial backups should be done by importing the tables.
There are three ways of specifying which part of the whole data will be backed
up: regular expressions (--tables), enumerating the
tables in a file (--tables-file) or providing a list of
databases (--databases).
The regular expression provided to this option will be matched against the fully
qualified database name and table name, in the form of
database-name.table-name.
If the partition 0 is not backed up, Percona XtraBackup cannot generate a .cfg file. MySQL 8.0 stores the table metadata in partition 0.
For example, this operation takes a back-up of the partition p4 from
the table name located in the database imdb. Run the following command as a root user.
xtrabackup --tables=^imdb[.]name#p#p4 --backup
If partition 0 is not backed up, the following errors may occur:
The error message
xtrabackup: export option not specified
xtrabackup: error: cannot find dictionary record of table imdb/name#p#p4
Note that this option is passed to xtrabackup --tables and is matched
against each table of each database, the directories of each database will be
created even if they are empty.
Next step
Prepare an individual partitions backup
To prepare partial backups, follow a procedure similar to restoring individual tables. Apply the logs and use the --export option:
xtrabackup --prepare --export --target-dir=/mnt/backup/2012-08-28_10-29-09
You may see warnings in the output about tables that do not exist. This happens because InnoDB-based engines stores its data dictionary inside the tablespace files. During the prepare phase, xtrabackup removes entries for tables that were not included in the partial backup from the data dictionary, preventing future warnings or errors.
Next step
Restore a backup
Restore full, incremental, and compressed backups
Command reference
Quick syntax for restoring a prepared backup:
xtrabackup --copy-back --target-dir=<path> [--datadir=<path>]
Or to move files instead of copying (backup directory will be emptied):
xtrabackup --move-back --target-dir=<path> [--datadir=<path>]
| Flag | Required | Description |
|---|---|---|
--copy-back |
Yes* | Copies backup files from the backup directory to the datadir. Preserves the original backup. |
--move-back |
Yes* | Moves backup files to the datadir. Removes files from the backup directory. Use one of --copy-back or --move-back. |
--target-dir=<path> |
Yes | Directory containing the prepared backup to restore. |
--datadir=<path> |
No | Destination directory for restored files. Defaults to the server datadir (for example, from my.cnf). |
Example (copy back to default datadir):
xtrabackup --copy-back --target-dir=/data/backups/
Example (copy back to a specific datadir):
xtrabackup --copy-back --target-dir=/data/backups/ --datadir=/var/lib/mysql
Warning
Backup needs to be prepared before it can be restored.
The restore backup procedure is the same for full, incremental, and compressed backups.
Ensure you have one of the following before proceeding:
-
Root access
-
sudoaccess — administrator privileges are required to restore files, change ownership, and manage the database service.
For convenience, xtrabackup binary has the --copy-back option to copy the backup to the datadir of the server:
xtrabackup --copy-back --target-dir=/data/backups/
If you don’t want to save your backup, you can use the --move-back option which will move the backed up data to the datadir.
If you don’t want to use --copy-back and --move-back options, you can also use rsync or cp to restore the files.
Note
The datadir must be empty before restoring the backup. Also, it’s important to note that MySQL server needs to be shut down before restore is performed. You cannot restore to a datadir of a running mysqld instance (except when importing a partial backup).
An example of the rsync command to restore the backup:
rsync -avrP /data/backup/ /var/lib/mysql/
You should check that the restored files have the correct ownership and permissions.
As files’ attributes are preserved, in most cases you must change the files’ ownership to mysql before starting the database server, as the files are owned by the user who created the backup:
chown -R mysql:mysql /var/lib/mysql
Prepare grastate.dat for Galera cluster (Optional)
When restoring a backup of a Percona XtraDB Cluster, be sure the grastate.dat file is present and correctly populated before you start the node.
The example demonstrates how to restore a backup on a single node and then bootstrap a new Percona XtraDB Cluster. Once the first node is up, additional nodes can join later via IST (Incremental State Transfer) or SST (State Snapshot Transfer).
This grastate.dat file contains the following information:
-
UUID- identifies the specific Galera cluster the node last belonged to. -
seqno- indicates the global transaction number of the last committed write-set on that node. -
safe_to_bootstrapflag - indicates whether the node was the last to shut down gracefully. A value of1means the node was the last to shut down gracefully and it is safe to use this node to bootstrap a new cluster. A value of0means the node was not the last to shut down gracefully and it should not be used to start the cluster.
After preparing and restoring the backup, do the following steps:
-
Extract the Galera state information from the backup metadata file located in the restored datadir (for example,
/var/lib/mysql). The extracted information is represented in theuuid:seqnoformat.cat /var/lib/mysql/xtrabackup_galera_infoExpected output
3f9d1c8e-4a12-11ee-bc3c-8c8590c4abcd:145672 -
Create or update the
grastate.datfile in the datadir using the extractedUUIDandseqno. In this example, the node is used to bootstrap a new cluster, sosafe_to_bootstrapis set to1.Note
Set
safe_to_bootstrapto1only on the node that will be used to bootstrap a new cluster. All other nodes must havesafe_to_bootstrapset to0.Bootstrap node (
safe_to_bootstrap: 1):cat > /var/lib/mysql/grastate.dat <<EOF # GALERA saved state version: 2.1 uuid: 3f9d1c8e-4a12-11ee-bc3c-8c8590c4abcd seqno: 145672 safe_to_bootstrap: 1 EOFAll other nodes (
safe_to_bootstrap: 0):cat > /var/lib/mysql/grastate.dat <<EOF # GALERA saved state version: 2.1 uuid: 3f9d1c8e-4a12-11ee-bc3c-8c8590c4abcd seqno: 145672 safe_to_bootstrap: 0 EOF -
Ensure the file has the correct ownership:
chown mysql:mysql /var/lib/mysql/grastate.dat
If grastate.dat is missing or contains incorrect values, the node may fail to start or attempt an unsafe cluster bootstrap.
Data is now restored, and you can start the server.
Restore a partial backup
Warning – Do Not Use –copy-back for Partial Restores
Never copy back a prepared backup when you only need a subset of the data. Restoring partial backups should be done by importing the required tables (e.g., via logical dumps, mysqldump, or XtraBackup’s --export/IMPORT TABLESPACE workflow). Using the --copy-back (or --move-back) option in this scenario can leave the server in an inconsistent state because the InnoDB redo logs expect a complete data set.
Do not start incremental backups from a partial backup. Incremental backups rely on a full, consistent base; beginning a new incremental chain from an incomplete backup will produce unusable backup sets.
Restore individual tables
Restore partial backups by restoring individual tables in the partial backup to the server. Use XtraBackup’s --export option during prepare, then import the tables using IMPORT TABLESPACE. For more information, see Restore individual tables.
Related topics
Restore the partition from the backup
Restoring should be done by importing the tables in the partial backup to the server.
First step is to create new table in which data will be restored.
CREATE TABLE `name_p4` (
`id` int(11) NOT NULL AUTO_INCREMENT,
`name` text NOT NULL,
`imdb_index` varchar(12) DEFAULT NULL,
`imdb_id` int(11) DEFAULT NULL,
`name_pcode_cf` varchar(5) DEFAULT NULL,
`name_pcode_nf` varchar(5) DEFAULT NULL,
`surname_pcode` varchar(5) DEFAULT NULL,
PRIMARY KEY (`id`)
) ENGINE=InnoDB AUTO_INCREMENT=2812744 DEFAULT CHARSET=utf8
Note
Generate a .cfg metadata file by running FLUSH TABLES ... FOR EXPORT. The command can only be run on a table, not on the individual table partitions.
The file is located in the table schema directory and is used for schema verification when importing the tablespace.
To restore the partition from the backup, the tablespace must be discarded for that table:
ALTER TABLE name_p4 DISCARD TABLESPACE;
The next step is to copy the .ibd file from the backup to the MySQL data directory:
cp /mnt/backup/2012-08-28_10-29-09/imdb/name#P#p4.ibd /var/lib/mysql/imdb/name_p4.ibd
Note
Make sure that the copied files can be accessed by the user running MySQL.
The last step is to import the tablespace:
ALTER TABLE name_p4 IMPORT TABLESPACE;
Restore single tables between databases
Sometimes, you must restore just one table instead of a whole database. Percona XtraBackup helps you do this. This guide shows you how to restore specific tables between different database systems while keeping your data safe.
This process only works with InnoDB tables that use the file-per-table setup. This setup stores each table’s data in its .ibd file. You can restore these tables to systems running Percona Server for MySQL with XtraDB or MySQL 8.0. Your source database can be any type, but the target database must be XtraDB or MySQL 8.0.
When moving tables, you’ll work with several important files. Each file has a specific job in the restoration process:
| File | Description |
|---|---|
| ibdata1 | The main system file in InnoDB that holds necessary metadata and sometimes table data. You need this file for any InnoDB restoration, including when recovering just one table. |
| undo_001 and undo_002 | Files that help undo transactions that weren’t finished. These files help recover from crashes during the preparation phase. They’re an essential part of a complete backup plan. |
| mysql.ibd | A file that contains table definitions and structure information. This file is necessary when restoring individual tables. |
| xtrabackup_info | A file with information about the backup, including which server version was used and when the backup was made. |
| xtrabackup_checkpoints | A file that keeps track of important points in the backup process. These checkpoints help with crash recovery. |
| xtrabackup_logfile | The transaction log that records all database changes. This log ensures your backup stays consistent throughout the restoration. |
| xtrabackup_tablespaces | This is a list of tablespaces stored outside the main data directory. During restoration, XtraBackup tries to rebuild file paths to match their original locations. |
| .ibd from all tables you want to restore | The most critical files for single-table restoration. Each InnoDB table in file-per-table mode has its .ibd file containing data and indexes. You must have the .ibd file for each table you want to restore. |
The following example shows the export and import process for a table called export_test:
mysql -u <username> -p -e "CREATE DATABASE create_database_test;"
CREATE TABLE export_test (
a int(11) DEFAULT NULL
) ENGINE=InnoDB DEFAULT CHARSET=latin1;
Save the schema
Before importing any table, you must save the schema definition for all tables you want to restore. Think of the schema as a blueprint for your table. XtraBackup only backs up data files, not these blueprints. Without the original schema, MySQL won’t be able to use the restored .ibd files.
When you back up your database, you may not know which tables to restore later. This operation prepares you for any future restoration needs. Also, table structures might change between the time when you create the backup and when you use mysqldump. Saving the most current structure helps ensure everything works during restoration.
Review the script in Dump schema for all tables for an easier way to save schemas. You’ll likely need to adjust this script to fit your setup.
By saving schemas ahead of time, you ensure that all the table blueprints are ready when you start restoring from backups, making data recovery go more smoothly.
Export the table
First, create the table using the innodb_file_per_table setting. This setting tells MySQL to create a separate .ibd file for each table in your source directory. Run this command to find the created file in your system:
find /data/backups/mysql/ -name export_test.*
/data/backups/mysql/test/export_test.ibd
Next, when you run the --prepare phase, add the –export option to your command. This option tells XtraBackup to create any extra files needed for moving the table:
xtrabackup --prepare --export --target-dir=/data/backups/mysql/
If you’re working with encrypted tables (ones that use transparent data encryption), you’ll need extra security settings. You must include the keyring file that has the encryption keys:
xtrabackup --prepare --export --target-dir=/tmp/table \
--keyring-file-data=/var/lib/mysql-keyring/keyring
After these commands finish successfully, you’ll need these files for the table import.
/data/backups/mysql/test/export_test.ibd
/data/backups/mysql/test/export_test.cfg
/data/backups/mysql/test/export_test.cfp
Restore the table
Now that we’ve exported the table, we can restore it to the destination system. You need to follow these steps in order on the target server:
-
Use the saved schema definition to create an empty table at the destination. This schema provides the framework for your imported data.
-
Copy all three important files (.ibd, .cfp, and .cfg) from your source directory to the matching directory in the destination system.
The following is the detailed process:
-
Use the schema and create an empty table copy in the new location on your target server (which must be running Percona Server for MySQL with XtraDB or MySQL 8.0).
mysql -uroot < ./schema_dumps/test/create_database_test.sql; mysql -uroot < ./schema_dumps/test/export_test.sql; -
Run this SQL command to disconnect the new table from its default tablespace. This command prepares it to receive the imported data:
ALTER TABLE test.export_test DISCARD TABLESPACE;If you see an error like “ERROR 1809 (HY000): Table ‘test/export_test’ in the system tablespace, ” the
innodb_file_per_tablesetting is disabled on your target server. Enable this in your server setup, then try the steps again. -
Copy all the table files (export_test.ibd, export_test.cfp, and export_test.cfg) from the source directory to the matching destination schema directory inside the server data directory.
-
Run this SQL command to attach the restored tablespace to the destination table, finishing the data restore:
ALTER TABLE test.export_test IMPORT TABLESPACE;
After these steps are finished successfully, your table restore is complete and the data is ready to use. You can run a SELECT query on the newly imported table to check that the imported data is correct.
Replicate
How to set up a replica for replication in 6 simple steps with Percona XtraBackup
Data is, by far, the most valuable part of a system. Having a backup done systematically and available for a rapid recovery in case of failure is admittedly essential to a system. However, it is not common practice because of its costs, infrastructure needed or even the boredom associated to the task. Percona XtraBackup is designed to solve this problem.
You can have almost real-time backups in 6 simple steps by setting up a replication environment with Percona XtraBackup.
Things you need
Setting up a replica for replication with Percona XtraBackup is a straightforward procedure. In order to keep it simple, here is a list of the things you need to follow the steps without hassles:
Source
A system with a MySQL-based server installed, configured and running. This
system is called Source. The Source server stores your data and can be replicated. We assume the following about this system:
-
the MySQL server is able to communicate with others by the standard TCP/IP port;
-
the SSH server is installed and configured;
-
you have a user account in the system with the appropriate permissions;
-
you have a MySQL’s user account with appropriate privileges.
-
server has binlogs enabled and server-id set up to 1.
Replica
Another system, with a MySQL-based server installed on it. We refer to this machine as Replica and assume the same things
we did about Source, except that the server-id on Replica is 2.
Percona XtraBackup
We use this backup tool. Install Percona XtraBackup on both computers for convenience.
Note
It is not recommended to mix MySQL variants (Percona Server, MySQL) in your replication setup. This may produce incorrect xtrabackup_slave_info file when adding a new replica.
1. Make a backup on the Source and prepare it
At the Source, issue the following to a shell:
xtrabackup --backup --user=yourDBuser --password=MaGiCdB1 --target-dir=/path/to/backupdir
After this is finished you should get:
Expected output
xtrabackup: completed OK!
This operation makes a copy of your MySQL data dir
to the /path/to/backupdir directory.
You have told Percona XtraBackup to connect to the database server
using your database user and password,
and do a hot backup of all your data in it
(all MyISAM, InnoDB tables and indexes in them).
In order for snapshot to be consistent, prepare the data on the source:
xtrabackup --prepare --target-dir=/path/to/backupdir
Select the path where your snapshot has been taken. Apply the transaction logs to the data files and your data files are ready to be used by the MySQL server.
Percona XtraBackup reads the my.cnf file to locate your data.
If you have your configuration file in a non-standard place,
you should use the flag --defaults-file =/location/of/my.cnf.
If you want to skip writing the username and password
every time you want to access MySQL,
you can set it up in .mylogin.cnf as follows:
mysql_config_editor set --login-path=client --host=localhost --user=root --password
For more information, see MySQL Configuration Utility .
This statement provides root access to MySQL.
2. Copy backed up data to the Replica
On the Source, use rsync or scp to copy the data from the Source to the
Replica. If you are syncing the data directly to replica’s data directory,
we recommend that you stop the mysqld there.
rsync -avpP -e ssh /path/to/backupdir Replica:/path/to/mysql/
After data is copied, you can back up the original or previously installed MySQL datadir.
Note
Make sure mysqld is shut down before you move the contents of its datadir, or move the snapshot into its datadir.
Run the following commands on the Replica:
mv /path/to/mysql/datadir /path/to/mysql/datadir_bak
and move the snapshot from the Source in its place:
xtrabackup --move-back --target-dir=/path/to/mysql/backupdir
After you copy data over, make sure the Replica MySQL has the proper permissions to access them.
chown mysql:mysql /path/to/mysql/datadir
If the ibdata and iblog files are located in directories outside the datadir, you must put these files in their proper place after the logs have been applied.
3. Configure the Source’s MySQL server
On the source, create a user specifically for replication tasks. Use the following command to define the user and set a secure password:
CREATE USER 'repl'@'$replicaip' IDENTIFIED BY '$replicapass';
Grant the replication privileges to the newly created user to allow the replica to connect to the source server:
GRANT REPLICATION SLAVE ON *.* TO 'repl'@'$replicaip';
Apply the changes:
FLUSH PRIVILEGES;
Also make sure that firewall rules are correct and that the Replica can
connect to the Source. Run the following command on the Replica to test
that you can run the mysql client on Replica, connect to the Source,
and authenticate.
mysql --host=Source --user=repl --password=$replicapass
Verify the privileges.
SHOW GRANTS;
4. Configure the Replica’s MySQL server
Copy the my.cnf file from the Source to the Replica:
scp user@Source:/etc/mysql/my.cnf /etc/mysql/my.cnf
and change the following options in /etc/mysql/my.cnf:
server-id=2
and start/restart mysqld on the Replica.
In case you’re using init script on Debian-based system to start mysqld, be
sure that the password for debian-sys-maint user has been updated, and
it’s the same as that user’s password on the Source. Password can be seen
and updated in /etc/mysql/debian.cnf.
5. Start the replication
On the Replica, review the content of the xtrabackup_binlog_info file:
cat /var/lib/mysql/xtrabackup_binlog_info
The results should resemble the following:
Expected output
Source-bin.000001 481
Do the following on a MySQL console and use the username and password you’ve set up in STEP 3:
Use the CHANGE_REPLICATION_SOURCE_TO statement
CHANGE REPLICATION SOURCE TO
SOURCE_HOST='$sourceip',
SOURCE_USER='repl',
SOURCE_PASSWORD='$replicapass',
SOURCE_LOG_FILE='Source-bin.000001',
SOURCE_LOG_POS=481;
Start the replica:
START REPLICA;
6. Check
On the Replica, check that everything went OK with:
SHOW REPLICA STATUS\G
The result shows the status:
Expected output
Replica_IO_Running: Yes
Replica_SQL_Running: Yes
Seconds_Behind_Source: 13
Both IO and SQL threads need to be running. The Seconds_Behind_Source
means the SQL currently being executed has a current_timestamp of 13
seconds ago. It is an estimation of the lag between the Source and
the Replica. Note that at the beginning, a high value could be shown
because the Replica has to “catch up” with the Source.
Adding more replicas to the Source
You can use this procedure with slight variation to add new replicas to a
source. We will use Percona XtraBackup to clone an already configured
replica. We will continue using the previous scenario for convenience, but
we will add a NewReplica to the plot.
At the Replica, do a full backup:
xtrabackup --user=yourDBuser --password=MaGiCiGaM \
--backup --slave-info --target-dir=/path/to/backupdir
By using the --slave-info Percona XtraBackup creates additional file
called xtrabackup_slave_info.
Apply the logs:
xtrabackup --prepare --use-memory=2G --target-dir=/path/to/backupdir/
Note
In the prepare phase, the --use-memory parameter speeds up the process if the amount of RAM assigned to the option is available. Use the parameter only in the prepare phase. In the other phases the parameter makes the application lazy allocate this memory (reserve) but does not affect database pages.
Copy the directory from the Replica to the NewReplica:
Note
Make sure mysqld is shut down on the NewReplica before you copy the contents the snapshot into its datadir.
rsync -avprP -e ssh /path/to/backupdir NewReplica:/path/to/mysql/datadir
For example, to set up a new user, user2, you add another grant on
the Source:
> GRANT REPLICATION REPLICA ON *.* TO 'user2'@'$newreplicaip'
IDENTIFIED BY '$replicapass';
On the NewReplica, copy the configuration file from the Replica:
scp user@Replica:/etc/mysql/my.cnf /etc/mysql/my.cnf
Make sure you change the server-id variable in /etc/mysql/my.cnf to 3 and
disable the replication on start:
skip-slave-start
server-id=3
After setting server_id, start mysqld.
Fetch the source_log_file and source_log_pos from the
file xtrabackup_slave_info, execute the statement for setting up the
source and the log file for the NewReplica:
CHANGE REPLICATION SOURCE TO
SOURCE_HOST='$sourceip',
SOURCE_USER='repl',
SOURCE_PASSWORD='$replicapass',
SOURCE_LOG_FILE='Source-bin.000001',
SOURCE_LOG_POS=481;
Start the replica:
> START REPLICA;
If both IO and SQL threads are running when you check the NewReplica,
server is replicating the Source.
How to create a new (or repair a broken) GTID-based replica
Percona XtraBackup automatically
stores the GTID value in the xtrabackup_binlog_info when doing the
backup of MySQL and Percona Server for MySQL 8.4 with the GTID mode
enabled. This
information can be used to create a new (or repair a broken) GTID-based
replica.
1. Take a backup from any server on the replication environment, source or replica
Run all the commands as root or use the sudo command.
The following command takes a backup and saves it in
the /data/backups/$TIMESTAMP folder:
xtrabackup --backup --target-dir=/data/backups/
In the destination folder, there will be a file with the name
xtrabackup_binlog_info. This file contains both binary log coordinates
and the GTID information.
cat xtrabackup_binlog_info
Expected output
mysql-bin.000002 1232 c777888a-b6df-11e2-a604-080027635ef5:1-4
That information is also printed by xtrabackup after taking the backup:
Expected output
xtrabackup: MySQL binlog position: filename 'mysql-bin.000002', position 1232, GTID of the last change 'c777888a-b6df-11e2-a604-080027635ef5:1-4'
2. Prepare the backup
The backup will be prepared with the following command on the Source:
xtrabackup --prepare --target-dir=/data/backup
You need to select the path where your snapshot has been taken, for example
/data/backups/2023-05-07_08-33-33. If everything is ok you should get the
same OK message. Now, the transaction logs are applied to the data files,
and new ones are created: your data files are ready to be used by the MySQL server.
3. Move the backup to the destination server
Use rsync or scp to copy the data to the destination server. If you are synchronizing the data directly to the already running replica’s data directory it is advised to stop the MySQL server there.
rsync -avprP -e ssh /path/to/backupdir/$TIMESTAMP NewReplica:/path/to/mysql/
After you copy the data over, make sure MySQL has proper permissions to access them.
chown mysql:mysql /path/to/mysql/datadir
4. Configure and start replication
Set the gtid_purged variable to the GTID from
xtrabackup_binlog_info. Then, update the information about the
source node and, finally, start the replica.
Note
The example above is applicable to Percona XtraDB Cluster.
The wsrep_on variable is set to 0 before resetting the source (RESET BINARY LOGS AND GTIDS). The reason is that Percona XtraDB Cluster will not allow resetting the source if wsrep_on=1.
# Using the mysql shell
> SET SESSION wsrep_on = 0;
> RESET BINARY LOGS AND GTIDS;
> SET SESSION wsrep_on = 1;
> SET GLOBAL gtid_purged='<gtid_string_found_in_xtrabackup_binlog_info>';
> CHANGE REPLICATION SOURCE TO
SOURCE_HOST="$sourceip",
SOURCE_USER="repl",
SOURCE_PASSWORD="$replicapass",
SOURCE_AUTO_POSITION = 1;
> START REPLICA;
5. Check the replication status
The following command returns the replica status:
SHOW REPLICA STATUS\G
Expected output
[..]
Replica_IO_Running: Yes
Replica_SQL_Running: Yes
[...]
Retrieved_Gtid_Set: c777888a-b6df-11e2-a604-080027635ef5:5
Executed_Gtid_Set: c777888a-b6df-11e2-a604-080027635ef5:1-5
We can see that the replica has retrieved a new transaction with step 5, so transactions from 1 to 5 are already on the replica.
We have created a new replica in our GTID based replication
environment.
Make backups in replication environments
There are options specific to back up from a replication replica.
The --slave-info option
This option is useful when backing up a replication replica server. It prints the
binary log position and name of the source server. It also writes this
information to the xtrabackup_slave_info file as a CHANGE REPLICATION SOURCE TO
statement.
This option is useful for setting up a new replica for this source.
You can start a replica server with this backup and issue the statement saved in the
xtrabackup_slave_info file. More details of this procedure can be found
in How to setup a replica for replication in 6 simple steps with Percona XtraBackup.
The --safe-slave-backup option
In order to assure a consistent replication state, this option stops the replication
SQL thread and waits to start backing up until Replica_open_temp_tables in
SHOW STATUS is zero. If there are no open temporary tables, the backup will
take place, otherwise the SQL thread will be started and stopped until there are
no open temporary tables. The backup will fail if Replica_open_temp_tables
does not become zero after --safe-slave-backup-timeout
seconds (defaults to 300 seconds). The replication SQL thread will be restarted when
the backup finishes.
Note
Using a safe-slave-backup option stops the SQL replica thread before copying the InnoDB files.
Using this option is always recommended when taking backups from a replica server.
Warning
Make sure your replica is a true replica of the source before using it as a source for backup. A good tool to validate a replica is pt-table-checksum .
Verify backups with replication and pt-checksum
One way to verify if the backup is consistent is by setting up the replication and running pt-table-checksum . This can be used to verify any type of backups, but before setting up replication, backup should be prepared and be able to run (this means that incremental backups should be merged to full backups, encrypted backups decrypted etc.).
Set up the replication
How to set up a replica for replication in 6 simple steps with Percona XtraBackup guide provides a detailed instructions on how to take the backup and set up the replication.
For checking the backup consistency you can use either the original server where the backup was taken, or another test server created by using a different backup method (such as cold backup, mysqldump or LVM snapshots) as the source server in the replication setup.
Use pt-table-checksum
This tool is part of the Percona Toolkit. It performs an online replication consistency check by executing checksum queries on the source, which produces different results on replicas that are inconsistent with the source.
After you confirmed that replication has been set up successfully, you can install or download pt-table-checksum. This example shows downloading the latest version of pt-table-checksum:
wget percona.com/get/pt-table-checksum
Note
In order for pt-table-checksum to work correctly libdbd-mysql-perl will need to be installed on Debian/Ubuntu systems or perl-DBD-MySQL on RHEL/CentOS. If you installed the percona-toolkit package from the Percona repositories package manager should install those libraries automatically.
After this command has been run, pt-table-checksum will be downloaded to your current working directory.
Running the pt-table-checksum on the source will create percona
database with the checksums table which will be replicated to the
replicas as well. Example of the pt-table-checksum will look like this:
./pt-table-checksum
The results are similar to the following:
Expected output
TS ERRORS DIFFS ROWS CHUNKS SKIPPED TIME TABLE
04-30T11:31:50 0 0 633135 8 0 5.400 exampledb.aka_name
04-30T11:31:52 0 0 290859 1 0 2.692 exampledb.aka_title
Checksumming exampledb.user_info: 16% 02:27 remain
Checksumming exampledb.user_info: 34% 01:58 remain
Checksumming exampledb.user_info: 50% 01:29 remain
Checksumming exampledb.user_info: 68% 00:56 remain
Checksumming exampledb.user_info: 86% 00:24 remain
04-30T11:34:38 0 0 22187768 126 0 165.216 exampledb.user_info
04-30T11:38:09 0 0 0 1 0 0.033 mysql.time_zone_name
04-30T11:38:09 0 0 0 1 0 0.052 mysql.time_zone_transition
04-30T11:38:09 0 0 0 1 0 0.054 mysql.time_zone_transition_type
04-30T11:38:09 0 0 8 1 0 0.064 mysql.user
If all the values in the DIFFS column are 0 that means that backup is
consistent with the current setup.
In case backup was not consistent pt-table-checksum should spot the difference and point to the table that does not match. Following example shows adding new user on the backed up replica in order to simulate the inconsistent backup:
grant usage on exampledb.* to exampledb@localhost identified by 'thisisnewpassword';
If we run the pt-table-checksum now difference should be spotted
./pt-table-checksum
The results are similar to the following:
Expected output
TS ERRORS DIFFS ROWS CHUNKS SKIPPED TIME TABLE
04-30T11:31:50 0 0 633135 8 0 5.400 exampledb.aka_name
04-30T11:31:52 0 0 290859 1 0 2.692 exampledb.aka_title
Checksumming exampledb.user_info: 16% 02:27 remain
Checksumming exampledb.user_info: 34% 01:58 remain
Checksumming exampledb.user_info: 50% 01:29 remain
Checksumming exampledb.user_info: 68% 00:56 remain
Checksumming exampledb.user_info: 86% 00:24 remain
04-30T11:34:38 0 0 22187768 126 0 165.216 exampledb.user_info
04-30T11:38:09 0 0 0 1 0 0.033 mysql.time_zone_name
04-30T11:38:09 0 0 0 1 0 0.052 mysql.time_zone_transition
04-30T11:38:09 0 0 0 1 0 0.054 mysql.time_zone_transition_type
04-30T11:38:09 1 0 8 1 0 0.064 mysql.user
This output shows that source and the replica aren’t in consistent state
and that the difference is in the mysql.user table.
More information on different options that pt-table-checksum provides can be found in the pt-table-checksum documentation .
Troubleshoot
xtrabackup exit codes
The xtrabackup binary exits with the traditional success value of 0 after a backup when no error occurs. If an error occurs during the backup, the exit value is 1.
In certain cases, the exit value can be something other than 0 or 1, due to the command-line option code included from the MySQL libraries. An unknown command-line option, for example, will cause an exit code of 255.
Dependency compatibility and limitations
xbcloud depends on several system libraries for correct operation. Some versions of these dependencies are known to cause unexpected terminations or unstable behavior and are therefore not supported.
If you are experiencing unexpected terminations or intermittent failures, verify that your environment does not use any of the versions listed below.
libcurl
Certain versions of libcurl are known to cause unexpected terminations or connection
reuse issues in xbcloud. The following versions are not supported.
Unsupported versions
libcurl 7.64.0
-
Known to mishandle reuse of closed connections
-
May cause intermittent backup failures in
xbcloud
libcurl versions ≥ 8.11.1 and < 8.12.0
-
Affected by double close of an eventfd file descriptor, CVE-2025-0665
-
May cause unexpected terminations when
xbclouduseslibcurl
Upgrade or downgrade options
You should always upgrade xbcloud to the latest version, as it includes fixes for all known issues and compatibility problems.
If the installed libcurl version is not supported, update it depending on the operating system and available repositories.
-
Recommended - Upgrade to libcurl
8.12.0 or laterif these versions are compatible with your operating system. -
If upgrading to the latest version
≥ 8.12.0is not possible, downgrade to a supported version earlier than 8.11.1 to avoid the vulnerability associated with CVE-2025-0665 . Ensure that the downgrade is compatible with other system dependencies.
Check the installed libcurl version
To check the installed libcurl version, run:
curl --version
Upgrade libcurl - Recommended
The following steps show how to update the libcurl to version 8.12.0 on Debian 12. Administrator privileges are necessary for installing packages and configuring system services.
-
Edit the
/etc/apt/sources.listto add the following:deb http://deb.debian.org/debian bookworm-backports main -
Refresh the
aptsources:sudo apt update -
Install the version from
bookworm-backports:sudo apt install -t bookworm-backports libcurl4 curl -
Verify the version number:
curl --versionExpected output
curl 8.12.0 (x86_64-pc-linux-gnu) libcurl/8.12.0
Downgrade libcurl
The following steps show how to downgrade the libcurl to the default Debian 12 version 7.88.1. Administrator privileges are necessary for installing packages and configuring system services.
-
Update the package list:
sudo apt update -
Reinstall the default system version of libcurl and curl:
sudo apt install --reinstall libcurl4 curl -
Verify the version number:
curl --versionExpected output
curl 7.88.1 (x86_64-pc-linux-gnu) libcurl/7.88.1 OpenSSL/3.0.9 zlib/1.2.13 libidn2/2.3.4 libssh/0.10.5 Release-Date: 2023-08-02 Protocols: dict file ftp ftps gopher http https imap imaps ldap ldaps mqtt pop3 pop3s rtsp smb smbs smtp smtps telnet tftp Features: AsynchDNS IDN IPv6 Largefile NTLM NTLM_WB SSL libz TLS-SRP HTTP2 HSTS HTTPS-proxy Metalink
Reference
Index of files created by Percona XtraBackup
- Information related to the backup and the server
| File Name | Description |
|---|---|
backup-my.cnf |
This file contains information to start the mini instance of InnoDB during the --prepare. This not a backup of the original my.cnf. The InnoDB configuration is read from the file backup-my.cnf created by xtrabackup when the backup was made. The --prepare uses InnoDB configuration from backup-my.cnf by default, or from --defaults-file, if specified. The InnoDB’s configuration in this context means server variables that affect dataformat, i.e., innodb_page_size option, innodb_log_block_size, etc. Location-related variables, like innodb_log_group_home_dir or innodb_data_file_path are always ignored by --prepare, so preparing a backup always works with data files from the back directory, rather than any external ones. |
xtrabackup_checkpoints |
The type of the backup (for example, full or incremental), its state (for example, prepared) and the LSN range contained in it. This information is used for incremental backups. Example of the xtrabackup_checkpoints after taking a full backup: backup_type = full-backuped from lsn= 0 to_lsn = 15188961605 last_lsn = 15188961605 Example of the xtrabackup_checkpoints after taking an incremental backup: backup_type = incremental from_lsn = 15188961605 to_lsn = 15189350111 last_lsn = 15189350111 |
xtrabackup_binlog_info |
The binary log file used by the server and its position at the moment of the backup. A result of the following query: SELECT server_uuid, local, replication, storage_engines FROM performance_schema.log_status; |
xtrabackup_binlog |
The xtrabackup binary used in the process. |
xtrabackup_logfile |
Contains data needed for running the: --prepare. The bigger this file is the --prepare process will take longer to finish. |
<table_name>.delta.meta |
This file is going to be created when performing the incremental backup. It contains the per-table delta metadata: page size, size of compressed page (if the value is 0 it means the tablespace isn’t compressed) and space id. Example of this file: page_size = 16384 zip_size = 0 space_id = 0 |
-
Information related to the replication environment (if using the
--slave-infooption):xtrabackup_slave_infoThe
CHANGE REPLICATION SOURCE TOstatement needed for setting up a replica. -
Information related to the Galera and Percona XtraDB Cluster (if using the
--galera-infooption):xtrabackup_galera_infoContains the values of
wsrep_local_state_uuidandwsrep_last_committedstatus variables
Understand version numbers
A version number identifies the product release. The product contains the latest features, improvements, and bug fixes at the time of that release.
In the 8.0 series, Oracle followed a fast continuous delivery approach, frequently pushing both patches and new features, which sometimes led to stability and compatibility issues. In contrast, 8.4 as an LTS release limits changes to essential fixes, improving overall stability and reducing operational risk.
Any Percona XtraBackup 8.4 release can work with any Percona Server for MySQL 8.4 or MySQL 8.4 release. You no longer need to match the Percona XtraBackup version number with the server version number.
| 8.4.0 | -1 |
|---|---|
| Base version | Minor build version |
Percona uses semantic version numbering, which follows the pattern of base version and build version. Percona assigns unique, non-negative integers in increasing order for each version release. The version number combines the base MySQL 8.4 version number and the minor build version.
The version numbers for Percona XtraBackup 8.4.0-6 define the following information:
-
Base version - the leftmost numbers indicate the MySQL 8.4 version used as a base. An increase in base version resets the minor build version to 0.
-
Minor build version - an internal number that denotes the version of the software. A build version increases by one each time the Percona XtraBackup is released.
Frequently asked questions
Does Percona XtraBackup 8.4 support making backups of databases in versions prior to 8.4?
Percona XtraBackup 8.4 does not support making backups of databases created in versions prior to 8.4 of MySQL, Percona Server for MySQL or Percona XtraDB Cluster.
Are you aware of any web-based backup management tools (commercial or not) built around Percona XtraBackup*?
ZRM Community is a community tool that uses Percona XtraBackup for Non-Blocking Backups:
“ZRM provides support for non-blocking backups of MySQL using Percona XtraBackup. ZRM with \Percona XtraBackup provides resource utilization management by providing throttling based on the number of IO operations per second. Percona XtraBackup based backups also allow for table level recovery even though the backup was done at the database level (needs the recovery database server to be Percona Server for MySQL with XtraDB).”*
xtrabackup binary fails with a floating point exception
In most of the cases this is due to not having installed the required libraries (and version) by xtrabackup. Installing the GCC suite with the supporting libraries and recompiling xtrabackup solves the issue. See Compiling and Installing from Source Code for instructions on the procedure.
How xtrabackup handles the ibdata/ib_log files on restore if they aren’t in mysql datadir?
In case the ibdata and ib_log files are located in different
directories outside the datadir, you will have to put them in their
proper
place after the logs have been applied.
Backup fails with Error 24: ‘Too many open files’
This usually happens when database being backed up contains large amount of
files and Percona XtraBackup can’t open all of them to create a
successful
backup. In order to avoid this error the operating system should be
configured
appropriately so that Percona XtraBackup can open all its files. On
Linux,
this can be done with the ulimit command for specific backup session or
by
editing the /etc/security/limits.conf to change it globally (NOTE:
the maximum possible value that can be set up is 1048576 which is a
hard-coded constant in the Linux kernel).
How to deal with skipping of redo logs for DDL operations?
To prevent creating corrupted backups when running DDL operations, Percona XtraBackup aborts if it detects that redo logging is disabled. In this case, the following error is printed:
[FATAL] InnoDB: An optimized (without redo logging) DDL operation has been performed. All modified pages may not have been flushed to the disk yet.
Percona XtraBackup will not be able to take a consistent backup. Retry the backup operation.
Note
-
Redo logging is disabled during a sorted index build . To avoid this error, Percona XtraBackup can use metadata locks on tables while they are copied:
-
To block all DDL operations, use the
--lock-ddloption that issuesLOCK TABLES FOR BACKUP.
Glossary
.CSM
Each table with the CSV Storage Engine has .CSM file which contains the metadata of it.
.CSV
Each table with the CSV Storage engine has .CSV file which contains the data of it (which is a standard Comma Separated Value file).
.exp
Files with the .exp extension are created by Percona XtraBackup per each InnoDB tablespace when the --export option is used on prepare. See restore individual tables.
.frm
For each table, the server will create a file with the .frm extension containing the table definition (for all storage engines).
General availability (GA)
A finalized version of the product which is made available to the general public. It is the final stage in the software release cycle.
.ibd
On a multiple tablespace setup ([innodb_file_per_table] enabled), MySQL will store each newly created table on a file with a .ibd extension.
.MRG
Each table using the MERGE storage engine, besides of a .frm file,
will have .MRG file containing the names of the MyISAM tables
associated with it.
.MYD
Each MyISAM table has .MYD (MYData) file which contains the data on it.
.MYI
Each MyISAM table has .MYI (MYIndex) file which contains the table’s indexes.
.opt
MySQL stores options of a database (like charset) in a file with a .opt extension in the database directory.
.par
Each partitioned table has .par file which contains metadata about the partitions.
.TRG
The file contains the triggers associated with a table, for example, \mytable.TRG. With the .TRN file, they represent all the trigger definitions.
.TRN
The file contains the names of triggers that are associated with a table, for example, \mytable.TRN. With the .TRG file, they represent all the trigger definitions.
backup
The process of copying data or tables to be stored in a different location.
compression
The method that produces backups in a reduced size.
configuration file
The file that contains the server startup options.
crash
An unexpected shutdown which does not allow the normal server shutdown cleanup activities.
crash recovery
The actions that occur when MySQL is restarted after a crash.
data dictionary
The metadata for the tables, indexes, and table columns stored in the InnoDB system tablespace.
datadir
The directory in which the database server stores its data files. Most Linux distribution use /var/lib/mysql by default.
full backup
A backup that contains the complete source data from an instance.
ibdata
The default prefix for tablespace files. For example, ibdata1 is a 10MB auto-extensible file that MySQL creates for a shared tablespace by default.
incremental backup
A backup stores data from a specific point in time.
InnoDB
Storage engine which provides ACID-compliant transactions and foreign key support, among others improvements over MyISAM. It is the default engine for MySQL 8.4.
innodb_buffer_pool_size
The size in bytes of the memory buffer to cache data and indexes of InnoDB’s tables. This aims to reduce disk access to provide better performance.
[mysqld]
innodb_buffer_pool_size=8MB
innodb_data_home_dir
The directory (relative to datadir) where the database server stores
the files in a shared tablespace setup. This option does not affect the location of innodb\_file\_per\_table. For example:
[mysqld]
innodb_data_home_dir = ./
innodb_data_file_path
Specifies the names, sizes and location of shared tablespace files:
[mysqld]
innodb_data_file_path=ibdata1:50M;ibdata2:50M:autoextend
innodb_file_per_table
By default, InnoDB creates tables and indexes in a file-per-tablespace . If the innodb_file_per_table variable is disabled, you can enable the variable in your configuration file:
[mysqld]
innodb_file_per_table
or
start the server with--innodb_file_per_table.
innodb_log_group_home_dir
Specifies the location of the InnoDB log files:
[mysqld]
innodb_log_group_home=/var/lib/mysql
logical backup
A backup which contains a set of SQL statements. The statements can be used to recreate the databases.
LSN
Each InnoDB page contains a log sequence number(LSN). The LSN is the system version number for the database. Each page’s LSN shows how recently it was changed.
my.cnf
The database server’s main configuration file. Most Linux distributions place it as /etc/mysql/my.cnf or /etc/my.cnf, but the location and name depends on the particular installation. Note that this method is not the only way of configuring the server, some systems rely on the command options.
MyISAM
The MySQL default storage engine until version 5.5. It doesn’t fully
support transactions but in some scenarios may be faster than InnoDB.
Each table is stored on disk in 3 files: .frm, .MYD, .MYI.
physical backup
A backup that copies the data files.
point in time recovery
This method restores the data into the state it was at any selected point of time.
prepared backup
A consistent set of backup data that is ready to be restored.
restore
Copies the database backups taken using the backup command to the original location or a different location. A restore returns data that has been either lost, corrupted, or stolen to the original condition at a specific point in time.
Tech preview
A tech preview item can be a feature, a variable, or a value within a variable. Before using this feature in production, we recommend that you test restoring production from physical backups in your environment and also use an alternative backup method for redundancy. A tech preview item is included in a release for users to provide feedback. The item is either updated and released as general availability(GA) or removed if not useful. The functionality can change from tech preview to GA.
xbcrypt
To support the encryption and the decryption of the backups. This utility has been modeled after the xbstream binary to perform encryption and decryption outside Percona XtraBackup.
xbstream
To support simultaneous compression and streaming, Percona XtraBackup uses the xbstream format. For more information see xbstream
XtraDB
Percona XtraDB is an enhanced version of the InnoDB storage engine, designed to better scale on modern hardware. Percona XtraDB includes features which are useful in a high performance environment. It is fully backward-compatible, and is a drop-in replacement for the standard InnoDB storage engine. For more information, see The Percona XtraDB Storage Engine .
Zstandard (ZSTD)
ZSTD is a fast lossless compression algorithm that targets real-time compression scenarios and better compression ratios.
Percona Toolkit version checking
Some Percona software contains “version checking” functionality which is a feature that enables Percona software users to be notified of available software updates to improve your environment security and performance. Alongside this, the version check functionality also provides Percona with information relating to which software versions you are running, coupled with the environment confirmation which the software is running within. This helps enable Percona to focus our development effort accordingly based on trends within our customer community.
The purpose of this document is to articulate the information that is collected, as well as to provide guidance on how to disable this functionality if desired.
Usage
Version Check was implemented in Percona Toolkit 2.1.4, and was enabled by default in
version 2.2.1. Currently, it is supported as a --[no]version-check option
by a number of tools in Percona Toolkit, Percona XtraBackup, and Percona Monitoring and Management (PMM).
When launched with Version Check enabled, the tool that supports this feature connects to a Percona’s version check service via a secure HTTPS channel. It compares the locally installed version for possible updates, and also checks versions of the following software:
-
Operating System
-
Percona Monitoring and Management (PMM)
-
MySQL
-
Perl
-
MySQL driver for Perl (DBD::mysql)
-
Percona Toolkit
Then it checks for and warns about versions with known problems if they are identified as running in the environment.
Each version check request is logged by the server. Stored information consists of the checked system unique ID followed by the software name and version. The ID is generated either at installation or when the version checking query is submitted for the first time.
Note
Prior to version 3.0.7 of Percona Toolkit, the system ID was calculated as an MD5 hash of a hostname, and starting from Percona Toolkit 3.0.7 it is generated as an MD5 hash of a random number. Percona XtraBackup continues to use hostname-based MD5 hash.
As a result, the content of the sent query is as follows:
Expected output
85624f3fb5d2af8816178ea1493ed41a;DBD::mysql;4.044
c2b6d625ef3409164cbf8af4985c48d3;MySQL;MySQL Community Server (GPL) 5.7.22-log
85624f3fb5d2af8816178ea1493ed41a;OS;Manjaro Linux
85624f3fb5d2af8816178ea1493ed41a;Percona::Toolkit;3.0.11-dev
85624f3fb5d2af8816178ea1493ed41a;Perl;5.26.2
Disabling version check
Although the version checking feature does not collect any personal information,
you might prefer to disable this feature, either one time or permanently. To
disable it one time, use --no-version-check option when invoking the tool
from a Percona product which supports it. Here is a simple example which shows
running pt-diskstats tool
from the Percona Toolkit with version checking turned off:
pt-diskstats --no-version-check
Disabling version checking permanently can be done by placing
no-version-check option into the configuration file of a Percona product
(see correspondent documentation for exact file name and syntax). For example,
in case of Percona Toolkit this can be done
in a global configuration file /etc/percona-toolkit/percona-toolkit.conf:
# Disable Version Check for all tools:
no-version-check
In case of Percona XtraBackup this can be done in its configuration file in a similar way:
[xtrabackup]
no-version-check
Frequently asked questions
Why is this functionality enabled by default?
We believe having this functionality enabled improves security and performance of environments running Percona Software and it is good choice for majority of the users.
Why not rely on Operating System’s built in functionality for software updates?
In many environments the Operating Systems repositories may not carry the latest version of software and newer versions of software often installed manually, so not being covered by operating system wide check for updates.
Why do you send more information than just the version of software being run as a part of version check service?
Compatibility problems can be caused by versions of various components in the environment, for example problematic versions of Perl, DBD or MySQL could cause operational problems with Percona Toolkit.
Dump schema for all tables
This script is designed to dump the schemas of all tables from each database in a MySQL server instance, excluding the system databases, into separate files.
The script should be modified for your specific use case before you run it. For example, you may want to exclude certain tables or databases, or specify a different output directory.
print_usage() {
echo "Usage: $0 [--defaults-file=<file>] [--destination-dir=<directory>]"
echo " --defaults-file=<file> (Optional) Path to MySQL defaults file (e.g., /etc/my.cnf)"
echo " --destination-dir=<directory> (Optional) Directory to save the schema dumps (default: schema_dumps)"
exit 1
}
USER=""
DEFAULTS_FILE=""
HARDCODED_PASSWORD="test2"
DEST_DIR="schema_dumps"
# Check for -h or --help option
if [[ "$1" == "-h" ]] || [[ "$1" == "--help" ]]; then
print_usage
fi
# Parse arguments using a loop to check for --defaults-file and --destination-dir options
while [[ "$#" -gt 0 ]]; do
case "$1" in
--defaults-file=*)
DEFAULTS_FILE="--defaults-file=${1#*=}"
echo "Using provided defaults file: ${1#*=}"
;;
--destination-dir=*)
DEST_DIR="${1#*=}"
echo "Saving schema dumps in: $DEST_DIR"
;;
*)
echo "Error: Invalid option '$1'"
print_usage
;;
esac
shift
done
# Default behavior if no defaults-file is provided
if [ -z "$DEFAULTS_FILE" ]; then
if [ -n "$MYSQL_PWD" ]; then
echo "Using password from environment variable MYSQL_PWD"
else
DEFAULTS_FILE="--password=$HARDCODED_PASSWORD"
echo "Using hardcoded password in the script"
fi
USER="-uroot"
echo "Using hardcoded user: $USER"
fi
mkdir -p "$DEST_DIR" # Root directory for schema dumps
echo "Schema will be saved in: $DEST_DIR"
# Get the list of all databases, excluding system databases
databases=$(mysql $DEFAULTS_FILE $USER -N -e "SHOW DATABASES" | grep -Ev "^(information_schema|performance_schema|mysql|sys)$")
for db in $databases; do
echo "Dumping schemas for database: $db"
mkdir -p "$DEST_DIR/$db" # Create a directory for each database
# Dump only the database creation statement
mysqldump $DEFAULTS_FILE $USER --no-data --databases "$db" > "$DEST_DIR/$db/create_database_${db}.sql"
# Get the list of tables for the current database
tables=$(mysql $DEFAULTS_FILE $USER -N -e "SHOW TABLES FROM $db")
for table in $tables; do
echo " Dumping schema for table: $table"
# Ensure `USE <database>;` is at the top of each table's schema file
echo "USE \`$db\`;" > "$DEST_DIR/$db/${table}.sql"
# Append the table schema dump
mysqldump $DEFAULTS_FILE $USER --no-data --skip-add-drop-table "$db" "$table" >> "$DEST_DIR/$db/${table}.sql"
done
done
echo "Schema dumps are saved in the '$DEST_DIR' directory."
Usage
To use this script, follow these steps. Run all the commands as root or use the sudo command.
-
Save the script
-
Copy the script to your local machine.
-
Save the file with a
.shextension, such asdump_schemas.sh.
-
-
Make the script executable
- Run the following command to make the script executable:
chmod +x dump_schemas.sh -
Verify dependencies
- Check if
mysqldumpis installed by running:
which mysqldump- If
mysqldumpis not installed or not available in your PATH, install it using:
sudo apt install mysql-client - Check if
-
Use one of the following commands to execute the script:
-
See the usage instructions, run:
./dump_schemas.sh --help -
Specify a MySQL defaults file (for example,
~/.my.cnf) and destination directory for the schema dumps, run:./dump_schemas.sh --defaults-file=/path/to/my.cnf --destination-dir=/path/to/output -
If you do not have a
defaults-file, use the script defaults of a hardcoded password or an environment variable, if set. Specify only the destination directory:./dump_schemas.sh --destination-dir=/path/to/output -
To use the hardcoded password and default destination directory,
schema_dumps, use:./dump_schemas.sh
-
-
Inspect the output
-
The script creates a
schema_dumpsdirectory in the current working directory. -
The dumped schemas are organized as follows:
find .Expected output
. ./test ./test/t4.sql ./test/t3.sql ./test/create_database_test.sql ./test2 ./test2/create_database_test2.sql ./test2/create_database_test2.sql ./test2/t1.sql ...
-
-
Review logs for errors or warnings
- After execution, check the terminal output for any errors or warnings that may indicate issues with the backup process.
Troubleshooting
If you encounter any issues while using this script, please check the following:
-
Ensure that
mysqldumpis installed and available in your PATH. -
Verify that the MySQL root user and password are correct.
-
Check the permissions of the output directory and ensure that the script has write access.
-
Ensure that the MySQL server is running and accessible.
-
Ensure that the MySQL server is configured to accept remote connections.
Trademark policy
This Trademark Policy is to ensure that users of Percona-branded products or services know that what they receive has really been developed, approved, tested and maintained by Percona. Trademarks help to prevent confusion in the marketplace, by distinguishing one company’s or person’s products and services from another’s.
Percona owns a number of marks, including but not limited to Percona, XtraDB, Percona XtraDB, XtraBackup, Percona XtraBackup, Percona Server, and Percona Live, plus the distinctive visual icons and logos associated with these marks. Both the unregistered and registered marks of Percona are protected.
Use of any Percona trademark in the name, URL, or other identifying characteristic of any product, service, website, or other use is not permitted without Percona’s written permission with the following three limited exceptions.
First, you may use the appropriate Percona mark when making a nominative fair use reference to a bona fide Percona product.
Second, when Percona has released a product under a version of the GNU General Public License (“GPL”), you may use the appropriate Percona mark when distributing a verbatim copy of that product in accordance with the terms and conditions of the GPL.
Third, you may use the appropriate Percona mark to refer to a distribution of GPL-released Percona software that has been modified with minor changes for the sole purpose of allowing the software to operate on an operating system or hardware platform for which Percona has not yet released the software, provided that those third party changes do not affect the behavior, functionality, features, design or performance of the software. Users who acquire this Percona-branded software receive substantially exact implementations of the Percona software.
Percona reserves the right to revoke this authorization at any time in its sole discretion. For example, if Percona believes that your modification is beyond the scope of the limited license granted in this Policy or that your use of the Percona mark is detrimental to Percona, Percona will revoke this authorization. Upon revocation, you must immediately cease using the applicable Percona mark. If you do not immediately cease using the Percona mark upon revocation, Percona may take action to protect its rights and interests in the Percona mark. Percona does not grant any license to use any Percona mark for any other modified versions of Percona software; such use will require our prior written permission.
Neither trademark law nor any of the exceptions set forth in this Trademark Policy permit you to truncate, modify or otherwise use any Percona mark as part of your own brand. For example, if XYZ creates a modified version of the Percona Server, XYZ may not brand that modification as “XYZ Percona Server” or “Percona XYZ Server”, even if that modification otherwise complies with the third exception noted above.
In all cases, you must comply with applicable law, the underlying license, and this Trademark Policy, as amended from time to time. For instance, any mention of Percona trademarks should include the full trademarked name, with proper spelling and capitalization, along with attribution of ownership to Percona LLC and/or its affiliates. For example, the full proper name for XtraBackup is Percona XtraBackup. However, it is acceptable to omit the word “Percona” for brevity on the second and subsequent uses, where such omission does not cause confusion.
In the event of doubt as to any of the conditions or exceptions outlined in this Trademark Policy, please contact [email protected] for assistance and we will do our very best to be helpful.
Copyright and licensing information
Documentation licensing
Percona XtraBackup documentation is (C)2009-2026 Percona LLC and/or its affiliates and is distributed under the Creative Commons Attribution 4.0 International License .
Index
- About Percona XtraBackup
- Accelerate the backup process
- Work with AppArmor
- Apt pinning packages
- Backup process overview
- Work with binary logs
- Binary tarball file names available
- Clean up
- Compile and install from source
- Configure xtrabackup
- Connection and privileges needed
- Copyright and licensing information
- Create a compressed backup
- Create a full backup
- Create a partial backup
- Create an incremental backup
- Create an individual partitions backup
- Decompress and prepare a backup
- Dump schema for all tables
- Encrypt backups
- Encrypted InnoDB tablespace backups
- Exponential backoff
- FIFO data sink
- Files in the DEB package
- Files in the RPM package built for Percona XtraBackup 8.4
- FLUSH TABLES WITH READ LOCK option
- Frequently asked questions
- Get help from Percona
- Glossary
- How Percona XtraBackup works
- How to create a new (or repair a broken) GTID-based replica
- How to set up a replica for replication in 6 simple steps with Percona XtraBackup
- Improved log statements
- Index of files created by Percona XtraBackup
- Install from a binary tarball
- Install overview
- Install Percona XtraBackup 8.4 using downloaded RPM packages
- Install using downloaded DEB packages
- Install with the Percona-release Tool on Debian-based Systems
- lock-ddl-per-table option improvements
- LRU dump backup
- Make backups in replication environments
- Next steps
- Percona Toolkit version checking
- Percona XtraBackup binaries overview
- Percona XtraBackup features
- Percona XtraBackup 8.4 Documentation
- Permissions needed
- Point-in-time recovery
- Prepare a full backup
- Prepare a partial backup
- Prepare an incremental backup
- Prepare an individual partitions backup
- Quickstart Overview
- Reduced backup lock time
- Restore a partial backup
- Restore full, incremental, and compressed backups
- Restore single tables between databases
- Restore the backup
- Restore the partition from the backup
- Run a Docker container
- Work with SELinux
- Server version and backup version comparison
- Smart memory estimation
- Start a Docker container and take a backup
- Store backup history on the server
- Take a streaming backup
- Take an incremental backup using page tracking
- Throttling backups
- Trademark policy
- Understand version numbers
- Uninstall Percona XtraBackup 8.4 on Debian and Ubuntu
- Uninstall Percona XtraBackup 8.4 on Red Hat Enterprise Linux and CentOS
- update-curl-utility
- Use a YUM repository to install Percona XtraBackup
- Use the xbcloud binary with Amazon S3
- Use the xbcloud binary with an IAM instance profile
- Use the xbcloud binary with Google Cloud Storage
- Use the xbcloud binary with Microsoft Azure Cloud Storage
- Use the xbcloud binary with MinIO
- Use the xbcloud binary with Swift
- Verify backups with replication and pt-checksum
- The xbcloud binary overview
- The xbcloud command-line options
- The xbcrypt binary overview
- The xbcrypt command-line options
- The xbstream binary overview
- The xbstream command-line options
- The xtrabackup binary overview
- The xtrabackup command-line options
- xtrabackup exit codes
- xtrabackup implementation details
- Release notes/
- Percona XtraBackup 8.4 release notes index